
Art.102789
USER MANUAL

Please read this manual carefully. This manual contains important safety information.
Note:
Technical specification and design are subject to chance without notification.
CHARACTERISTICS
Contents
Supplied with
Features
Power supply
Operation
Safety notes
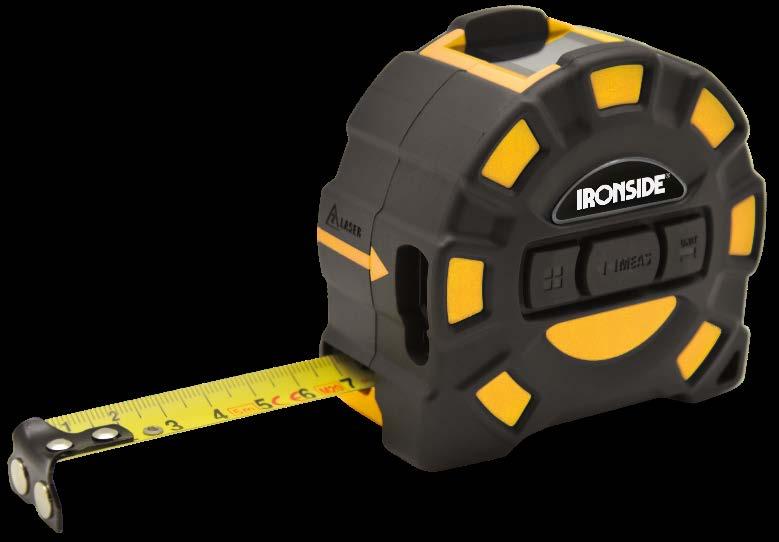
· Laser distance meter with built-in 20 m tape
· Easy to use with only one button
· Magnetic hook
· Clear Blue-on-black display with backlight
In the box
· 2 IN 1 LASER TAPE MEASURE 20 M
· USB charging cable
· Built-in Li-Ion battery
· User manual FEATURES
· Length and area measurement
· Tape measure 20 m.
· Magnetic hook and tape self-locking function
· Band locking button with continuous automatic rolling
· Metal belt clip
· Zero- point laser is always at the rear
· Auto-shutdown for laser and instrument
102789 Laser Measure
Range 20m/40m/60m
Accuracy ±(2mm+5x10⁻⁵D)
Reference Front/Rear
Measuring Units m/ft/in/’ ’’
LCD Type White-on-black Display
Single Measurement √
Continuous measurement √
Area Measurement
Volume Measurement
Pythagoras(2-Point) √
Memory 20
Battery type Lithium battery
Laser class Class 2
Laser type
FEATURES

mode
Long press to switch memory
Short press to check the records
Short press to single measurement
Long press to continuous measurement
Unit Switch/Reference
Short press to switch unit m/ft/in/’ ”
Long press to switch front or rear
*Tape magnetic hook is default front reference
*Tape power port is default rear reference
Press the tape lock to control the stretch
Long press to turn ON/OFF
Short press to return last state
POWER SUPPLY
CHARGING THE BATTERY
Plug (5) to the USB port. Now the built-in battery can be charged via USB connector. When the charging process is completed push the lock down again.

CONTINUE MEASUREMENT
Press (2) long times to switch continue measurement mode, sweep slowly the laser back and forth and up and down over the desired target point and press (2) to stop.

AREA MEASURENT
OPERATION
LENGTH MEASUREMENT
The device will enter single measurement when it is powered ON.
Press (2) after aiming at target to get result at bottom of the screen. Press (2) to measure new data.
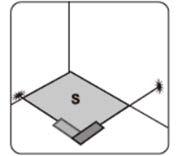
Press (1) 1 time to switch to area measurement mode. According to the flashing line, press (2) to get the first distance (Length) from the target point, press (2) again to get the second distance (Width) from the second target point, the Area will be calculated and displayed accordingly

VOLUME MEASURMENT
Press (1) 3 times to get the v olume measurement mode. According to the flashing line, press to get the distance (Length)from the target point, press again to get the second distance(width)from second target point, press to get the third distance(height)from the third target point, the v olume will be calculated and displayed accordingly.

PYTHAGORAS (2 POINTS)
Press (1) 4 times to get the Pythagoras measurement mode. According to the flashing line, press to get the distance of first line, change to the horizontal direction of the object from the fixed measuring point, press again to get the distance of second line, the result is displayed in the summary line.

TAPE MEASURER
The measuring tape is equipped with a movable magnetic hook. Thus, the starting point for measurements is corrected and always in the exact zero position.
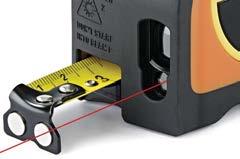
When carrying out measurements the tape automatically locks when you stop pulling. By pressing the band locking button, the tape will be retracted again.
SAFETY NOTES
INTENDED USE OF INSTRUMENT
The instrument emits a red laser beam in order to carry out the following measuring tasks: measurement of distances, heights and angles.
CARE AND CLEANING
Handle measuring instruments with care. Clean with microfiber cloth only after any use. If necessary, damp the cloth with some water. If the instrument is wet clean and dry it carefully.
SPECIFIC REASONS FOR ERR ONEOUS MEASURING RESULTS
After the instrument has been dropped or hit. Please check the accuracy.
Large fluctuation of temperature: If the instrument will be used in cold areas after it has been stored in warm areas (or the other way round) please wait some minutes before carrying out measurements.
ERROR CODES
All information will be showed as code or “Error”, the following are all codes and corresponding explain and solution.
204 Calculation error
220 Low Battery
255 Received signal too weak or measurement time too long
256 Received signal too strong.
Refer to user manual, repeat the procedures.
Replace batteries or charge the batteries
Improve the reflective surface. (Use target plate, white paper)
Improve the reflective surface. (Use target plate, or don’t aim at strong light)
261 Out of measuring range
500 Hardware error
Measuring the distance within measurement range.
Switch on/off the device, if the symbol still appears after several times, please contact with your dealer.
ELECTROMAGNETIC ACCEPTABILITY (EMC)
It cannot be completely excluded that this instrument will disturb other instruments (e.g. navigation systems); will be disturbed by other instruments (e.g. intensive electromagnetic radiation nearby industrial facilities or radio transmitters).

CE-CONFORMITY
This instrument has the CE mark according to:
EN 61326-1:2013
EN 61326-2-2:2013.
LASER CLASSIFICATION
The instrument is a laser class 2 laser product according to DIN IEC 60825-1:2014.
It is allowed to use the unit without further safety precautions. The eye protection is normally secured by aversion responses and the blink reflex.
The laser instrument is marked with class 2 warning labels


WARRANTY
This product is warranted by the manufacturer to the original purchaser to be free from defects in material and workmanship under normal use for a period of two (2) years from the date of purchase. During the warranty period, and upon proof of purchase, the product will be repaired or replaced (with the same or similar model at manufacturers option), without charge for either parts or labor. In case of a defect please contact the dealer where you originally purchased this product. The warranty will not apply to this product if it has been misused, abused or altered.
Without limiting the foregoing, leakage of the battery, bending or dropping the unit are presumed to be defects resulting from misuse or abuse.
SAFETY INSTRUCTIONS
· Follow up the instructions given in the user manual.
· Do not stare into the beam. The laser beam can lead to eye injury.
A direct look into the beam (even from greater distance) can cause damage to your eyes.
· Do not aim the laser beam at persons or animals.
· The laser plane should be set up above the eye level of persons.
· Use the instrument for measuring jobs only.
· Do not open the instrument housing. Repairs should be carried out by authorized workshops only. Please contact your local dealer.
· Do not remove warning labels or safety instructions.
· Keep the instrument away from children.
· Do not use the instrument in explosive environment.
· User manual must always be kept with the instrument
CONTACT
IRONSIDE INTERNATIONAL
13 rue de la perdrix B.P.41031
Tremblay en France 95912 Roissy CDG. Cedex FRANCE
Laser measuring tape 2in1
MODE D’EMPLOI
Veuillez lire attentivement ce manuel. Ce manuel contient des informations importantes sur la sécurité.
Note :
Les spécifications techniques et la conception sont sujettes au hasard sans préavis.
Contents
1. Dans la boîte
2. Caractéristiques
3. Alimentation
4. Opération
5. Consignes de sécurité
CARACTERISTIQUES
· · Télémètre laser avec ruban intégré de 20 m
· · Facile à utiliser avec un seul bouton
· · Crochet magnétique
· · Écran clair bleu sur noir avec rétroéclairage
Livré avec
· 2 IN 1 Télémètre laser 20 M
· Cable USB
· Batterie Li-Ion intégrée
· Manuel
CARACTÉRISTIQUES
· Mesure de longueur et de surface
· Ruban à mesurer 20 m.
· Crochet magnétique et fonction autobloquante de bande
· Bouton de verrouillage de la bande automatique continu
· Clip de ceinture en métal
· Le laser point zéro est toujours à l'arrière
· Arrêt automatique du laser et de l'instrument
102789 Télémètre
Portée 20m/40m/60m
Précision ±(2mm+5x10⁻⁵D)
Unités de mesures m/ft/in/’ ’’
LCD Type Noir et Blanc Longueur
Batterie type Lithium batterie
de fonctionnement
d’énergie
FONCTIONEMENT
1. Bouton 1. Mode de mesure
2. Bouton 1 longue visualisation des données en mémoire
3. Bouton 1 Appuyez brièvement pour vérifier les enregistrements
4. Bouton 2. Mesurer
5. Appuyez brièvement sur une seule mesure
6. Appuyez longuement pour mesurer en continu
7. Bouton 3. Commutateur d'unité/référence
8. Appuyez brièvement pour changer d'unité m/ft/in/' "
9. Bouton 3 Appuyez longuement changer le point de départ de la mesure voire écran point 3
10. Le crochet magnétique est la référence avant par défaut
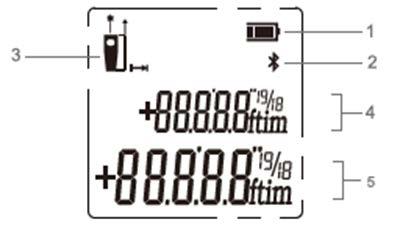
DISPLAY INDICATION
11. Le port d'alimentation de bande est la référence arrière par défaut
12. Bouton 4. Verrouillage de la bande
13. Appuyez sur le verrou de bande pour contrôler l'étirement
14. Bouton 5. Marche/Arrêt
15. Appuyez longuement pour allumer/éteindre
16. Appuyez brièvement pour revenir au dernier état
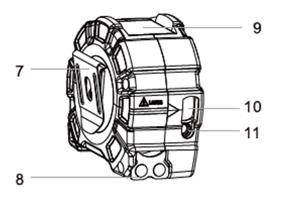
17. Fig 6. Port micro-USB et clip
18. Fig 8 Crochet magnétique
19. Fig Ecran LCD
20. Fig 10 Fenêtre de réception du faisceau laser
21. Fig 11 Fenêtre de de sortie du faisceau
ALIMENTATION
CHARGEMENT
Branchez (5) au port USB port. Quand la charge est terminée, retirer le câble
OPERATIONS
DISTANCE
L'appareil entrera en mesure unique lorsqu'il est sous tension. Appuyez sur (2) après avoir visé la cible pour obtenir le résultat en bas de l'écran. Appuyez sur (2) pour mesurer de nouvelles données.
MESURE CONTINUE
Appuyez longuement sur (2) pour passer en mode de mesure continue, balayez lentement le laser d'avant en arrière et de haut en bas sur le point cible souhaité et appuyez sur (2) pour arrêter.
SURFACE
Appuyez sur (1) 1 fois pour passer en mode de mesure de surface. Selon la ligne clignotante, appuyez sur (2) pour obtenir la première distance (Longueur) du point cible, appuyez à nouveau sur (2) pour obtenir la deuxième distance (largeur) à partir du deuxième point cible, la zone sera calculée et affichée en conséquence
VOLUME
Appuyez 3 fois sur (1) pour accéder au mode de mesure du volume. Selon la ligne clignotante, appuyez sur pour obtenir la distance (longueur) du point cible, appuyez à nouveau pour obtenir la deuxième distance (largeur) du deuxième point cible, appuyez sur pour obtenir la troisième distance (hauteur) du troisième point cible, le magnétique volume sera calculé et affiché en conséquence.
PYTHAGORE (2 POINTS)
Appuyez 4 fois sur (1 ) pour accéder au mode de mesure de Pythagore. Selon la ligne clignotante, appuyez sur pour obtenir la distance de la première ligne, passez à la direction horizontale de l'objet à partir du point de mesure fixe, appuyez à nouveau pour obtenir la distance de la deuxième ligne, le résultat s'affiche dans la ligne récapitulative.
METRE RUBAN
Le ruban à mesurer est équipé d'un crochet magnétique mobile. Ainsi, le point de départ des mesures est corrigé et toujours à la position zéro exacte.

Lorsque vous effectuez des mesures, le ruban se verrouille automatiquement lorsque vous arrêtez de tirer. En appuyant sur le bouton de verrouillage de la bande, la bande sera à nouveau rétractée.
NOTE DE SECURITE
UTILISATION PRÉVUE DE L'INSTRUMENT
L'instrument émet un faisceau laser rouge afin d'effectuer les tâches de mesure suivantes : mesure de distances, de hauteurs et d'angles.
ENTRETIEN ET NETTOYAGE
Manipulez les instruments de mesure avec précaution. Nettoyez avec un chiffon en microfibre uniquement après chaque utilisation. Si nécessaire, humidifiez le chiffon avec un peu d'eau. Si l'instrument est humide, nettoyez -le et séchez-le soigneusement.
RAISONS SPÉCIFIQUES DES RÉSULTATS DE MESURE ERRONÉS
Après une chute ou un choc de l'instrument.
Veuillez vérifier l'exactitude.
Grande fluctuation de température : Si l'instrument est utilisé dans des zones froides après avoir été stocké dans zones chaudes (ou l'inverse) veuillez attendre quelques minutes avant d'effectuer les mesures.
CODES ERREURS
Toutes les informations seront affichées sous forme de code ou "Erreur",
Code Cause
204 Erreur de calcul
220 Batterie faible
255 Signal reçu trop faible ou temps de mesure trop long
Corrective Mesure
Recommencez la mesure.
256 Signal reçu trop fort.
261 Hors plage de mesure
Améliorer la surface réfléchissante. (Utilisez une plaque cible, ou du papier blanc)
Améliorer la surface réfléchissante. (Utilisez une plaque cible ou ne visez pas une lumière forte)
Mesurez de la distance dans la plage de mesure.
500 Erreur matérielle
ACCEPTABILITE ELECTROMAGNETIQUE (EMC)
Il ne peut pas être complètement exclu que cet instrument perturbe d'autres instruments (par exemple les systèmes de navigation) ; seront perturbés par d'autres instruments (par exemple, un rayonnement électromagnétique intense à proximité d'installations industrielles ou d'émetteurs radio).
CE-CONFORMITY
This instrument has the CE mark according to: EN 61326-1:2013 EN 61326-2-2:2013.
CLASSIFICATION LASER
L'instrument est un produit laser de classe laser 2 selon la norme DIN IEC 60825-1:2014. Il est permis d'utiliser l'appareil sans autres précautions de sécurité. La protection oculaire est normalement assurée par des réponses d'aversion et le réflexe de clignement.
L'instrument laser est marqué d'étiquettes d'avertissement de classe 2
GARANTIE
Ce produit est garanti par le fabricant à l'acheteur d'origine contre tout défaut de matériau et de fabrication dans des conditions normales d'utilisation pendant une période de deux
(2) ans à compter de la date d'achat. Pendant la période de garantie, et sur présentation d'une preuve d'achat, le produit sera réparé ou remplacé (par le même modèle ou un modèle similaire au choix du fabricant), sans frais pour les pièces ou la main-d'œuvre. En cas de défaut, veuillez contacter le revendeur auprès duquel vous avez acheté ce produit. La garantie ne s'appliquera pas à ce produit s'il a été mal utilisé, abusé ou modifié.
Sans limiter ce qui précède, une fuite de la batterie, une flexion ou une chute de l'appareil sont présumés être des défauts résultant d'une mauvaise utilisation ou d'un abus.
CONSIGNES DE SÉCURITÉ
· Suivez les instructions données dans le manuel d'utilisation.
· Ne regardez pas le faisceau. Le faisceau laser peut entraîner des lésions oculaires. Un regard direct dans le faisceau (même à une plus grande distance) peut endommager vos yeux.
· Ne dirigez pas le faisceau laser vers des personnes ou des animaux.
· Le plan laser doit être installé au-dessus du niveau des
yeux des personnes.
· Utilisez l'instrument uniquement pour des travaux de mesure.
· Ne pas ouvrir le boîtier de l'instrument. Les réparations doivent être effectuées uniquement par des ateliers agréés. Veuillez contacter votre revendeur local.
· Ne retirez pas les étiquettes d'avertissement ou les consignes de sécurité.
· Gardez l'instrument hors de portée des enfants.
· Ne pas utiliser l'instrument dans un environnement explosif.
· Le manuel d'utilisation doit toujours être conservé avec l'instrument CONTACTEZ
IRONSIDE INTERNATIONAL
13 rue de la perdrix B.P.41031
Tremblay en France 95912 Roissy CDG. Cédex LA FRANCE
Laser meetlint 2in1 Artikel: 102789
GEBRUIKERSHANDLEIDING
Lees deze handleiding aandachtig door. Deze handleiding bevat belangrijke veiligheidsinformatie.
Notitie:
Technische specificaties en ontwerp zijn onderhevig aan toeval zonder voorafgaande kennisgeving.
KENMERKEN
Inhoud
1. Supplied with 2. Features 3. Power supply
Operation 5. Safety notes
· Laserafstandsmeter met ingebouwde 20 m tape
· Eenvoudig te gebruiken met slechts één knop
· Magnetische haak
· Helder blauw-op-zwart display met achtergrondverlichting
In the box
· 2 IN 1 LASERMEETLINT 20 M
· USB-oplaadkabel
· Ingebouwde Li-Ion batterij
· Gebruikershandleiding
FUNCTIES
· Lengte- en oppervlaktemeting
· Meetlint 20 m.
· Magnetische haak en tape zelfborgende functie
· Bandvergrendelingsknop met continu automatisch rollen
· Metalen riemclip
· Nulpuntlaser zit altijd aan de achterzijde
· Automatische uitschakeling voor laser en instrument
102789 laserafstand
Bereik 20m/40m/60m
Nauwkeurigheid ± (2 mm + 5x10⁻⁵D)
Referentie Voor/Achter
Meeteenheden m/ft/in/' ''
LCD-type Wit-op-zwart scherm
Enkele meting
Continue meting
Oppervlakte meten
Volume meting
Pythagoras (2 punten)
Geheugen 20
Type batterij Lithium batterij
Laser klasse Klasse 2
Soort laser 630-670nm, <1mW
Temperatuur tijdens gebruik 0ºC ~ 40ºC
Temperatuur bij opslag -10°C-60°C
Laser automatische uitschakeling Jaren '30
Automatische uitschakeling jaren 180
Meetlint
Lengte 5 miljoen
Nauwkeurigheid ≤±1,5 mm
Breedte blad 19mm
Opvallen 1,8 miljoen
Dimensie 85x56,3x81,5 mm
Gewicht 300gr
FEATURES
1. Meetmodus
Lang indrukken om van geheugen te wisselen
Kort indrukken om de records te controleren
2. Meten
Kort indrukken voor een enkele meting
Lang indrukken voor continue meting
3. Eenheid Schakelaar/Referentie
Kort indrukken om de eenheid m/ft/in/' te schakelen
Lang indrukken om voor of achter te wisselen
*Tape magnetische haak is standaard referentie aan de voorkant
*Tape-voedingspoort is de standaard referentie aan de achterkant
4. Tape slot
Druk op de tapevergrendeling om de rek te controleren
5. Aan/Uit
DISPLAY INDICATIE
Lang indrukken om AAN/UIT te zetten
Kort indrukken om terug te keren naar de laatste status
6. Micro-USB-poort
7. Riem clip
8. Tape/magnetische haak
9. LCD-scherm
10. Laser ontvangende lens
11. Laser Emitter Lens
POWER SUPPLY
DE BATTERIJ OPLADEN
Sluit (5) aan op de USB - poort. Nu kan de ingebouwde batterij worden opgeladen via een USBconnector.
Wanneer het laadproces is voltooid, duwt u de vergrendeling weer naar beneden.
DOORGAAN METEN
Druk lang op (2) om de meetmodus voort te schakelen, veeg de laser langzaam heen en weer en op en neer over het gewenste doelpunt en druk op (2) om te stoppen.
OPPERVLAKTE METEN
OPERATION
LENGTE METING
Het apparaat gaat naar een enkele meting wanneer het wordt ingeschakeld.
Druk op (2) nadat je op het doel hebt gericht om onder aan het scherm resultaat te krijgen. Druk op (2) om nieuwe gegevens te meten.
Druk 1 keer op (1) om over te schakelen naar de gebiedsmetingsmodus. Druk volgens de knipperende lijn op (2) om de eerste afstand (lengte) vanaf het doelpunt te krijgen, druk nogmaals op (2) om de tweede afstand (breedte) vanaf het tweede doelpunt, wordt het gebied dienovereenkomstig berekend en weergegeven
VOLUME METING
Druk 3 keer op (1) om de volumemeetmodus te krijgen. Volgens de knipperende lijn, druk op om de afstand (lengte) vanaf het doelpunt te krijgen, druk nogmaals om de tweede afstand (breedte) vanaf het tweede doelpunt te krijgen, druk op om de derde afstand (hoogte) vanaf het derde doelpunt te krijgen, het volume wordt dienovereenkomstig berekend en weergegeven.
PYTHAGORAS (2 PUNTEN)
Druk 4 keer op (1) om de Pythagoras-meetmodus te krijgen. Volgens de knipperende lijn, druk om de afstand van de eerste lijn te krijgen, verander naar de horizontale richting van het object vanaf het vaste meetpunt, druk nogmaals om de afstand van de tweede lijn te krijgen, het resultaat wordt weergegeven in de samenvattende regel.
MEETLINT
Het meetlint is voorzien van een beweegbare magnetische haak. Zo wordt het uitgangspunt voor metingen gecorrigeerd en altijd in de exacte nulpositie.
Bij het uitvoeren van metingen vergrendelt het meetlint automatisch wanneer u stopt met trekken. Door op de bandvergrendelingsknop te drukken, wordt de tape weer ingetrokken.
SAFETY NOTES
BEOOGD GEBRUIK VAN HET INSTRUMENT
Het instrument zendt een rode laserstraal uit om de volgende meettaken uit te voeren: meting van afstanden, hoogtes en hoeken.
VERZORGING EN REINIGING
Ga voorzichtig om met meetinstrumenten. Reinig met een microvezeldoek alleen na elk gebruik. Maak de doek eventueel vochtig met wat water. Als het instrument nat is, maak het dan schoon en droog het zorgvuldig af.
SPECIFIEKE REDENEN VOOR FOUTIEVE MEETRESULTATEN
Nadat het instrument is gevallen of geraakt. Controleer de juistheid.
Grote temperatuurschommeling: Als het instrument in koude ruimtes wordt gebruikt nadat het is opgeslagen in warme gebieden (of andersom) Wacht enkele minuten voordat u metingen uitvoert.
FOUTCODES
Alle informatie wordt weergegeven als code of "Fout", de volgende zijn alle codes en de bijbehorende uitleg en oplossing.
Code Oorzaak
204 Rekenfout
220 Batterij bijna leeg
255 Ontvangen signaal te zwak of meettijd te lang
Corrigerende maatregel
Raadpleeg de gebruikershandleiding, herhaal de procedures.
Vervang de batterijen of laad de batterijen op
Verbeter het reflecterende oppervlak. (Gebruik doelplaat, wit papier)
256 Ontvangen signaal te sterk.
261 Buiten het meetbereik
Verbeter het reflecterende oppervlak. (Gebruik een richtplaat, of richt niet op sterk licht)
Meten van de afstand binnen het meetbereik.
500 Hardware fout
Schakel het apparaat in/uit, als het symbool na meerdere keren nog steeds verschijnt, neem dan contact op met uw dealer.
ELEKTROMAGNETISCHE AANVAARDBAARHEID (EMC)
Het kan niet volledig worden uitgesloten dat dit instrument andere instrumenten (bijv. navigatiesystemen) stoort; wordt gestoord door andere instrumenten (bijv. intensieve elektromagnetische straling in de buurt van industriële faciliteiten of radiozenders).
CE-CONFORMITY
Dit instrument heeft de CEmarkering volgens:
EN 61326-1:2013
EN 61326-2-2:2013.
GARANTIE
LASER CLASSIFICATIE
Het instrument is een laserproduct van klasse 2 volgens DIN IEC 60825-1:2014.
Het is toegestaan om het apparaat te gebruiken zonder verdere veiligheidsmaatregelen. De oogbescherming wordt normaal gesproken beveiligd door aversiereacties en de knipperreflex.
Het laserinstrument is gemarkeerd met waarschuwingslabels van klasse 2
Dit product wordt door de fabrikant aan de oorspronkelijke koper gegarandeerd vrij te zijn van defecten in materiaal en vakmanschap bij normaal gebruik voor een periode van twee (2) jaar vanaf de datum van aankoop. Tijdens de garantieperiode en na aankoopbewijs wordt het product gerepareerd of vervangen (naar keuze van de fabrikant door hetzelfde of een vergelijkbaar model), zonder kosten voor onderdelen of arbeid. Neem in geval van een defect contact op met de dealer waar u dit product oorspronkelijk heeft gekocht. De garantie is niet van toepassing op dit product als het is misbruikt, misbruikt of gewijzigd. Zonder het voorgaande te beperken, wordt aangenomen dat lekkage van de batterij, buigen of laten vallen van het apparaat defecten zijn die het gevolg zijn van verkeerd gebruik of misbruik.
VEILIGHEIDSINSTRUCTIES
· Volg de instructies in de gebruikershandleiding op.
· Kijk niet in de straal. De laserstraal kan leiden tot oogletsel. Een directe blik in de straal (zelfs van grotere afstand) kan schade aan uw ogen veroorzaken.
· Richt de laserstraal niet op personen of dieren.
· Het laservliegtuig moet boven de ooghoogte van personen worden opgesteld.
· Gebruik het instrument alleen voor het meten van taken.
· Open de behuizing van het instrument niet. Reparaties mogen alleen worden uitgevoerd door geautoriseerde werkplaatsen. Neem contact op met uw lokale dealer.
· Verwijder geen waarschuwingslabels of veiligheidsinstructies.
· Houd het instrument uit de buurt van kinderen.
· Gebruik het instrument niet in een explosieve omgeving.
· De gebruikershandleiding moet altijd bij het instrument worden bewaard
CONTACT
IRONSIDE INTERNATIONAAL
13 rue de la perdrix B.P.41031
Tremblay en France 95912 Roissy CDG. Cedex
FRANKRIJK