1 0 4 WA L L S m a g a z i n e
4 WA L L S m a g a z i n e 1 1
[ Mal’ s m a s t e rcla ss ]
Corner Pockets
these are available commercially but making one’s own is simple and effective.
B
C
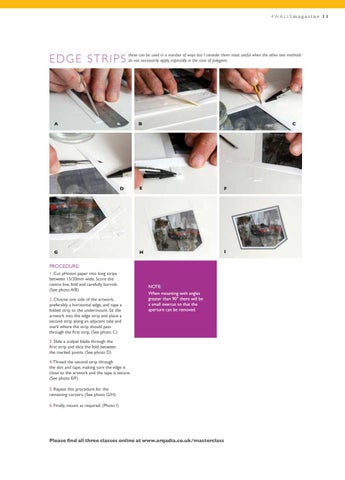
E dge S trips
these can be used in a number of ways but I consider them most useful when the other two methods do not necessarily apply, especially in the case of polygons.
D
A
B
C
Notes: • Corner pockets should be slightly loose allowing the artwork to expand and contract. A
E
Procedure: 1. Strips of pHoton paper are cut to the required size, in our case this was 50 x 10mm and the centre marked with pencil. (See photo A) 2. The corners were folded back on themselves to line up with the
• Additional tape may be applied diagonally across the face of the corner pocket for extra stability.
F
marked centre thereby forming the corner pocket. (See photo B) 3. The creases were burnished to ensure sharp, crisp edges. (See photo C) The artwork was positioned on the undermount and the corners marked.
4. EvaCon-R adhesive was applied to the back of the corner pocket and positioned and weighted as required. (See photo D)
C
• Not particularly suitable for light or flimsy materials.
D
PA P E R T R AY S
5. The artwork was then positioned in corner pockets. (See photo Image E)
there are two types of paper trays; the first uses a simple, single fold to create a tray suitable for lightweight items, (see photo A should you wish to use this). However, the following procedure details the use of a ‘Z Fold’ which makes for a more universal tray. B
C
A
F
H
I
• Corner pockets may be used with Edge Strips where extra support is required. (See photo F)
G A
E
G
Procedure: 1. Cut pHoton paper into long strips between 15/20mm wide. Score the centre line, fold and carefully burnish. (See photo A/B) 2. Choose one side of the artwork, preferably a horizontal edge, and tape a folded strip to the undermount. Sit the artwork into the edge strip and place a second strip along an adjacent side and mark where the strip should pass through the first strip. (See photo C)
Note: When mounting with angles greater than 90° there will be a small overcut so that the aperture can be removed.
3. Slide a scalpel blade through the first strip and slice the fold between the marked points. (See photo D)
D
E
Procedure: 1. Cut a piece of pHoton paper approx 30mm larger than the item to be supported; with a pencil, mark the position of the item. 2. From the item’s position draw three lines, each a distance of 10mm apart; marking the top and bottom. (See photo B) 3. Cut the four corners at 45° and two further slits horizontally along the item’s
F
4. Thread the second strip through the slot and tape, making sure the edge is close to the artwork and the tape is secure. (See photo E/F)
position from the top corners and vertically along the item’s position from the bottom two corners. (See photo C)
6. Place the folded sides under the top side and secure with tape. (See photo F) Fold the top side and tape. (See photo G)
5. Repeat this procedure for the remaining corners. (See photo G/H)
4. Score these the lines to help with the folding. (See photo D)
7. Repeat the procedure for the bottom side.
6. Finally, mount as required. (Photo I)
8. Carefully insert the artwork into the tray. 5. Fold along the scored lines to make the ‘Z fold’ and burnish with artist’s bone. (See photo E)
Please find all three classes online at www.arqadia.co.uk/masterclass