p11
How to add a little extra pizzazz to the presentation of your canvas artwork.
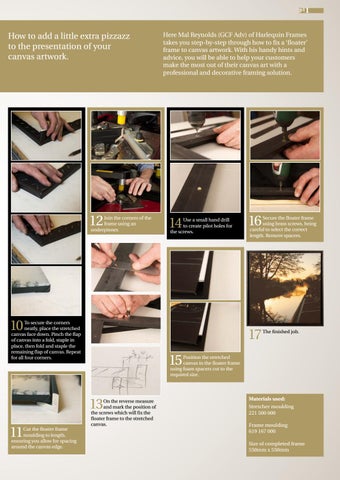
12
Join the corners of the frame using an underpinner.
Here Mal Reynolds (GCF Adv) of Harlequin Frames takes you step-by-step through how to fix a ‘floater’ frame to canvas artwork. With his handy hints and advice, you will be able to help your customers make the most out of their canvas art with a professional and decorative framing solution.
14
Use a small hand drill to create pilot holes for the screws.
10
To secure the corners neatly, place the stretched canvas face down. Pinch the flap of canvas into a fold, staple in place, then fold and staple the remaining flap of canvas. Repeat for all four corners.
11
Secure the floater frame using brass screws, being careful to select the correct length. Remove spacers.
17
The finished job.
15
Position the stretched canvas in the floater frame using foam spacers cut to the required size.
13 Cut the floater frame moulding to length, ensuring you allow for spacing around the canvas edge.
16
On the reverse measure and mark the position of the screws which will fix the floater frame to the stretched canvas.
Materials used: Stretcher moulding 221 500 000 Frame moulding 619 167 000 Size of completed frame 550mm x 550mm


