Project 5
Tissue Box Holder—Scenic
T
his project will use the Pad Method of cutting the veneer; see ‘Concepts, Pad Marquetry’ for details on this. The marquetry for each side of the Scenic Tissue Box Holder is cut separately and the scene is different on all four sides however the Snow line flows from one panel to the next as in Drawing 5-5. Each piece of marquetry should be 5 3/4-in. wide x 5 3/4-in. high. This allows 3/16-in. to be trimmed off on both sides and the top and the bottom after the marquetry piece is glued onto the box. Use the instructions below to make the plywood box for this project and for the other tissue box project that follows. These tissue box holder projects have proved most popular at marquetry workshops and make great gifts. Extra Tools and Materials Needed:
Basic Marquetry and Beyond
3/8-in. thick, for the box.
30
Plywood,
Make the Wooden Tissue Box Holder: Most cardboard tissue boxes that you buy at the store are 4 1/2-in. square and 5-in. high; the dimensions of this wooden box should be altered if your tissues come in a different sized box. 1. Cut four sides out of 3/8-in. plywood (5in. wide x 5-in. high). See Drawing 5-1. 2. Position the four wooden side pieces around the tissue box to make sure it will fit. The inside measurement of the plywood box should be 1/8-in. bigger than the tissue box for ease of fit.
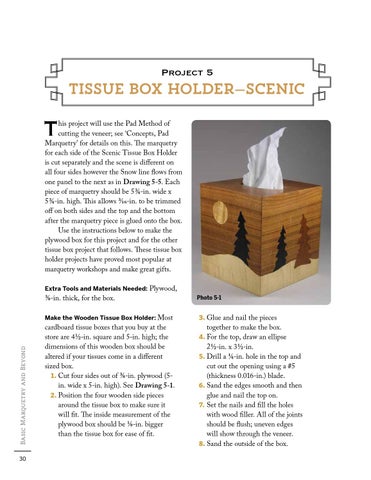
Photo 5-1
3. Glue and nail the pieces
together to make the box. 4. For the top, draw an ellipse 2 1/2-in. x 3 1/2-in. 5. Drill a 1/4-in. hole in the top and cut out the opening using a #5 (thickness 0.016-in.) blade. 6. Sand the edges smooth and then glue and nail the top on. 7. Set the nails and fill the holes with wood filler. All of the joints should be flush; uneven edges will show through the veneer. 8. Sand the outside of the box.