Part number 48194542 1st edition English November 2017 SERVICE MANUAL 580N EP Tier 4B (final) Tractor Loader Backhoe PIN NHC740227 and above

SER VICE MANUAL 580N Four-Wheel Drive (4WD) T ier (final) [NHC740227 - ] 580N T wo-Wheel Drive (2WD) T ier (final) [NHC740227 - ] 48194542 20/1 1/2017
Link Product / Engine
Product Market Product Engine
F5HFL463D*F005
580N T - Wheel Drive (2WD)
T ier (final) [NHC740227 - ] North America
F5HFL463D*F005
580N Four - Wheel Drive (4WD)
T ier (final) [NHC740227 - ] North America
48194542 20/1 1/2017
INTRODUCTION
Engine . . . . . . . . . . . . . . . . . . . . . . . . . . . . . . . . . . . . . . . . . . . . . . . . . . . . . . . . . . . . . . . . . . . . . . . . . . . . . . . . . . . . . . .
[10.001] Engine and crankcase . . . . . . . . . . . . . . . . . . . . . . . . . . . . . . . . . . . . . . . . . . . . . . . . . . . . . . . . . . . . . 10.1
[10.103] Crankshaft and flywheel . . . . . . . . . . . . . . . . . . . . . . . . . . . . . . . . . . . . . . . . . . . . . . . . . . . . . . . . . . . . 10.2
[10.202] Air cleaners and lines . . . . . . . . . . . . . . . . . . . . . . . . . . . . . . . . . . . . . . . . . . . . . . . . . . . . . . . . . . . . . . 10.3
[10.206] Fuel filters . . . . . . . . . . . . . . . . . . . . . . . . . . . . . . . . . . . . . . . . . . . . . . . . . . . . . . . . . . . . . . . . . . . . . . . . . . 10.4
[10.216] Fuel tanks . . . . . . . . . . . . . . . . . . . . . . . . . . . . . . . . . . . . . . . . . . . . . . . . . . . . . . . . . . . . . . . . . . . . . . . . . . 10.5
[10.218] Fuel injection system . . . . . . . . . . . . . . . . . . . . . . . . . . . . . . . . . . . . . . . . . . . . . . . . . . . . . . . . . . . . . . . 10.6
[10.304] Engine lubrication system . . . . . . . . . . . . . . . . . . . . . . . . . . . . . . . . . . . . . . . . . . . . . . . . . . . . . . . . . . 10.7
[10.400] Engine cooling system . . . . . . . . . . . . . . . . . . . . . . . . . . . . . . . . . . . . . . . . . . . . . . . . . . . . . . . . . . . . . 10.8 [10.414] Fan and drive . . . . . . . . . . . . . . . . . . . . . . . . . . . . . . . . . . . . . . . . . . . . . . . . . . . . . . . . . . . . . . . . . . . . . . 10.9 [10.501] Exhaust Gas Recirculation (EGR) exhaust treatment . . . . . . . . . . . . . . . . . . . . . . . . . . .
Contents
10.10 T ransmission . . . . . . . . . . . . . . . . . . . . . . . . . . . . . . . . . . . . . . . . . . . . . . . . . .
. 12] Power shuttle transmission 13] Powershift transmission Power shuttle transmission external controls Powershift transmission external controls Power shuttle transmission internal components Powershift transmission internal components
axle system . . . . . . . . . . . . . . . . . . . . . . . . . . . . . . . . . . . . . . . . . . . . . . . . . . . . . . . . . . . . . . . . . . . . . . . Powered front axle Front bevel gear set and dif ferential [25.108] Final drive hub, steering knuckles, and shafts . . . . . . . . . . . . . . . . . . . . . . . . . . . . . . . . . . . . . 25.3 [25.400] Non-powered front axle . . . . . . . . . . . . . . . . . . . . . . . . . . . . . . . . . . . . . . . . . . . . . . . . . . . . . . . . . . . . 25.4 Rear axle system . . . . . . . . . . . . . . . . . . . . . . . . . . . . . . . . . . . . . . . . . . . . . . . . . . . . . . . . . . . . . . . . . . . . . . . . Powered rear axle 48194542 20/1 1/2017
.
. . . . . . . . . . . . . . . . . . . . . . . . . . .
Front
Rear bevel gear set and dif ferential Planetary and final drives
and controls . . . . . . . . . . . . . . . . . . . . . . . . . . . . . . . . . . . . . . . . . . . . . . . . . . . . . . . . . . . . . . . . . . . . 10] Parking brake parking lock Hydraulic service brakes Hydraulic systems Hydraulic systems Pump control valves Fixed displacement pump Remote control valves Reservoir , cooler , and filters Safety and main relief valves Pilot system Main control valve Auxiliary hydraulic valves and lines Front loader arm hydraulic system Stabilizer hydraulic system 1 Front loader bucket hydraulic system Excavator and backhoe hydraulic controls Boom hydraulic system Dipper hydraulic system Excavator and backhoe bucket hydraulic system Swing arm hydraulic system [35.740] T elescopic arm hydraulic system . . . . . . . . . . . . . . . . . . . . . . . . . . . . . . . . . . . . . . . . . . . . . . . . . 35.18 Frames and ballasting . . . . . . . . . . . . . . . . . . . . . . . . . . . . . . . . . . . . . . . . . . . . . . . . . . . . . . . . . . . . . . . . . [39.100] Frame . . . . . . . . . . . . . . . . . . . . . . . . . . . . . . . . . . . . . . . . . . . . . . . . . . . . . . . . . . . . . . . . . . . . . . . . . . . . . . 39.1 Stabilizers Steering . . . . . . . . . . . . . . . . . . . . . . . . . . . . . . . . . . . . . . . . . . . . . . . . . . . . . . . . . . . . . . . . . . . . . . . . . . . . . . . . . . . . . 48194542 20/1 1/2017
Brakes
. . . . . . . . . . . . . . . . . . . . . . . . . . . . . . . . . . . . . . . . . . . . . . . . . . . . . . . . . 55.1 [55.201]
. . . . . . . . . . . . . . . . . . . . . . . . . . . . . . . . . . . . . . . . . . . . . . . . . . . . . . . . . . . . . 55.2 [55.301] Alternator . . . . . . . . . . . . . . . . . . . . . . . . . . . . . . . . . . . . . . . . . . . . . . . . . . . . . . . . . . . . . . . . . . . . . . . . . . . 55.3
[55.302] Battery . . . . . . . . . . . . . . . . . . . . . . . . . . . . . . . . . . . . . . . . . . . . . . . . . . . . . . . . . . . . . . . . . . . . . . . . . . . . . . 55.4
[55.404] External lighting . . . . . . . . . . . . . . . . . . . . . . . . . . . . . . . . . . . . . . . . . . . . . . . . . . . . . . . . . . . . . . . . . . . . 55.5
. . . . . . . . . . . . . . . . . . . . . . . . . . . . . . . . . . . . . . 55.6 [55.510]
. . . . . . . . . . . . . . . . . . . . . . . . . . . . . . . . . . . . . . . .
Steering control Hydraulic control components Cylinders
Wheels . . . . . . . . . . . . . . . . . . . . . . . . . . . . . . . . . . . . . . . . . . . . . . . . . . . . . . . . . . . . . . . . . . . . . . . . . . . . . . . . . . . . . .
Rear wheels
Front wheels [44.520]
. . . . . . . . . . . . . . . . . . . . . . . . . . . . . . . . . . . . . . . . . . . . . . . . . . . . . . . . . . . . . . . . . . . . . . . . 44.2
.
Heating Air conditioning Electrical systems . . . . . . . . . . . . . . .
. . . .
Harnesses
Cab climate control
. . . . . . . . . . . . . . . . . . . . . . . . . . . . . . . . . . . . . . . . . . . . . . . . . . . . . . . . . . . . . . . . . . . .
. . .
. . . . . . . . . . . . . . . . . . . . . . . . . . . . . . . . . . . . . . . . . . . . . . . . . [55.100]
and connectors
Engine starting system
W arning indicators, alarms, and instruments
Cab platform harnesses and connectors
[55.640] Electronic modules . . . . . . . . . . . . . . . . . . . . . . . . . .
T elematics F AUL T CODES Front loader and bucket . . . . . . . . . . . . . . . . . . . . . . . . . . . . . . . . . . . . . . . . . . . . . . . . . . . . . . . . . . . . . . . Arm [82.300] Bucket . . . . . . . . . . . . . . . . . . . . . . . . . . . . . . . . . . . . . . . . . . . . . . . . . . . . . . . . . . . . . . . . . . . . . . . . . . . . . . 82.2 Booms, dippers, and buckets . . . . . . . . . . . . . . . . . . . . . . . . . . . . . . . . . . . . . . . . . . . . . . . . . . . . . . . Bucket [84.1 14] Boom pivoting support . . . . . . . . . . . . . . . . . . . . . . . . . . . . . . . . . . . . . . . . . . . . . . . . . . . . . . . . . . . . . 84.2 [84.910] Boom . . . . . . . . . . . . . . . . . . . . . . . . . . . . . . . . . . . . . . . . . . . . . . . . . . . . . . . . . . . . . . . . . . . . . . . . . . . . . . . 84.3 [84.912] Dipper arm . . . . . . . . . . . . . . . . . . . . . . . . . . . . . . . . . . . . . . . . . . . . . . . . . . . . . . . . . . . . . . . . . . . . . . . . . 84.4 48194542 20/1 1/2017
[55.408]
55.7
. . . . . . . . . . . . . . . . . . . . . . . . . . . . . . . . . . . . . . . 55.8
Engine hood and panels
[90.1 14] Operator protections . . . . . . . . . . . . . . . . . . . . . . . . . . . . . . . . . . . . . . . . . . . . . . . . . . . . . . . . . . . . . . . 90.2
[90.124] operator seat . . . . . . . . . . . . . . . . . . . . . . . . . . . . . . . . . . . . . . . . . . . . . . 90.3
[90.150] Cab . . . . . . . . . . . . . . . . . . . . . . . . . . . . . . . . . . . . . . . . . . . . . . . . . . . . . . . . . . . . . . . . . . . . . . . . . . . . . . . . . 90.4
[90.151] Cab interior . . . . . . . . . . . . . . . . . . . . . . . . . . . . . . . . . . . . . . . . . . . . . . . . . . . . . . . . . . . . . . . . . . . . . . . . . 90.5
[90.154] Cab doors and hatches . . . . . . . . . . . . . . . . . . . . . . . . . . . . . . . . . . . . . . . . . . . . . . . . . . . . . . . . . . . . 90.6
[90.156] Cab windshield and windows . . . . . . . . . . . . . . . . . . . . . . . . . . . . . . . . . . . . . . . . . . . . . . . . . . . . . . 90.7
cab, and decals
48194542 20/1 1/2017
48194542 20/1 1/2017 1
INTRODUCTION
Foreword - Important notice regarding equipment servicing
All repair and maintenance work listed this manual must carried out only qualified dealership strictly complying with the instructions and whenever the special
Anyone who performs repair and maintenance operations without complying with the procedures provided herein shall responsible for any subsequent
The manufacturer and all the organizations its distribution chain, including - without limitationnational, regional, local reject any responsibility for damages caused parts and / components not approved the facturer , including those used for the servicing repair the product manufactured marketed the manufacturer any case, warranty given attributed the product manufactured marketed the manufacturer case damages caused parts and / components not approved the manufacturer
The manufacturer reserves the right make improvements design and changes specifications any time without notice and without incurring any obligation install them units previously and illustrative material herein are accurate known time publication but are subject change without notice.
case refer your CASE CONSTRUCTION Sales and Service
INTRODUCTION
48194542 20/1 1/2017 4
Safety rules
Personal safety
This the safety alert used alert you potential personal injury Obey all safety messages that follow this symbol avoid possible death injury

Throughout this manual you will find the signal words W and CAUTION followed special These precautions are intended for the personal safety you and those working with
Read and understand all the safety messages this manual before you operate service the
DANGER indicates a hazardous situation not will result death serious injury
W ARNING indicates a hazardous situation not could result death serious injury
CAUTION indicates a hazardous situation not could result minor moderate injury
Machine safety
NOTICE: Notice indicates a situation that, not avoided, could result machine property damage.
Throughout this manual you will find the signal word Notice followed special instructions prevent machine property damage. The word Notice used address practices not related personal safety .
Information
NOTE: Note indicates additional information that clarifies other information this
Throughout this manual you will find the word Note followed additional information about a step, other information the The word Note not intended address personal safety property
INTRODUCTION
F AILURE T O FOLLOW DANGER, W ARNING, AND CAUTION MESSAGES COULD RESUL T DEA SERIOUS INJUR Y .
48194542 20/1 1/2017 5
Safety rules - Personal safety
Unless otherwise instructed, always perform these steps before you service the machine:
Park the machine a level
Place the backhoe the transport position with the swing lock pin installed for transport.
Place the loader bucket the with the bottom the loader bucket parallel the
Place the direction control lever and the transmission you need open the hood perform raise the loader arms and install the support
Shut down the Place a Not tag the key switch that visible other workers remove the key
INTRODUCTION
48194542 20/1 1/2017 6
Safety rules - Ductile iron
DANGER
Altering cast ductile iron can cause weaken Before you weld, cut, drill holes any part this machine, make sure that the part not cast ductile iron. Failure comply will result death serious injury .
Altering cast ductile iron can cause weaken
Unauthorized modifications cast ductile iron parts can cause death serious injury not repair , attach items cast ductile iron parts this
Before you drill holes any part this make sure the part not cast ductile See your dealer you not know a part cast ductile
The following items are examples cast ductile iron There may also other parts made cast ductile iron that are not the list below


• two - wheel drive steering link
• dump links
• front axle
• stabilizers
• extend - a - hoe
• swing tower
• bucket linkage
• Air - Conditioning / compressor mounting bracket not make any unauthorized Consult authorized dealer before making any modifications this
INTRODUCTION
D0148A
48194542 20/1 1/2017 7
SER VICE MANUAL Engine 580N Four-Wheel Drive (4WD) T ier (final) [NHC740227 - ] 580N T wo-Wheel Drive (2WD) T ier (final) [NHC740227 - ] 48194542 20/1 1/2017
Engine - Engine and crankcase Engine - Speeds Stall test check sheet NOTE: The following specifications are for engines with more than hours NOTE: Engine RPM speed based the ISO 14396 Cetane number least and density between 820 –845 / ( 1382 – 1424 / yd³ ) Fuel inlet 36.0 –40.0 ( 96.8 –104.0 ) Results from stall test procedure (fill values accordingly) RPM test valve Stall test component (specified value) 1 Loader hydraulic stall speed ( 2150 – 2300 RPM ) 2 Backhoe hydraulic stall speed ( 2150 – 2300 RPM ) 3 T orque converter stall speed ( 2025 – 2200 RPM ) 4 Combined - loader hydraulic and torque converter - stall speed ( 1450 – 1720 RPM ) Stall test reference chart RPM Results 1 2150 – 2300 RPM 2 2150 – 2300 RPM 3 2025 – 2200 RPM 4 1450 – 1720 RPM All systems operating within normal specified RPM values. 1 Above 2300 RPM 2 2150 – 2300 RPM 3 Above
RPM 4 Above 1720 RPM Engine Check engine Refer the engine service 1 Below 2150 RPM 2 2150 –
RPM 3 Below
RPM 4 Below 1450 RPM Engine Check engine Replace the fuel and air Refer the engine service 1 Below
RPM 2 2150 –
RPM 3 2025 –
4 Below
RPM Hydraulic system Check the setting the main relief Check the output the hydraulic 1 Above
RPM 2 2150 –
3 2025 –
4 Above
Hydraulic
Check the
relief Check
output
pump. Check
valve. 1 2150 –
2 Below
3 2025 –
4 1450 –
Hydraulic
Check
1 2150 –
2 Below
3 2025 –
4 1450 –
RPM Hydraulic system Check the setting the main relief Check the output the hydraulic 1 2150 – 2300 RPM 2 2150 –
RPM 3 Above
RPM 4 Above
RPM T orque converter transmission 1 2150 –
RPM 2 2150 –
RPM 3 Below 2025 RPM 4 Below 1450 RPM T orque converter transmission 48194542 20/1 1/2017 10.1 [10.001] / 3
2200
2300
2025
2150
2300
2200 RPM
1450
2300
2300 RPM
2200 RPM
1720 RPM
system
setting the main
the
the hydraulic
for leakage the loader control
2300 RPM
2150 RPM
2200 RPM
1720 RPM
system problem(s).
the setting the main relief valve. Check the output the hydraulic
2300 RPM
2150 RPM
2200 RPM
1720
2300
2200
1720
2300
2300

Engine - Engine and crankcase RAIL12UTL0338GA 1 48194542 20/1 1/2017 10.1 [10.001] / 5
Engine - Prepare - Stall tests
the stall test find the cause poor
The main relief valve must set within specifications achieve accurate readings when performing the following stall
The engine run full throttle and the transmission and hydraulic systems are engaged separately , and then gether .
Comparing the engine speeds from the stall test with the check sheets this section will help find the cause the problem. can necessary check a separate system find the exact cause the problem.
Use a photo tachometer other tachometer equal accuracy get accurate results from the stall
The transmission and hydraulic system must operating temperature before doing the stall Heat the oil according instructions this
Machines with standard transmission
Apply the parking
Move the transmission gear selector into fourth gear
Lock the brake pedals together Put your foot the service brakes and hold the machine with service
Release the parking
With the engine running low move the direction control lever
Slowly increase the engine speed full the machine begins move any decrease the engine speed low idle and stop the
Machines with S - T ype and H - T ype transmissions
Apply the parking Place the automatic / manual switch the manual
Select fourth gear the range selector .
Lock the brake pedals together Put your foot the service brakes and hold the machine with service
Release the parking
With the engine running low move the direction control lever
Slowly increase the engine speed full throttle. the machine begins move any decrease the engine speed low idle and stop the Refer sections Parking brake discs - Inspect (33.1 10) , Parking brake discs - T est (33.1 10) and Parking brake discs - Check 10)
Engine - Engine and crankcase
48194542 20/1 1/2017 10.1 [10.001] / 6
Procedure heat the torque converter and the hydraulic oil
Apply the parking
Start and run the engine low
Run the engine full throttle, hold the loader control lever the rollback position for
Return the loader control lever neutral for
Return the boom control lever neutral for Repeat steps 3 and 4 until the temperature the oil ( 126 ) The side the reservoir will very warm this
With the engine running low move the mission control fourth gear and the direction control lever
Run the engine full throttle for seconds.
Decrease the engine speed low idle and move the direction control lever neutral for
10. Repeat steps 6 through 8 until the pointer the gauge for transmission oil temperature the center the green zone the gauge for transmission oil ature.
Stall test procedure
Prepare the machine for the stall test according structions this
Heat the oil according instructions this
Apply the parking brake and start the engine.
With the engine running full hold the loader control lever the lift position and read the tachometer Record the reading line 1 the check
With the engine running full throttle and boom travel hold the dipper lever the position and read the tachometer Record the reading line 2 the check
Decrease the engine speed low
Move the transmission control lever fourth gear .
NOTE: For machines with S - T ype and H - T ype place the automatic / manual switch the manual sition.
Lock the brake pedals together Put your foot the service brakes and hold the machine with service
Release the parking brake.
Move the direction control lever
1 Slowly increase the engine speed full throttle and read the tachometer Record the reading line 3 the check sheet.
Engine - Engine and crankcase
48194542 20/1 1/2017 10.1 [10.001] / 7
12. With the transmission control lever fourth gear , the direction control lever and the engine ning full hold the loader control lever the lift position and read the tachometer Record the ing line 4 the check
Decrease the engine speed low move the directional control lever neutral.
Run the engine low idle for two minutes and then stop the
See the check sheet understand the results the stall test.
Engine - Engine and crankcase
48194542 20/1 1/2017 10.1 [10.001] / 8
Engine - Remove
Prior operation: Remove the engine See Engine hood - Remove (90.105)

Prior operation: Remove the Diesel Oxidation Catalyst (DOC) tray See Diesel Oxidation Catalyst (DOC) - Remove Prior operation: Drain the engine cooling See Radiator - Drain fluid Prior operation: Remove the engine cooling system. See Radiator - Remove (10.400) . Prior operation: evacuate the air - conditioning See Air conditioning - Charging Air conditioner system evacuation and recharging
disconnect electrical connectors (1) and (2)
disconnect the A / C high pressure disconnect the A / C low pressure disconnect the A / C condenser voltage
Disconnect fuel lines (1) and (2)

Disconnect the water sensor electrical connector (not shown).
NOTE: W ater sensor located the bottom the primary fuel filter
Engine - Engine and crankcase
RAIL14FRK01 14BA 1
RAPH1 1TLB0041BA
2
48194542 20/1 1/2017 10.1 [10.001] / 9
Disconnect the glow plug control unit electrical tor (1)

RAPH1 1TLB0021BA 3
Remove the supporting bracket (1) and hanging barrier curtain (2)

RAIL14UTL0095BA 4
Disconnect the heater hose (1)
RAPH1 1TLB0039BA 5

Engine - Engine and crankcase
48194542 20/1 1/2017 10.1 [10.001] /


Engine - Engine and crankcase
the air temperature sensor
Remove the air intake hose
48194542 20/1 1/2017 10.1 [10.001] / 1 1
Disconnect
RAIL14FRK01 15BA 6 1
RAIL14FRK0104BA 7
NOTE: For assembly identify and label all trical
Disconnect the wires from the air restriction indication

Remove the air filter assembly and cap all

RAIL14FRK0104BA 8
RAIL14FRK0122BA 9 14. Disconnect the wiring harness connector (1) and the positive battery cable (2) from the rear the tor RAPH12FRK0163AA

Engine - Engine and crankcase
48194542 20/1 1/2017 10.1 [10.001] /
15. equipped, remove the battery disconnect switch bracket from the frame and set
RAIL14TLB0403AA 1 1
Remove the nut (3) , disconnect the wire harness (4) and positive battery cable (2) from the terminal the starter (1) .


RAIL14TLB0403AA
Disconnect the ground
RAIL14FRK0129BA
Engine - Engine and crankcase
48194542 20/1 1/2017 10.1 [10.001] /

Engine - Engine and crankcase 18.
RAIL14FRK0141BA 48194542 20/1 1/2017 10.1 [10.001] /
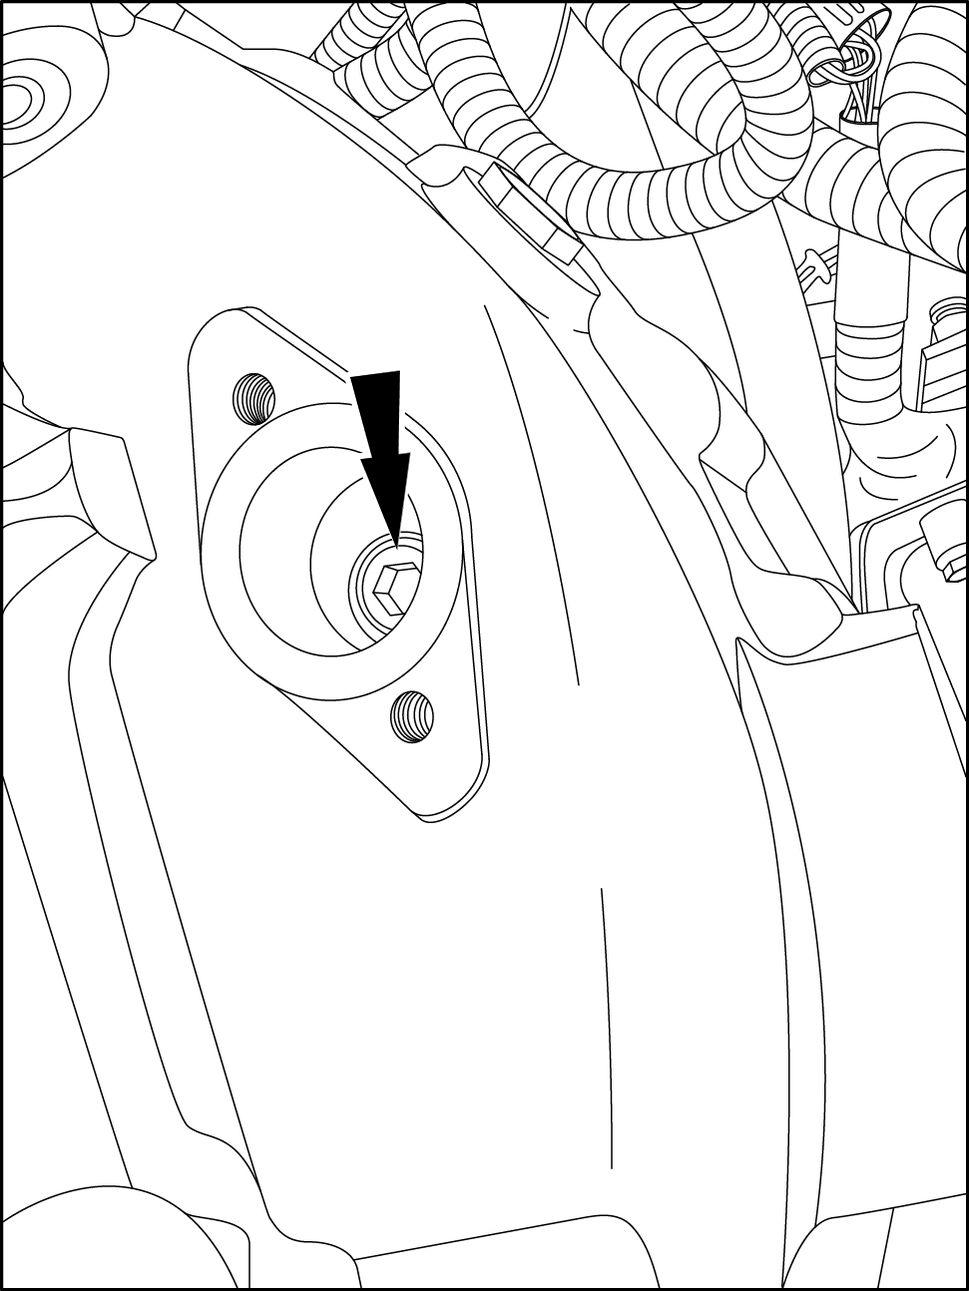
the right - hand side the engine remove both caps access the flex plate

Thank you very much for your reading. Please Click Here. Then Get COMPLETE MANUAL.NOWAITING NOTE: If there is no response to click on the link above, please download the PDF document first and then clickonit.
Insert the engine turning tool 380003372 into the lower opening and rotate the flywheel until the flex plate bolt visible the top opening.


Engine - Engine and crankcase
RAPH12FRK0979BA RAIL14FRK0139BA 48194542 20/1 1/2017 10.1 [10.001] /

Engine - Engine and crankcase 20. Remove all the bolts that fasten the flywheel the flex RAIL14FRK0140BA Support the engine using lifting DANGER Heavy parts! Support designated component(s) with adequate lifting Failure comply will result death serious injury . D0018A Specification Engine weight (approximate) 363 ( 800 ) Remove all the bolts and washers that fasten the transmission the flywheel housing (two shown). RAPH12FRK0977BA 48194542 20/1 1/2017 10.1 [10.001] /
23. Loosen the motor mount - - frame bolts both sides the Remove all motor mount - - engine bolts both sides the engine.
NOTICE: A void machine Maintain adequate clearance between the engine and machine Make sure the engine components NOT come contact hang the frame frame components during engine
Carefully raise and remove the engine from the Place the engine the repair stand and repair replace necessary

Engine - Engine and crankcase
RAPH12FRK0103BA
48194542 20/1 1/2017 10.1 [10.001] /
Engine - Install DANGER
Heavy objects! Lift and handle all heavy components using lifting equipment with adequate capacity . Always support units parts with suitable slings hooks. Make sure the work area clear all bystanders. Failure comply will result death serious injury
Specification
Engine weight (approximate) 363 ( 800 ) Attach appropriate lifting device the three engine lift eyelets (1) the engine

NOTICE: A void machine Maintain adequate clearance between the engine and machine Make sure the engine components NOT come contact hang the frame frame components during engine
Carefully raise and position the engine the Install all the bolts and washers that fasten the mission the flywheel housing (only two not tighten this time.
Engine - Engine and crankcase
D0076A
RAPH12FRK0643HA
1
RAPH12FRK0977BA 2 48194542 20/1 1/2017 10.1 [10.001] /


Engine - Engine and crankcase
RAIL14TLB1008BA 3 RAPH12FRK0103BA 4 Specification Mount - - engine torque – 107 ( – ) Mount - - frame torque 178 – 240 N·m ( 131 – 177 ) T ighten all the bell housing bolts NOTE: V iew from underneath the RAPH1 1TLB0020BA 5 48194542 20/1 1/2017 10.1 [10.001] /
Install all motor mount - - engine bolts both sides the T ighten Install the motor mount - - frame bolts both sides the engine.
