COMPONENTS
2004 STEERING Power Steering Gear - Sequoia
2004 STEERING
Power Steering Gear - Sequoia

2004 STEERING Power Steering Gear - Sequoia
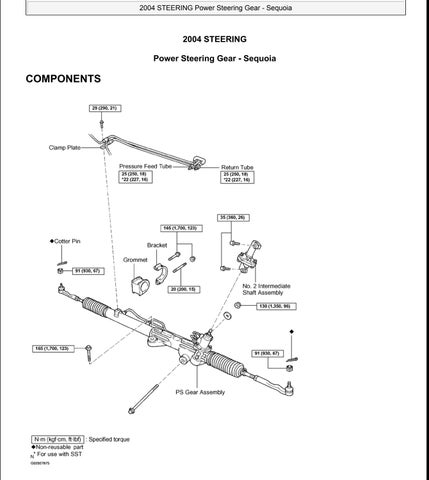
Fig. 1: Identifying Power Steering Gear Components (1 Of 3) Courtesy of TOYOTA MOTOR SALES, U.S.A., INC.

2004 STEERING Power Steering Gear - Sequoia
Fig. 2: Identifying Power Steering Gear Components (2 Of 3) Courtesy of TOYOTA MOTOR SALES, U.S.A., INC.

Fig. 4: Locating SST Courtesy of TOYOTA MOTOR SALES, U.S.A., INC.

DISASSEMBLY
NOTE:When using a vise, do not overtighten it.
1. REMOVE 2 TURN PRESSURE TUBES
a.Using SST, remove the 2 turn pressure tubes. SST 09023-38400
b.Remove the 4 O-rings from the tubes.
2.
Using
SST 09612-00012
Reference: Bolt: 90105-10346 Nut: 90170-10198


2004 STEERING Power Steering Gear - Sequoia
Fig. 6: Locating SST
Courtesy of TOYOTA MOTOR SALES, U.S.A., INC.
3. REMOVE RH AND LH TIE ROD ENDS AND LOCK NUTS
a.Place matchmarks on the tie rod end, lock nut and rack end.

b.Loosen the lock nut, remove the tie rod end and lock nut. c.Perform the same manner described above to the other side.
Fig.
7: Placing Matchmarks On Tie Rod End, Lock Nut & Rock End
Courtesy of TOYOTA MOTOR SALES, U.S.A., INC.
4. REMOVE RH AND LH CLIPS, RACK BOOTS AND CLAMPS
a.Using a screwdriver, loosen the 2 clamps.
b.Remove the 2 clips and boots.
NOTE:Mark the RH and LH boots.
NOTE:Be careful not to damage the boot.
Fig. 8: Loosening Boots Clamps Courtesy of TOYOTA MOTOR SALES, U.S.A., INC.

Fig. 9: Unstaking Claw Washer
Courtesy of TOYOTA MOTOR SALES, U.S.A., INC.
b.Using a spanner, hold the steering rack steadily, and using SST, remove the rack end. SST 09922-10010

NOTE:Mark the RH and LH rack ends.
NOTE:Use SST 09922-10010 in the direction shown in the illustration.
c.Remove the washer from the rack end.
d.Perform the same manner described above to the other side.
Using SST, remove the lock nut. SST 09922-10010

NOTE:Use SST 09922-10010 in the direction shown in the illustration.
a.Using a hexagon wrench, remove the rack guide spring cap. b.Remove the rack guide spring and rack guide sub-assembly.
Fig. 11: Removing Rack Guide Spring Cap Lock Nut Courtesy of TOYOTA MOTOR SALES, U.S.A., INC.

8. REMOVE RACK HOUSING CAP
Using SST, remove the rack housing cap. SST 09816-30010

11. REMOVE CONTROL VALVE HOUSING WITH CONTROL VALVE ASSEMBLY

a.Place matchmarks on the control valve housing and rack housing.
b.Remove the 2 bolts and control valve housing with control valve assembly attached.
c.Remove the gasket from the rack housing.
Fig. 14: Identifying Matchmarks

Courtesy of TOYOTA MOTOR SALES, U.S.A., INC.
12. REMOVE CONTROL VALVE ASSEMBLY
a.To prevent oil seal lip damage, wind vinyl tape around the serrated part of the valve shaft. b.Press out the valve assembly with the oil seal.
NOTE:
Place a shop rag between the valve housing and the blocks.
Be careful not to drop the valve assembly.
Be careful not to damage the oil seal lip.