

Selected Works
of Kevin Bainter

Kevin Bainter
Contact Information:
kevinbainter847@gmail.com (314)-803-8353
https://www.linkedin.com/in/kevinbainter
Portfolio: https://issuu.com/kevinbainter/docs/ fall_2023_portfolio
Education:
University of Kansas
Master of Architecture
School of Architecture and Design
Graduatied - May 2025
Design Build Graduate Certificate Received- May 2025
B.A. Architectural Studies
School of Architecture and Design
Minor in Slavic Language: Russian Business and Professional Culture Track Graduated- May 2024
St. Louis University High School (2016-2020)
References:
Dan Rockhill
Professor of Architecture
University of Kansas dan@rockhillandassociates.com (785)-393-0747
Kapila Silva
Professor of Architecture University of Kansas kapilads@ku.edu (785)-864-1150
Shannon Criss
Professor of Architecture University of Kansas scriss@ku.edu (785)-766-0069
I am a recent graduate of the Architecture Program at the University of Kansas who has received a Master of Architecture degree as well as a Graduate Certificate in Design Build.
Work Experience:
Insulation Leader and LEED Representative for Studio 804 (August 2024- July 2025) (Lawrence, KS)
For my graduate year at the University of Kansas, I enrolled in the Studio 804 program where a group of students under the direction of the distinguished professor, Dan Rockhill, work to design and construct a house ourselves during the duration of a school year. For my personal leadership task as insulation lead, I was in charge of insulating the whole structure and foundation of the house. As a LEED representative, my partner and I worked together to make sure we achieved a LEED Platinum house.
Architectural Intern at Crawford, Murphy, & Tilly (CMT) (May 2024-August 2024) (St. Louis, MO)
During my time in this position I worked on multiple tasks for a variety of projects. Some of these tasks include creating 3D models, drafting sections and elevations, as well as editing construction documents. Working as an architectural intern at an engineering firm was very eye-opening for me because it allowed me to work with engineers and learn from their perspectives.
Extracurriculars:
Secretary of Triangle Fraternity
I handled and organized all of the important documents of the fraternity. I also documented every meeting and created a calendar to keep members informed of important updates. This position helped me improve both my organizational skills and my team-working skills.
Risk Management of Triangle Fraternity
For this role I was tasked with identifying and minimizing the potential risks of the fraternity house and its members. I corrected irresponsible behaviors that did not comply with university and fraternal guidelines in order to create a safe environment and protect the reputation of the fraternity.
Software Skills:
Revit, Rhino, AutoCAD, SketchUp, Adobe Creative Cloud, Enscape, D5 Render, Lumion, Microsoft Office Suite
Contents: Graduate Work:

New York St. House Design Build 6-21
Undergraduate Work:
1.

US Embassy in Estonia 22-43
2.

3.
4.
The American Prison Experience 44-63

A Stop on Santa Fe 64-87
Design Build: Expanding the Parameters 88-97

Photo Credit: Corey Gaffer Photography

What is Studio 804?
Studio 804 is a unique opportunity offered to graduate level architecture students at the University of Kansas that focuses on collaborative, hands-on learning. In this program, students work together as a class to design and build a structure in the timeline of a typical school year. 804 students are involved in each step of the design and construction process. This program offers a new way of learning that differs drastically from the previous four years of education and challenges students to think in a much deeper way.
My primary lead roles in this project were Insulation Lead, and LEED Representative. However, I also was in charge of sealing all exterior penetrations, and worked on the siding team. Whenever I was not fulfilling my own roles, I assisted in other tasks. This project allowed me to experience and participate in every essential step of the project.

Project Featured in Articles: https://archello.com/project/1040-ny-house-in-east-lawrence https://www2.ljworld.com/news/ku/2025/may/15/tour-the-latest-eco-friendly-house-by-ku-architectures-studio-804-students-on-saturday/
General Overview
First Floor Plan
Courtesy of Studio 804
Second Floor Plan
Courtesy of Studio 804
Scale: 1/8”= 1’-0”
As a class, we worked together to design a two-bedroom singlefamily residence with a detached garage/ADU on a small vacant lot in the heart of Lawrence Kansas. We did our best to maximize living space in the residence while prioritizing southern exposure in order to maximize passive heat gain. This home was designed to be as energy efficient as possible in order to reduce energy costs for the homeowners, as well as to meet our LEED goals.
As a LEED Representative, I made sure that we followed all requirements and maximized the amount of points we could receive in the design phase following the LEED V 4.1 Single Family Residential Guidelines. Our goal for this house was to achieve LEED Platinum status, and we are very likely to achieve this.
Scale: 1/8”= 1’-0”


Aerial View
Photo Credit: Corey Gaffer Photography
Kitchen and Staircase
Photo Credit: Corey Gaffer Photography


ADU Photo Credit: Corey Gaffer Photography
Rear Elevation
Photo Credit: Corey Gaffer Photography
Insulation
As Insulation Lead I was in charge of the procurement and installment of all types of insulation for both the primary residence and garage/ADU. In our house we used three types of insulation:
Extruded Polystyrene or XPS Insulation is a rigid foam insulation that we used on the perimeter of the foundation of both structures. For this project we used a 2-inch product that had an R-value of 10.
For our walls and roof we are using nailbase polyiso panels that completely wrap all the sides of the building providing a continuous covered surface. These panels consist of a 7/16” OSB nailbase and 3 1/2” of polyiso foam and have an R-value of 18. In our front “bumpout” with the flat roof, we stuffed each rafter with 3 layers of 1 1/2” polyiso Insulation..
Lastly, I used an insulation blower to fill the space between each stud and rafter with cellulose insulation. The cellulose was held in place by the Intello Plus Vapor Barrier we installed on the inside of each exterior wall. We cut holes in the vapor barrier at the top of each stud bay so that the blower hose could fill up the cavities.
Foundation Insulation

For the foundation insulation, we dug down 26” around the perimeters of both structures in order to get below the frost line. We had three layers of XPS Insulation: two long strips and a shelf piece which we attached with a foam board adhesive. We then backfilled with crushed concrete and dirt to hold the insulation in place. The top layer of insulation was then covered with Hardie Board Panelling to hide the XPS.


Roof and Wall Insulation
Areas insulated with 4 1/2” Energy Shield Continuous Wall Insulation Polyiso.

East Elevation

West Elevation
South Elevation
Areas insulated with both 3 1/2” Hunter Panels Nailbase Polyiso and Green Fiber blown-in cellulose.

Roof Elevation
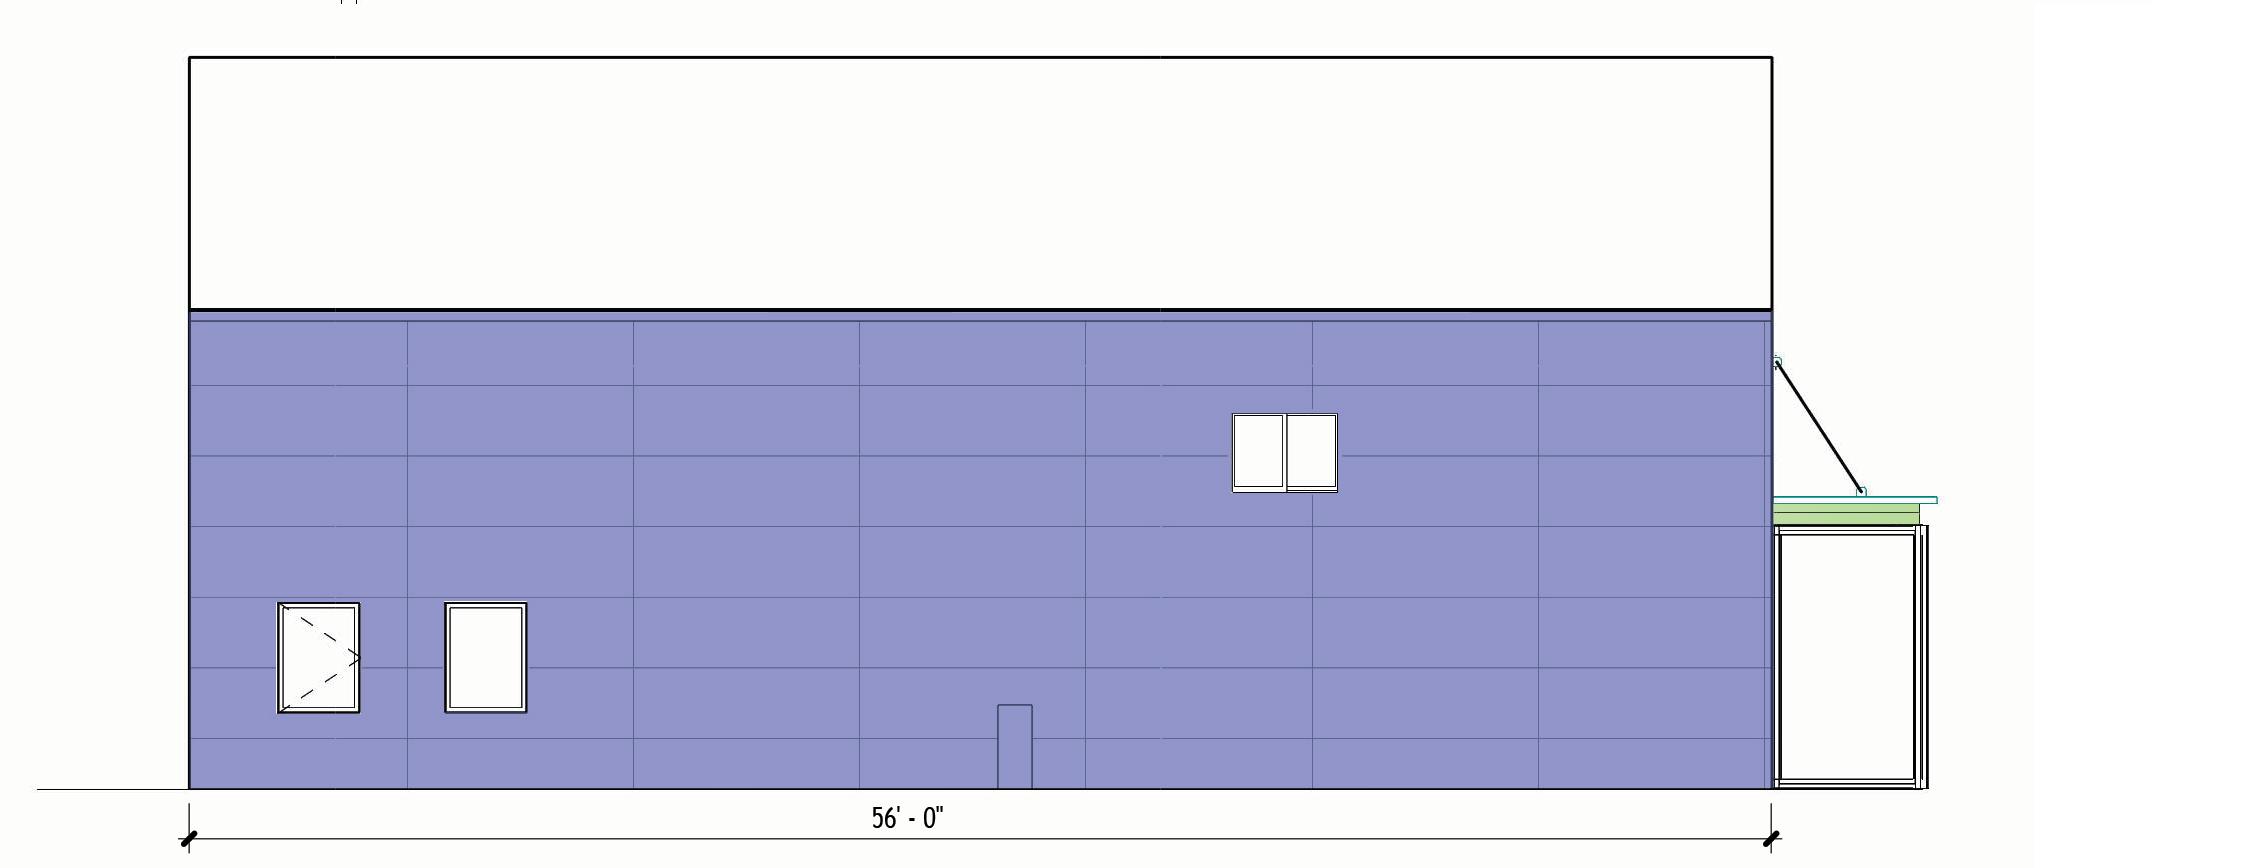
North Elevation

Roof and Wall Insulation
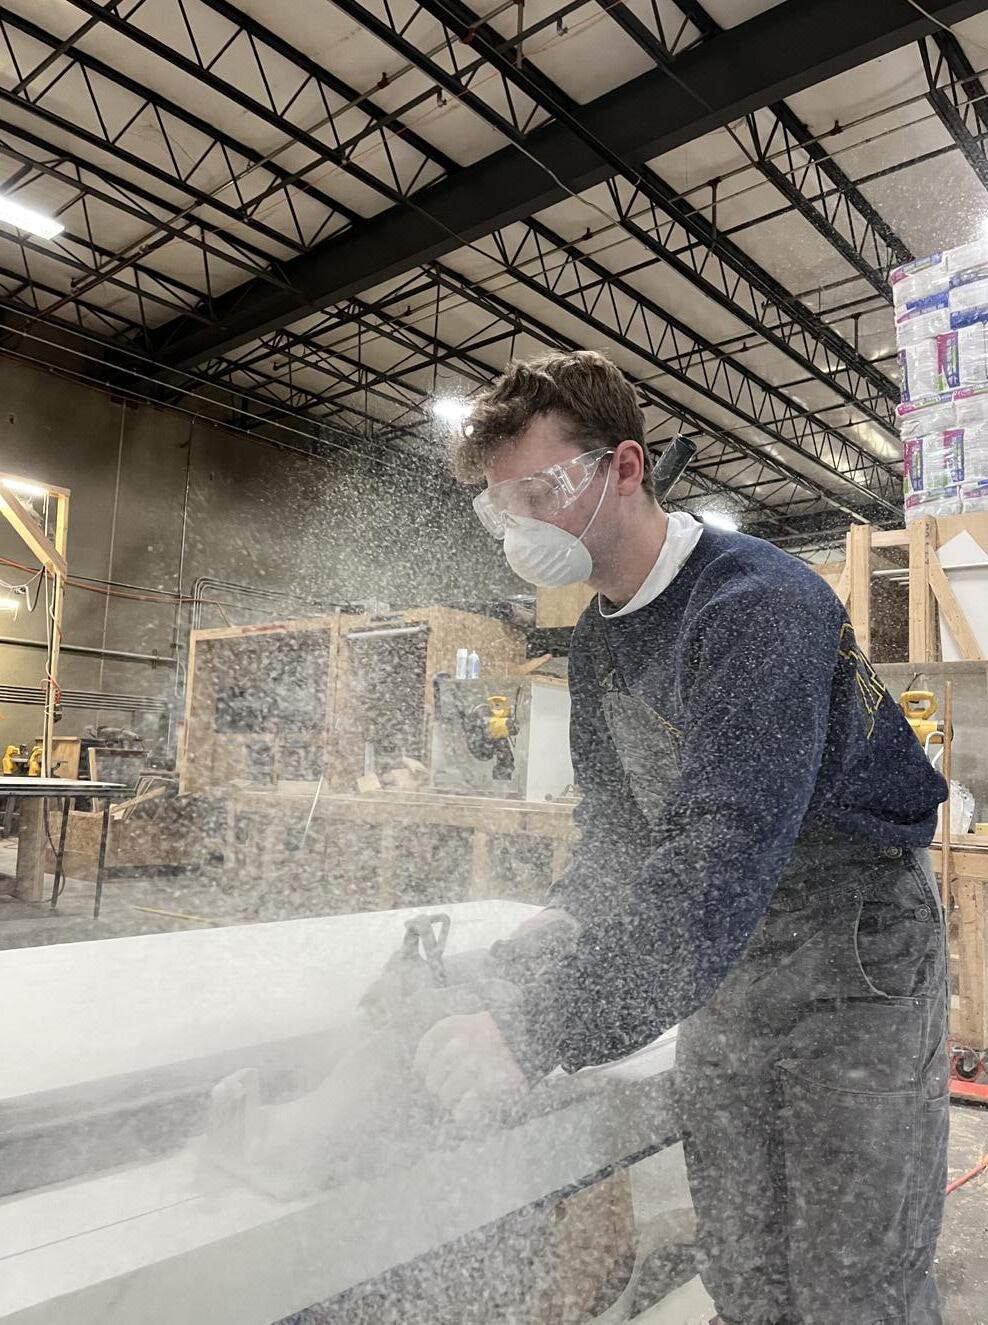


One aspect of this project which I thoroughly enjoyed was making mockups to problem solve. The mockup on the left showcases the connection between the roof and wall insulation. While this idea was slightly modified, building a mockup was extremely helpful in coming up with the finalized design.
I precut some of the panels in our warehouse with rabbet cuts for our corner pieces. The panels on the north and south walls of the structures hang over the panels on the east and west sides so I made larger cuts for those panels.
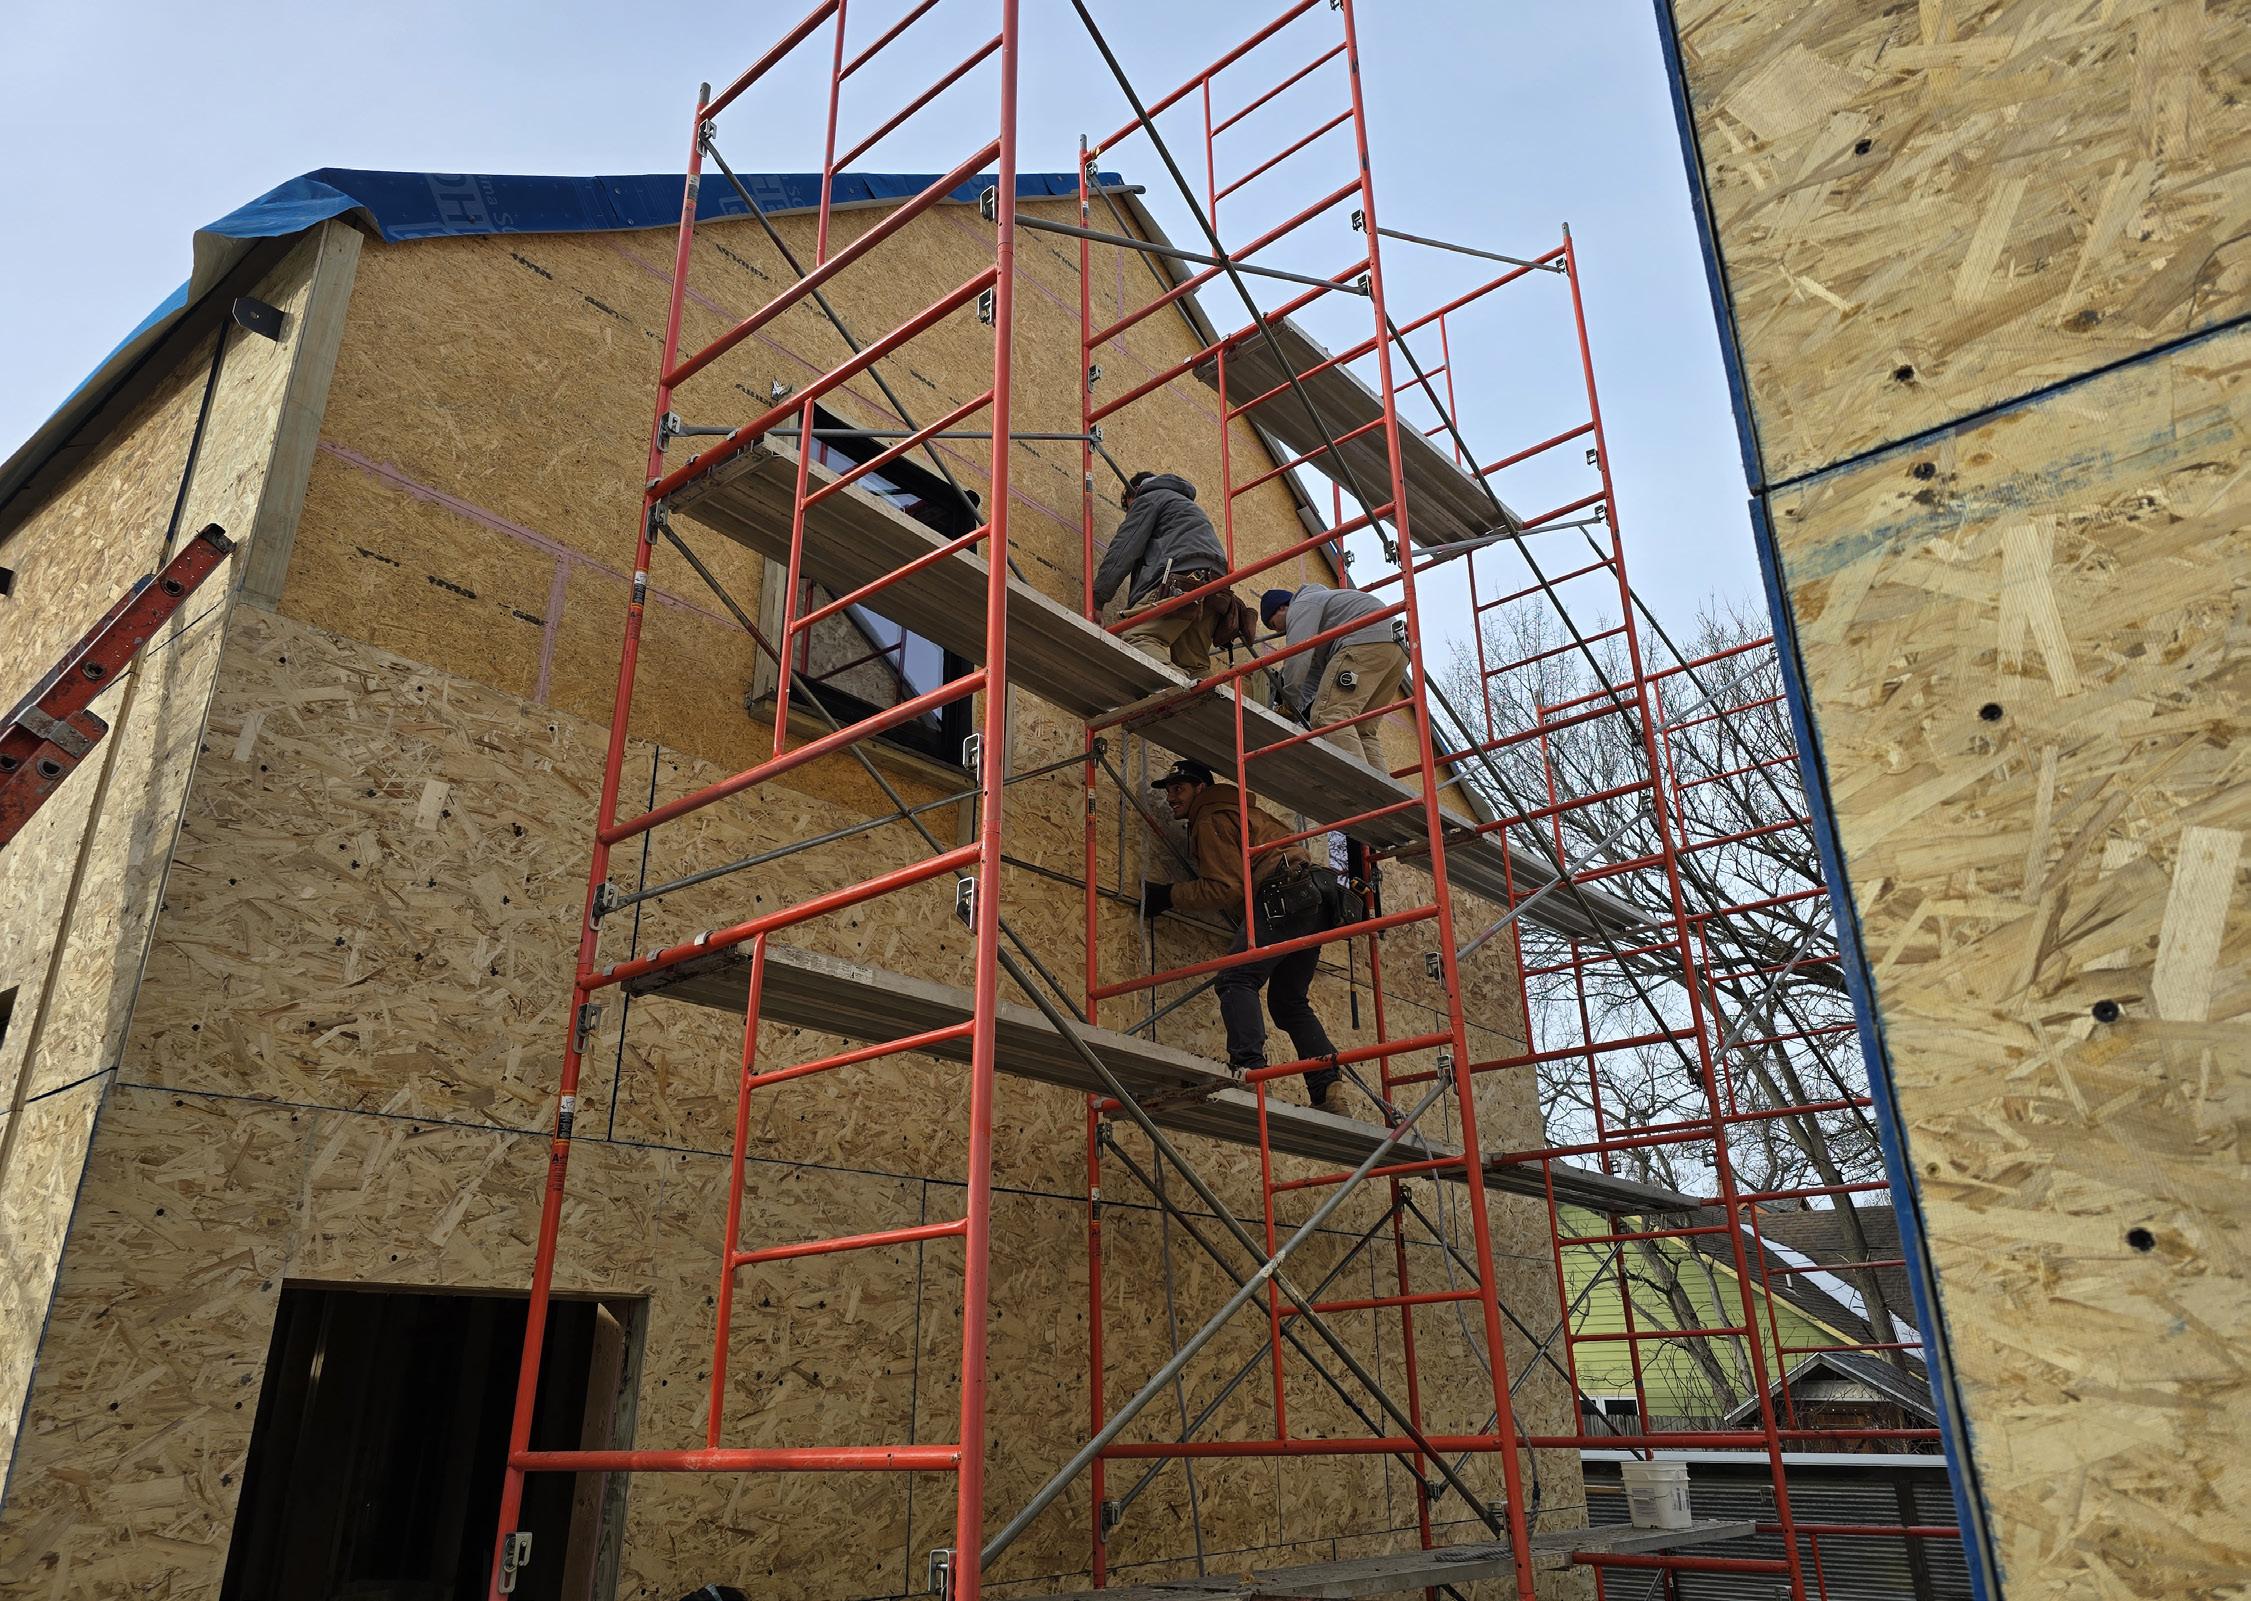
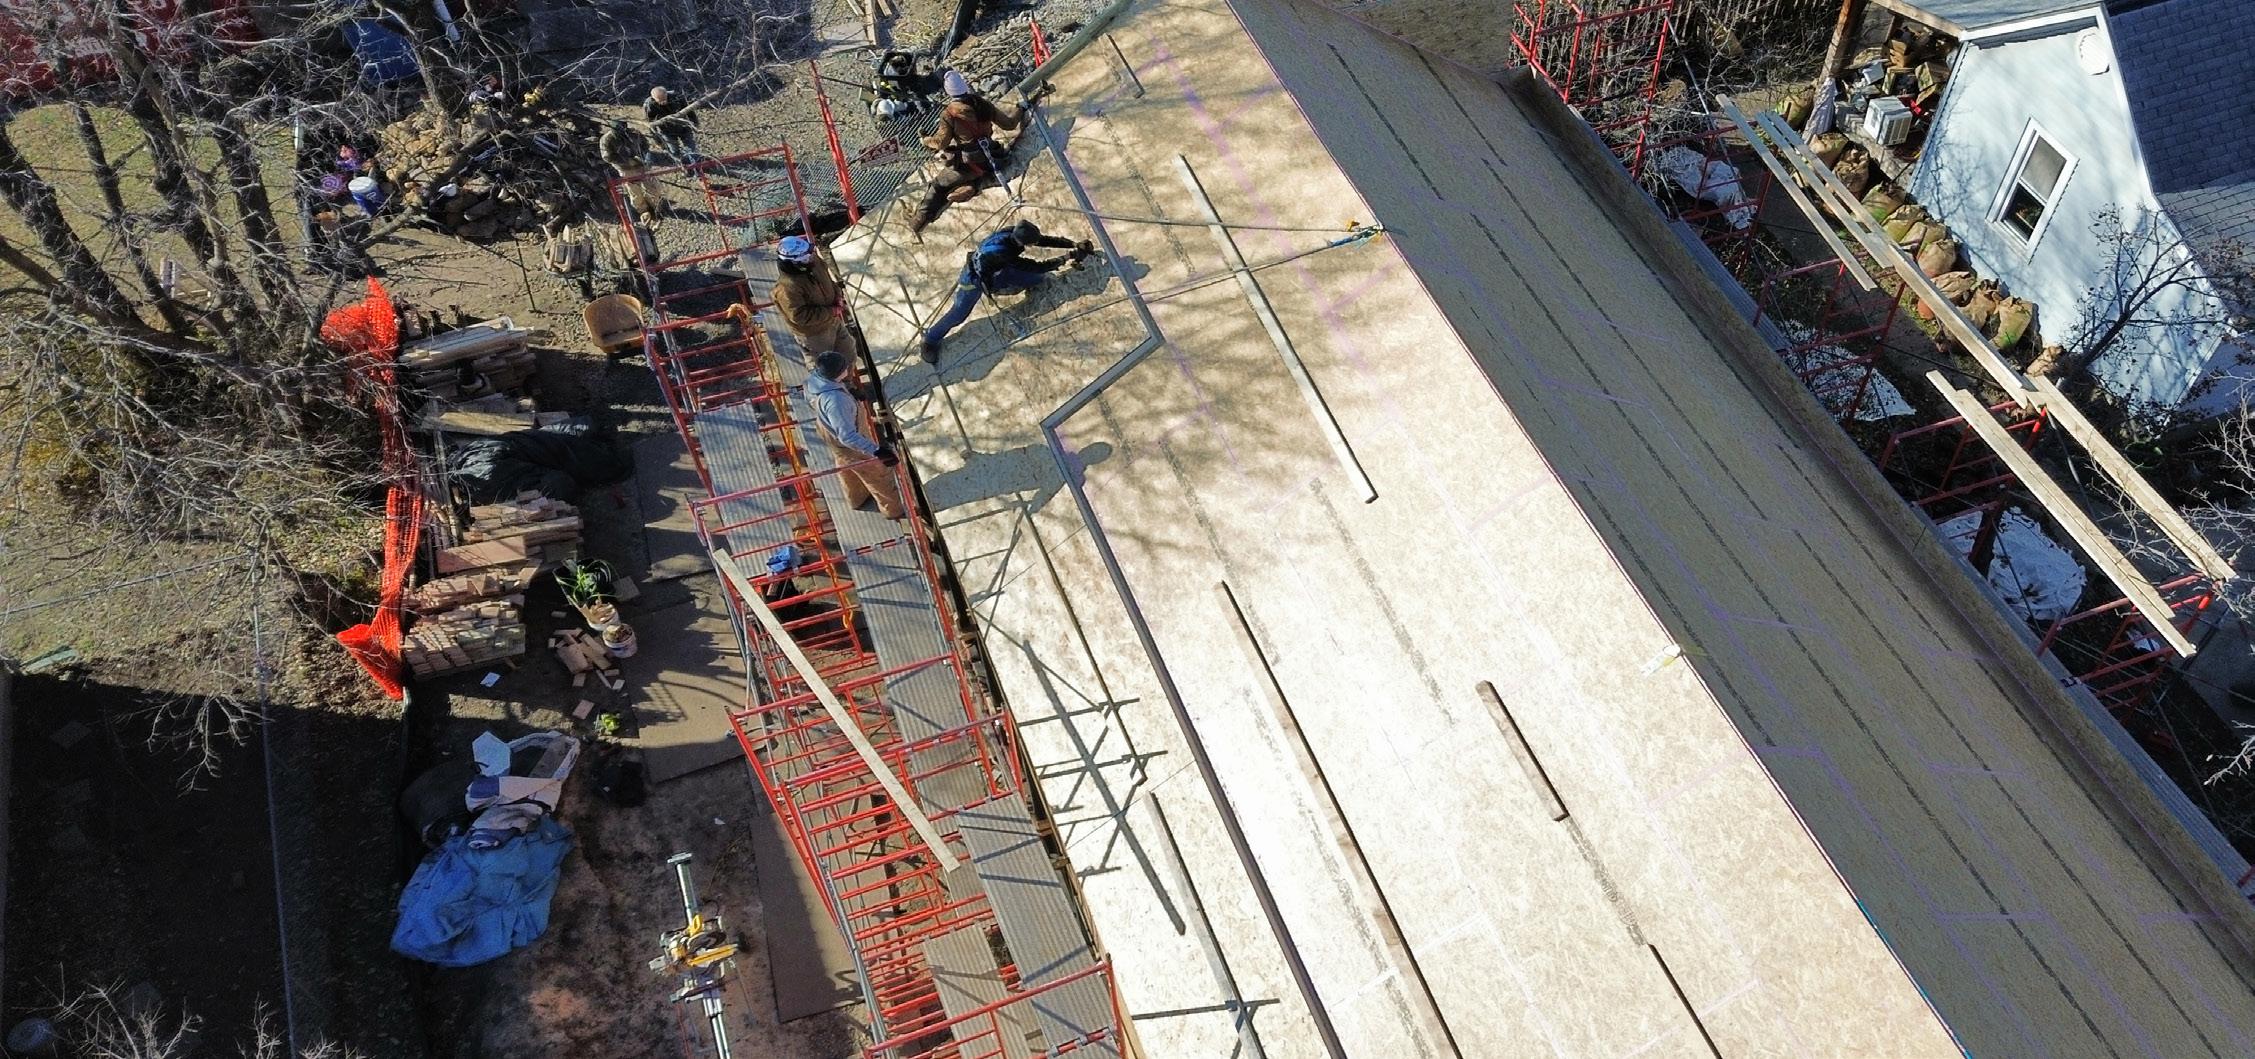
Treated 2x4s were used as nailers around door and window openings and at the corners where panels would meet and overlap.
The heavy panels were carried up the scaffolding with ropes. Multiple students held the panels in place while screwing them in with specialized insulation screws.
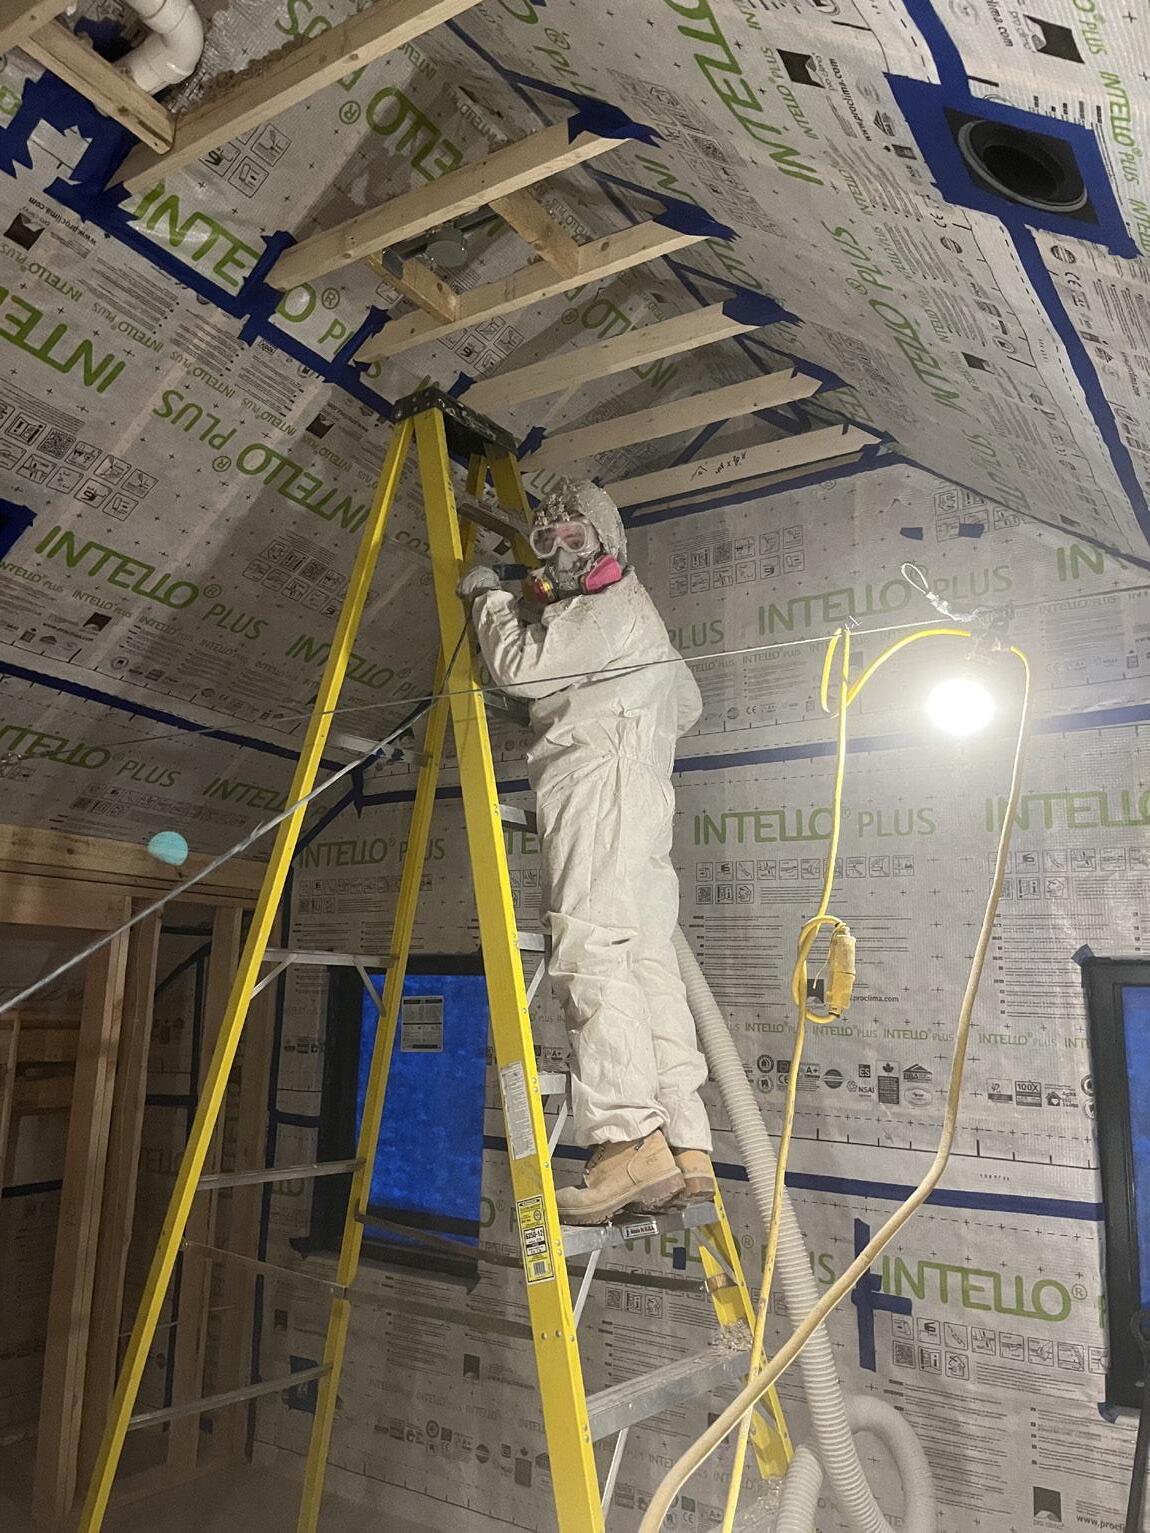

Cellulose Insulation
I used an insulation blower to fill the space between each stud and rafter with cellulose insulation. The cellulose was held in place by the Intello Plus Vapor Barrier we installed on the inside of each exterior wall. We cut holes in the vapor barrier at the top of each stud bay so that the blower hose could fill up the cavities.
KANSAS ENERGY EFFICIENCY DISCLOSURE
As required by KSA 66-1228
Kansas law requires the person building or selling a previously unoccupied new residential structure which is a single family or multifamily unit of four units or less shall disclose to the buyer or a prospective buyer, at any time upon request or prior to the signing of the contract to purchase and prior to closing if changes have occurred or are requested, information regarding the energy efficiency of the structure. For new residential structures that are completed and suitable for occupancy, but unsold, the completed disclosure form shall be made available to the buyer or a prospective buyer by the builder or seller when the residence is shown and at any other time upon request.
Common Address or Legal Description of Residence:
1040 New York Street, Lawrence, KS 66044
To be determined by Title Company
Part 1: Builder must describe the following energy efficiency elements of this house:
Foundation Insulation R-Value
Slab-on-Grade R-10, 2 ft depth R-10, 2 ft depth
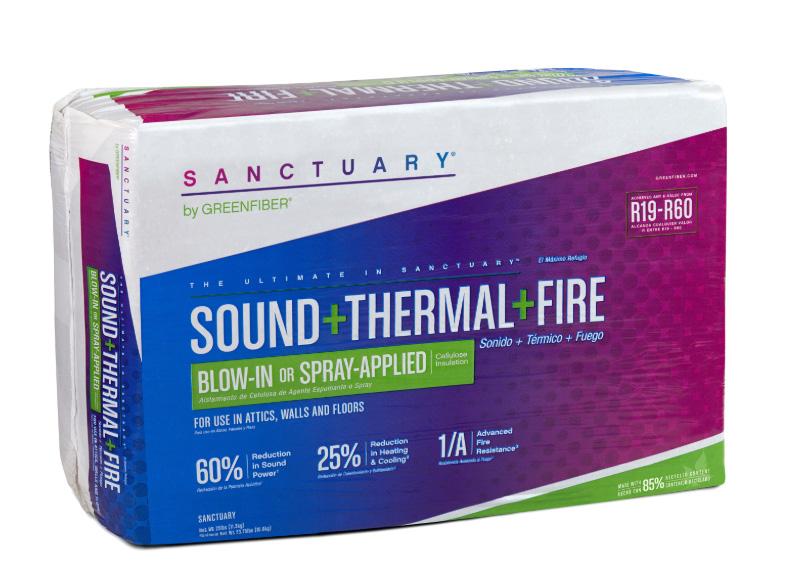
The combination of the nailbase polyiso insulation and the cellulose packed tightly in between each exterior 2x6 stud allowed us to achieve an Wall Insulation R-Value of 39.96, which dwarfs the city’s requirement of R-13. Due to the 2x12 structure of the roof, we were able to achieve an Attic Insulation R-value of 60.96 which greatly exceeds the city requirement of R-38.
This residence has been/will be built to meet the energy-efficiency standards of the International Energy Conservation Code of 2006
This residence has received a Home Energy Rating (HERS) index score of 100 or less based on an energy audit performed in accordance with the Mortgage Industry National Home Energy Rating Systems Standards (July 1, 2006) by a rater certified by
The product we used was made up of 85% recycled paper content which allowed us to apply it towards a LEED credit.
This residence is an Energy Star Qualified Home and has been verified and field tested in accordance with RESNET standards by a
Seller Signature: Date:
Seller Name and Address:
Buyer Signature:
Buyer Signature:
LEED
As a LEED Representative, my partner and I worked with our classmates on each stage of the project, making sure to document each point we would receive. I also worked with a Green Rater throughout the project who would perform multliple tests and inspections including a Blower Door Test, Static Pressure Test, Insulation Inspection and more.
At the end of the project, my partner and I compiled a large document consisting of all the documentation for each point and requirement for our Green Rater to use to get LEED Platinum Certification from the USGBC.

I was also responsible for construction activity pollution prevention.

As a LEED Representative, I was responsible for weighing our daily construction waste.
I also worked to separate and reuse recyclable materials to reduce our total waste.


This
Additional Tasks
Siding Crew


My job on the siding crew was to install hat channels on all the exterior walls of both structures to create a level surface for our exterior siding panels to attach. The siding for this project was a very light-weight aluminum composite material that was easy to screw into the hat channels after the holes were pre-drilled. Due to the inconsistencies of the walls, each channel had to be shimmed out a different amount so that every hat channel was independently level, level with the channels next to it, as well as level with the channels above and below it.
Sealing Penetrations

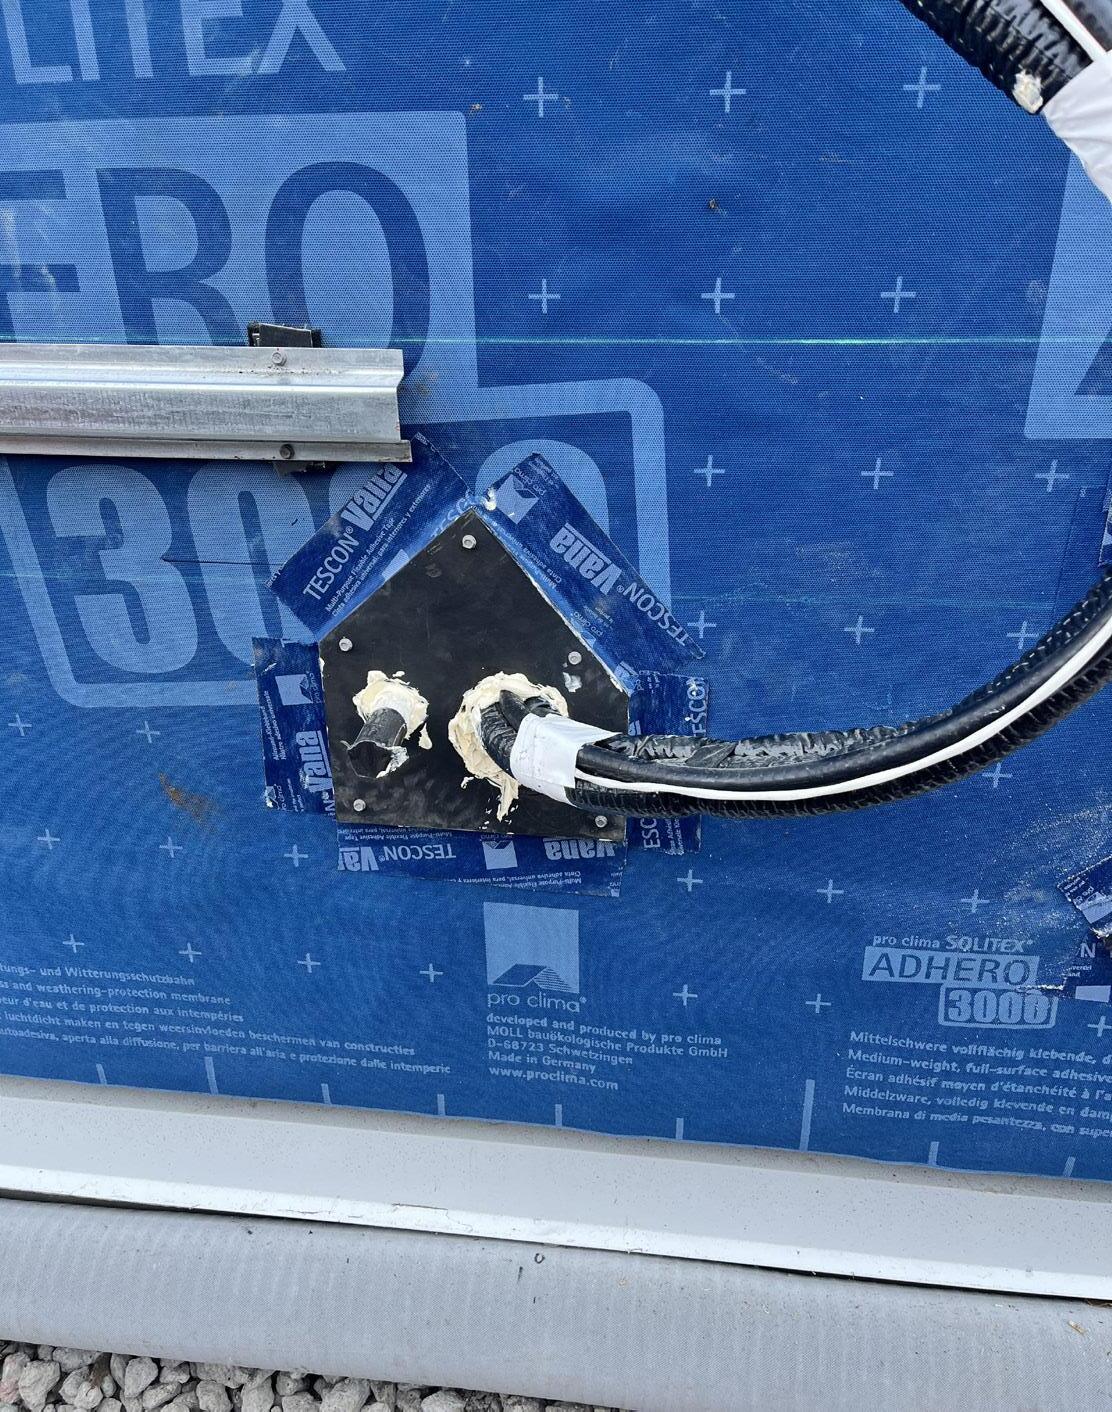
I was also in charge of finding and sealing all penetrations on both structures. In order to seal the penetrations behind the rainscreen, I created doghouses using Richlite, a durable material consisting of resin and recycled paper. After fitting the doghouse around the penetration and screwing it in, I would caulk around both the outside of the doghouse as well as the inside. I then applied strips of WRB tape on the outside of the doghouse for extra protection.

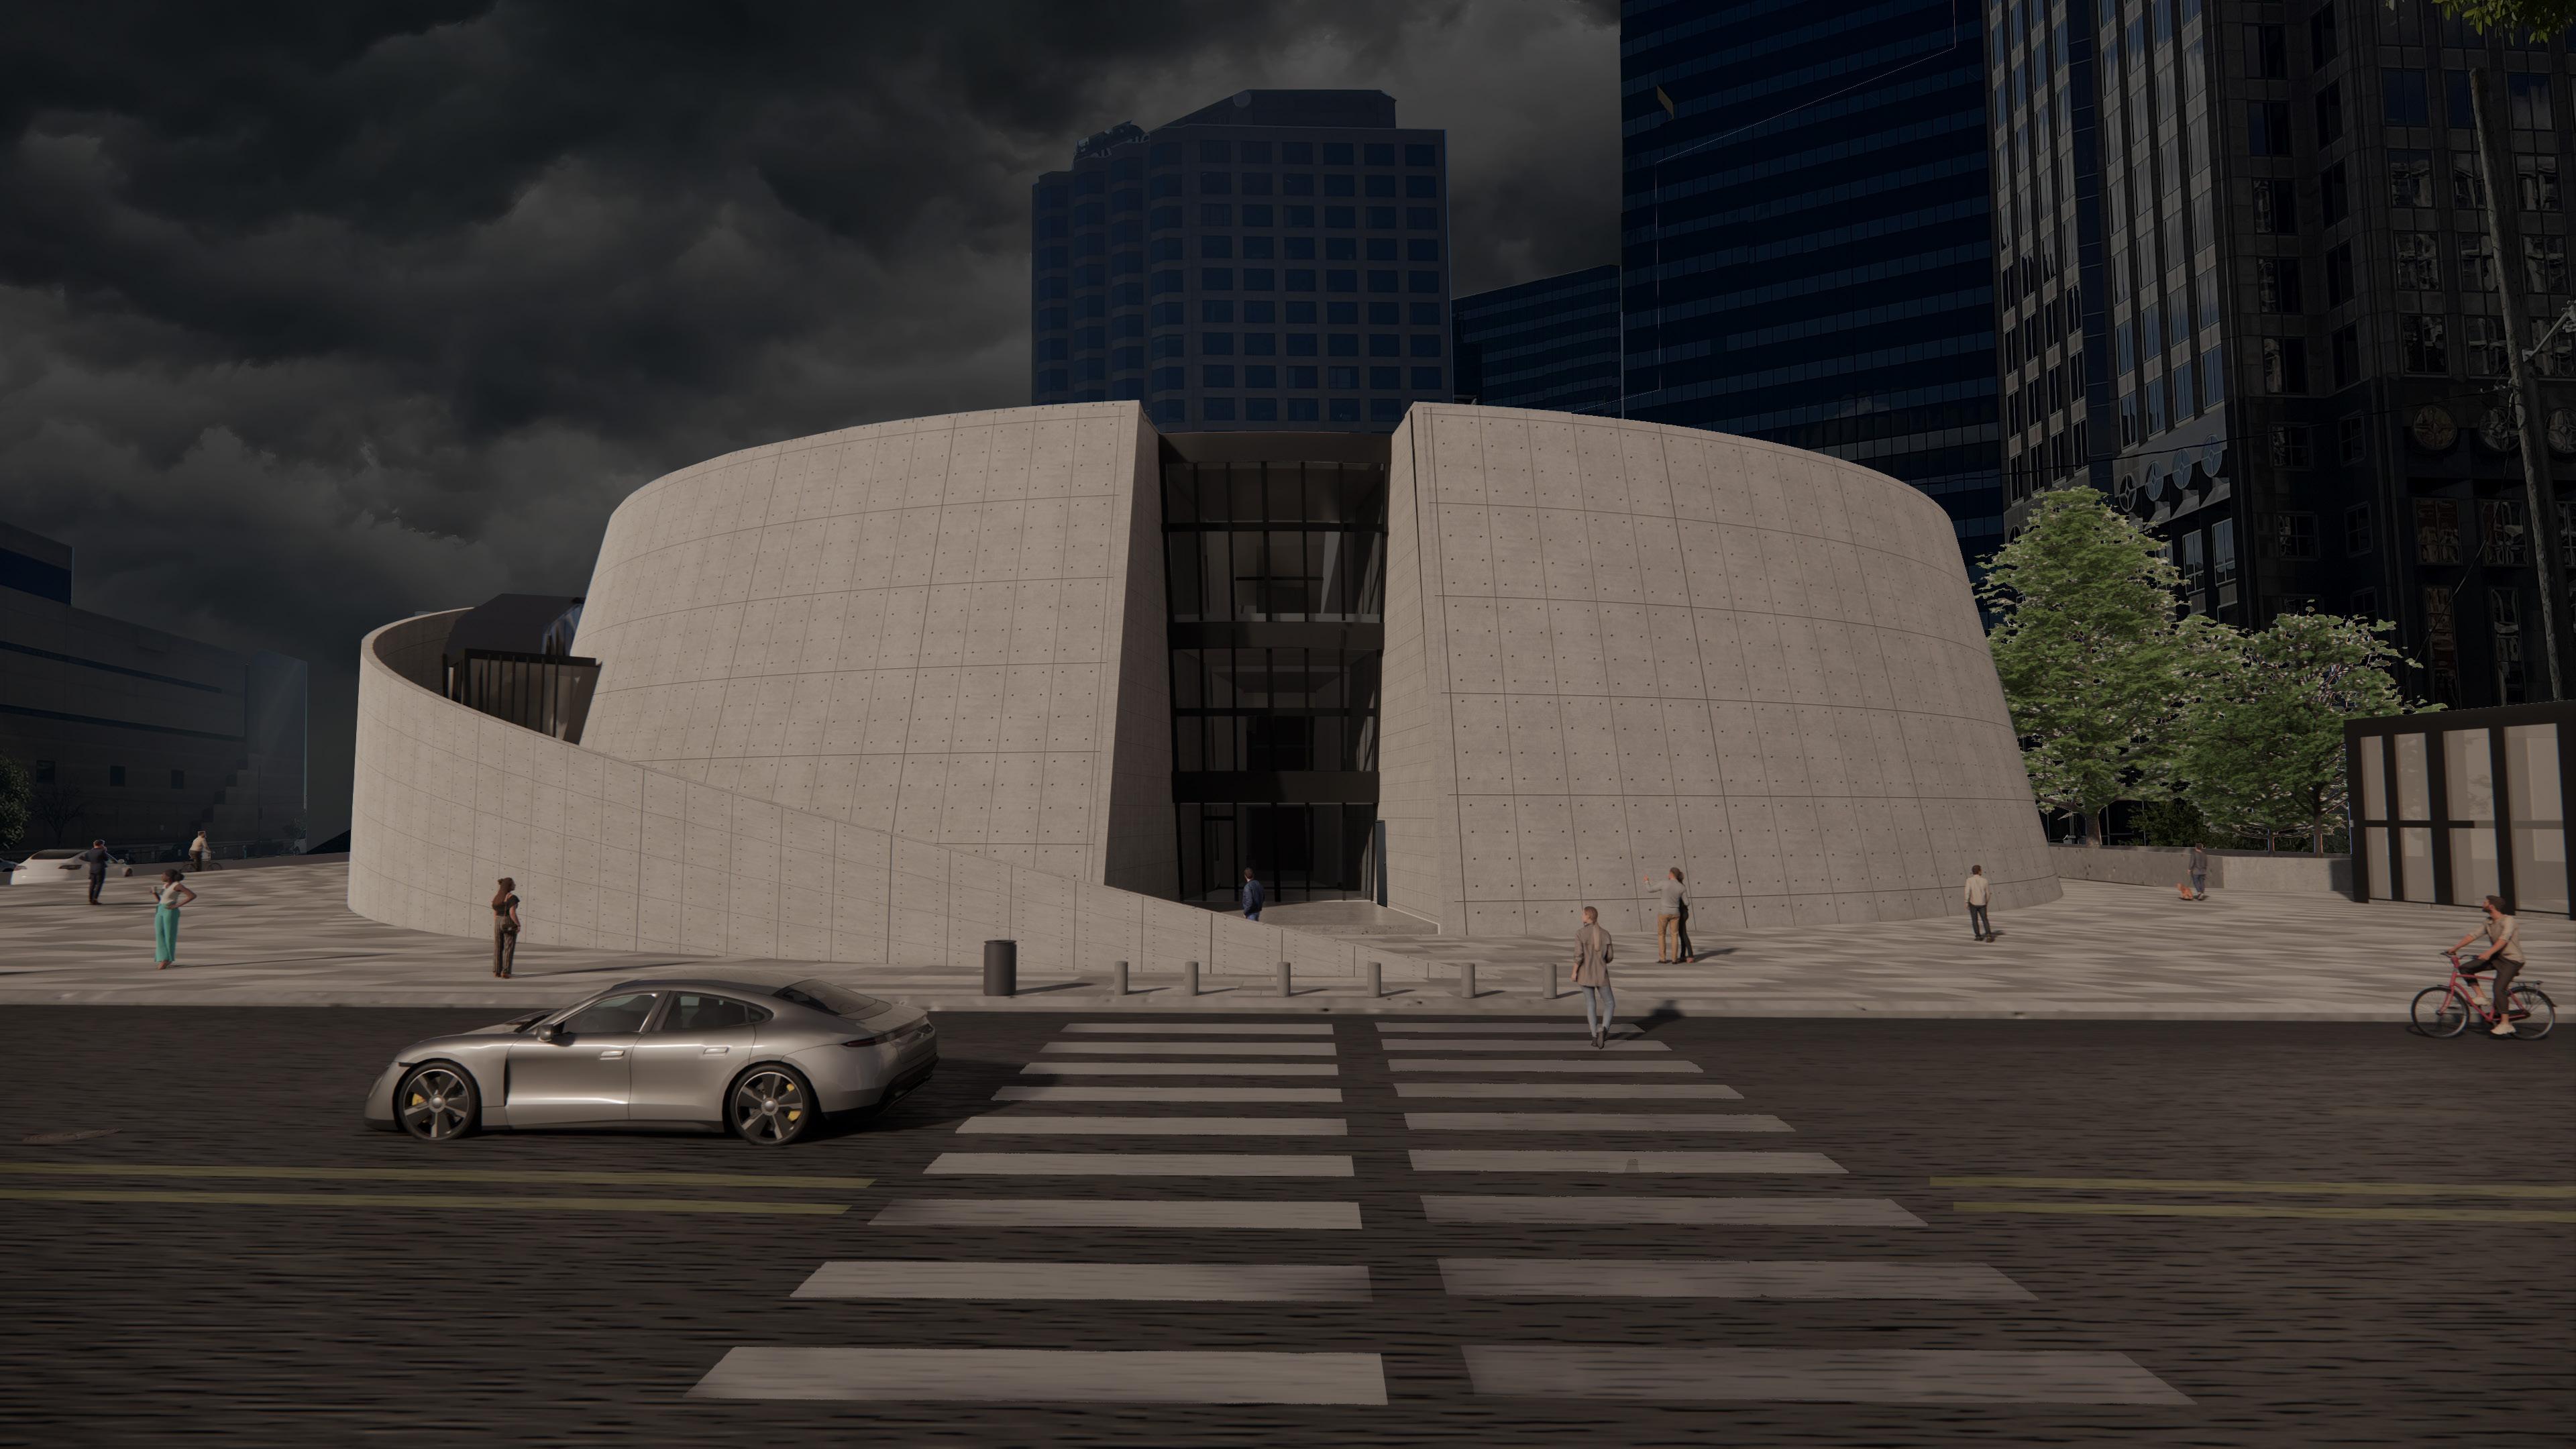
Tallinn, Estonia 10111
Arch 609 | Spring 2024
Developed with Lin Jaw

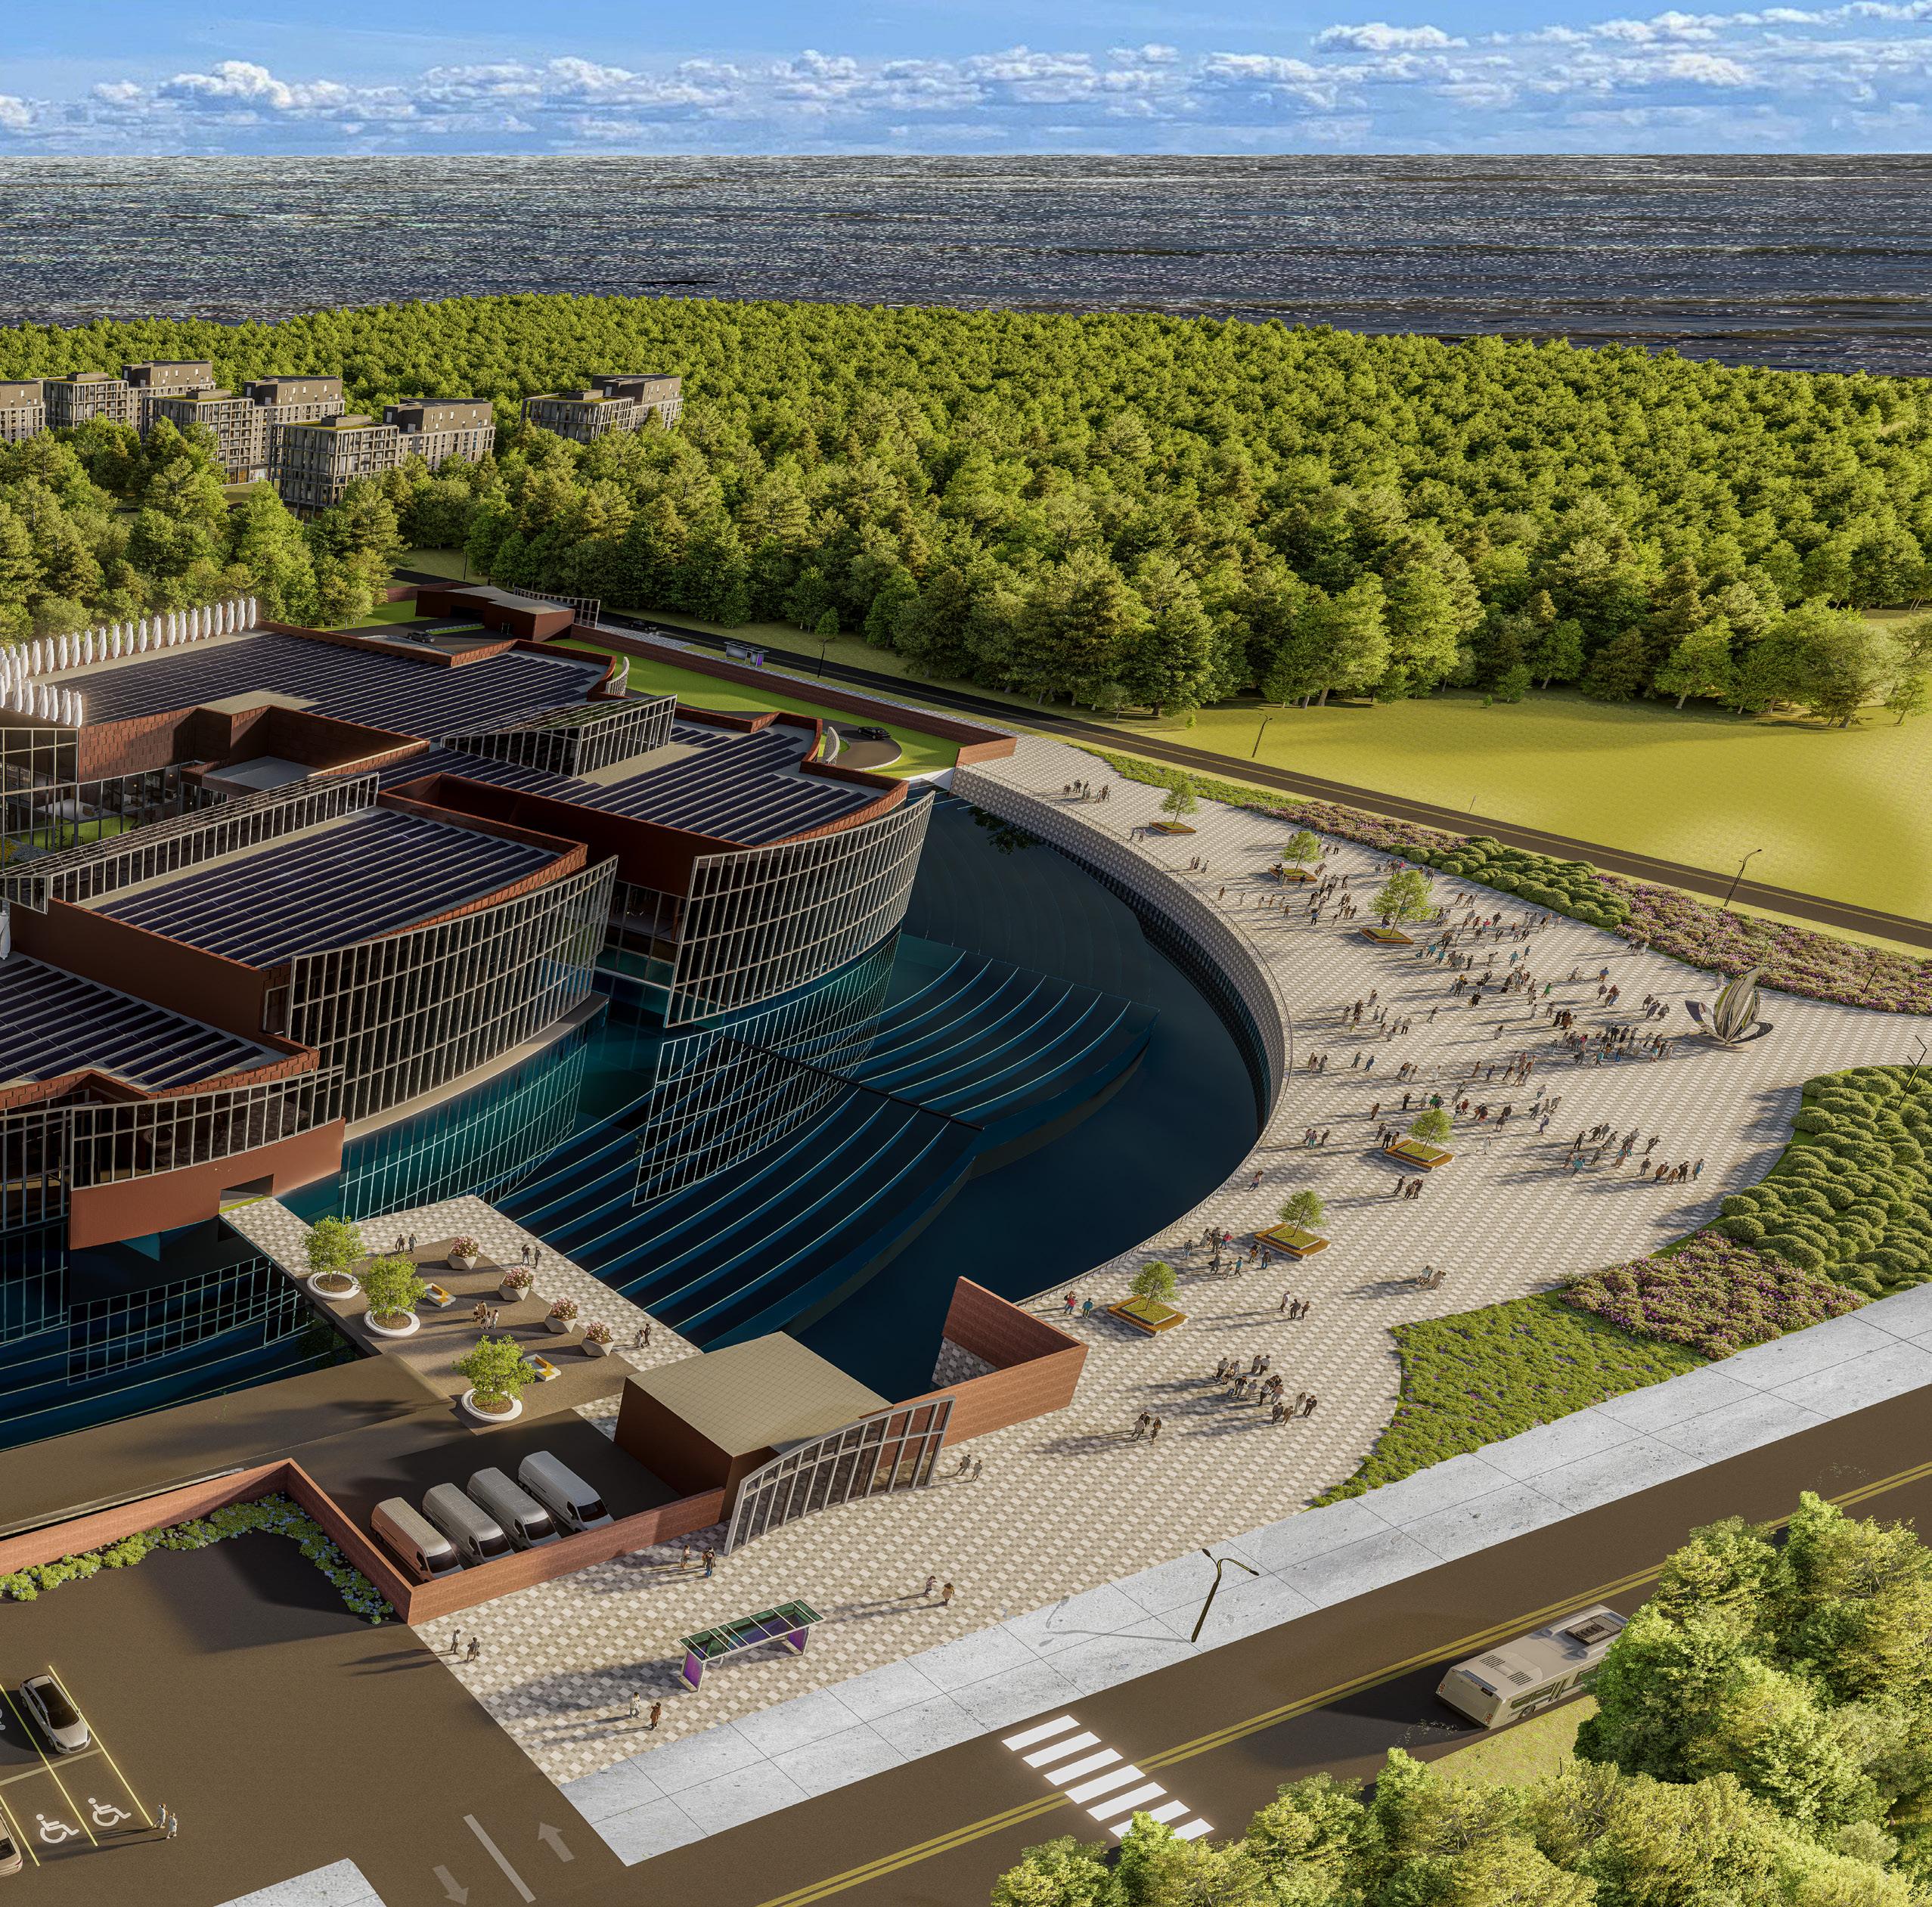
Inspired by the elements of a traditional Estonian canoe, this embassy seeks to provide a welcoming and respectful space to strengthen the reslationship between the United States and Estonia. Despite being designed following the Bureau of Overseas Building Operations’ (OBO) strict secuirty measurures, the embassy evokes a feeling of openess between the Estonian people and the US officials through its inviting courtyard and hidden security features. The whole campus is designed to be secure and self sufficient with a net-zero design.


The design of this embassy campus was heavily inspired by a traditional Estonian canoe. The more restrictive chancery and the more publicly accessible consulate are separated from the public plaza by a hidden “Ha-Ha” wall disguised by the prominent water feature. The bright blue line wrapping around the structure represents the 100’ setback from the wall which is guarded on three sides by outposts.
0’
’

1. Executive Entrance by Lin Jaw
1.

2. Atrium Art Gallery
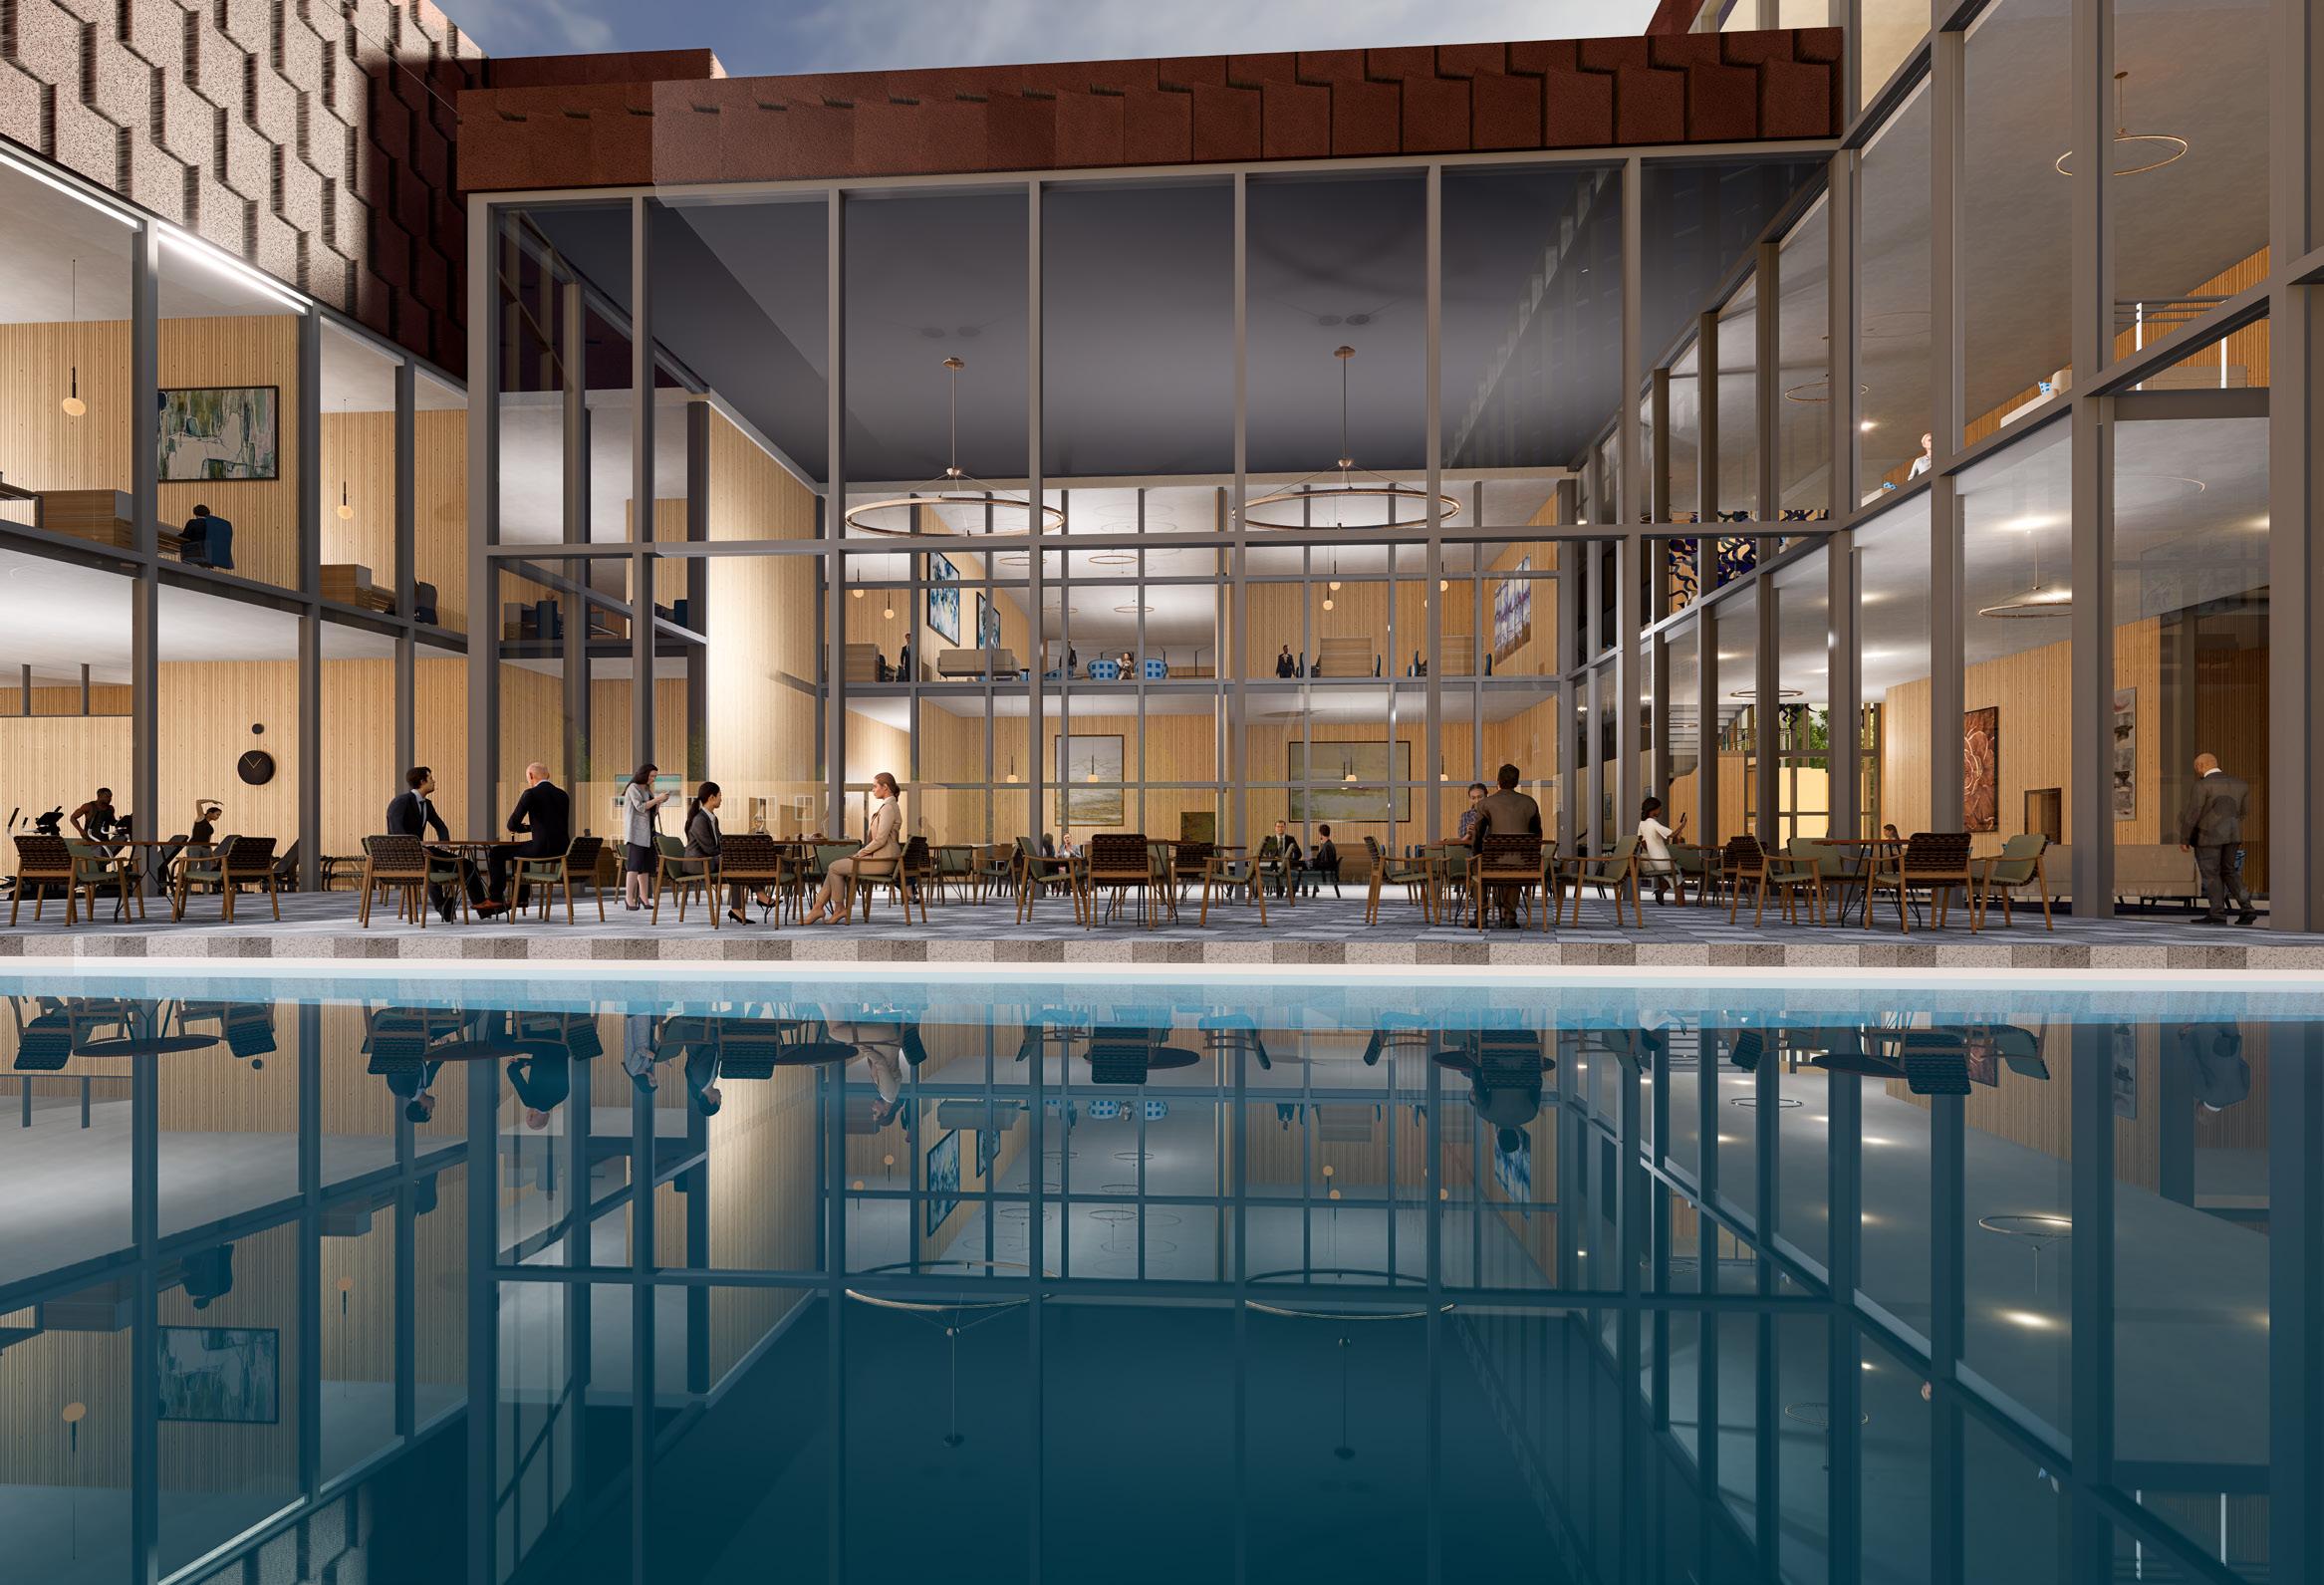
3. Outdoor Patio looking into Cafeteria
4.

4. Cafeteria


Consular Entrance by Lin Jaw
Second Floor Hallway


Publicly Accessible Area
General Work Area
Medium Secuirity Area
High Secuirity Area
Maximum Secuirity Area

Ground Level Plan Designed with Lin Jaw
Second Floor Plan Designed with Lin Jaw
US Embassy in Estonia
0’ 25’ 75’
Third Floor Plan Designed with Lin Jaw
2”
8”
5/8”

Structure

The structure of the embassy was designed to withstand attacks with features such as 2” thick bullet-proof glass and ultra high performance concrete.


Sustainability
Sustainability is one of the main design features that the US government heavily emphasizes with their embassy designs. Not only does a sustainable design set a precedent for innovation, it also is a necessity that an embassy complex be self-sustaining for defense purposes.
One sustainable feature implemented in this design is the use of geothermal energy too heat not only the building as well as the water feature in front. Since temperatures in Tallinn get very low in winter, this feature is essential for the continuous operation of the embassy.
Wind turbines wrap the perimeter of the structure to harness the power of the strong Estonian winds while solar panels line most of the roof’s area. The solar fritted glass facade also works to capture the energy of the sun. In the winter, our site can receive as little as three hours of sunlight per day so it is vital to store all of the solar energy captured in the summer.
One other feature is the use of fiber optic cables that capture daylight and distribute it into darker parts of the building. This will save on the costs for artificial lighting.
Callout A 3/16”= 1’-0”
Callout C 3/16”= 1’-0”
Callout B 3/16”= 1’-0”
Callout D 3/16”= 1’-0”
Callout E 3/16”= 1’-0”
Callout F 3/16”= 1’-0”
Callout G 3/16”= 1’-0”
Detail F1 3/16”= 1’-0”
Detail G1 3/16”= 1’-0”
Detail F2 3/16”= 1’-0”
Callout H 3/16”= 1’-0”
Wall Section 2 by Lin Jaw
Detail H1 3/16”= 1’-0”
Detail H2 3/16”= 1’-0”


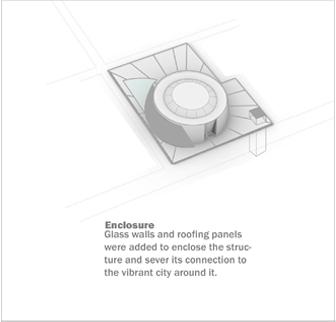
The American Prison Experience Museum exists to educate visitors on the faults and corrupted history of the American Prison System as well as inspire hope for reformation. The overall experience of the museum seeks to imitate a journey through prison in which one feels trapped in an overbearing maze of fear and hopelessness before miraculously crossing over into redemption. The final conclusion seeks to provoke ideas for a renewed penal system in the minds of the visitors.


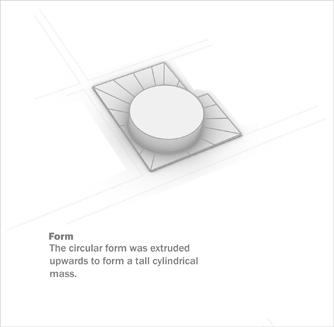




The American Prison Experience
The Site
This museum is situated in an urban arts district, surrounded by theaters, museums, and a sculpture walk. The American Prison Experience rests at the end of the sculpture, serving as an art piece by itself.

Front Perspective View
This view illustrates the structure on its prominent site in the heart of Downtown Dallas. The site includes a public plaza as well as reflective gardens and an entrance structure for the automated parking garage below grade.




The Lobby
This space serves as both the entry and exit point in this journey through trials and redemption.

The

The Cells
These galleries immerse the visitors in the lives of prisoners as they are informed of the history and current injustices of the United States Penal System.

The Eye
In this space, visitors cross over from the series of “depressing” galleries into the uplifting redemption galleries. This level acts as a turning point in the journey where guests have the opportunity to look back at the trials of the past and look forward to the hopes of the future.

The Redemption Galleries
The purpose of these inspiring galleries is to provoke a desire for change in the minds of the visitors. This light-filled space heavily contrasts the dark, gloomy galleries at the beginning of the journey.

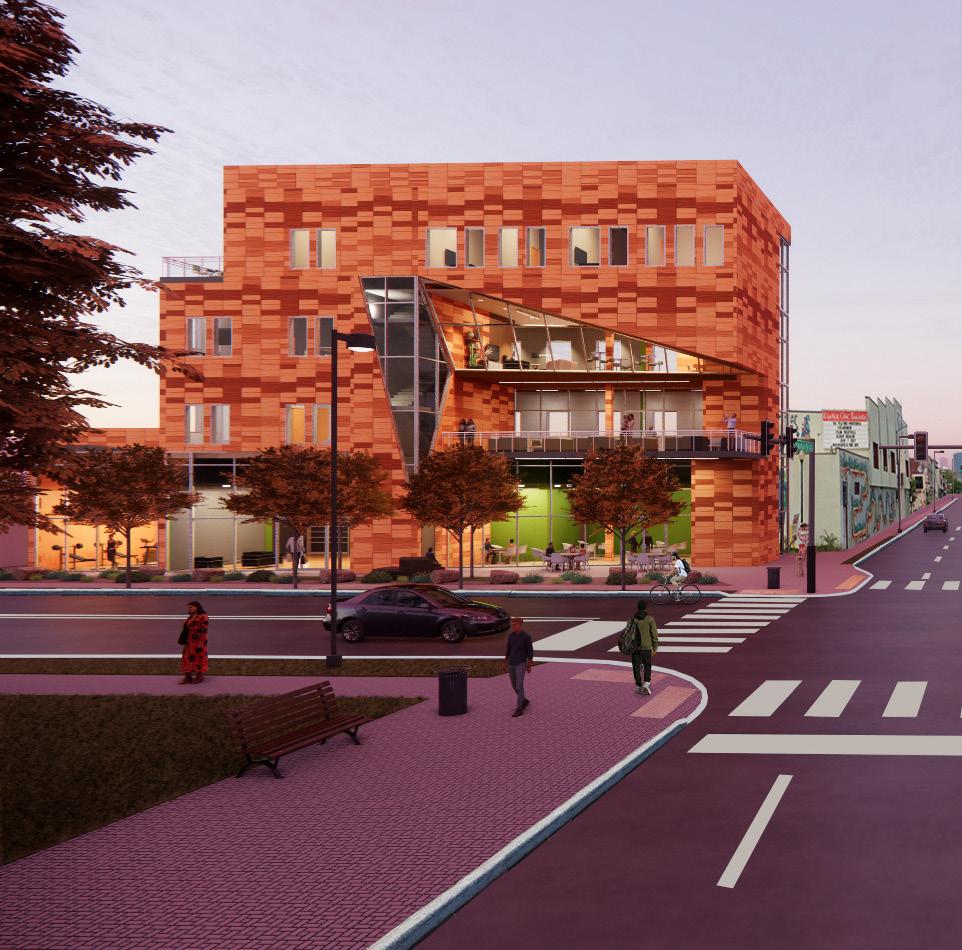

A Stop on Santa Fe serves as a mixed-use development at the gateway of the vibrant Santa Fe Arts District directly south of Downtown Denver. The two structures that comprise the development took heavy inspiration from the nearby Red Rocks Park as well as the colorful existing buildings which make up the historically Latino neighborhood.
A Stop on Santa Fe seeks to honor the existing culture of the neighborhood as well as contribute an excess of public space to engage the community. Research and form development was done in collaboration with Lin Jaw.

A Stop on Santa Fe
Bulk Plane Zoning Diagram
In the first stage of this project, my partner and I heavily researched the demographics, transportation systems, zoning, and codes of both Denver and the La Alma neighborhood, where the Santa Fe Arts District is located. This research not only taught us the constraints of our buildings, but also highlighted issues outside of our immediate site that we felt necessary to address. Our primary concern was the lack of pedestrian safety on Santa Fe Drive. Santa Fe Drive is a one-way street with three lanes of vehicular traffic. Due to poor zoning, sidewalk widths typically vary from 3’-6’.


Bus Routes
Bus routes 1 and 9 run adjacent to the sites connecting the Santa Fe Arts District to the Central Business District and other Denver neighborhoods. Both routes have stops within immediate walking distance of the planned builidings.


Shelter Public Space
The primary goal of A Stop on Santa Fe is to act as a safe “stop” on the journey of both pedestrians and residents. Inspired by the comforting form of the Colorado Red Rocks, these structures form a protective barrier between the vehicular traffic and community space using both natural and man-made elements.
The cohesive form of the structures is highlighted by the multiple angles of the design that carry over both buildings.


1. Massing the Form 2. Layering the 4.
the Natural Layers Connect the Natural and Built
Extruding


Connecting the Ideas
A Stop on Santa Fe

In this phase, my partner and I combined our concepts with the zoning restrictions to create an evolving form. After achieving the form below, we parted ways to develop our designs independently.
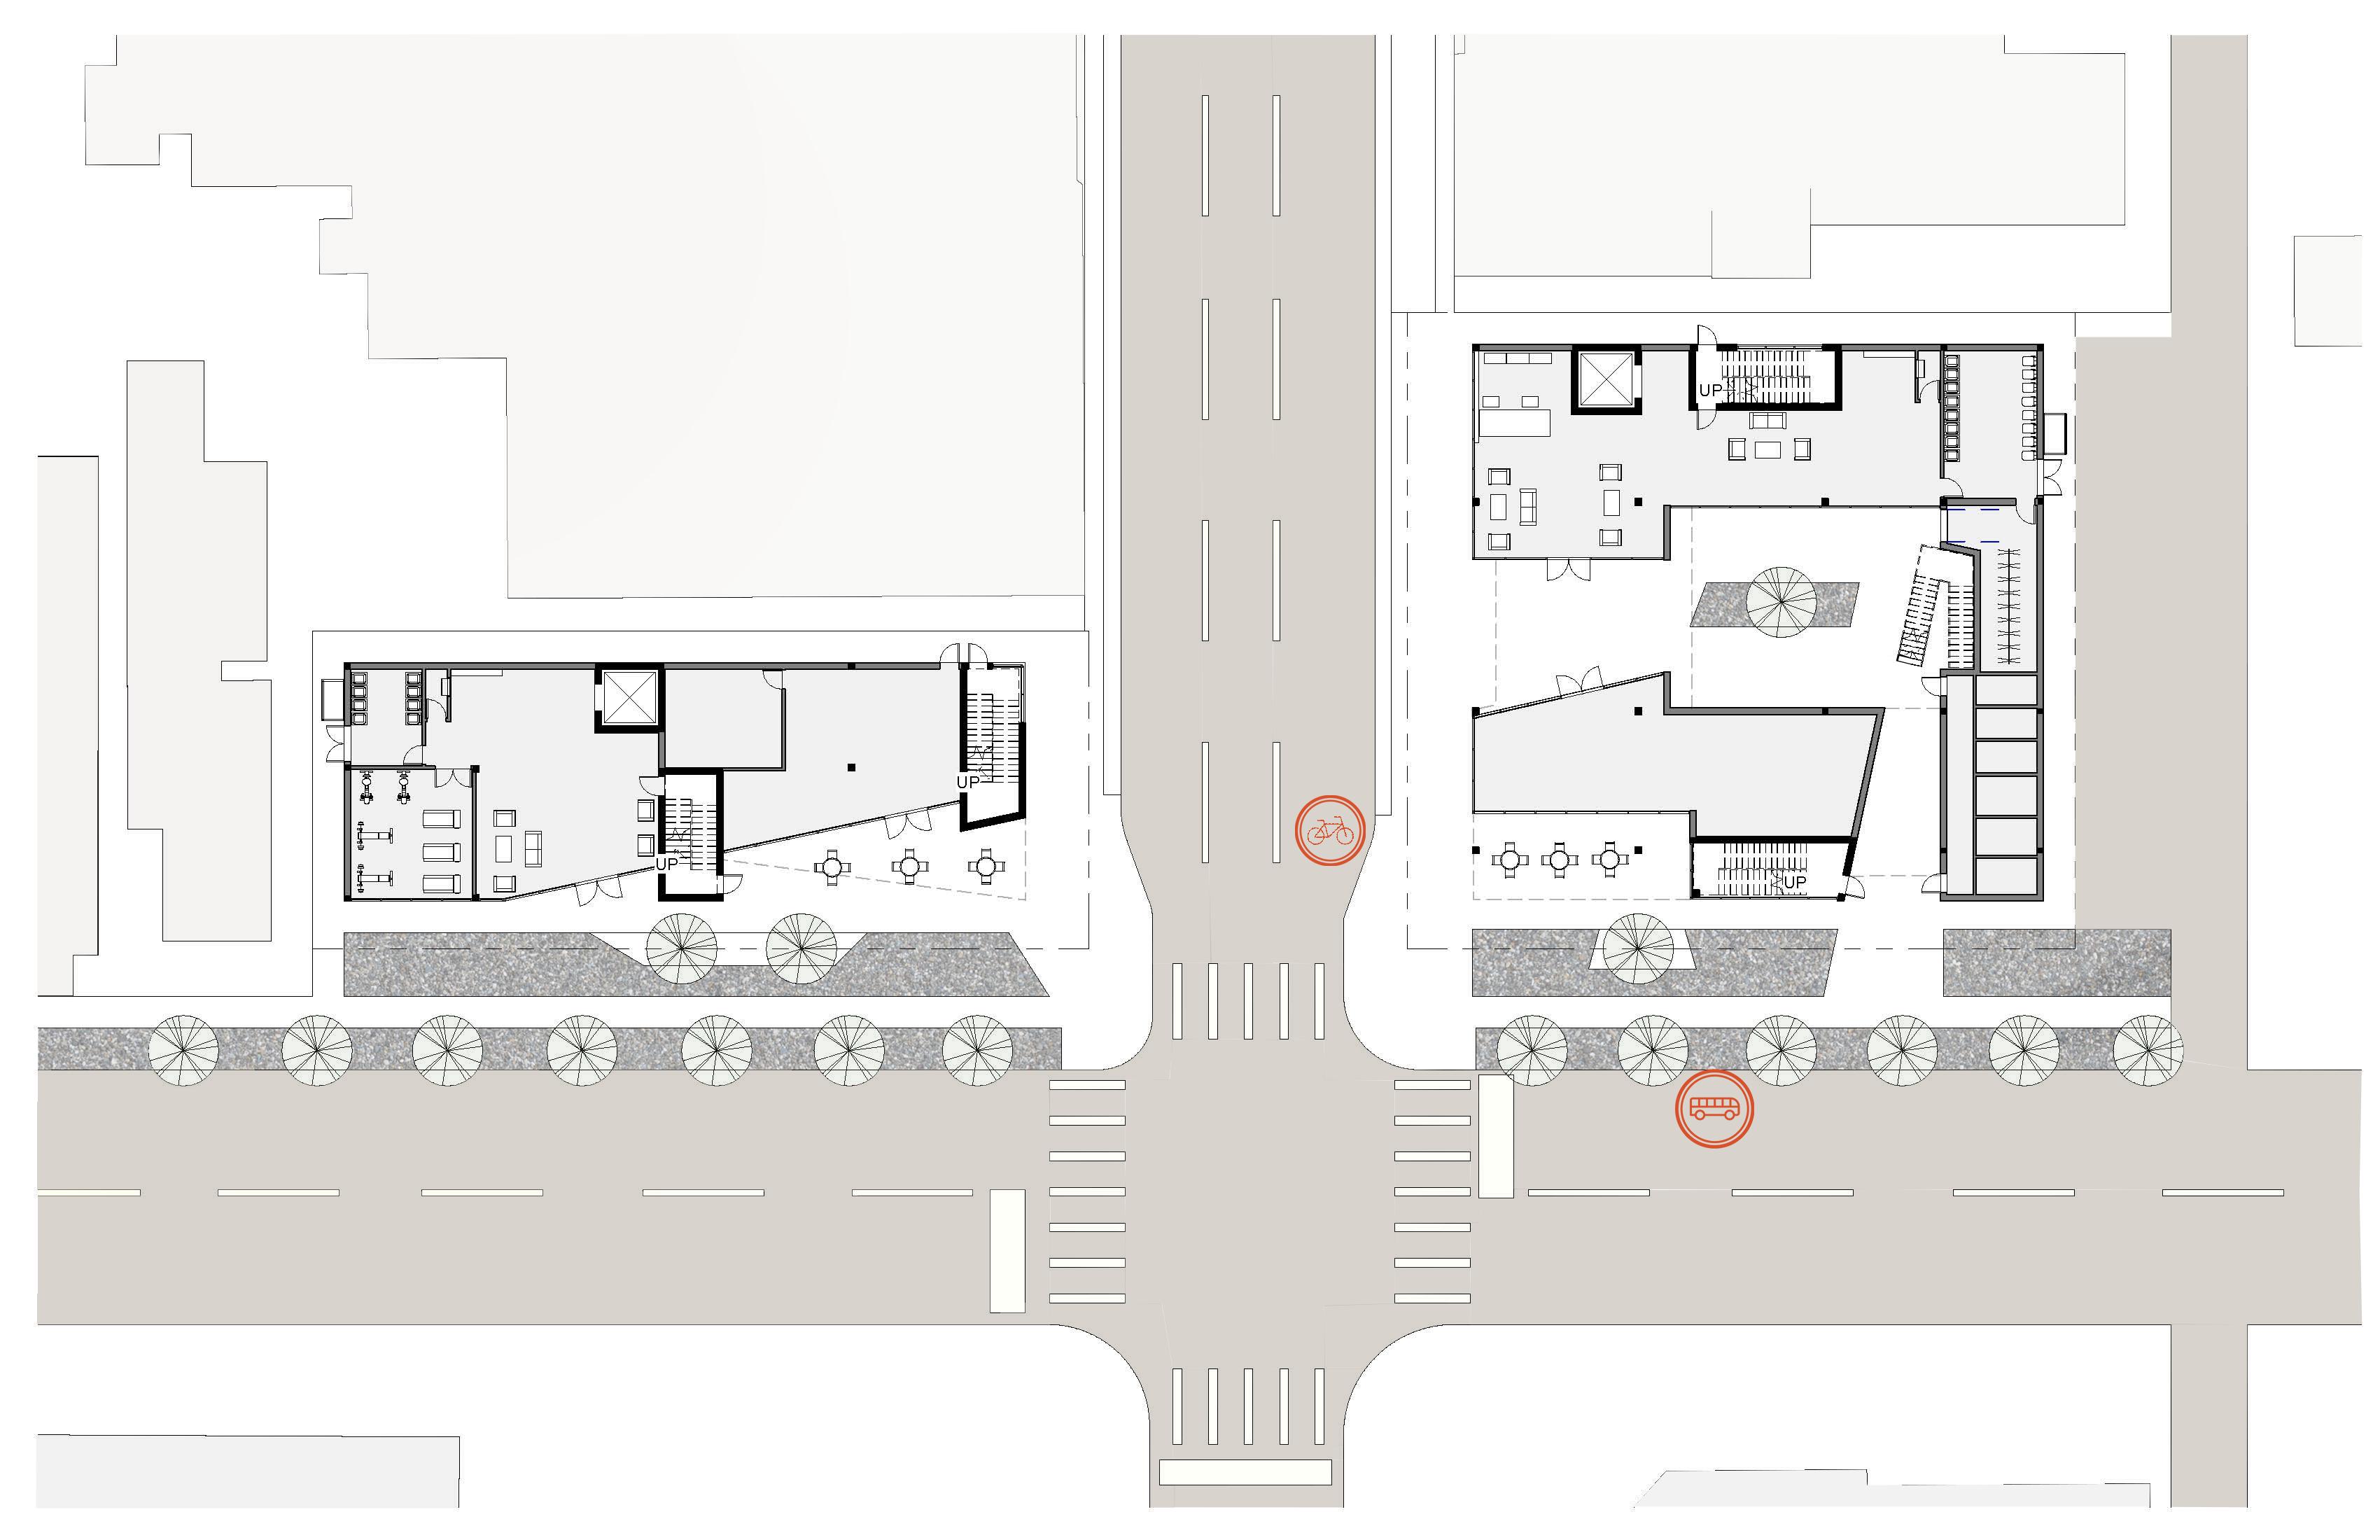
Open circulation connnects pedestrian traffic to inner courtyard.

Stacked mass allows for an appropriate amount of light to enter the center courtyard.


1. Lobby/Mailroom
Gym
Trash Room
Bicycle Shop
Bicycle Storage
Resident Storage
Restaurant
Courtyard


Second Level

Third Level


Fourth Level


2 Bedroom Unit View 1
2 Bedroom Unit View 2
Accessibility

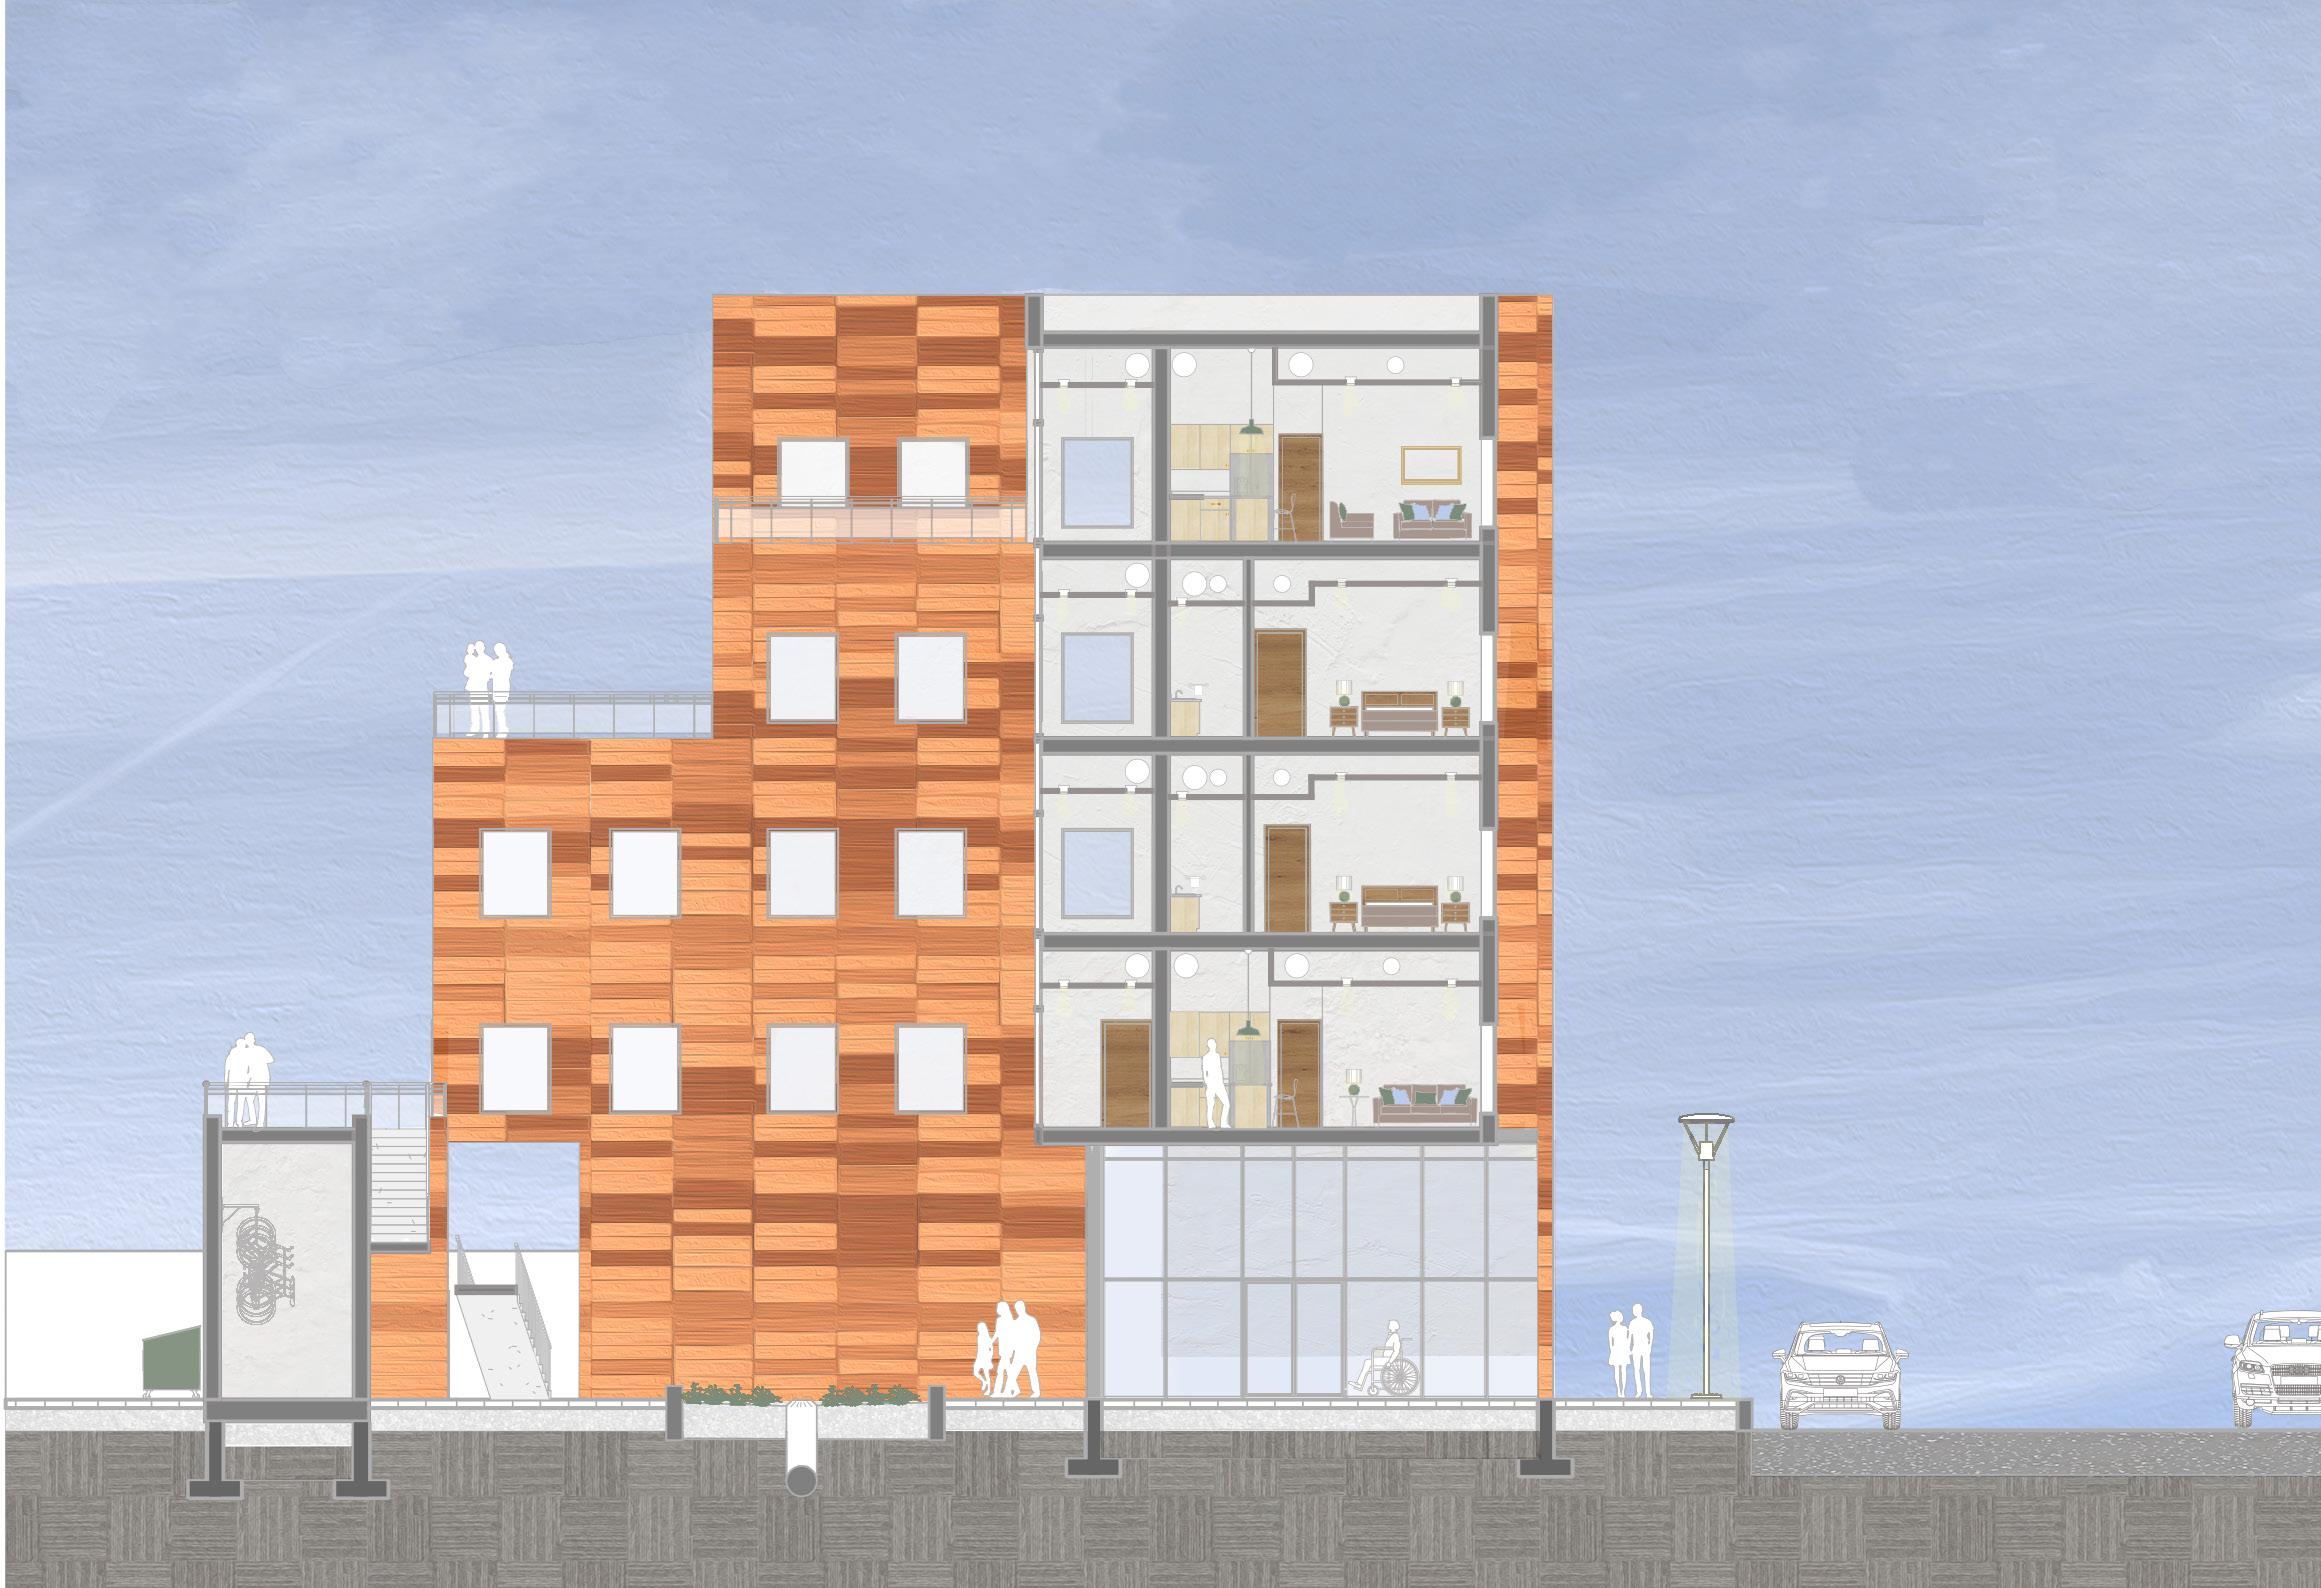
One of our primary goals with the design was to provide a safe, accessible space for pedestrians on the street level. We carried that goal up to the living spaces above in which we were able to arrange two ADA accessible units.

Egress Structure
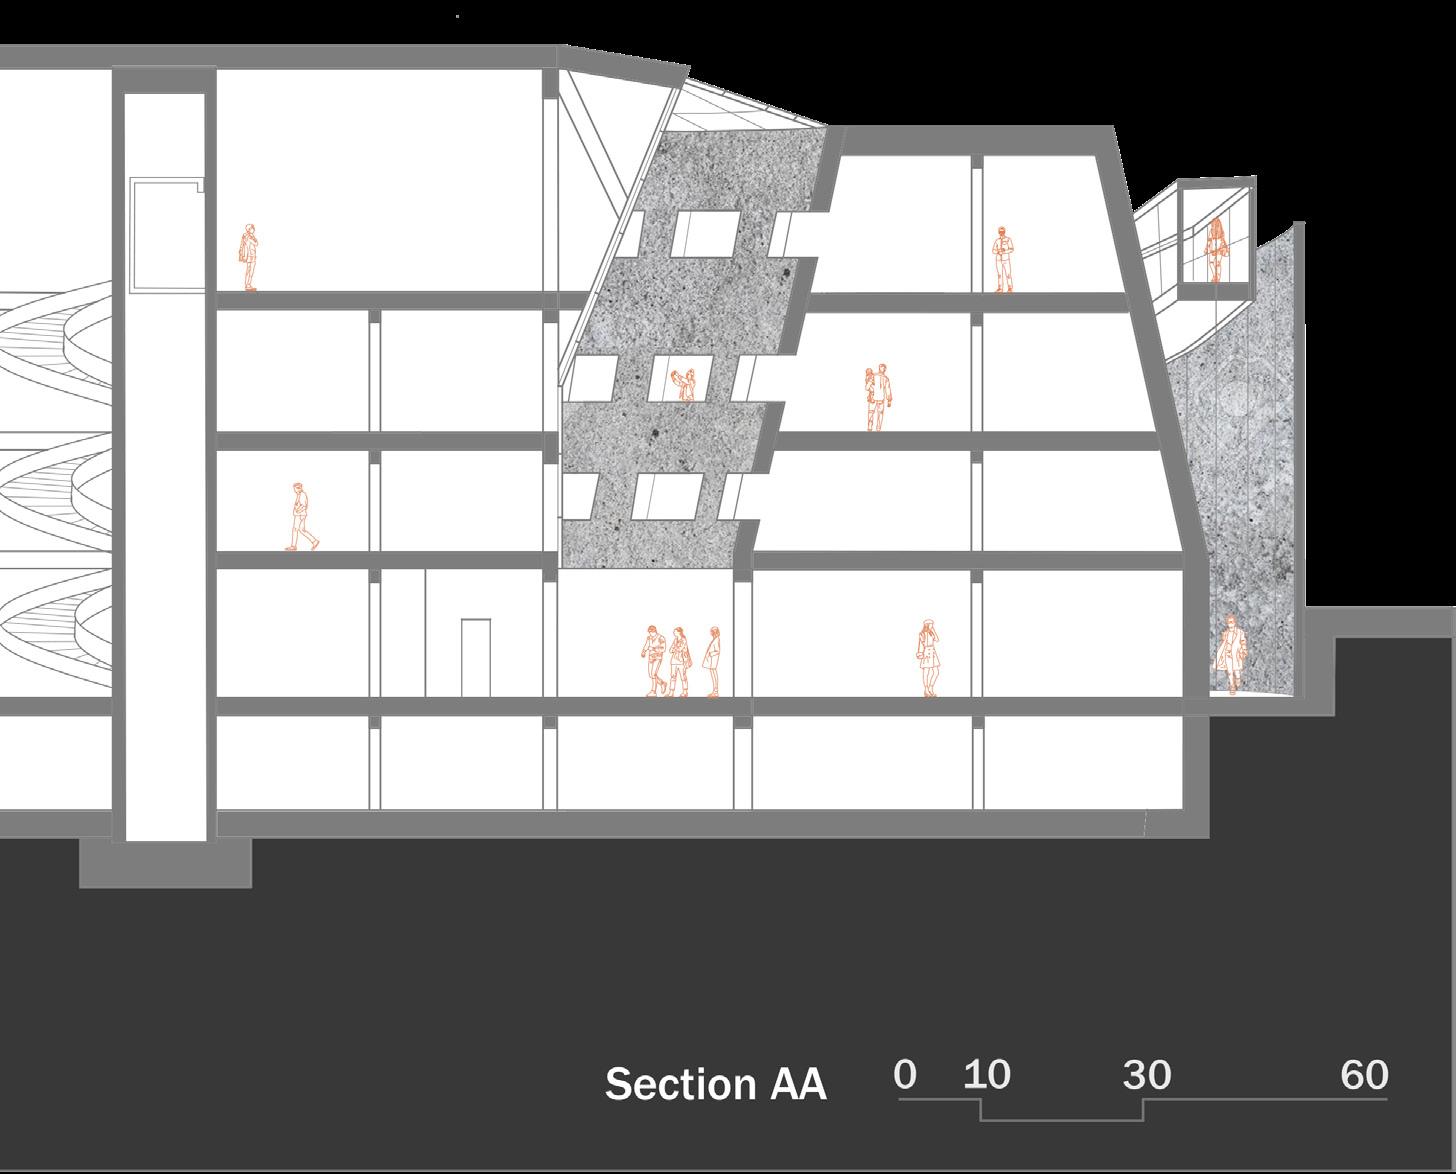
The construction assembly of the buildings consists of a castin-place concrete podium base and light-gauge steel upper floors.

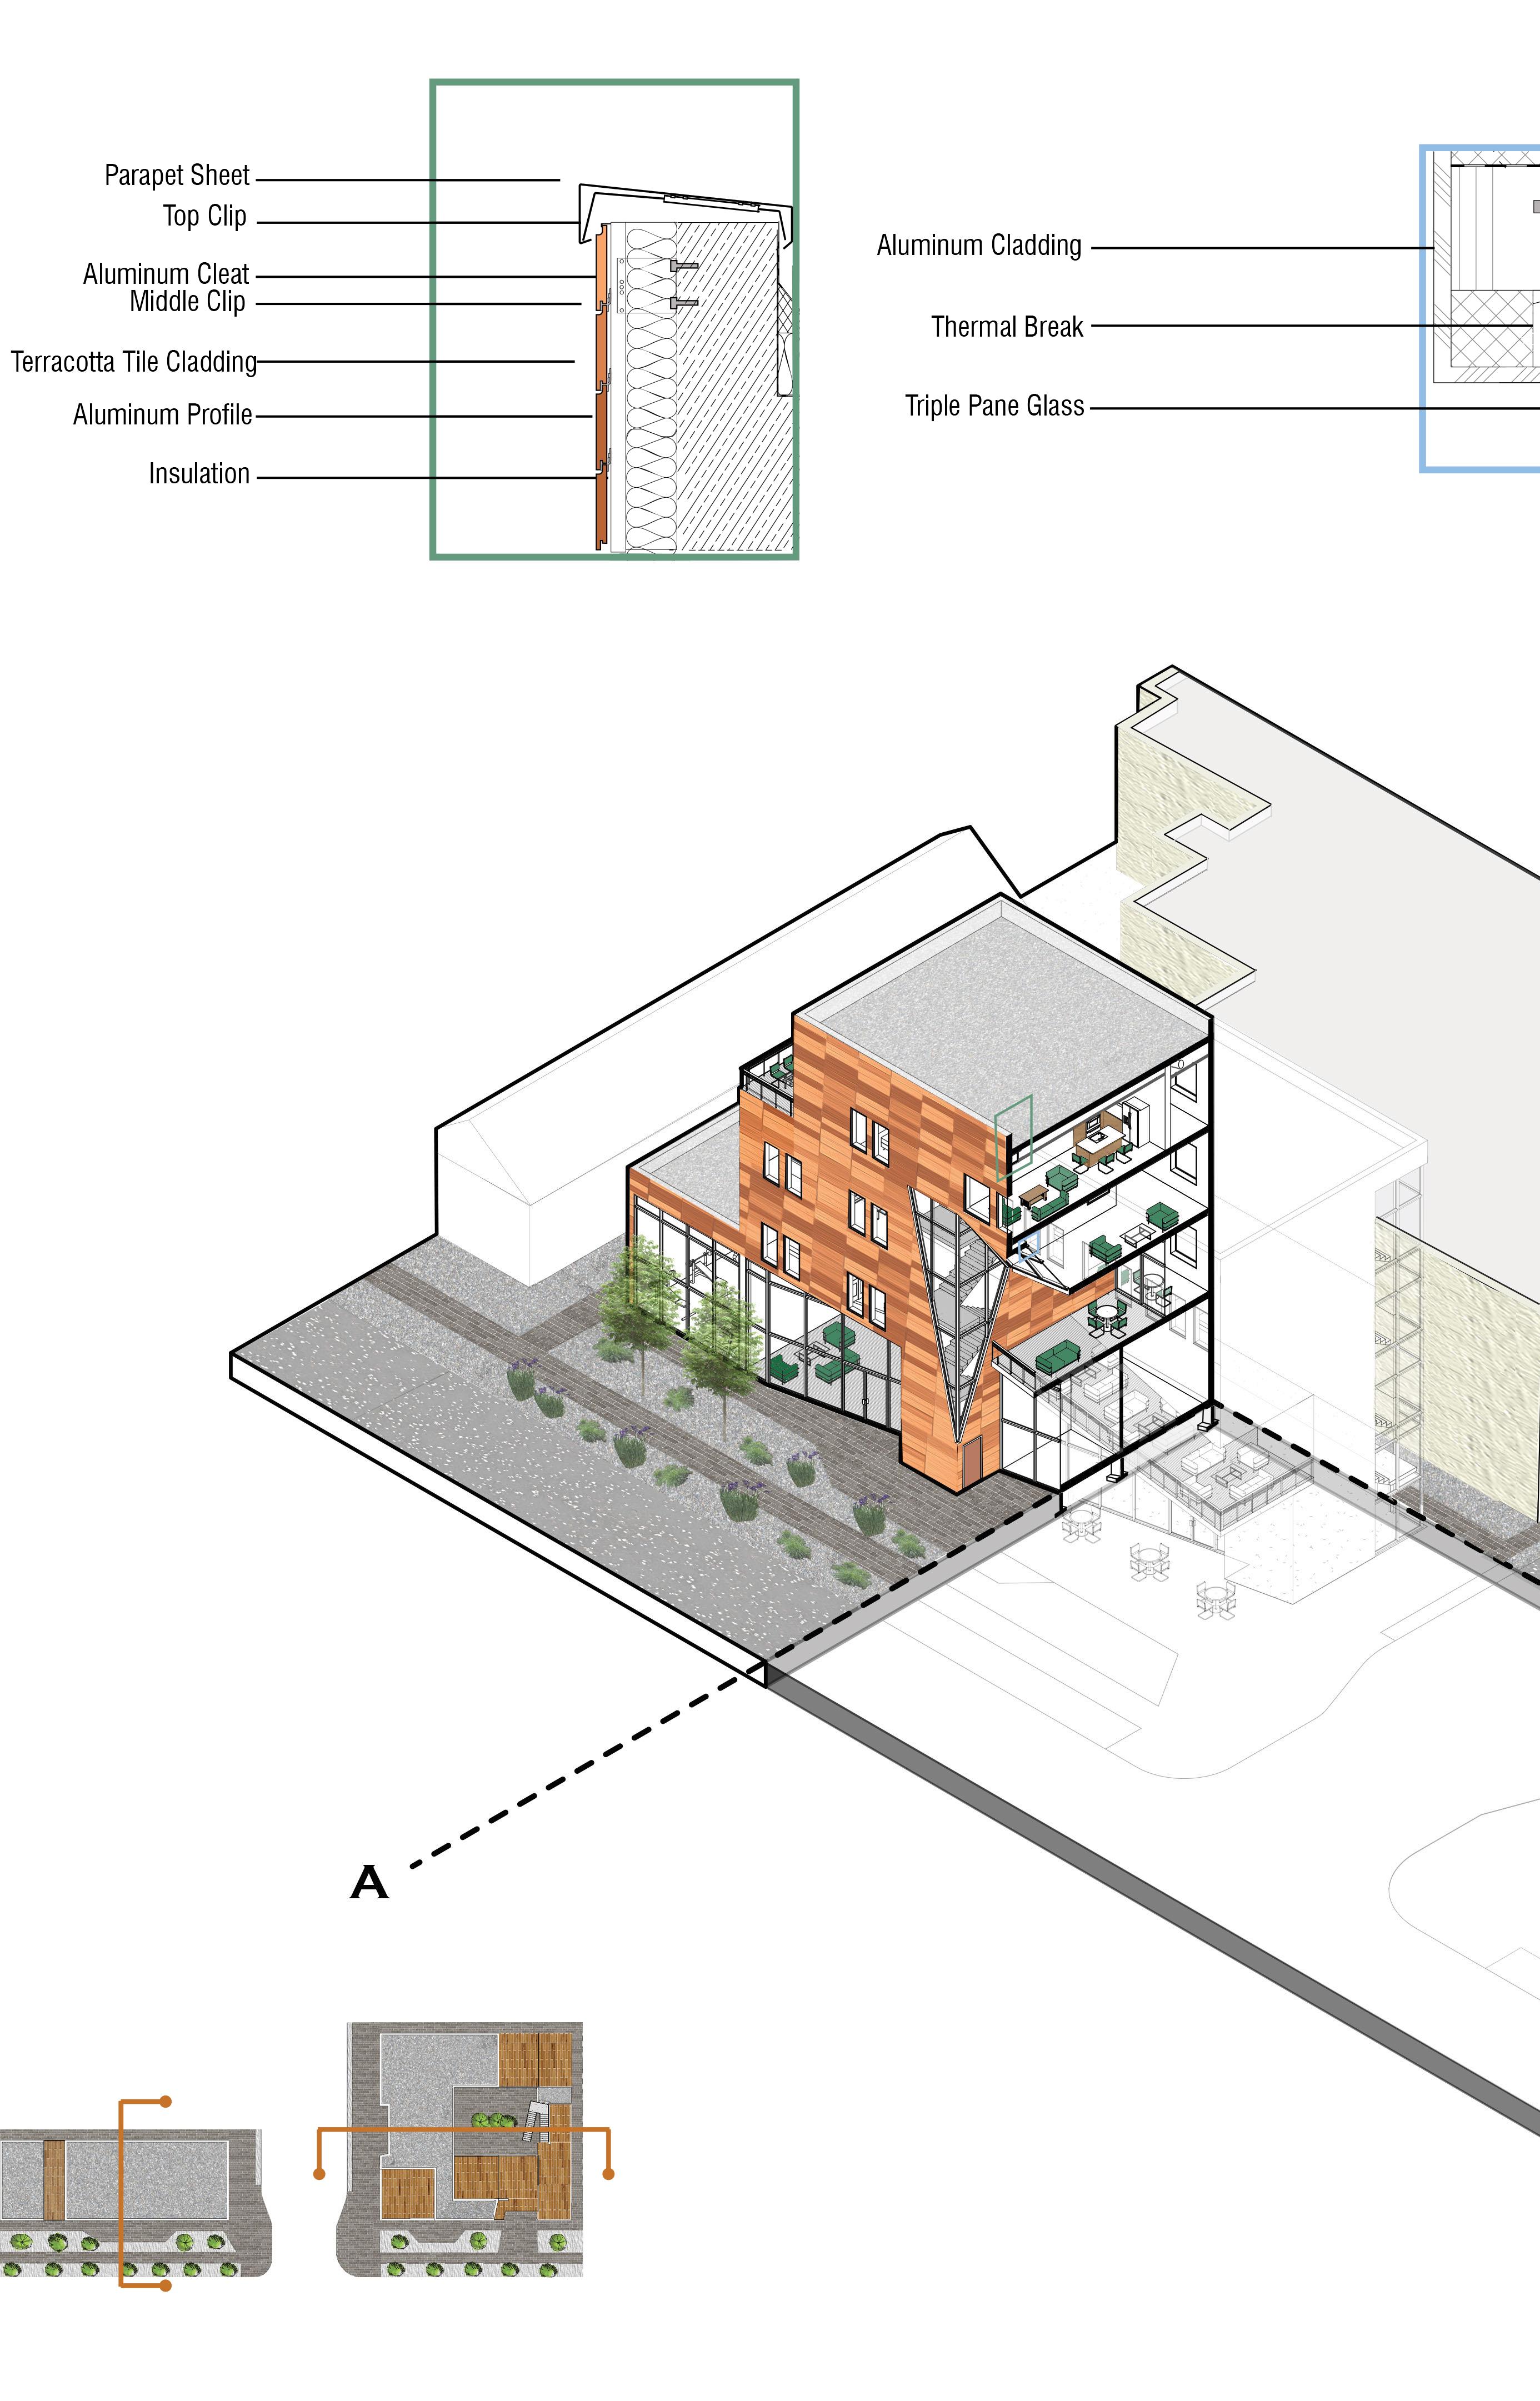
Section A
Material Selection
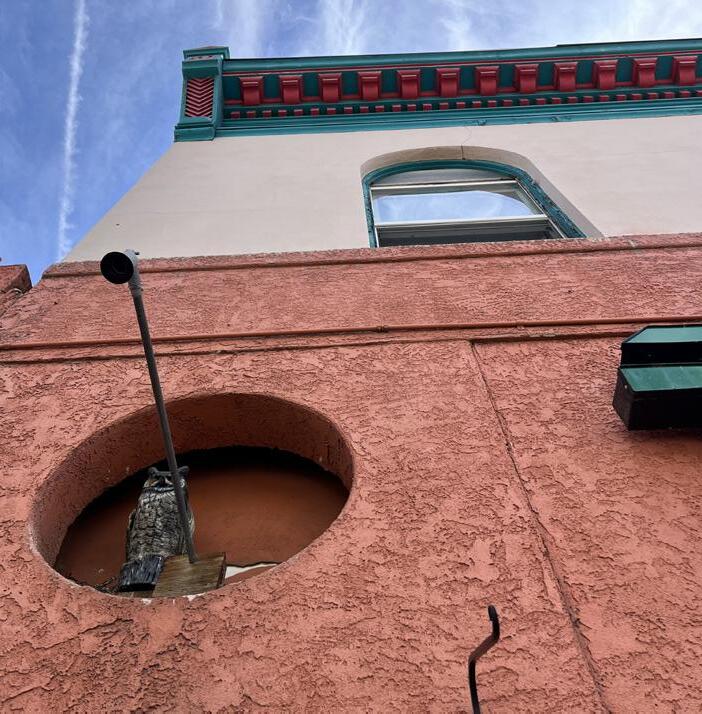
The exterior facade of these buildings are clad with multicolored terra cotta panels seeking to mimic the natural striations of the nearby Red Rocks Park. The warm tones of the panels blend seamlessly with the earth tones of the surrounding structures.

Brushed Finish Terra Cotta Panels


Red Rocks Park Rock Striations
Adjacent Building Color Scheme

A Stop on Santa Fe
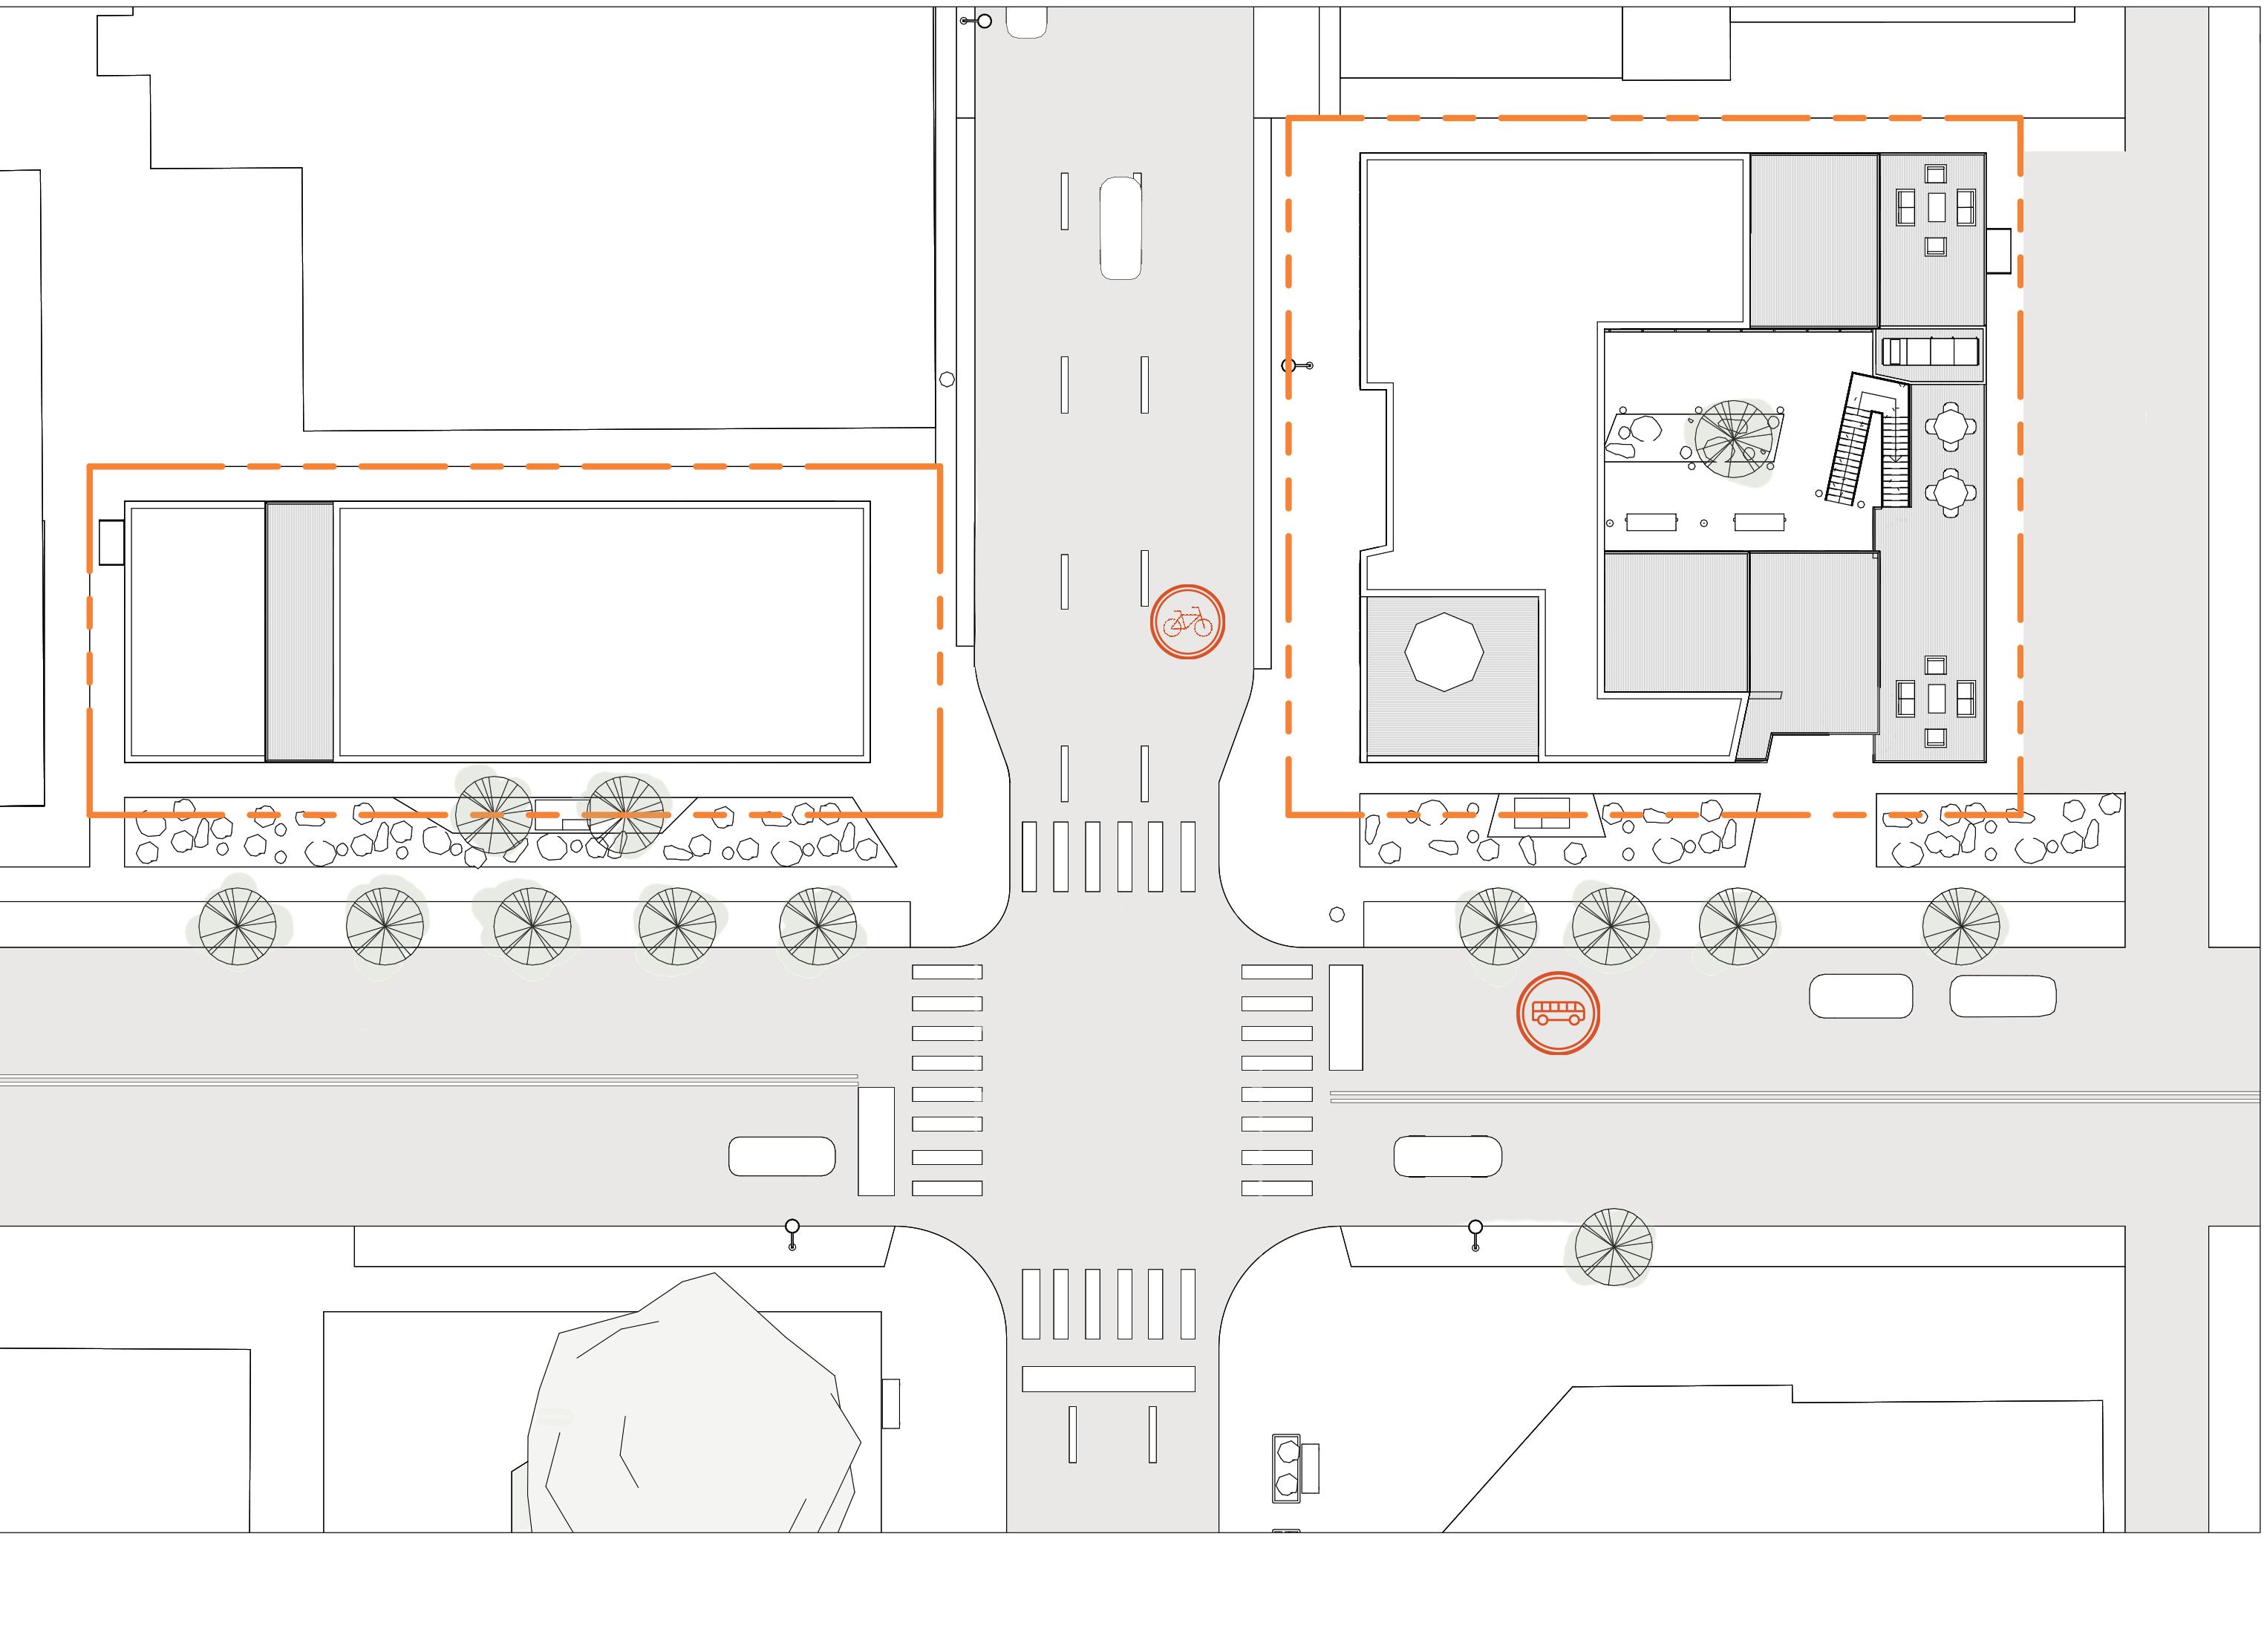
The Sites
The site plan above highlights the plan to activate the pedestrian experience as well as promote ecology. The permeable pavers and multiple bioswales filled with native plants have increased the overall permeability of the two sites by over 81%. The central courtyard acts as a buffer from the busy, unsafe street by guiding the community away from the traffic and into a relaxing space. The flow of the courtyard takes inspiration from the nearby Red Rocks Park which provides its visitors with a comfortable, protected environment.

Red Rocks Park

The Courtyard
The courtyard seeks to strengthen the bond between the public and private spaces influenced by the structure. Pedestrians are drawn to the central hub by an angled pathway between the lobby and a public bike shop. From there, visitors have the option to exit on the right or continue their stay on the second floor courtyard.
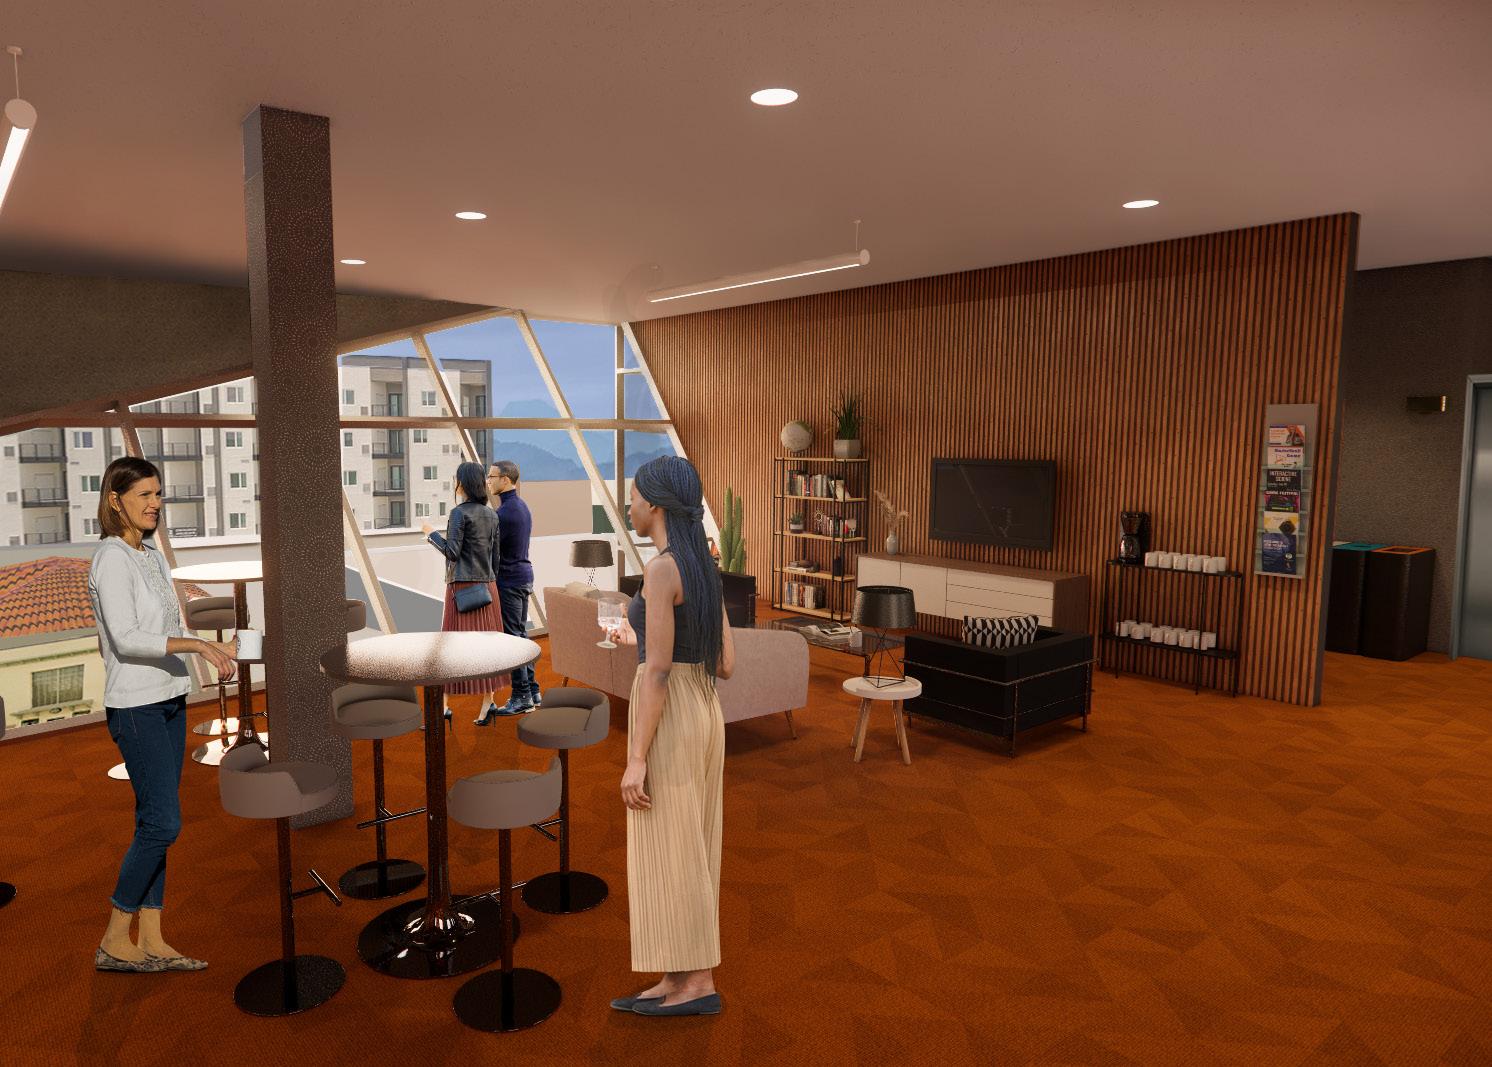
Common Space
Both buildings feature a myriad of common spaces which seek to promote interaction between residents. The common space shown above is located in the smaller building and offers a clear view of the street level to allow for transparency.

Expanding the Parameters
Installation
The University of Kansas
Arch 509 Spring 2023
Teammates:
Brookelyn Vittitow, Isaac Decker, Louis Cobb
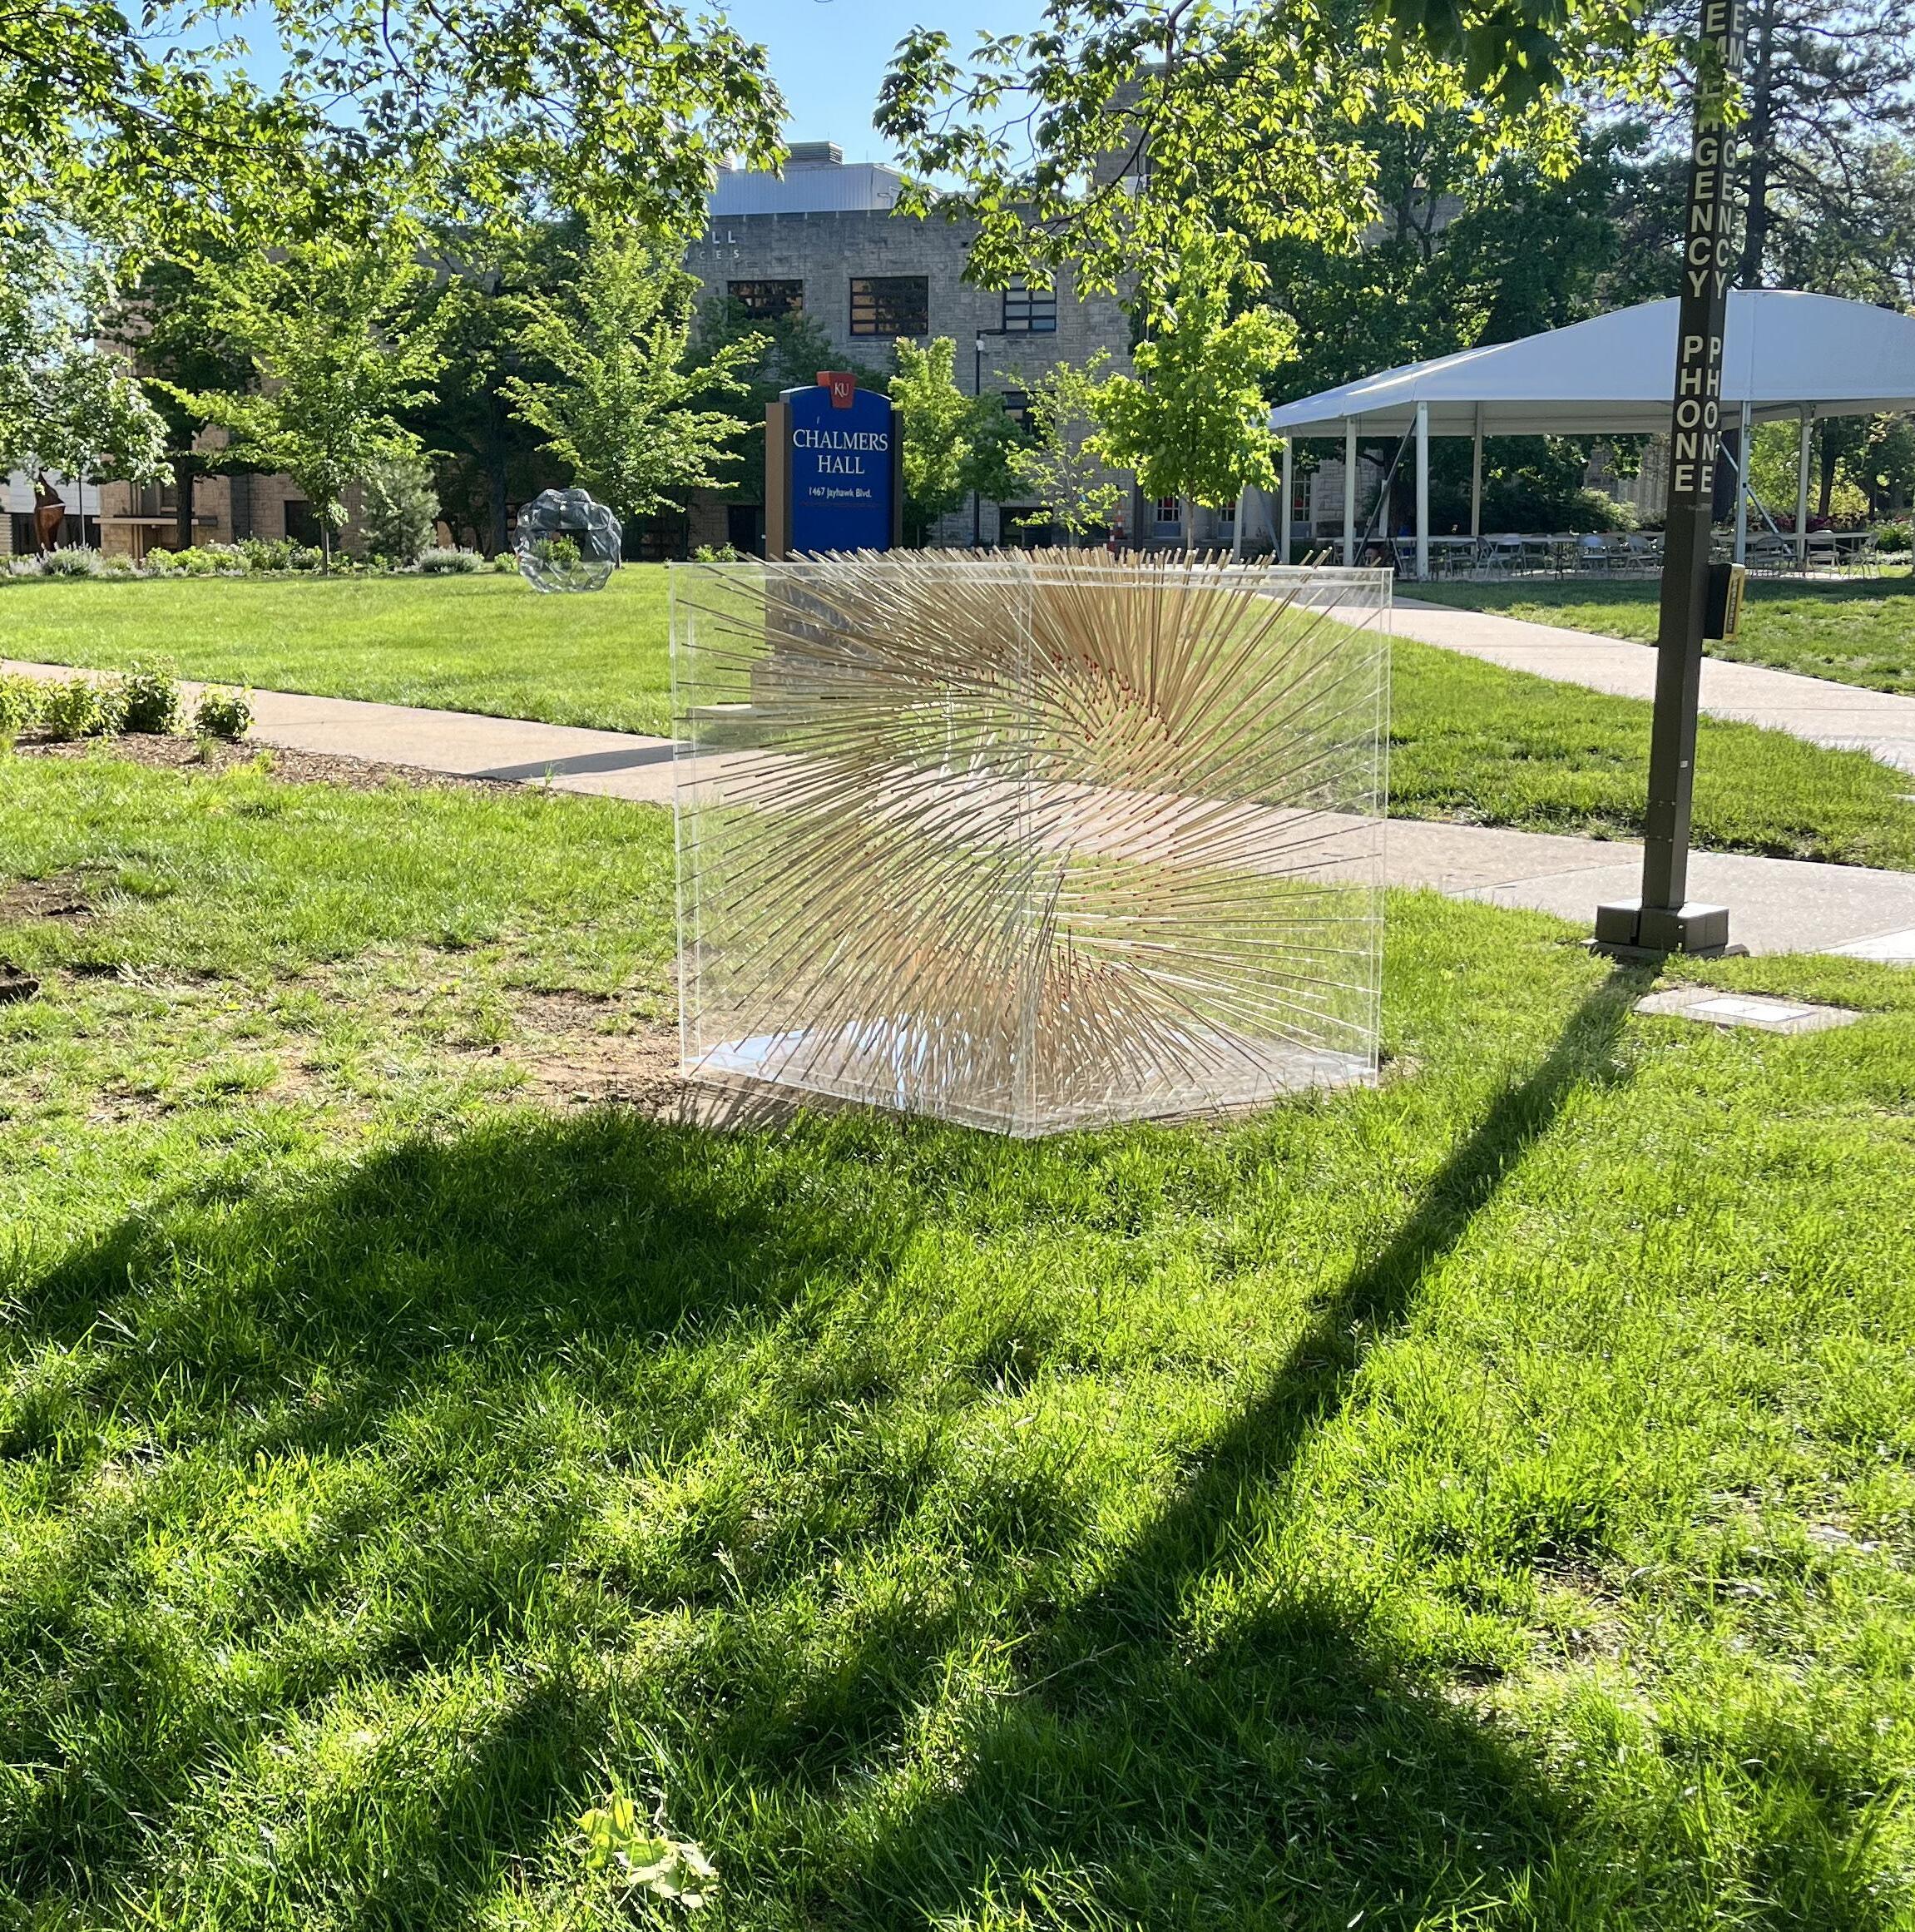
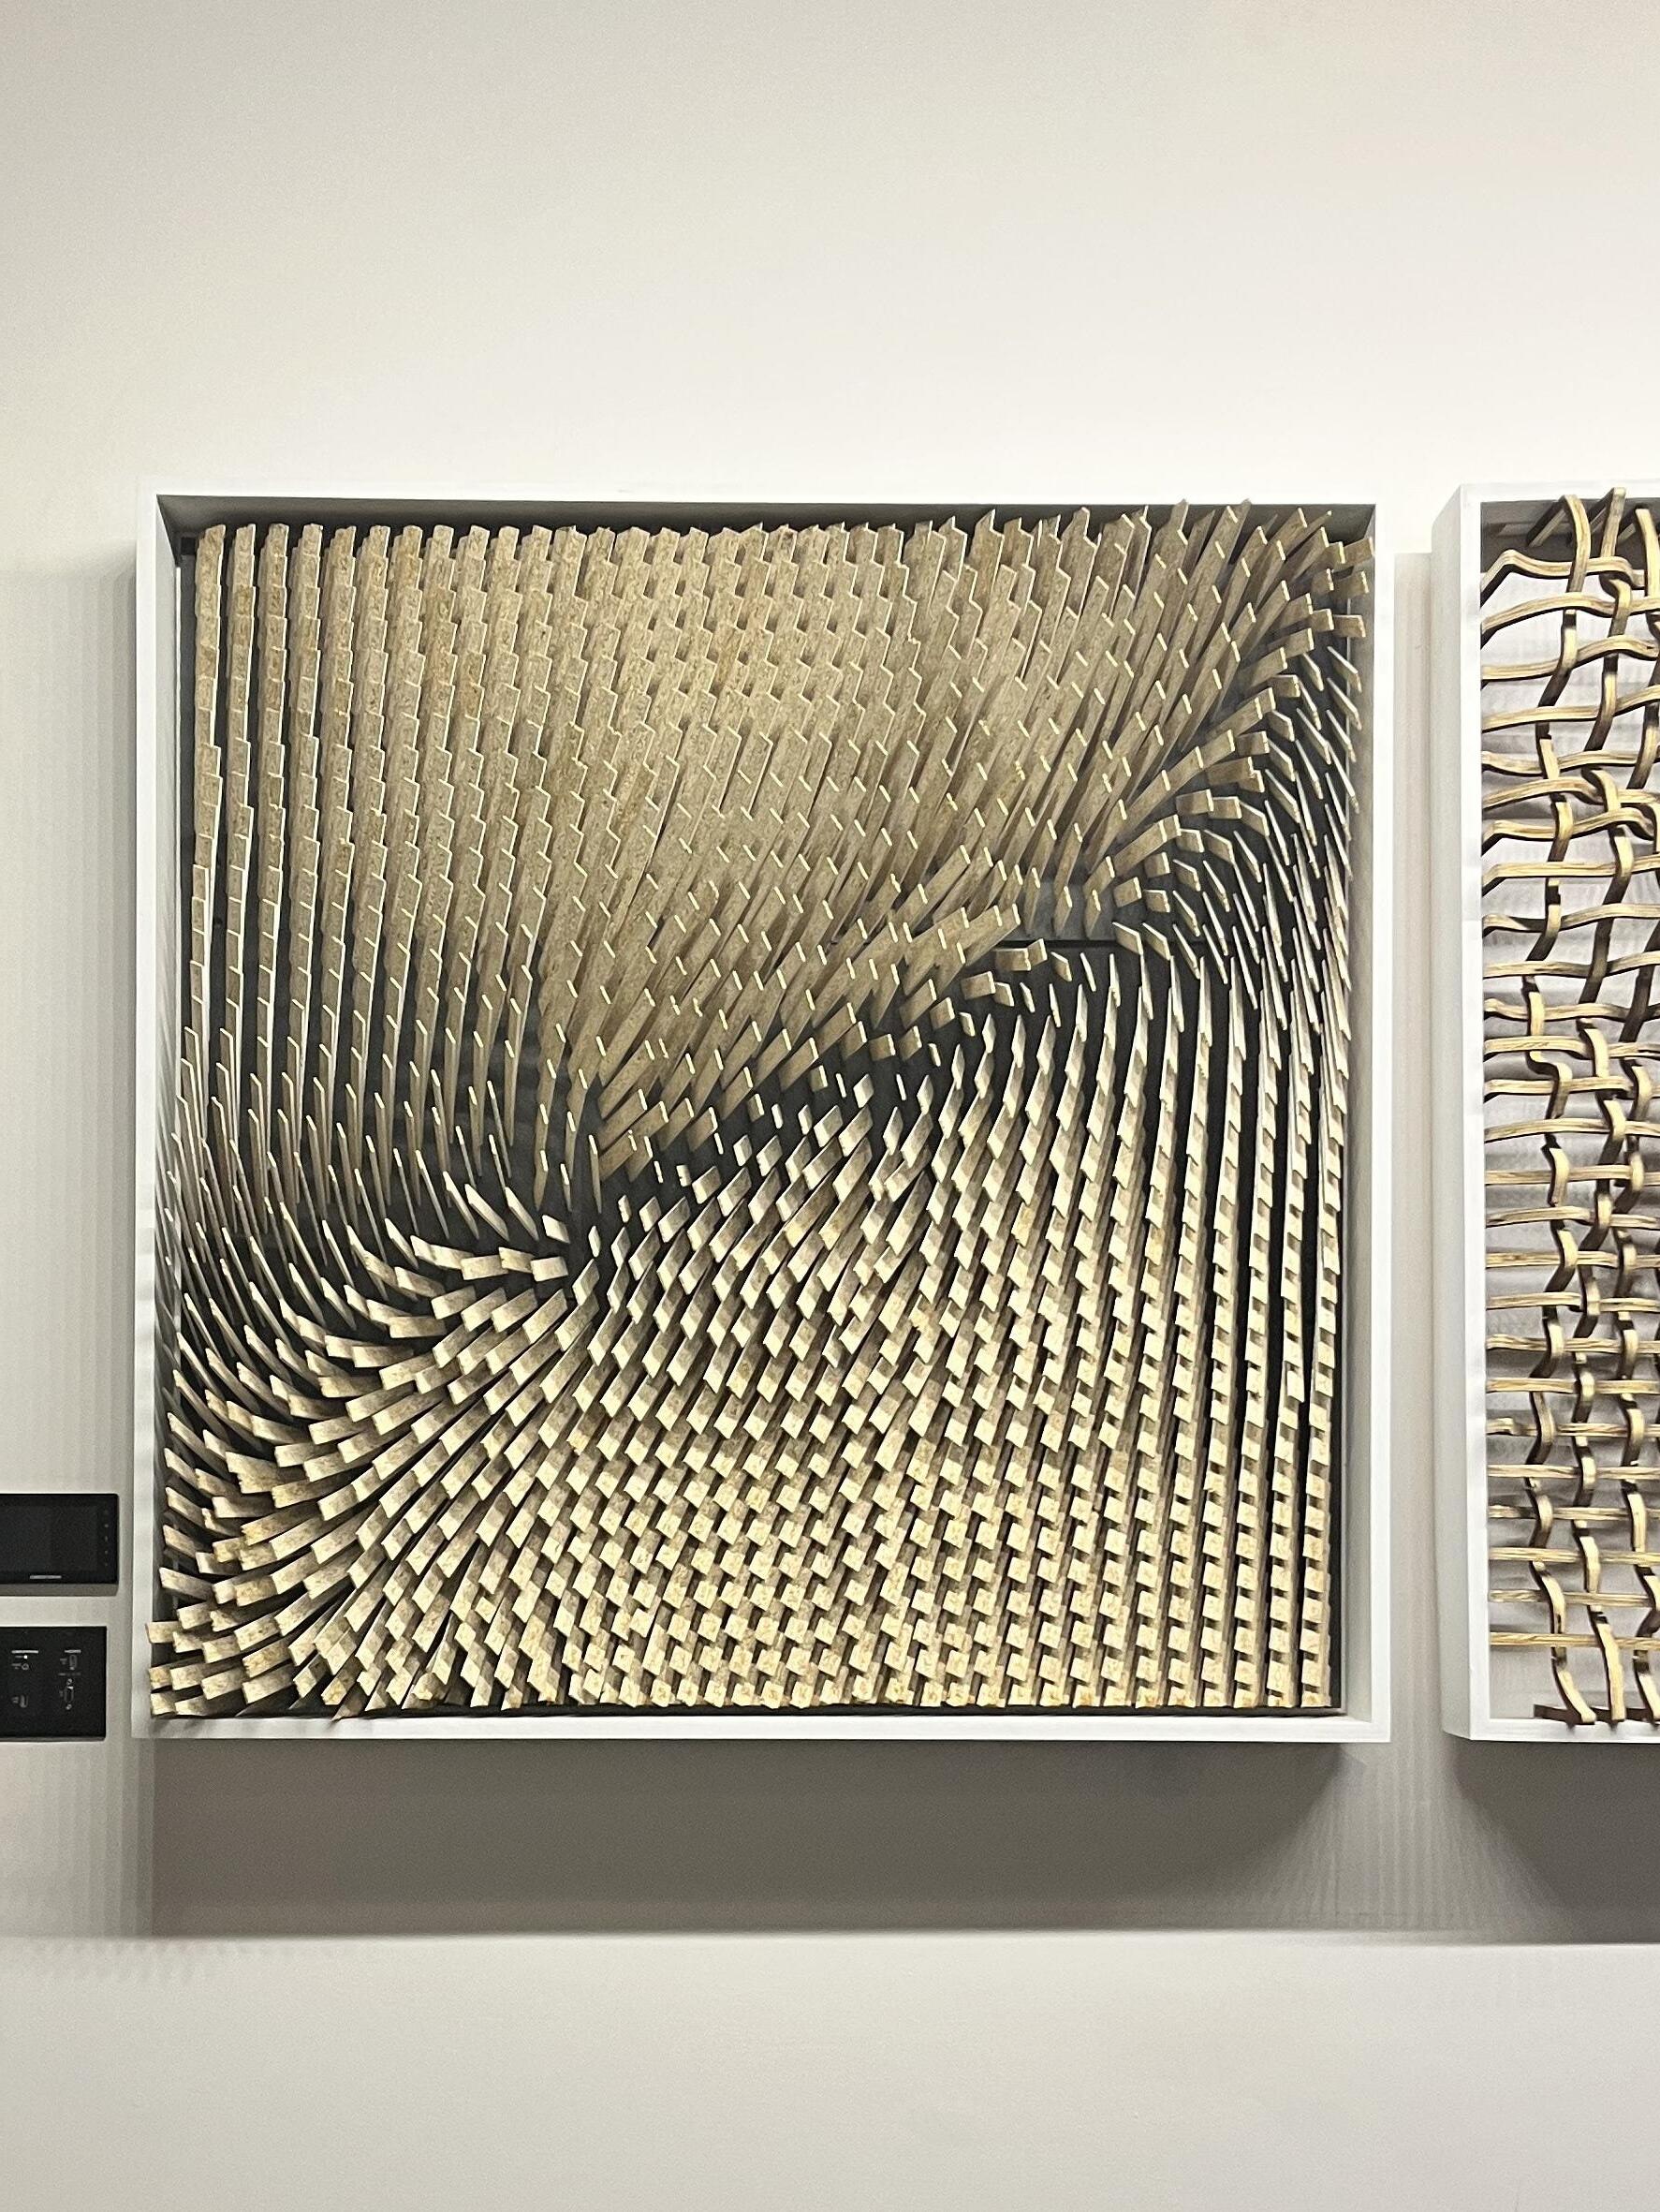
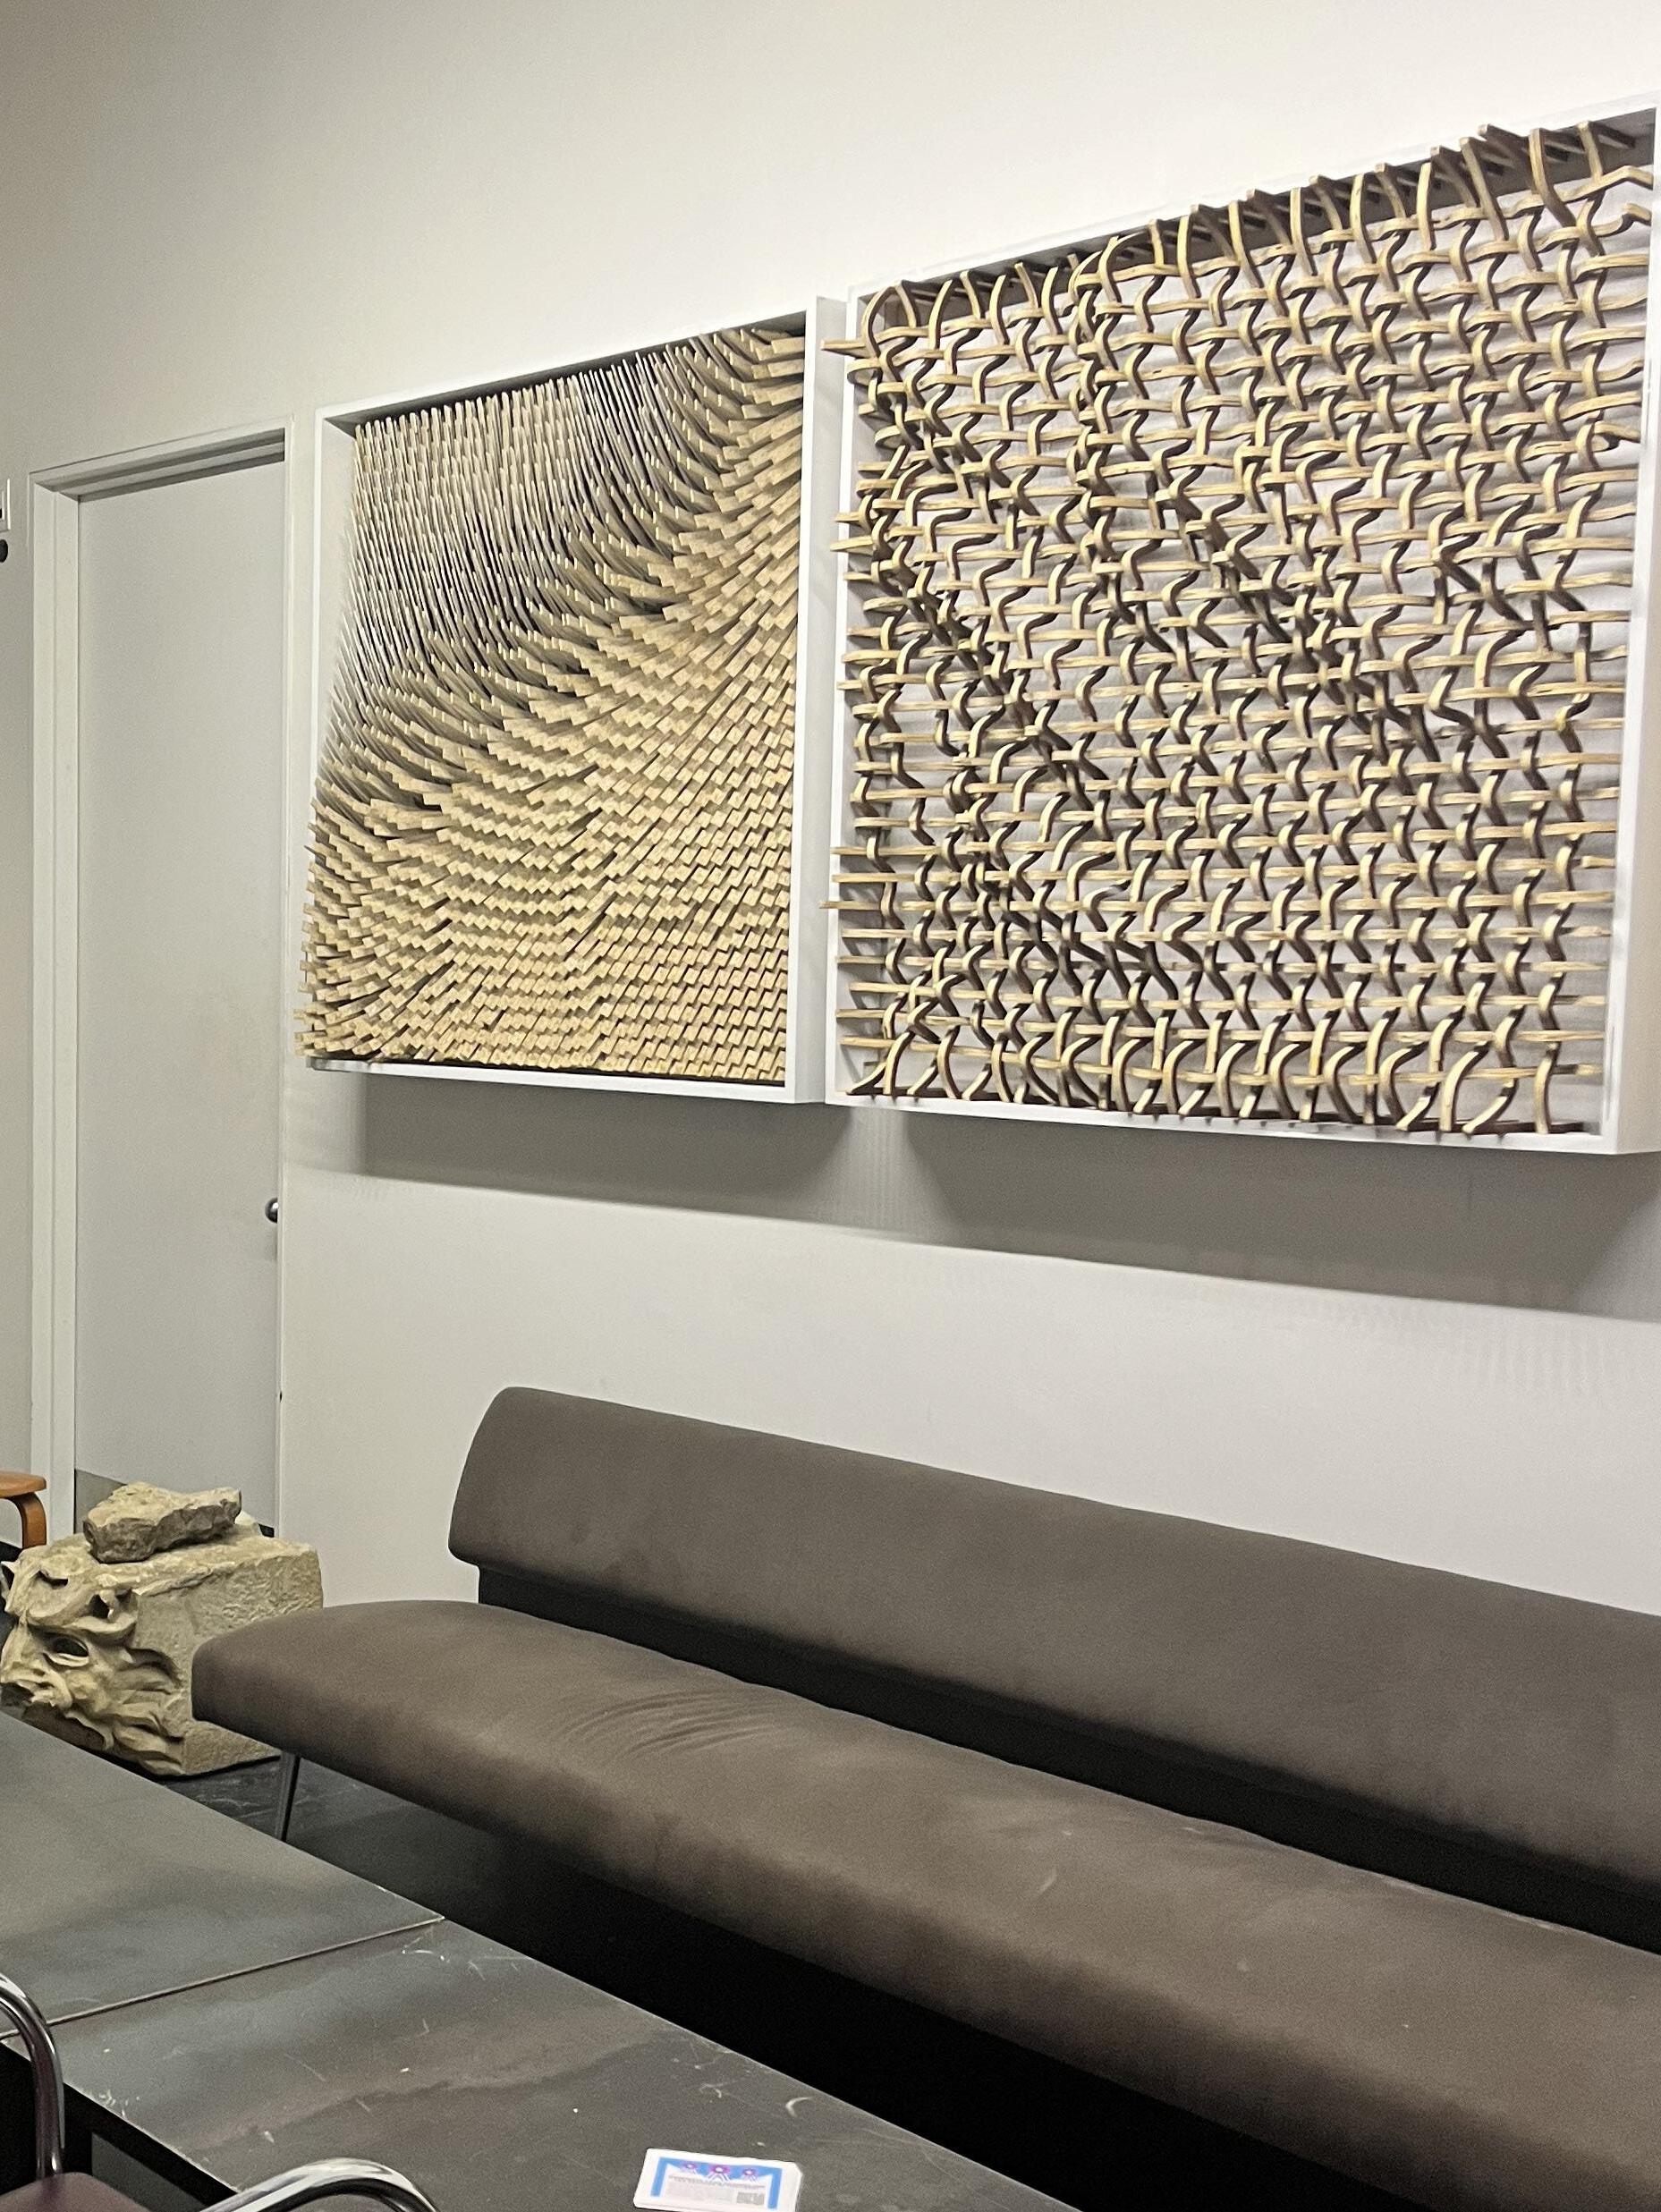
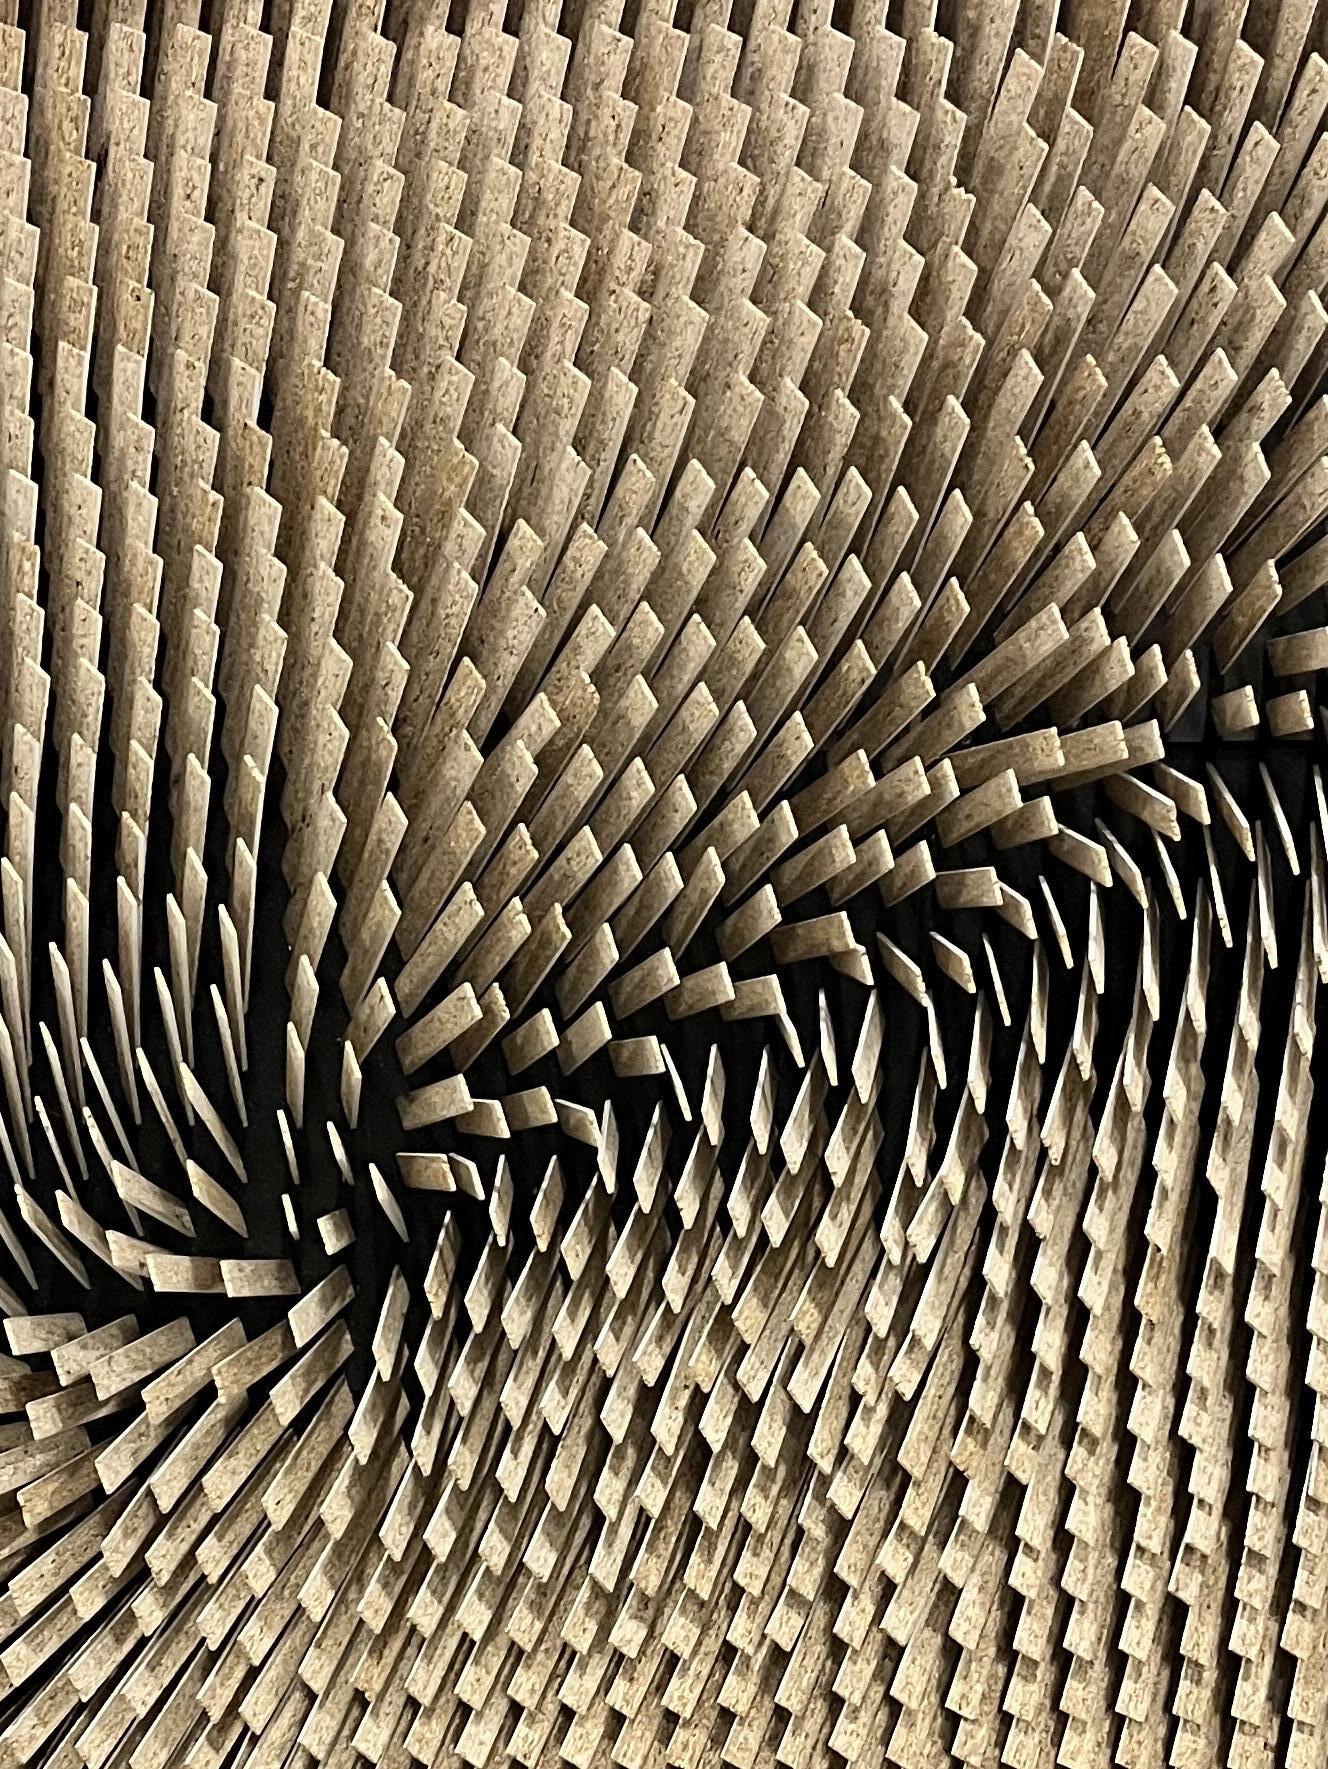
In this two-phase design project our group of four was tasked to create a self-sufficient system that can exist as both a wall system, and a three-dimensional structure using parametric design. Using a Grasshopper script created by Isaac Decker, our team designed and built a 4X4 wall panel using a multi-layered system of chipboard and dowels constructed out of recycled desks. The laser cut pattern in the chipboard allowed the dowels to rest freely in the cut holes without the need for any adhesive. We took what we learned from our Phase 1 design and modified it to create a freestanding acrylic box with a similar dowel system. The system we used can be adapted and modified to fit many different purposes, whether it be a facade or a furniture piece.


Phase 1
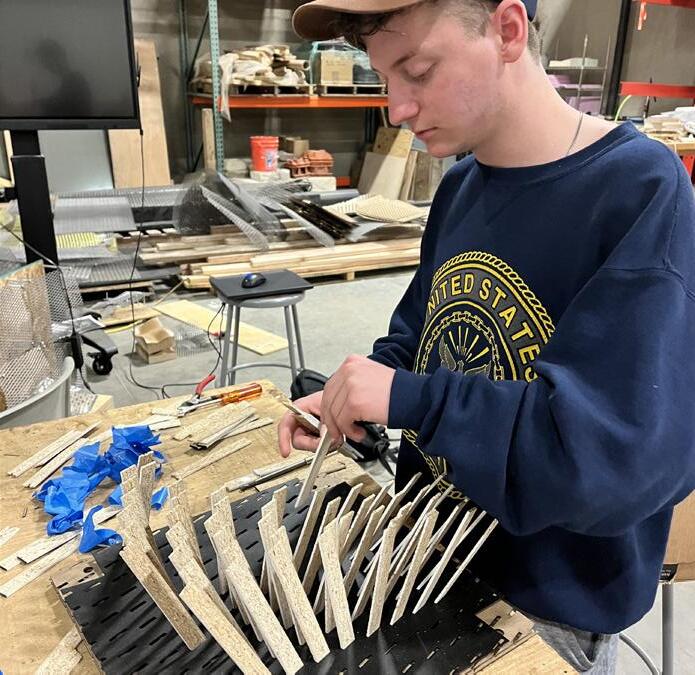
For Phase One of this project my group designed a 4X4 wall panel using recycled desks and chipboard. The flowing composition of the piece sought to mimic the soft winds blowing through the tall grasses of the Kansas prairie. The first step to creating this piece was to slice the large particle board desk panels into small, uniform strips. These strips would act as our dowels and would fit perfectly into the holes of the chipboard. We then punctured the purposefully designed holes into the three layers of chipboard using a laser cutter. Next, we painted the top layer of chipboard black before assembling our structure using wooden spacers. After nailing our layers of chipboard together, we finalized the assembly by inserting the dowels into the three layers of chipboard to stabilize the piece.


Interlocking Joints
1/4” Wooden Dowels
Two Layers of Acryllic Panels
CNC-Cut Holes


Phase 2
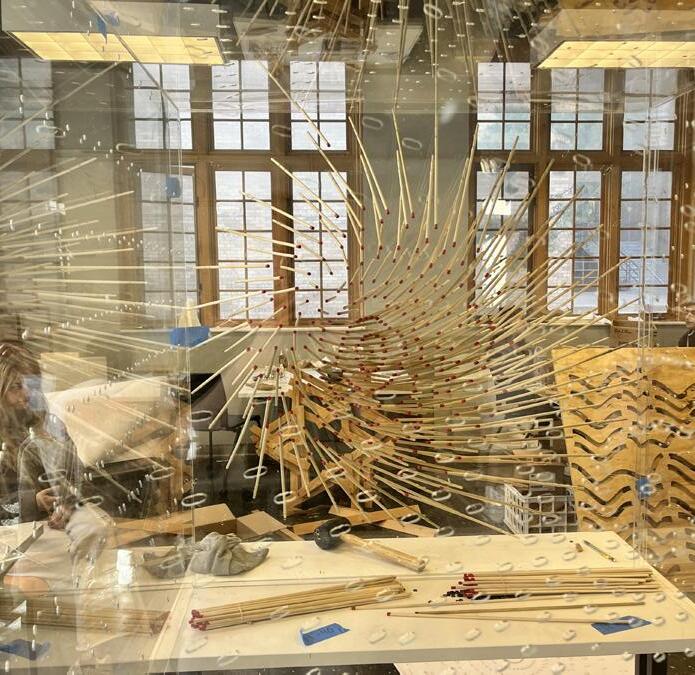
We took the lessons we learned from Phase One and applied them to the structure of Phase Two to create a free-standing acrylic box, structurally supported by wooden dowels forming the shape of a sphere. After using a CNC machine to cut ten pieces of acrylic, We assembled the pieces into the shape of a two-layered cube with an open side. We left an inch wide gap between the two layers to firmly secure the sticks in place. After finding out the quantity of each stick we needed to create the spherical shape in the center we cut each group of sticks to the necessary size before painting each tip red. FInally, we carefully assembled the piece by placing each stick in its desired location to create an eye-catching floating sphere.
Project Feautured in Article: https://www.dezeen.com/2023/11/29/university-kansas-ten-architecture-projects-dezeen-schoolshows/


thank you
