USING ADVANCED INSPECTION METHOD (THREE-DIMENSIONAL ULTRASONIC) IN
RECOGNITION OF DEFECTS IN HIGH THICKNESS PIPELINES
1Department of Mechanical Engineering, Savadkoh Branch, Islamic Azad University, Mazandaran, Iran
2Department of Mechanical Engineering,West Tehran Branch, Islamic Azad University, Tehran,Iran
3Department of Mechanical Engineering, Sari Branch, Islamic Azad University, Mazandaran, Iran
ABSTRACT
In this study, using Harfang Code 32 device, the slag catcher pipelines in one of the South Pars phases were tested. In radiography method of these lines, no clear defect was observed in radiographic films due to the high thickness of 40 mm. However, marvelous results were obtained using advanced ultrasonic. Review and analysis of the results will result in high potential of three-dimensional ultrasonic method in identifying defects in pipelines with high thicknesses and preventing financial and life-threatening risks during the use of these refineries in the future.
KEYWORDS
Non-destructive testing, Three-dimensional Ultrasonic (PAUT), Ultrasonic, Radiography
1. INTRODUCTION
By industrialization and the spread of the welding process and salient reception of industry, this process was in public use soon as a special process in the framework of main method of connecting two or more pieces of metal together, and its major advantages such as economic advantages and its speed and efficiency caused arrival this technology to more sensitive areas such as aerospace, refining industry and military industry. In such circumstances, discussion of quality control found a special place in this process. As far as it caused non-destructive methods in quality control to enter the field as quickly as possible the ground is free from destructive methods of analysis available for control eye and welding, regardless of available visual methods and destructive analysis for controlling welding, and be in public interest of industries. The success of these techniques caused the non-destructive tests of materials quickly entered in other manufacturing industries such as casting, rolling and some non-metallic industries, and now these methods have the unique status in the industry. In the meantime, penetrant testing, magnetic
Advances in Materials Science and Engineering: An International Journal (MSEJ),
particle test and Eddy Current test in determining surface defects in welding and industrial radiography and ultrasound tests to determine the deep flaws in the welds were of most interest. Development and application of three-dimensional ultrasound waves as an offshoot of the technology had reached its maturity at the beginning of the twenty-first century. In fact, this technology made its way into the world of industry in the medicine area in 1980. In the mid1980s the piezoelectric composite materials were developed and used in construction of I.P.A probes with different shapes and designs. In the early 1990s, three-dimensional ultrasonic technology was introduced as one of modern methods of NDTs in the visual test handbooks and training manuals for engineers.
The main uses of this technique in the years between 1985 and 1992 were limited to inspection of pressure vessel nozzles in nuclear industry, large wrought shafts and parts for turbines. New developments in manufacturing technology of piezo-composites, high-precision machining, microelectronics, increased computing power (including simulation packages for probe design and details of the interaction of waves) caused occurrence a revolutionary development in threedimensional ultrasonic technologies at the end of the 1990s, and at the same time, the function solution software were also developed with growing computer capabilities.
2. SHAPING THE WAVES
Using three-dimensional ultrasound waves in non-destructive testing began started because of having the following general characteristics.
1. Reducing inspection and settings time;
2. Expanding access to inaccessible areas or with difficult access;
3. Removing harmful radiations;
4. Ability to detect cracks in the direction of different depths using a probe placed on a fixed point.
5. Strong sizing capability for weld inspection carried out on different materials;
6. Finding and showing small cracks due to stress corrosion in turbine parts with complex geometry.
7. High precision of finding location and direction of critical defects because of the ability to focus the waves at different depths and move these focus points along different angles.
3. RESEARCH METHODOLOGY
In this study, radiography of the slag catcher welds of one of the South Pars phases with API5LX65materialswere taken, using X-ray camera with 80 C powers. Considering the thickness of these foams and also the impossibility of radiography with SWSI technique (due to lack of access to the inside of pipes), DWDI technique had been used. In the study of radiographic film of this technique, very vague dots and lines were seen that, according to several experienced commentators, any of these symptoms was not considered as a flaw or defect.
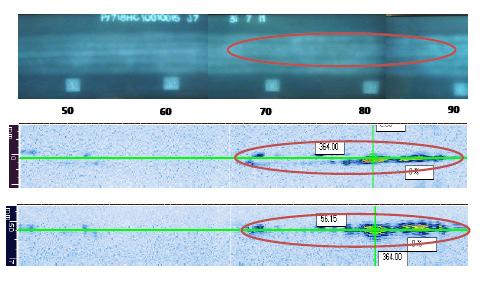
To achieve more accurate information, a comparison activity for similar foam that access inside them was still possible, was performed using Harfang Code 32 device. Using three-dimensional ultrasonic inspection on ten 48.6 cm thick 480 and 500 foams, amazing results were achieved. In all these foams, imperfections of lack of sidewall fusion / lack of sidewall Root and cracks were
Advances in Materials Science and Engineering: An International Journal (MSEJ), Vol. 3, No. 4, December 2016
observed. By interpretation results, recorded by Harfang device and their evaluation with special software to interpret the results, implication of the existence of these defects have been inspected across sectors.
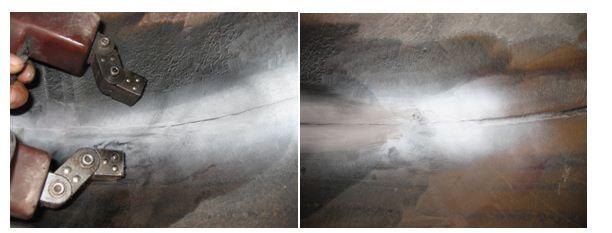
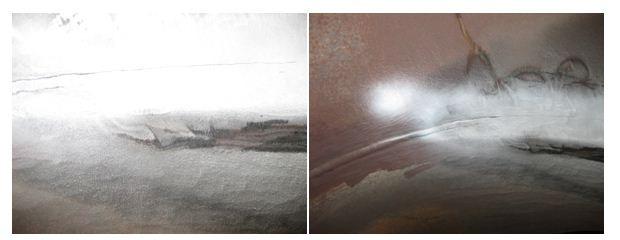
To observe the above defects and comparing them with data obtained from three-dimensional ultrasonic method, magnetic particles inspection method has been used. As we can see the figures, much walls with lack of sidewall fusion imperfection, which been ended to the longitudinal cracks by spreading them finally. By imaging with a digital camera from the root area of above foams and measuring shown defect length, it was found that in many cases, the dimensions of the defect obtained by the three-dimensional ultrasonic method are much more accurate than radiographic method. Because many of these imperfections the length was smaller than its true size due to crack growth and its penetration into the interior. But using threedimensional ultrasonic method exact size and position of defects were identified. According to the efficiency of slag catcher unit in the refineries and also being under the pressure of the lines, existence of such imperfections may have very dangerous results to life and property that, there were no possibilities to identify them in any way without the use of three-dimensional ultrasonic.


3. DISCUSSION AND CONCLUSIONS
Developments of inspection methods by three-dimensional ultrasonic technology have higher speed and accuracy compared to conventional non-destructive testing methods such as radiography and ultrasonic; its reasons can be summarized as follows:

1. The use of echo pulse in three-dimensional ultrasonic method similar to a conventional ultrasonic.
2. Using a powerful imaging tool.
3. Drawing two-dimensional and three-dimensional data using various scanning and probe movement.
4. If the employer needs, provides the possibility of implementation of a few meters of inspection to detect flaws that their discovery and inspection is difficult.
5. Precise drawing of imperfection location.
6. Very high quality Report for the customer or client representatives.
7. Reasonable impression of how to diagnose the imperfection and measure it using imaging technique by several sets of waves to train technicians.
In addition to all the benefits that we mentioned for P.A. technology already, this method has drawbacks mentioned in Table 1.1. Restrictions may make implementation and use of this
technology limited in large scale. In this regard, the most important P.A equipment manufacturer is rapidly going to find and implement strategies to remove barriers that some of them have been discussed in the column of Table 1.
Presentlimitations
Very expensive Instruments
Moredetails
- Its hardware is 10 to 20 times more expensive than conventional UT.
- The high cost to update device software
Takenmeasuresorinprogress
- Optimized hardware design, such as actions has been done for conventional UT in recent years.
- Standardizing product line
- With above measures price reduction will be 2 to 8 times the normal UT.
The probes are expensive and long duration of buying them because of exclusivity
- 12 to 20 times the price of conventional UT probes.
- Providing standard instructions for making probe
- Standardization of probes used in weld inspection and corrosion control
- The price of probes will decline to about 3 to 6 times the price of conventional probe.
Very skilled operator with significant knowledge of ultrasonic is needed.
- This technique needs several specialties including computers, mechanics, ultrasound knowledge and special skills.
- Now, skilled manpower to carry out inspections with high workloads are considered a problem.
- Training courses with different degrees of certification.
- Publication of diverse and advanced handbooks on how to perform P.A according to its applications.
The calibration of device has been complex and needs a long time.
- Before starting required several operations for calibration.
- Periodic and routine calibration of device is also time-consuming.
- Development and installation of calibration equipment on the device.
- Development of special equipment and adjustments for periodic controls of the device.
- Standardization of calibration instructions.
Data analysis and drawing defects will take time.
- Large data catching of defect situation causes its analysis time-consuming for the system.
- Development of automated analysis method based on the specific characteristics of incoming waves.
- Development of twodimensional and threedimensional plotting data directly.
Advances in Materials Science and Engineering: An International Journal (MSEJ), Vol. 3, No. 4, December 2016
Method does not quite standardize.
REFERENCES:
- Because of the many complexities of P.A technique, studies still has not been done to standardize them.
- National and international continued activities to standardize it in the Committee of ASME, ASNT, IIW
- Creating manuals for the P.A equipment
- Simplifying calibration of the recipes.
- Preparing general recipes.
[1]. Introduction to Phased array Ultrasonic Technology Applications.By: R/D Tech Canada -1ST Edition in August 2004 in Canada.
1. Dr.MichaelD.C Moles (R/D Tech Canada )
2. Colin R.B ird ( TWI Ltd. R U K )
3. Pamela Harzog ( USAF , USA )
4. Tim Armitt (Lavender International. Ltd. U K )
5. Petro Cioran ( OPG.Canada )
6. Ron Roberts (Lowa State University. USA )
[2]. Phased Arrays and Mechanised Ultarsonic Testing, By: E/A. Ginzel Third Edition-2008- Prometheus Press- Waterloo,Ontario.
[3]. Basic of Phased Array Ultrasonic and its Applications in Quality Evaluation of Welded Joints on Combined Cycle Power Plants Boilers.
[4]. F. Marefat, M. R. Faghedi, A. R. Khodabandeh, M. R. Afshar, A. Amadeh (International Congress on Advances in Welding Science and Technology for Construction, Energy and Transportation Systems (AWST - 2011) 24-25 October 2011, Antalya, Turkey).
[5]. Capabilities and Limitations of Radiography and Phased Array Ultrasonic Test in the Detection of subtle welding defects. Fereidoon MAREFAT, M.Reza FAGHEDI, A.Reza KHODABANDEH, M.RezaAFSHAR4, Ali AMADEH, Afshin YOUSEFI (Singapore International NDT Conference & Exhibition , 3-4 November 2011).
