
Photoshop Shortcuts for Editing Ecommerce
Product Images and Clipping Paths

When editing finished product photographs in Photoshop, shortcuts are a terrific method to expedite the editing process. But, there are so many that it's impossible to keep track of them all, especially if photo editing isn't your primary duty.

For this reason, we've put together a useful guide that includes a printable cheat sheet that you can pin to your desktop or use as a quick reference for all the Photoshop shortcuts you need to know to make pixel-perfect alterations to product photos.
A word about Macs and PCs
Given that each operating system has a slightly different keyboard, key command shortcuts are typically slightly different between Mac and PC (Windows). Generally


speaking, whenever CTRL is used on a PC, COMMAND is used on a Mac, and whenever ALT is used on a PC, OPTION is used on a Mac.


This rule has one major exception. You must first press the FN key on more recent Mac laptops in order to access the Function keys. Nevertheless, there is no FN key on Mac desktops or PCs.
A few hours of precious time can be saved by learning Photoshop shortcuts. These are some simple Photoshop keyboard shortcuts that you can learn to speed up and simplify your process.
 Basic Photoshop key command shortcuts are listed below.
There are extra task-specific shortcut keys in each of the sections below in addition to these standard shortcut key commands.

Tips for using Photoshop shortcuts when retouching product photos
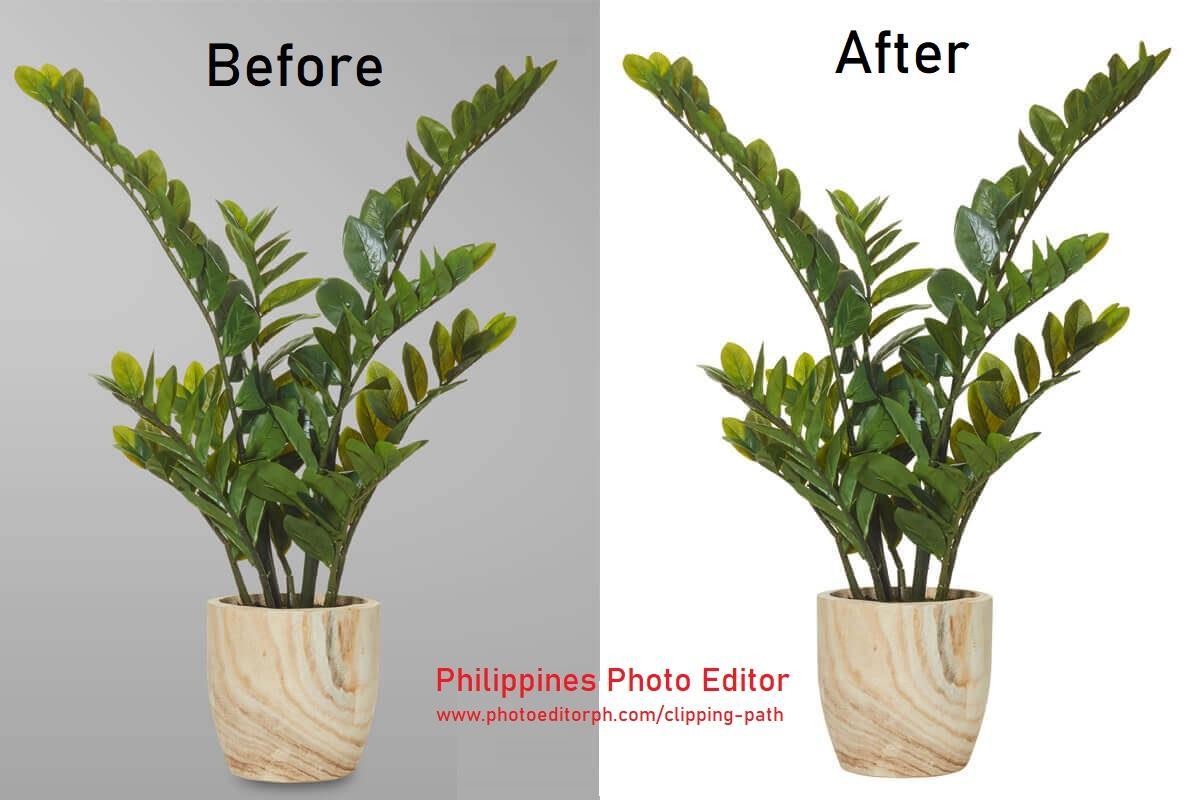
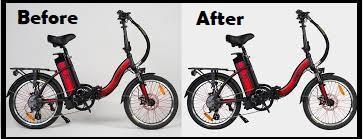
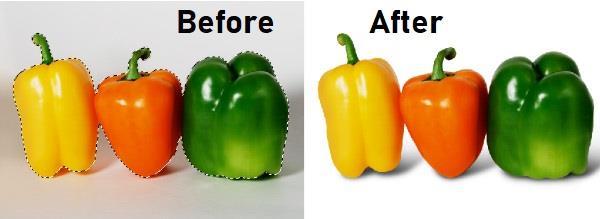
How to use keyboard shortcuts for cutting paths
Previously, we went through how to use the Magic Wand tool with Choose Subject to get rid of the backdrop from your product image. The Magic Wand tool won't function, though, if your background is similarly focused or colored to your foreground.

Creating clipping paths is your best choice in these situations to get rid of the background. We've also created a tutorial to show you how to edit product photographs in Photoshop by removing the background with the Pen Tool.

You may create quick clipping path ways by using both of your hands one to type on the keyboard and the other to draw with the mouse or a stylus. Your other hand can continue fast drawing the path while your keyboard hand writes the shortcut key commands to quickly switch between tools.
Set up your workspace before creating the clipping path. Ensure that the Direct Selection tool and the Pen tool are both visible in the Toolbar.


There are several key command shortcuts you can utilize to speed up and simplify the process of separating a product image from its background using a clipping path.
How to use the Photoshop shortcut for the stroke path
Your path will be delineated using the same brush's width, hardness, opacity, blending mode, and color when you use the stroke path shortcut. Hence, you must first configure your Brush tool presets to the desired size and color before using the stroke path Photoshop shortcut that is displayed in the Paths panel above. It's best to always create a new layer and select it before using the shortcut for the stroke path because the route stroke will appear in your selected layer otherwise.
How to utilize a clipping mask shortcut
Clipping paths and clipping masks initially seem to share a lot in common. Yet, when you take a clipping mask shortcut, there are minute variations that stand out. The little Add Layer Mask icon, which can be found at the bottom of the Layers panel and the Paths panel, is the most widely used shortcut for creating a clipping mask.


The area of your layer that you want to keep visible after applying the mask should be chosen first in order to swiftly and efficiently make a layer mask. Then, in the Layers panel or the Paths panel, click the Add Layer Mask icon. The remaining elements of your layer will be immediately "masked out," making only your selection visible.
Using adjustment layers as a shortcut for clipping masks is another option. The image below, for instance, includes two layers with an adjustment layer on top. The majority of the layer on the layer nearest to the adjustment layer is transparent.


Select the adjustment layer and press ALT + CTRL + G (OPTION + COMMAND + G on a Mac) to only apply it to the non-transparent portions of the top layer. In this case, just the earphones should receive the Color Balance modification.
How to quickly crop in Photoshop
It's crucial that the style of your photographs is consistent throughout your website. Your Crop tool can be configured to swiftly crop photos of comparable products so that they are all the same size and resolution.
How to make a product image crop preset
Type C to quickly access the Crop tool when it appears on your toolbar. Specify the final measurements of the width and height for your product photographs.
You should use pixels for the width and height of webpages and apps, and set the resolution to 72 ppi for typical web graphics. Double both the height and width parameters if you require your photographs to look good on a retina monitor.
Also, you can select the positioning rules you want to employ for your product image as you crop it by clicking on the dropdown menu next to the grid symbol. Rule of Thirds is the default setting for this.

Once your dimensions are chosen, click Create Crop Preset from the W x H x Resolution dropdown menu. Give your preset a name like "product thumbnail" to make it easier to remember which product images these crop settings will be applied to.
Once you've made your crop preset, you can use the crop tool to click on any product image, choose your preset from the Resolution menu, and follow the directions to arrange the subject of your picture similarly.
Several helpful tips for ensuring consistency are also provided by the crop tool. To straighten your product image, click the Straighten icon and trace a line around the edge of the image. To rotate the crop, you can also move your cursor over the crop edge's corners.
After you are happy with your crop, select it by clicking the checkbox in the Settings column. Repeat with the following image in your product series after that.
How to export photographs for your website rapidly
Similar to the Crop tool, a little bit of preparation with your export features can speed up your production by hours. You can set up your Quick Export settings and then quickly export each file into a web-ready format if you know you'll be working on a sizable batch of web-ready photographs that must have the same file format.
You can select the JPG, PNG, GIF, or SVG file type, the directory where you want the exported file to exist, and the color space you want the exported file to be in in the dialog box that appears. You can decide to apply copyright information from a metadata template you've developed to exported files as well.

Click OK once you've configured your options.
Moreover, Fast Export features a shortcut key command. Once you've selected the options you want, click Quick Export.
Simply type this key command the next time you need to export a picture for your website, and the image will be exported automatically with all of your Quick Export preferences.
How to quickly make a background that is truly white
Chances are you still need to perform some editing to ensure the white background in one image has the same brightness as the background in the next if you photographed your goods in front of a white backdrop and don't need to remove it from the background. You may quickly achieve that with the use of this eyedropper shortcut.
At the bottom of the Curves dialog box, which now appears, are three eyedropper tools. Choose the eyedropper that is farthest to the right. The Set White Point eyedropper is shown here.


Choose the eyedropper tool, then click on the product image's backdrop. Choose the area of your white background that is the darkest and is not a shadow. The eyedropper will turn those pixels completely white, and the rest of the image will be modified correspondingly.
Repeat the procedure for the remaining product photos. If you used the same lighting for all of your images, you can brighten the backdrop without sacrificing consistency.
How to make custom Photoshop keyboard shortcuts
You can design your own shortcut key if Photoshop doesn't offer one for a task you perform frequently. a keyboard shortcut to be created.
Shortcuts For: is an option that can be accessible from the Application Menu, so in the dialog window that appears, select Application Menus next to it. Due to the fact that Shadows/Highlights... is listed under the Image menu, click on Image in the window's scrolling menu and then go down until you find Shadows/Highlights... listed under Adjustments.
As long as it's not already in use by Photoshop and contains either key, you can create any shortcut key you like. Finding a shortcut key that is not in use may require some trial and error because Photoshop already has so many shortcut keys.
Questions on Photoshop shortcuts
Why is there a shortcut key?
Using a keyboard command, frequent operations can be completed more rapidly by using a shortcut key. It makes photo editing more effective.
What is the Adobe Photoshop shortcut for the clipping mask?
The Create Layer Mask or Create Mask from Path icons in the Layers panel or the Paths panel, respectively, are the shortcuts for clipping masks in Photoshop.


What
Photoshop shortcut keys are there?


This article and this downloadable cheat sheet pdf both list the Photoshop shortcut keys. Keep in mind the ones that are most useful for the daily chores you perform. See the list at the start of this post for a list of some of the most popular shortcut keys for Photoshop.
WhatsApp: +880 1723-283638
Address: Blk 34 Lot 5 Easthomes 3 Subd., Estefania, Bacolod City, Philippines,6100
