IWAKI AMERICA MAGNETIC DRIVE PUMP MD/WMD SERIES
Thank you for having selected an Iwaki America MD/WMD Series magnetic drive pump. This instruction manual deals with the correct handling, maintenance, inspection and troubleshooting procedures for the MD/WMD magnetic drive pump. Please read through it carefully to ensure the optimum performance, safety and long service of your pump.
Contents 1 SAFETY INSTRUCTION ................................................................................................................. 1 2 UNPACKING AND INSPECTION 3 3 OPERATING PRINCIPLE ................................................................................................................ 3 4 MODEL IDENTIFICATION GUIDE 4 5 SPECIFICATIONS ............................................................................................................................ 5 Construction/Materials ....................................................................................................................... 6 6 HANDLING INSTRUCTIONS 7 7 INSTALLATION, PIPING, AND WIRING 8 7.1 Installation 8 7.2 Piping instructions .................................................................................................................. 9 7.3 Wiring ...................................................................................................................................... 9 8 ASSEMBLY 11 9 OPERATION 12 10 MAINTENANCE/INSPECTION AND CONSUMABLE PARTS ............................................... 14 11 PARTS DESCRIPTION AND EXPLODED VIEW 14 12 DIMENSIONS ................................................................................................................................ 15 13 TROUBLESHOOTING 16 P/N 180243 Rev. H Oct 2019
1 SAFETY INSTRUCTIONS
Turn off the power supply
Working without disconnecting the power supply may cause an electrical shock. Before performing any assembly or maintenance procedures involving the pump, make sure to turn the power supply switch off and to stop the pump and other related devices.
Terminate operation
When you detect any signs of abnormal operation, terminate pump operation immediately.
For specified application only
The use of a pump in any applications other than those clearly specified may result in injury or damage to the pump. Use the pump strictly in accordance with the pump specifications and application capabilities.
Modification
Never modify the pump. Iwaki America will not be responsible for any accident or damage of any kind caused by the user remodeling the pump without first obtaining permission or instructions from Iwaki America.
Protective clothing
If application involves the handling of hazardous liquids, protective gear (gloves, glasses, clothing, etc) must be worn before performing any maintenance on the pump. Please follow safety guidelines established for such applications.
Operation
Operation of the pump and related system must be by experienced or knowledgeable personal. The pump operator or pump operation supervisor must not allow any personal who have little or no knowledge of the pump to operate the unit.
Power
Do not operate the pump at a different voltage than specified on the nameplate. This may result in damage to the unit or fire. Only the specified voltage must be used.
Do not submerge
If the motor or power cable becomes wet or damp fire or electric shock may occur. The unit should be installed in such a manner to prevent contact with fluids or in a wet environment. Follow all local, state and government regulations for the installation and wiring of the pump.
Spill accident
Protective measures should be taken against any accidental spill or leakage of any hazardous liquids as a result of unexpected damage to the pump or the related piping. Please follow safety guidelines established for such occurrences.
Operating site must be free of water and humidity
The pump is not designed to be water-proof or dust-proof. The use of the pump in places with splashing water or humidity above 90% may result in an electrical shock or short circuit.
1
Do not damage power cord
Do not cut, abrade or forcibly pull the power cord. Excessive heat or heavy load applied to the cable may damage the cable and finally result in a fire or an electrical shock.
Do not cover the motor
Covering the motor during operation may result in an accumulation heat inside the motor and cause a fire or a mechanical failure. Proper ventilation is necessary for the motor.
Grounding
Do not operate the pump without proper grounding; otherwise an electrical shock may result. Follow all local, state and government regulations for the installation and wiring of the pump.
Power cord cannot be replaced
Never use a damaged power cable; otherwise, a fire or an electrical shock may result. Handle the power cord carefully, as it cannot to be replaced by a new cable. (The complete motor must be replaced if damaged).
Location and storage
Do not install or store the pump in the following places:
* Places where a flammable gas or material is used or stored.
* Places where the ambient temperature is extremely high (104°F or higher) or extremely low (32°F or lower).
Static Electricity Hazard
When low electric conductivity liquid such as ultra-pure water is handled, static electricity may be generated in the pump, which may cause static discharge and damage the pump. Take appropriate countermeasures to avoid and remove any potential static electricity.
2
6 HANDLING INSTRUCTIONS
1. Handle the pump carefully
Strong impact to the pump assembly may result in damage or reduced performance.
2. Starting
Before priming the pump be sure the power is turned off then proceed with filling the pump end with water. Note, the pump must be fully primed before starting.
Next close the valve on the outlet or discharge side of pump. Turn on power to the pump, when full speed is reached gradually open the discharge vale until specified flow rate is achieved.
Caution
Operating the pump dry (without liquid) may cause severe damage.
3. Stopping
When stopping the pump, first close the discharge valve gradually. When it is completely closed, turn off the power switch so that the pump stops. Never stop the pump suddenly by quickly closing a valve (i.e., solenoid or hydraulic valves).
Caution
Quick valve closure may cause water hammer that can cause severe damage to the pump.
4. Temperature
The pump itself may not suffer a change in performance due to temperature fluctuation. However, the liquid may change in terms of viscosity, vapor pressure, and corrosive properties. Pay special attention to changes in liquid characteristics as a result of temperature fluctuation.
Liquid temperature range: 32 – 176°F (0 – 80°C)
Ambient temperature range: 32 – 104°F (0 – 40°C)
5. As there is a powerful magnet inside the pump unit, do not use any liquid that contains metallic substances such as iron, nickel, etc.
6. Do not operate the pump in the following places:
• Places exposed to rain and/or wind.
• Places where the temperature falls below 32°F (0°C).
• Places where corrosive gas (such as chlorine) is present.
• Places exposed to splashing of water or fluid being pumped.
• Places where the ambient temperature is 104°F (40°C) or above.
• Places where explosive or combustible materials/gases are present.
7. Do not operate the pump with the following liquids:
7
• For the compatibility to chemical liquid or any special liquid, contact an Iwaki America sales representative.
• Liquids that significantly swell polypropylene.
• Paraffinic hydrocarbons such as gasoline and kerosene.
• Halogenated hydrocarbons such as trichloroethylene and carbon tetrachloride.
• Ether and low-grade ester
• Slurry
(For a chemical compatibility to guide contact Iwaki America customer service.)
8. To prevent fire and explosions, do not place dangerous or flammable substances near the pump.
9. Be sure unit is properly ground.
10. If a pumped is damaged, it can be dangerous to operate. Contact factory for assistance.
11. Avoid direct physical contact with the motor or pump during operation, as surface temperatures may be extremely high due to operating conditions.
7 INSTALLATION, WIRING AND CONNECTIONS
7.1 Installation
1. Installation site
Installation site must have an ambient temperature of 32-104°F (0-40°C) and a relative humidity lower than 90%. Install the pump where maintenance and inspection work can be done easily.
2. Pump installation method
This pump is not self-priming. It is recommended that the pump shall be installed in a position lower than the liquid level of the suction tank by at least 12 inches (30 cm). If this distance is too short, air may enter the pump, causing damage.
3. Direction of pump discharge port
The discharge port can be directed as desired. However, for efficient elimination of air in the pump end, it is recommended that the discharge port be positioned in the horizontal direction.
4. Anchoring of base
The base of the pump must be anchored firmly. The pump must not be mounted in a vertical position.
8
7.2 Piping instructions
1. To minimize frictional resistance, the shortest piping possible with a minimum number of bends should be utilized on the inlet or suction side of the pump.
2. Use a corrosion-resistant vinyl hose that is rated at or above the pressure rating of the pump (see specification table).
3. Hose size (for hose-barb style pumps)
Select hose size in accordance with the diameter of the pump connections. As the hose tends to be crushed under the force, the use of a braided reinforced hose is recommended. Note, if the connection on the suction side is loose air may be mixed in with pumped fluid.
(In the case of high temperature liquids, special attention must be paid to the selection of a hose.)
4. Hose connection
Be sure to cut the ends of the hose straight. Press the hose end firmly against the discharge or suction port until it reaches the bottom of the port. Use a fastener (such as a hose clamp) to make the connection tight and leak free.
Caution
Do not over tighten the connection ports (suction and discharge) excessively as they are made of plastic resin and are could be damaged.
5. Valve installation
Install valves close to the suction and discharge ports.
• Suction side valve: For easy liquid removal and pump maintenance
• Discharge side valve: For adjustment of the discharge rate or head and for easy removal and pump maintenance.
7.3 Wiring
1. Prior to wiring the pump, confirm the voltage indicated on the nameplate is correct for your installation. (Observe all local and national regulations regarding electrical work.) The connection diagram is presented on the next page.
2. The pump does not have an external switch. It starts when power is supplied to the pump wires.
9
Wiring diagrams
• (W)MD-15R, 20R, 20RX, 20RZ, 30R, 30RX and 30RZ (Single-phase capacitor run motor with thermal protector)
BLACK WHITE GREEN
THERMAL PROTECTOR
POWER SOURCE
AUXILIARY COIL MAIN COIL
CAPACITOR
• (W)MD-40R, 40RX, 40RZ, 55R, 70R, 70RZ, and 100R (Single-phase capacitor run motor with thermal protector)
THERMAL PROTECTOR AUXILIARY COIL MAIN COIL CAPACITOR POWER SOURCE
BLACK WHITE GREEN
BROWN BLUE GREEN/YELLOW
MAIN COIL POWER SOURCE
THERMAL PROTECTOR CAPACITOR
• MD-70R, 70RZ, and 100R models (3-phase motor, 220/380V)
10
THERMAL PROTECTOR THERMAL PROTECTOR ROTOR POWER SOURCE RED WHITE BLACK GRAY BLUE YELLOW W2 U2 V2 U1 V1 W1 THERMAL PROTECTOR THERMAL PROTECTOR POWER SOURCE RED WHITE BLACK GRAY BLUE YELLOW W2 U2 V2 U1 V1 W1 220V 380V 100R ONLY
• (W)MD-70R, 70RZ, and 100R models (3-phase motor,400/440V)
8 ASSEMBLY
1. Place the motor on end vertically so that the shaft is pointed upward.
2. Install the drive magnet on the motor shaft and position the shaft flush with the inside of the magnet. Note: On WMD models, screw the bracket to the motor first.
3. Insert the rear casing into the magnet/motor bracket.
4. Install the impeller and O-ring into the rear casing.
5. Place the front casing over the pump, making sure that the volute casing is aligned.
6. Using a hex head driver, fasten the liquid end to the bracket using six screws. Tighten in a star pattern.
11
THERMAL PROTECTOR THERMAL PROTECTOR ROTOR POWER SOURCE
Caution
• Before operating the pump, confirm that connections to the discharge and suction ports are secure.
• Dry run operation (operation without liquid in the pump) damages the pump. Be sure to fill the pump with liquid prior to startup.
• Do not operate the pump with closed, or almost entirely closed, suction and/or discharge side valve(s). A closed suction valve will cause dry-run operation.
• Do not open or close the suction or discharge side valve suddenly, this may result in decoupling and damage to the pump end. (Under such circumstances, turn off the power supply immediately. When the motor stops rotating, the magnetic coupling will be reconnect automatically.)
No. Operation Step Note
1 Check piping, wiring and voltage. Check connections to confirm they are secure and leak-free. Check the power supply voltage by referring to the information on the nameplate.
2 Open and close valves. Fully open suction side valve. Fully close discharge side valve.
3 Check that pump chamber is filled with liquid.
Fill pump chamber with priming liquid. Be sure suction line is completely filled, this is especially important if pump is above liquid level.
4 Supply power to pump After steps 1 to 3 above, connect power supply to start pump.
5 Adjust discharge capacity & head to desired values.
Adjust discharge side valve gradually till desired discharge capacity and head are obtained. Do not open or close valves suddenly.
Note: Do not keep discharge side valve closed for more than 1 minute.
Note: Check that pump is operating normally. If not, turn off power immediately and eliminate cause referring to 'Causes of Trouble and Troubleshooting' section (p.27).
6 Checkpoints during operation
Be careful to prevent solids from entering the pump. Solids in the pump may cause impeller to be locked stopping liquid circulation. The motor continues to rotate even if impeller is locked. In such a case, turn off power supply at once.
12 9
OPERATION
Pump Stopping Procedure
No. Stopping Step Description
1 Close discharge side valve. Close discharge side valve gradually. Do not use electromagnetic valve for quick closing.
2 Switch power off. Check that motor stops smoothly after power supply is disconnected. If not, pump should be inspected. (For details, contact Iwaki or your dealer.)
How to store pump when it is out of use for a long time
Remove the liquid from the pump if it is to be stored for a long period of time. In addition, run it with water for about 5 minutes every 3 months to prevent rust on the motor bearing.
Warning
• Before draining the pump, turn off the power supply.
• Be sure to wear proper safety gear (gloves, protective shoes, etc.) when handling pump end for draining purposes, especially when a hazardous chemical is being pumped.
Caution
Note that residual liquid may run from the discharge and suction ports when the housing is removed. Do not allow any electric parts to come in contact with the liquid.
Never discharge hazardous or chemical liquid over the ground or floor in the plant. Instead, use a draining pan (or container). Observe each applicable local law or regulation for the handling or disposal of hazardous liquids.
Draining procedure
1. Turn off the power supply. (Make sure no other operator will turn the power supply on accidentally.)
2. Close the discharge and suction sides valves fully.
3. Remove the hoses piping attached to the pump.
4. Remove the screws on the pump base to detach the pump from its mounting location.
5. Rotate the pump.
6. Discharge hazardous liquids appropriately.
13
10 MAINTENANCE/INSPECTION
Maintenance and inspection
• When the pump has been used for a long time, the front casing screws attaching the pump head to the motor bracket may loosen. Tighten screws periodically taking care not to deform the plastic parts. Also, after pump has been stored for a long time, tighten screws before pump is used again.
• Daily inspection
Check operating conditions (vibration, noise) as well as electric current value and pump discharge capacity. As soon as you find any abnormality, turn off power and refer to “Troubleshooting” on page 27.
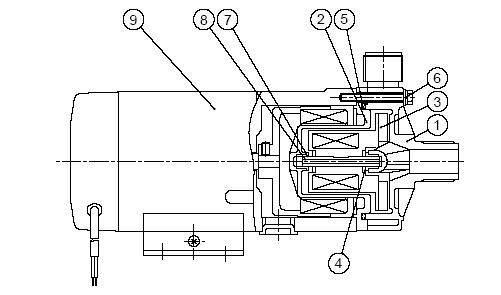
11 PARTS DESCRIPTION AND EXPLODED VIEW

TYPICAL MD-6 through 40
TYPICAL MD-55/70/100
TYPICAL WMD
14 1 2 3 4 5 6 9 7
Item No. Description Item No. Description 1 Screw 5 Rear Casing 2 Front Casing 6 Drive Magnet 3 O-Ring 7 Motor Assembly 4 Impeller 8 Retainer (MD-100R,100F, 70RZ, 55F only) 9 Bracket
15 12
Dimensions in inches *Varies with motor Connections W H L a b c d e f Model Hose NPT(M) Polypropylene Models (MD-115V models only) MD-6/10 1/2 2.91 3.62 4.09 1.18 2.87 2.36 1.77 1.22 0.67 WMD-15R(T) 1/2 1/2 3.50 4.26 9.46 2.37 4.15 2.50 1.94 1.52 0.85 MD-15R(T) 1/2 1/2 3.74 4.39 7.05 1.97 4.59 3.35 2.17 1.52 0.85 WMD-20R(T) 5/8 3/4 3.50 4.35 9.70 2.37 4.39 2.50 1.94 1.30 1.12 MD-20R(T) 5/8 3/4 4.17 4.19 7.99 1.73 4.06 3.54 1.77 1.30 1.12 WMD-20RX(T) 1 1 3.50 4.95 10.37 2.37 5.06 2.50 1.94 1.83 40+ MD-20RX 1 1 4.17 4.75 8.66 1.73 4.45 3.54 1.74 1.83 40+ WMD-20RZ 5/8 3/4 3.50 4.70 9.98 2.37 4.67 2.50 1.94 1.56 1.52 MD-20RZ 5/8 3/4 4.17 4.92 8.31 1.73 4.17 3.54 2.17 1.56 1.52 WMD-30R 3/4 3/4 3.50 4.70 11.65 2.37 5.72 2.50 1.94 1.89 1.22 MD-30R 3/4 3/4 4.72 5.12 9.76 1.57 5.87 3.94 2.36 1.89 1.22 WMD-30RX 1 1 3.50 5.09 11.89 2.37 5.96 2.50 1.94 1.97 40+ MD-30RX 1 1 4.72 5.51 10.00 1.57 6.10 3.94 2.36 1.97 40+ WMD-30RZ 5/8 3/4 3.50 4.70 10.97 2.37 5.04 2.50 1.94 1.56 1.53 MD-30RZ 5/8 3/4 4.72 5.12 9.05 1.57 5.16 3.94 2.36 1.56 1.53 WMD-40R 3/4 3/4 4.38 4.84 11.34 3.09 6.66 3.37 2.08 1.89 1.22 MD-40R 3/4 3/4 4.72 5.12 9.85 1.57 5.87 3.94 2.36 1.89 1.22 WMD-40RX 1 1 4.38 5.23 11.30 3.09 7.02 3.37 2.08 1.97 43+ MD-40RX 1 1 4.72 5.51 10.08 1.57 6.10 3.94 2.36 1.97 43+ MD-55R 1 1 4.72 6.10 10.77 1.57 7.05 3.94 2.56 2.42 1.57 MD-70R 1 1 5.63 6.10 10.22 2.75 5.20 4.25 2.56 2.09 1.69 MD-70RZ 3/4 3/4 5.63 6.50 9.80 2.75 5.20 4.25 2.56 1.65 1.87 MD-100R 1 1 6.14 6.89 12.67 2.76 6.38 4.33 2.95 2.55 1.71 WMD-100R 1 1 * 7.44 * 3.00 10.43 4.87 3.50 2.55 1.71 Fluoroplastic Models (MD-115V models only) WMD-30F (X,Y,Z) 1/2 3.50 5.02 11.82 2.37 6.67 2.62 2.29 1.84 1.22 MD-30F (X,Y,Z) 1/2 4.72 5.12 9.09 1.57 6.77 3.94 2.36 1.53 1.52 MD-55F (Y,Z) 1 4.72 6.11 10.53 1.57 6.61 3.94 2.56 2.30 1.56 WMD-100F (Y,Z) 1 * 6.80 * 3.00 12.05 4.88 3.56 2.55 1.71 MD-100 (Y,Z) 1 6.14 6.89 12.67 2.76 6.38 4.33 2.95 2.55 1.71
DIMENSIONS
Power is not supplied or wiring is faulty.
Motor is out of order (short coil or capacitor failure).
There is residual air in the pump.
Air is sucked in via suction port.
Pump is running dry.
Specific gravity/viscosity of liquid is too high.
Periphery of impeller magnet is in contact with rear casing.
Impeller is damaged.
Foreign matter is stuck to impeller.
O-ring is damaged.
Loose front casing bolts.
Pump does not start.
Pump is not pumping or flow is insufficient.
Electric current is high.
Excessive noise or vibration. Liquid leaks.
Check power connections or contact your dealer.
Contact your dealer.
Eliminate air from pump end completely.
Check suction connection.
Supply priming water to pump.
Confirm application with pump specifications.
Contact your dealer.
Contact your dealer.
Contact your dealer.
Contact your dealer.
Tighten bolts.
16 13
TROUBLESHOOTING
○ ○
○ ○
○ ○
○ ○
○ ○
○ ○ ○
○ ○ ○ ○
○ ○ ○ ○
○ ○ ○
○
○ ○
17 5 BOYNTON ROAD HOPPING BROOK PARK HOLLISTON, MA 01746 USA TEL: 508-429-1440 FAX: 508-429-1386 www.iwakiwalchem.com