
Clicwall
Decorative wall covering Installation guide

1. 1. Preparation
2.2. Installing the substructure
3. 3. Positioning Clicwall panels
3.1 SECURING THE CLICWALL
3.2 INSTALLING THE CLICWALL
4.Finishing internal and external corners
4.1 INTERNAL CORNERS
4.1.1 Open joint or sealing
4.1. 2 Aluminium Clicwall internal corner profile
4.1. 3 Flexible Clicwall MDF corner profiles
4.2 EXTERNAL CORNERS
4.2.1 Aluminium Clicwall external corner profile
4.2. 2 L-profile for external corner
4.2. 3 Flexible Clicwall MDF corner profiles
5.Incorporating windows and doors
5.1 WINDOWS
5.1.1 Finishing with a Clicwall external corner profile
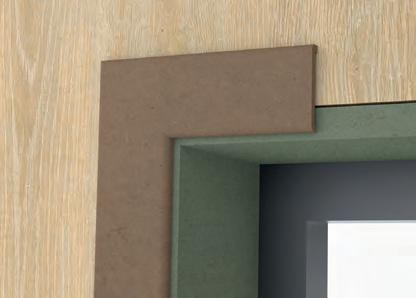
5.1. 2 Finishing with MDF mouldings or flexible Clicwall MDF corner profiles
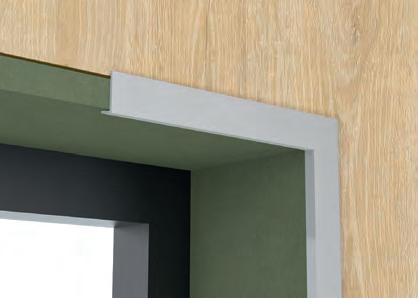
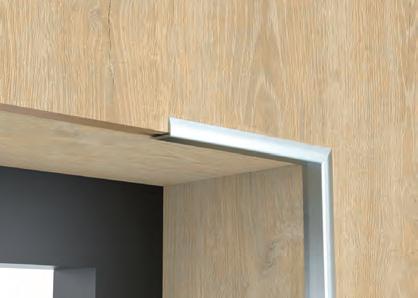
5.1. 3 Finishing with aluminium L-profile
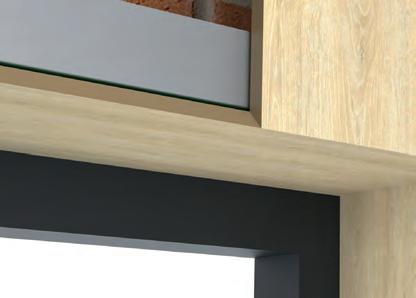
5.1.4 MDF mitre
5.2 DOORS
5.2.1 Standard doors finished with door frames
5.2. 2 Block frame doors
5.2. 3 Doors with recess
6.Incorporating pipes, sockets and switches
6.1 SOCKETS AND SWITCHES
6.2 INSTALLATION AROUND A PIPE
6.3 RADIATORS AND AIR CONDITIONERS
7.Finishing skirting boards and ceiling joints
7.1 SKIRTING BOARD TRIM
7.1.1 Surface-mounted skirting board
7.1. 2 Shadow gap
7.1. 3 Flush-recessed skirting board
7.1.4 Connecting to vinyl flooring
7.2 CEILING FINISH
8. Maintaining and replacing panels
8.1 RETOUCHING A DAMAGED PANEL
8.2 REPLACING A DAMAGED PANEL
8.3 MAINTAINING CLICWALL
9. Specific processing tips
9.1 WIDE WALL (> 8 M)
9.2 HIGH WALL (> 3.5 M)
9.2.1 Finishing with aluminium T-profile
9.2. 2 Shadow gap
9.2. 3 Overlap connection
9.3 CLICWALL AGAINST OR UNDER AN ANGLED WALL
9.3.1 Against an angled wall
9.3. 2 Under an angled wall
9.4 REMOVABLE PANEL
9.5 USING CLICWALL AS A CEILING FINISH OR SLOPING WALL
10.Using Clicwall in rooms with special technical requirements
10.1 CLICWALL IN HUMID AREAS
10.2 CLICWALL IN AREAS WITH INCREASED FIRE REQUIREMENTS
10.2.1 Reaction to fire
10.2 .2 Fire resistance
10.2 .2.1 Clicwall partition wall with fire resistance EI30
.2.2
1. Preparation
Below we go over the most important to-do’s before installation:
1. Choose the appropriate Clicwall panels: decor, dimensions, etc.
2. Select a finishing method of your choice: skirting boards, corner profiles, etc.
3. Determine what type of substructure you want to work with and procure matching fasteners (screws or staples) and MS polymer sealant.
4. Assemble the necessary work tools:
• plunge-cut saw with guide rail for the panels
• screwdriver or stapler to attach the panels
• caulking gun to fix and finish the panels
• grinding wheel or metal scissors to cut the metal studs to size and/or a mitre saw to cut the CLS/SLS wood and the corner profiles to size
• jigsaw to cut out U-shapes for finishing around beams, etc.
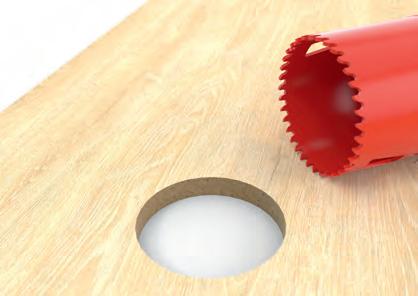
• hole saw for cut-outs at sockets, switches, ventilation pipes etc.
• masking tape to temporarily secure panels when making corners
• spirit level or laser
5. Clean the work floor and wear appropriate personal protective equipment.
6. Check that the room is sufficiently dry and allow the panels to acclimatise there for at least 48 hours in unopened packaging. Make enough perforations to allow for optimal acclimatisation. Make sure there are no holes around the joint to avoid excessive dust collecting on it. Do not remove the packaging until you start installation.
7. Ideally, the room temperature should be between 15 and 20 °C and the humidity between 50 and 60 %. Keep the temperature and humidity constant during installation and ensure a wind and watertight environment.
TIP: Clicwall is suitable for dry environments. In humid areas or areas with special fire requirements, it is better to use moisture-resistant or fire-retardant Clicwall (see point 10).
2. Installing the substructure
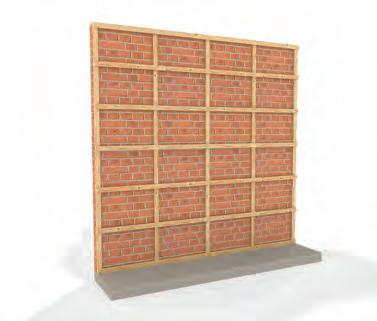
You generally install Clicwall on a substructure. Install the structure in a straight line, level and without undulations.
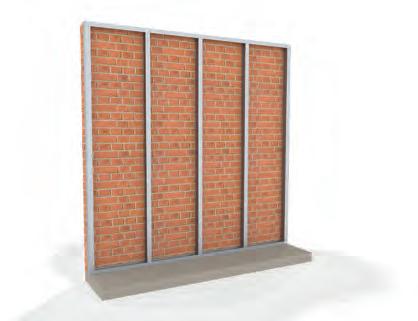
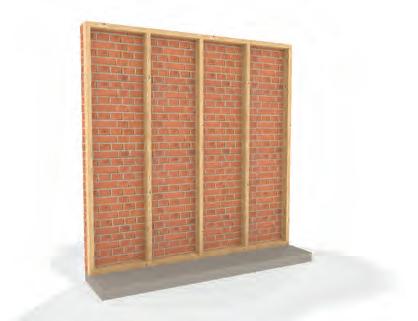
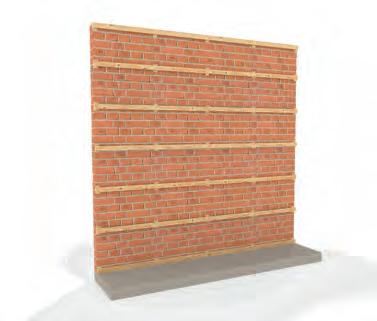
There are various types of substructures:
1. vertical posts of metal studs
• centre-to-centre distance 600 mm
2. CLS/SLS
• centre-to-centre distance 600 mm
3. ceiling slats/roof battens directly on the wall horizontally
• centre-to-centre distance 400 mm
• Use spacer screws or packing shims to obtain a flat, aligned surface.
4. wooden grid
• vertical posts, centre distance 600 mm (e.g. CLS/SLS 38 x 63 mm)
• horizontal battens, centre-to-centre distance 400 mm (e.g. ceiling slats 23 x 38 mm)
As you build the frame, think about how you want to distribute the panels across the wall. If the wall is not a multiple of 600 mm, it is best to start and end with 2 equal panels (minimum width 250 mm).
Wooden grid
Ceiling slats/roof battens directly on the wall
/ SLS
How do I calculate the width of the start and end panels?
• Divide the width of the wall by the width of the panel (600 mm).
• Subtract X number of panels from that until you are left with a number between 1 and 1.999.
• Multiply this number by 600 and finally divide by 2.
Example:
• 3200/600 = 5,33
• 5,33 - 4 = 1,33
• 1,33 x 600 = 800 > 800/2 = 400
Take into account an expansion joint of 1 mm per running metre (maximum 8 metres) and the location of windows and doors. Avoid posts and battens near pipes and other utilities.
For loads up to 50 kg per screw (4.5 x 45 mm is recommended), the Clicwall panels do not require any additional wood reinforcement (e.g. OSB, chipboard, etc.). For loads up to 70 kg, you can use a Qualirack panel (12 mm). In each case, follow the item’s installation instructions.
If a CLT structure is already in place, you can install the Clicwall panels directly onto it (using the same method as installing on battens). The CLT panel must not have any unevenness or be concave or convex. What if the surface is uneven anyway? Install aligned battens against the CLT. You then attach the Clicwall to these.
You can also attach Clicwall directly to plasterboard if the substrate has no unevenness or undulations.
Stagger the Clicwall panels in relation to the plasterboard or install the plasterboard horizontally. Preferably work with plasterboard without bevelled edges to ensure a level surface. If there is any unevenness, it is best to install aligned battens against the plasterboard panels and then attach the Clicwall to these.
TIP: Are you installing Clicwall against an exterior wall (cold zone on the outside, warm zone on the inside)? Then in some cases you will need a vapour barrier, for example if you insulate the wall on the warm interior side. Install the vapour barrier between the wood battens and the Clicwall. A second layer of battens between the vapour barrier and the Clicwall is not necessary.
3.3. Positioning Clicwall panels
3.1 SECURING THE CLICWALL (600mm Centres)
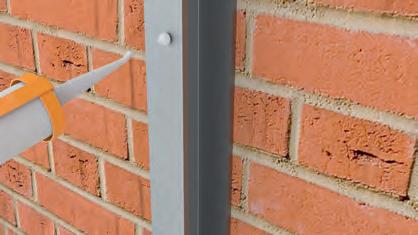
You can attach Clicwall with wood screws (3.5 x 25 mm) or staples (width > 10 mm, depth > 20 mm). Use MS polymer sealant to attach the first and last panels or as extra reinforcement if you use staples. Make sure the substrate is free of dust before applying the MS polymer sealant.
We recommend self-drilling screws to attach Clicwall to metal studs. Make sure that the diameter of the screw head is less than 7 mm.
MS polymer sealant is the best solution for attaching Clicwall to plasterboard. Screws and staples are not suitable in this case. Allow the sealant to dry on the first panel before installing the following panels. You can also install ceiling slats against the plasterboard and attach the panels to these using screws or staples.
Screws or Velcro tape are recommended if you are using Clicwall in a modular set-up where the panels are assembled and disassembled multiple times. Staples or MS polymer sealant are not suitable in this kind of set-up.
3.2 INSTALLING THE CLICWALL
IMPORTANT: in this manual, we always install Clicwall from left to right.
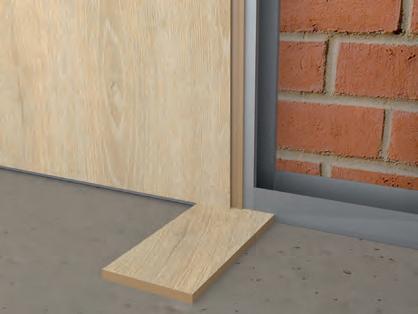
1. Position the first panel level and allow at least 10 mm clearance at the bottom. You can use a piece of Clicwall for this purpose, which you remove again after fastening the panel (1
Allow a 1 mm expansion joint per running metre on the left and right sides 23
Leave a 1 to 2 mm joint if you are finishing the ceiling joint with elastic sealant. You can also provide a little more space if you are using finishing strips.
Cut the first panel to size in length and width. Leave the groove on the panel and cut along the tongue side as you adjust the width.
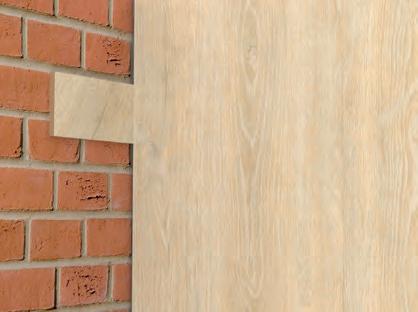
2. Attach the first panel with dabs of MS polymer sealant on the left side 4. Then insert a screw or staple into the groove every 400 mm on the right side. There is a dotted line in the groove to indicate where you can screw 5 or staple 6. Make sure the screws or staples are neatly recessed. Et voilà, the first panel is in place.
TIP: Secure the left side of the first panel with a batten or wedge until the mounting sealant has dried. This will prevent the first panel from coming loose when you install the second.
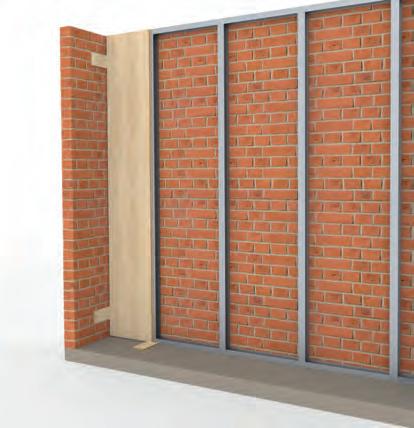
3. Cut the second panel to length, position it in the groove at an angle of about 30° to the wall and press it in gently. Then attach the panel through the groove and into the substructure. Do not push too hard if the panels do not slide together smoothly to avoid damaging the tongue and groove. Make sure the panels are interlocked at the top and bottom to ensure a smooth appearance
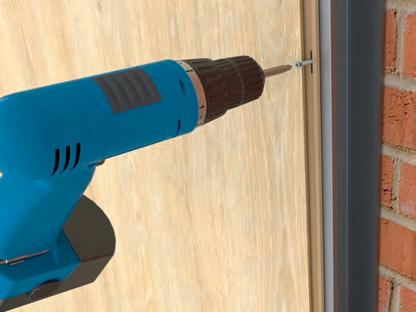
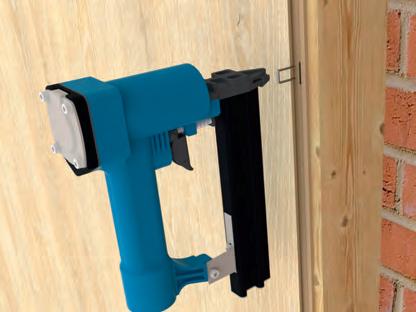
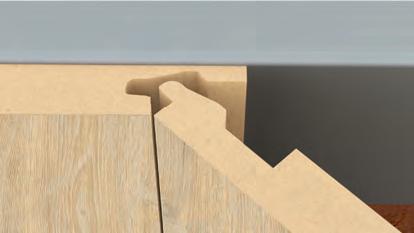
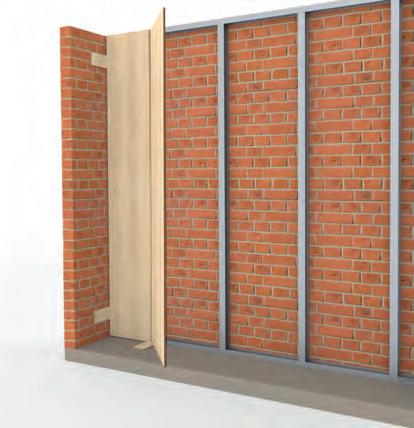
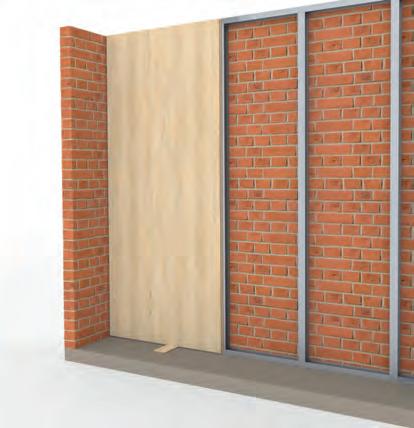

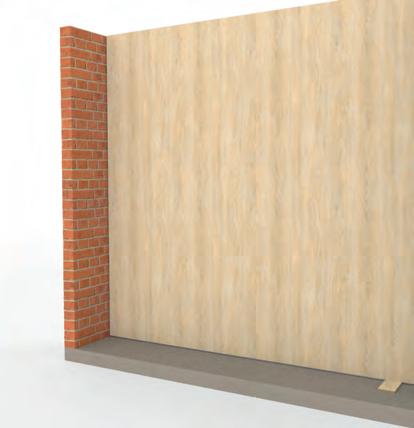
4. Repeat this operation up to and including the penultimate panel.
You can still adjust the width of the last panel. When doing so, remember to allow for the expansion joint. You have to keep the tongue on the panel but you can remove the groove. Click the last panel into the one before it and attach it to the structure on the right side using the mounting sealant. Secure the glued side with a batten or wedge.
TIP: Hide the longer wall behind the shorter one. This gives the longer wall more room to move and limits the visible joint in the corner.
TIP: Are you using Clicwall paint? Lightly sand the joints after installation and before painting. Choose a water-based paint for a seamless finish.
For 450 mm Centres:
When installing Clicwall onto 450 mm stud centres (closer stud or batten spacing), the installation method remains the same, but with a few important considerations:
• Because Clicwall panels are 600 mm wide, fasteners can only be installed at the panel edges, not at every stud.
• As a result, there are fewer fastening points per panel, and the panels are less tightly pulled against the substructure across their full width.
• To improve panel support:
o Install at least two additional noggings — one above and one below the standard nogging line — so that more fastening points are available behind the panel.
• Installing extra noggings helps:
o Reduce surface markings from any minor thickness variations or natural panel curvature.
o Minimise the risk of indentations if pressure is applied to the panel (e.g., someone leaning against the wall).
• Screws must still be used at all times for mechanical fixing.
• While MS polymer construction adhesive in addition to screws on the first and last panels is necessary, it is recommended that is used more frequently with 450mm centres where extra fixing strength is needed.
4.Finishing internal and external corners
You can finish Clicwall in a number of ways. Fit and level the substructure properly for a perfect corner joint.
4.1 INTERNAL CORNERS
4.1.1 Open joint or sealing
Fill the open joint in the internal corner with sealant, then and smooth it out. You can also leave the joint open and work with a shadow gap, but not in humid areas 1
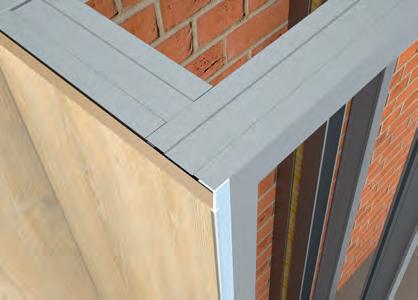
4.1.2 Aluminium Clicwall internal corner profile
Use aluminium Clicwall interior corner profiles (2785 or 3500 mm) to finish interior corners2
Cut the profile to length: the height of the panel minus the skirting board height.
Apply MS polymer sealant to the serrated side of the profile and attach it to the panel with tape 3
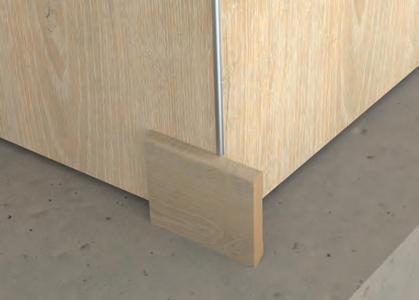
Place a piece of skirting board under the profile so it does not slip down during curing 4. Afterwards, remove the tape with a utility knife
TIP: If you work with an interior corner profile, the short wall to which the profile is glued cannot expand. The profile then fills the entire expansion joint. Only the long wall can still slide behind the profile. Thus, this method is only recommended in a situation with a short and a long wall. Do you have two long walls? Then fill the joint with sealant or create a shadow gap.
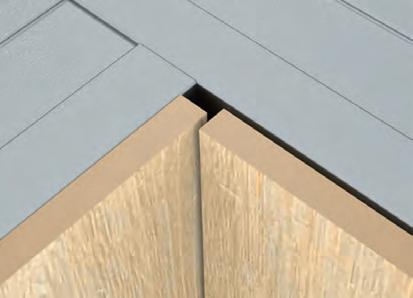
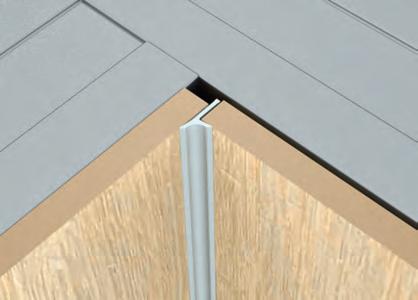

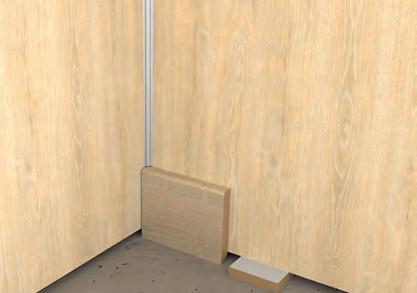
Aluminium inner corner profile Inside corner with open joint
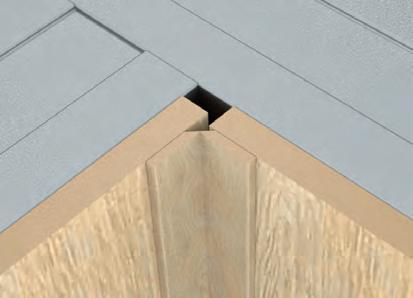
4.1.3 Flexible Clicwall MDF corner profiles
Use flexible profiles (2750 mm) in a matching decor to finish interior corners, and install them using MS polymer sealant 5. These profiles are also available with a backing film you can paint over. Unlike with other finishes, you should install them after you have installed the skirting boards.
4.2 EXTERNAL CORNERS
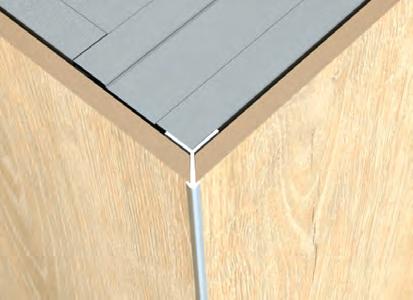
4.2.1 Aluminium Clicwall external corner profile
Clicwall exterior corner profiles (2785 or 3500 mm) guarantee the most aesthetic finish for the exterior corner (with connection tolerances up to 1.5 mm)
1. Cut the panel first to length, then to width with a 45° mitre. The width is the distance to the corner + the thickness of the panel + 1 mm for the thickness of the profile 7
TIP: Sand the mitre lightly to avoid injury from the sharp edge after sawing.
2. Cut the profile to length. Subtract the skirting height from this so that the skirting board will fit nicely against the wall afterwards.
3. Apply adhesive to the front edges of the profile and attach the profile to the panel. Then apply dabs of glue to the corners of the substructure and install the panel together with the profile on the substructure.
Place a piece of skirting board under the profile so it does not slip down during curing 8
Next cut the following panel to size with a mitre (distance to the corner + the thickness of the panel + 1 mm for the thickness of the profile) and slide this panel into the profile. Apply masking tape to the profile and corner panels until the MS polymer sealant has dried. Secure the second panel in the groove with screws or staples, or repeat the previous step to make a U-structure.
4.2.2 L-profile for external corner
If you use the aluminium Clicwall L-profile (10 x 15 x 1.5 mm), you do not need to mitre the corner panels q
You can also install a larger L-profile. L-profiles are available from most hardware merchants in a variety of sizes.
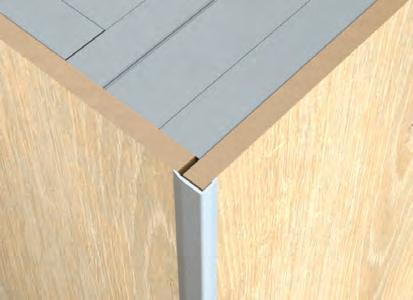
4.2.3 Flexible Clicwall MDF corner profiles
Use flexible profiles (2750 mm) in a matching decor to finish exterior corners, and install them using MS polymer sealant. These profiles are also available with a backing film you can paint over. Unlike with other finishes, you should install them after you have installed the skirting boards w
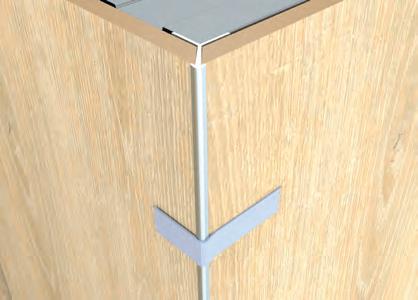
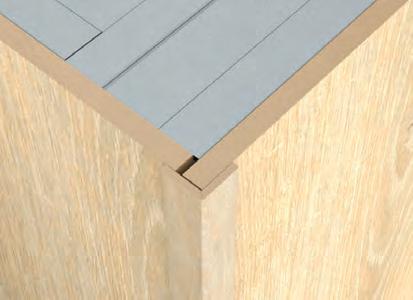
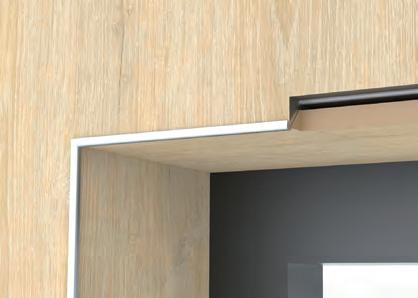
Outside corner with L-profile
Outside corner with flexible Clicwall MDF corner profile
5. 5 . INCORPORATING WINDOWS AND DOORS
5.1 WINDOWS
Windows can be incorporated into MDF or Clicwall panels. Ensure a seamless seal between the reveal and the exterior joinery.
5.1.1 Finishing with a Clicwall external corner profile
Proceed in the same way as for exterior corners 1:
1. Start with panel A and cut it to length. Then cut the recess for the window opening using mitred corners. Take into account the thickness of the panels for the reveals (D1, D2 and D4) and also allow 1 mm for the thickness of the corner profile.
2.Put panel A in place. Click the left side into the previous panel but do not yet attach the right side with screws or staples.
3. Cut all Clicwall exterior corner profiles (P1-P4) to size.
4. Apply dabs of MS polymer sealant to the interior and exterior of corner profile P1. Place the profile between the substructure and panel A.
5. Attach panel A to the substructure with screws or staples in the joint.
6. Apply dabs of MS polymer sealant to the interior of corner profiles P2, P3 and P4 and attach the profiles to the substructure.
7. Cut panels B1 and B2 to length. Make sure the top of B2 and the bottom of B1 are mitred.
8. For panels B1 and B2, remove the thickening at the back of the tongue. This will allow you to click into panel A with a smooth twist. 23
9. Place panel B1 on profile P1 and slide it against panel A. Do the same for the bottom of panel B2.
10. Cut panel C to length, then mitre the cut-out for the window opening. Allow for the thickness of the panels for the reveals (D2, D3 and D4) and also allow 1 mm for the thickness of the corner profile.
11. For panel C, also remove the thickening at the back of the tongue and slide it into panel B1 and B2. Make a tight connection to profiles P2, P3 and P4.
You can make reveals in Clicwall panels or moisture-resistant MDF panels (max. 12 mm). Start with the top and bottom (D2 and D4). Cut the strips to size and create a mitre on the side that connects with the profile. Apply dabs of MS polymer sealant to the structure and exterior of profiles P2 and P4. Position the strips and ensure a tight fit to the profiles. Repeat for strips D1 and D3. After installing all the strips, seal the joints between the different reveals (D1-D4). Also seal the transition between the reveals and the window.
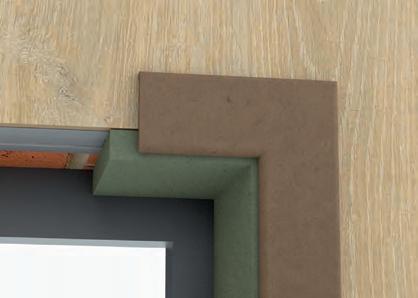
5.1.2 Finishing with MDF mouldings or flexible
Clicwall MDF corner profiles
Cut strips of MDF or Clicwall to cover the reveals.
Do you work with flexible Clicwall MDF corner profiles 4? Then let the vertical Clicwall wall panel come up to in front of the sawn strips. Cut the profiles to size and attach them with MS polymer sealant.
If you are working with MDF framing, the Clicwall wall panel will not reach in front of the MDF framing. Cut the frames to size and attach them with MS polymer sealant 5
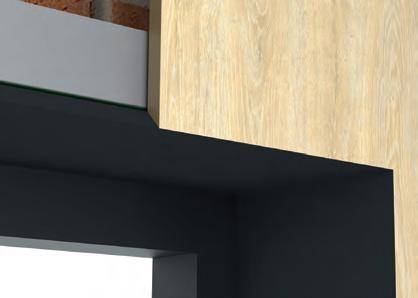
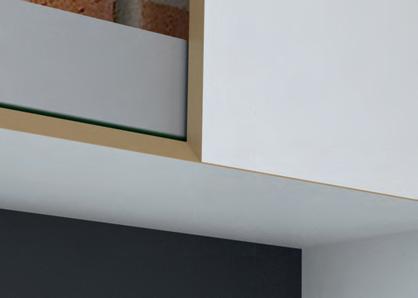
5.1.3 Finishing with aluminium L-profile
Cut strips of MDF or Clicwall to cover the reveals. As a finish, choose aluminium profiles (minimum width according to the thickness of the MDF) 6 or Clicwall L-profile (min. 10 x 15 x 1.5 mm) 7
Let the vertical Clicwall wall panel come up to in front of the sawn strips for the most aesthetic finish. Cut the profiles to size and attach them with MS polymer sealant.

5.1.4
MDF mitre
Do you prefer a finish without profiles? Then, mitre the MDF and cold glue the panels together with white wood glue. Lightly sand the corners afterwards 89q
Decor / decor finish
Black MDF / decor finish
Paint / paint finish
5.2 DOORS
5.2.1 Standard doors finished with door frames
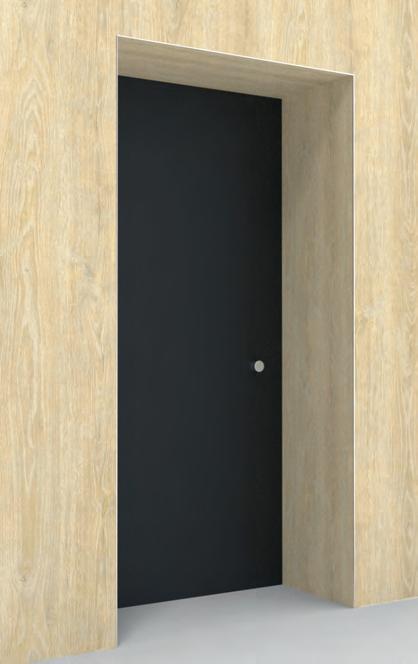
For standard doors, install the Clicwall panels first. Only then install the door and finish it with door frames. Pre-plan the doorway, in line with the planned structure 1
5.2.2 Block frame doors
Install the block frames first, then install the Clicwall panels. That way you minimise the joint between the block frame and the Clicwall.
Mitre the sides of the panels that connect (left and right) to the block frame 2. This prevents the panel from hanging on to the block frame when you turn it in. Do not place the panel against the block frame, but provide a 2 mm expansion joint. Seal them with sealant.
5.2.3 Doors with recess
Doors with a recess can also be finished with Clicwall. You do this in the same way as when you install Clicwall around windows with Clicwall exterior corner profiles (see 5.1.1) 3

6 .Incorporating pipes , sockets and switches
6.1 SOCKETS AND SWITCHES
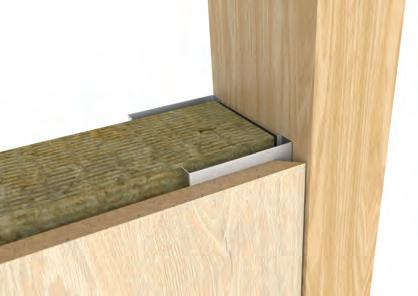
Sockets and switches are easily incorporated using with a hole saw of the required diameter. Make the cut-outs when you cut the panels to size, before you install the panel. Keep in mind the structure 1
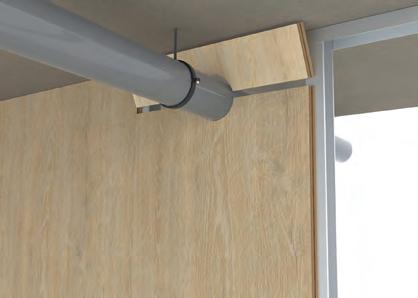
6.2 INSTALLATION AROUND A PIPE
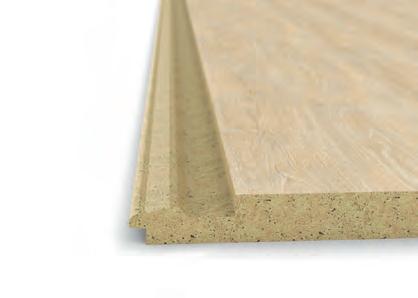
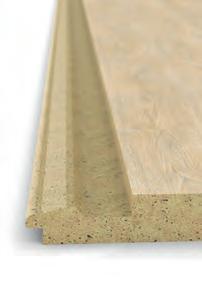
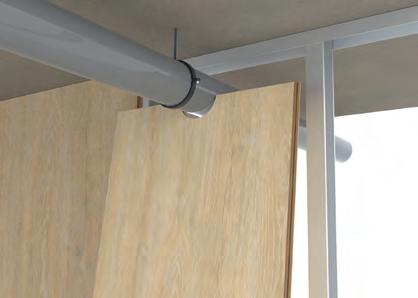
A pipe prevents the turning motion for clicking the panel into the previous one. In this situation you have to slide the panel (with cut-out for the pipe) into the previous panel. To do this, remove the thickening on the tongue at the back of the panel 2
Make a cut-out for the pipe and allow an additional 3 mm for clearance around the pipe itself. Divide the length of the panel horizontally into two, exactly through the centre of the pipe.
Install the lower section of the panel 3. The modified tongue allows you to slide the panel sideways into the previous panel. For this you need 3 mm clearance around the pipe (see above).
Apply white wood glue to the end of the bottom panel. Then, with a sideways motion, put the top section of the panel in place 4
6.3 RADIATORS AND AIR CONDITIONERS
You can install Clicwall near a radiator without any problems, provided there is at least 3 to 5 cm between the panels and the appliance.
With an air conditioner, it is best to avoid direct air currents on the panels.
7. 7. Finishing skirting boards and ceiling joints
7.1 SKIRTING BOARD TRIM
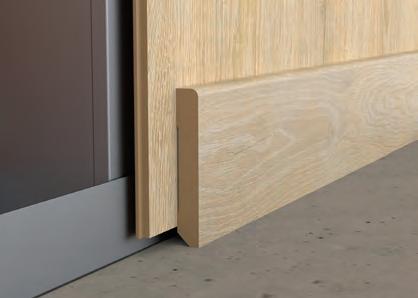
7.1.1 Surface-mounted skirting board
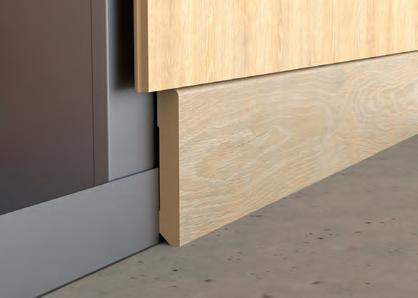
Choose an MDF skirting board in a matching design (2400 x 80 x 12 mm) or a skirting board which can be painted (2400 x 160 x 16 mm), aluminium or MDF skirting boards or wide aluminium profiles. Use MS polymer sealant to attach the skirting boards or profiles 1
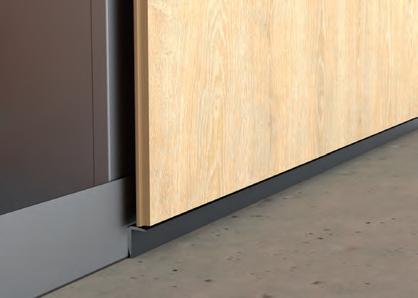
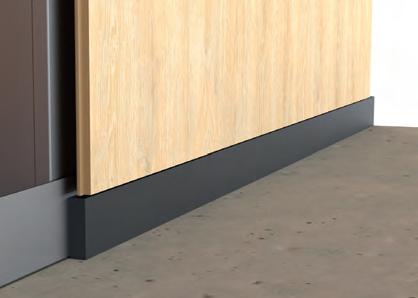
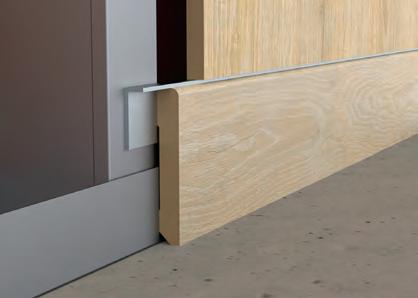
7.1.2 Shadow gap
For a clean finish, work with shadow gaps. Use an L-profile 2 or fill with a strip of black moisture-resistant MDF 3 (or other moisture-resistant material) to prevent contact with water.
When installing the L-profile or strip, take into account unevenness in the floor and the height of the profile or strip. Align the bottom of the Clicwall level. Allow enough space so that once the panels are installed, you can smoothly place the profile or strip between the floor and the Clicwall. Take into account the highest point of the floor and allow 2 mm extra clearance between the profile or strip and the Clicwall to avoid tension on the panels. Secure the profile or strip with MS polymer sealant.

7.1.3 Flush-recessed skirting board
Place the skirting board in the same plane of the Clicwall, with or without an L-profile (10 x 15 x 1.5 mm) 4
Use a jig and packing so that you can then place the skirting board underneath, in combination with an L-profile if necessary 5. Where necessary, cut the skirting board to the correct height. Attach the skirting board and seal the joint between the skirting board and the Clicwall.
Avoid contact between the panels and absorbent fasteners. Are you installing stone skirting boards with absorbent grout? Then install a profile between the skirting boards and the panels or leave a joint that you can fill with elastic sealant.
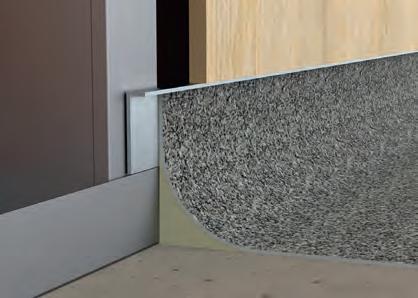
7.1.4 Connecting to vinyl flooring
You can also finish Clicwall with a raised vinyl floor. Install the Clicwall first, then the L-profile, then the vinyl floor against the L-profile. Allow 2 mm clearance between the Clicwall and the L-profile to avoid tension on the panels 6
7.2 CEILING FINISH
Preferably install the Clicwall before you finish the ceiling to avoid damaging the ceiling and to allow the panels to expand properly.
If you install the Clicwall after you have finished the ceiling, it is best to provide an expansion joint. You can leave it open or fill it with elastic sealant. If necessary, use a finishing strip or L-profile in MDF or aluminium to hide the expansion joint. Attach it with MS polymer sealant 7
8. 8. Maintaining and replacing panels
Clicwall panels are shock-proof. The impact resistance is up to 4 times higher than plasterboard – up to 20 Newton (N). The scratch resistance is also 4 times higher than that of plasterboard.
8.1 RETOUCHING A DAMAGED PANEL
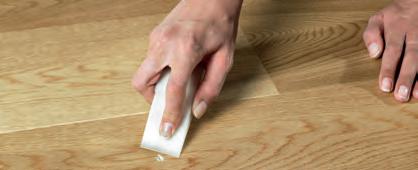
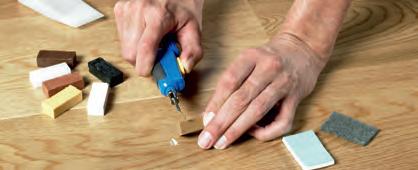
Slight damage to Clicwall panels is easily touched up with a repair kit.
1. Careful preparation is necessary. First clean the dust spot on the floor and make sure it is free of oil and grease.
2. Choose your color.
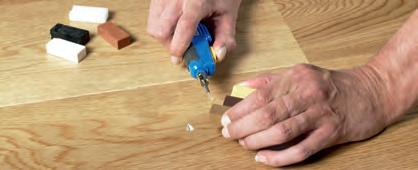
3. Melting and mixing.
4. Fill.
5 Remove excess material with the sharp side of the filler applicator.
6. Detail work: if you want to imitate the wood grain in detail, make a groove in the filler with a sharp object and fill in the groove with a darker color.
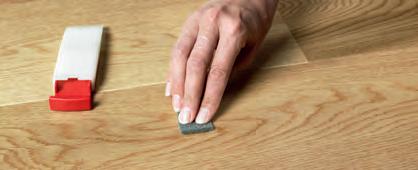
7. Degreasing: degrease with the gray sanding block.
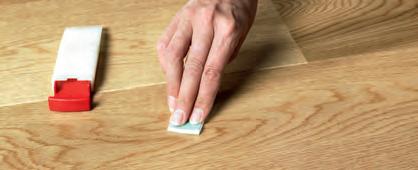
8. Adjustment of the gloss layer: with the green side of the block you provide more gloss. With the white side you make the surface matt.




8.2 REPLACING A DAMAGED PANEL
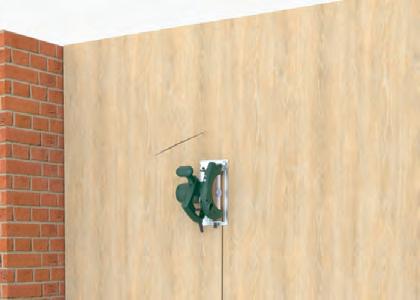
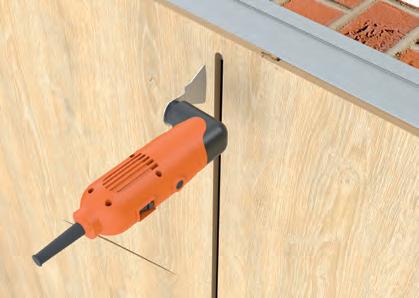
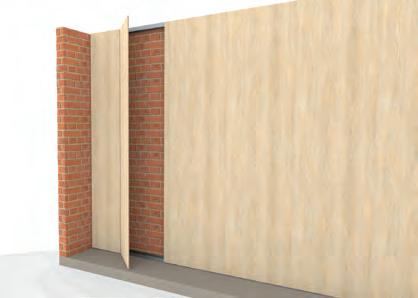
You can easily replace a badly damaged panel using a multi-tool and plunge-cut saw. Note: you can only remove an installed panel if it was attached with screws or staples.
1. Set the plunge-cut saw to a depth of 10 mm. Cut the panel to be replaced lengthwise at 40 mm from the joint on the groove side 1
2. Complete the operation at the top and bottom with a multi-tool 2
3. Remove the left side (tongue side) of the panel from the assembly 3
4 Remove the remaining piece on the right side (groove side). The screws or staples can be left in place.
5. Using MS polymer sealant, reattach the panel to the right of the replaced panel to the substructure. Press it down well and let the glue dry.
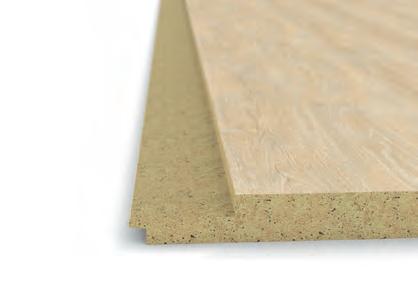
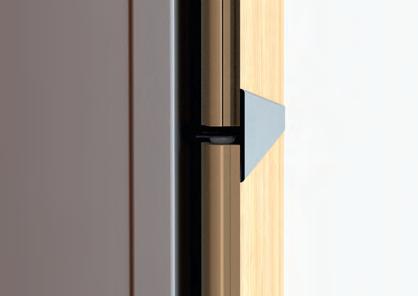
6. Take a new panel, cut it to length and remove the lip from the groove 4
7. Click the new panel into the panel to its left and attach the right side (where the groove was originally) to the substructure with MS polymer sealant.
8.3 MAINTAINING CLICWALL
Clicwall’s hygienic melamine surface requires no special maintenance. You can also easily clean textured wood or other surfaces.
Treating slight or recent soiling
Clean the panel with a paper towel, a soft dry or damp cloth, or a sponge. Do you use a damp cloth? Afterwards, dry the panel surface with an absorbent paper towel or microfibre cloth.
Treating normal or long-term soiling
Clean the panel with warm water and a microfibre cloth, soft sponge or brush. Do not use too much water while cleaning. Choose a standard cleaning agent or one without abrasive ingredients. Apply the agent immediately to the soiled area. Then wipe the panel using fresh water to remove all traces of the agent and avoid streaks. Dry the panel surface with an absorbent cloth or paper towel.
Under no circumstances use the following materials and cleaning agents:
• abrasive or aggressive materials (scouring pad, steel wool)
• polish, washing powder, furniture cleaner, bleach
• detergents with strong acids and salts
• steam cleaning equipment.
9. Specific processing tips
9.1 WIDE WALL (> 8 M)
Allow an additional expansion joint for walls wider than 8 metres and finish with a Clicwall T-profile. Attach with MS polymer sealant.
9.2 HIGH WALL (> 3.5 M)
A Clicwall T-profile is the most practical installation method for walls higher than 3.5 metres. You can also place the panels on top of each other as they are or using a rebate. Install the bottom row of Clicwall level to make the panels blend seamlessly. Avoid dirt or unevenness between rows.
9.2.1 Finishing with aluminium T-profile
Install the bottom row of Clicwall, leaving an open joint (with packing if necessary), then install the top row of panels. Finish the transition with an aluminium T-profile (3000 x 12 x 10.5 mm).
Mount the T-profile with the wide side at the front of the wall. That way, the expansion joint between the panels is hidden by the profile. Use MS polymer sealant for gluing to the bottom panel.
9.2.2 Shadow gap
After cutting the two panels at right angles, place them on top of each other. Finish the full height and then continue the installation from left to right.
9.2.3 Overlap connection
Mill a rebate at the top of the bottom panel and at the bottom of the top panel to create an overlapping joint. Finish the full height and then continue the installation from left to right.
9.3 CLICWALL AGAINST OR UNDER AN ANGLED WALL
9.3.1 Against an angled wall
Cut the panel to length and temporarily level it in front of the structure. Do not forget the expansion joint. Measure the open space at the bottom and mark it on the panel at the top. Saw the panel at an angle and begin installation 1
9.3.2 Under an angled wall
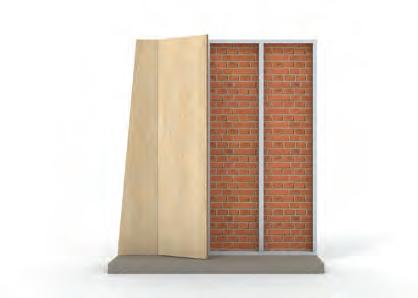
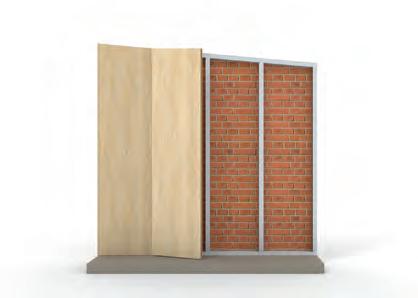
Install the first panel each time at the highest point of the sloping wall. That way, it can still be turned. If the highest point is on the right, installation from right to left is recommended. Install the tongues in the grooves 2
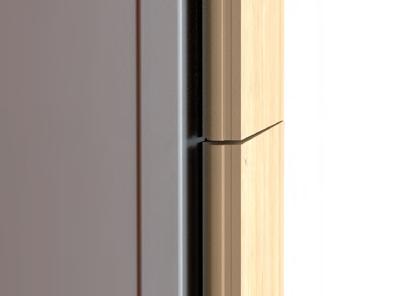
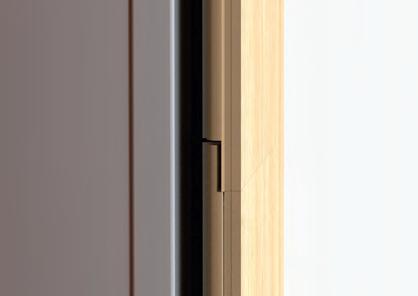
9.4 REMOVABLE PANEL
If there are utilities in the room, it is best to install a removable panel.
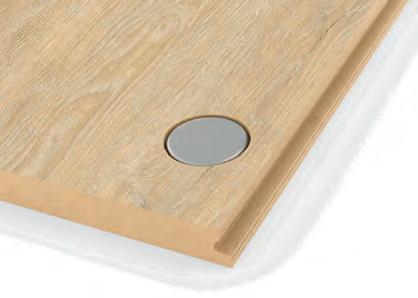
Take a panel, cut it to length and cut the lip of the groove as shown in the figure 3
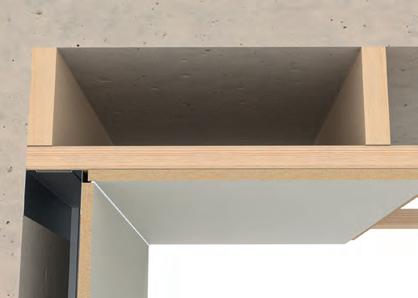
Mill or drill a hole on the back of the panel next to the sawn groove. Place a magnet in it in the same plane as the panel. Attach the magnet to the metal stud or to the wooden structure in which you also place a magnet. This makes the panel removable 4
Apply MS polymer sealant to the right of the modified groove to secure the tongue side of the next panel to the structure. Avoid contact between the sealant and the removable panel. Insert the next panel into the custom groove and press lightly. Secure the groove side with screws or staples. If necessary, open the removable panel and temporarily secure the right panel with masking tape. Then continue with the installation.

9.5 USING CLICWALL AS A CEILING FINISH OR SLOPING WALL
Clicwall is essentially a wall-finishing product. But you can also use it as a ceiling. Clicwall does not come with a Uniclic system on the short side of the panel, so the room width is limited to 3500 mm.
When installing on the ceiling, provide an extra sturdy framework, with cross slats with a maximum centre-to-centre distance of 300 mm. Install the Clicwall panels at right angles to the battens. Attach the panels with screws (stapling is not possible) and apply sufficient MS polymer sealant to each ceiling slat across the full width of the Clicwall panel 1
10.Clicwall in rooms with special technical requirements
10.1
CLICWALL IN HUMID AREAS
Clicwall is suitable for dry environments. In humid areas (use class 2), it is better to use moisture-resistant Clicwall (Clicwall MR).
The surface of Clicwall is naturally watertight. However, the joint and end faces are water sensitive. In areas with a risk of splashing water (e.g. behind the sink or around the shower) you should therefore seal the joint with sealing compound. This also applies to corners and transitions with profiles and skirting boards.
Under no circumstances install Clicwall in environments with prolonged water contact (e.g. shower cubicles).
10.2 CLICWALL IN AREAS WITH INCREASED FIRE REQUIREMENTS
10.2.1
Reaction to fire
Clicwall panels have a default reaction to fire of Ds2d0. Clicwall is also available with reaction to fire Bs2d0 (fire resistant Clicwall or Clicwall FR), and there is a variant with a modified thickness up to 12 mm and reaction to fire Bs1d0.
You install both fireproof variants in the same way as the standard Clicwall panels.
10.2.2 Fire resistance
Clicwall, installed as described below, guarantees fire resistance of 30 and 60 minutes, respectively, according to EN 13501-2.
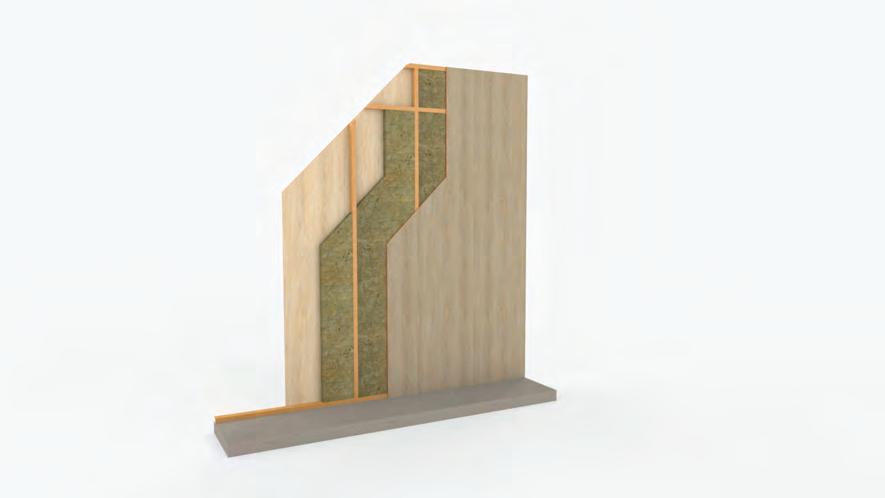
10.2.2.1 Clicwall partition wall with fire resistance EI30
European certificate for non-load-bearing partition wall – EN 1364-1:2015.
Structure
• Clicwall 10 mm (Euroclass Ds2d0): fastened with wood screws (centre-to-centre distance 400 mm) to a wooden substructure.
• Rock wool insulation (RockSono Solid 211): 60 mm – 45 kg/m³
• Substructure: wooden beams (CLS) 38 x 63 mm.
Wooden substructure
• Wooden beams (CLS) 38 x 63 mm, C18 softwood.
Primary beams
• Position: horizontally at the top and bottom and vertically on the left and right sides of the wall.
• Attachment: wood screws (3.5 x 25 mm).
Secondary beams
• Position: vertically between the primary beams.
• Attachment: wood screws (3.5 x 16 mm) –centre-to-centre distance 600 mm. To place two panels on top of each other, install an additional horizontal beam at the level of the joint at the transition.
Insulation
Rockwool insulation (Rockwool): 60 mm – 45 kg/ m³. Install the insulation tightly in the wood substructure to avoid air gaps between the beams and the insulation.
Finishing cladding
• Using wood screws (3.5 x 25 mm), fasten the 10 mm Clicwall on both sides to the wooden substructure with centre-to-centre distance 400 mm.
• Wooden framework.
• Clicwall 10 mm.
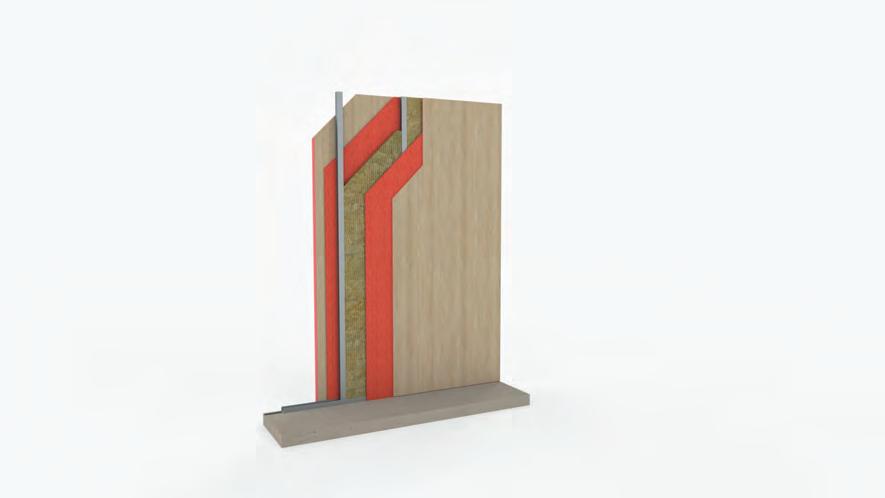
10.2.2.2 Clicwall partition wall with fire resistance EI60
European certificate for non-load-bearing partition wall – EN 1364-1:1999.
Structure
• Clicwall FR 10 mm (Euroclass Bs2d0): attached with mounting sealant (MS polymer dabs with centre-to-centre distance 200 mm) to Antivlam 12 mm.
• Antivlam 12 mm: fastened with wood screws (4 x 25 mm) – centre-to-centre distance 300 mm to metal stud.
• Rock wool insulation (RockSono Base 210): 40 mm – 35 kg/m ³
• Substructure: metal stud 50 mm.
• Sealing: PE50 tape (flexible insulating tape).
Airborne sound insulation
The following applies for the EI60 fireproofing system: Rw (C; Ctr) = 52 (-4; -11) dB.
Metal substructure
• U-profiles, metal stud MSH-50 –40 x 50 x 40 mm.
• C-profiles, metal stud MSV-50 –5 x 48 x 49 x 51 x 5 mm.
Primary profiles
• Position: U-profiles horizontally top and bottom and C-profiles vertically left and right.
• Attachment of U-profiles: nail plugs (diameter: 4.7 mm and length 40 mm) with PVC plug
• (diameter: 8 mm and length 40 mm) – cent-
re-to-centre distance min. 330 mm.
• Attachment of C-profiles: nail plugs – centre-to-centre distance 275 mm.
Secondary profiles
• Position: C-profiles vertically between the primary profiles.
• Attachment: nail plugs – centre-to-centre distance 275 mm.
Sealing tape
Consists of closed-cell polyethylene (PE). Install self-adhesive, flexible PE/50 insulation tape all around (top, bottom, left and right) on the back of the profiles.
Insulation
Rockwool insulation (Rockwool): 40 mm – 35 kg/m³
Fit the insulation snugly between the metal profiles to prevent air gaps between the profiles and the insulation.
Intermediate cladding
Attach 12 mm Antivlam (fire-resistant chipboard) on both sides with wood screws (4 x 25 mm) with centre-to-centre distance 300 mm (screw at 20 mm from the panel edge).
Finishing cladding
Using MS polymer dabs (centre distance 200 mm), attach the 10 mm fire-resistant Clicwall FR on both sides to the underlying fire-resistant chipboard.
Proudly Distributed in Australia by:

Unilin Panels
Ingelmunstersteenweg 229 8780 Oostrozebeke
Belgium T +32 56 66 70 21 info.panels@unilin.com www.unilinpanels.com

ITI NSW (Sydney) 59 Dunheved Circuit, St Marys, NSW 2760 02 8805 5000 | salesnsw@iti.net.au
ITI NSW (Newcastle) 19 Nelson Rd, Cardiff, NSW 2285 02 4953 7666 | salesnc@iti.net.au
ITI WA (Perth) 102-108 Bannister Rd, Canning Vale, WA 6155 08 9256 5700 | saleswa@iti.net.au
For more information:

www.itiaustralia.com.au/clicwall
ITI QLD (Brisbane)
62 Creek St, Bundamba, QLD 4304 07 3436 8400 | salesqld@iti.net.au
ITI QLD (Townsville)
54-62 Enterprise St, Bohle QLD 4818 07 4724 5509 I salestsv@iti.net.au
ITI SA (Adelaide) 82-94 Grand Trunkway, Gillman, SA 5013 08 8447 0400 | salessa@iti.net.au
ITI VIC (Melbourne) 68-80 Kirkham Rd W, Keysborough, VIC 3173 03 9392 8400 | salesvic@iti.net.au
