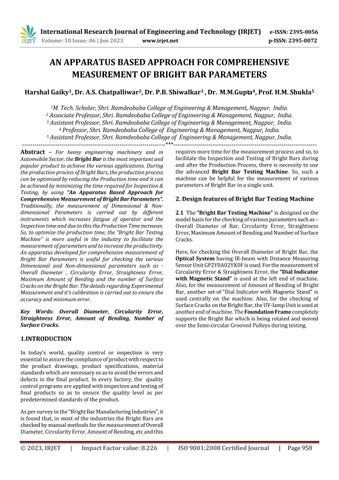
AN APPARATUS BASED APPROACH FOR COMPREHENSIVE MEASUREMENT OF BRIGHT BAR PARAMETERS
1M. Tech. Scholar, Shri. Ramdeobaba College of Engineering & Management, Nagpur, India.
2 Associate Professor, Shri. Ramdeobaba College of Engineering & Management, Nagpur, India.

3 Assistant Professor, Shri. Ramdeobaba College of Engineering & Management, Nagpur, India.
4 Professor, Shri. Ramdeobaba College of Engineering & Management, Nagpur, India.
5 Assistant Professor, Shri. Ramdeobaba College of Engineering & Management, Nagpur, India. ***
Abstract – For heavy engineering machinery and in Automobile Sector, the BrightBar is the most important and popular product to achieve the various applications. During the production process of Bright Bars, the production process can be optimized by reducing the Production time and it can be achieved by minimizing the time required for Inspection & Testing, by using “An Apparatus Based Approach for ComprehensiveMeasurementofBrightBar Parameters”. Traditionally, the measurement of Dimensional & Nondimensional Parameters is carried out by different instruments which increases fatigue of operator and the Inspectiontime andduetothis theProductionTimeincreases. So, to optimize the production time, the “Bright Bar Testing Machine” is more useful in the industry to facilitate the measurement of parameters and to increase the productivity. An apparatus developed for comprehensive measurement of Bright Bar Parameters is useful for checking the various Dimensional and Non-dimensional parameters such asOverall Diameter , Circularity Error, Straightness Error, Maximum Amount of Bending and the number of Surface Cracks on the Bright Bar. The details regarding Experimental Measurement and it’s calibration is carried out to ensure the accuracy and minimum error.
Key Words: Overall Diameter, Circularity Error, Straightness Error, Amount of Bending, Number of SurfaceCracks.
1.INTRODUCTION
In today’s world, quality control or inspection is very essentialtoassurethecomplianceofproductwithrespectto the product drawings, product specifications, material standardswhicharenecessarysoastoavoidtheerrorsand defects in the final product. In every factory, the quality controlprogramsareappliedwithinspectionandtestingof final products so as to ensure the quality level as per predeterminedstandardsoftheproduct.
Aspersurveyinthe“BrightBarManufacturingIndustries”,it isfoundthat,inmostoftheindustriestheBrightBarsare checkedbymanualmethodsforthemeasurementofOverall Diameter,CircularityError,AmountofBending,etcandthis
requiresmoretimeforthemeasurementprocessandso,to facilitate the Inspection and Testing of Bright Bars during andaftertheProductionProcess,thereisnecessitytouse the advanced Bright Bar Testing Machine. So, such a machine can be helpful for the measurement of various parametersofBrightBarinasingleunit.
2. Design features of Bright Bar Testing Machine
2.1 The “Bright Bar Testing Machine” isdesignedonthe modelbasisforthecheckingofvariousparameterssuchas–Overall Diameter of Bar, Circularity Error, Straightness Error,MaximumAmountofBendingandNumberofSurface Cracks.
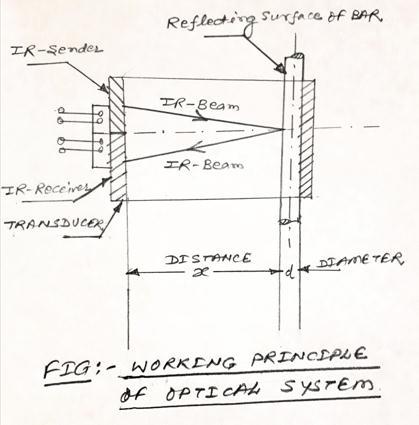
Here, for checking the Overall Diameter of Bright Bar, the Optical System having IR-beam with Distance Measuring SensorUnitGP2Y0A02YK0Fisused.Forthemeasurementof CircularityError&StraightnessError,the “Dial Indicator with Magnetic Stand” is used at the left end of machine. Also,forthemeasurementofAmountofBendingofBright Bar,anothersetof“Dial IndicatorwithMagneticStand” is used centrally on the machine. Also, for the checking of SurfaceCracksontheBrightBar,theUV-lampUnitisusedat anotherendofmachine.The FoundationFrame completely supportstheBrightBarwhichisbeingrotatedandmoved overtheSemi-circularGroovedPulleysduringtesting.
2.2 Working Principle of Optical System for Overall Diameter Measurement

AstheIR–BeamfromSenderProbeisemitted,itisreflected by the Reflecting Surface of Bar and it comes onto the Receiver Probe. Thereby, the Time Elapsed ( t ) between SenderandReceiverProbeisanalyzedbythecircuit,which dependsupontheDistance(x).Asthediameterof Bar(d) changes,thedistance(x)changesandtherebytheDisplay DevicegivesthereadingofDiameterofbar(d).
2.3 Three-Dimensional View of Machine


2.4 Testing Results of Bright Bar
2.4.1 Testing of Overall Diameter of Bright Bar
Here,theOverallDiameterofBrightBarischeckedby Non-contacttypemethodbyusingtheOpticalSystemand the Diameter of Bright Bar is measured as 18.75 mm as againstreading18.81mmbyusingDigitalVernierCaliper.
2.4.2 Testing of Circularity Error of Bright Bar
The various points along the Bright Bar are marked at a distanceof375mmfromEnd(A)toEnd(B)ofBrightBar and then at a particular section, the Bright Bar is rotated through one complete revolution under the Set-up of Dial Indicator and the Ymin & Ymax readings are noted and thereby the Circularity Error at a particular section is calculated.TheBrightBarismovedundertheSet-upofDial Indicatorthrough375mmandthevariousreadingsofDial IndicatoraretakenandtheReadingsofDiameteratvarious Cross-Sections of Bar are taken by Digital Vernier Caliper and thereby the Overall Circularity Error is calculated as under–Sr. No.
Location of Section from End (A)mm
Readings of Dial Indicatorforone complete revolutionofbar

Readings of Diameter at various Cross-Sections of bar, by usingDigitalVernierCaliper
2.4.4 Testing of Amount of Bending of Bright Bar
2.4.3 Testing of Straightness Error of Bright Bar
The various points along the Bright Bar are marked at a distanceof100mmfromEnd(A)toEnd(B)andtheBright BaristraversedundertheSet-upofDialIndicatortoreachat a particular section and the reading of Dial Indicator is noted The Bright Bar is moved under the Set-up of Dial Indicatorthrough100mmandthevariousreadingsofDial Indicator are taken and thereby the Overall Straightness Erroriscalculatedasunder–
Firstlythebarislocatedonthesupports(i.e.Pulleys)and theBarisrotatedcompletelyandtheMinimumReadingof Dial Indicator ( Ymin ) is obtained and thereby HalfRevolution is applied to the Bar and then the Maximum Reading of Dial Indicator ( Ymax ) is noted and the calculationsarecarriedoutasunder-
∆Y=ChangeinDialIndicatorReadingsforDialIndicator2, forHalfrevolutionofBar= [Ymax–Ymin]=[0.675–0.255 ]mm=0.42mm;

L= DistancebetweenSupportPulleyNo.1 &SupportPulley No.2 =EffectivelengthofBarundertest=711.2mm.
Therefore,
AmountofBending=(∆Y/2)/L=[0.21/711.2]mm/mm= 0.00029527mm/mm=295.275µm/m.
2.4.4 Testing of No. of Surface Cracks on Bright Bar
ThenumberofSurfaceCracksalongtheperipheryofBright Bararecheckedbyimpartingthecompleterevolutiontothe Barataparticularsectionfromend (A).
3. Results and Discussion
ThereadingforOverallDiameterofBrightBarbyusingNoncontact type Optical System is found out as 18.75 mm as against18.81mmbyDigitalVernierCaliper.
TheOverallCircularityErrorofBrightBarbyusingSet-upof AnalogTypeDialIndicatorisfoundoutas0.032mm/mm& theOverallStraightnessErrorofBrightBarisfoundoutas 431.429µm/mandtheAmountofBendingofBrightBarat thecentrebyusingSet-upofAnalogTypeDialIndicatoris foundoutas295.275µm/m.TheoveralllengthofBrightBar undertestis1800mm.
ForthetestingoflongBrightBars,theFoundationFrameof machine should be of larger size to accommodate the Bar completely. Also, to utilize the same machine for various BarsofdifferentDiameters,theuseofV-pulleyswillbemore advantageous.Also,formoreaccuratequicklymeasurement of OverallDiameterofBar,theOpticalMicrometercanbe appliedalongwithServo-motorControlledRotaryChuckto rotate the Bar and another Servo-motor Controlled Bar Traversing System for the quickly measurement of CircularityErrorandStraightnessError.
4. CONCLUSIONS
In this paper, the method is proposed for Bright Bar Inspection and Testing for the measurement of Overall Diameter of Bright Bar by using Non-contact type Optical System and the measurement of Circularity Error, StraightnessErrorandAmountofBendingofBarbyusing Dial Indicator of Least Count 0.001 mm with a set-up of Magnetic Stand and the Number of Surface Cracks are checkedbyusingUV-lampSystem.
ThisBrightBarTestingMachinefacilitatesthemeasurement of various parameters of Bright Bar efficiently in a single unit. The apparatus is well-calibrated and the results are validatedsuccessfully.
REFERENCES
[1] Leo Miyashita & Masatoshi Ishikawa ; Real time InspectionofRodStraightnessandAppearancebyNonTelecentricCameraArray; JRMjournal–2022.
[2] F.A.Elerian,WasimM.K.Helal,M.A.AbouEleaz;Methods of Roundness Measurement : An Experimental ComparativeStudy;JournalofMechanicalengineering ResearchandDevelopments–Year2021.
[3] TobiasSchmid-Schirling,LeaKraft&DanielCarl;Laser scanningbasedstraightnessmeasurementofprecision bright steel rods ; International Journal of Advanced ManufacturingTechnology
July2021.
[4] Mr. Harshal Shankarrao Khode, ManagerTechnical/Audit/QA/QC/Civil/QMS/Structure/Environ ment/Water/Safety,India–CaseStudyPaperonField InspectionGuideforRustonReinforcingBarsby“IS/ ACI / ASTM Norms” ( A State of an Art Review ) ; IARJSET(InternationalAdvancedResearchJournalin Science, Engineering & Technology ) – Vol.6, Issue 9, September2019
[5] SyedMobinBaba,ShaikAzgerpasha,ShaikFayaz,Asst Professor, Mechanical engg. dept., SEC, TS, India 2 ResearchScholar,NoidaInternationalUniversity(NIU), Noida – India ; EVALUATION OFDEFECTSIN THESS304L MATERIAL BY USING NON DESTRUCTIVE EXAMINATION TECHNIQUES; EURASIP Journal on ImageandVideoProcessing;IRJET-Vol.6-Jan.2019.
[6] M.K.Ramezani,J.Purbolaksono,A.Andriyana,S.Ramesh &N.A.Mardi;Analysisofsurfacecracksinroundbars using dual boundary element method ; Journal of “ScienceDirect”–August2018.
[7] Yurii V. Chiryshev, Artem V. Kruglov, Anastasia S. Atamanova & Svetlana G. Zavada ; Detection and Dimension of Moving Objects Using Single Camera AppliedtotheRoundTimberMeasurement;ACSISVol. II–2017.
[8] Shrikant B. Pawar1, Swapnil K. Koli2 1 BE Scholar, Mechanical, DACOE, Karad, Maharashtra, India 2 BE Scholar,Mechanical,DACOE,Karad,Maharashtra,IndiaDESIGN AND FABRICATION OF BAR POLISHING MACHINE; International Research Journal of EngineeringandTechnology(IRJET)e-ISSN:2395-0056 Volume: 03 Issue: 06 | June-2016 www.irjet.net pISSN:2395-0072©2016,IRJET

[9] Mr.AshokJ.Trivedi&Mr.RajulR.Parikh;25thNational Seminar & International Exhibition on NONDESTRUCTIVEEVALUATION-AutomatedEddyCurrent TestingSystemforbrightbarInspection
;NDE2015,Hyderabad,November26-28,2015.
[10] Nirbhar Neogi, Dusmanta K. Mohanta and Pranab K. Dutta;Reviewofvision-basedsteelsurfaceinspection systems. – EURASIP Journal on Image and Video Processing(2014).
