The Walking Dead
Research - Page 3 to 15
Script Breakdown - Page 16
Notes on Breakdown / Designs - Page 17 to 18
Sampling - Page 19 - 26
Breakdown - Page 27 to 38
Before and After - Page 39 to 44
Dye Room Budget - Page 45
Supplier Information - Page 46
Breakdown Kit - Page 47
Final Images - Page 48 to 57
CPD - Page 58
List of Figures - Page 59 to 60
Reference List - Page 60
Bibliography - Page 61
Research
Research
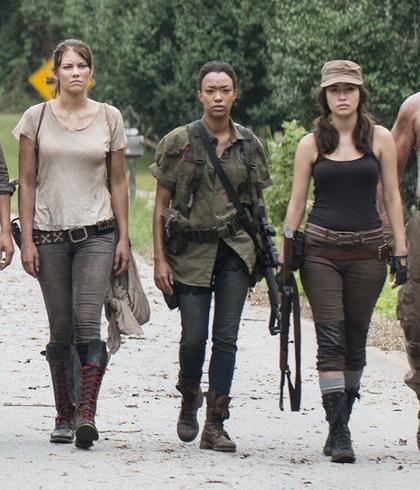
The Walking Dead
Watching The Walking Dead is good primary research because I’m looking at the actual show to see how the costumes are made and used. I can see how the clothes get dirty, torn, and worn out over time, and how that helps tell the story of each character. It shows me how to make a costume look real in a post-apocalyptic world. By watching closely, I get ideas I can use in my own breakdown work
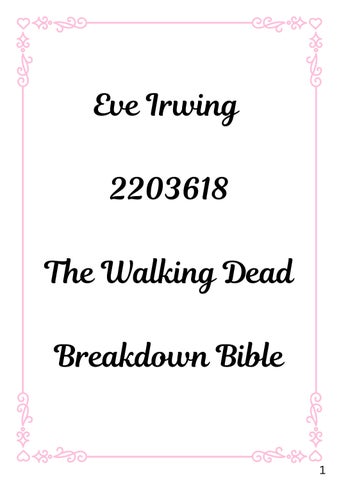
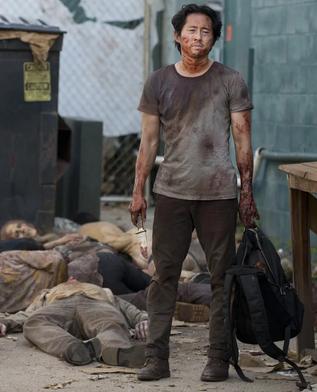
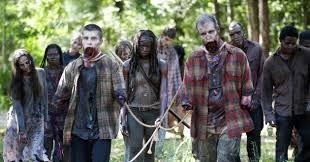
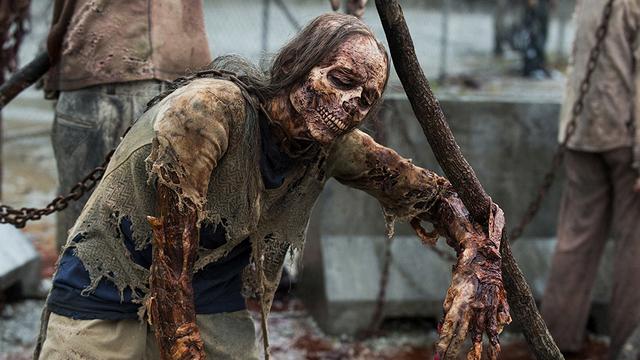
This image of Rick Grimes from Season 9, Episode 5 is useful for researching realistic costume breakdown in action in The Walking Dead world.
His shirt is stained with dirt, sweat and grime showing that he has been fighting or travelling for a long time.
The bloodstains on his shirt and hand tell the audience that he is injured and the blood looks fresh although it is darker around the shirt area.
His trousers are scuffed with holes in them showing long term wear, physical action and survival.
His sleeves are rolled up showing that he is ready for work or action.
The blood, dirt and wear on his costume is a good reference for making my own costumes look believable and part of The Walking Dead. I would like to get a similar shirt to this for part of my own breakdown as Rick often wears these throughout the show
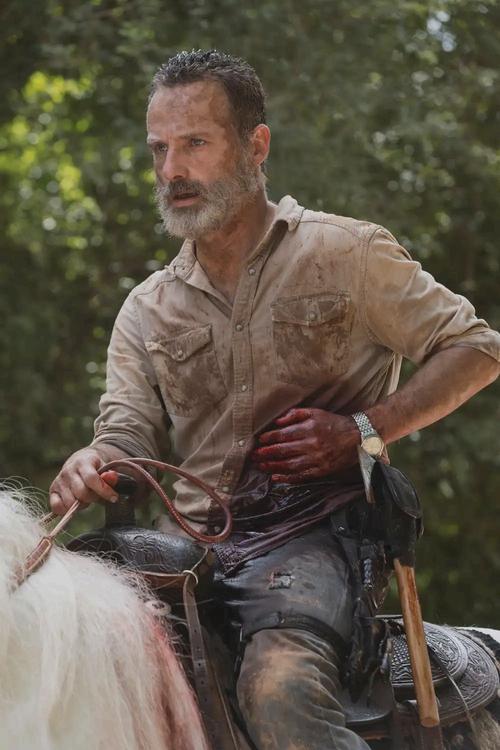
This image shows more of the blood on Ricks shirt, I can use this image as research because it shows how the costume helps tell the story. Rick’s shirt is covered in dirt and blood, which shows he’s hurt and been through a lot. His trousers are ripped and messy, making him look like he’s been surviving in a rough world. This helps me see how to make my own costume look realistic for The Walking Dead.
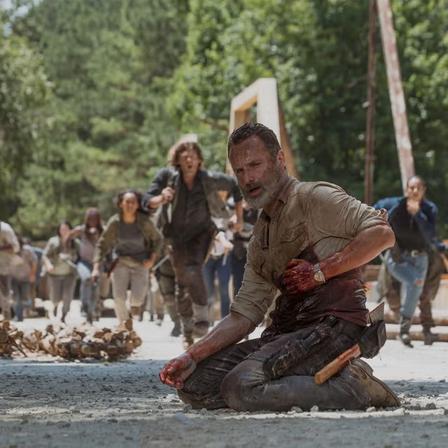
Figure 1: Rick Grimes
Figure 2: Rick Grimes
Research
The Walking Dead
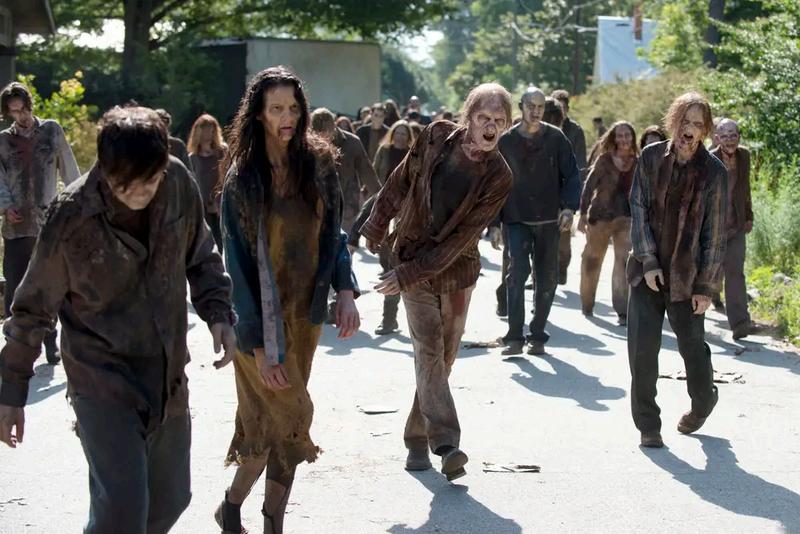
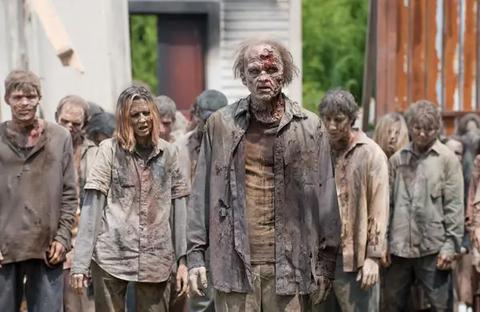
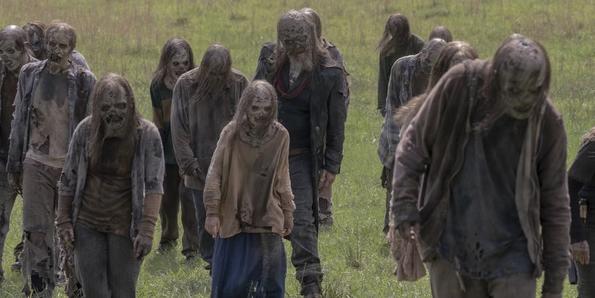
Figure 3: Group of Zombies
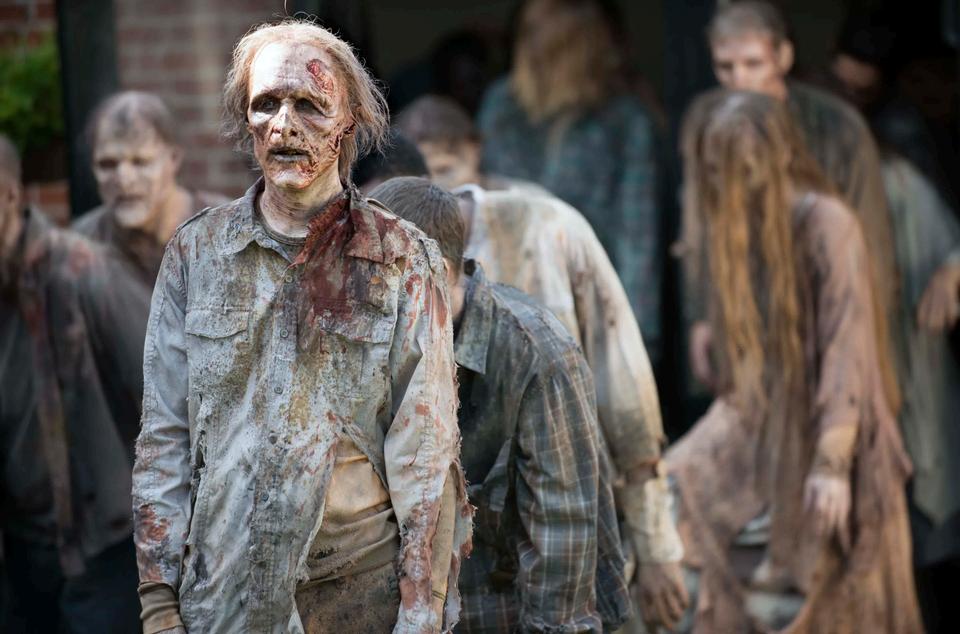
Watching zombies in The Walking Dead helps with my research because I can see what they look like, how they move and what their clothes are like. I can look at all the rips, blood and dirt on their costumes and see how old or damaged their clothes are. It also shows how zombies change over time and how their environment affects them, which helps me come up with ideas for my own costume.
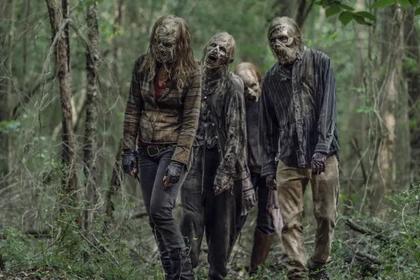
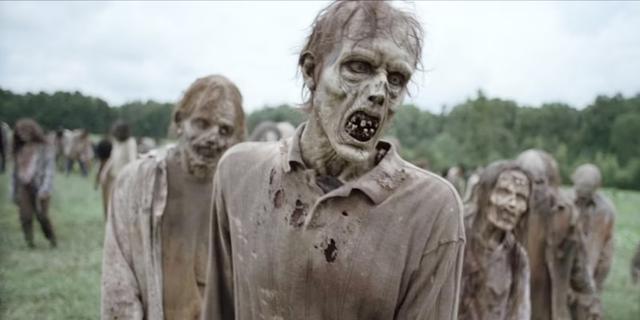
Figure 4 is a good image for me to use as inspiration when breaking down a zombie costume as it has very good detailing on it. The shirt is ripped showing the level of decay. The bloodstains show a realistic zombie look, I also like the colour palette used of the greens and greys and would like to use this in my own costume as I think it helps to convey zombies and decay.
Figure 4: Zombies
Research
Hampshire Cultural Trust

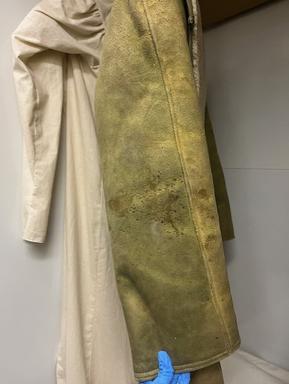
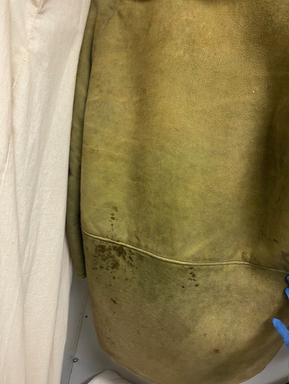
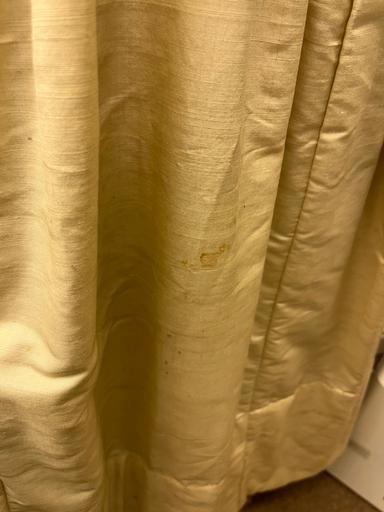
To continue my research I visited the Hampshire Cultural Trust in Winchester to see some costumes from their archive that could help with my breaking down of costumes. I wanted to look at garments that had natural wear and tear and breakdown over time. The first item I looked at was this ¾ length sheepskin coat from 1957. This coat had natural breakdown on it with dark staining all over. The stains looked like mud splats which I want to create on the breakdown of my costume. This coat helps my research by showing what real aging and damage look like on clothes. I can use it to guide where and how to add wear, stains, and texture to costumes, especially for zombie looks that need to feel believable and naturally decayed.
Figure 5: Reception
Figure 6: Sleeve
Figure 7: Cuff
Figure 8: Buttonholes
Research
Hampshire Cultural Trust


The next garment I looked at was this evening dress from 1820 - 24. This dress was made from a cream silk, trimmed with satin and crepe. This dress had some breakdown on it due to the age of it, I found some mould staining on the inside of the under skirt of the dress as show in Figure 10. This was useful for my research as it shows how clothes naturally break down over time. Mould creates realistic textures, stains, and colour changes that can inspire how I age or distress costumes For example, the uneven patches, dark spots, and spreading patterns of mould can help me recreate believable grime or rot on zombies.
Figure 9: Evening Dress
Figure 10: Mould
Figure 11: Stain
Research
Hampshire Cultural Trust
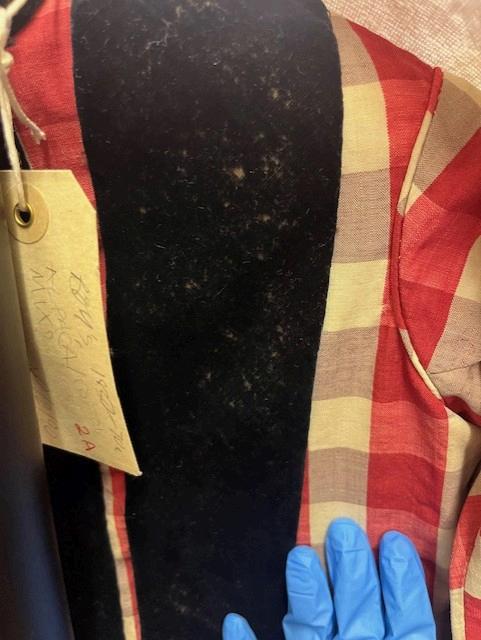

Continuing on from looking at mould I looked at this boys coat from 1830 This coat had mould and dust staining scattered all down the back of it. The mould on this coat is useful for my project because it shows how clothes naturally rot and stain over time. The random patterns and textures help me know where and how to add grime or decay to a costume, especially for a zombie or distressed looks. It also teaches me how different fabrics react to age, which helps make my designs look more realistic.
In my own project I would like to create some similar splats to how this mould looks maybe with some mud, I could do this with fullers earth or even paint to get this effect and look similar.
Figure 12: Mould
Figure 13: Label
Research
Hampshire Cultural Trust
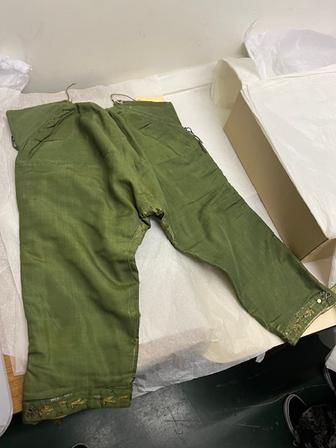
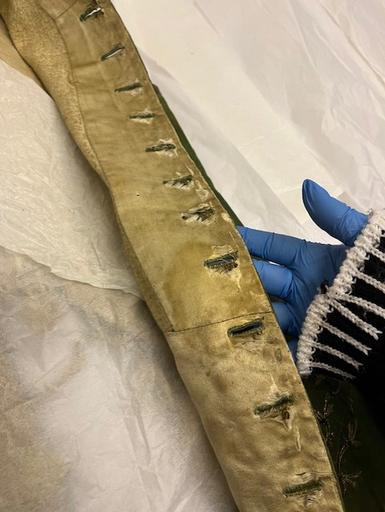
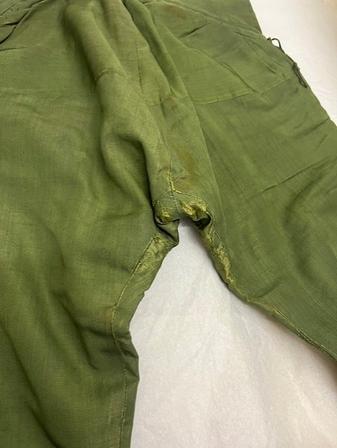
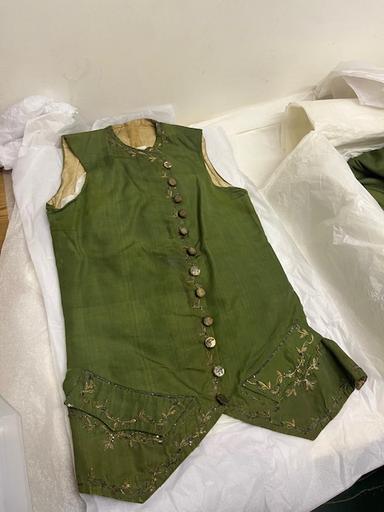
Next I looked at this mid 18 century mens waistcoat and breeches that had natural breakdown on it Although the outside of the waistcoat looked in pretty good condition when I opened it the inside by the button holes was very broken down It had natural dirt staining and fading which would be interesting to recreate, there was some tears around the button holes which is probably due to repeated use over time. The breeches had breakdown in the crotch area which was interesting to look at. This was probably due to where the most wear would be like sitting down and movement like walking and running, this would be interesting to try and recreate in my own work th
Figure 14: Waistcoat
Figure 15: Breeches
Figure 16: Inside of Waistcoat
Figure 17: Breeches Close Up
Research
The Walking Dead Companion Book
Next I looked at ‘The Walking Dead Chronicles: The Official Companion Book’ to help with my research:
‘The Walking Dead Chronicles: The Official Companion Book is the only authorized guide to season one of AMC's The Walking Dead, which tells the story of a sheriff's deputy leading a band of survivors in a postapocalyptic world overrun by the undead. Focusing on the making of the first season of the Golden Globenominated TV show, as well as the creation of the New York Times bestselling comic book on which the series is based, The Walking Dead Chronicles is illustrated with never-before-seen photography, set designs, storyboards, makeup and visual effects shots, and page-to-screen comparisons to the comics. Featuring new, exclusive interviews with Executive Producers Frank Darabont and Robert Kirkman, as well as with the cast and crew, The Walking Dead Chronicles. reveals new directions for the second season and beyond.’ (Ruditis and AMC, 2011)
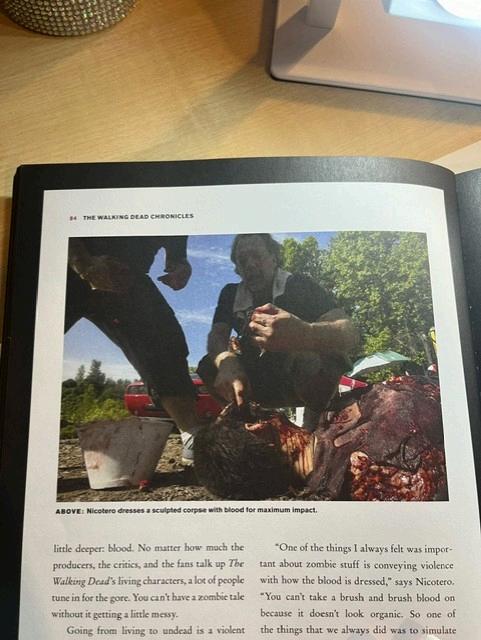
Figure 18: Corpse
The image above I have taken from the book and it shows a sculpted corpse and the breakdown / sfx artist Greg Nicotero adding blood for maximum impact. When looking at the costume of this corpse I can see that the shirt is severely ripped up and drenched in blood for a more severe breakdown look. There is some use of special effects, possibly latex to make chunks of flesh - this is something I could explore looking at in my own work
Research
The Walking Dead Companion Book
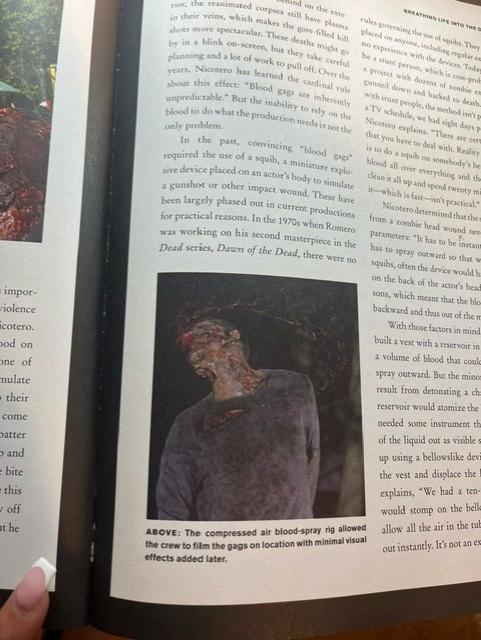
Figure 19: Zombie being shot
The image above I got from the book ‘The Walking Dead Chronicles: The Official Companion Book’. The costume in this image shows some more subtle breakdown with some dark staining on the shirt, it looks like dirt or possibly some older blood. I want to recreate this in my own work - I could do this by using dyes or even vaseline and baby oil to make the stains look greasier and darker. The shirt is also ripped, all of the images I have looked at so far contain rips in them so this is something I will be sure to include in my own work Beneath the rip a wound is shown so when adding rips on my costume I could add blood staining around it to symbolise where a wound would be and the effects after.
The book says “The zombies of The Walking Dead needed to visually convey the violence that had ended their lives so that every corpse told a story.” This is something I need to take in account when breaking down my own costumes as I would like the characters to tell a story through the breakdown on their costumes so that an audience would be able to see what they have been through and their story just be looking at even the marks on their costumes from the rips and mud to the bigger gashes and blood.
Research
The Walking Dead: Eulyn Womble
Next I decided to research into Eulyn Womble who worked as costumier in Season 1 of The Walking Dead. For Season 2, she was hired as costume designer. She then confirmed that she would return in Season 3, and has. Womble returned as costume designer for Season 4 and throughout the rest of the series. She also helped take on the role of breakdown artist by breaking down a lot of the costumes herself.
I looked at her interview with Fortress of Solitude, when asked about colour palettes Womble stated:
“I started using a camouflaged earthy tone on all the walker clusters.” Then, by Season 4, the show introduced “fresher” walkers – survivors who fell victim to the undead. Womble took the chance to make the distinction between the more active “survivor” zombies and the older generation of walkers, who would usually wear “suits and ties” (Hendricks, 2024)
I want to use this in my own work by making the zombies clothing have a more earthy tone, possibly with a blended green colour palette to not stand out too much as then it will not look very realistic. She also stated: “I drew inspiration from the covers of the graphic novels. By Season 3, we realised that the walkers form herds, so I started using a camouflaged earthy tone on all the walker clusters surrounding the prison. In Season 4, there are more ‘survivor’ type walkers. If a walker is in a suit and tie, it has been dead for a while and would be more tattered and mouldy.”
This made me realise that when breaking down the costumes, for a zombie, the more broken down it is will show how long this person has been a zombie and the effects.
Research
The Walking Dead: Eulyn Womble
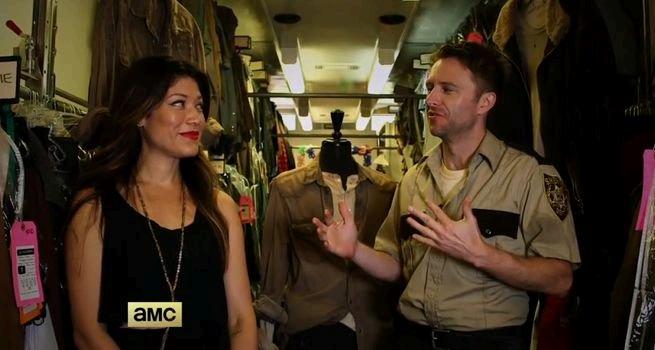
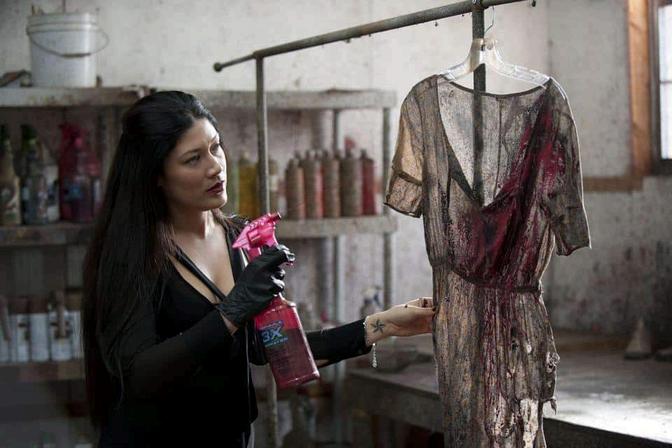
Finally I watched a short YouTube interview with Eulyn Womble where she shows and speaks about her process when breaking down costumes for The Walking Dead.
The video can be found here: https://www.youtube.com/watch?v=uoHUfkc4gHM
Watching Eulyn Womble talk about her breakdown process helps me understand how professionals make costumes look real and lived-in. It shows the creative thinking behind each detail, and teaches me how to tell a story through clothing. I can use her techniques and ideas to make my own costume breakdowns more believable and meaningful.
It was interesting how she used layering to break things down, for example she had one dress that she just kept dyeing and adding layers of dirt to create a more dirty effect - this is something I’d like to use in my own work.
She used tools that I will be using too such as wire brushes and cheese graters, she also used her hands for most things such as ripping and adding blood as it sometimes gave a more realistic effect than using other tools
Figure 21: Eulyn Womble Video
Mood Board - People

Mood Board - Zombie

Script Breakdown

Notes on Breakdown / Designs
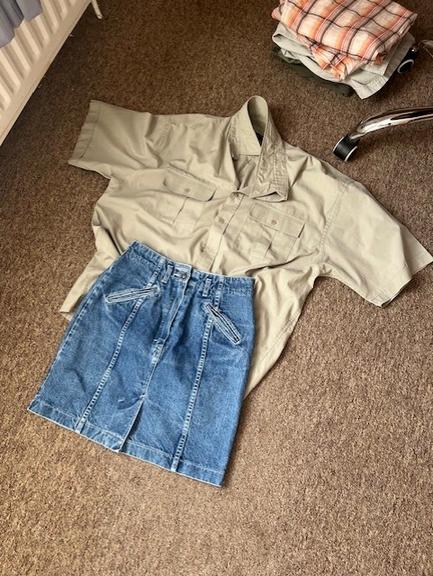
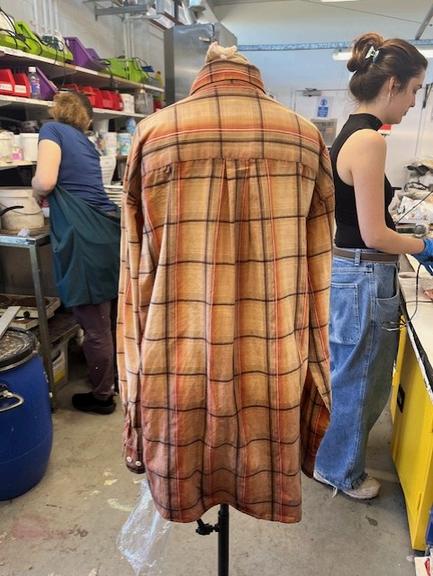
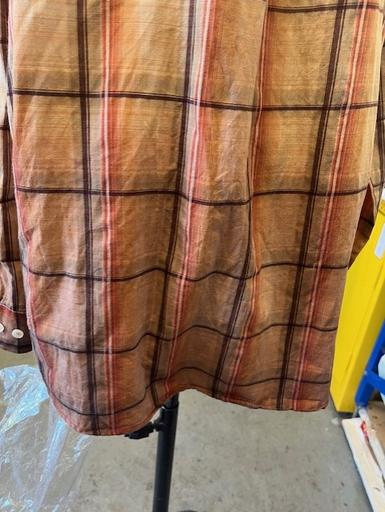
Costume 2:
For my next costume I want to create a younger girl, possibly a teenager in the world of The Walking Dead. I want the costume to reflect a young, tough survivor. The skirt can hint to a youthful past whereas the shirt shows resourcefulness by wearing what is avaliable
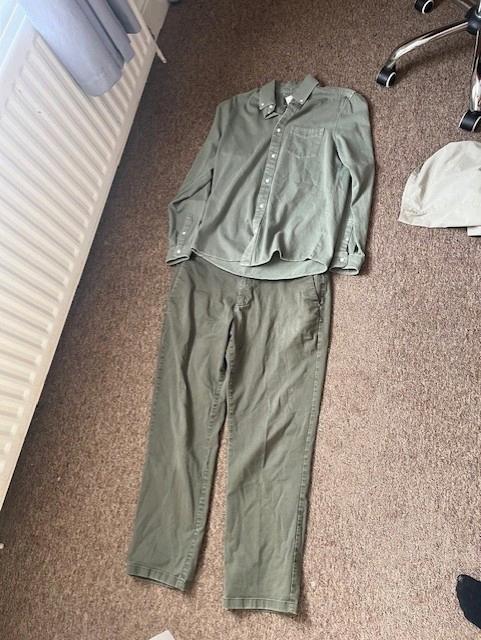
Costume 1:
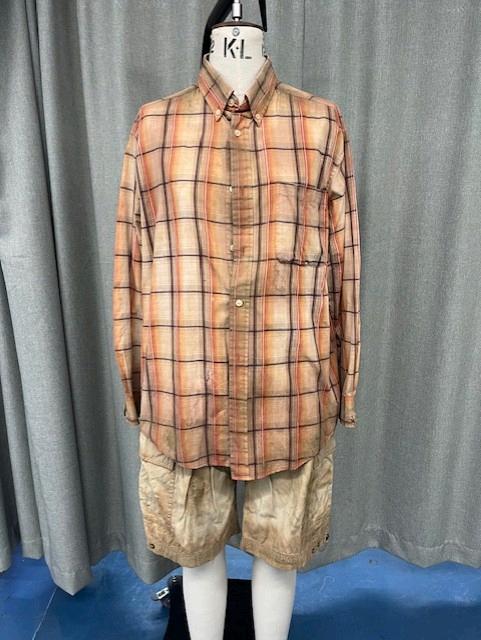
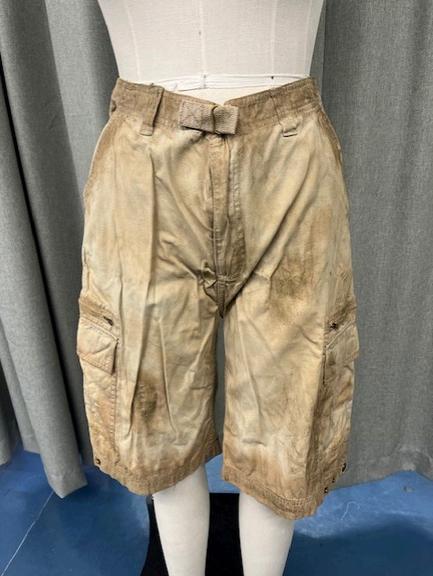
For my first costume I want to create a man in the post apocalyptic survivalist world. This character is a small town survivor who has been on the road.
I want the shirt to look faded and stained to show time, sun exposure and and survival. Tearing cuffs and seams can show that he has been through scrapes but kept going. I will keep this all in mind when breaking down the costume
Notes on Breakdown / Designs
me 3:
For my final costume I want to break down a costume of a zombie. The costume will need to tell the story of a once living person whose body and clothing have been through decay, attack, and time
Compared to my first two costumes this one will need to be much more severely distressed, bloodstained and torn. I will need to keep in mind this will take a lot longer to break down than the other two costumes will
Sampling
Sampling
Grating and Tea Staining:
To start my breaking down process I needed to do some sampling to see how the costume responds to the different processes being used. By doing this it helps to prevent irreversible damage on the actual costume. For example different distressing techniques such as sanding, bleaching and dyeing can ruin or permanently alter the fabric. Different fabrics can also react to processes in different ways so it is important to sample on the same fabric or a very similar fabric being used on the actual garment. For my sampling for this project I have used the same garments and built up the breakdown over a process to show the different stages from person to zombie which I will then be breaking down different costumes for.
Before: After:
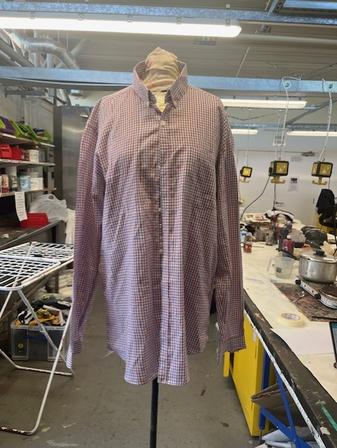
To start the breaking down process of this shirt I used a wire brush and grater to just start sanding down the shirt to create a natural wear and tear. I also used scissors to create some rips and pull the pocket slightly off I then used tea staining for a subtle and natural looking aging effect I started by wetting the shirt before leaving it in the tea for about 20 minutes. This gave the fabric a slightly yellowed tone to show age related discolouration I then went in with just the tea bag to create some more realistic sweat stains around the collar, armpits and back to show where natural dirt and sweat would be on a garment. This was a good start to the breaking down of this costume.
Sampling
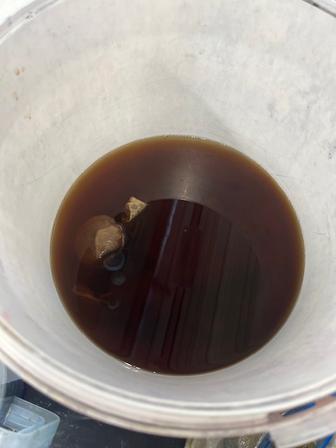
Dyeing: Procion Dye:
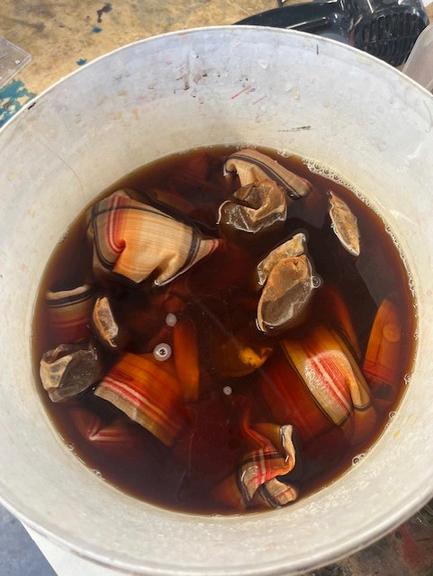
The next step in my breaking down process was to go in with some cold dyes to add some darker staining around areas where dirt is commonly found such as the collar and cuffs. I mixed up some brown and black procion dyes for this. I then used a paint brush to just brush on the staining where needed.
Before: After:
I started by using the brown dye to brush on some dark marks around the collar area but found that this wasn’t showing up much on the shirt and where I had just used the tea bag it was showing a lot more. I then mixed up some black dye to use instead. The black dye showed up a lot more on the shirt against the black dye. I made a dipped effect on the cuff by using some water on the brush to bleed the dye out slightly. After doing this I decided for my next lot of sampling I needed something that would look a bit more like realistic dirt.
Figure
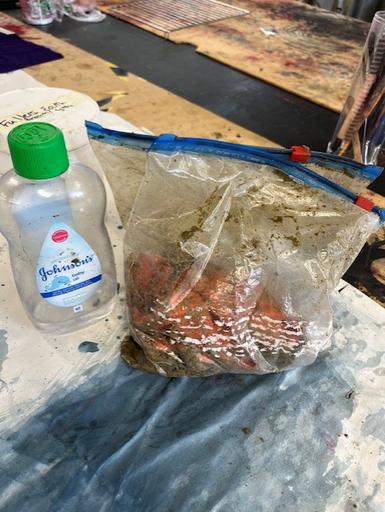
Fullers Earth:
Sampling
For my next part of the sampling I needed something to make some more realistic dirt marks. Fuller's earth is a natural clay-like material that is frequently used to mimic dirt, dust, and grime in set and costume design. It's a popular substance for deteriorating and ageing items and costumes
Front: Back:

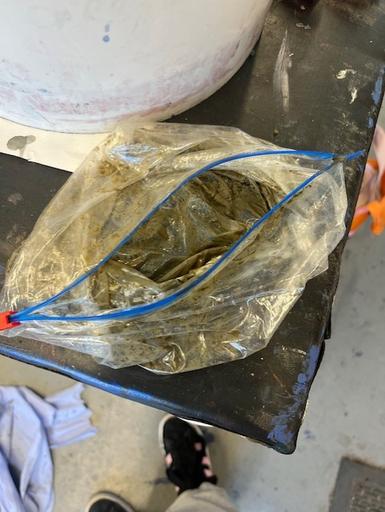
For this sampling I mixed up about 2 spoons of fullers earth with some baby oil in a zip lock bag until it was a paste consistency to replicate mud. I then used a cloth to start gently rubbing the dirt on for a subtle effect to see how it looked before building up over it. I then found it easier though to just use my hands with gloves to apply the fullers earth straight onto the shirt. I found doing this I had more control of where I wanted the dirt to go and how thick or how many layers I wanted it in places. I found that the baby oil and fullers earth worked really well together to get the effect wanted.
Sampling
Blood Staining:
For the next step in breaking down my sample costume I wanted to do some blood staining. This is where the transition from person to zombie can be made clearer, although the people costumes may have some blood staining, the zombies costume will be more severe so it was important for me to keep this in mind when sampling.
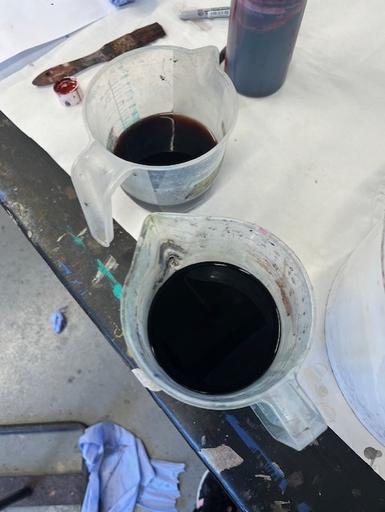
DysperseDye:
1g Dye
1 Litre Hot Water
1ml Acetic Acid
Front: Back:

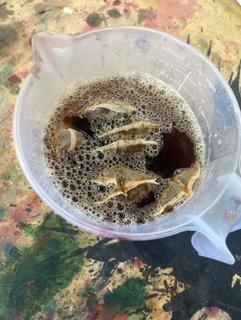
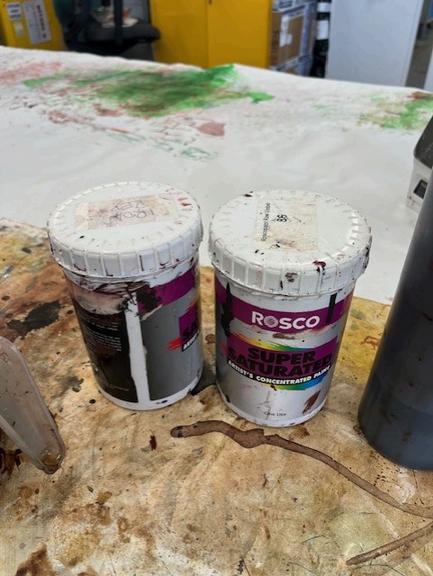
For the blood staining sample I started by mixing up some dysperse dye as the shirt I was using contained polyester and I found from using the procion dye it wasn’t showing up as well. I used the shade scarlet red. I started by using a paint brush to paint on the red dye as a base layer for the blood staining. I used images from my mood board to inspire me to put blood on the collar, I then put blood on some of the holes I had made from grating to replicate wounds. Once this base layer was down I used some of the Roscos super saturated paint to add some darker detailing to the blood with a paintbrush. This gave it a more of a darker and deeper effect to show more of an old blood look.
Sampling
Grating and Dyeing:
For the next half of my sampling I needed to do some sampling for the bottom half of the costume. I used some denim jeans cut into shorts as I would be using denim or a similar fabric for the real costumes I started by using a similar process that I had used for the shirt by using a wire brush and grater to scuff up the jeans to add some wear and tear and make them look more broken down. I focused on areas such as the knees and pockets, also on the back where there would be more wear over time.
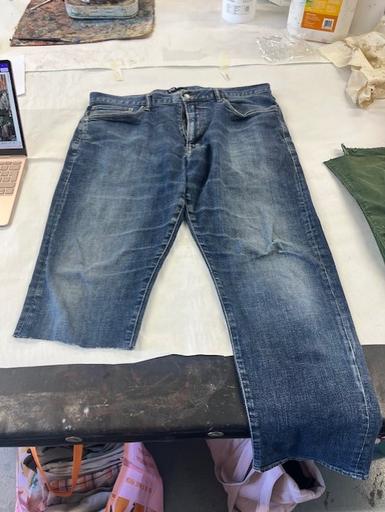
Before: After
After I had finished grating I used the same black and brown procion dyes I had mixed up for my earlier sampling of the shirt I started by using the brown procion dye on the bottom of the jeans and on the rips I had created However it was not showing up against the denim so I used the black dye which showed up slightly more. From this sampling I realised I would need to be using possibly a stronger dye such as dysperse or dylon or use a different technique such as the tea bag staining which had worked really well in my earlier sampling on the shirt.
Sampling
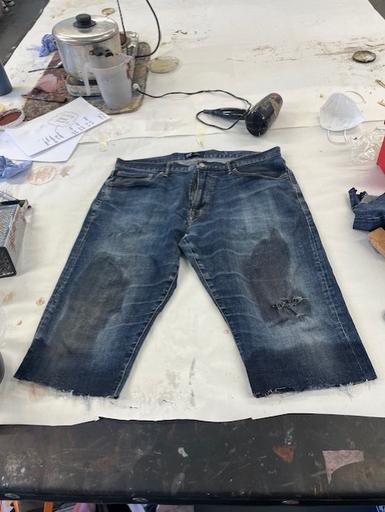
Fullers Earth: Before: After:
Fuller's earth is great for making jeans look worn because it adds real dirt and wear without affecting the fabric. It gives garments a matte, dusty look, and makes other breaking down like sanding and grating look better, and since it doesn't last, it's great for continuity. It's simple to use, works well with the texture of denim, and helps make the jeans look really worn in.
For the next step in breaking down I used the same mixture of fullers earth and baby oil that I had previously used and used a cloth to start applying it to the jeans. I then used my gloves to spread it around and add different layers to different areas of the jeans
Sampling
Blood Staining:

Blood Stain:
Red Procion Dye
Brown Procion Dye
Dye-na-Flow
French Enamel
Varnish
Rosco Super
Saturated Paint
These are some of the typical products used when creating blood staining with breakdown. However as I was working on denim I used slightly different dyes for this sampling as I found the dysperse dye showed up more
For the final step of my sampling I wanted to create some blood staining on the jeans. I focused on the rip by the knee to create a wound maybe from the character falling over. I also added some staining to the bottom of the jeans. For this I followed the same process that I had done for blood staining my sample shirt, I started by using some scarlet red dysperse dye as a base layer to create a red undertone. Next I used the Roscos super saturated paint to add a darker effect to make the blood look slightly older and more realistic than just the dye being painted on the jeans.
Breakdown
Breakdown
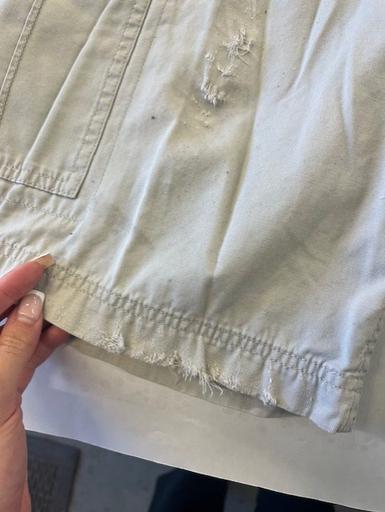
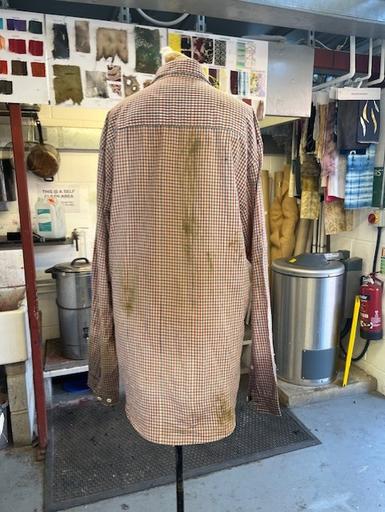
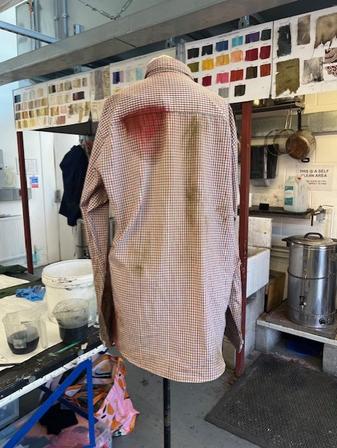
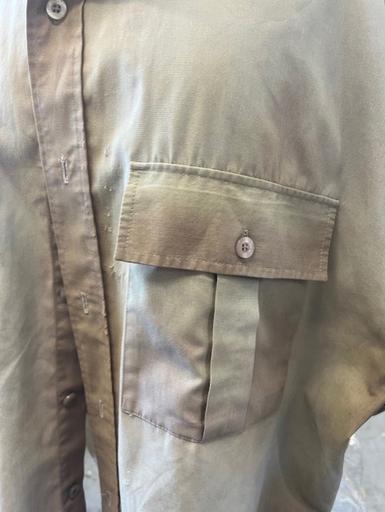
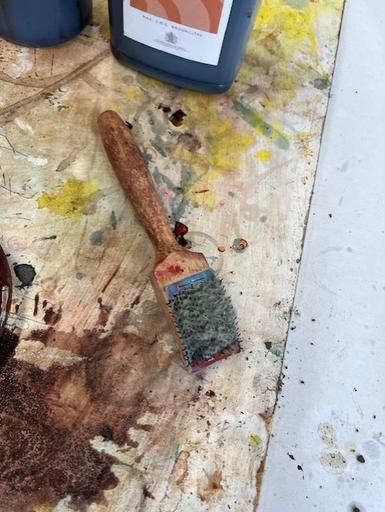
For the breakdown of my first costume I started by using a wire brush and grater to work on the costume and mimic real life friction and abrasions. I focused on fraying the cuffs and elbows and then for the shorts I broke down the knees, pockets and the bottom of the shorts as well as the waistband. I focused on these areas as it is where there would be the most wear and tear realistically. I then mixed up a bucket of warm water with 5 tea bags in to tea stain both the shirt and shorts to fade the colouring of the garments to make them look more aged. I kept them in the tea stained water for around 10 / 15 minutes and then put them through the spinner to drain the water before moving onto the next step
Breakdown

For the next stage of my breakdown I wanted to add some staining to this costume to age them further and create a base layer for building up dirt. I started by using tea bags and dabbing them onto the costume to create staining, these stains were not showing up on the shirt as much as they did on the shorts so I then mixed up some dyes. I mixed up a brown procion and a black procion. For the shirt I dipped the cuffs and bottom of the shirt onto the black dye and then used a paint brush to paint on some darker details onto the shorts with the brown dye

Breakdown
For the final step on this costume I mixed up some fullers earth with baby oil in a zip lock bag. On its own fullers earth is dry and can fall off easy with excess dust. I used a cloth to dip into the zip lock bag to apply the fullers earth to the costume. I then used my gloves to add more specific details to the costumes
On the shorts I started building up on the staining from the dyes with the fullers earth and baby oil. This helped layer up the staining to create realistic dirt and mud staining.
For the shirt I focused on the cuffs and specifically around the collar when applying the fullers earth as this is where the most realistic grime and dirt would be on this type of character from The Walking Dead.
Breakdown
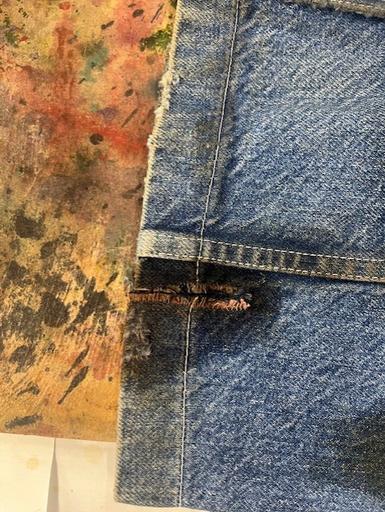
To start the breakdown of my second costume I followed the same process of using a wired brush to start scuffing and tearing at the costume. This shirt was very easy to rip so I had to make sure to use the brush lighter to prevent creating rips that were too drastic and became unrealistic.
Breakdown
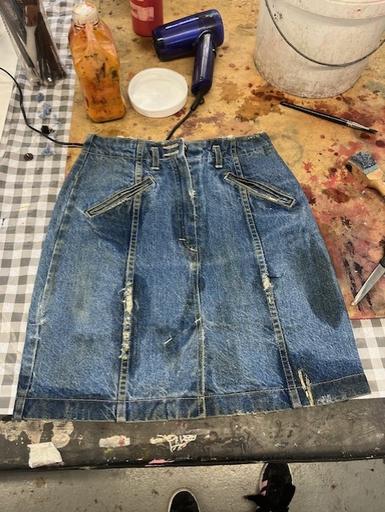

For the next step of breaking down this costume I filled a jug with hot water and multiple tea bags. For this denim skirt I found the tea staining worked really well with creating an realistic aging effect. The staining also worked well on the shirt. I used the tea bags and applied them directly onto the garment to create staining. For the shirt I focused on the armpits and back to create sweat staining along with other dirt and grime stains.
Breakdown

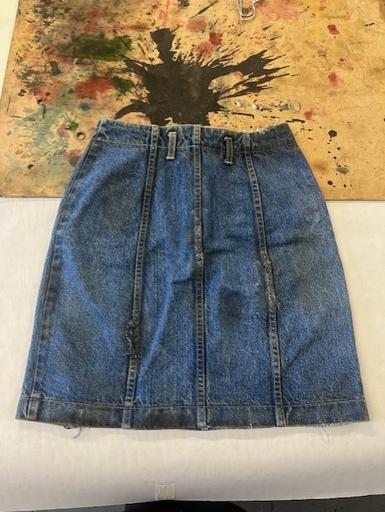
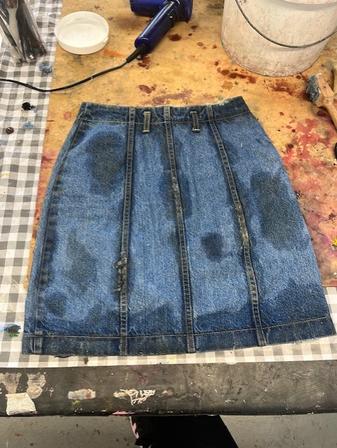
For the next step of breaking down this costume I used the hair dryer to dry off the tea staining of the costumes In the images above you can see the visible staining from the tea bags On the skirt I created a small rip and added some scarlet red dysperse dye to create some staining of a small wound.
Breakdown

For the final step of breaking down this costume I moved onto the fullers earth and baby oil I had previously mixed up. I used gloves to apply the fullers earth mixture on quite thick and then used the gloves to spread it out in more thinner layers and across the costumes. The fullers earth helped create darker staining to the costume which layered up on the tea staining to create a much more realistic effect of the costume.
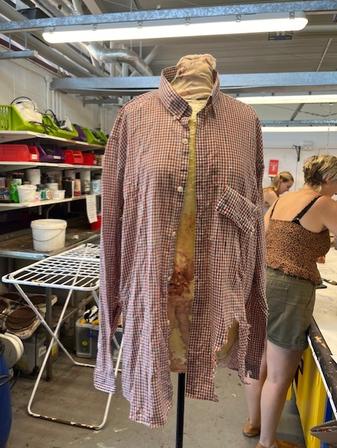
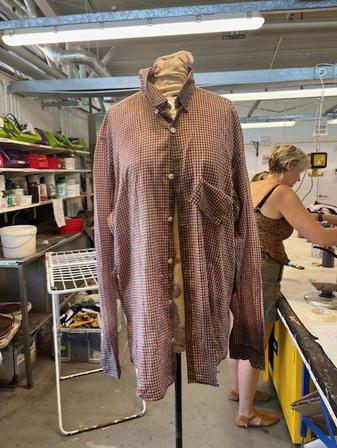
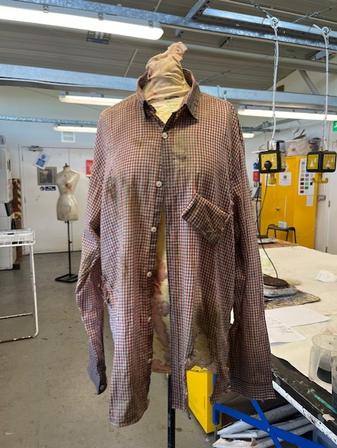
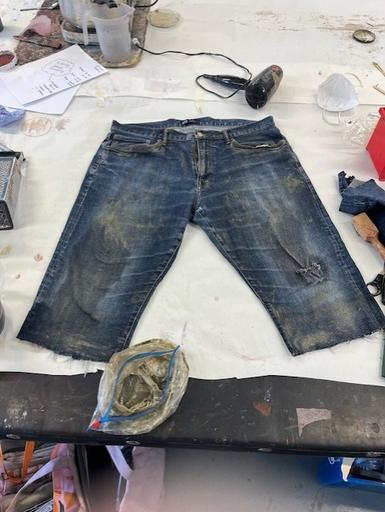
Breakdown


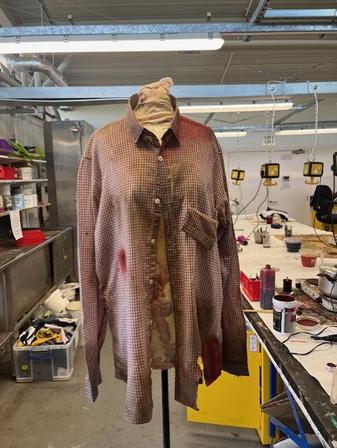
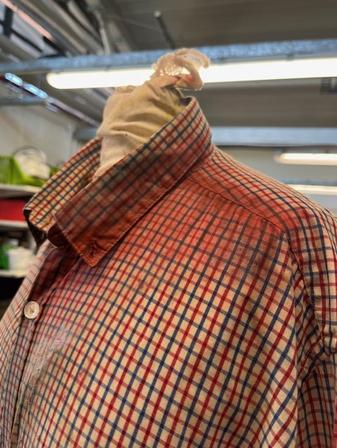
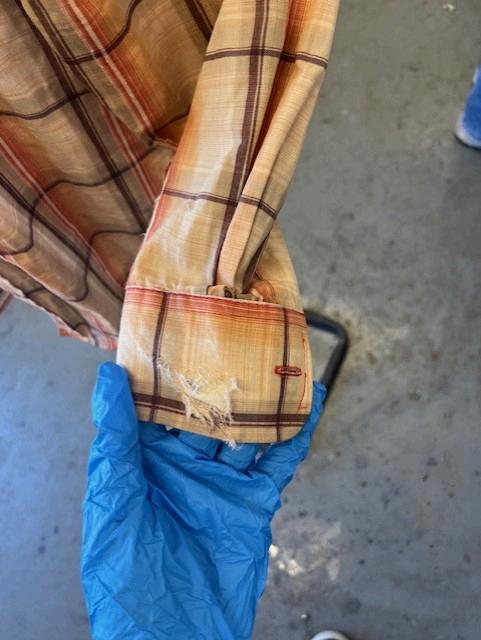
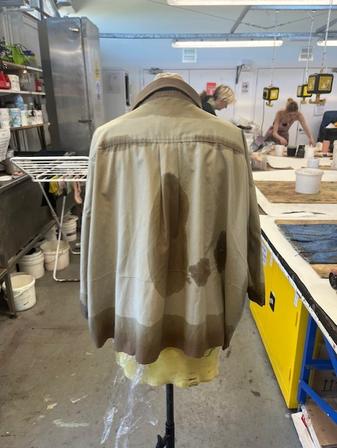
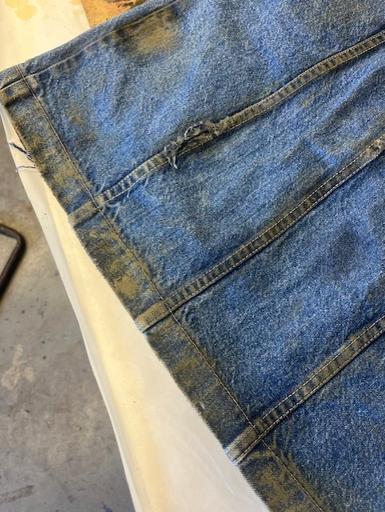
For my final costume I wanted to have a go at breaking down a Zombie costume instead of just a a person so the breakdown needed to be much more severe. I used the wire brush to break down the costume more drastically by creating deep rips and tears along the costume. I used scissors to cut down the jeans and the arms of the shirt, along with creating some deeper tears
Breakdown
For the next step of breaking down this costume I followed the same step of using tea bags and applying them directly to the garment. It was interesting as I found that the tea bags stained really well on the shirt and created a nice yellow colour that really aged the shirt, however on the jeans the tea bags didn’t really take at all. To combat this I mixed up some procion black and brown dyes. I then used these dyes and a paint brush to create some further staining on both the shirt and specifically the jeans where the tea bag staining had not taken to them as much before.
Breakdown
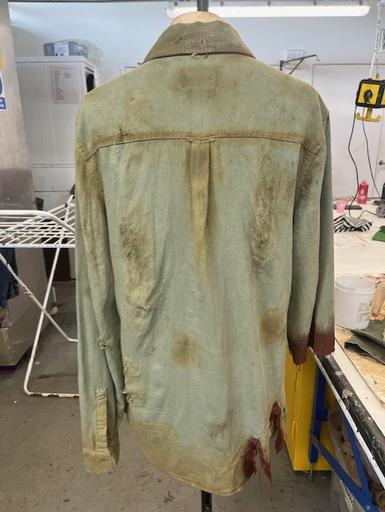

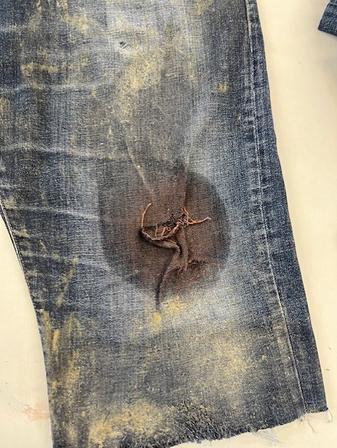
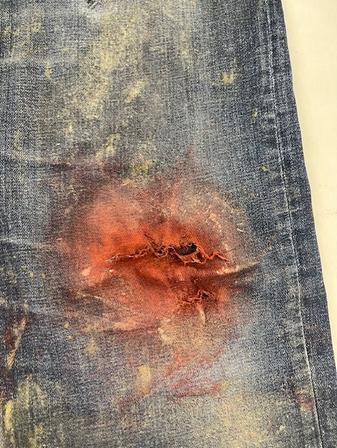
For the next step of breaking down this costume I needed to create some blood staining. To make the staining more severe I went straight in with using the Roscos super saturated artists concentrated paint. I used a mix of the shades Iron Red and Raw Umber to create a deep red / brown colour to make the blood look slightly older and less fresh. I focused on putting this on the rips on the shirt cuff and bottom of the shirt to make zombie like wounds. I found the shade of the blood still looked quite fresh so for my next step I worked on dulling this down slightly.
Breakdown


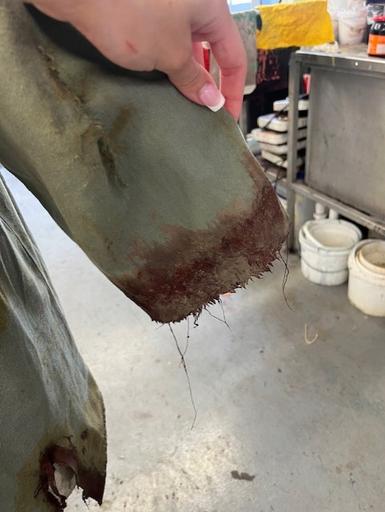
For the final step of breaking down the zombie costume I used brown french enamel varnish and brown dye - naflow to add some darker details all over the costumes, both to make the blood look older and also to create some mud staining. I then used the fullers earth and baby oil mixture to create mud staining along the bottom of the jeans and to create some muddy detailing on the shirt too. This helped to pull the final look together to make the breakdown on the costume look more severe and realistic.
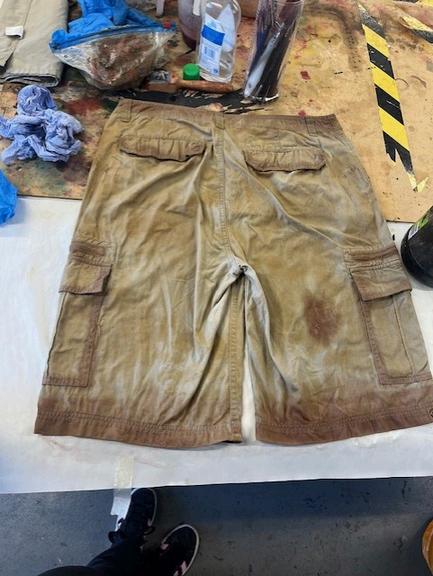
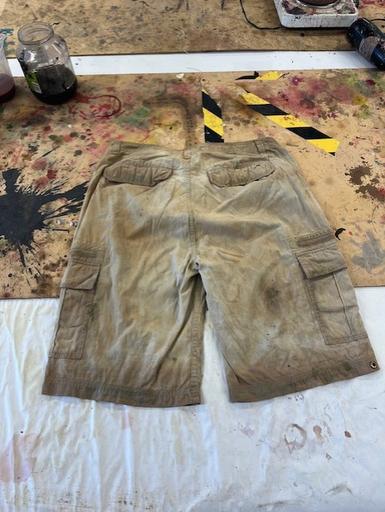
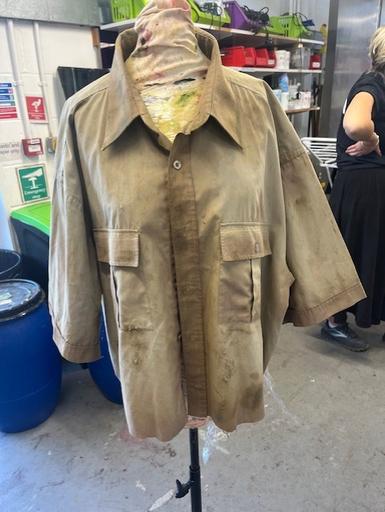
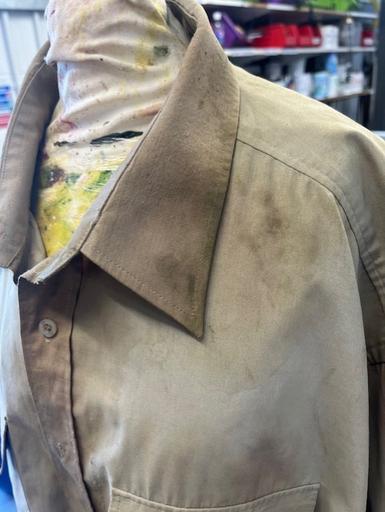
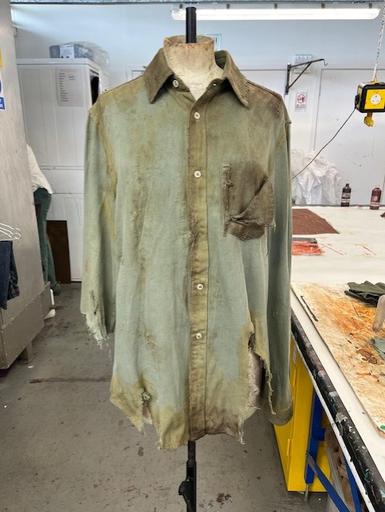
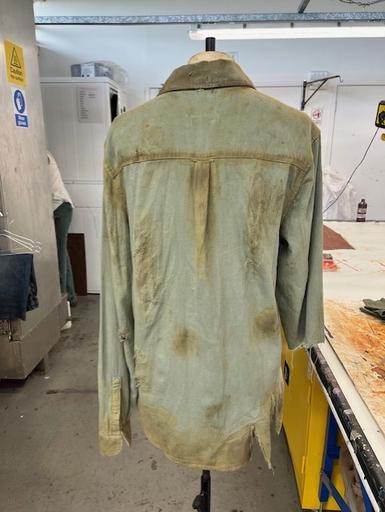
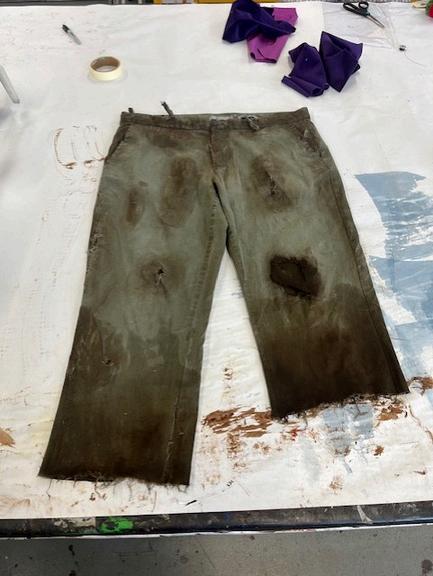
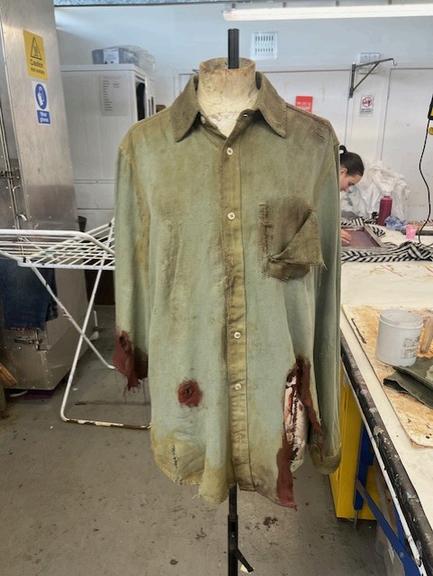
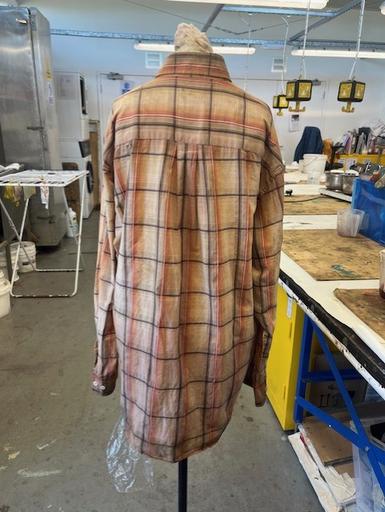
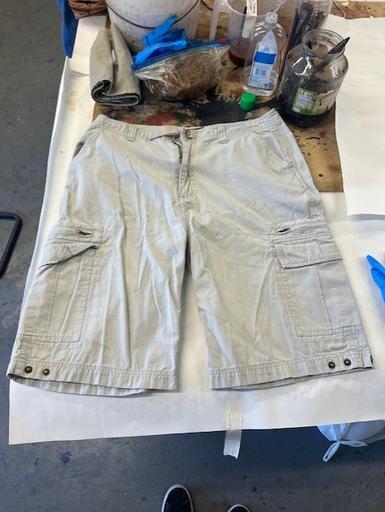
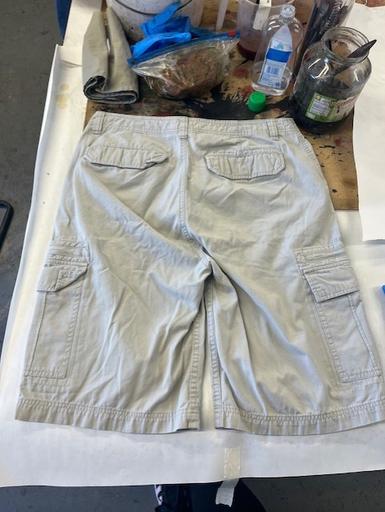
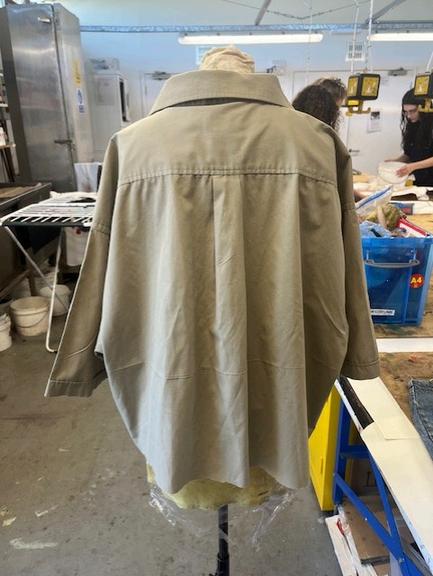
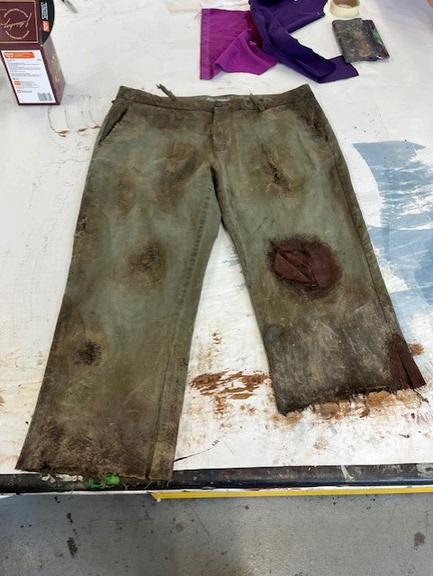
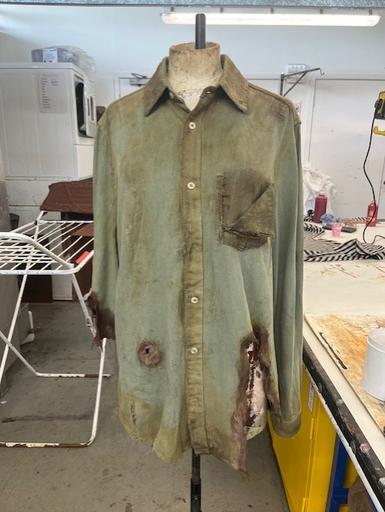
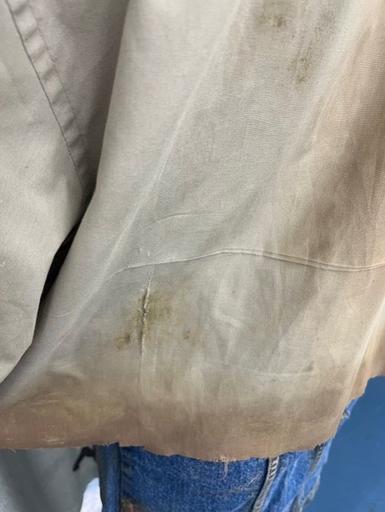
Before & After
Before and After
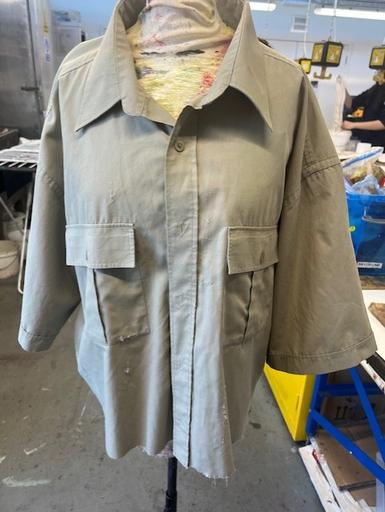
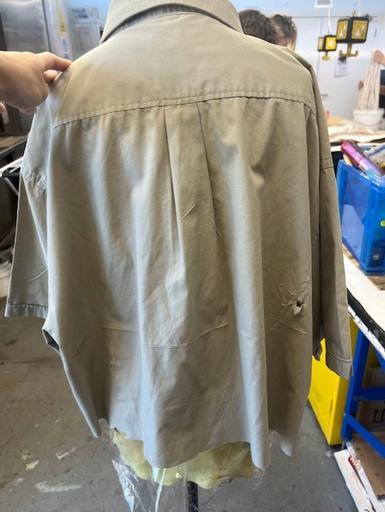
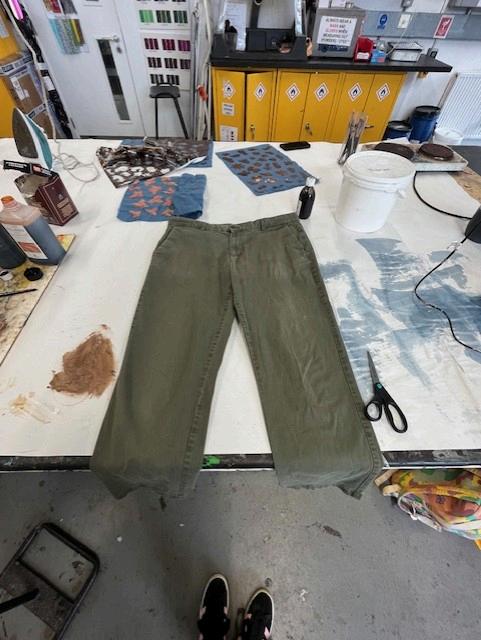
Costume 1:
Before:
After:

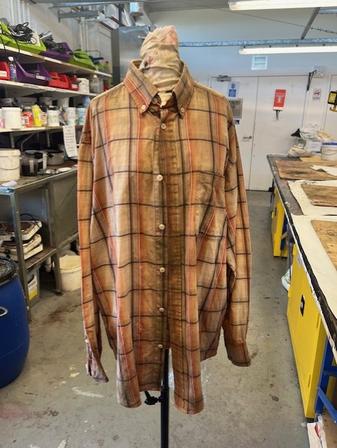
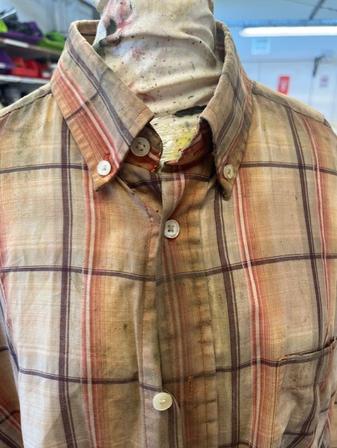
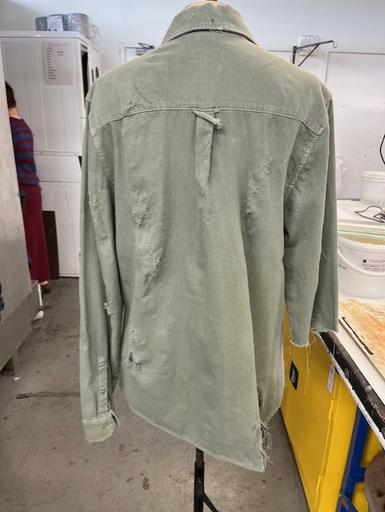
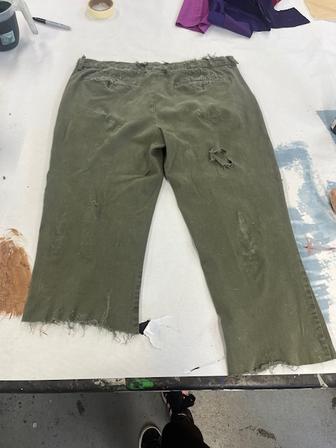
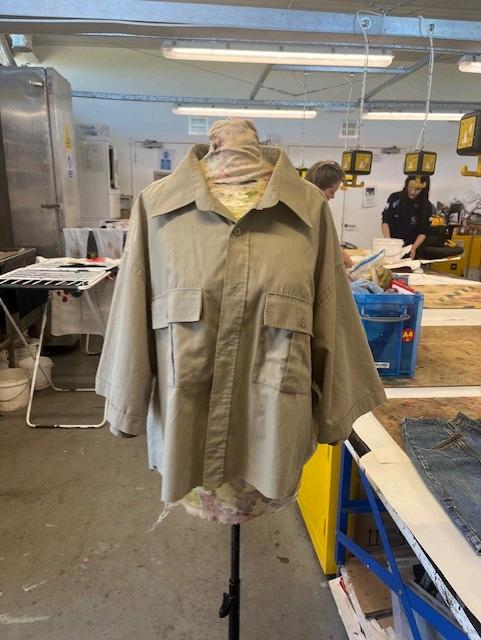
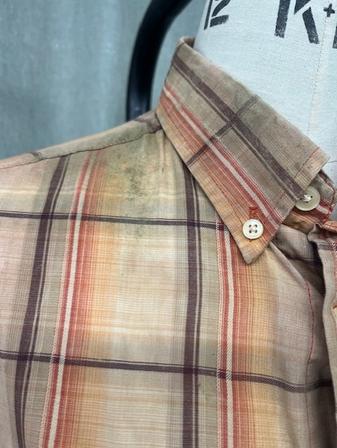
Before and After
Costume 1:
Before: After:

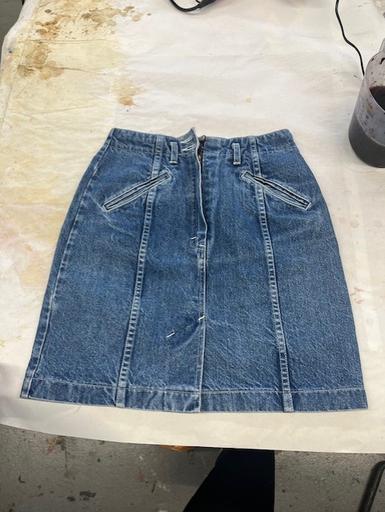
Before and After
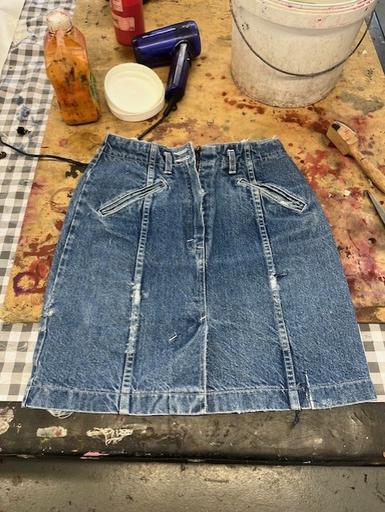
Before:
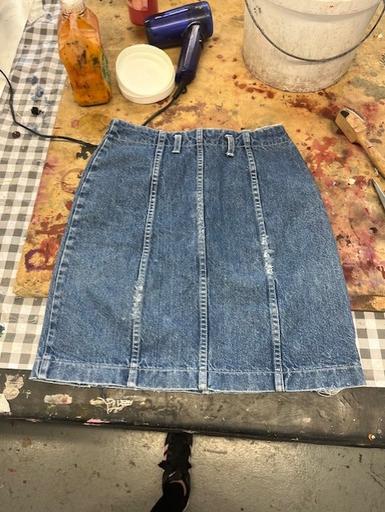
Costume 2:
After:
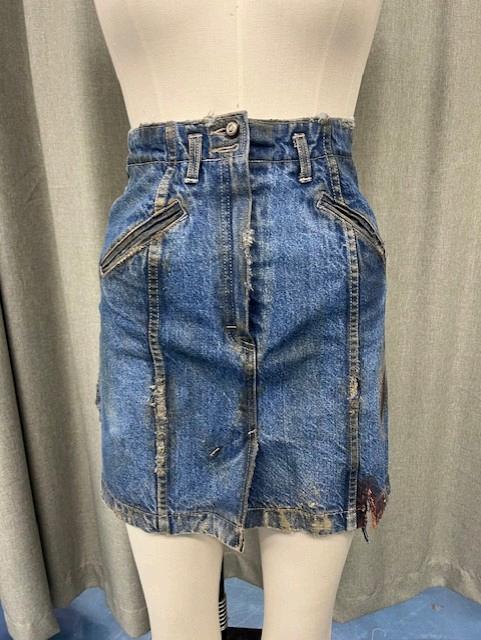
Before and After
Costume 2:
Before:
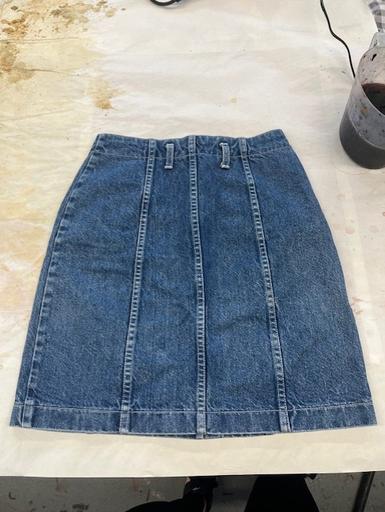
After:
Before and After
Before:
Costume 3:

After:
Dye Room Budget
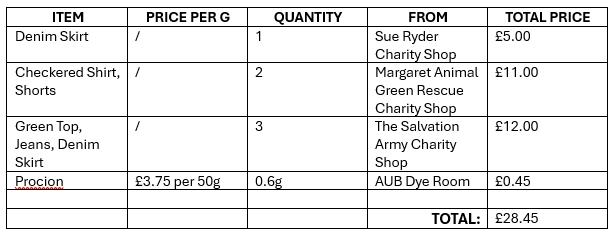
SW19 3UX
Breakdown Kit


A breakdown kit is vital for a costume breakdown artist because it organises and makes all of the necessary tools and materials such as brushes, dyes, and Fuller's earth easy to access. It makes sure there is consistency across costumes, allows speedy touch-ups or alterations on set, and equips the breakdown artist for all situations. Also having a kit shows professionalism, effectiveness, and preparedness
For this project the main items I would need in my break down kit as a breakdown artist would be: a wire brush, dye-na-flow, french enamel, fullers earth, tea bags and roscos super saturated paint. Along with a range of procion dyes in the colours red, brown and black.
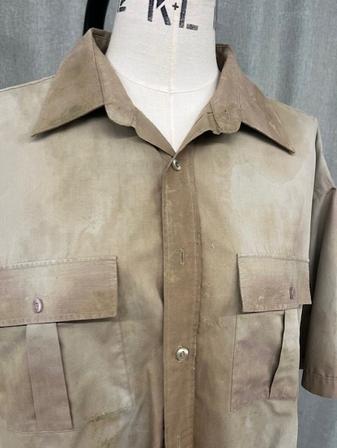
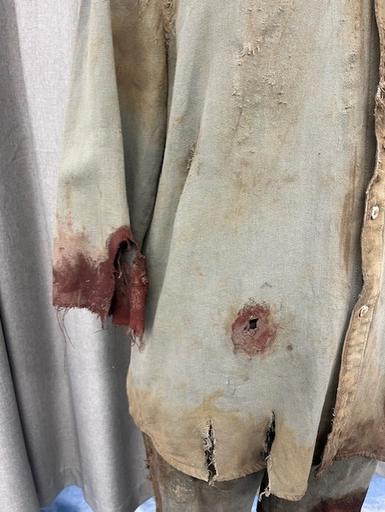
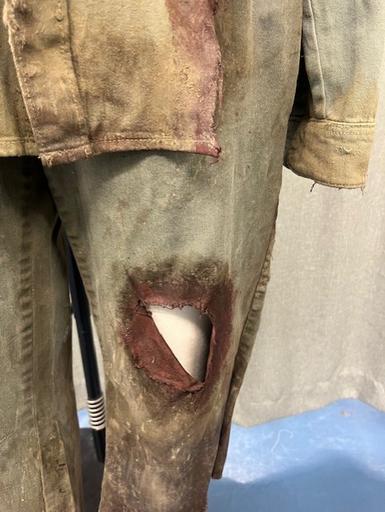
Final Images
Final Images
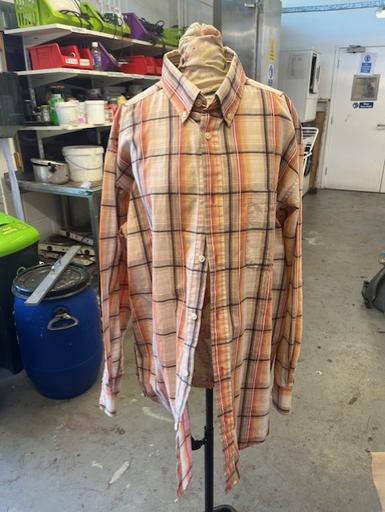
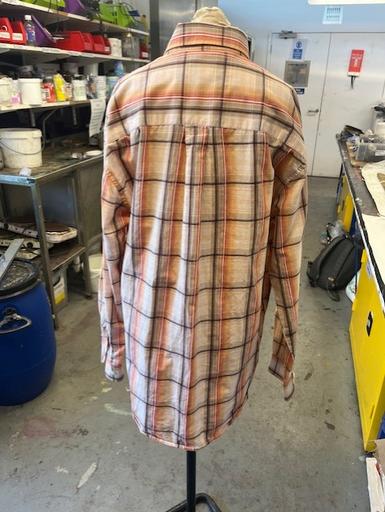
Costume 1:
Final Images
Costume 1:

Final Images
Costume 1:

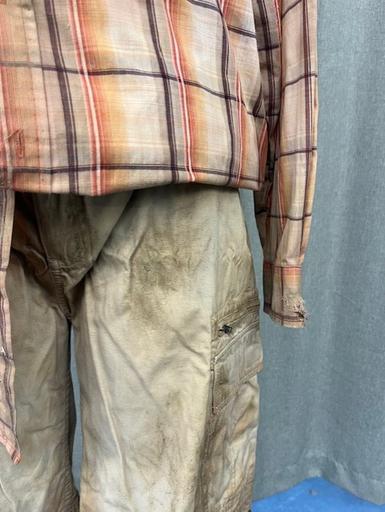
Final Images
Costume 2:

Final Images
Costume 2:

Final Images
Costume 2:
Final Images
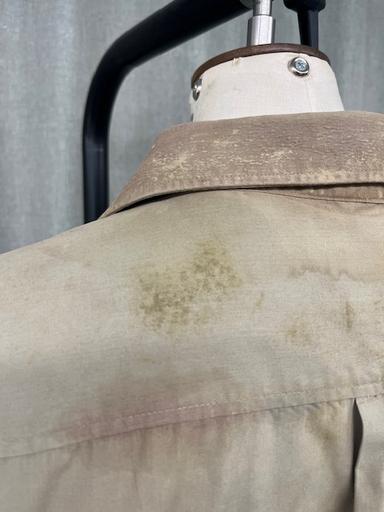
Costume 3:
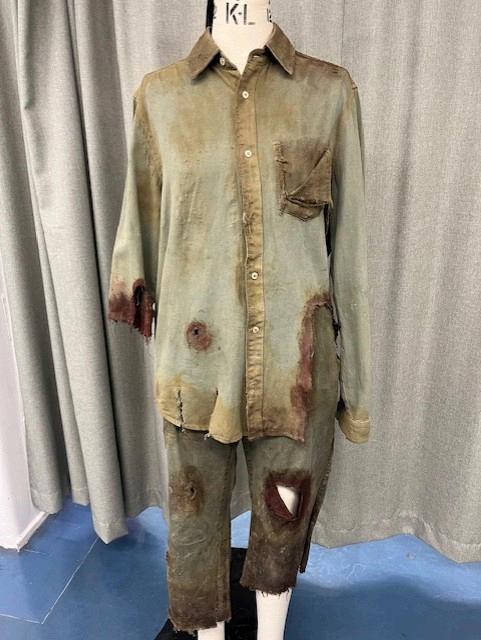
Final Images
Costume 3:
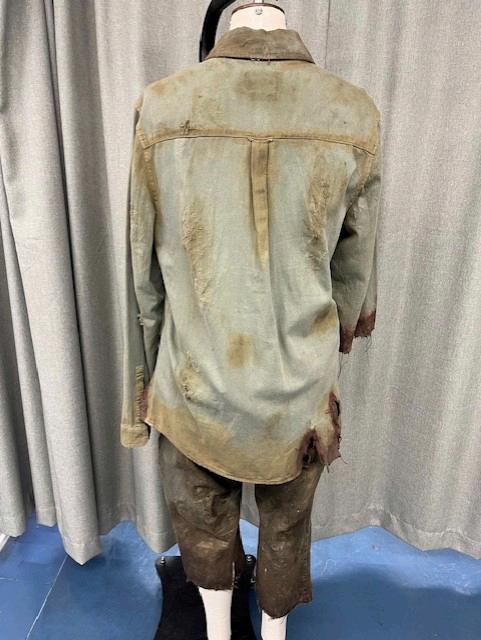
Final Images
Costume 3:


Scribed for second Prince Charming Costume Fitting - 1 hour
Scribed for third Prince Charming Costume fitting - 1 hour
Helped Dress for Prince Charming Costume Photoshoot - 1 hour
Scribed for Still Here fitting - 3 hours
List of Figures
Figure 1: Page 4: Rick Grimes: Source: https://www usmagazine com/entertainment/news/did-rick-grimes-survive-thewalking-dead
Figure 2: Page 4: Rick Grimes: Source: https://www.digitalspy.com/tv/ustv/a27881501/the-walking-dead-rick-spin-offdead/
Figure 3: Page 5: Group of Zombies: Source: https://www.businessinsider.com/walking-dead-zombies-evolution-before-after2015-11
Figure 4: Page 5: Zombie: Source: https://www.vox.com/2015/10/29/9634036/glenn-walking-dead-death-murio
Figure 5: Page 6: Reception: Source: Authors Photograph
Figure 6: Page 6: Sleeve: Source: Authors Photograph
Figure 7: Page 6: Cuff: Source: Authors Photograph
Figure 8: Page 6: Buttonholes: Source: Authors Photograph
Figure 9: Page 7: Evening Dress: Source: Authors Photograph
Figure 10: Page 7: Mould: Source: Authors Photograph
Figure 11: Page 7: Stain: Source: Authors Photograph
Figure 12: Page 8: Mould: Source: Authors Photograph
Figure 13: Page 8: Label: Source: Authors Photograph
Figure 14: Page 9: Waistcoat: Source: Authors Photograph
Figure 15: Page 9: Breeches: Source: Authors Photograph
Figure 16: Page 9: Inside of Waistcoat: Source: Authors Photograph
Figure 17: Page 9: Breeches Close Up: Source: Authors Photograph
List of Figures
Figure 18: Page 10: Corpse: Source: Ruditis, P. and AMC (2011). The Walking Dead Chronicles. Harry N. Abrams
Figure 19: Page 11: Zombie being shot: Source: Ruditis, P. and AMC (2011). The Walking Dead Chronicles. Harry N. Abrams
Figure 20: Page 12: Eulyn Womble: Source: https://www.fortressofsolitude.co.za/clothing-walking-dead-interview-eulynwomble/
Figure 21: Page 13: Eulyn Womble Video: Source: https://www.eulyn.com/new-page
Reference List
Hendricks, T.P., Byron (2024). Exclusive: Eulyn Womble Explains Walking Dead’s Zombie Clothing. [online] Fortress of Solitude. Available at: https://www.fortressofsolitude.co.za/clothing-walkingdead-interview-eulyn-womble/.
Ruditis, P. and AMC (2011). The Walking Dead Chronicles. Harry N. Abrams
Timothy Barry (2014). talking dead eulyn womble season 2. [online] YouTube. Available at: https://www.youtube.com/watch? v=uoHUfkc4gHM
to, C (2018) Eulyn Hufkie [online] Walking Dead Wiki Available at: https://walkingdead.fandom.com/wiki/Eulyn Hufkie
Bibliography
(Hendricks, T.P., Byron (2024). Exclusive: Eulyn Womble Explains Walking Dead’s Zombie Clothing. [online] Fortress of Solitude. Available at: https://www.fortressofsolitude.co.za/clothing-walking-deadinterview-eulyn-womble/.
Hufkie, C. (2020). Eulyn Colette Hufkie. [online] Eulyn Colette Hufkie. Available at: https://www.eulyn.com/new-page
IMDb. (2025). The Walking Dead Season 3 Q&A with Costume Designer Eulyn Womble - IMDb. [online] Available at: https://www.imdb.com/news/ni34516232/
Mendenhall, N. (2013). A Social Conversation with The Walking Dead’s Eulyn Womble. [online] Social Media Today. Available at:
https://www.socialmediatoday.com/content/socialconversation-walking-deads-eulyn-womble
Ruditis, P. and AMC (2011). The Walking Dead Chronicles. Harry N. Abrams.
Timothy Barry (2014). talking dead eulyn womble season 2. [online] YouTube. Available at: https://www.youtube.com/watch?v=uoHUfkc4gHM
to, C. (2018). Eulyn Hufkie. [online] Walking Dead Wiki. Available at: https://walkingdead.fandom.com/wiki/Eulyn Hufkie