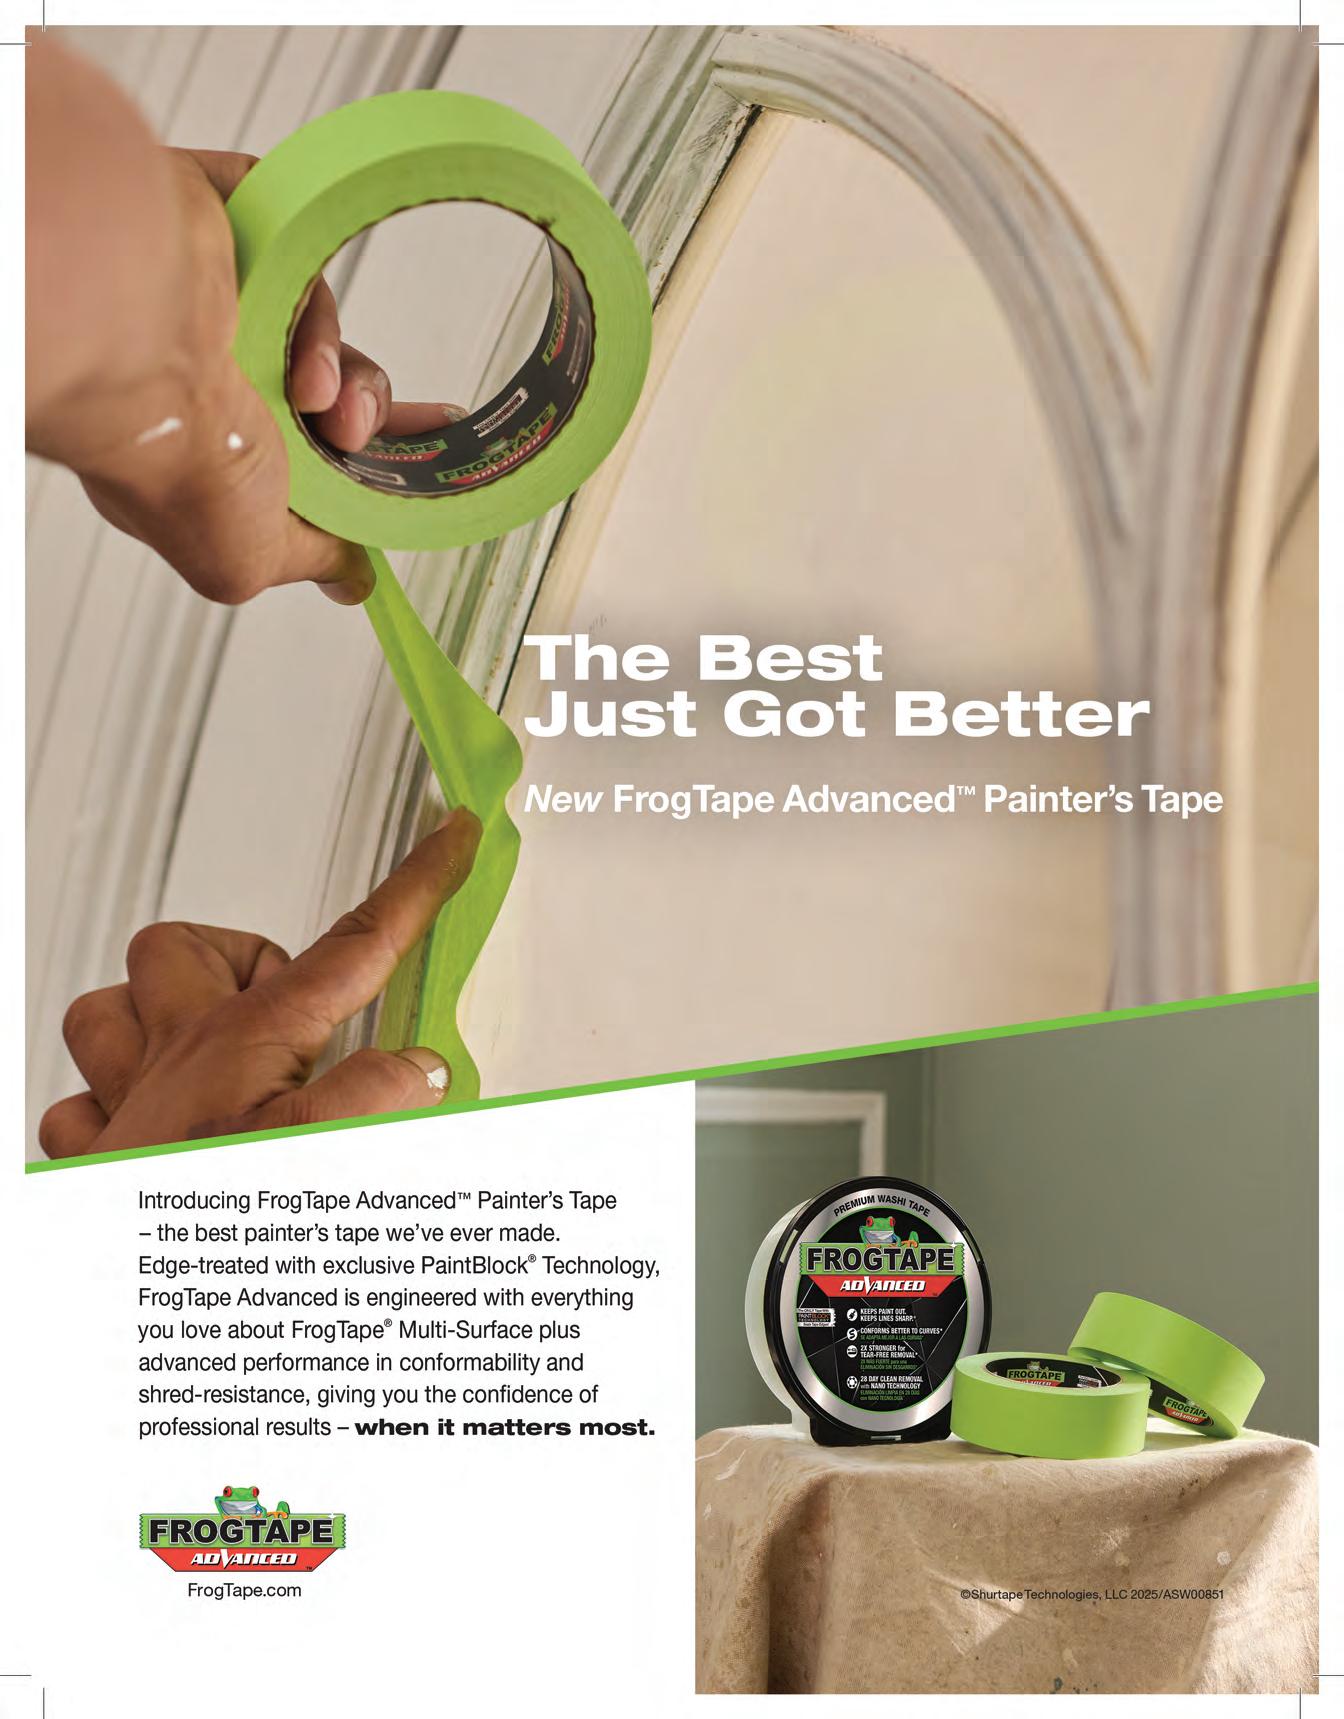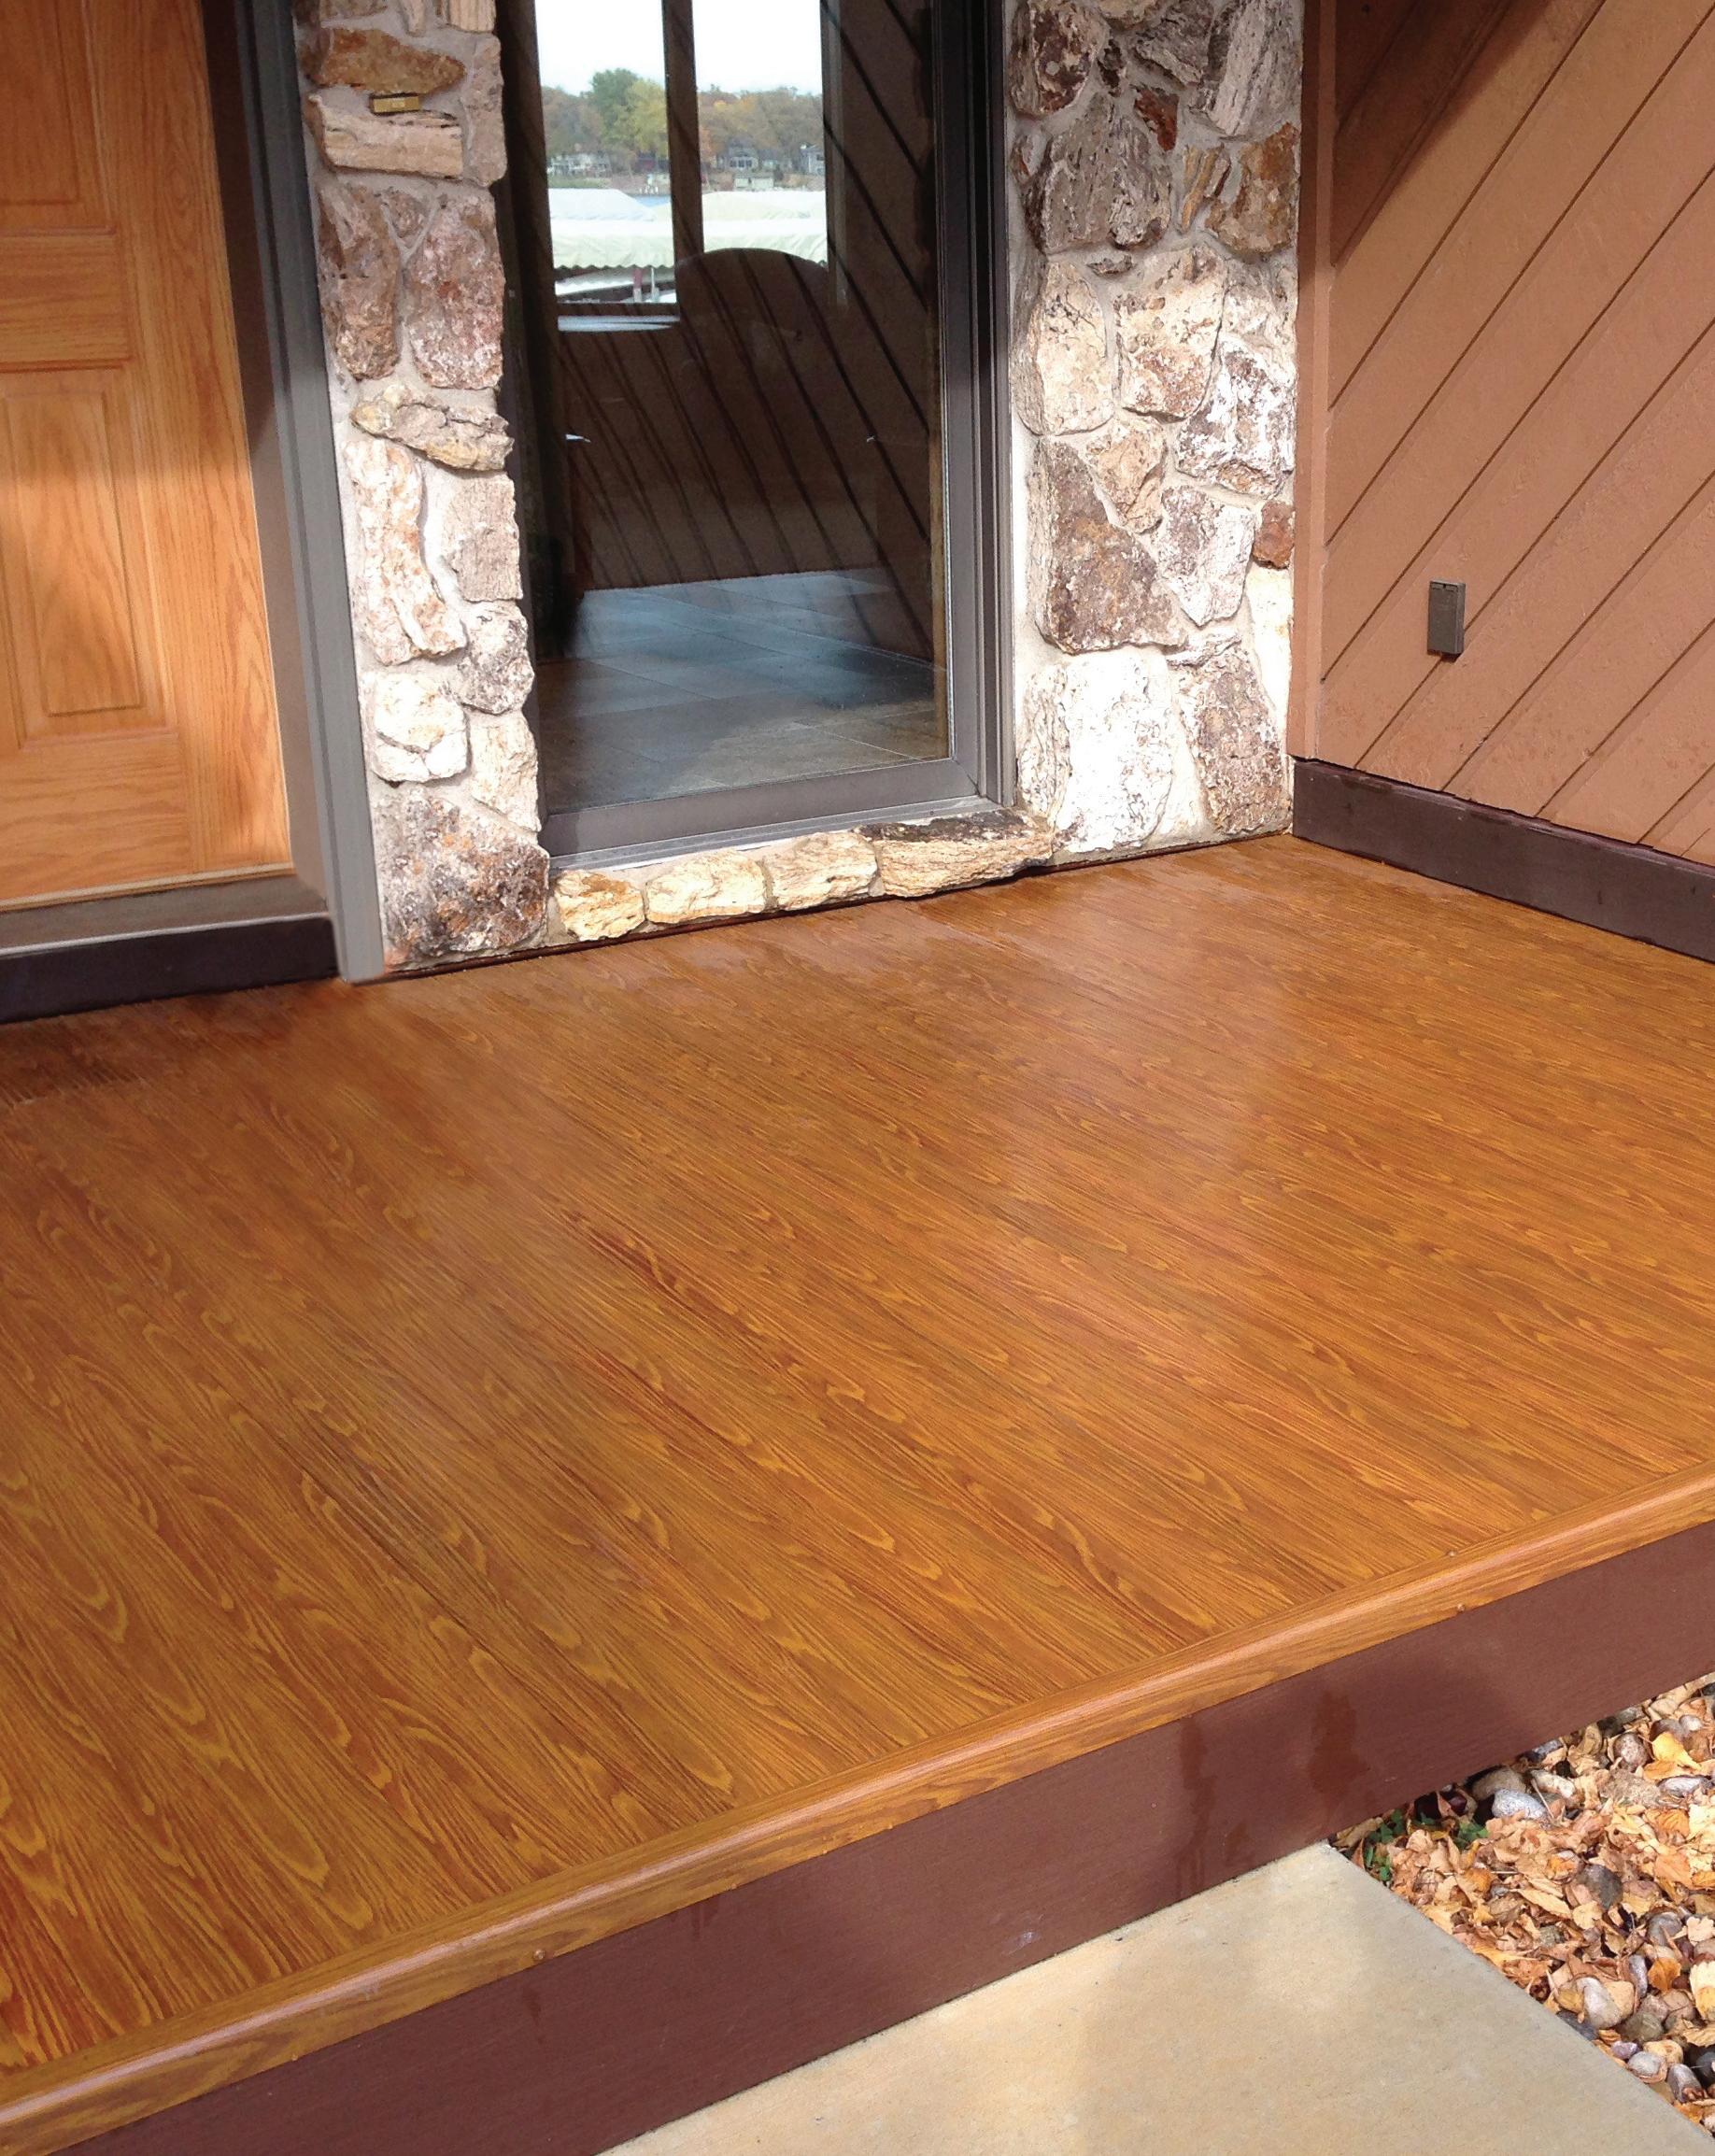
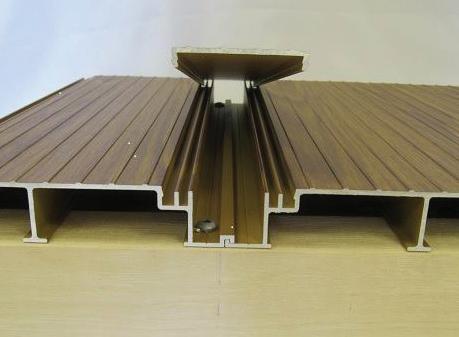
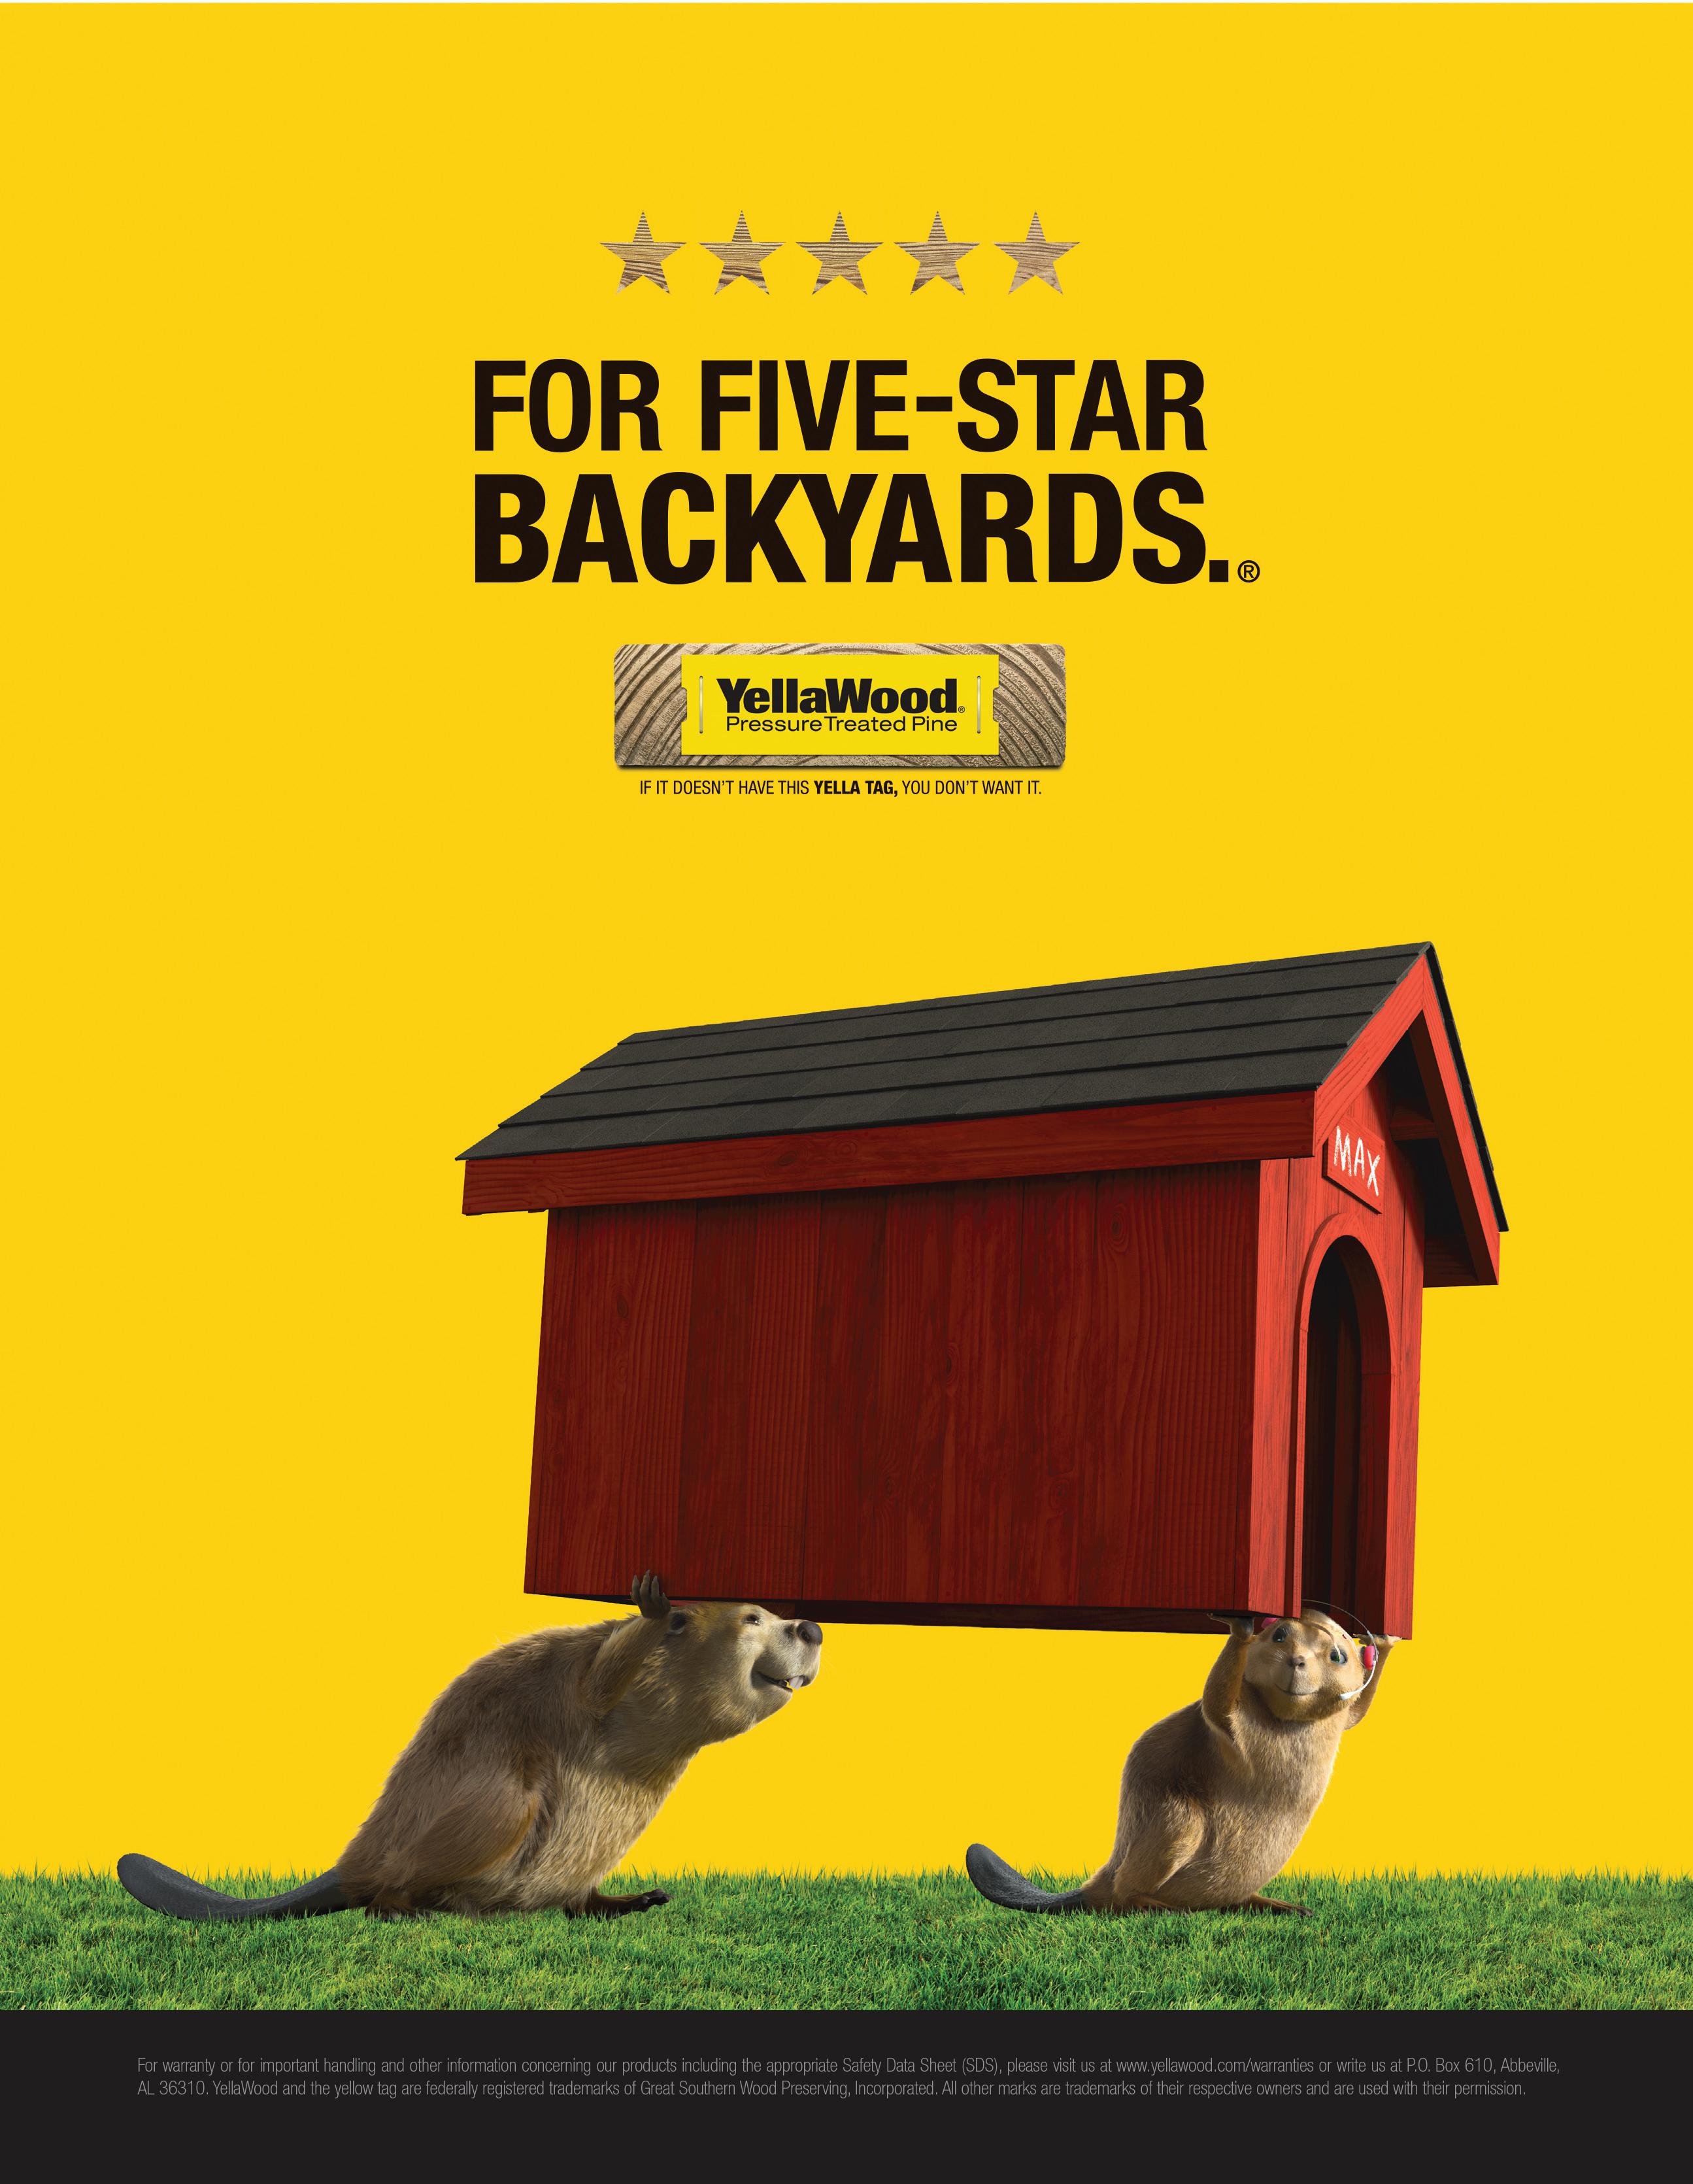
last-deck requires no staining or sealing, just mild soap and water for cleaning. No warping, splitting, cracking, rotting, molding, lightweight and fire-resistant. LastDeck is available in a multitude of options allowing you to design your own luxury outdoor space.
Manufactured in the Midwest of all American made structuralgrade aluminum – the same as an aircraft; Last-Deck is built with high quality standards from our family to yours.
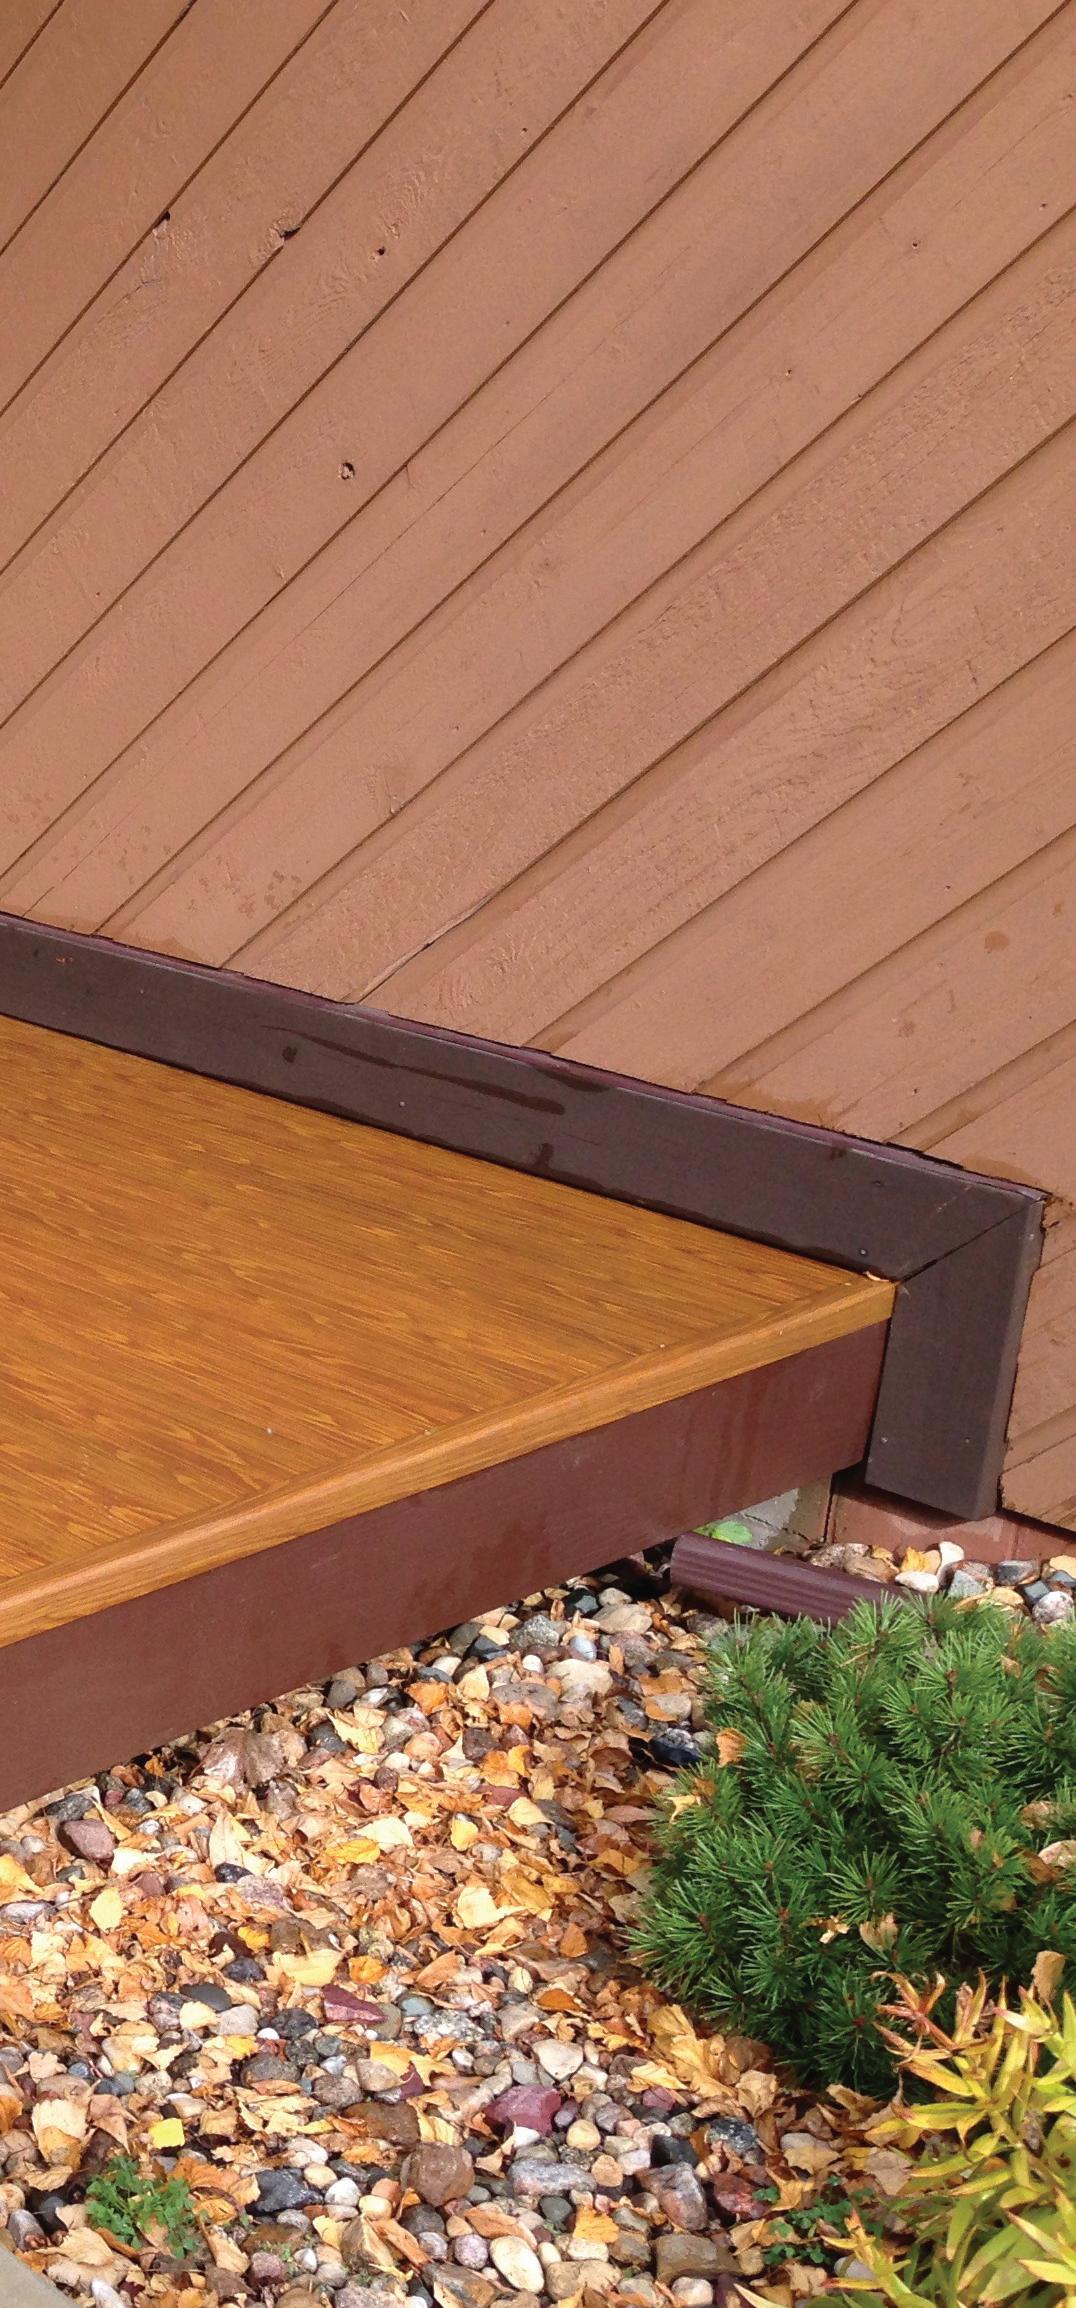
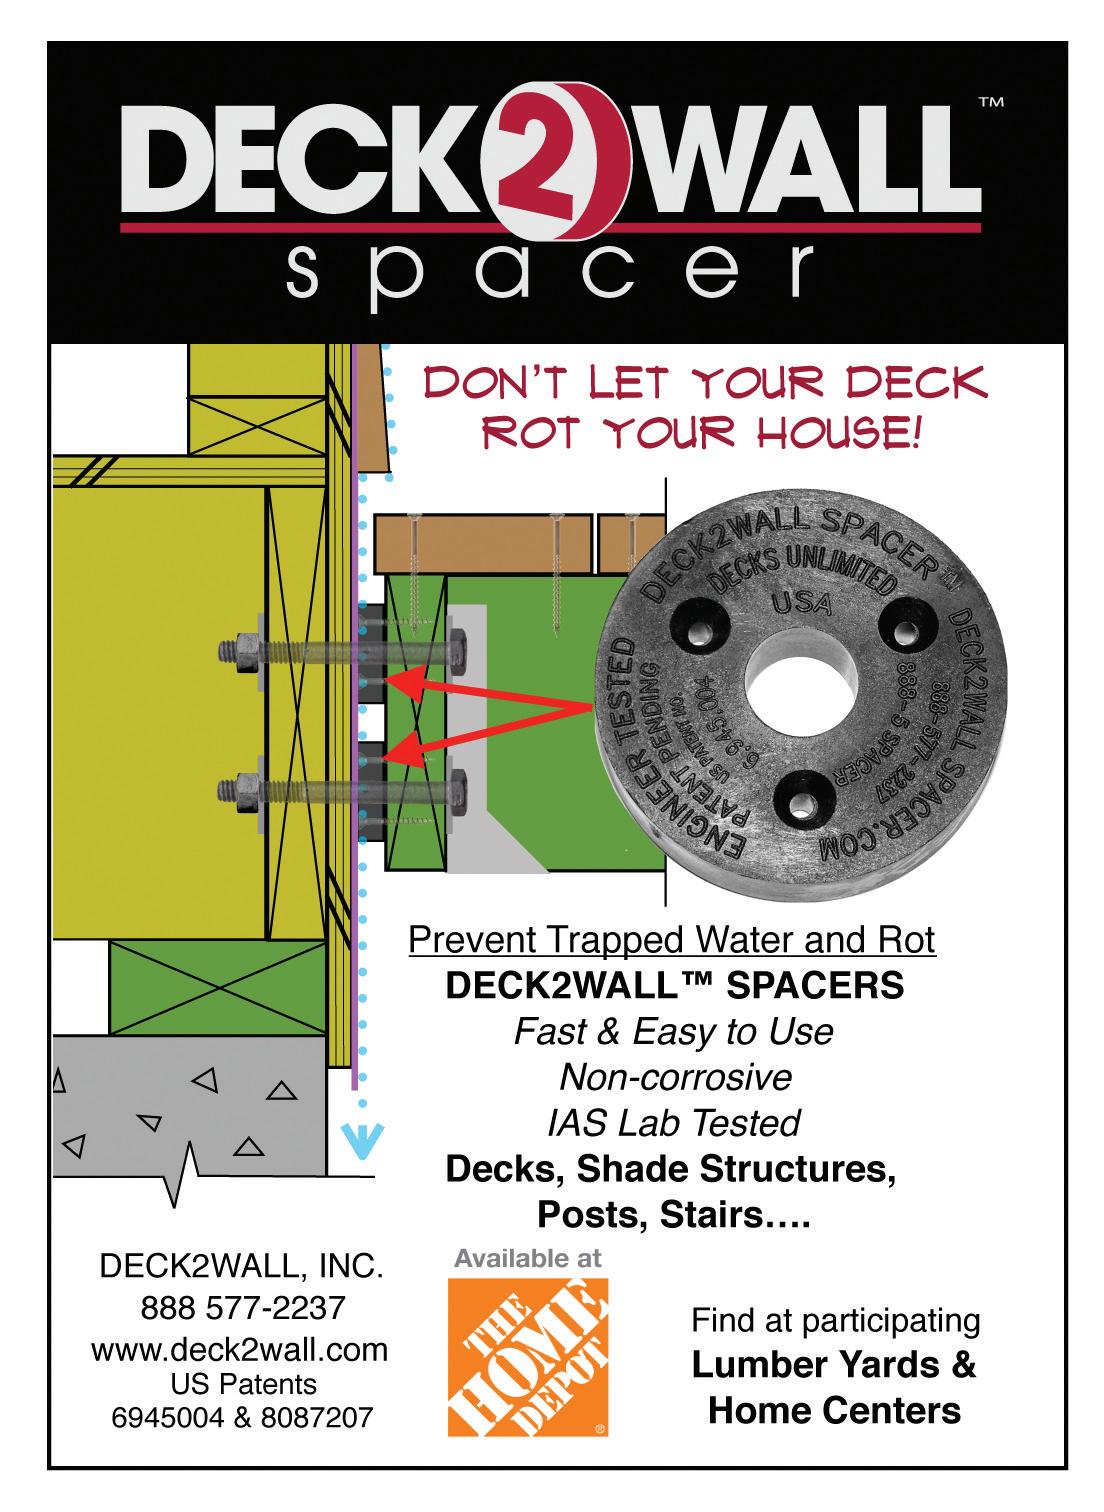
The 300 series is a patented, watertight product that has the ability to be replaced without having to start at one end. Should you receive damage at the mid-way point of your deck, simply pop up 2 joiner strips, replace the bad plank, snap the joiner strips back down, and your repairs are finished!

300 series easily pop up and snap back down!


The next few years will be a rocky time for the building industry. The Associated Builders and Contractors (ABC) forecast that the construction industry will need to attract an estimated 439,000 net new workers in 2025 to meet anticipated demand for construction services. Additionally, in 2026, ABC predicts the industry will need
Another unknown factor comes from the new Presidential administration. Many construction professionals have expressed optimism at the financial prospects and the new regulatory environment promised after the election. However, only time will tell how the new administration’s immigration policy will impact the available workforce.
is shaping the future to adapt to the skilled labor shortage. Commercial construction—and perhaps homebuilding in the future—will rely increasingly on modular prefabricated construction, equipment automation, remote-control operation, robotics, and of course, artificial intelligence.
to bring in 499,000 new workers as spending picks up in response to presumed lower interest rates. That is a whole lot of jobs to fill, and those calculations were made prior to thousands of structures burning to the ground in Los Angeles. Suffice it to say, the resulting reconstruction in California will require a great deal of labor and supplies.
The scarcity of skilled workers will likely drive demand for construction workers nationwide, and as a result, might make it tough for customers to track down reputable contractors. Homeowners may have to sharpen their DIY skills as a necessity and not just as a hobby. Meanwhile, the nature of construction is evolving in response to the changing times. Technology
The world is evolving at a rapid pace. To remain competitive, construction pros will need to embrace the changes or be left in the past.

EDITOR-IN-CHIEF
MATT WEBER matt@HIRpub.com
CREATIVE DIRECTOR
WESLEY GLASSCO wesley@HIRpub.com
NATIONAL SALES jeremy@HIRpub.com
EDITORIAL
ADVISORY


Looking forward to 2025, many homeowners will plan renovations to refresh their spaces and boost their property value. If updating your home is on your New Year's resolutions list, new research has revealed the most profitable home renovations in the USA, with garage door replacement ranking number one.
Experts in bathroom and kitchen remodels at Oakridge Remodels analyzed the average cost and resale value of over 20 popular home renovations, including entry door replacement and minor kitchen remodeling. They calculated the average return on investment for each project to reveal which ones are the most profitable. A return on investment under 100 percent suggests a project is not profitable.
“It is interesting to see which home renovation projects are the most profitable, both on a state and national level,” says Arthur Taylor, founder of Oakridge Remodels. “In the US as a whole, there are only three projects that are profitable: garage door replacement, entry door replacement and stone veneer addition. However, the profitability of different renovations varies widely depending on the state, local housing market and buyer preferences.
“Renovations can be great for aesthetics, however, if your goal is to increase property value to sell or rent, it is best to stick to projects with a return on investment over 100 percent. This ensures you are not only improving your home but also maximizing the financial benefits.
“Hopefully, this research will help to inform homeowners looking to increase their property
on which projects are worth their time and money.”

Source: These insights are based on analysis by Oakridge Remodels of city data – 2024, provided by the Journal of Light Construction. For more on Oakridge Remodels, visit www.oakridgeremodels.com.
Burst pipes, ice dams, and poor insulation can lead to costly repairs in harsh winter weather. Burst pipes are the most common culprit of home water leaks in the winter, because as the water in the pipe freezes, it expands and ruptures the pipe.
Simple steps to protect your home this winter:
• Install pipe insulation made of foam or fiberglass on all pipes, particularly those in unheated spaces, such as attics and crawlspaces.
• Shut off the water to outside faucets. Add extra protection with an insulated spigot cover.
• Disconnect any exterior lines like garden hoses.
• Shut off water to appliances if going out of town.
• Install water sensors that alert the homeowners quickly in the event of a leak.
• Maintain an average home temperature of 68 degrees.
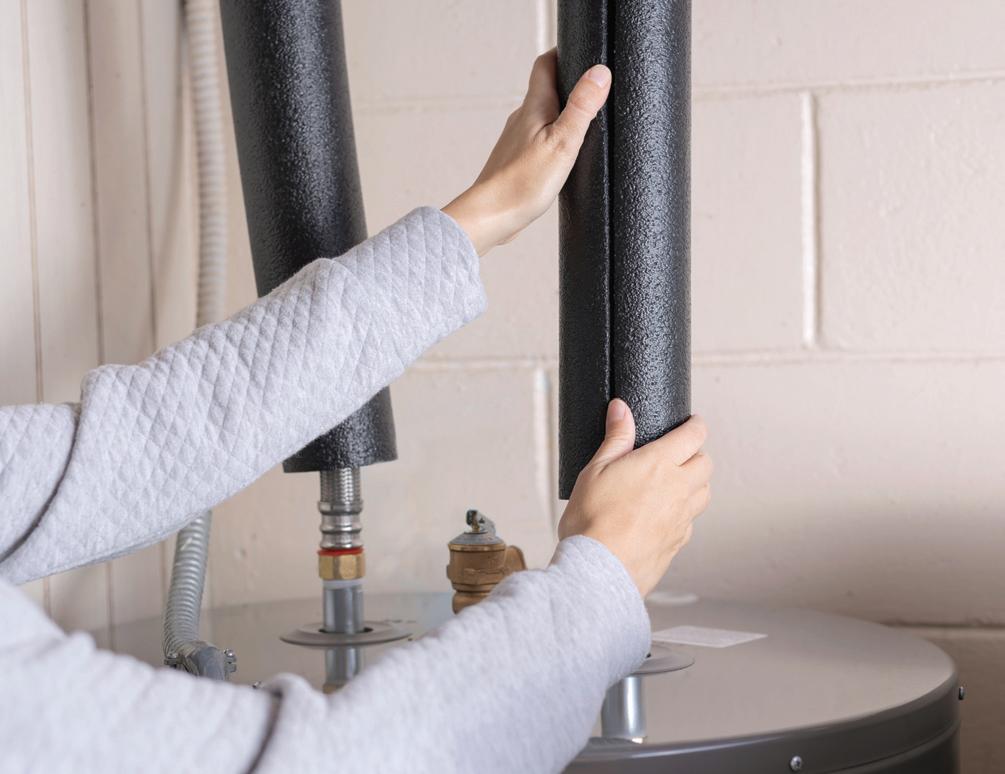
Water heater inspection: The temperature of the cold water drops about 25 degrees during the winter, so water heaters have to work harder to heat up. Check the water heater for any unusual noises, faulty pipes or leaks, or schedule maintenance to drain the sediment in the tank.

Maintain your gutters and roofs: Clean out your gutters and roof eaves, and if it snows, use a snowremoval rake to get the snow off your roof as soon as possible. These efforts prevent ice dams, which form from melting snow and water that run down the roof and freeze along the roof line and into the gutter. The dams in turn cause water to back up and pool beneath roof shingles, allowing water to leak into the home.
Inspect your house foundation: You should remove accumulated snow around the foundation of your house. When it begins to melt, it can seep deep down into the soil and infiltrate basement walls. Seal any cracks in your basement walls as soon as you find them.
The Outdoor Power Equipment Institute (OPEI) reminds home and business owners to use generators and snow throwers (often referred to as snow blowers) safely and offers tips to help.
Review the owner’s manual: Check the owner’s manual for safe handling procedures. If the manual cannot be found, look it up online, and store a copy on your computer so it’s available to reference in the future. Review how to operate controls. Be able to shut off equipment quickly.
Purchase the right fuel: For most gasoline-powered outdoor equipment, only use fuel that is rated E10 or less. Often fuel stations are closed after a storm so buy gasoline in advance of storms. It’s best to use fresh fuel, but if you are using fuel that has been sitting in a gas can for more than 30 days, add fuel stabilizer to it. Store gas only in an approved container and away from heat sources. For more information on fueling properly, see www.opei.org.

Rake the leaves and trim the trees: Remove any dead leaves because if they are left accumulated during winter they will likely kill the grass and fester disease in the lawn. Also, don't forget to cut away dead or dying tree limbs wherever possible. Dead tree limbs are known as "widow-makers" for a reason. They can fall off the tree at any time, but are especially dangerous during windstorms or when weighted down by a heavy snow load.
Store and use fuel properly: Place gasoline in a proper fuel container and label it with the date purchased and the ethanol content. Store fuel safely and out of the reach of children and away from heat sources. Never add fuel to a running or hot engine.
Ensure portable generators have plenty of ventilation: Keep it outside. Generators should NEVER be used in an enclosed area or placed inside a home, a building or a garage, even if the windows or doors are open. Place the generator outside and away from windows, doors, air intakes, or vents that could allow carbon monoxide to drift indoors.
Install a battery-operated carbon monoxide detector in your home: This alarm will sound if dangerous levels of carbon monoxide enter the building.
Keep the generator dry: Do not use a generator in wet conditions. Cover and vent a generator. Modelspecific tents or generator covers can be found online
for purchase and at home centers and hardware stores.
Charge & use battery-powered generators/inverters properly: Recharge only with the charger specified by the manufacturer. A charger that is suitable for one type of battery pack may not be compatible with another battery pack. Follow all charging instructions and do not charge the battery pack or equipment outside the temperature range specified in the instructions. Charging improperly or at temperatures outside the specified range may damage the battery.
Plug in safely: If you don’t yet have a transfer switch, you can use the outlets on the generator. It’s best to plug in appliances directly to the generator. If you must use an extension cord, it should be heavy-duty and designed for outdoor use. It should be rated (in watts or amps) at least equal to the sum of the connected appliance loads. Make sure the cord is free of cuts, and the plug has all three prongs.
Install a transfer switch: A transfer switch connects the generator to the circuit panel and lets you power hardwired appliances. Most transfer switches also help avoid overload by displaying wattage usage levels.
Do not use the generator to “backfeed” power into your home electrical system: Trying to power your home’s electrical wiring by “backfeeding” –where you plug the generator into a wall outlet – is dangerous. You could hurt utility


workers and neighbors served by the same transformer. Backfeeding bypasses built-in circuit protection devices, so you could damage your electronics or start an electrical fire.
Check equipment: The snow thrower should be powered off when being checked over. Adjust any cables and check the auger.
Charge batteries: Locate the batteries for your snow thrower and charge them fully before it snows.
Clear the area: Snow can sometimes hide objects. Doormats, hoses, balls, toys, boards, wires, and other debris should be removed from areas you intend to clear. When run over by a snow thrower, these objects may harm the machine or people.
Dress for winter weather: Wear safety glasses, gloves, and footwear that can handle cold and slippery surfaces when operating the snow thrower.
Never put your hands inside the auger or chute. Use a clean-out tool to unclog snow or debris from the snow thrower. Your hands should never go inside the auger or chute. Turn OFF the snow thrower if you need to clear a clog! If you need to remove debris or unclog snow, always turn off the machine and wait for all moving parts to come to a complete stop before clearing any clogs or debris.
Operate in visible conditions: Never operate the snow thrower without good visibility or light.
Aim with care: Never throw snow toward people or cars. Keep children or pets inside and away from your snow thrower when it is operating.
Use extreme caution on slopes and hills: Use caution when changing directions on slopes. Do not attempt to clear steep slopes.
Know where the cord is: If using an electric powered snow thrower, be aware of where the power cord is at all times. Avoid tripping.

QUESTION: What is the easiest way to repair damaged peel-and-stick flooring?
ANSWER: If peel-and-stick vinyl tile or planks have been damaged or are coming unattached from the subfloor, the best way to repair is to remove the individual tiles and replace them. For stubborn tiles that are difficult to remove, try applying heat to soften the adhesive backing. Use a heat gun or hairdryer on a low setting to warm the tile, making it more pliable and easier to pry away. Replace the tile with new peel-and-stick tile, following manufacturer suggestions for installation. Peel-and-stick tile always adheres best if pressed down with a hard rubber roller after installation.
QUESTION: I would like to carve a couple of creative accent pieces for a fireplace mantel. What are the best types of wood for carving?
ANSWER: According to the experts at Schaaf Tools, which manufactures woodcarving tools, beginning carvers should begin with a block of carving wood that holds detail and is relatively easy to carve. Basswood (aka Linden) is a soft wood that holds detail well, is light cream colored, with streaks of brown, and has a smooth, even grain. Butternut (sometimes called white walnut) is a soft wood that holds detail well and has a medium coarse texture. Butternut is easy to work with hand tools but can dull tools quickly, so have your sharpener ready. Aspen is technically a hardwood, but a “soft” hardwood, and still easy to carve. White Pine is best for whittling, relief carving, or carving in the round, but it not suited for chip carving because it has a soft, straight grained texture. Black Walnut is a bit more expensive and a little harder but is still straight grained and fairly easy to carve. These woods are relatively inexpensive and easy to find.


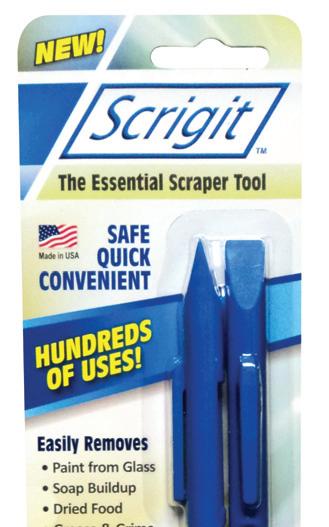
The Essential Non-Scratch SCRAPER TOOL!
SAVES TIME AND EFFORT WHEN CLEANING SMALL SURFACES, EDGES & GROOVES


PEN-SHAPED DESIGN EASY TO KEEP HANDY
UNIQUE ROUNDED TIP BETTER SCRAPER THAN A FINGERNAIL
SECOND FLAT-EDGED TIP WON’T SCRATCH LIKE A SCREWDRIVER REMOVE STICKERS, TAPE, CAULK, PUTTY, GRIME & MUCH MORE


www.artisticpavers.com
The 2025 NAHB International Builders' Show—the premier, once-a-year event that shapes the residential construction industry—is scheduled for February 25-27 in Las Vegas, Nevada. The show is a hub for construction demos, workshops, panel discussions, and new product launches. Here is a preview of some handy home products that will be on display this month. Stay tuned to www.homeimprovementandrepairs.com for follow-up coverage of our visit to the convention!
Learn more at www.buildersshow.com
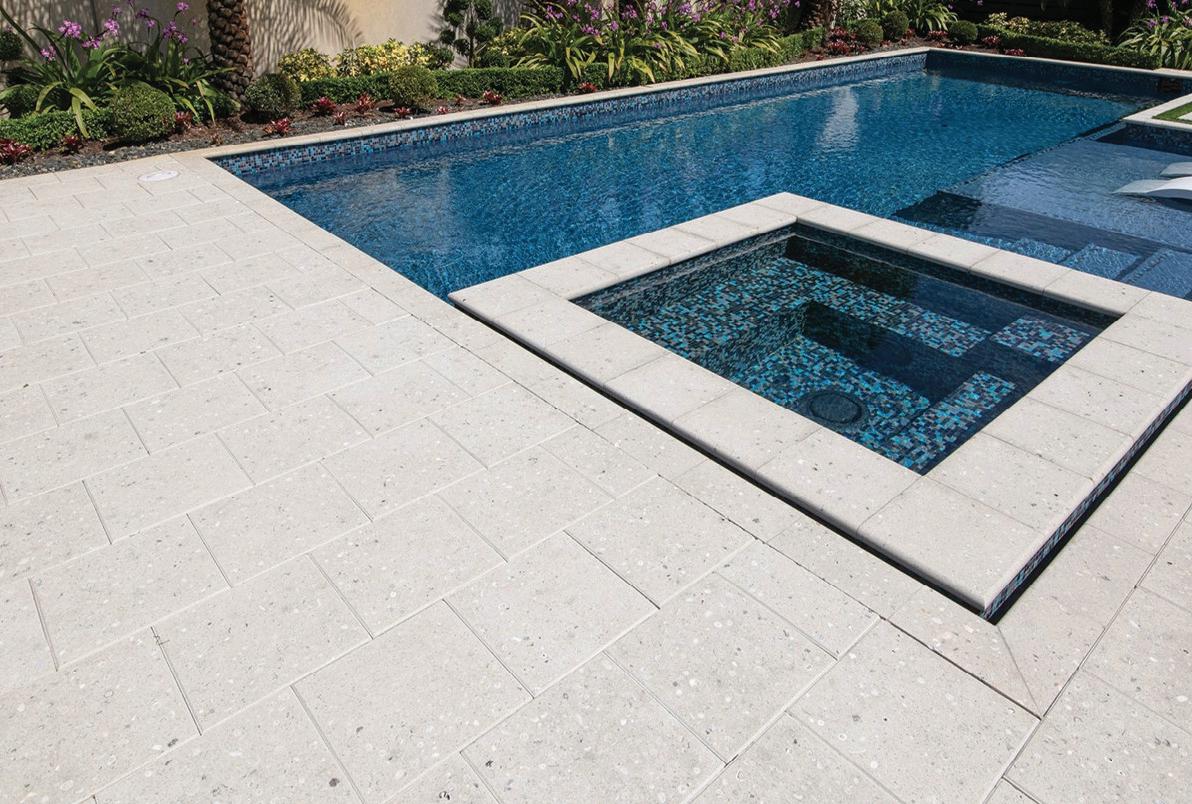
Artistic Pavers offers a distinctive and top-quality selection of pavers designed to enhance outdoor spaces. The manufacturing process incorporates premium natural resources, such as seashells, conchs, and glass, which offer a diverse range of colors and finishes. Cutting-edge technology ensures compressive strength, flexural strength, and freeze-thaw resistance. The company’s Steplock pavers are available in different textures, and Shellock pavers feature the exposed beauty of seashells on each paver. Granitelock pavers feature the timeless appeal of granite in a paver.


CHOOSE COATED CARBON OR STAINLESS STEEL
• HIGH STRENGTH COATED CARBON STEEL FOR ENDURANCE
• STAINLESS STEEL FOR SUPERIOR CORROSION RESISTANCE
4 CLIP PROFILES


• PRECISE FIT ELIMINATES LOOSE DECK BOARDS
• INCREASES HOLDING POWER
ELEVATES YOUR DECK BOARDS
• BETTER AIR FLOW REDUCES ROT
• RELIEVES LATERAL LOAD STRESS


2
www.deckorators.com
2
Booth C5207
Featuring mineral-based Surestone technology, Deckorators Summit Decking will be offered in three new ontrend colors and is designed to deliver a practical blend of performance and value. Summit Decking is warranted for water and ground-contact installation and features a low-gloss surface finish with flatgrain variegation.
Coming mid-2025, Deckorators Glass Rail Post Kits will feature a post-to-post glass design with line, end, and corner-post configurations. Available in textured black, the kit is adaptable to 6mm and 13mm glass.
3
Booth P956
Frontline Defense System 2 pairs hardware and software for wildfire protection. Sprinklers activate automatically within seven miles, which is more than 100x faster than traditional sensor-based systems. Once active, the system saturates your property with water and biodegradable firefighting foam, creating an environment that is too wet to burn. If a fire comes within seven miles of your home, you will receive a notification via the Frontline App. At that point, a ten-minute timer will begin to countdown on the app. You have the option to activate your system immediately or choose to override the activation. If you don’t take any action, the system will automatically activate at the end of the 10-minute timer.
4
Booth C6207
The Feeney CableRail cable infill system is slender, stylish, and easy-to-use. It’s an ideal complement to any railing design, indoors or out. Kits are available with wood frames. You can also purchase bulk cable and build your own assemblies to fit your needs using the special CableRail Quick-Connect fittings. The unique stainless steel fittings attach to the cable without tools. One-way jaws automatically grab and lock on after the cable is inserted, making assembly and installation fast and easy.


5
Booth W5620
A Hammock bathtub is a freestanding modern tub design that appears to be floating in air. This innovative design has the bath volume to allow you and/or another to lie back comfortably and relax fully immersed in water. Its large bath shape brings unique comfort and style to a bathtub while retaining functionality. Choose from two styles of the Hammock Bath; the Slimline bath design and the Mark II bathtub design. The Hammock Bath was originally designed in a solid surface finish and now it has an acrylic version in a matt white and matt black finish.
6
Booth SU3049
FrogTape Pro Grade Flashing and Waterproofing Tape creates an airtight, weatherproof seal around windows, doors and building openings. The tape utilizes a high-performance acrylic adhesive specifically formulated for building envelope applications to help it adhere to a variety of surfaces in wide-ranging weather conditions. This professional-grade flashing tape is ideal for use in both residential and construction applications, including the flashing of windows and doors, deck ledgers, and weatherproofing for skylights, dryer vents, roofs, and other building openings.
7
Booth C7907
Founded in 1978, Lynden Door is a third-generation, family-owned company crafting beautiful, premium quality interior doors. The Elemental Interior Door Collection now offers double-route lines, adding depth and character to any space. These interior doors are designed to create dimension, available in 5 different profiles. The FineLine Interior Door Collection embraces the increasingly popular flush-grooved door designs, and Lynden Door introduces four new FineLine designs.
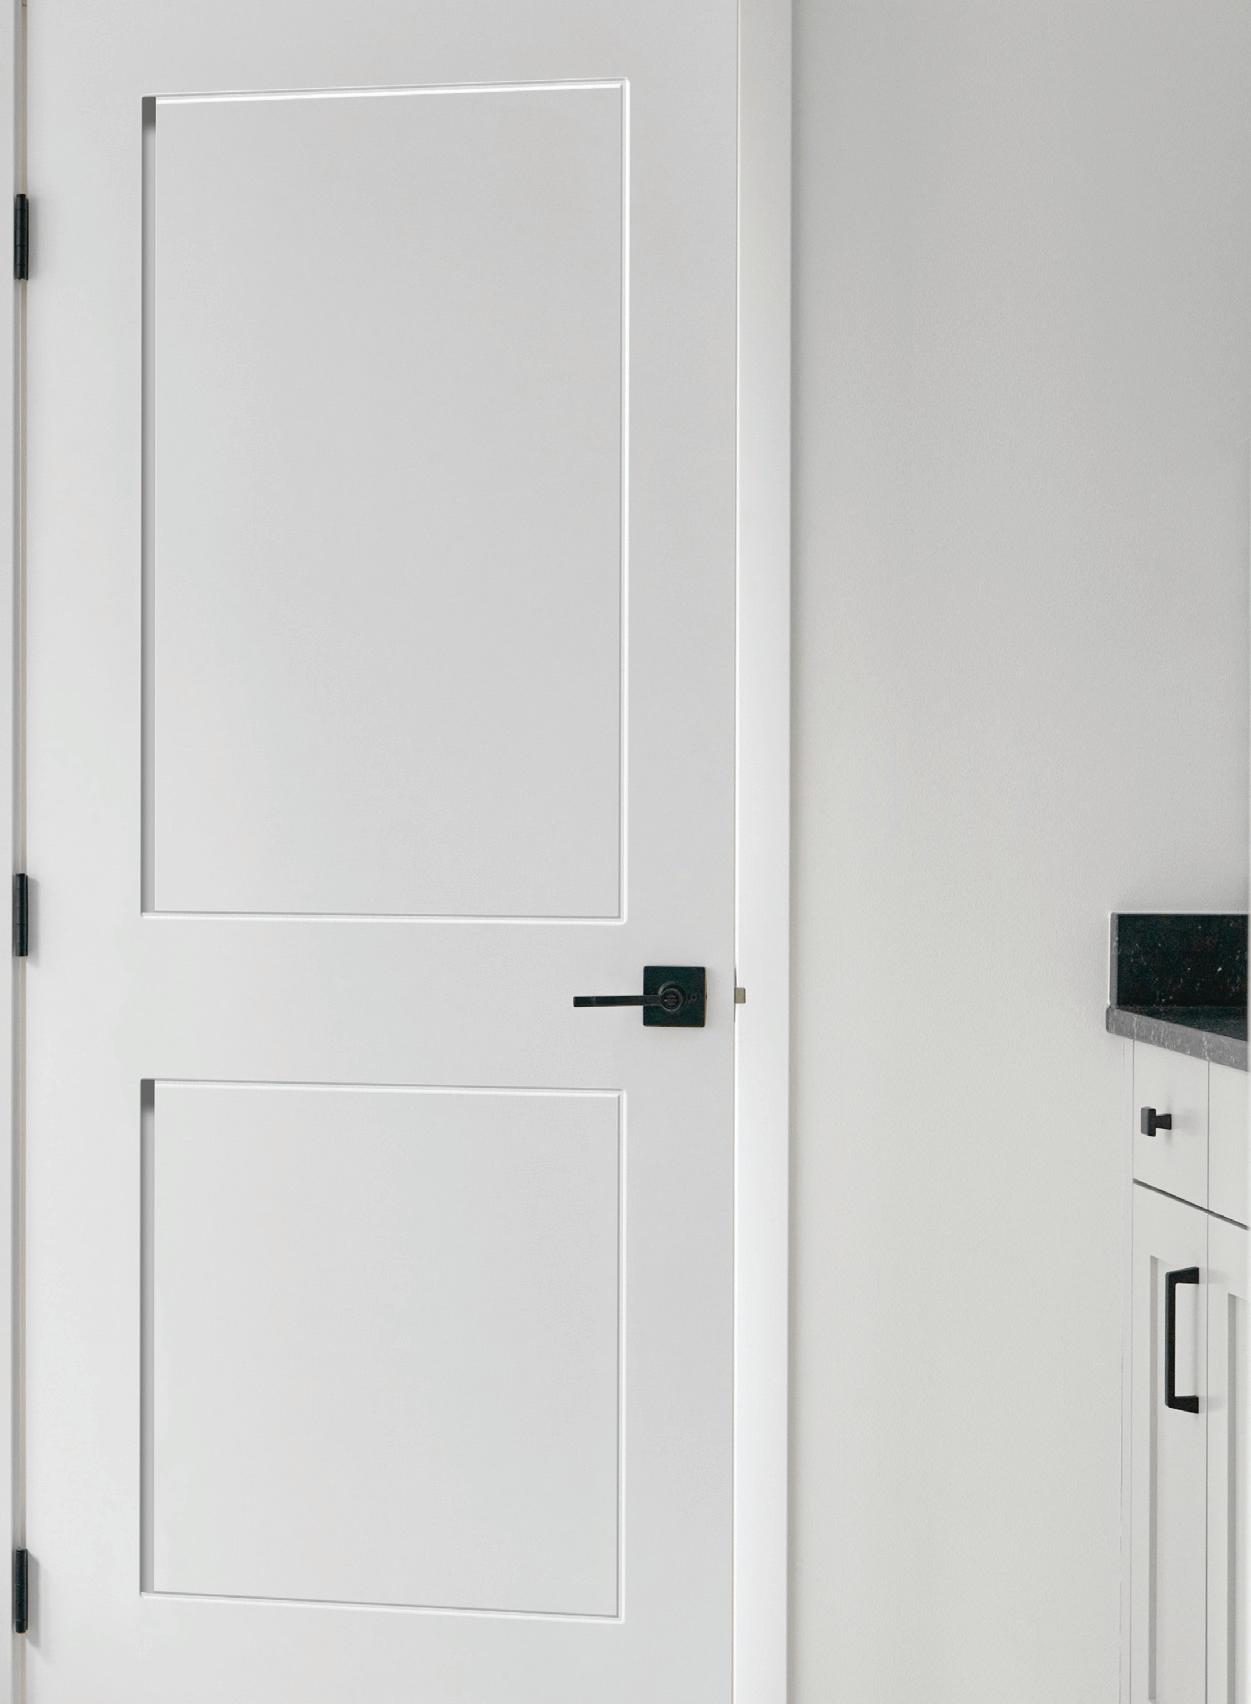
www.lyndendoor.com
Booth W5013
www.barrondesigns.com
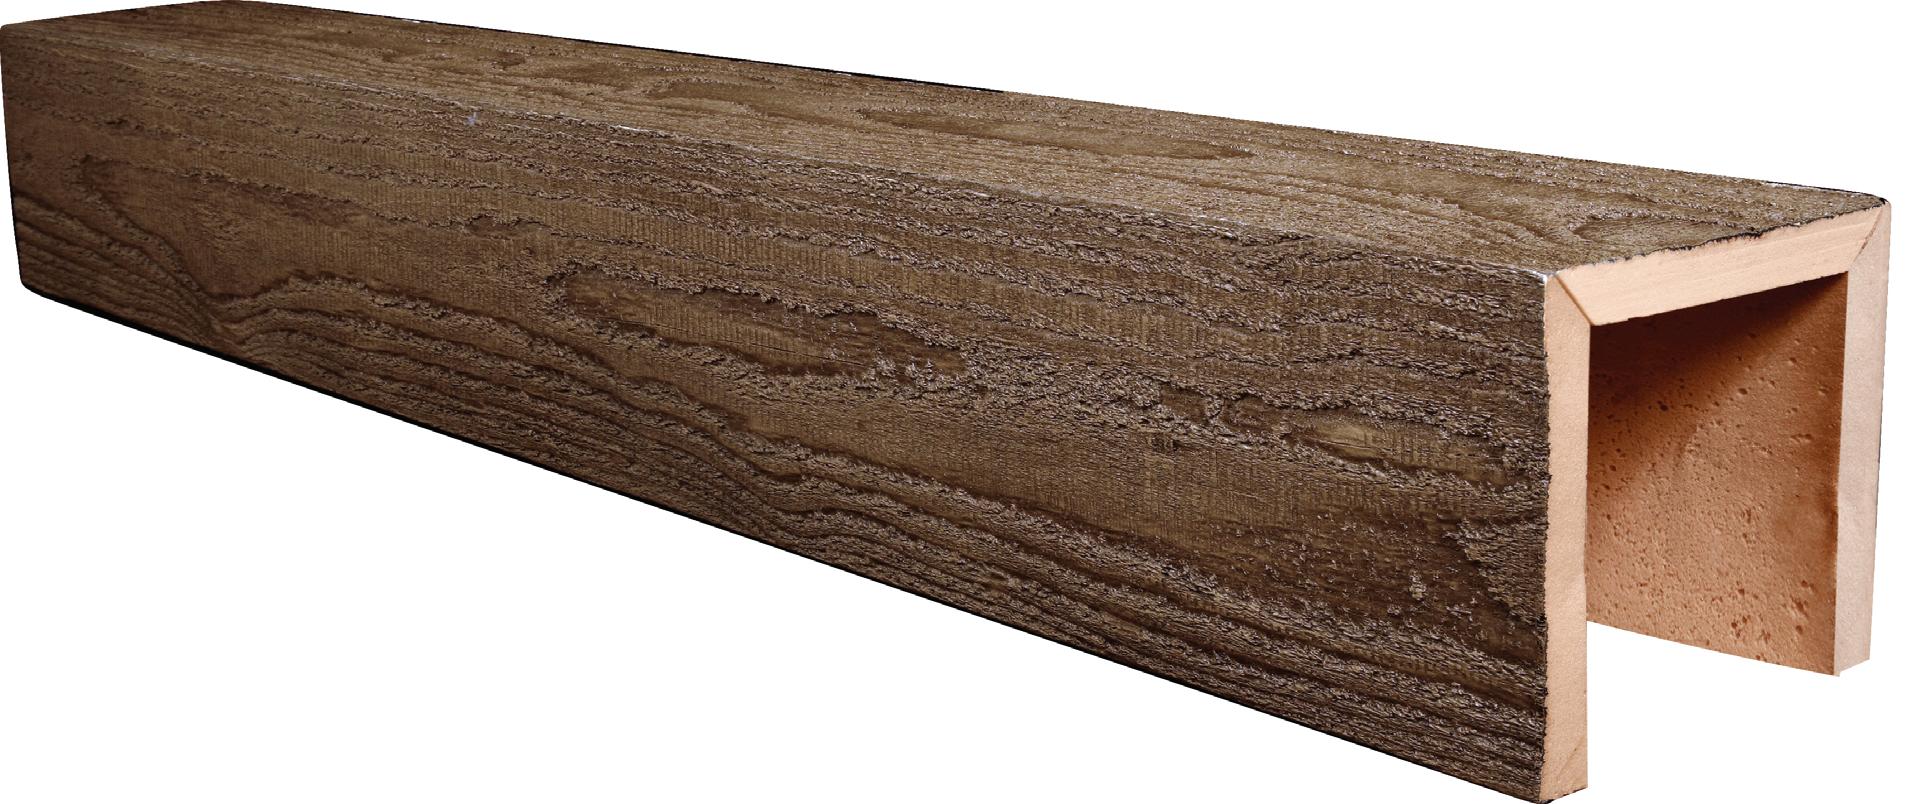
Barron Designs offers one of the largest selections of faux architectural decor panels and faux wood timber beams. All products are crafted by hand in the U.S. with in-house artisans to create authentic-looking wood, brick and stone materials. Custom timber faux wood beams are a great way to add a rustic look to a home or commercial space at a fraction of both the time and cost of real wood. The multiple attractive and natural finishes work in any design situation.


By Tom Matthews
Insulation keeps the home warm during winter and the home cool during summer. The right material and application should save energy, reduce utility bills, and help maintain a more constant temperature for a comfortable home. All exterior walls that separate the conditioned and unconditioned spaces should be insulated to create a thermal envelope. A wide range of products are available to totally insulate a building.
Homeowners should understand that insulation levels are specified by R-Value, a measure of the product’s ability to resist heat traveling through it. The higher the R-Value, the better the thermal performance.
The recommended insulation level depends on the geographic area of your home. According to the Department of Energy, the warm, southern areas of the country should have enough attic insulation to achieve a value of R-30 to R-60. The northern, colder areas of the U.S. require attic insulation of at least R-49 to be cost effective.
The amount of insulation required to achieve a certain R-value depends on the type of insulation being used. For example,
3-1/2 in. of fiberglass may achieve R-13, while 2 inches of rigid foam polystyrene achieves R-10. The R-value will be printed on the package of the insulation product so you can easily calculate how much is required. R-Values of individual products can be added to achieve recommended levels. An R-11 added to R-38 equates to R-49.
These days, insulation products are designed for each specific use. For the most energy-efficiency, a combination of products can be used to create a total insulating system. This includes products for insulating the foundation walls, exterior walls, crawl space (underfloor), basement walls, floors, HVAC ducts and more.
A home's exterior walls should have a moisture barrier and insulation installed upon construction. Other areas of the home that you determine to have inadequate insulation can usually be retrofitted to increase the R-value.
The major types of insulation include fiberglass, blow-in, spray-foam, rigid foam, and various types of gap-filling products.
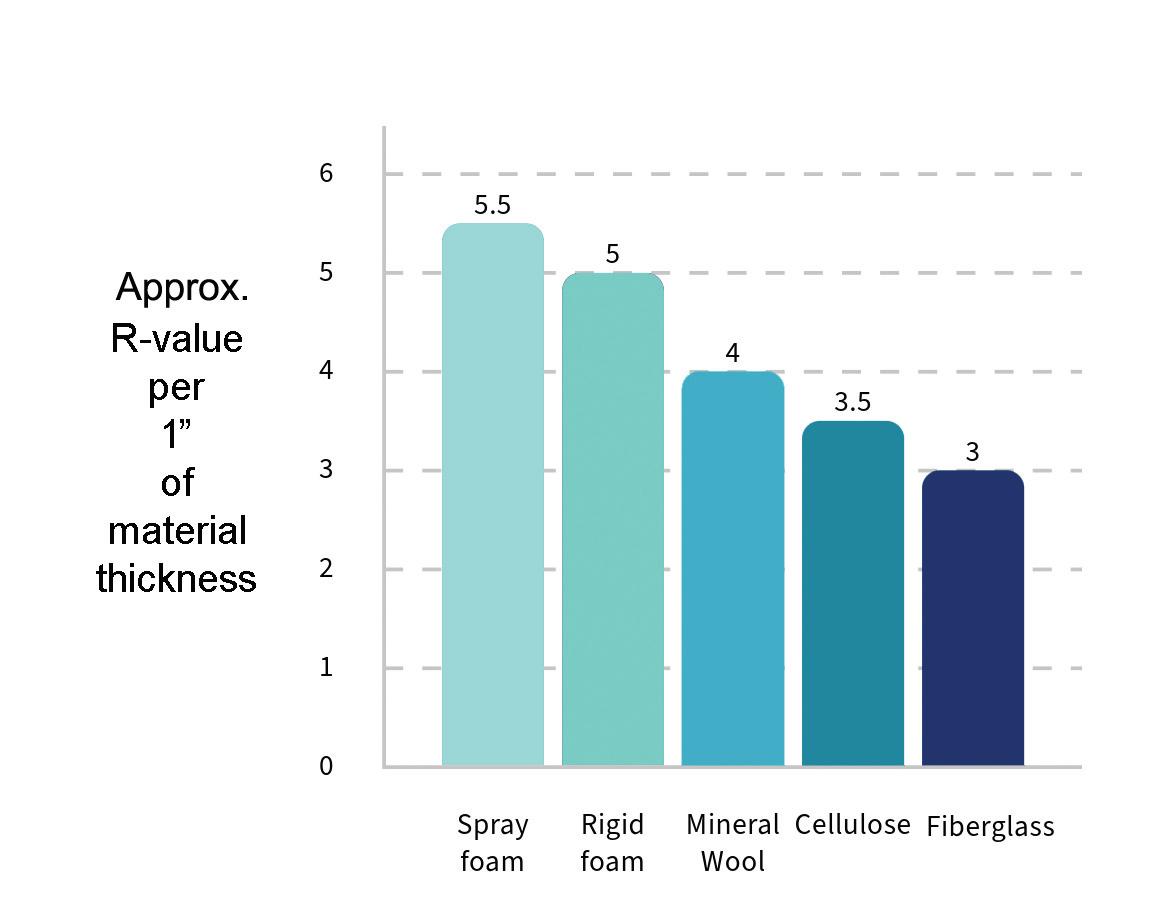
The amount of insulation required to achieve a certain R-value depends on the type of insulation being used.
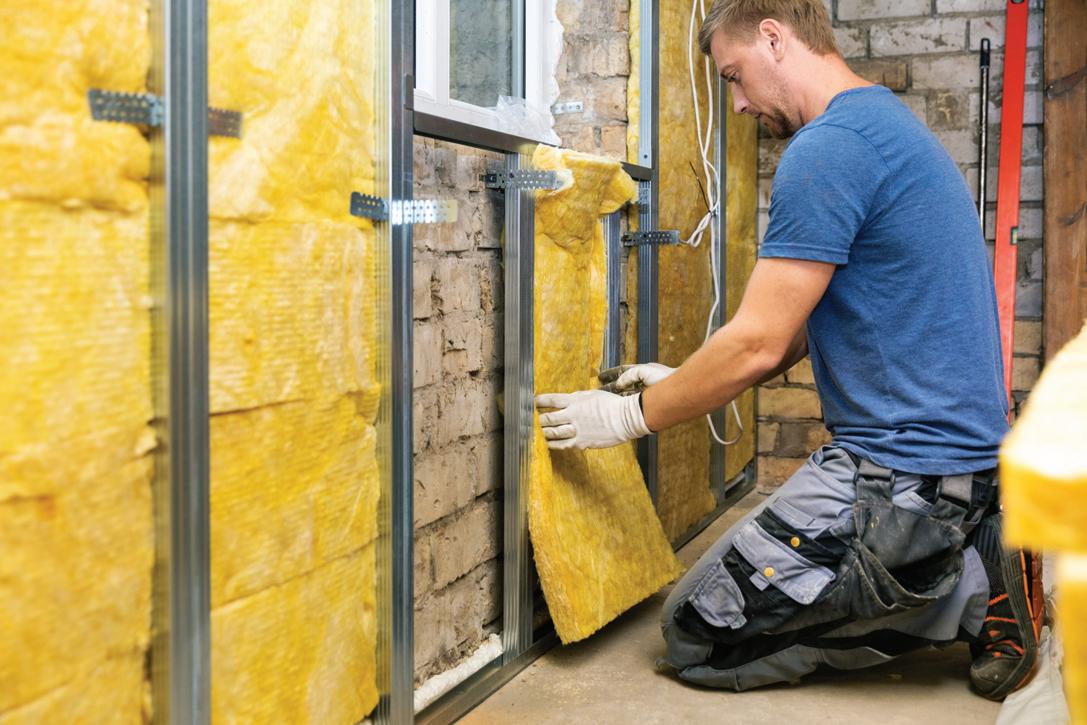
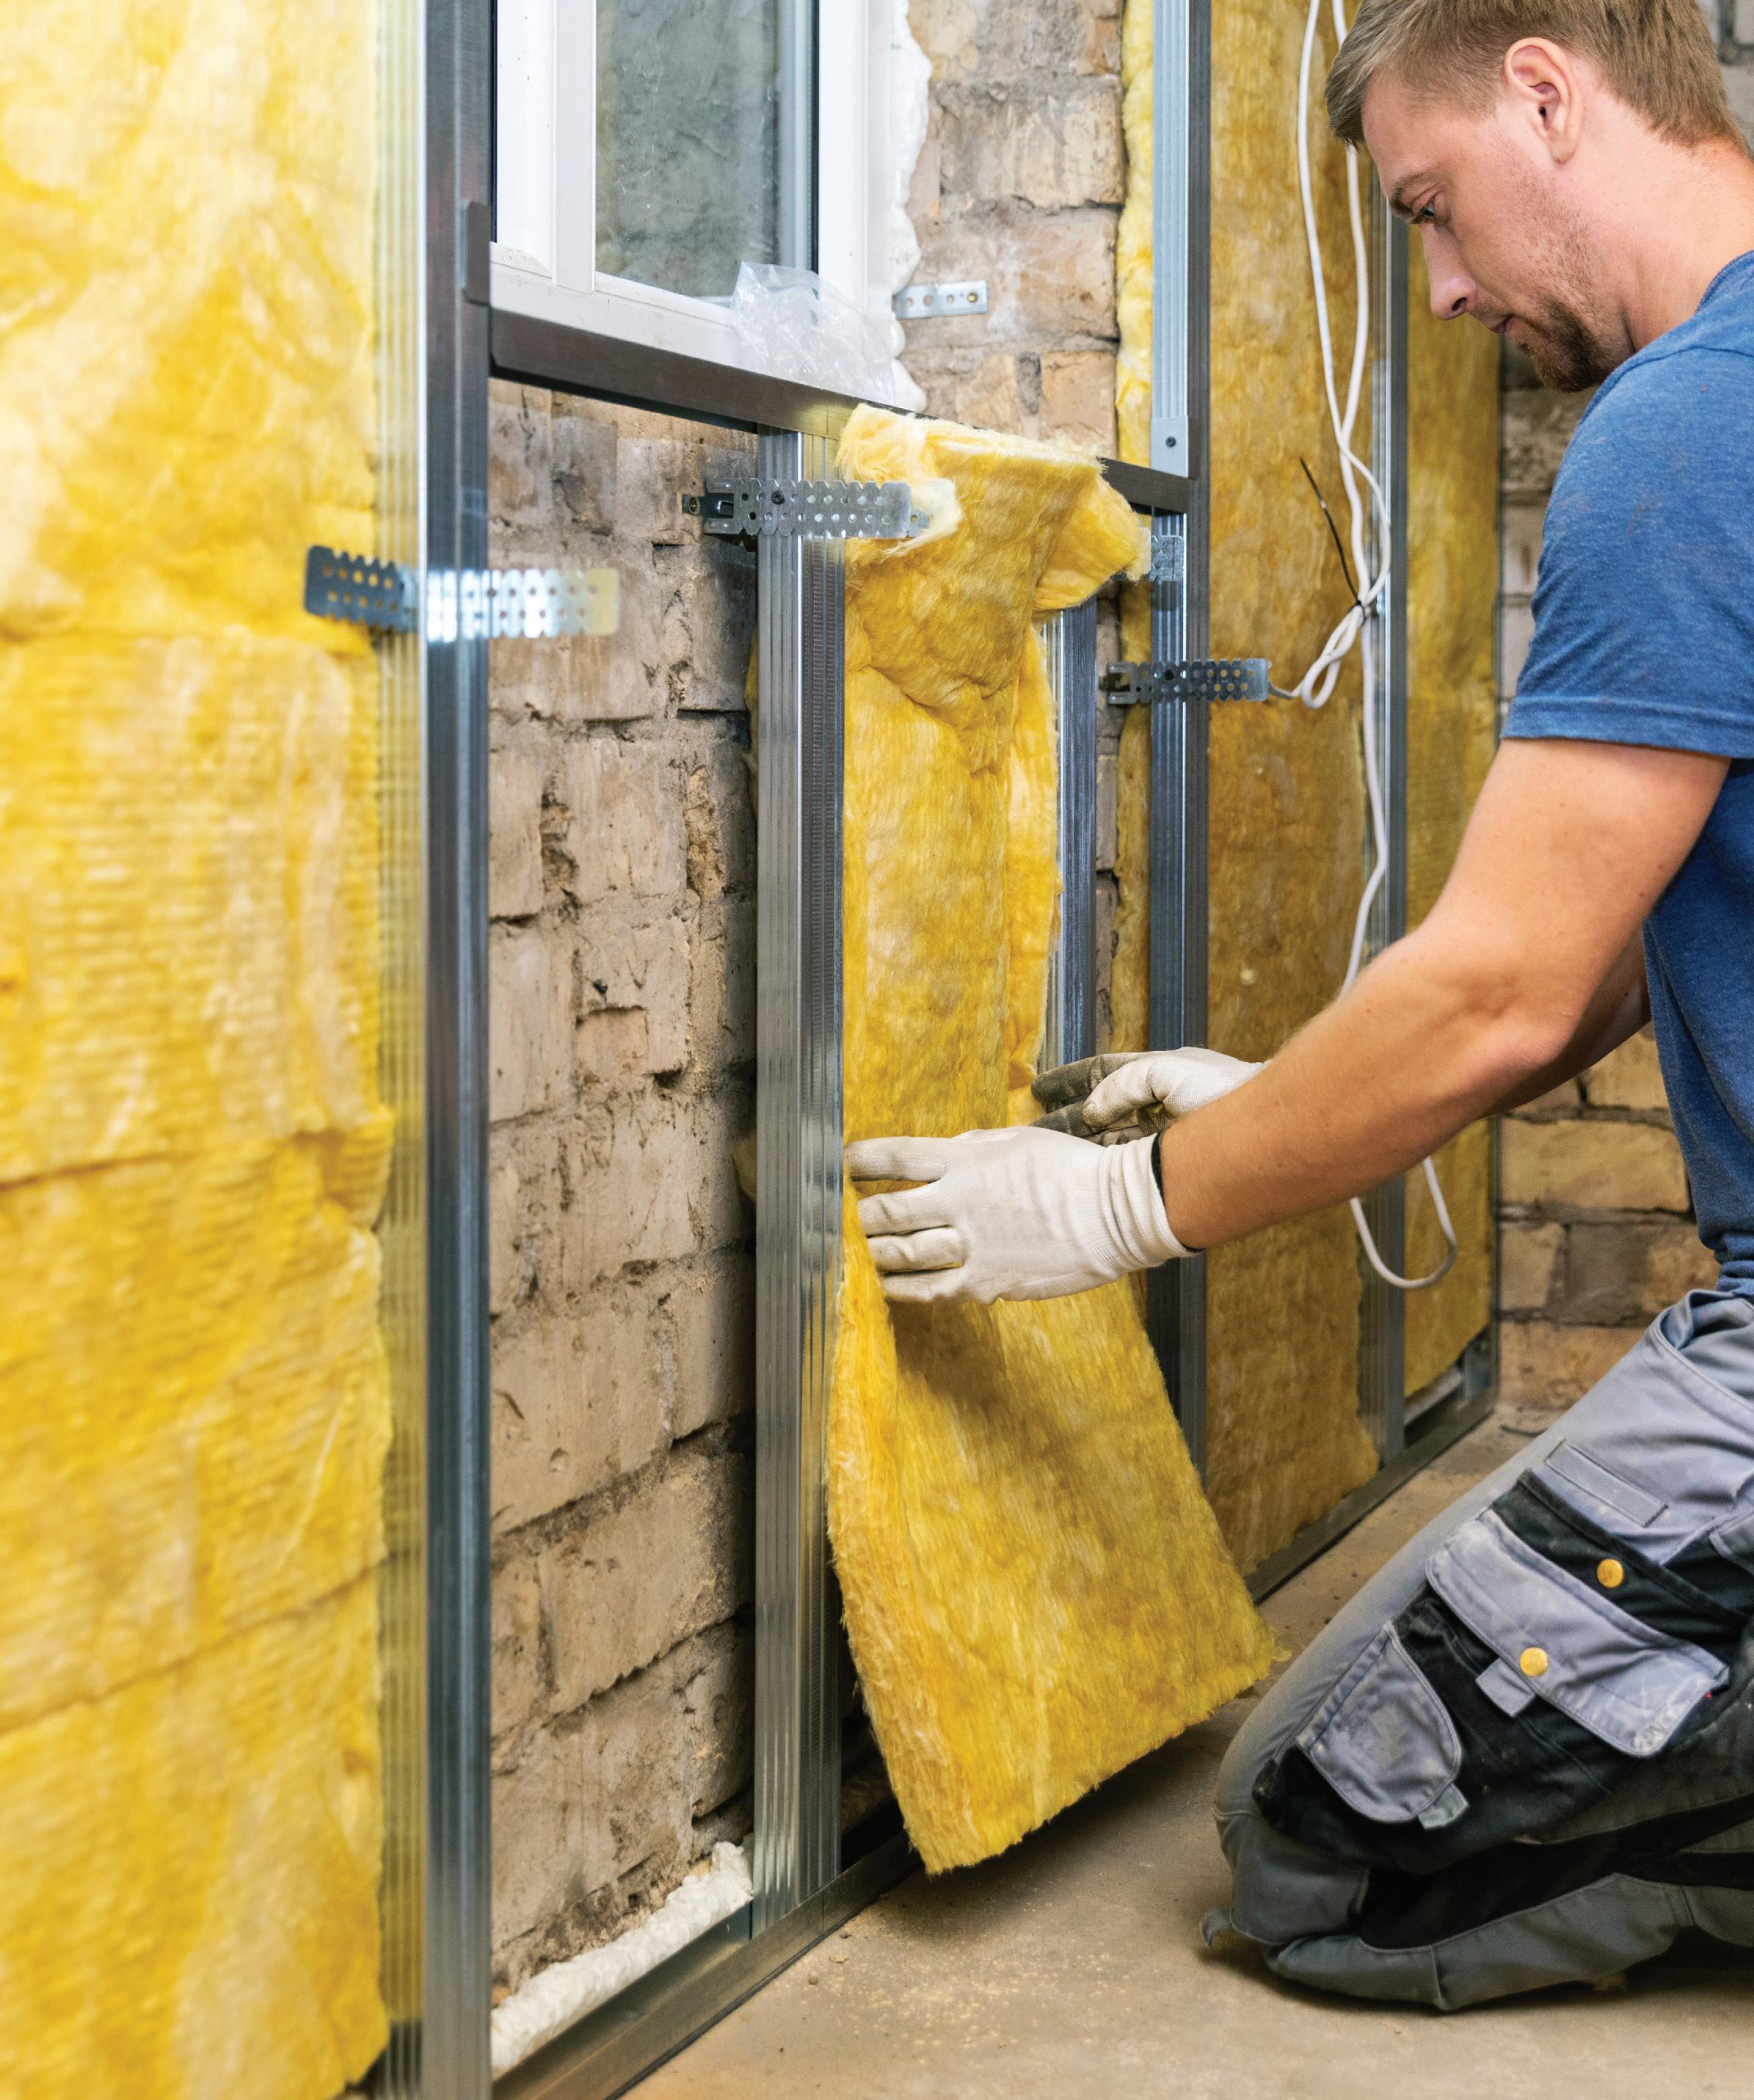
Fiberglass rolls and batts—Fiberglass insulation is the mostcommonly used product. It's inexpensive, easy to install, and can be used in walls, attics and crawlspaces. Fiberglass rolls are long, continuous lengths of insulation which are unrolled, measured, and cut to fit specific areas. They’re best for insulating long runs in crawlspaces and attics. Fiberglass batts, on the other hand, are pre-cut lengths available for 8- and 9-ft. walls and are sized to fit between wall framing.
Pro tip If you install additional fiberglass insulation over existing attic insulation, be sure to use unfaced rolls or batts. Once the joist cavity is full, you can install an additional layer of unfaced insulation over the ceiling joists to reduce heat loss through the wood.
Mineral Wool Insulation—Mineral wool is a type of fiber insulation, similar to fiberglass, but is made from natural materials and not
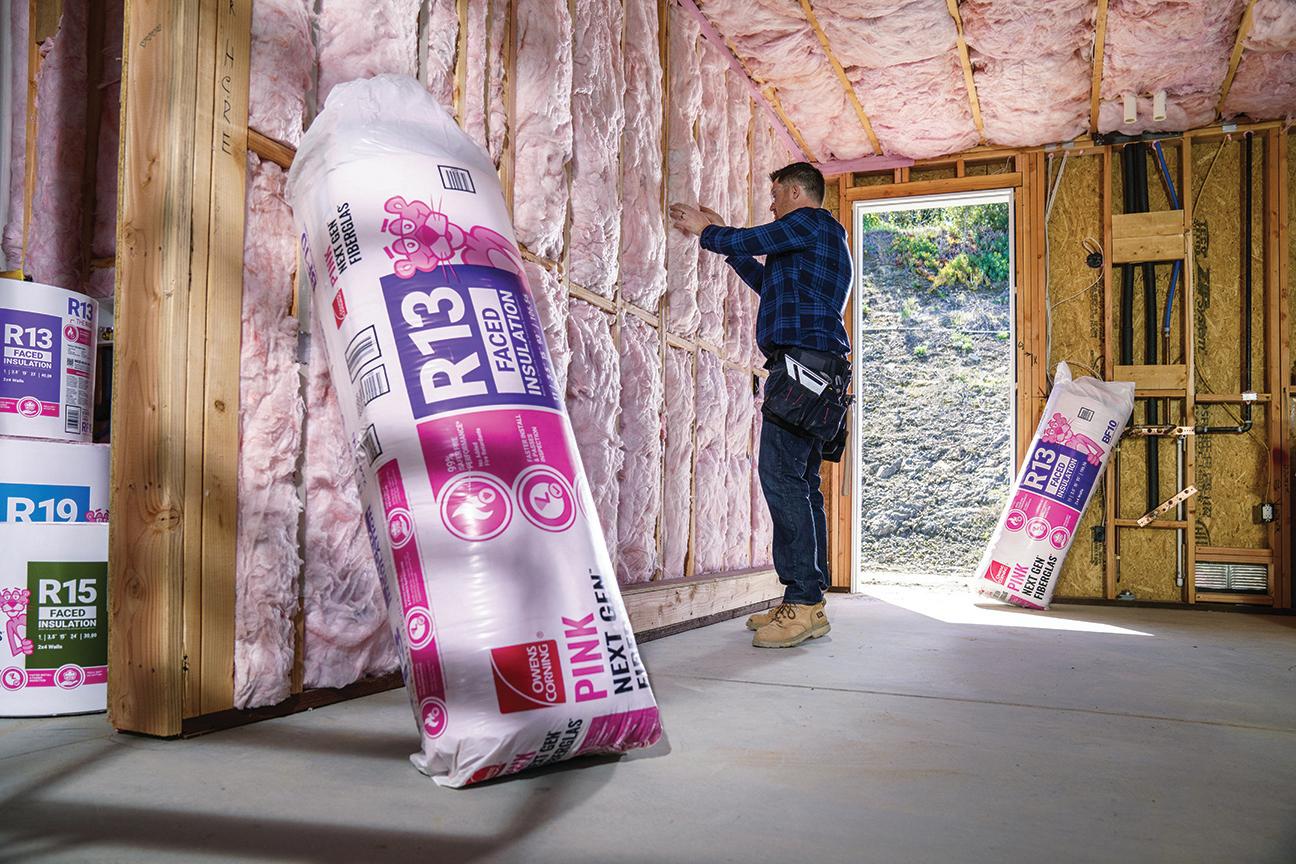
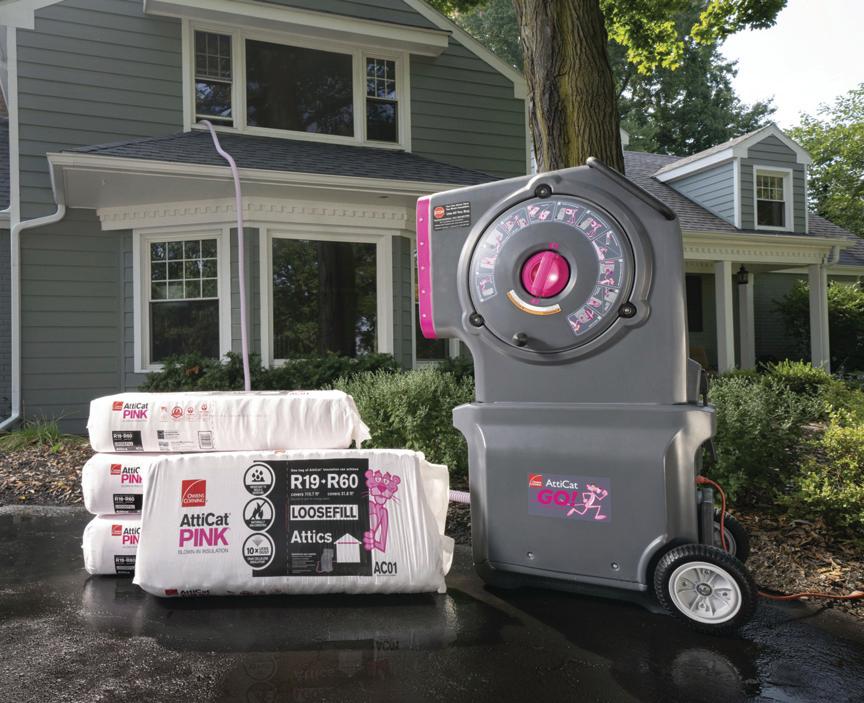
PINK Next Gen Fiberglas from Owens Corning is ready to fit snugly into the wall cavity right out of the package. It is easy to handle, soft as cotton, and cuts cleanly with a single pass. This makes it easier (and less itchy) for DIY’ers to handle and makes it easier for pros to manage budgets and timelines, enabling up to 23 percent faster installation compared to previous fiberglass products.
Measure your depth of insulation to see if more is required to achieve the adequate R-value recommended for your geographic area. You can find the recommended R-value for your location at www.energy.gov.

glass. There are two kinds of mineral wool available for home insulation—rock wool, which is made from fibers of stone, and slag wool, which are fibers made from iron ore waste. Mineral wool tends to be more expensive than fiberglass, but has proven noise-reduction and sound-absorption properties, and it’s durable and typically non-combustible.
Cellulose Insulation—Made from cellular plant material, such as corncobs, recycled newspapers, cardboard, office paper, and other everyday paper products, cellulose is an eco-friendly insulation with an average lifespan of 20 to 30 years. The material is applied with a blowing machine and can settle around and conform to most obstructions in walls and attics. Attic spaces can be overfilled leaving no empty spaces. Loose-fill cellulose is relatively cheap but has an R-value of about 3-1/2 per inch of thickness.
Rigid foam insulation—Polystyrene sheets can be used for retrofits in basements and in areas of the home where there's not enough room for batts or blow-in. Sheets up to 4×8 feet are available at home stores in thicknesses typically ranging from 1/2 to 1 inch. The material is easy to cut with a straight edge and a utility knife, and installation is similar to fiberglass batts.
Pro tip—Maintain a minimum 3-inch gap between any electrical fixtures and the
surrounding insulation. This is a safety measure required by electrical code, and if necessary you can nail wood barriers between ceiling joists to keep the insulation away.
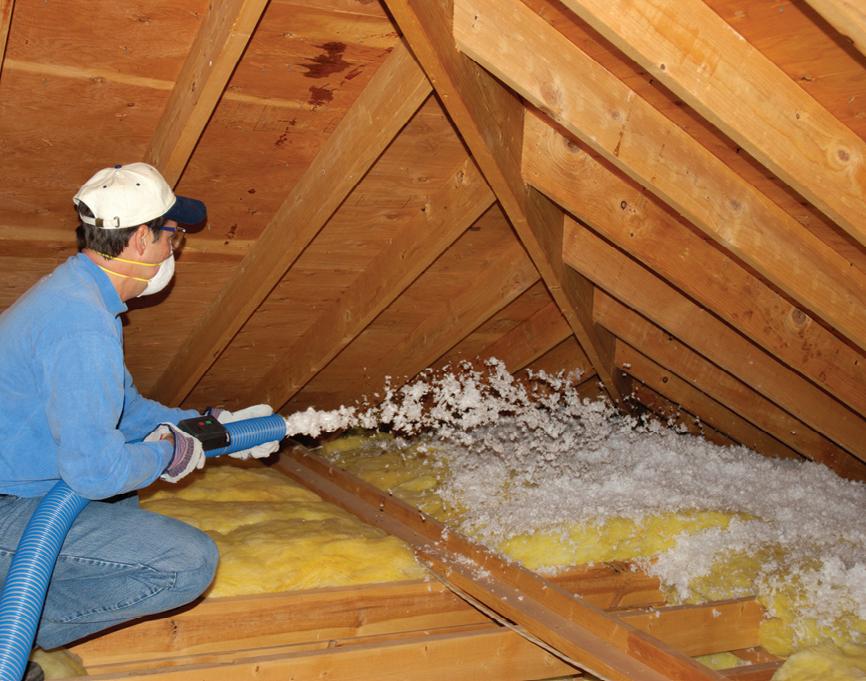
Blow-in (AKA loose-fill) insulation is a good choice for placing a lot of insulation in enclosed walls or in narrow spaces, like between ceiling joists in cramped attics. Blow-in insulation (usually fiberglass or cellulose) can achieve uniform coverage even in hard-to-reach areas, and the job can easily be done by a DIY'er with
Fiberglass is the most commonly used insulation product, available in rolls, batts, and as a blow-in product. Photo © Certainteed.
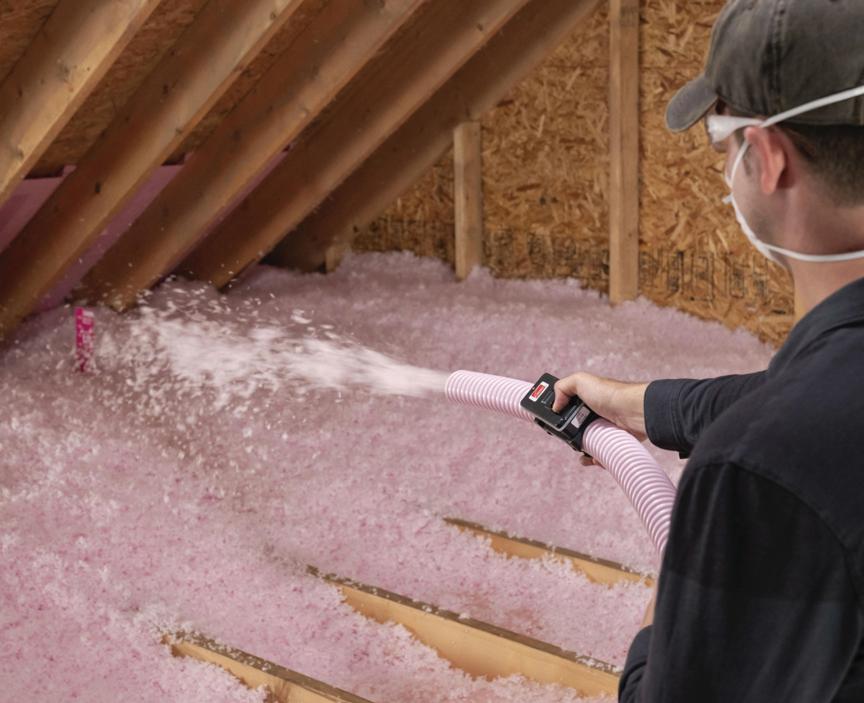
Applying blow-in insulation is a two-person job that requires someone outside the house to feed the insulation into a machine where it is blown through a long, flexible hose while another person directs it into the attic and walls.
a weekend to spare. Homeowners can rent machines from home centers to blow in the product. The process requires someone outside the house who feeds the insulation material into a pneumatic machine where it is blown under high pressure through a long, flexible hose as another person directs it into the attic and walls.
Note that for small, targeted areas, loose-fill insulation can generally be applied by hand. However, the material comes in densely packed bales which are fed into the hopper of the insulation blower where rotating teeth or prongs at the bottom of the hopper fluff up the cellulose. The resulting feathery texture of the blown-in product achieves better insulation value than densely packed material.
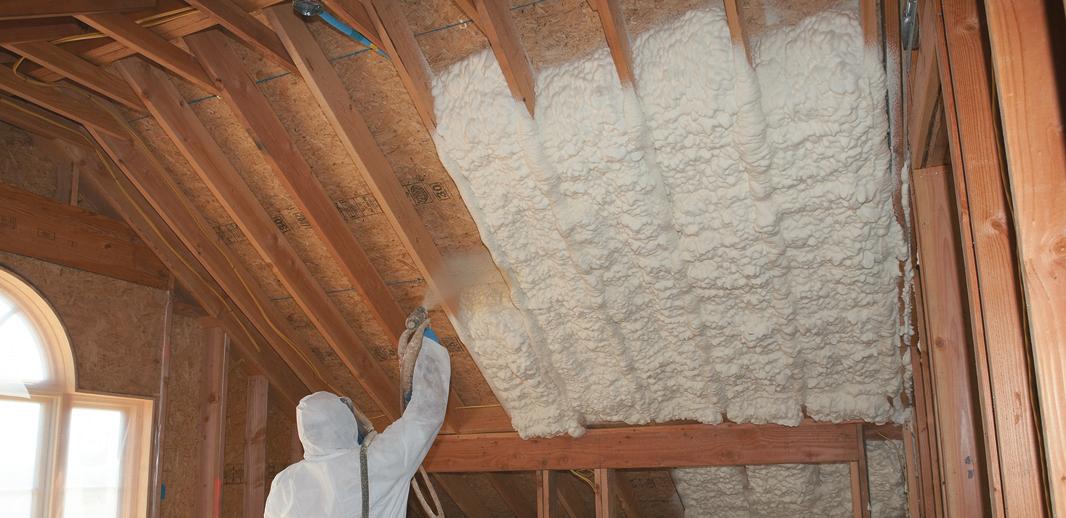
In seconds, spray foam expands to provide a flexible foam blanket of millions of tiny air cells, which fills building cavities and seals cracks and crevices. Photo © Tiger Foam.
Pro tip—To fill enclosed walls with blow-in insulation, an access hole can be cut in the wallboard near the ceiling to fill the stud cavity. Once filled, the hole can be patched or concealed with trim molding.
Spray-foam insulation is especially popular in new construction when the exposed framing can be filled without obstruction. Spray-foam insulation installs fast and seals, soundproofs and insulates. In seconds, the foam expands to provide a flexible foam blanket of millions of tiny air cells that fills building cavities and seals cracks and crevices. It dries quickly, and any excess material can easily be trimmed away, leaving the surface ready for drywall.
Most spray-foam products are dealerinstalled and arrive on a truck with complex equipment to seal the entire house. However, some companies make products available to the do-it-yourself homeowner. For room additions, remodels and targeted areas in the attic or basement, check into disposable self-contained polyurethane kits, which are engineered for professional-duty but also easy to use.
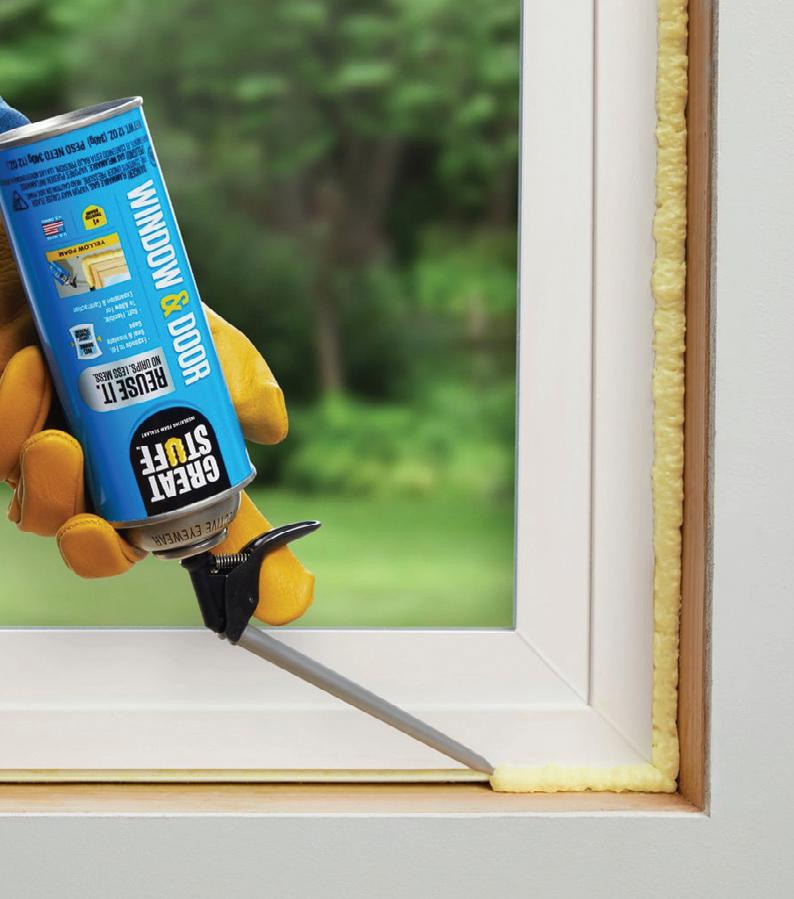
DIY tip—Spray foam from brands such as Great Stuff and DAP is available in handheld cans for small, targeted applications around plumbing fixtures, gaps in framing, and for sealing windows and doors. For application around windows and doors, it’s important to select a low-expanding product intended for the specific application, otherwise the expanding foam can distort the shape of door and window casing.
A radiant barrier retains heat much like aluminum foil does with a potluck casserole. This reflective barrier can be used in homes to reduce heat transfer like traditional insulation.
On a hot day the sun heats a home’s roof and attic, which in turn emits radiant heat to varying degrees throughout the house. A hotter attic means a hotter house, so radiant barriers block the sun’s rays from transferring heat to your attic, reflecting up to 96-percent of solar energy. Less heat moves from the attic to the living area, so there's less need to crank up the air conditioner. Furthermore, this two-way reflective barrier behaves similarly in the winter.

For application around windows and doors, it’s important to select a lowexpanding spray foam product intended for the specific application, otherwise the expanding foam can warp the door and window casing.
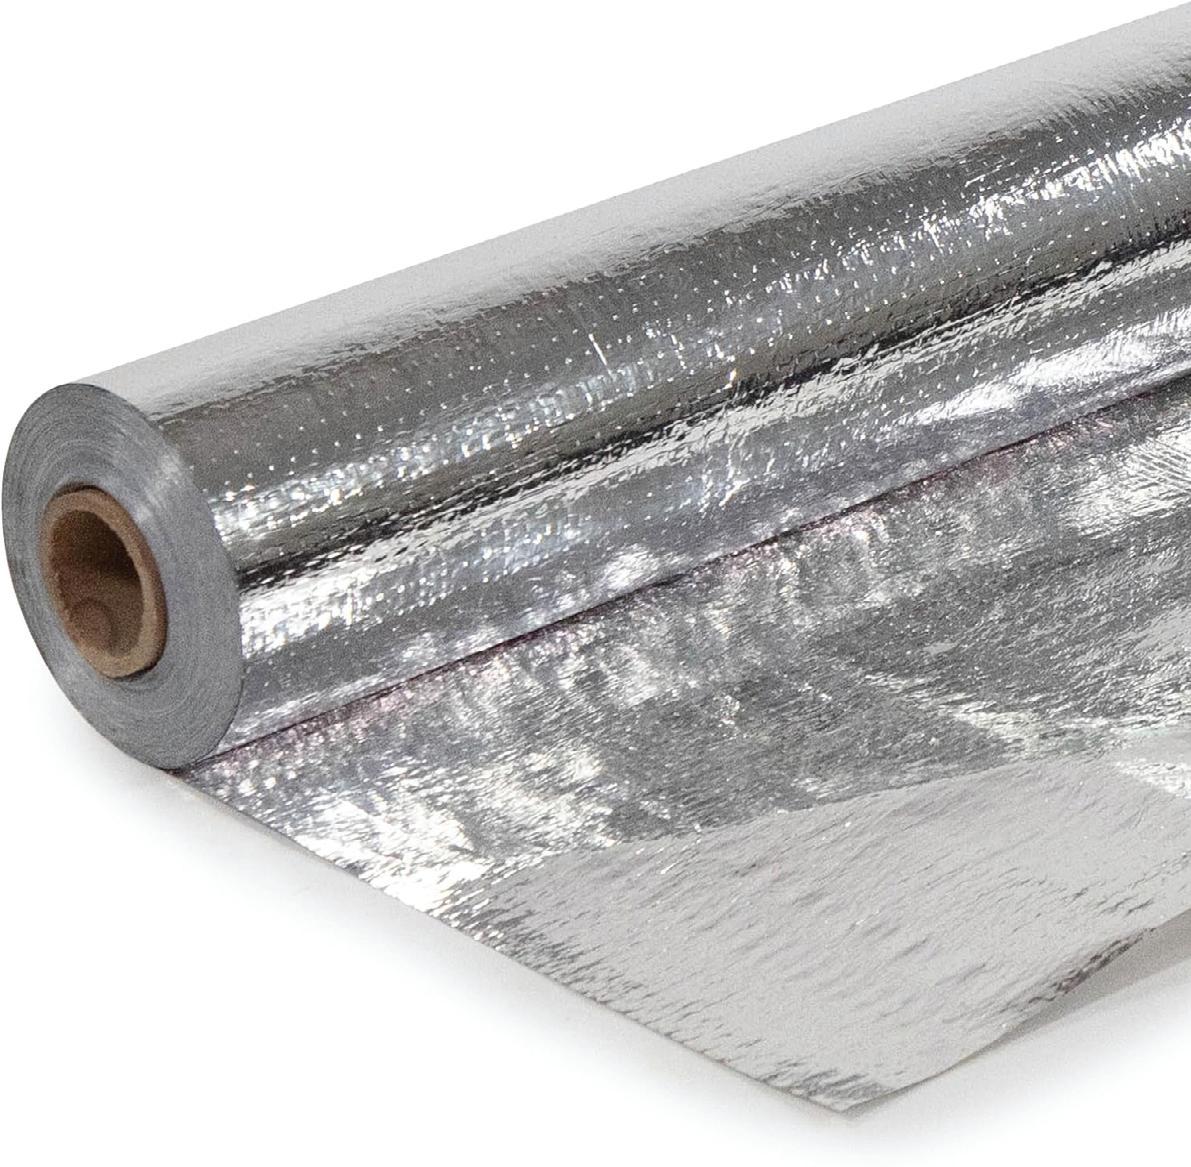
According to Energy.gov, “Radiant barriers are more effective in hot climates than in cool climates, especially when cooling air ducts are located in the attic. Some studies show that radiant barriers can reduce cooling costs by 5 to 10 percent when used in a warm, sunny climate. The reduced heat gain may even allow for a smaller air conditioning system. In cool climates, however, it's usually more cost-effective to install more thermal insulation than to add a radiant barrier.”
By Matt Weber
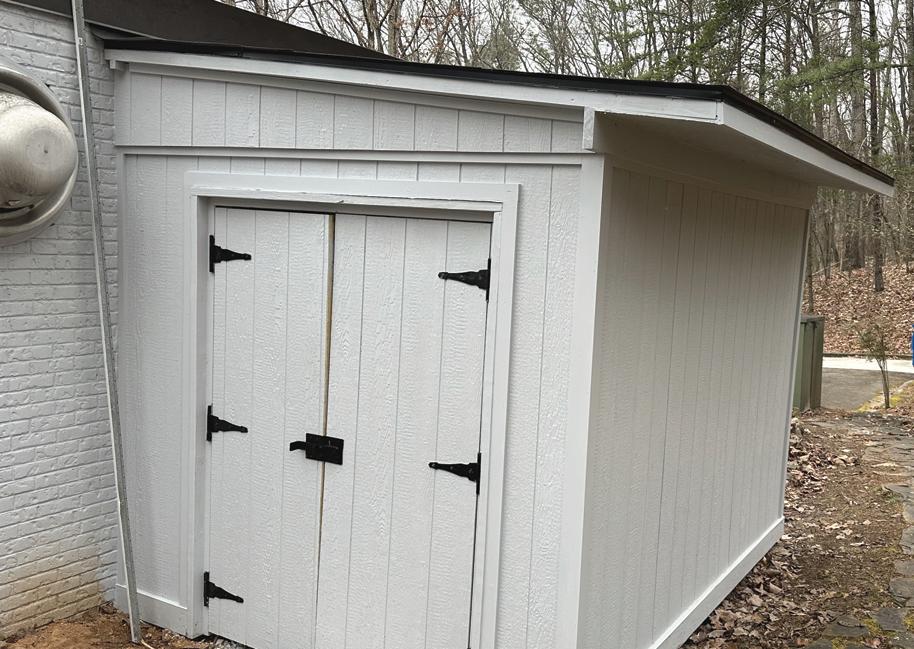
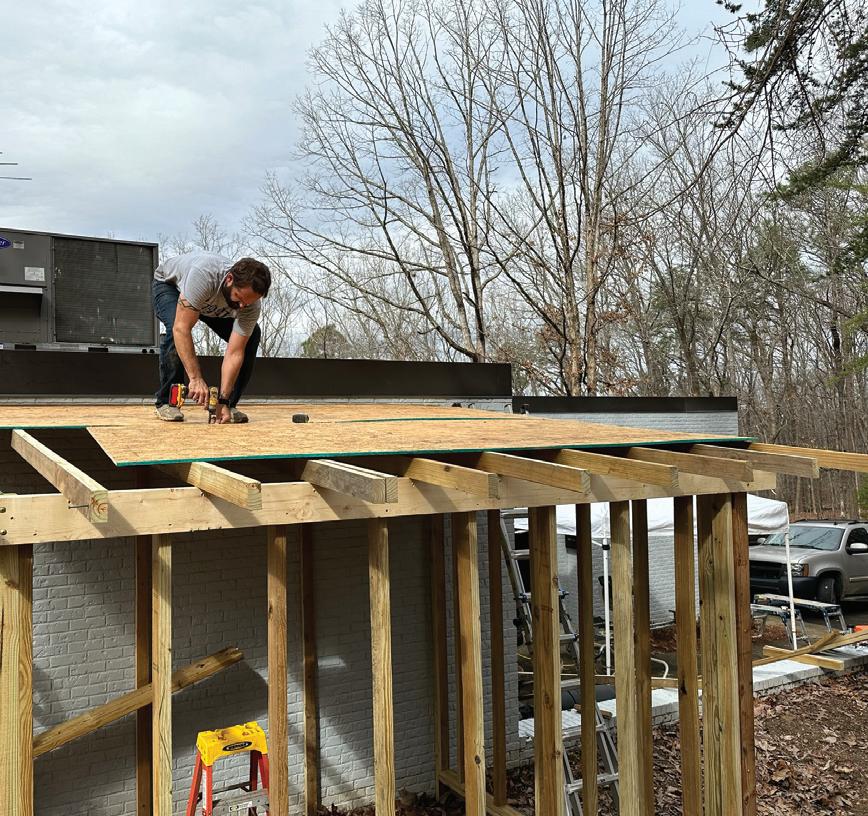
Building an attached shed can be a great way to expand your storage space while keeping your property organized and clutter-free. Whether you're looking to store gardening tools, seasonal items, or landscaping supplies, an attached shed can help you stay organized and make the most of your available space. This article will guide you through the basics of building an attached storage shed, from planning and design to construction and finishing touches.
Before you start building, it’s essential to have a clear plan. Take into account the purpose of the shed, the available space, and any local building codes or regulations.
Assess the Space: The shed can be attached to an existing structure like your garage or house. Make sure the site is level, dry, with no drainage issues and that there’s enough room for easy access to the items you plan to store.
Size: Common sizes for attached storage sheds range from 6x8 feet to 10x12 feet, but you can tailor the dimensions to fit your needs.
Design: Create a simple sketch or blueprint of your shed. Typically the finished appearance is designed to complement the existing structure. Make sure to plan for a door, windows (optional), and proper ventilation to avoid humidity buildup in the shed.
Check Building Codes: Contact your local building department to check for zoning laws, building codes, and any necessary permits. Some areas may require you to get approval before you can begin construction.
If your shed is designed with a constructed foundation, then that’s where you should begin. For smaller sheds, using pressure-treated wooden skids as a foundation is an easy and effective choice. Lay the skids flat and level, and ensure they are anchored securely.
For a more solid foundation, build forms and pour a concrete slab for the shed to rest on.
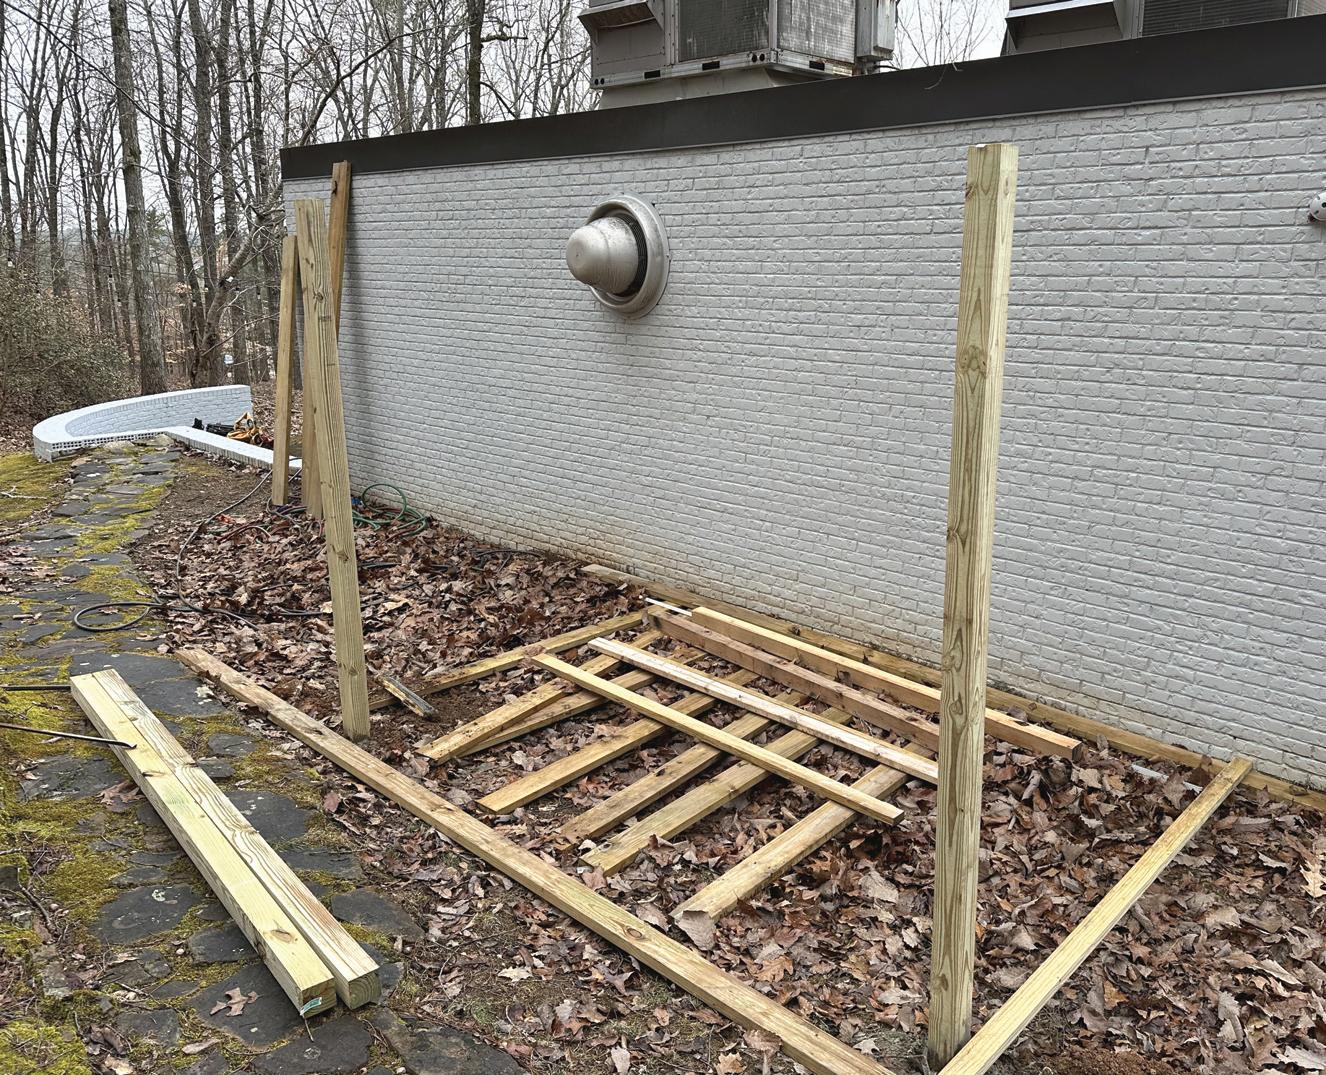
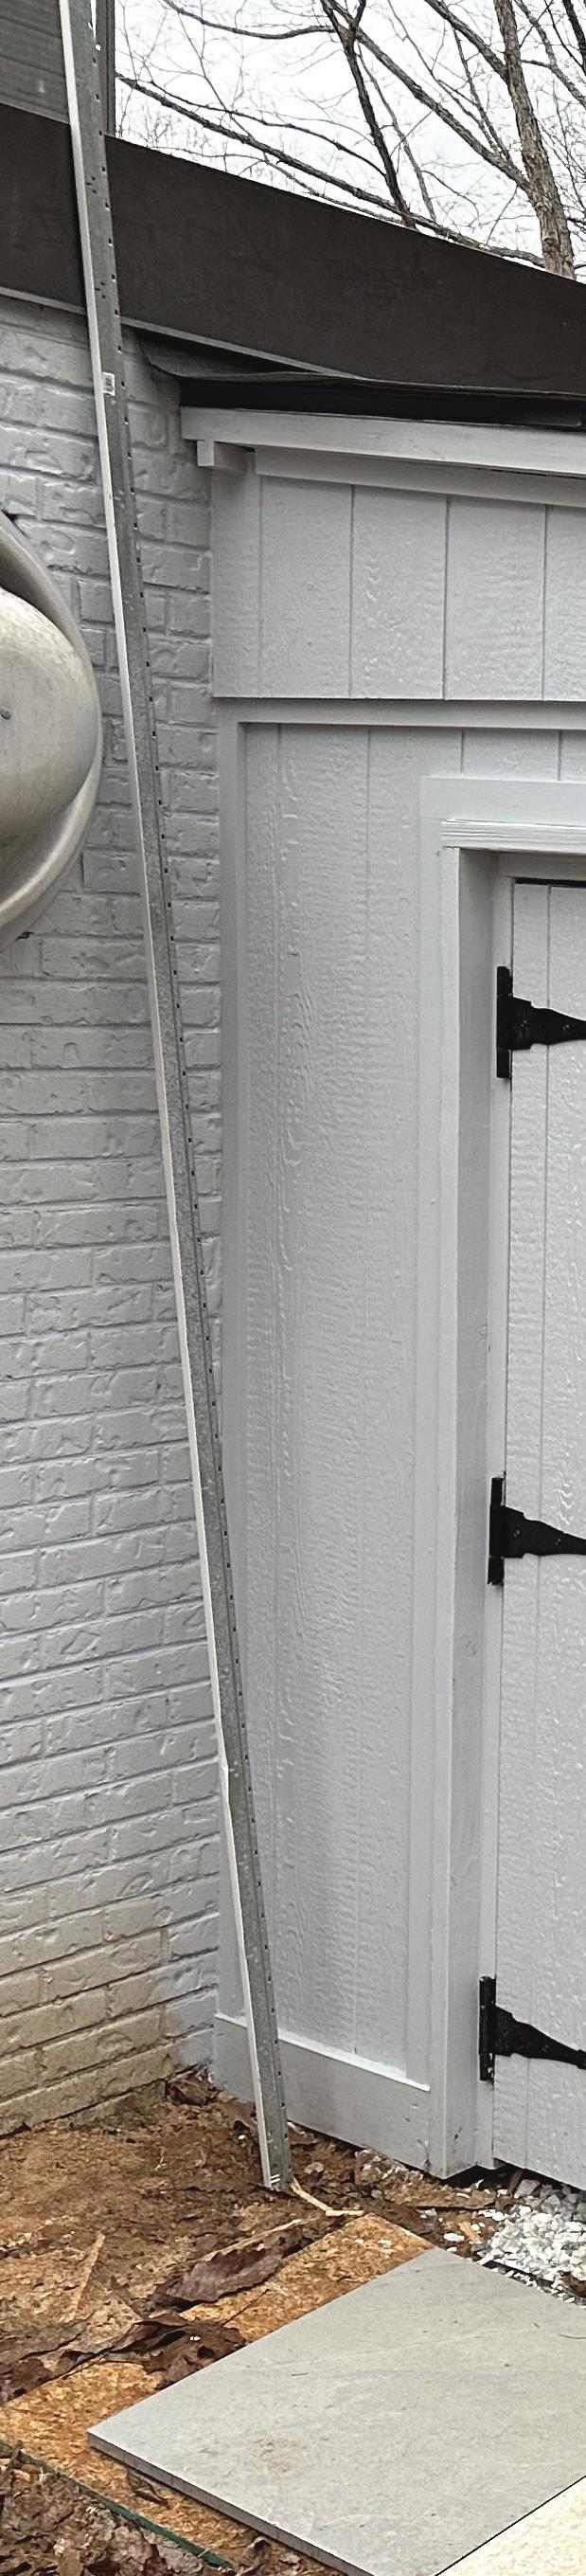
Our shed was built with post-and-beam construction opposite a ledger board anchored to a concrete brick wall.
This is a more involved process and requires mixing and pouring concrete.
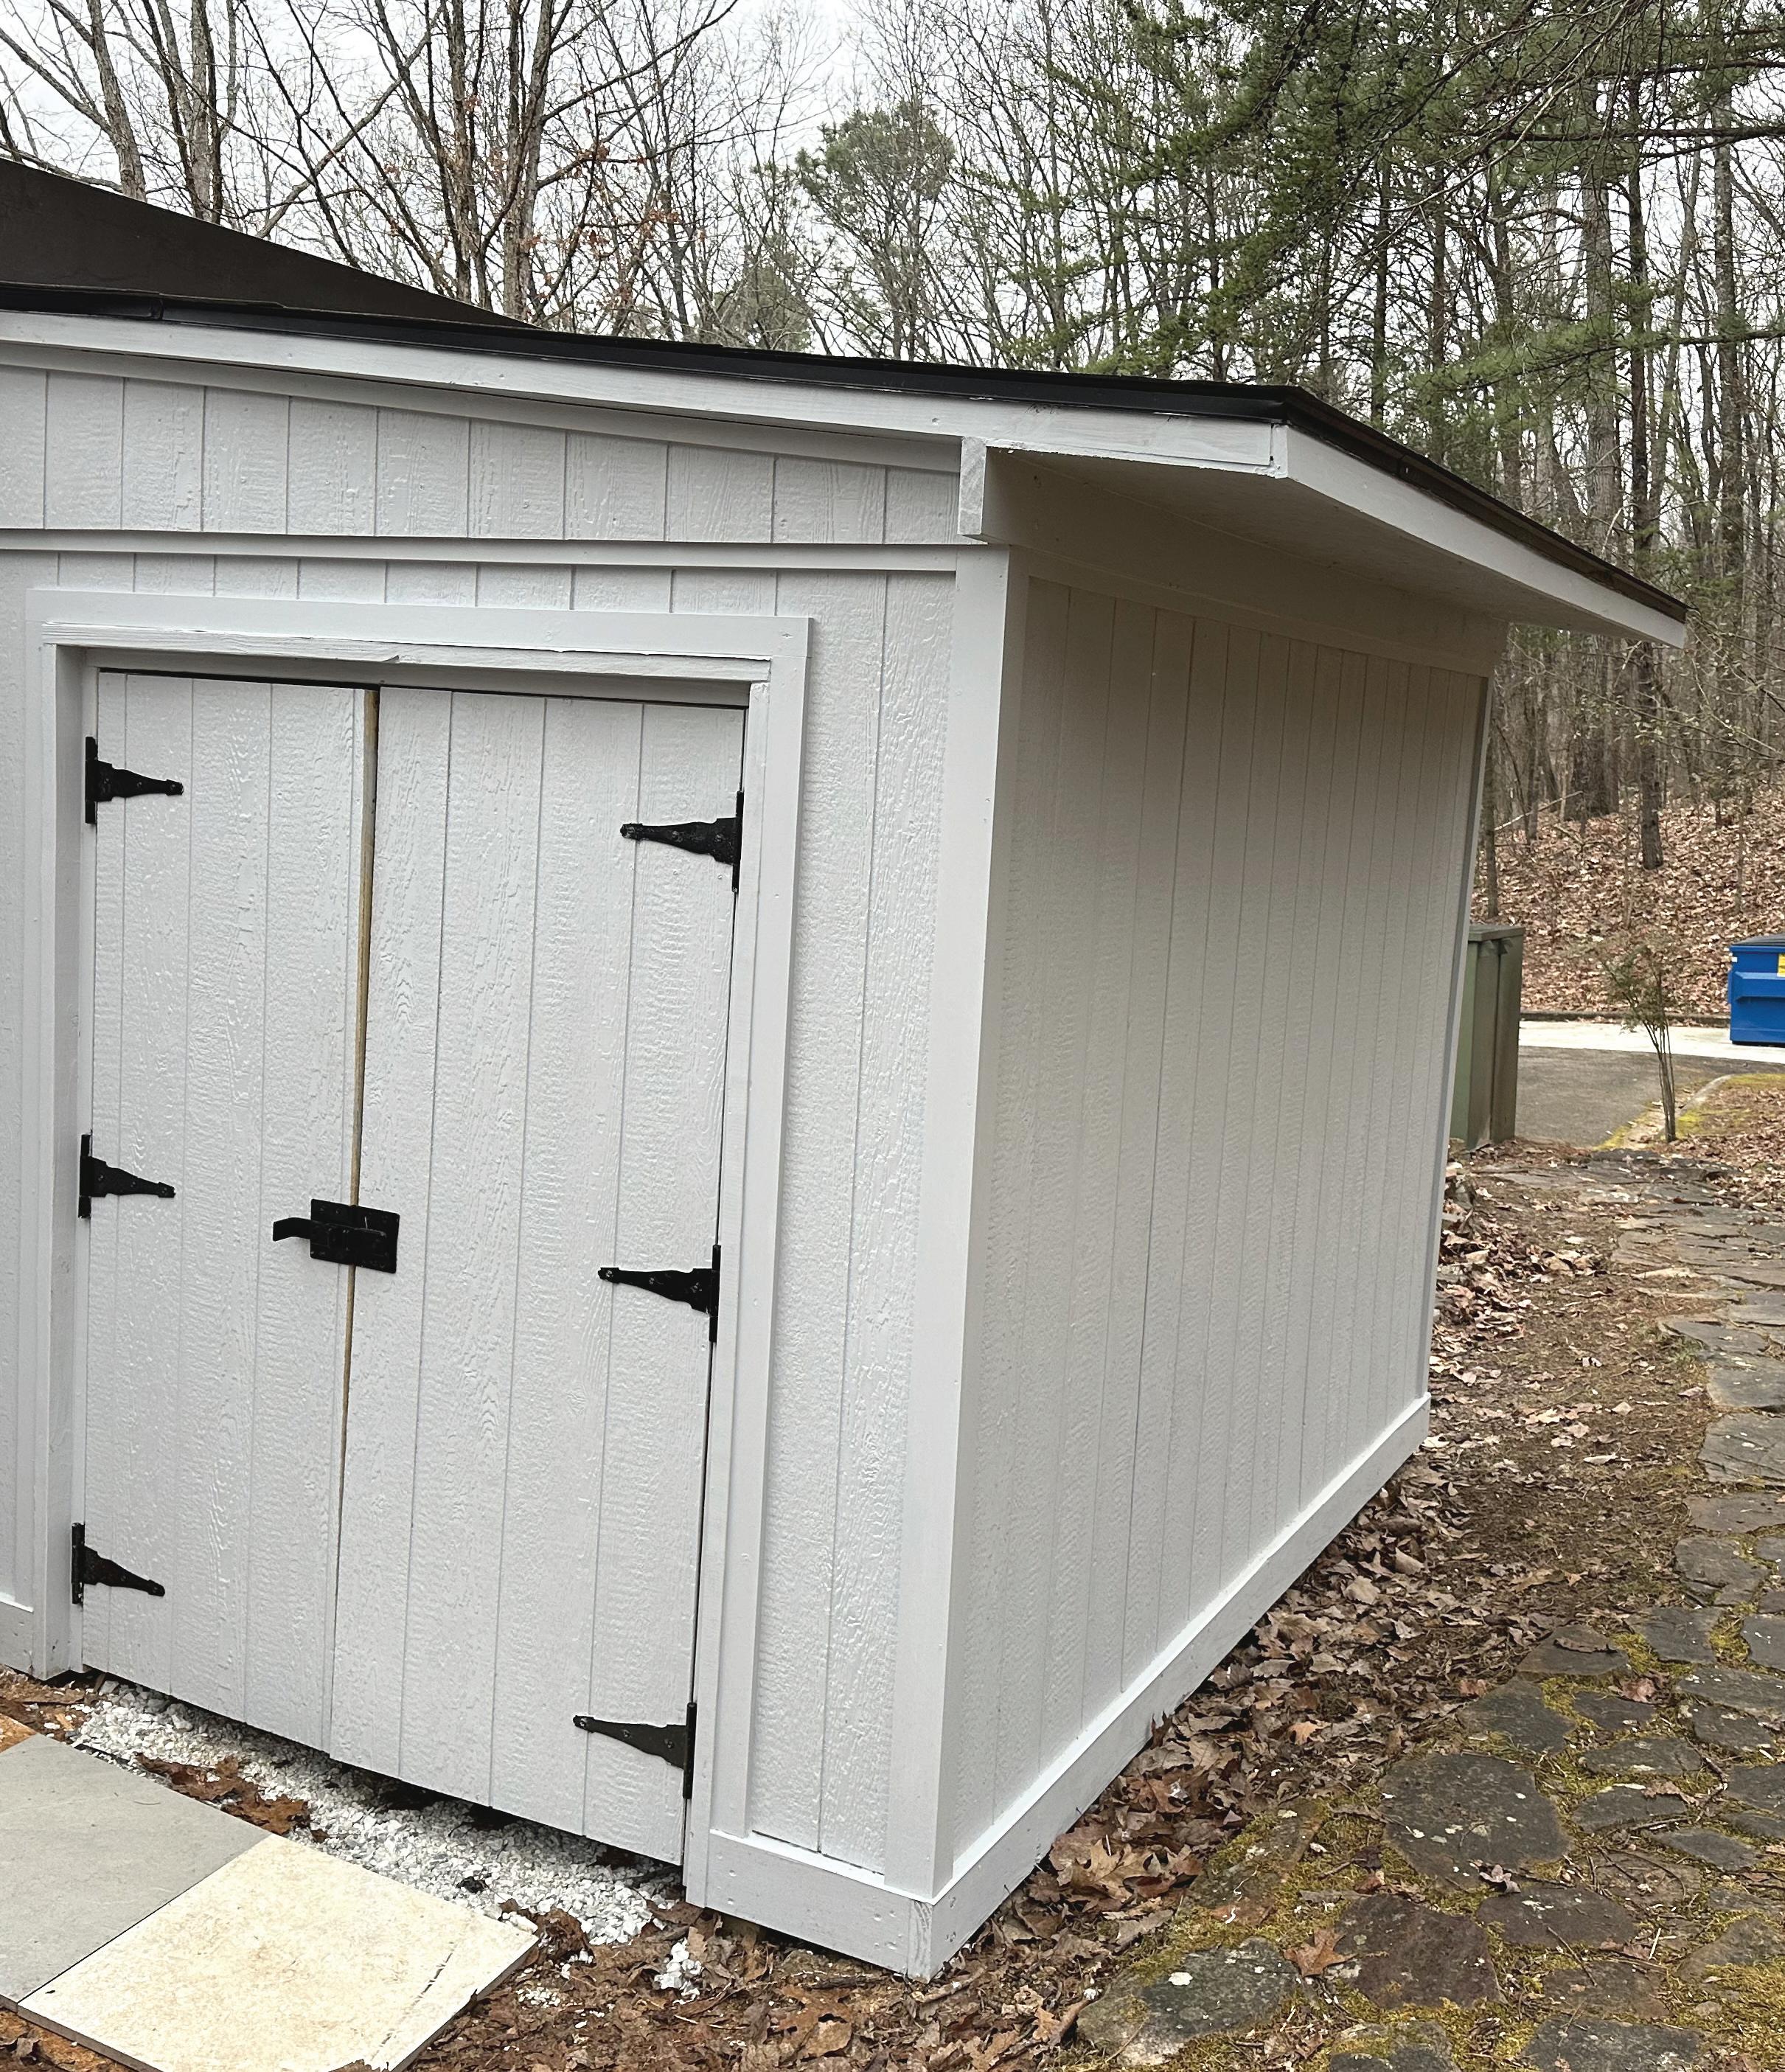
Our simple storage shed was framed without a foundation and incorporated a gravel floor once construction was complete. The gravel covers any dirt or mud while providing stable footing for storage of a riding mower, wheelbarrow, etc.
Once your foundation is ready, begin framing the shed. This involves building the floor, walls, and roof structure.
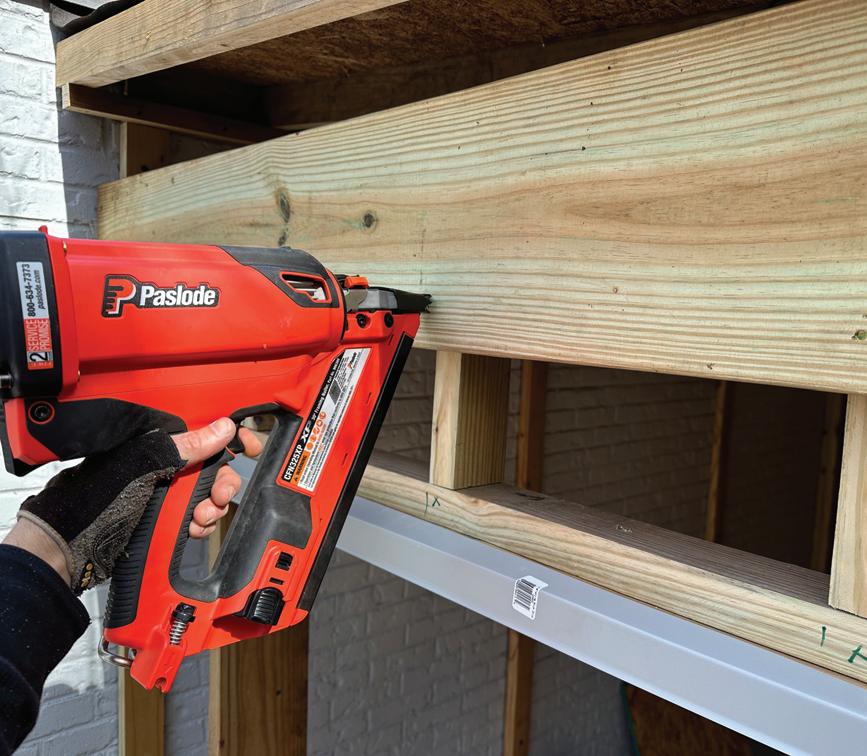
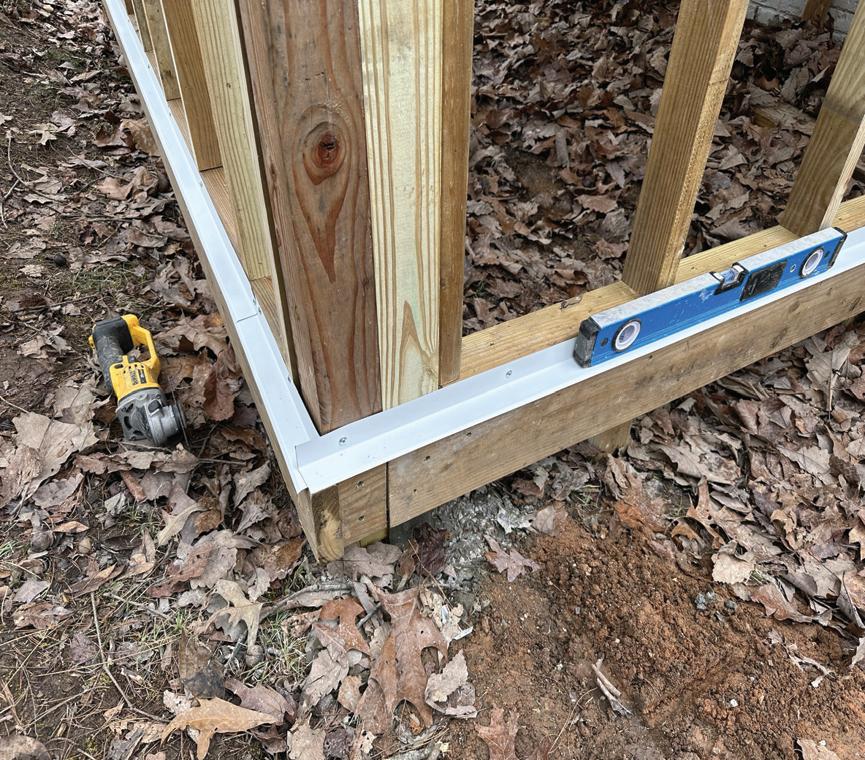
On the shed pictured, we used the existing building as one of the shed walls and erected two pressure-treated corner support posts, anchored in concrete, to frame the opposite wall.
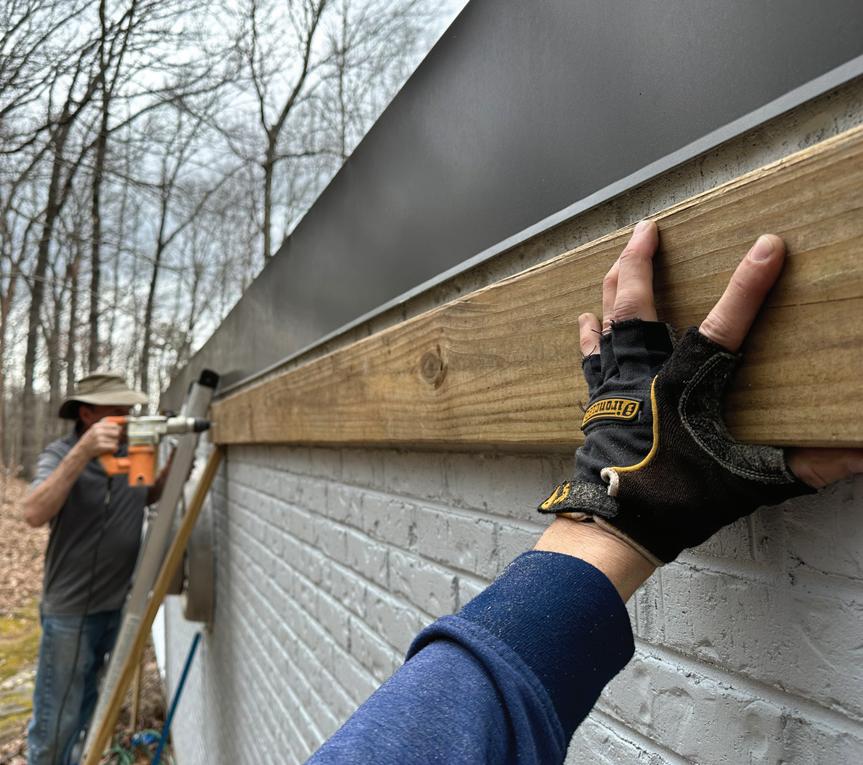

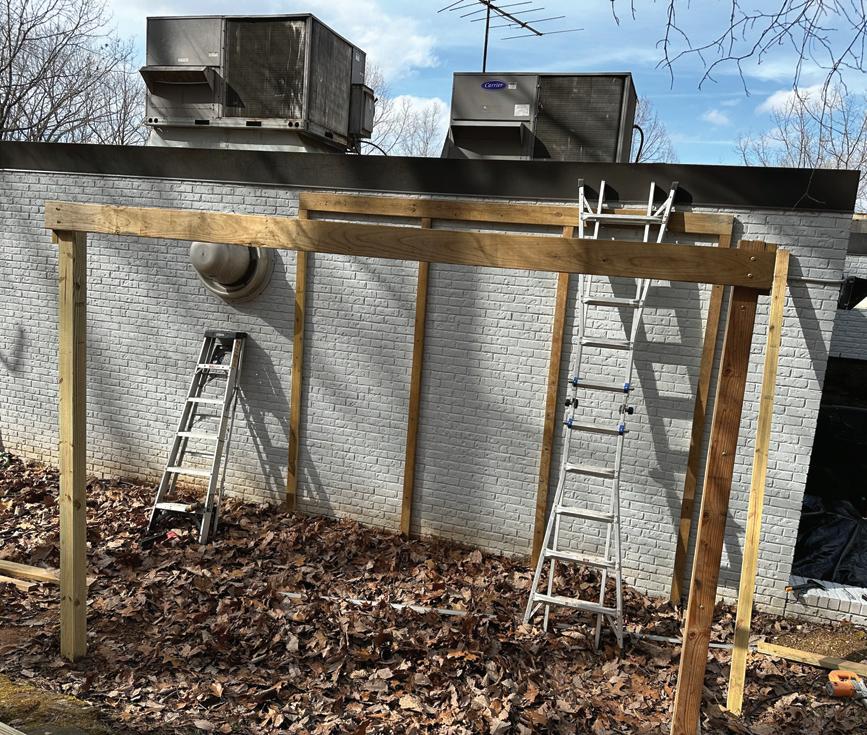
Along the concrete block wall of the existing building, we installed a 2x8 roof ledger board using masonry anchors. We also fastened vertical 2x4 supports to the brick wall beneath it to give more loadbearing strength to the ledger board. The 2x4s are anchored to the wall and extend from the ledger down to a concrete shelf along the foundation.
Note that if you aren’t tying your shed into an exiting concrete wall, then you should frame this back wall the same as any other wall.
We anchored vertical 2x4s to the wall beneath the ledger to provide additional support.
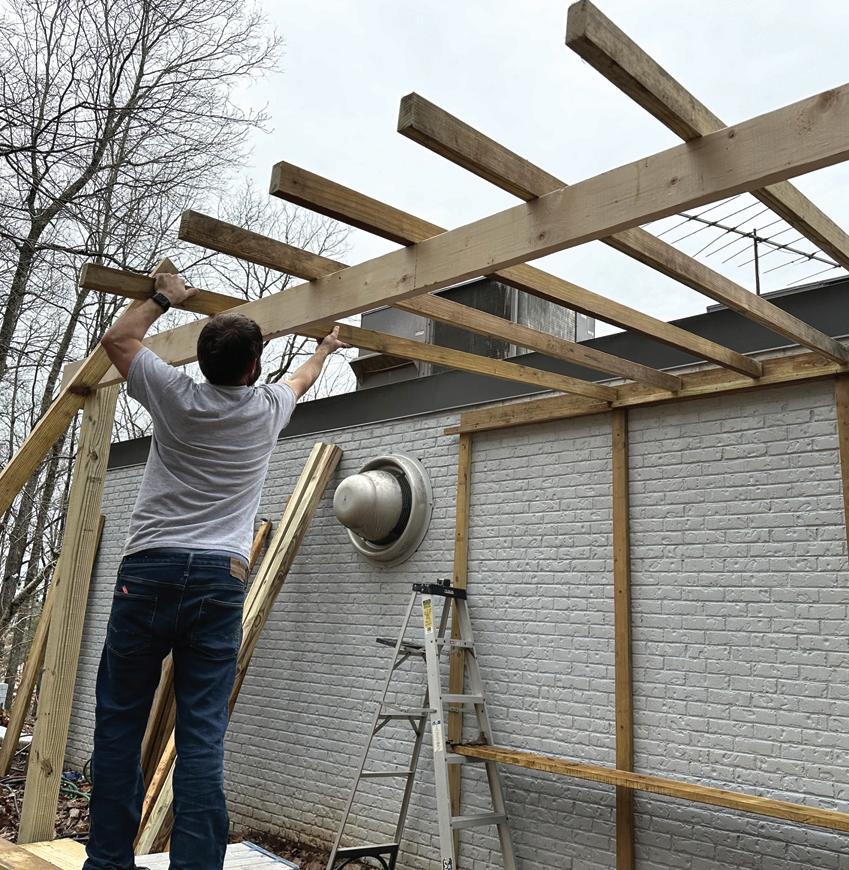
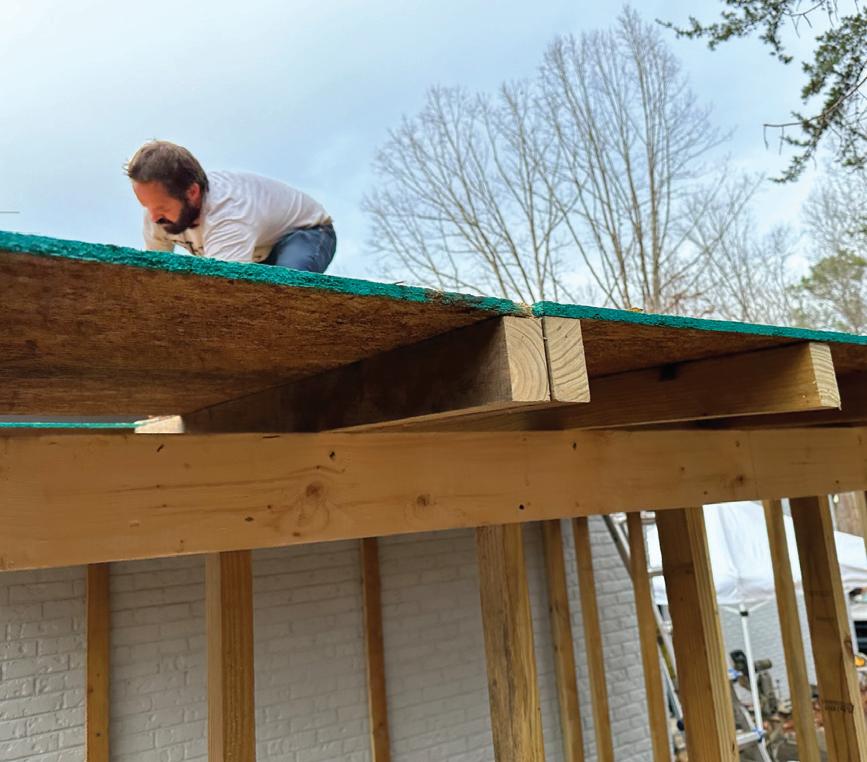
We used structural screws to anchor a level 2x8 rim joist across the 4x4 posts a few inches lower than the ledger. (Minimum roof slope is usually 2/12.) The ledger board and the parallel rim joist support the 2x6 rafters of our simple slant roof.
A 2x2 nailing block fastened along the lower edge of the ledger provided a shelf to assist when positioning the rafters along the ledger. It’s a good idea to use metal rafter ties to lock the rafters into place tightly. We spaced the
The rafters extended from the ledger to cantilever over the beam and posts.
The materials you need will depend on the design and size of your shed. Here’s a general list of supplies:
• Pressure-treated lumber for the foundation framing
• Regular lumber for wall and roof framing
• Plywood or OSB for the walls, roof, and floor
• Siding and accessories
• Roofing materials (underlayment, roll roofing, shingles, metal panels, etc.)
• Gravel or concrete for the foundation (if needed)
• Screws, nails, and other fasteners
• Hinges and door hardware
• Caulk or sealant for weatherproofing
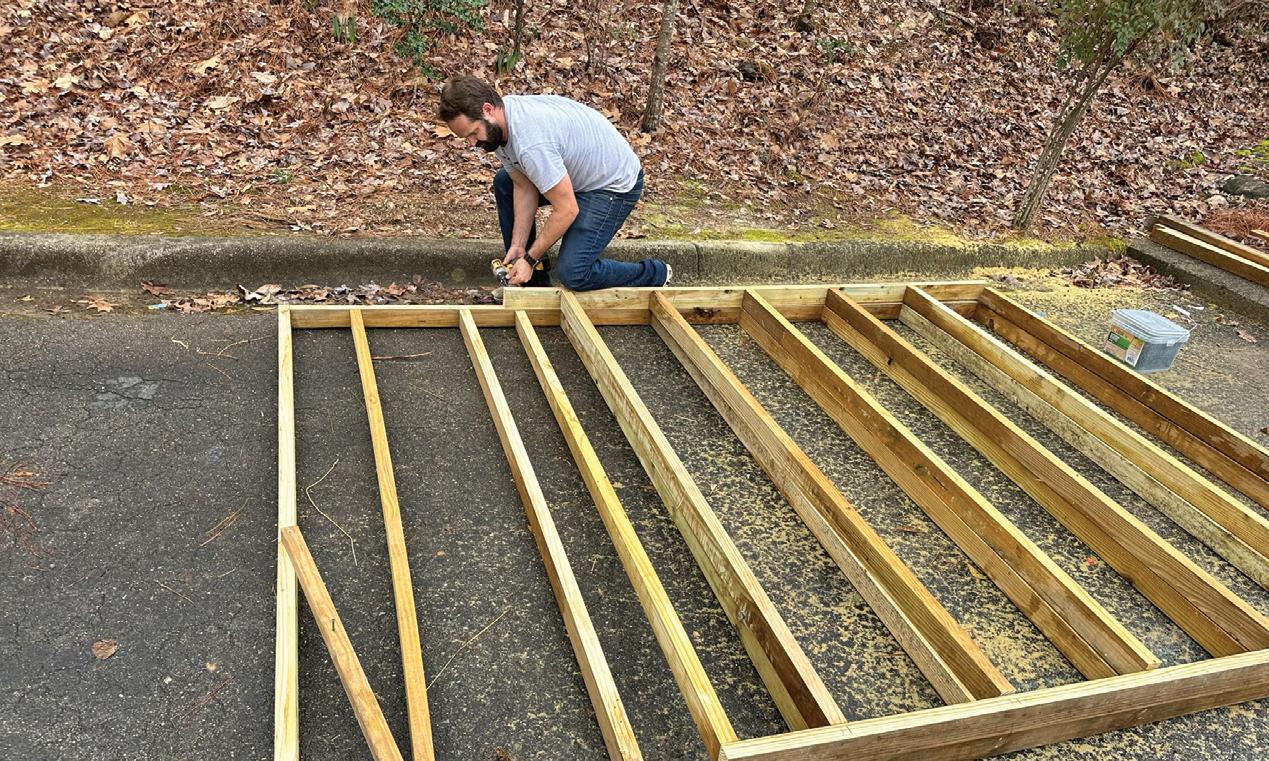
We framed the walls on the ground to be moved into place.
rafters 24 inches apart and let them cantilever across the opposite rim joist.
Build the wall frames on the ground by attaching vertical 2x4 studs to the 2x4 horizontal top and bottom plates. Space the studs 16 inches apart. Incorporate the frames of windows or doors into the wall frames as needed. Use a square to ensure each wall frame is 90 degrees and in plane.
Once the walls are built, lift them into place and secure them to the 4x4 posts and to the

A helper will be required to move the walls into position and fasten them in place.
A 2x2 screwed along the bottom of the ledger can provide a shelf to help position the ends of the rafters.
existing structure (which required concrete screws, in our case). You’ll want a helper for this step, as the walls can be heavy and unwieldy. You can incorporate 2x6 band joists at the bottom of the walls to help with fastening and support.
Depending on the design of your shed, it may be time to install the wall sheathing (plywood or OSB) by nailing or screwing it
Stagger the seams between courses of roof sheathing.
onto the wall frames, then follow up with siding installation.
For the rugged utility shed shown here, we went with 4x8 LP SmartSide composite siding panels with a vertical board-and-batten pattern. This material is designed to stand up to weather and moisture, but the panels can be cut to size with a circular saw just like wood, and they’re strong enough to be nailed directly to the studs, making additional sheathing unnecessary. Before installing the panels, we nailed L-shaped aluminum drip edge along the bottom band joists to ensure a proper drainage plane.
Attach the roofing felt with cap nails.
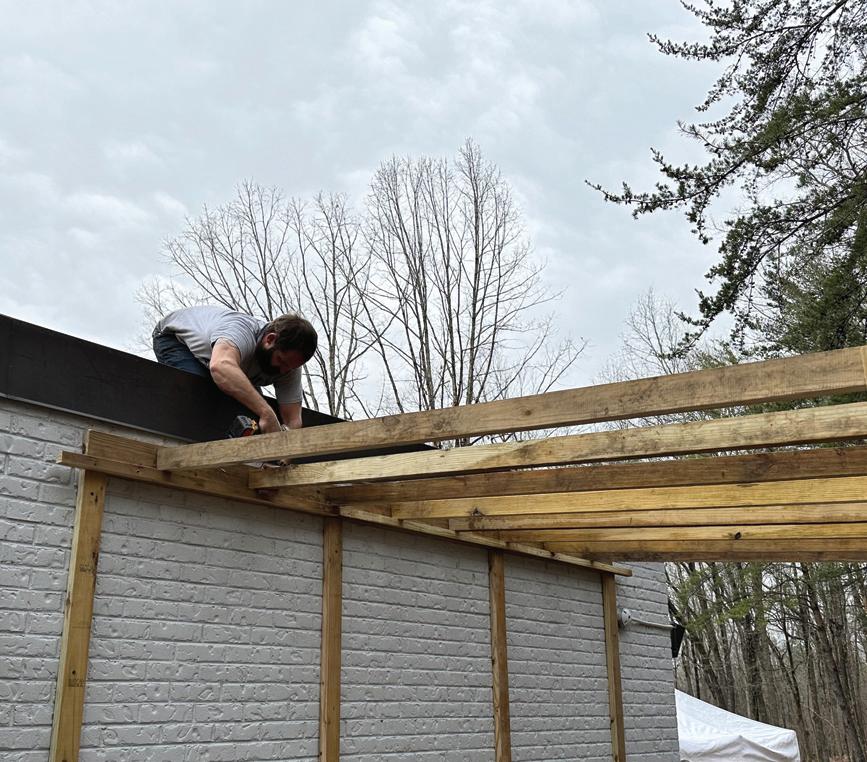
Double the rafters if necessary to provide an adequate nailing surface where two roof-sheathing panels meet.
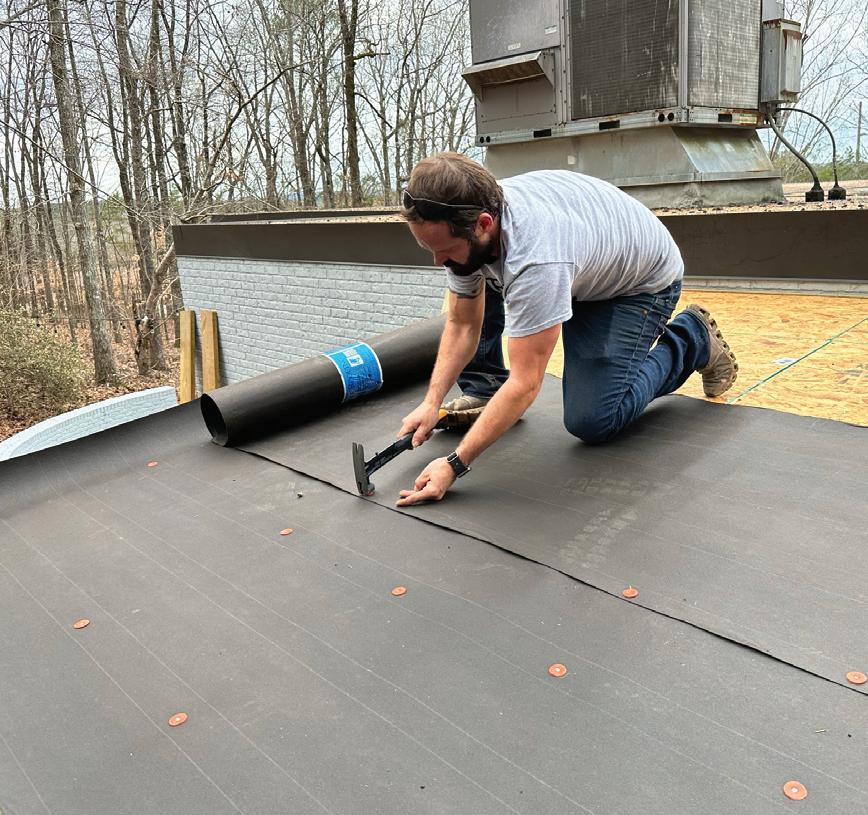
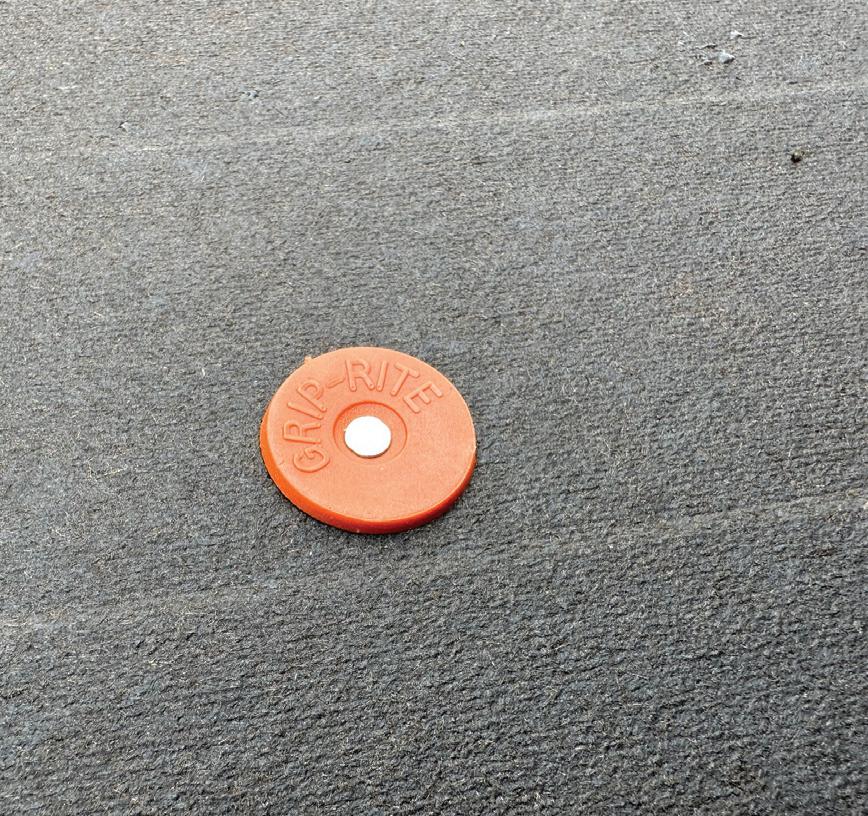
After the roof and walls have been framed, fit 3/4-in. plywood sheathing over the roof frame, staggering the seams between the courses of panels. Align the edges carefully and insert 1-5/8-in. screws, every 8 inches along the rafters. Leave no gaps between panels. Cover the sheathing with roofing felt before installing the roof covering. Cap nails will hold the roofing underlayment in place without tearing out.
You can follow the underlayment with shingles, metal panels, or simple roll-roofing as we used for this shed. This will ensure your shed is waterproof and well-insulated. For roll roofing, lay the material in courses beginning at the lowest edge of the roof working toward the highest. Each course should overlap the course beneath it by at least 3 inches, and the overlapped seams should be sealed with asphalt plastic cement.
We installed level 2x8 band joists along the tops of the wall studs to strengthen the
Install 2x8 band joists to enclose the structure and provide a nailing surface for the cladding.
Nail aluminum drip edge to the lower band joists before installing the cladding.
structure, provide a cap for the siding panels, and provide a nailing surface for the siding fill-ins above the wall frames.
You will have many options when it comes to doors, but our double-door was built on site by framing up 2x4s and cladding them with the same SmartSide panels we used on the walls. We installed the doors with heavy-duty gate hinges and gate hardware.
Once the structure was complete, we added decorative trim and enclosed the eaves with OSB and a fascia board.
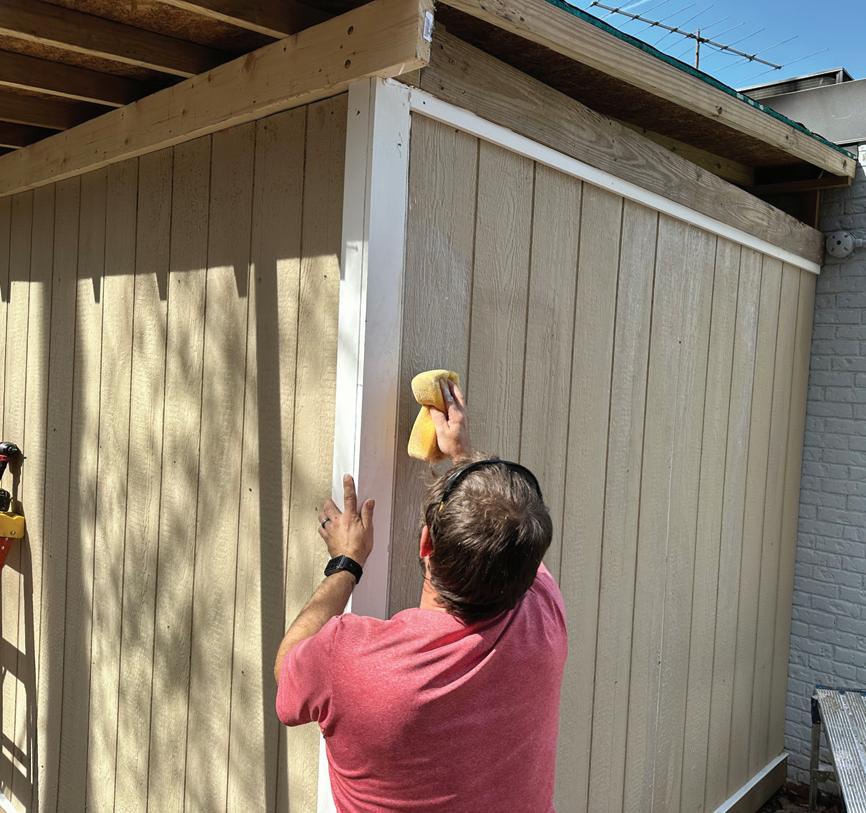
Although the shed is an unconditioned space, you still need to caulk all seams and fill the nails holes with exterior-grade spackling to protect against rain and moisture, which will in turn cause mold and material deterioration.
Using a damp rag can help to shape and clean any excess caulk or sealant from the building envelope. The cladding panels are sold pre-coated with a coat of primer, so once everything was sealed up, we painted the shed to match the existing building.
After construction is complete, it’s time to organize the inside of your shed. Here are some ideas for maximizing storage:
Shelving: Simple right-angle metal brackets from a hardware provide an easy way to install shelves along the walls to store smaller items.
Pegboard: Hang a pegboard on the walls to organize hand tools and keep things easily accessible.
Hooks and Racks: Add hooks or racks for hanging gardening tools, ladders, or other items.
Storage Bins: Use plastic bins to store seasonal or less frequently used items to keep them organized and protected from dust and insects.
We nailed LP SmartSide cladding directly to the wall studs.

Caulk all seams and fill all nail holes. Wipe away any excess sealant before painting.

We enclosed the eaves and installed trim boards.
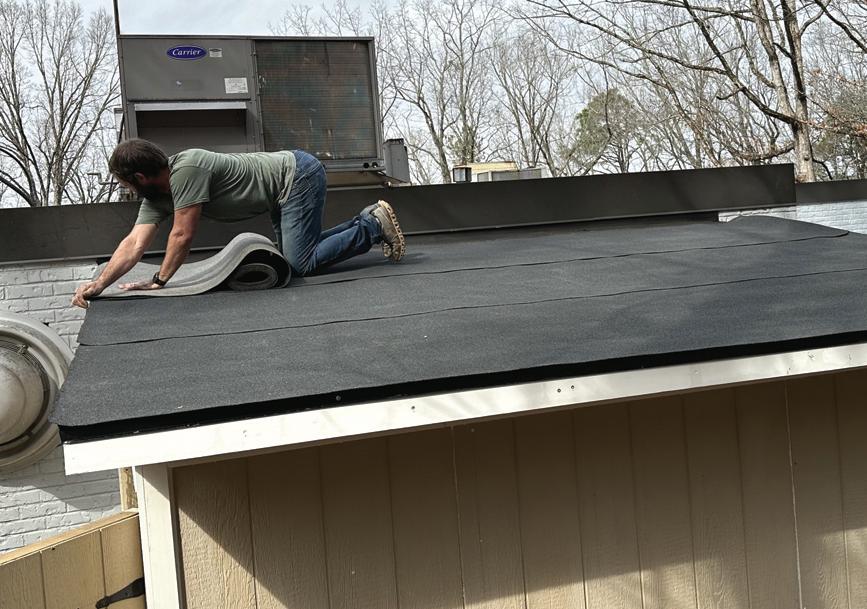
Since this was an office building, the shed was finally covered with simple roll roofing, but shingles and metal panels are alternatives.
Building an attached storage shed is a rewarding project that can help you make better use of your space, store items securely and protect them from the weather. By planning ahead, choosing the right materials, and tailoring these basic instructions to your own design, you'll be able to construct a functional and attractive shed that complements your home or office.
HEditor’s Note: Design and construction of the shed shown in this article appears courtesy of Caleb and Randy Stephenson of Core Resources. Contact them at Coreresourcesal@gmail.com or (205) 612-9021.
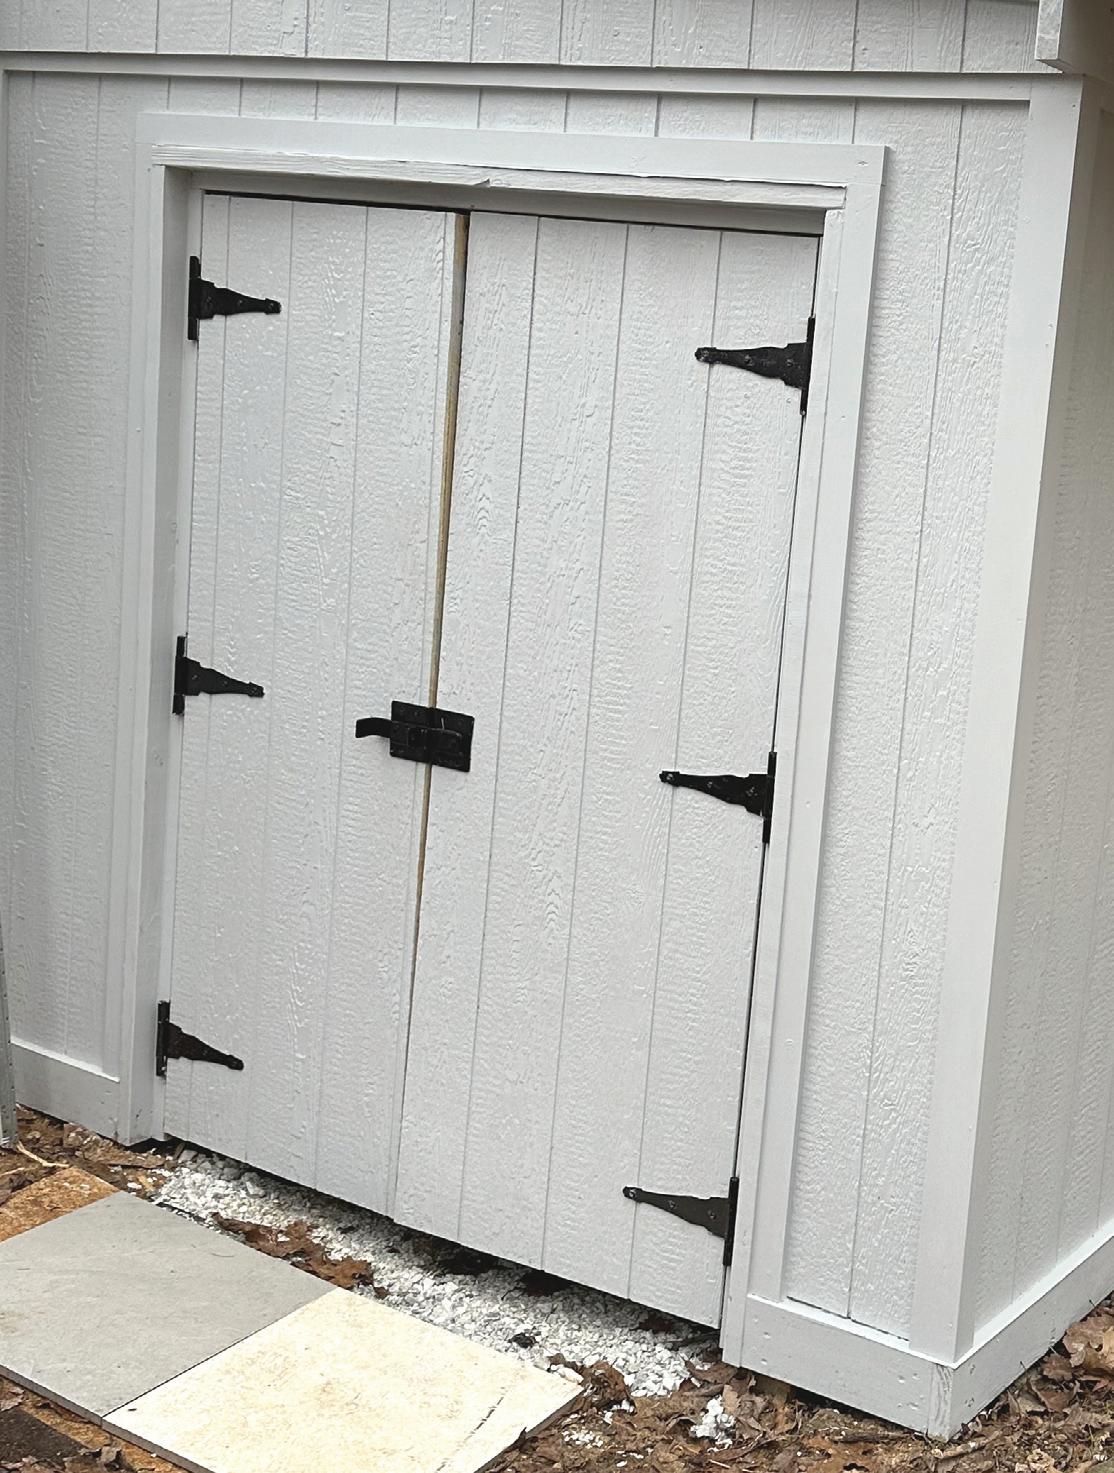
The double-door was framed on site from 2x4s and covered with the same siding that we used for the shed, then we installed it like a fence gate using gate hardware.

By Ted Speers
Drywall is a tough, fire-resistant material that lasts for years, but it can and does get damaged. Because it is the finish of your walls and ceiling and reflects the beauty of your home and how you decorate, it is critical to repair damage as soon as you see it to keep your walls looking pristine.
Drywall repair can be tricky, even for those with some DIY experience. It involves techniques that professionals spend years perfecting and is considered an art by many. However, it can be a difficult and often dangerous task, depending on where you are working within the home.
If you’re considering tackling the job yourself, here are some tips to help guide you through the process, along with reasons why you might want to leave it to the pros.
One of the telltale signs of drywall damage is an uneven or mismatched texture. While
textured walls and ceilings can hide minor flaws, significant repairs can be a different story. If the texture isn’t matched correctly, the repair might stand out more than the original damage.
When matching textures, there are a few things to keep in mind to ensure your patch blends seamlessly.
First, make sure you know the thickness of your drywall before you start. This helps ensure the new piece fits smoothly with the surrounding area. While 1/2-inch drywall is the most common, it does come in other sizes.
A good tip is to use as little of the original texture as possible when applying the mud. This gives you more control over the new texture and a better chance of matching it perfectly. After you’ve patched the area, be sure to smooth out any lines between the patch and the existing texture to make the repair invisible.
The texture on drywall comes from both the mud and how you apply it. Sometimes, people mix additives like sand or texture

compounds into the mud to create a unique finish. But most of the time, the texture is all about the technique.
• Smooth Finish: Just what it sounds like—mud is applied and then sanded down until there’s no texture at all.
• Orange Peel: This one looks like an orange’s skin and is sprayed on with a special spray gun.
• Knockdown: You start by spraying on the mud, then lightly flattening it with a wide knife to “knock down” the peaks.
• Popcorn: This bumpy texture is usually sprayed on using a special mix that creates that popcorn ceiling look.
• Skip Trowel: For this one, you use a trowel to spread the mud in thin layers, leaving parts of the surface exposed for a hand-finished look.

It’s crucial to use the same tools and methods that were originally used to create the texture. Tools like trowels, knives, sponges, or spray guns are used to achieve different patterns. The way you move the tool and the consistency of the mud play a big part in what the final texture looks like. If you’re new to drywall work, try experimenting with different tools and techniques to see how each one affects the texture. To figure out what tools and techniques were used on a wall, you can usually tell by looking closely at the texture:
• Orange Peel: If the surface has a fine, bumpy texture, kind of like the skin of an orange, it was probably sprayed on with a spray gun and a thinned-out drywall mud mix.
• Knockdown: If the texture is somewhat flat with rough patches that look spread out, it was likely first sprayed and then "knocked down" with a wide drywall knife or trowel.
• Popcorn: The classic bumpy, raised texture on ceilings? That’s usually done with

Orange peel texture (left) looks like the skin of an orange and subtly hides wall and ceiling imperfections. Knockdown texture (right) is achieved by knocking down the peaks of a sprayed finish to achieve a more stucco-like appearance. s


a popcorn sprayer and a mixture that often includes Styrofoam or other texture additives.
• Skip Trowel: If the texture looks more random and hand-applied, with rough sections that aren’t fully smoothed out, it was likely done with a trowel, using a "skipping" motion.
Finally, make sure your drywall mud has the same consistency as what was used originally. This might seem like a small detail, but it can make a big difference in the final look.
To figure out the original consistency, it's mostly about paying attention to the texture and how it feels:
Hopper-type spray guns are often used to apply the original coating of drywall texture. Shown is the Marshalltown Texture-Pro 200 Hopper Gun.
Knockdown finish is achieved by "knocking down" the highest peaks of a sprayed finish with the flexible blade of a trowel or drywall knife. Shown is the Marshalltown Adjustable Squeegee Trowel.
• Look at the Texture: If the texture looks thicker and more pronounced (like with knockdown or skip trowel), the original mud was probably on the thicker side. If it’s more subtle, like orange peel, the mud was likely thinned down.
• Feel the Wall: Run your hand over the texture. If it feels bumpy and rough, the mud was likely thick when applied. A smoother texture usually means it was thinned out.
To match the consistency:
1. Start with Pre-Mixed Mud: Pre-mixed drywall mud is a great starting point, especially
ENSURE YOUR PATCH IS FLAWLESS AND BLENDS SEAMLESSLY WITH THE SURROUNDING WALL BY HIRING A PROFESSIONAL.
if you're new to this. You can adjust it by adding water or letting it sit to thicken up.
2. Add Water for Thinner Consistency: If you need a thinner mix for textures like orange peel or knockdown, slowly add water and stir until it reaches the right consistency. For thicker textures like trowel finishes, use less water and let the mud sit for a bit.
3. Test It Out: Always test your mix on a scrap piece of drywall before committing. Compare it to the original texture and adjust as needed until you get a good match.
If it’s still not coming out right, consult a professional. They have the experience to get the texture and consistency spot-on without the trial and error. Given how challenging matching texture is, it might be worth calling in a professional to avoid any headaches and ensure a perfect finish.
Now that you know what goes into matching texture, let’s talk about the tools you’ll need for the repair patch. Some of these are specialized for drywall work, so if this is your first time, you might not have them on hand. For precise and clean cuts, you’ll need a utility knife, a keyhole saw, a drywall saw and a putty knife. A keyhole saw is particularly
useful for cutting around electrical outlets and other obstacles. A drywall saw (also known as a jab saw) helps you avoid unnecessary damage to the surrounding area, and a putty knife is essential for applying joint compound smoothly.
You’ll also need a drywall screw gun, a drywall T-square, a sanding block or sponge, taping knives, and protective gear like safety goggles and a dust mask. It might seem like a lot of equipment for a small repair, but each tool plays a critical role. Having the right tools not only helps you achieve a flawless finish but also prevents costly mistakes that can happen when using the wrong equipment.
While DIY drywall repair is an option, you can ensure your patch is flawless and blends seamlessly with the surrounding wall by hiring a professional. Drywall technicians have years of experience dealing with all kinds of damage, so they know exactly how to approach your specific issue for the best results.
Professionals are also experts in texture matching, meaning you won’t be left with an eyesore reminding you of past damage. These experts come equipped with all the necessary tools, saving you the trouble and expense of buying equipment you might only use once.
Another big advantage of hiring professionals is that they handle all the cleanup. Drywall repair can be messy, but technicians protect your space with plastic or a tarp before they start, and clean up everything once the job is done, leaving you with a perfectly repaired wall or ceiling and no mess to worry about.
About the author: As the brand president of The Patch Boys, a leading drywall and ceiling repair company, and a member of the BELFOR Franchise Group family of residential and commercial services brands, Ted Speers has been recognized for his ability to build strong brands and for his demonstrated track record of business development and sales management skills. He has more than 20 years of experience leading innovative businesses. For more, visit www.thepatchboys.com.