7 minute read
ZE205E/ZE230E HYDRAULIC EXCAVATOR OPERATION MANUAL


Chapter Six: Transportation and storage of the excavator
6.1 Transport of the excavator
For transport safety, the machine can be divided into several parts. Please contact ZOOMLION or ZOOMLION dealer for details
Usually a trailer matching the weight and size provided in the technical specifications is required for transportation. Please note that the value of weight and transportation size provided in the technical specifications will vary with different types of track shoes, arms or accessories. During transport, do comply with the following provisions: a) Study all the restrictions and local regulations on transport load, width and length; if necessary, disassemble the working devices. Different working devices may be different in width, height and weight. Therefore, the determining of the transport routes should take this point into account. b) Before crossing the bridges or private lands, you should first check whether the structural strength is strong enough to support the weight of the machine. On highway transport, request the authorities to do inspections and follow their guidance.
Here are the specific steps of transport.
6.1.1 Loading and unloading of the machine
1. While performing the loading/unloading operations, turn the automatic idle button to OFF position (canceled). If the automatic slow-down button is still at the ON position, the machine will move suddenly.
2. When the machine is mounted on or unloaded from the trailer, run the machine at low speed and do not operate the traveling speed selective switch.
3. Run the engine at low speed and operate the machine with low speed while loading/unloading.
4. Do not load/unload the machine during automatic warming-up operation
5. Load/ unload the machine on solid and flat ground, and maintain a safe distance from the edges of the road.
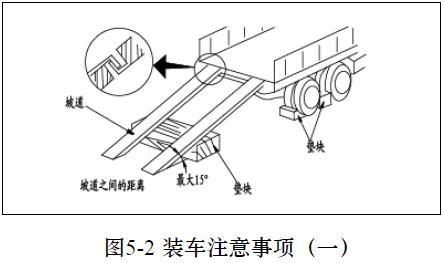
6. Use the ramp with adequate width, length, thickness and strength, and the loading/unloading slope should be no more than 15 °(Figure 6-1). When bulldozing slopes, the soil should be compacted securely and measures should be taken to prevent slope collapse.
7. In order to prevent the machine from slipping on the ramp, remove all mud and dirt on the track before starting the operation. Please make sure that the ramp surface is clean with no water, snow, ice, grease or oil.
8. Do not steer the machine on the ramp, otherwise the machine may risk overturning. If you must turn, you should exit the ramp and then enter it again after adjusting the direction.
9. Do not use the working devices for loading/unloading operations, for it is dangerous.
10. When the machine is on the ramp, do not operate any lever other than the traveling lever.
11. Gravity center of the machine will suddenly change at the junction between the ramp and the trailer and thus the machine may lose balance. Therefore, travel slowly while crossing the site.

12. When slewing the upper structure of the machine on the trailer, the trailer is unstable, so retract the working devices and slew slowly.
6.1.1.1 Loading
When loading excavator, be sure to use the ramps and platforms and operate according to the following steps: a). The machine can only be disassembled on solid and flat ground, and maintain a safe distance from the edges of the road. b). Apply proper braking force to the trailer and put pads under the tire, so as to ensure that the trailer does not move. Then install the ramps between the trailer and the machine. Ensure that both ramps are in the same horizontal plane. The slope of the ramp should be no more than 15 °. The distance between the ramps should be adjusted to match the track center (see Figure 6-2). c). Make sure that the machine is at low speed position. d). Deactivate the auto-idle function and then operate the fuel control knob to adjust the engine speed to low speed e) If the machine is equipped with a working device, put the device in the front and travel forward for loading; if there is no working device, then travel backwards for loading. f) Align the traveling direction with the ramp and travel slowly. Try to lower down the working device without causing any impact. When the machine is on the ramp, you can only operate the traveling lever and any other lever or pedal cannot be operated (Figure 6-3). g) When the machine travels to the top of the trailer’s rear wheels , it gets unstable, so drive slowly and carefully (no steering). h). Right when the machine passes the rear wheels of the trailer, it will tilt forward, so be careful not to let the working devices impact on the trailer body. Drive the machine forward to the specified location and then stop. i) Slowly slew the upper structure for 180 °so that the working device faces the rear (Figure 6-4). j). Park the machine at the specified location on the trailer.
Maximum 15。
6.1.1.2 Fix the machine
Attention
1. Retract the radio antenna. Remove the rear-view mirror, and attach the removed parts securely to the trailer.
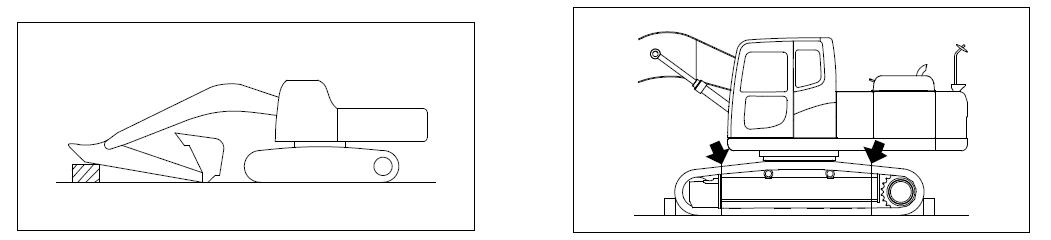
2. In order to prevent the bucket cylinder from being damaged during transport, wooden pad should be placed at one end of the bucket cylinder to prevent it from touching the floor (Figure 6-5).

Fix the machine according to the following steps when the machine is loaded on the trailer: a) Fully extend the bucket cylinder and the arm cylinder, and then slowly put down the boom b). Turn off the engine and remove the key from the starter switch. c). The safety locking lever is in the locked position. d). Lock the cab, side doors, battery lid and engine hood.
Place pads below both ends of the track to prevent the machine from moving during transit, and tether the machine securely with chains or wire rope (see Figure 6-6). Pay special attention to fix the machine firmly so that it will not slide to one side.
6.1.1.3 Unloading
When unloading the machine, be sure to use the ramps and platforms, and comply with the following steps in the operation: a) Only load and unload on solid and flat ground, and maintain a safe distance from the edges of the road. b). Apply braking force to the trailer properly, and put pads under the tires to ensure that the trailer does not move. Then set the ramps between the trailer and the machine. Ensure that both ramps are at the same horizontal plane. The ramp slope does not exceed 15 °. Adjust the distance between the ramps to the match that of crawler center. c). Remove the chains or wire rope that fix the machine d) Start the engine, and perform a thorough warming-up operation in cold weather. e). Put the safety locking lever to the free position. f). Confirm that the machine is running at low speed. g) Deactivate the auto-idle function and operate the fuel control knob to adjust the engine speed to low speed. h) Raise the working device, retract the arm under the boom, and then move the machine slowly i). Stop the machine when the machine is located at the top of the trailer rear wheel. j). When moving towards the ramp from the rear of the trailer, adjust the angle of the stick and the boom to 90-110 °. Drop the bucket to the ground, and then move the machine slowly (Figure 6-7). k). When the machine moves to the ramp, slowly operate the boom and the arm and carefully drive the machine until the machine is completely off from the ramp.

6.1.2 Hoist the machine
1. Do not hoist the machine with people on it.
2. Ensure that wire rope used for hoisting the machine is strong enough to withstand the weight of the machine.
3. In addition to the posture provided in the following procedures, do not hoist the machine in any other posture, otherwise the machine will risk losing balance.
4. Do not hoist the machine when the upper structure is slewed to one side of the machine. Before hoisting, turn the working device to the one end of the sprocket and keep the track parallel to the upper structure.
5. Keep the machine horizontal while hoisting it. Walking under a machine being hoisted is dangerous.
6. In this case, do not walk under the machine.
1. The hoisting procedures apply to the machine with standard technical specifications.
2. Lifting method will be different according to the actual installation of accessories and options. In this case, please consult Zoomlion or Zoomlion dealer.
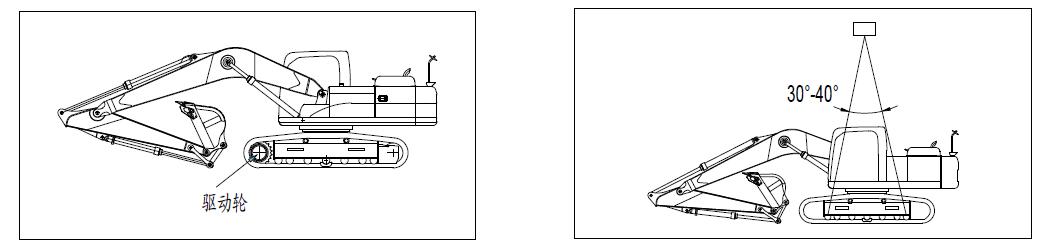
When lifting the machine, follow these steps on flat ground: a) Slew the upper structure, so that the working device is at one end of the sprocket. b). Fully extend the bucket cylinder and arm cylinder, and then use the boom cylinder to lower the working device down to the ground, as shown in Figure 6-8. c). Turn off the engine, ensure that the cab is surrounded by nothing, and then leave the machine. Close the cab doors and the windshield. d). Pass wire rope through the first and second track rollers in the front and the first and second track rollers in the rear. However, for machines equipped with track roller retaining plate, the wire rope should be passed under the crawler. e). Adjust the lifting angle of the wire rope to 30 °~ 40 °and then slowly lift the machine (Figure 6-9). f). After the machine is lifted off the ground, check carefully whether the machine is balanced and then lift it slowly.
Attention
Driving wheel
6.2 Storage of the excavator
6.2.1 Precautions before storage
While storing the machine, adjust the machine into the posture shown in Figure 6-10 to protect the cylinder rod (to prevent the cylinder piston rod from rusting).
For long-term storage of the machine, do according to the following steps: a) Clean and wash all the parts, and then put the machine into the room. If the machine has to be stored outdoors, select a flat surface and cover the machine with drop cloths. b) Before storage, fill the fuel tank and lubricate and change engine oil. c) Coat the metal surface of the piston rod with a thin layer of grease. d) Disconnect the negative terminal of the battery and cover the battery or remove the battery from the machine and have it stored separately. e) If the expected ambient temperature drops below 0 °C (32 °F), add antifreeze in the coolant. f) Place the safety locking lever in the locked position and lock the locking device of the pedal. g) Place the cut-off valve (if installed) for accessory installation on the machine in the locked position, and screw a plug in the elbow. h) Place selection valve (if installed) for mounting accessories on the machine in "no accessory to install" position.