2 minute read
MAINTENANCE INSTRUCTIONS

from Zetor Tractor Forterra 100 Forterra 110 Forterra 120 Forterra 130 Forterra 140 Operator’s Manual

Replacement Of The Transmission Oil Cleaner Element With Hydraulic
PUMP SUCTION FILTER
The oil cleaner is placed on the left side of the gearbox.
Before replacing the oil cleaner element, place a suitable vessel for dripping oil under the tractor.

1. Unscrew the body of the cleaner (1)
2. Replace the filtration element
3. Reassemble the body of the cleaner
LUBRICATION AND FILLING POINTS OF THE FRONT DRIVING AXLE
1. Lubricating nipple of the kingpin
2. Sliding bearings (2 pieces) of the front driving axle
3. Drain opening of the final drive housing oil
4. Filling and inspection opening of final drive housing oil (after removing of the inspection screw the oil level must reach the bottom edge of the inspection opening)
FILLING, INSPECTION AND DRAIN OPENING OF OIL OF THE FRONT WHEEL REDUCERS
Oil is checked, filled and drained through one opening after turning of the reducer in accordance with the figure.
1. Checking the oil level - opening on the horizontal axis of the reducer (after removing of the inspection screw the oil level must reach the bottom edge of the inspection opening)
2. Oil filling - opening at the top
3. Oil draining - opening at the bottom
Front Pto
The inspection and filling plug of oil (1) is situated on the front side of the front PTO case.
The front PTO with the standard turning direction is equipped with a hollow bolt of the oil cooler hose instead of the inspection and filling plug. Perform the check after removing the hollow bolt. After unscrewing of the inspection plug the oil level must reach the bottom edge of the inspection opening.
During the oil replacement the oil cleaning strainer (2) must be cleaned. The cleaning strainer is accessible after the disassembly of the locking ring and removal of the cap.
Brake Liquid Replenishment
The tank is accessible after the removal of the right rear side plate of the hood. Maintain the brake liquid level in the range of 3/4 of the tank content (max. level) and 1/2 of the tank content (minimum level).
When handling brake liquid, keep absolute cleanness. Check the brake liquid level daily before starting your work.
Carbon Filter Installation Instructions
1. Remove the old filter from the air duct orifice in the place of its mounting.
2. Remove the protective package from the new filter.
3. Insert the filter into the air duct orifice in such a way to make the air flow direction correspond to the flow direction through the filter in accordance with the arrow on the filter. The entering air must first pass through the white dust filtration layer.
4. Check proper sealing of the filter.
5. Secure the filter.
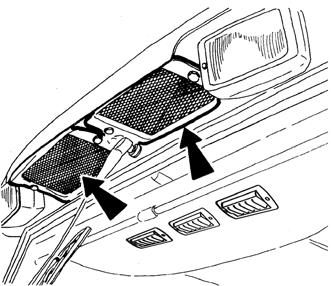
Cleaning The Heating Filters
Recover the filters positioned under the covering grills over the windshield outside the cabin with regard to the degree of clogging:
−by shaking
−by blowing with compressed air Check the filters for clogging daily. Replace heavily clogged filters. The safety cab of the tractor is not equipped with special filters of air aspirated to the cab. It does not protect the operator from the effect of aerosols and other harmful substances! Use a filter with active carbon when working with harmful substances.