7 minute read
10.7.6 Servicing the hydraulic system


10.7.6 Servicing the hydraulic system
CAUTiON
danger of injury from moving parts! Never open the driver‘s platform when the engine is running. danger of scalding from hot hydraulic fluid! danger of injury from hydraulic fluid escaping under pressure! a fine jet of hydraulic fluid under high pressure can pierce the skin. Go to a doctor immediately should you get hydraulic fluid in your eyes or on your skin. Open hydraulic systems only if they have been depressurised. Even if a loader is parked on a horizontal surface with its lift frame completely lowered and engine turned off, there can still be considerable residual pressure in parts of the hydraulic system. residual pressure reduces gradually at first. If a hydraulic system is opened immediately after shutting down, the system has to be depressurised as described in the chapter „Discharging residual pressure in the hydraulic system“.
NOTE
danger of technical damage! ► Service the hydraulic system according to the inspection intervals specified in this operating manual. ► Exercise extreme cleanliness when carrying out service work on the hydraulic system. Impurities in the hydraulic fluid in the form of dirt or water can result in premature wear or failure of the entire system.
Hydraulic fluid cooler
The hydraulic fluid cooler is located in the front carriage of the loader (Fig. 107). The electric fan is switched on at 55 °c by means of a temperature probe. Should the loader get too hot during long drives on the road or at high outside temperatures, check whether the radiator is continuously clean at every position and whether the electric fan of the hydraulic fluid cooler works.
Fig. 107 Hydraulic fluid cooler
Ventilation filter / hydraulic fluid filler neck
NOTE
replace the ventilation filter after 1000 operating hours.
The ventilation filter is located on the hydraulic fluid tank item 1 (Fig. 108). it ensures that the hydraulic tank is ventilated and exhausted when the hydraulic fluid level fluctuates. The air filter contains a filter element which prevents dust and dirt from penetrating and oil spills from escaping. The air filter has a valve that keeps the tank pressure at approx. 0.5 bar. This pressure will escape if the hydraulic fluid filler neck is opened.
Checking the hydraulic fluid level
NOTE
danger of technical damage! Never let the oil level drop below the „minimum“ mark on the dip stick. When pouring in oil, never let the „maximum“ mark on the dip stick be exceeded. ► check the hydraulic fluid level at regular intervals. do not use the loader if the hydraulic fluid level is not correct. ► Oil cloudiness means that water or air is in the system, which could damage the hydraulic pump. contact trained specialized personnel to eliminate the fault. do not drive the loader until the fault has been eliminated.
The hydraulic oil tank is located on the left side of the rear carriage. To access it, tilt open the driver‘s platform.
1. Stop the loader on a horizontal surface and set the parking brake. 2. Lower the lift frame as far as it will go. 3. Turn off the engine. 4. Tilt the driver‘s platform. 5. The dip stick is located on the underside of the ventilation filter. unscrew the ventilation filter (Fig. 109). 6. Wipe the dip stick with a clean, lint-free cleaning rag. 7. Put the dip stick back in. 8. Pull the dip stick out again. 9. check the oil level. The oil level must be between the „minimum“ and „maximum“ marks. 10.Put the dip stick back in after checking the oil level. 11.close the hydraulic oil filler neck item 1 (Fig. 108).

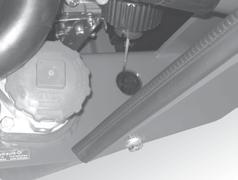
Fig. 108 Ventilation filter
1
Fig. 109 Hydraulic fluid dip stick
Adding hydraulic fluid
NOTE
use the correct fluid grade (see the chapter „Specifications and filling quantities“). open the hydraulic fluid filler neck item 1 (Fig. 108) carefully so that the pressure can escape from the tank.
if the fluid level is under the „maximum“ mark, hydraulic fluid must be added:
1. open the hydraulic fluid filler neck item 1 (Fig. 108). 2. add hydraulic fluid. 3. check the hydraulic fluid level. 4. add hydraulic fluid until the fluid level is at the »maximum« mark. 5. close the hydraulic oil filler neck item 1 (Fig. 108).
Changing the hydraulic fluid
CAUTiON
danger of scalding from hot hydraulic fluid! ► Let the hydraulic oil cool down or use protective gloves.
ENViRONMENT NOTE
danger of environmental damage! ► Avoid environmental damage. collect old hydraulic fluid and dispose of it in an ecologically sound manner.
NOTE
use a sufficiently dimensioned receptacle for the old hydraulic fluid and use the correct oil grade (see the chapter „Specifications and filling quantities“).

Fig. 110 Hydraulic fluid drain plug
1. Stop the loader on a horizontal surface and set the parking brake. 2. Lower the lift frame as far as it will go. 3. Turn off the engine. 4. depressurize the hydraulic system as described in the chapter „relieving residual pressure in the hydraulic system“. 5. Place a sufficiently dimensioned receptacle under the lower drain opening of the hydraulic fluid tank (see the chapter „Specifications and filling quantities“). 6. unscrew the sealing plug (Fig. 110). once the hydraulic fluid has been drained:
1. remove the filter insert item b (Fig. 112). 2. clean the tank bottom and tank interior with hydraulic or detergent oil through the opening. 3. replace the filter element of the return filter (see the section „changing the return filter element“). 4. Screw on the plug (Fig. 110). 5. Pour the hydraulic oil into the hydraulic oil filler neck item 1 (Fig. 108) until the oil level has reached the „maximum“ mark. 6. close the hydraulic fluid filler neck. 7. vent the hydraulic system (see the section „venting the hydraulic system“). 8. check the hydraulic fluid level and top up the hydraulic fluid if necessary. 9. dispose of the old hydraulic fluid in an ecologically sound manner.
Changing the return filter element
NOTE
risk of technical damage. ► replace the filter insert of the return filter in good time during the inspections, as the filtration does not work when the bypass valve is open.
ENViRONMENT NOTE
danger of environmental damage! ► let the pressure from the hydraulic fluid tank escape by opening the hydraulic fluid filler neck item 1 (Fig. 108) before you unscrew the lid of the filter housing item a (Fig. 112). otherwise, hydraulic fluid will be forced out of the filter housing and could get into the environment. ► dispose of the old filter element and any leaking hydraulic fluid in an ecologically sound manner. The hydraulic system is equipped with a return filter item 2 (Fig. 111). an installed bypass valve secures the return valve against positive pressure.
Preparations:
1. Stop the loader on a horizontal surface and set the parking brake. 2. Lower the lift frame as far as it will go. 3. Turn off the engine. 4. depressurize the hydraulic system as described in the chapter „relieving residual pressure in the hydraulic system“. 5. Open the engine hood.
changing the return filter element:
1. unscrew the cover of the filter housing item a (Fig. 112): 2. remove the filter element item b (Fig. 112). 3. insert a new filter element. 4. check the gasket item c (Fig. 112): replace the gasket if it is damaged. 5. Screw on the cover of the filter housing item a (Fig. 112): 6. close the hydraulic oil filler neck item 1 (Fig. 108). 7. vent the hydraulic system (see the section „venting the hydraulic system“). 8. check the hydraulic fluid level and top up the hydraulic fluid if necessary.
2

a

c
Fig. 111 Return filter
Fig. 112 Filter insert
b
Venting the hydraulic system
WARNiNG
danger of the loader and lift frame moving uncontrollably! Exhaust the hydraulic system each time after the hydraulic fluid or the return filter is changed, in the event of a malfunction in the hydraulic system, or following repairs or longer periods of shutdown. ► Exhaust the system only from the driver‘s seat. danger of accidents due to people in the danger area. ► make sure that no one is in the loader‘s danger area while exhausting is being carried out. 1. check the fluid level in the hydraulic fluid tank. if necessary, top up hydraulic fluid until the fluid level is at the „maximum“ mark. 2. Start the engine and let it idle for a few minutes. 3. drive the piston rod for all the hydraulic cylinders in and out several times. 4. With the engine running, turn the steering wheel to its maximum angle of turn in both directions until the steering can be actuated faultlessly and without any noises. 5. check the oil level in the hydraulic fluid tank after exhausting has been completed. If necessary, top up hydraulic fluid until the fluid level is at the „maximum“ mark.