2 minute read
Model 4700 Maintenance Manual
Section 7.Component Procedures
Mast Lift Chains
Lift Chains Adjustment
1.Lower the fork carriage fully.
2.Tilt the mast so the forks are parallel with the floor.
3.Measure from the floor to the top of the fork.
4.Elevate the fork carriage to gain access to the chain anchors. Block the fork carriage and mast to prevent lowering while working on the lift truck.
5.Turn the key switch OFF and disconnect the battery connector.
6.Adjust the anchor nuts equally until the forks are 2 in. (51 mm) off the floor, when measured to the top surface of the fork at the fork bend.
NOTE : Make sure the forks are parallel with the floor.
7.Repeat the preceding steps until you obtain the correct lowered height.
8.Liberally apply oil to each chain. See “Lubrication Specification Chart” on pageA-2.
9.Test operation.
Removal
Use extreme care when blocking the mast for any reason.
1.Lower the fork carriage onto wooden blocks to slacken the chains.
2.Turn the key switch OFF and disconnect the battery connector.
3.Remove the master links at the carriage chain anchors.
4.Remove the chain and chain anchors by unscrewing the nuts on the adjustable chain anchors.
5.Remove cotter pins at both chain anchors to separate the chain from the anchors.
6.Inspect the chain. See “Lift Chain Inspection” on page4-9. Replace both chains when either is worn.
Installation
1.On a work bench or floor, attach the adjustable chain anchor to the chain using a new master link.
2.Install cotter pins (for each anchor) through both pins and bend to secure.
3.With carriage lowered, key switch OFF, and battery connector disconnected, insert the chain anchor (with chain attached) over the sheave and into the chain anchor block.
4.Thread on the lock nut by hand to hold the chain in place.
5.Insert the opposite end of the chain between the fork carriage and the lift cylinder. The end of the chain should be near the main frame chain anchor.
6.Fasten the chain to the anchor with a master link and secure with a cotter pin.
7.Repeat steps 1-6 for the other chain.
8.Holding the chain anchor with locking pliers, tighten the chain anchor nuts until 1 in. (25.4 mm) of thread is visible below the nut.
9.Reconnect the battery connector and turn the key switch ON.
10.Slowly raise the carriage, using the lift lever, until the carriage is raised off the blocking.
11.Remove the blocking, then slowly lower the carriage all the way down.
NOTE : The carriage may rest on the floor with slack in the chains.
12.Keeping equal tension on the chains, adjust the chain anchor nuts so the carriage is slightly off the floor.
13.Tilt the mast so the forks are parallel with the floor.
14.With the forks level with the floor and the key switch OFF, adjust the anchor nuts
Publication 1160093, Issued: 20 May 2013 7-77
Section 7.Component Procedures
Lift Chains equally until the forks are 2 in. (51 mm) off the floor, when measured to the top surface of the fork at the fork bend.
15.Liberally apply oil to each chain. See “Lubrication Specification Chart” on pageA-2.
16.Test the operation of the lift chains.
Lift Chain Anchor Bolts
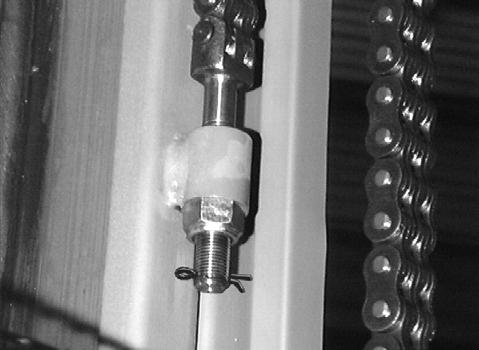
Make sure the lift chain anchor bolts are not damaged and that the adjusting nuts are locked by a cotter pin. See Figure7-97.
Publication 1160093, Issued: 20 May 2013


