7 minute read
SXG326 & SXG323

from Iseki Mower SXG323 326 Mower Decks SCMA54 SCMB48 SCMC48 Collectors SBC550X & 600X Operator's Manual

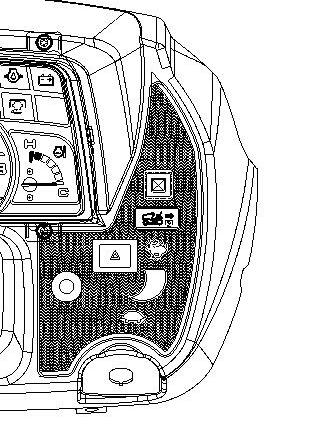
• Parking lamp (GE TYPE):
: The lamp illuminates while the starter switch is in the ON ( ) position and parking lever is pulled upward to apply brake.
IMPORTANT: Always release the parking brake lever and make sure that the lamp is turned off before driving the lawn mower to prevent abnormal brake wear.
• High beam lamp (GE TYPE):
: The lamp illuminates while high beam light of combination switch is in the ON position.
1.4. PTO LEVER
With this lever, the PTO can be either engaged to spin or disengaged to stop.
: Move the lever to the position indicated by this mark, and the front PTO shaft starts spinning and the monitor lamp illuminates.
: Move the lever to the position indicated by this mark, and the front PTO shaft stops spinning and the monitor lamp turns off.
IMPORTANT: When engaging the PTO clutch, slow down the engine speed sufficiently for safety.
1.5. TACHOMETER AND HOURMETER
The tachometer indicates engine speed in crank shaft revolutions per minute (rpm).
1.6. FUEL GAUGE
The gauge indicates fuel level in the fuel tank when the starter switch is in the ON position.
NOTE: The gauge can not indicate an accurate fuel level when the lawn mower is on the slope. It takes a little time to indicate an accurate level after the lawn mower recovers its horizontal position.
The hourmeter counts operation hours of the lawn mower and shows them. The lowest figure indicates one-tenth hour of operation.
1.7. COOLANT TEMPERATURE GAUGE
The gauge indicates engine coolant temperature when the starter switch is in the ON position.
: - Shows too cool temperature for severe work. Warm up until needle points in the middle of temperature gauge before applying heavy load.
: - Indicates overheating (red area on gauge). Reduce engine speed to idle, allow to run at no load several minutes and investigate cause (refer to the section “TROUBLESHOOTING”).
1.8. HEADLAMP SWITCH (E TYPE)
: The light in front grill turns on while the headlamp switch is in the ON position.
1.9. POSITION SWITCH (GE TYPE)
: The meter panel illuminates and the light in combination lamp (OPTION) turns on while the position switch is in the ON position.
1.10. COMBINATION SWITCH (GE TYPE)
The combination switch includes the master lighting switch, turning signal switch and horn switch.
2.1. LIFT LEVER
With this lever, the lift link is raised and lowered: in this position, the lift link is lowered. in this position, the lift link is raised.
(1)
○ : OFF
: low beam headlamps
: high beam headlamps
(2) Turn signal switch
: turn signal right
: turn signal left
NOTE : Turn signal switch works while the starter switch is at ON position.
(3)
1.11. HAZARD LIGHT SWITCH (GE TYPE)
: The monitor lamp and turn signal lamps blink while hazard light switch is in the ON position.
2.2.
CAUTION: When servicing or leaving the lawn mower, be sure to lower the mower deck to the ground.
Use this lever when parking the lawn mower. Pull up the lever, and the parking brake is applied. Push in the top button and lower the lever to disengage the brake.
WARNING: Never start travelling with the parking brake applied, or the brake performance will deteriorate soon or, even worse, the brake system could break down. In the worst case, the brake system may cause fire by heated brake drum if inflammables around the brake system is not properly removed.
The parking lamp illuminates while the starter switch is in the ON ( ) position and parking lever is pulled upward. Relieve the parking lever before starting the lawn mower and make sure that the parking lamp is turned off.
CAUTION: When leaving the lawn mower, be sure to apply the parking brake.
2.3. CLEANING LEVER
With this lever, the clogged grass in the chute can be removed. Pull up this lever to open the chute, and the clogged grass in the chute can be removed. Lower this lever to close the chute.
(1) Lift lever (4) Height adjustment dial (2) Parking brake lever (GE TYPE) (5) Collector lift lever (3) Cleaning lever (6) Collector dump lever
2.4. HEIGHT ADJUSTMENT DIAL
Height adjustment dial can adjust the cutting height of the mower deck.
Turn the dial forward ( ), the cutting height become low.
Turn the dial backward ( ), the cutting height become high.
2.6. COLLECTOR DUMP LEVER
With this lever, the container is opened or closed.
Move this lever forward, the container is closed.
Move this lever backward, the container is opened.
IMPORTANT: The container (SBC600X-3H) does not open until the container is lifted at the middle position.
DANGER: Safety switch prevents the blades from starting during lifting the container (SBC600X-3H) or dumping the container (SBC550X-3L) to keep operator’s safety.
(1) Height adjustment dial
(2) Height adjustment indicator
IMPORTANT: In case of using the height adjustment dial only, cutting height would be uneven on the rough ground. Use the height adjustment dial with gauge wheel.
Before turning height adjustment dial, move the lift lever backward to raise the mower deck to the highest position.
Before attaching or detaching the mower deck, turn the height adjustment dial to the lowest position before that.
2.5. COLLECTOR LIFT LEVER
With this lever, the collector is lifted or lowered. (SBC600X-3H)
Move this lever forward, the collector is lowered.
The engine stops as soon as operator starts to lift the container (SBC600X-3H) or dump the container (SBC550X-3L) when the mower deck is operating.
3. CONTROL PEDALS
Move this lever backward, the collector is lifted.
(1) Master brake pedal (3) HST forward travel pedal
(2) Parking lock (4) HST reverse travel pedal (E TYPE) (5) Differential lock pedal
3.1. MASTER BRAKE PEDAL
The lawn mower stops travelling by depressing this pedal.
3.2. PARKING LOCK (E TYPE)
When parking the lawn mower (E type), the master brake pedal can be locked with the parking lock as the parking brake. In order to lock the brake pedal, move the foot to the parking lock while depressing the master brake pedal, and then depress the parking lock to lock the master brake pedal.
To unlock the master brake pedal, depress the master brake pedal fully, and then release the master brake pedal gradually.
WARNING: Never start travelling with the parking brake applied, or the brake performance will deteriorate soon or, even worse, the brake system could break down. In the worst case, the brake system may cause fire by heated brake drum if inflammables around the brake system is not properly removed.
CAUTION: When leaving the lawn mower, be sure to apply the parking lock.
3.3. HST FORWARD TRAVEL PEDAL
Depress this pedal, and the lawn mower starts moving forward. Forward travelling speed is controlled only by depressing it: forward travel accelerates and decelerates by how much the pedal is depressed.
WARNING: After a long time of use, the neutral position of the HST unit may change, which will cause various troubles such as difficulty in stopping the lawn mower, changing over between forward travel and reverse travel, etc., which is very dangerous.
IMPORTANT: • When the HST unit is out of order, ask your dealer to repair it.
• The adjustment of the neutral position of the HST unit should be done by your dealer.
3.4. HST REVERSE TRAVEL PEDAL
Depress this pedal, and the lawn mower starts moving backward. Reverse travelling speed is controlled by depressing it: reverse travel accelerates and decelerates by how much the pedal is depressed.
WARNING: After a long time of use, the neutral position of the HST unit may change, which will cause various troubles such as difficulty in stopping the lawn mower, changing over between forward travel and reverse travel, etc., which is very dangerous.
IMPORTANT: • When the HST unit is out of order, ask your dealer to repair it.
• The adjustment of the neutral position of the HST unit should be done by your dealer.
3.5. DIFFERENTIAL LOCK PEDAL
To minimize the turning radius of the lawn mower, the differential is installed, which causes the right and left driving wheels to turn at different speeds when turning. On the other hand, it causes the wheels to slip on wet grass or soft ground. In such a case, lower engine speed and depress the differential lock pedal, and then the differential is locked and both wheels turn at the same speed, which results in straighter travelling.
WARNING:
• Never use the differential lock when travelling at high speeds.
• It is very dangerous to attempt to turn the lawn mower with the differential lock pedal depressed. When turning the lawn mower, be sure to release the differential lock pedal.
• When the differential lock is not released despite releasing the differential lock pedal, stop the lawn mower immediately and ask your dealer to repair.
4. OTHER CONTROLS
4.1. SAFETY SWITCHES
The operator’s seat, master brake pedal, PTO lever and engine hood are equipped with a safety switch respectively. Before starting the engine, close the engine hood securely, the operator should be seated in the operator’s seat, keep the master brake depress position and move the PTO lever to the OFF ( ) position.
CAUTION: When the engine does not start due to a defective safety switch or does not stop when the operator has left the operator’s seat, consult your dealer at once without fail.
4.2 REVERSE MOWING SWITCH SYSTEM (R.M.S.)
This lawn mower equips with a Reverse mowing switch system (R.M.S.), its function is to make the operator aware of the danger when reverse mowing. If not equipped with a R.M.S., the legislation demands reverse mowing speed is limited to 0.3m/s or else the engine has to be cut-off automatically. By using the Reverse Mowing Switch before reversing direction the driver can disable this safety system, the PTO will remain on even with reverse speed higher than 0.3 m/s.
To indicate the safety is by-passed the reverse mowing switch lights up in green.
The safety bypass is reset in one of the three following conditions:
•HST reverse travel pedal is released.
•PTO drive is disengaged.
•Engine stops.
To operate reverse mowing
1. Move the PTO lever to ON position.
2. Push reverse mowing switch and depress the HST reverse travel pedal.
3. When the reverse mowing switch lights up in green, release your hand from the switch.
4. As long as the reverse mowing switch is lit in green, the reverse mowing function remains active.
CAUTION: For safety, make sure to check the surroundings allow safe reverse mowing before enabling the Reverse Mowing Switch.