3 minute read
TMS500E OPERATOR’S MANUALOPERATING CONTROLS AND PROCEDURES


Transmission Shift Panel
The transmission shift panel (25) is located on the right side console. The panel contains six pushbuttons marked as follows: D for drive, N for neutral, R for reverse, ( ) arrow up, ( ) arrow down and the MODE button. The neutral button has a raised edge so the operator can orient his hand without looking at the panel. The arrow buttons are used to set the gear range and display error codes. The control is electrically connected to the transmission ECU and each time a button is pushed, a short beep is sounded to verify that the ECU has received instructions.
The MODE button switches between the performance and economy modes and the crane must be stopped before the transmission will shift modes. The mode indicator will illuminate when the transmission is in the performance mode. The economy mode optimizes engine horsepower.
Craning Controls and Indicators
Hydraulic Pump Engaged Indicator
The PUMP ENGAGED indicator (26) is located on the right side console. The amber indicator is illuminated when the hydraulic pumps are engaged.
Hydraulic Pump Disconnect Switch
The hydraulic PUMP disconnect switch (27) is located on the right side console. Positioning the switch to ENGAGE energizes the PTO clutch solenoid to engage the transmission PTO that drives the main hydraulic pumps. NOTE: When the PTO is engaged, the contacts of a separate mechanical switch will close, thus illuminating the PUMP ENGAGED indicator (26) and activating the engine ECM remote accelerator and maximum engine speed signals to limit the engine speed to 2000 rpm.
Accessory Controls and Indicators
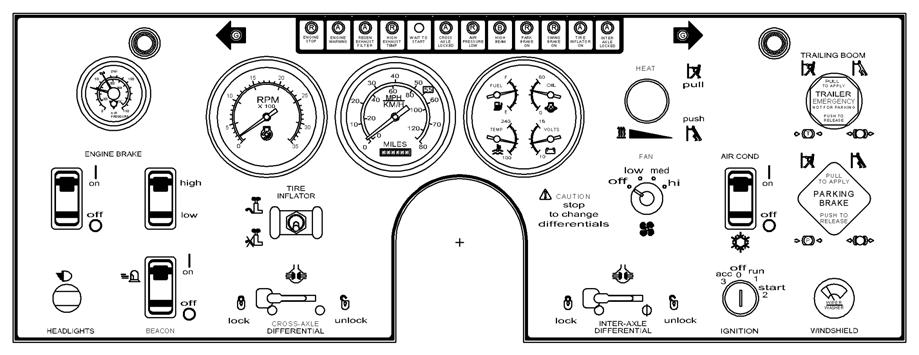
High Beam Indicator
The headlight HIGH BEAM indicator (28) is located at the top of the center front console. The indicator is a blue light that illuminates when the head lights are on high beam.
Heater Air Temperature Control
The heater air temperature (HEAT) control (29) is located on the right side of the front console. The control is a push-pull cable that opens and closes the valve in the hot water supply line to the heater. Pull to open the valve for heat.
Heater Fan Switch
The HEATER control switch (30) is located on the right side of the front console. This rotary switch controls the speed of the heater fan (LOW, MED, and HI) which in turn regulates the volume of heated air output. The middle position is OFF. The next two positions at 90° increments are LOW and medium (MED). The far right position is high (HI).
Air Conditioner Switch
The air conditioner (AIR COND) switch (31) is located on the right side of the front console. The rocker switch turns the air conditioner (ON) or (OFF).
Windshield Wiper/Washer Switch
The WINDSHIELD switch (32) is located on the right side of the front console. The switch has four positions; off, intermittent, low, and high range. Rotating the switch to the first detent energizes the wiper motor for intermittent operation, rotating the switch to the second detent energizes the wiper motor at low speed, and rotating it to the third detent energizes the motor at high speed. Rotating the switch counterclockwise to off stops the motor and returns the wiper blade to the parked position. Push the switch to energize windshield washer system.
Headlights Switch
The HEADLIGHTS switch (33) is located on the left side of the front console. The switch is a push-pull type switch with a rheostat control. Pull the switch to the first detent to illuminate the marker and gauge lights. Pull the switch to the second detent to illuminate the headlights. Rotating the switch knob controls the brightness of the gauge lights.
The low beam headlights function as daytime running lights. They are de-activated when the parking brake is engaged.
Beacon Light Switch (Optional)
The beacon light switch (BEACON) (34) is a two position, ON-OFF rocker switch located on the left side of the front console that controls the beacon light (40) on the top of the carrier cab. When the switch is in the ON position, the amber LED in the switch will be illuminated.
Headlights Dimmer Switch
The headlight dimmer switch (35) incorporated in the turn signal switch. Pull on the turn signal handle to switch between high and low beam.
Turn Signal Lever
The turn signal lever (35) is located on the steering column. Push the lever up for a right turn and pull down for a left turn.
Hazard Light Switch
The hazard light switch (36) is located on the steering column. Pushing forward on the switch (in the direction of the arrow) causes all the turn signals and the indicator light on the column to flash.