2 minute read
CHAPTER 9 SERVICE

from Gehl Mixer Feeders 7000 Series MF7210 MF7285 MF7335 MF7435 MF7500 Operators Manual 907060A - PDF

General Information Caution
BEFORE proceeding to perform all Service routines on this unit, exercise the MANDATORY SAFETY SHUTDOWN PROCEDURE (page 8).
NOTE: The following information is also referred to in the Troubleshooting chapter of this manual. It should be understood that all services, detailed in this chapter, are Owner-Operator responsibilities. Where indicated, certain service routines should only be carried-out by (or under the direction of) an authorized GEHL equipment dealer.
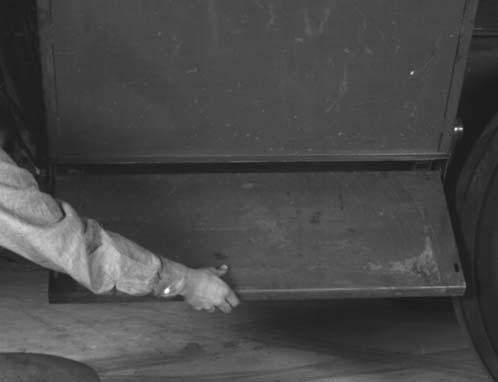
CLEANOUT DOOR (Fig. 23)
A Cleanout Door is provided on units with a Discharge Conveyor to enable removal of debris in the area of the lower Apron Sprockets. This area should be inspected on a routine basis after every 50 hours of operation.
RELUBEABLE BALL BEARING REPLACEMENT (Fig. 24)
Relubeable Ball Bearings are used on various Shafts, around the unit. This type of Bearing is generally retained, in place, with a Self-locking Eccentric Collar. The Lock Collar has a counterbored recess, which is eccentric with the Collar bore. This eccentric recess engages or mates with an eccentric end of the Bearing inner ring, when the Bearing is assembled on the Shaft. The Bearing is engaged, on the inner ring cam, by the Collar. This assembly grips the Shaft tightly with a positive binding action that increases with use. The Collar Set Screw provides supplementary locking.
The Bearing can be removed from the Shaft by loosening the Set Screw and tapping on a punch which is placed in the drift pin hole, to loosen the Collar. Install Bearings with self-locking Collars in the following manner:
1.Place the Bearing and Collar on the Shaft with the cam surfaces next to each other. Tighten the bolts on the Bearing Retainers.
2.Mate the cam of the Lock Collar with the cam of the Bearing inner ring.
3.Press the Locking Collar against the Bearing wide inner ring and turn it, in the direction of Shaft rotation, until it tightly engages. Tighten the Collar further, by tapping on a punch inserted in the drift pin hole.
NOTE: Avoid damaging the Collar by overtightening it.
TIRES & WHEELS
Check the Mixer Feeder Tire pressure after every 50 hours of operation. Tires should be inflated to the appropriate pressure listed in the Table. Wheel Lug torque should be checked after every 50 hours of operation and tightened with 90 ft-lb (120 Nm) torque for 8-Bolt Wheels or 220 ft-lb (300 Nm) torque for the 10-Bolt Wheels.
Table of Tire Pressures
Warning
The GEHL Company does NOT sell replacement Tires. In addition, Tire mounting, repair and replacements should ONLY be attempted by a qualified tire manufacturer’s representative or by properly trained personnel following the tire manufacturer’s instruction. If you do NOT have such instructions, contact your tire dealer or the GEHL Company. In addition, inflating or servicing tires can be dangerous. Whenever possible, trained personnel should be called to service and/or mount tires. In addition, do NOT place fingers on tire bead during inflation; serious injury or amputation could result! In any event, to avoid possible fatal or serious injury, follow the safety precautions below:
• BE SURE the Rim is clean and free of rust. Lubricate both the tire beads and rim flanges with a soap solution. Do NOT use oil or grease. Do NOT weld, braze, or otherwise attempt to repair and use a damaged rim.
• Use a clip-on tire chuck with a remote hose and gauge which allows you to stand clear of the tire while inflating it.
• NEVER inflate beyond 35 PSI (240 kPa) to seat the beads. If beads have NOT seated by the time the pressure reaches 35 PSI, deflate the assembly, reposition the tire on the rim, relubricate both parts and re-inflate it. Inflation pressure beyond 35 PSI with unseated beads may break the bead or rim with explosive force sufficient to cause fatal or serious injury.
• After seating the beads, adjust the inflation pressure to the recommended operating pressure listed.