1 minute read
DEALER CHECK LISTS

from Frontier Root Grapple Loader Attachments AV20 Owner’s Operator's Manual(5WS105006) - PDF DOWNLOAD L

PRE-DELIVERY CHECK LIST
(Dealer’s responsibility)
Inspect the equipment thoroughly after assembly to be certain it is set up properly before delivering it to the customer.The following check list is a reminder of points to inspect.Check off each item if it is found satisfactory or after proper adjustment is made.
____Check that all safety decals are installed and in good condition.Replace if damaged.
____Check all bolts to be sure they are tight.
____Check that all cotter pins and safety pins are properly installed.
____Order optional parking stand kit if customer desires.Order #5WS811395.
Delivery Check List
(Dealer’s Responsibility)
____Show customer the safe, proper procedures to be used when mounting, dismounting, and storing equipment.
____Show customer how to make adjustments.
Present Owner’s/Operator’s Manual and request that customer and all operators read it before operating equipment.Point out the manual safety rules, explain their meanings and emphasize the increased safety hazards that exist when safety rules are not followed.
____Point out the safety decals.Explain their meaning and the need to keep them in place and in good condition.Emphasize the increased safety hazards when instructions are not followed.
____Explain to customer the potential crushing hazards of going underneath raised equipment.Instruct customer that service work does not require going underneath unit and never to do so.
____Complete the Warranty Registration located on the Frontier website.
Installation
ATTACHING AND DETACHING EQUIPMENT (200/300/400/500 SERIES LOADERS)
NOTE:Procedure is the same for all attachments.Bucket attachment shown.
ATTACHING (Root Grapple without optional parking stands)
1.Extend bucket tilt cylinders to angle attaching brackets forward.
NOTE:Angle must be greater than that of the brackets on the rear of the root grapple.
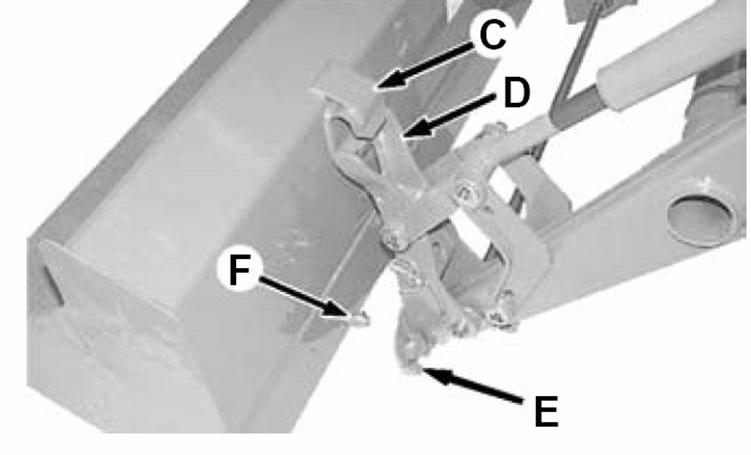
2.Drive forward, adjusting loader height and position until the top of the loader bracket engages the hooks (C) on the root grapple.

3.Slowly retract the bucket tilt cylinders and raise the loader so the lower lock pins (F) engage the hole in the holder strap (E).
4.Continue to retract the tilt cylinders and raise the loader until the main frame of the root grapple is vertical.
5.Engage tractor parking brake and/or place transmission in PARK.Shut off tractor engine and remove key.
6.Install the quick-lock-pin (A) into the pins (F) on each side of the root grapple.
7.Connect the hydraulic hoses to the auxiliary hydraulic hook up on your loader or to the rear tractor remote outlets.
8.Start the tractor and lower the grapple clamp arms.Installation is now complete.
ATTACHING (Root Grapple equipped with optional parking stands)
Follow the same procedure as above.
ROOT GRAPPLE SHOWN IN STORAGE POSITION (WITHOUT OPTIONAL PARKING STANDS)
NOTE:Main frame will be vertical with parking stands.Raise parking stands and pin before using root grapple.
NOTE:On attachments with two pins (F),the 200,300 and 400 series loaders will utilize the upper pin and the 500 series loader will utilize the lower pin.