6 minute read
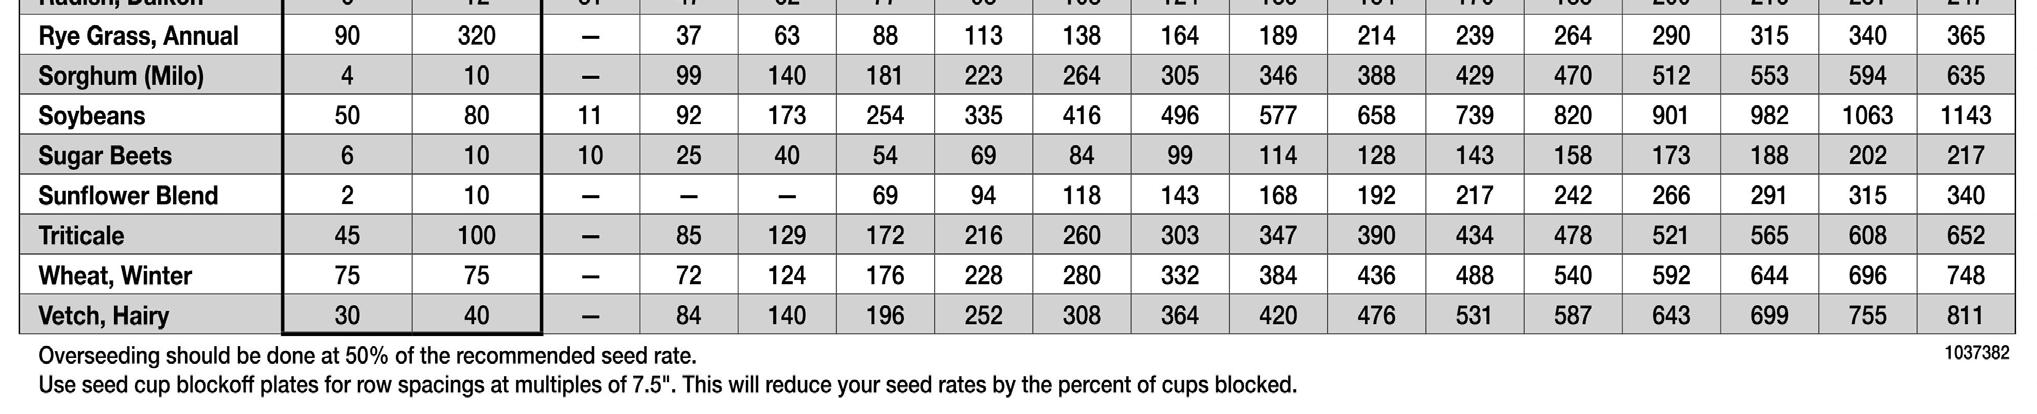
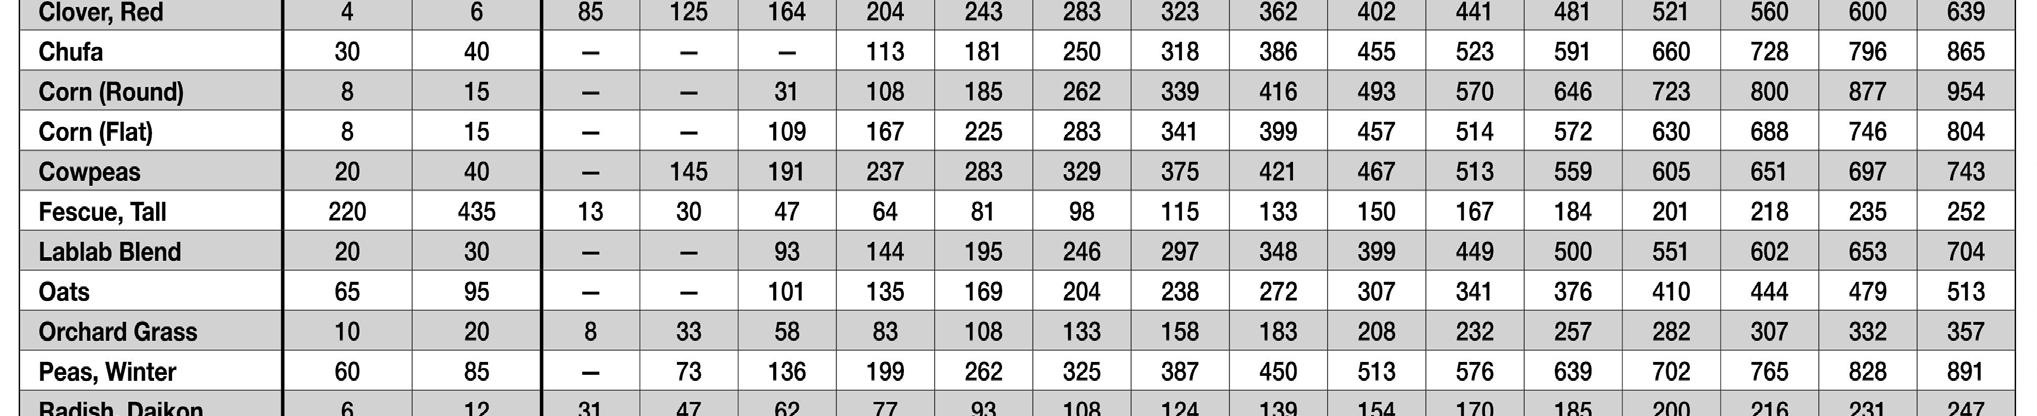
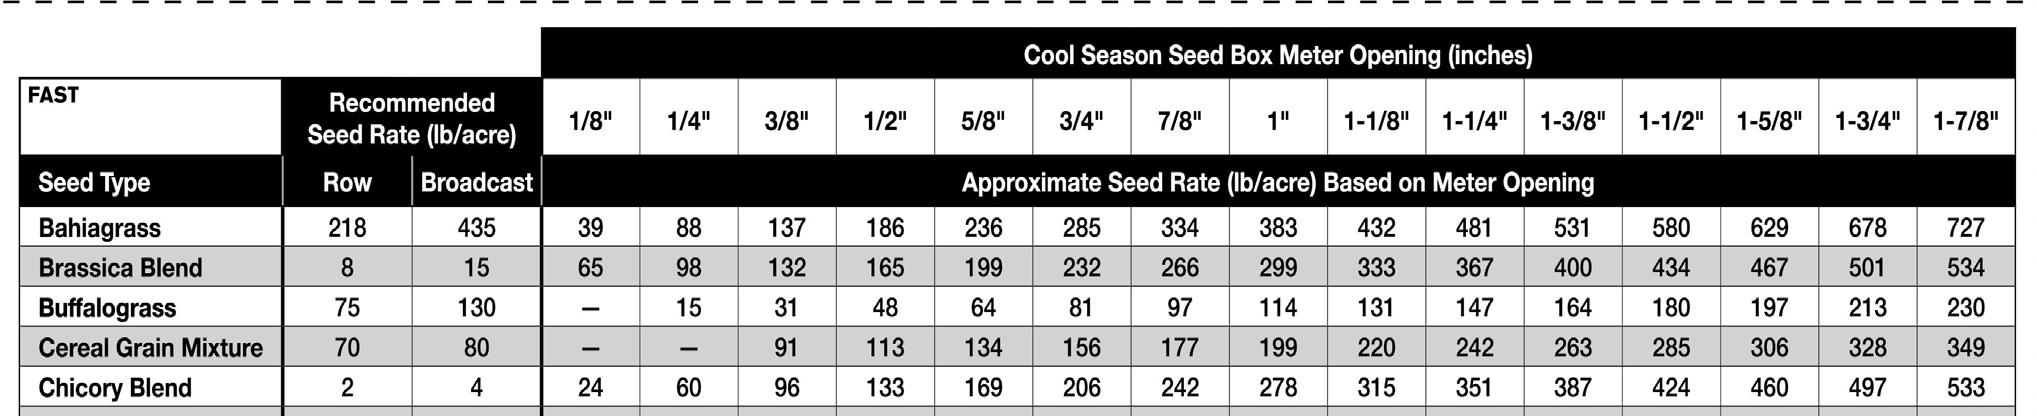
SAMPLE SEED RATE CHARTS


NOTICE: For chain drives other than the standard drive, refer to the conversion charts for the multiplier to convert the application rate to the correct value.
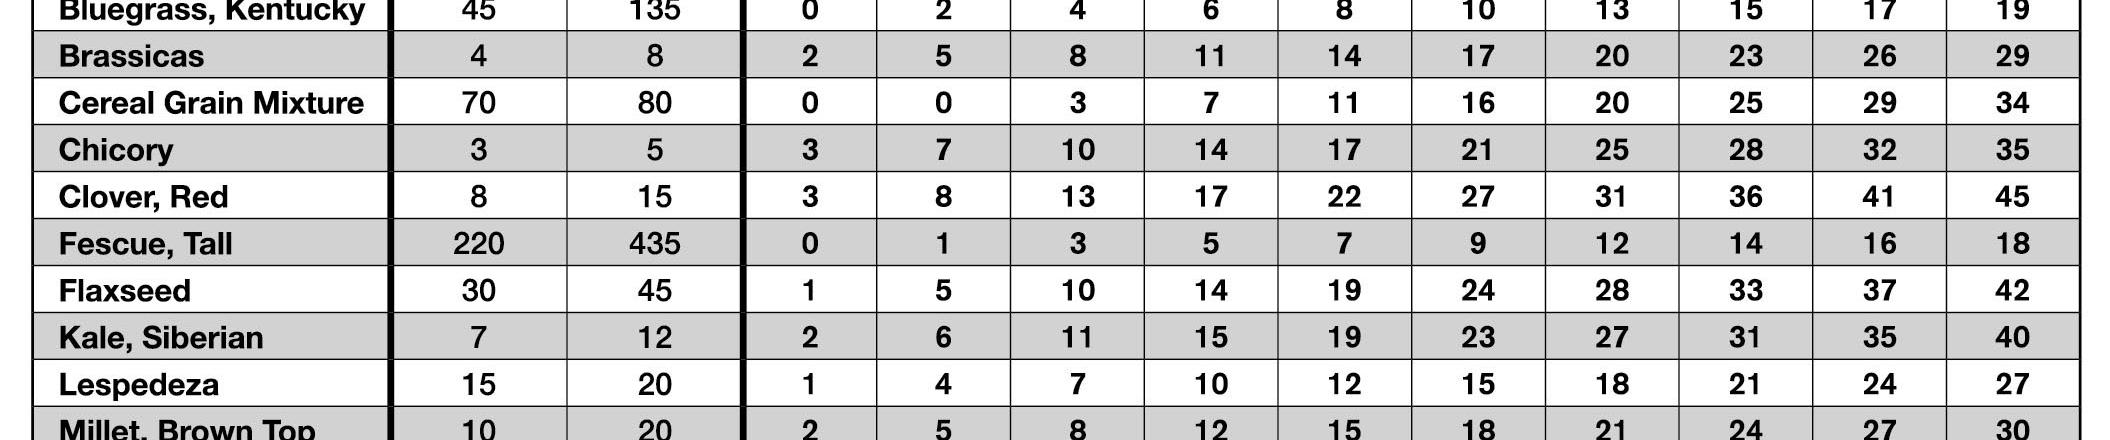
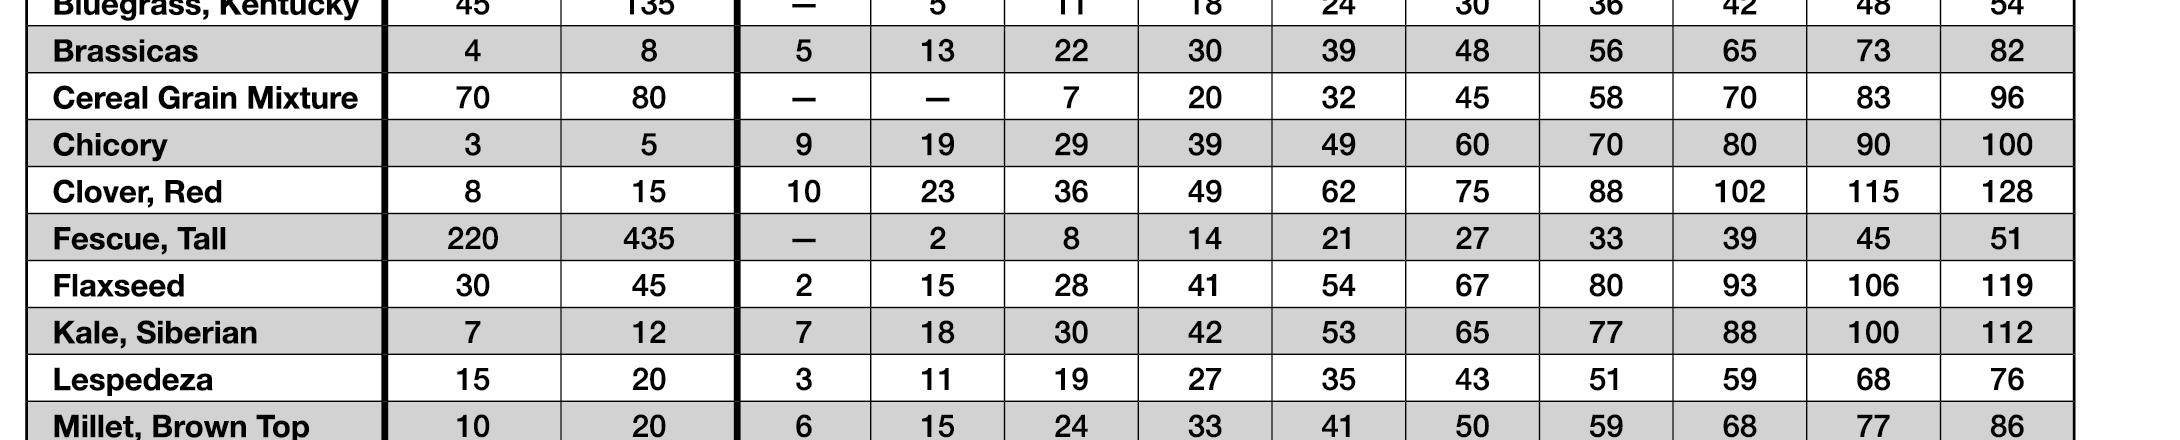
Cool Season Seed Rate Chart - Fast Chain Drive
Cool Season Seed Rate Chart - Slow Drive
5WPMAN1285 (5/07/2019)
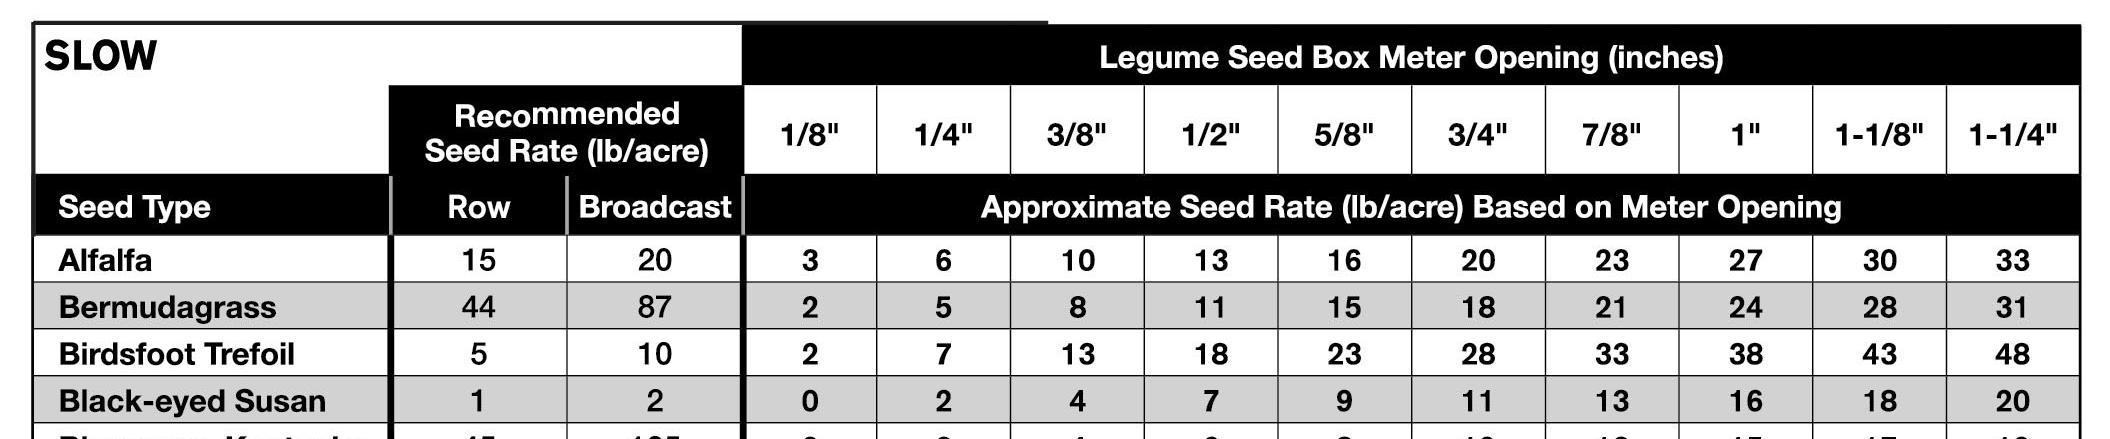
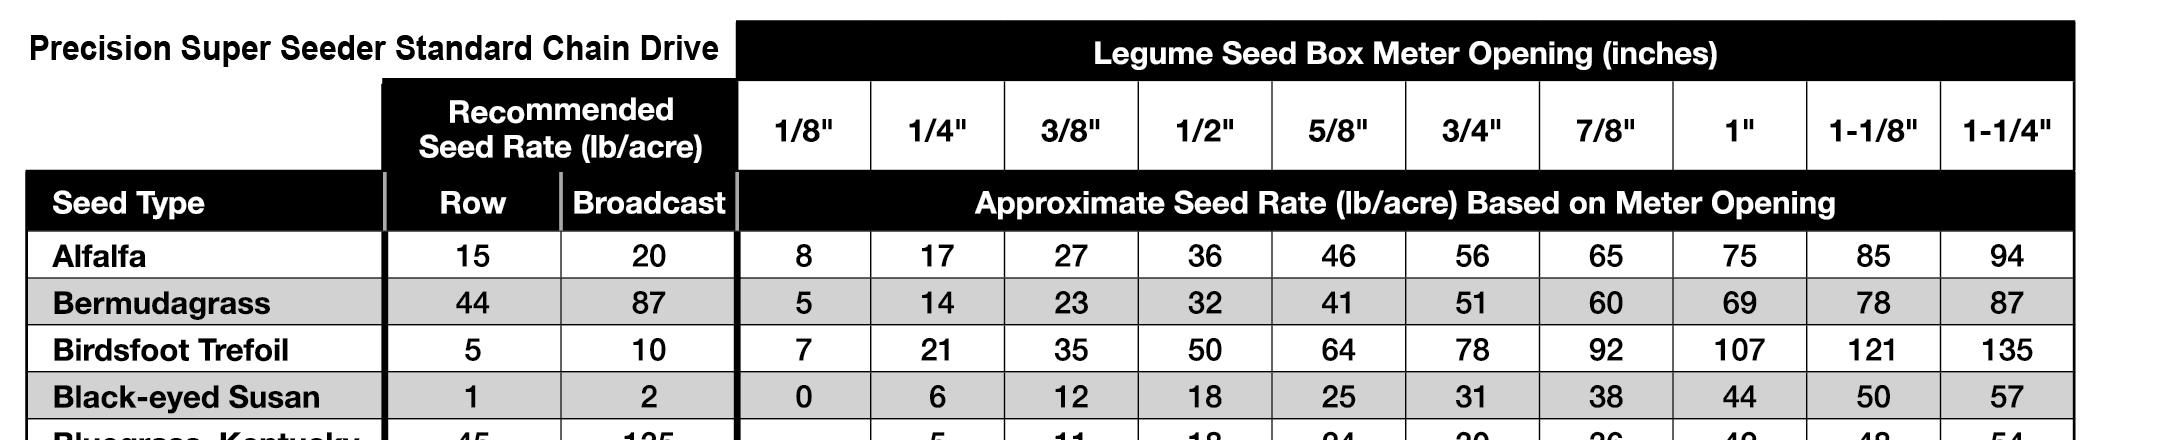
Legume Seed Rate Chart - Fast Chain Drive
Legume Seed Rate Chart - Slow Chain Drive
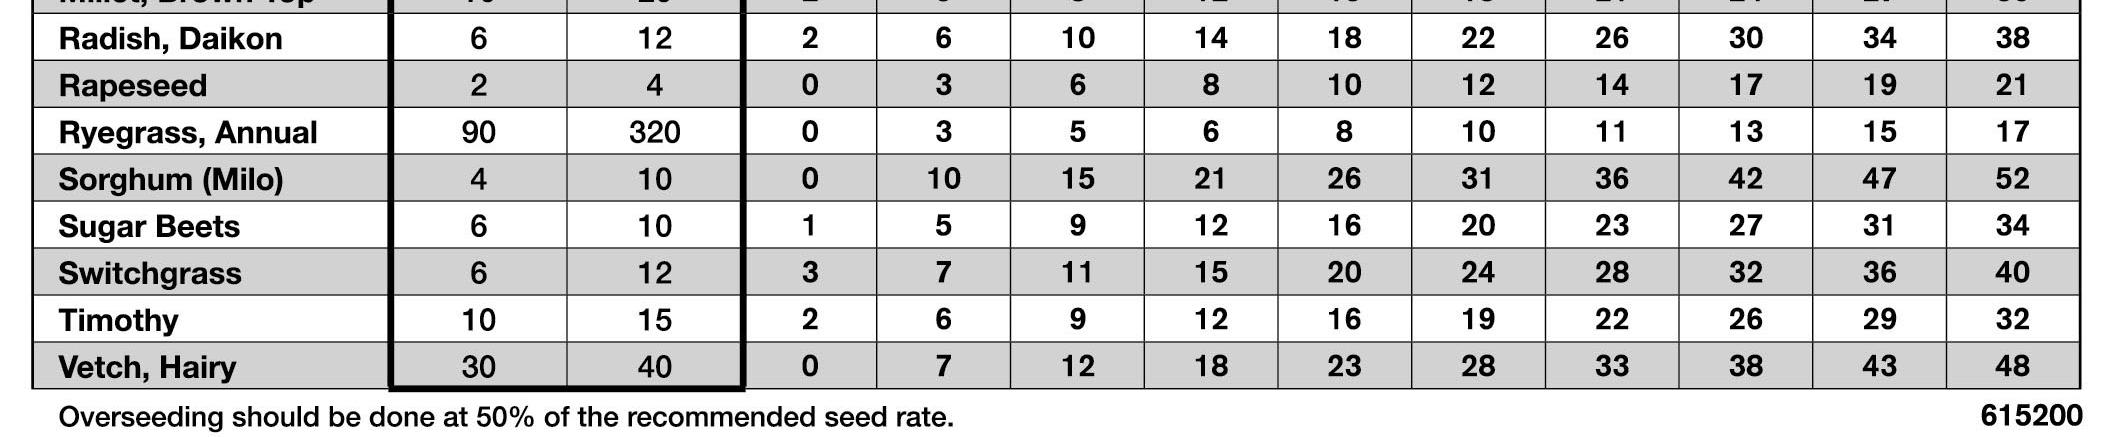
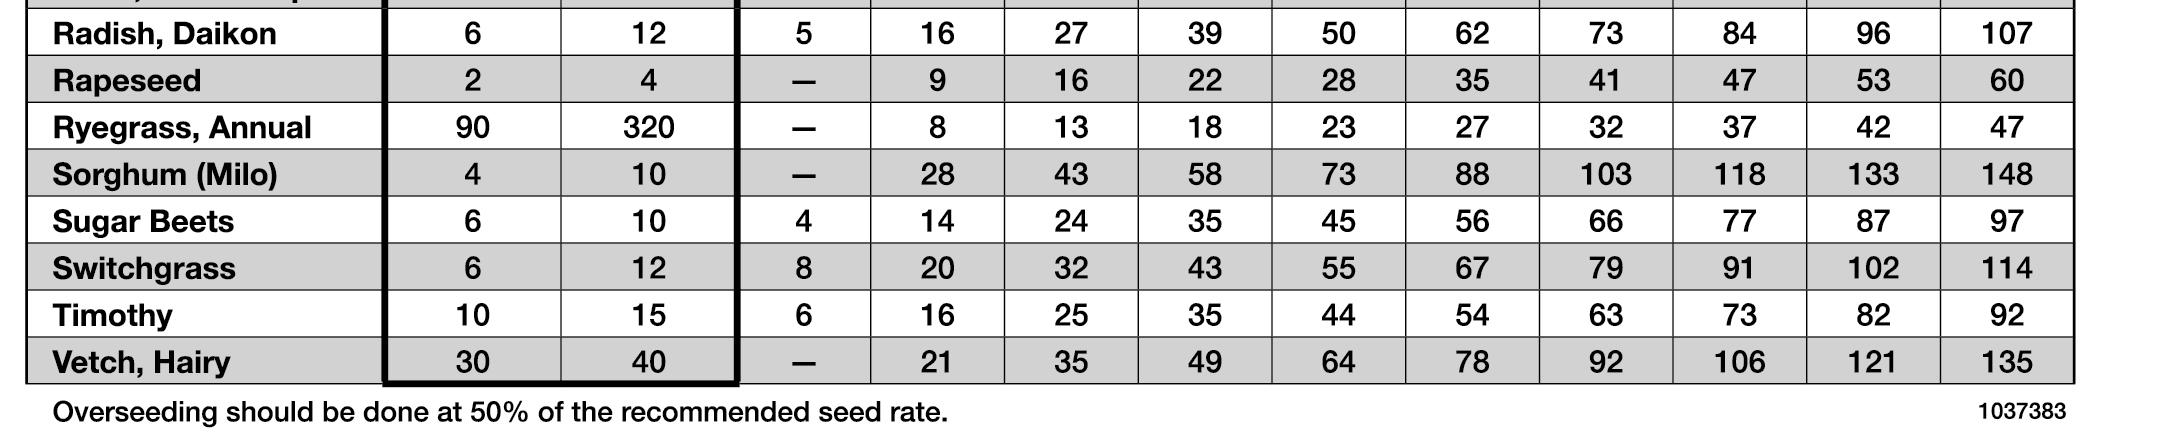
NOTICE: These charts should only be used as guides. For more accurate rates, refer to the calibration section on page25.
Filling the Seed Box
1. Calibrate seeder and set seed cup rate adjustment and concaves to the correct position. Start with the seed cup at a fully closed position and open the seed cup to the desired fluted roller opening.
NOTICE: The seed cup can be opened further with seed, but closing the seed cup or concave when full of seed could result in seed cup damage. If the seed cup must be restricted with seed in the seed box, place a piece of cardboard over the seed cup opening and remove seed in the seed cup by opening the concave or rotating the seed shaft and then closing the seed cup.
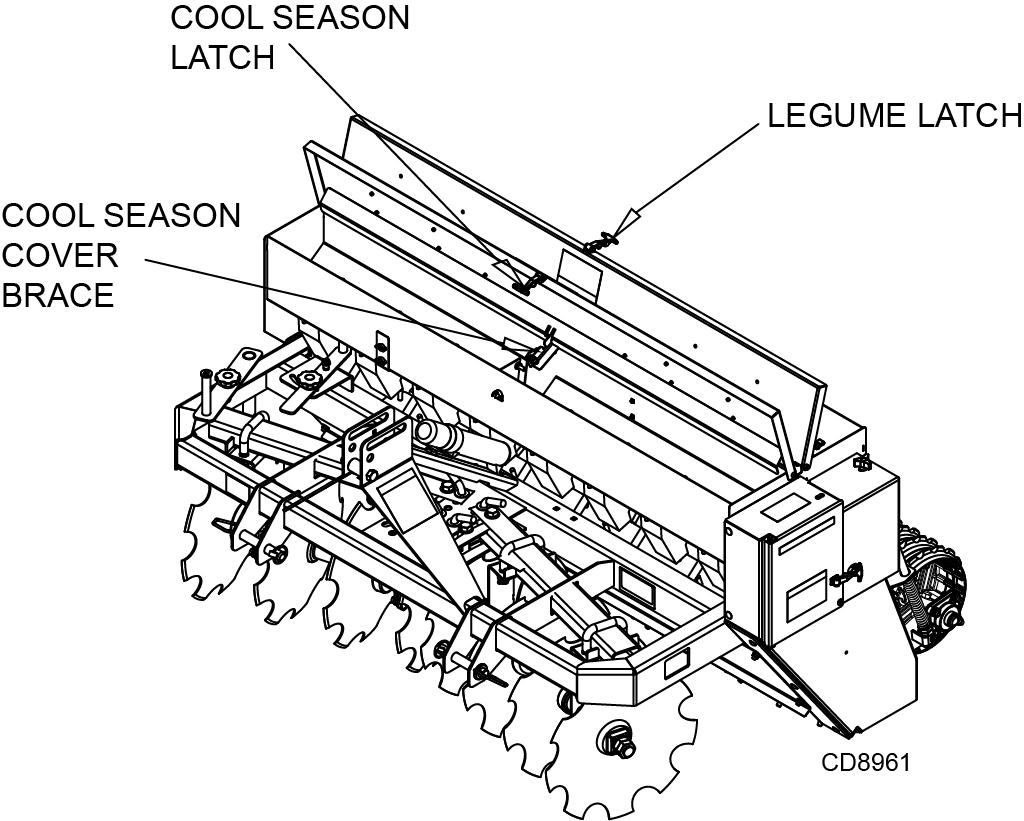
2. Open the seed box cover and rotate the brace to hold the cover up while filling the seed box. Place brace point in the covers spill guard notch. See Figure 16.

3. Place seed in the seed box.
4. Lift brace and rotate to storage position. Close seed cover and engage cover latch.

Seed Rate Adjustment
Tractor speed and seed flow settings are critical for proper seed population. Use the calibration tray to adjust the seed cups for the desired seeding rate. Tractor speed (normally 2-5 mph) should be established so that uniform seed incorporation occurs with the action of the rollers.
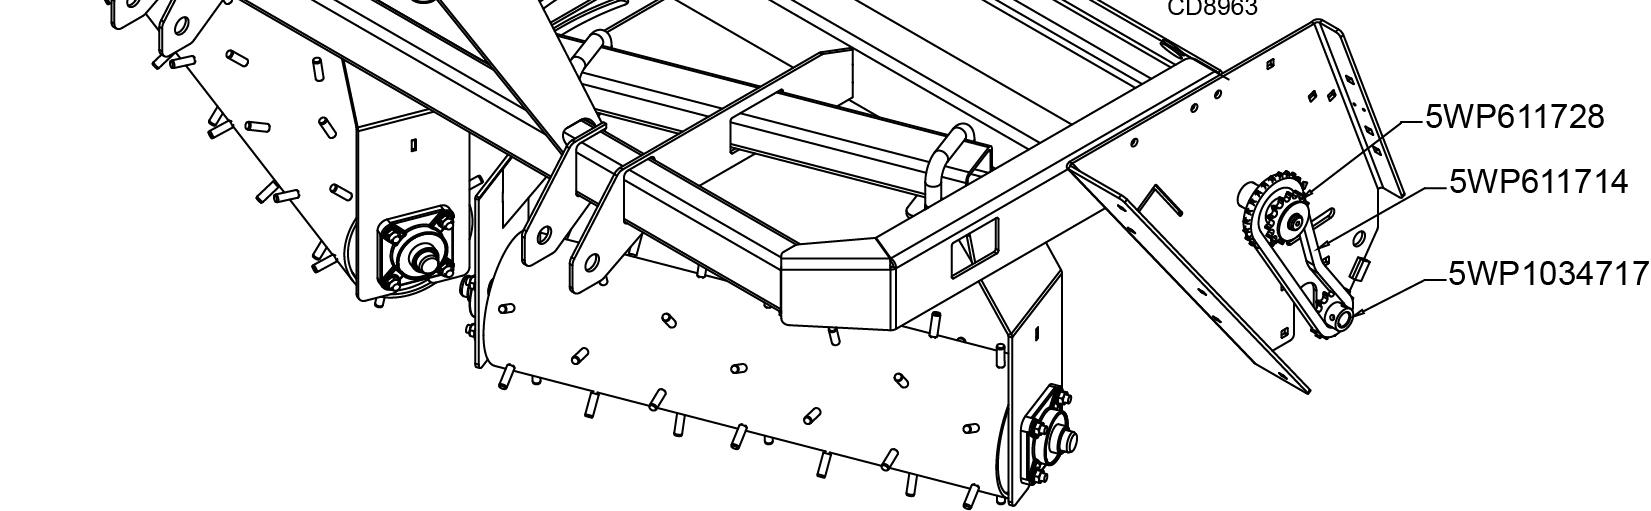
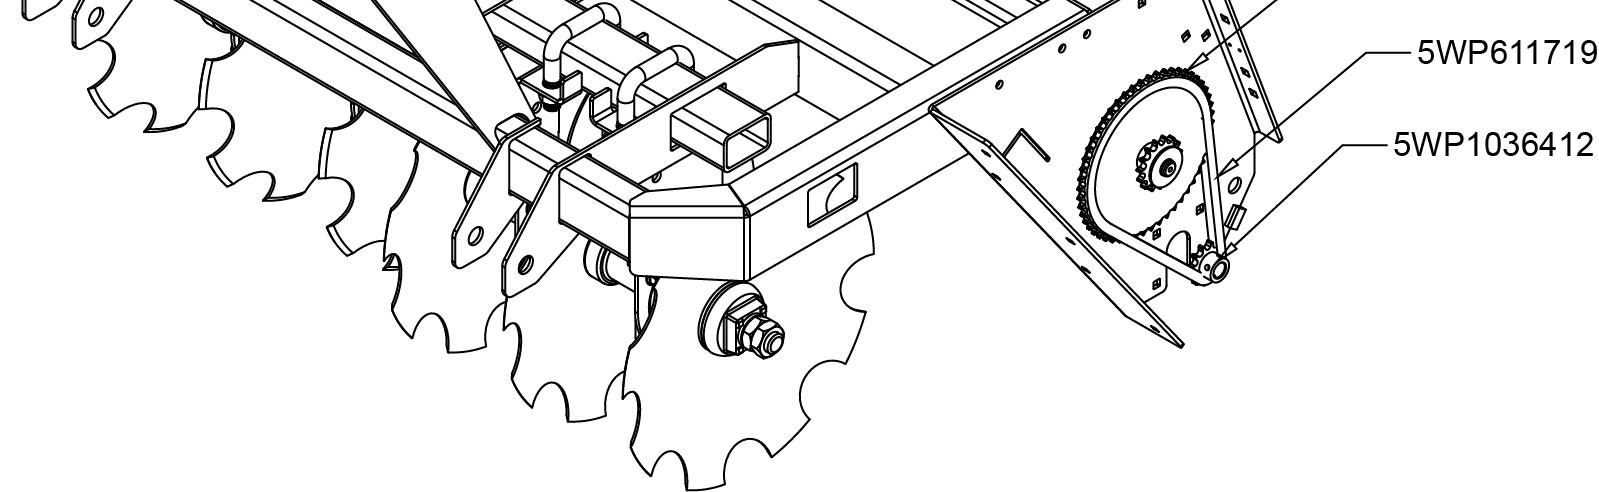
The slow chain drive, Figure 24 and Figure 25, comes with the disc gang accessory. The fast chain drive, Figure 23 and Figure 26, comes with the spiked roller accessory. If the other chain drive is desired for use with the front tool, they can be purchased separately.
Seed Rate
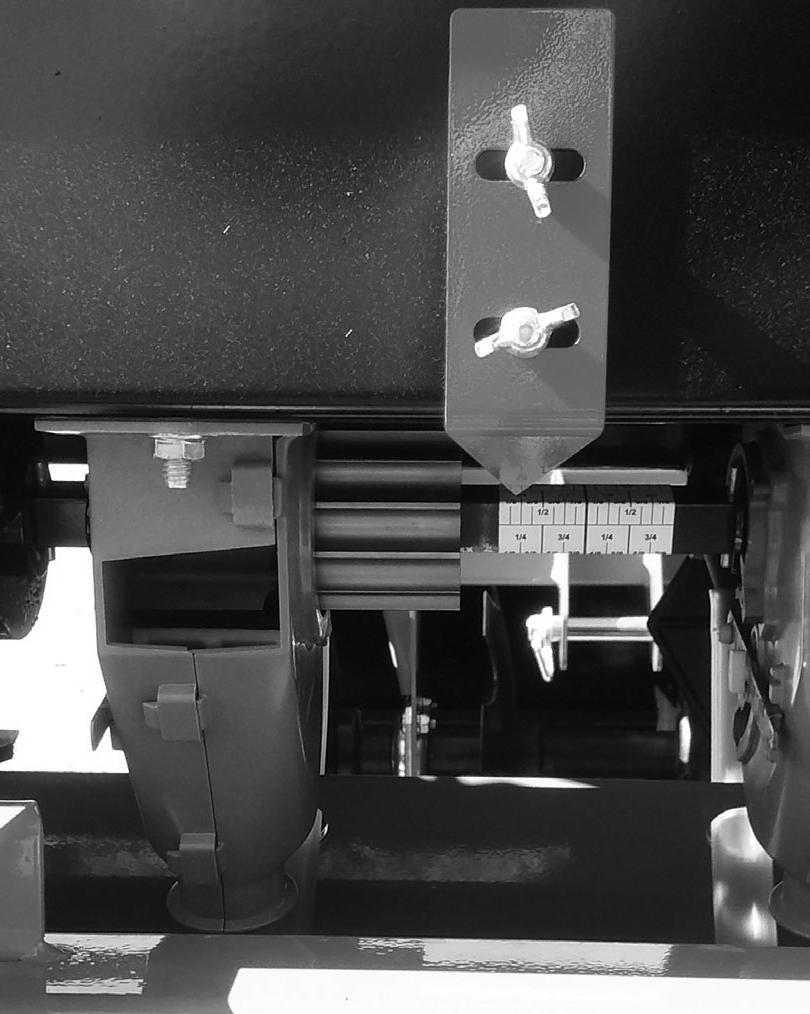
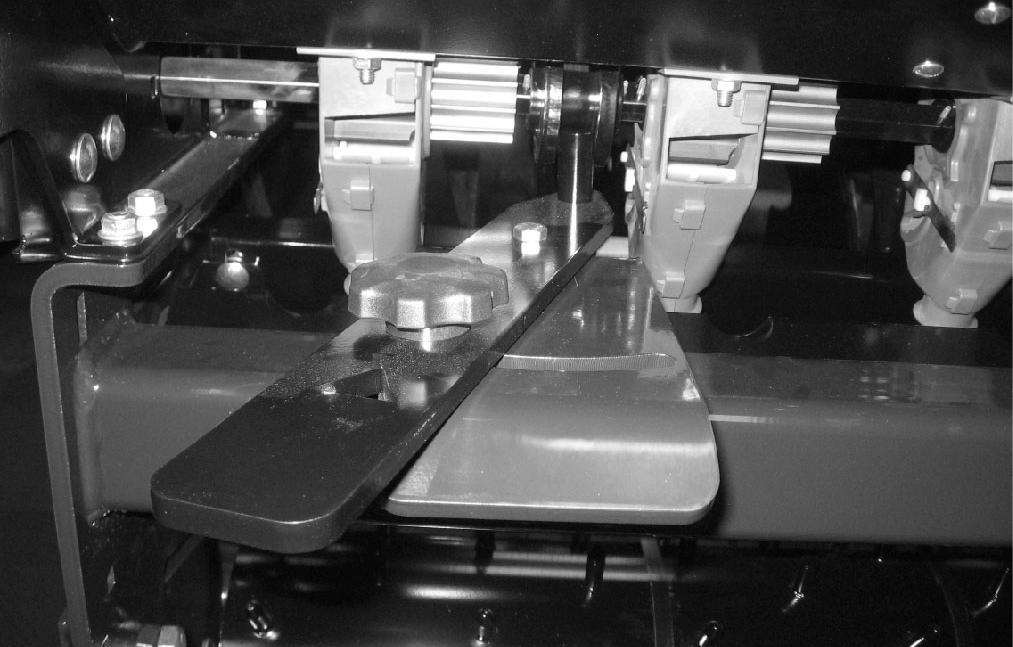
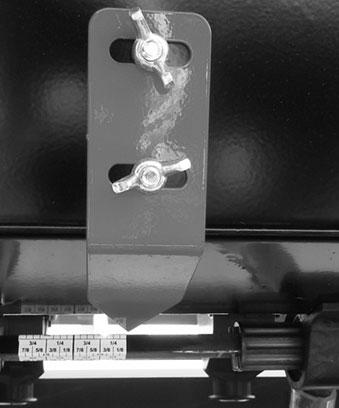
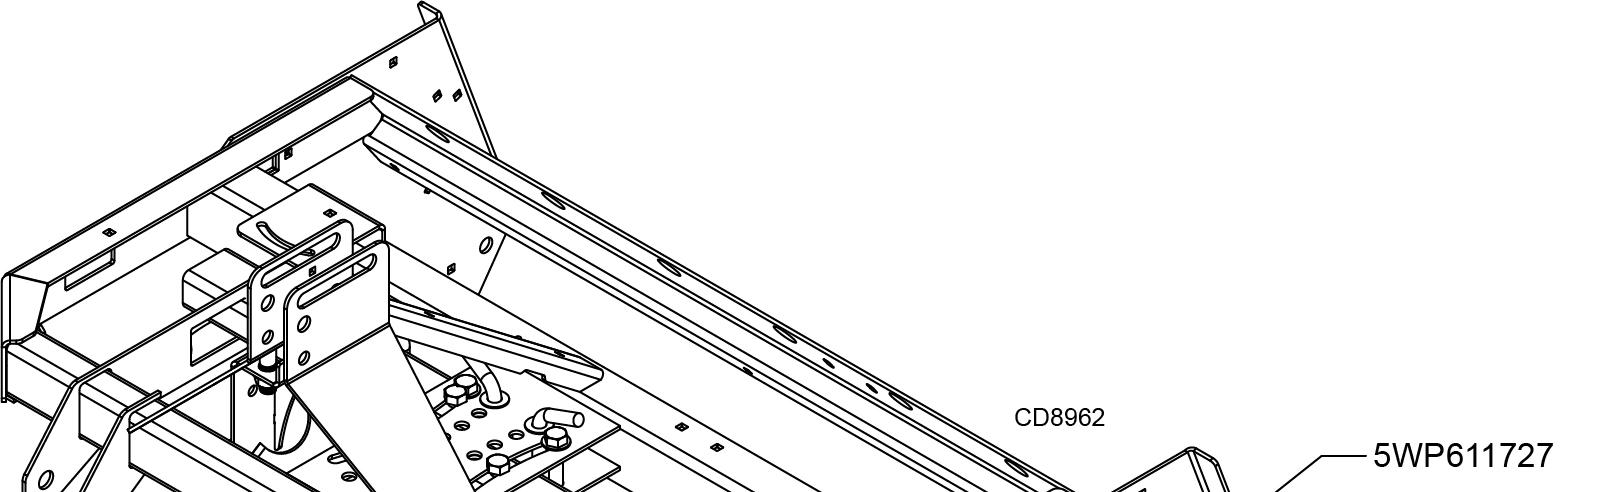
Adjust the flow control lever (Figure 17 and Figure 20) as needed for the seed being used and the population desired. To adjust, loosen the plastic knob, move to desired position and re-tighten the knob. Refer to the seed charts on page17 and18, or calibration section on page25 for settings.
Before seeding an area, adjust the top link so that it is in the middle of the slot with the seeder on level ground.
NOTICE: It is normal for the disc version to pitch forward at maximum front tool angle.
Seed Cup Concave Adjustment
Cool Season Seed Cup Concave Lever Adjustment
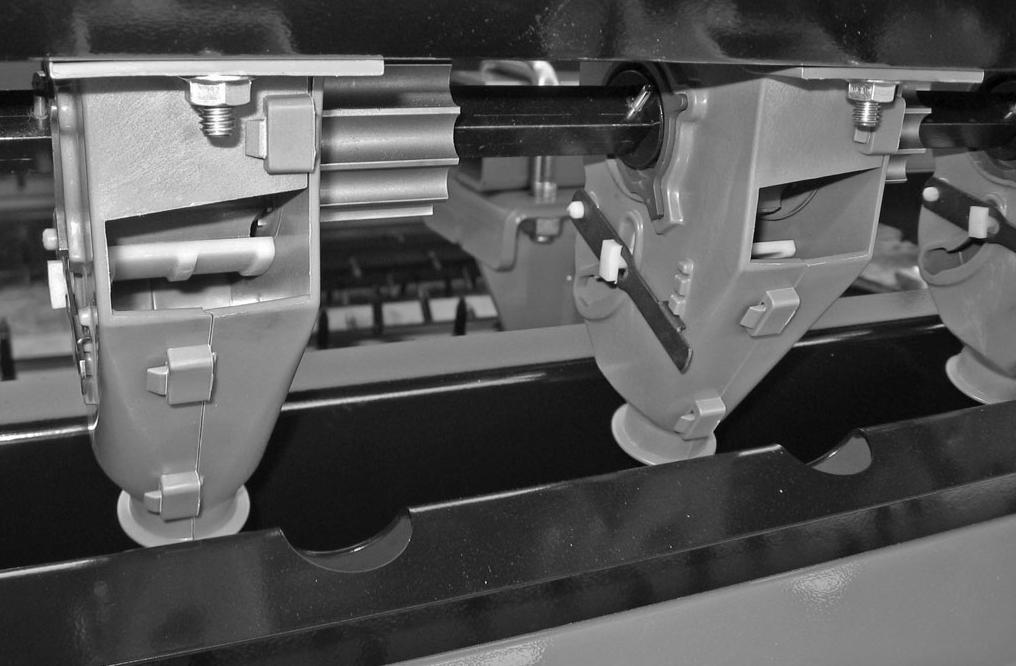
The Cool Season seed cup comes equipped with an adjustable concave to handle a wide variety of seed sizes. For small seeds, including grass seeds, the concave should be at the highest position. This position will prevent the loss of seed flowing through the seed cup. For larger seeds, including soybeans, the concave should be moved to a lower position. For minimum seed rates, the concave should only be opened to the size of the seed. This will prevent cracking of large seeds by the seed cup. Opening further will increase seed rates. See Figure 19.
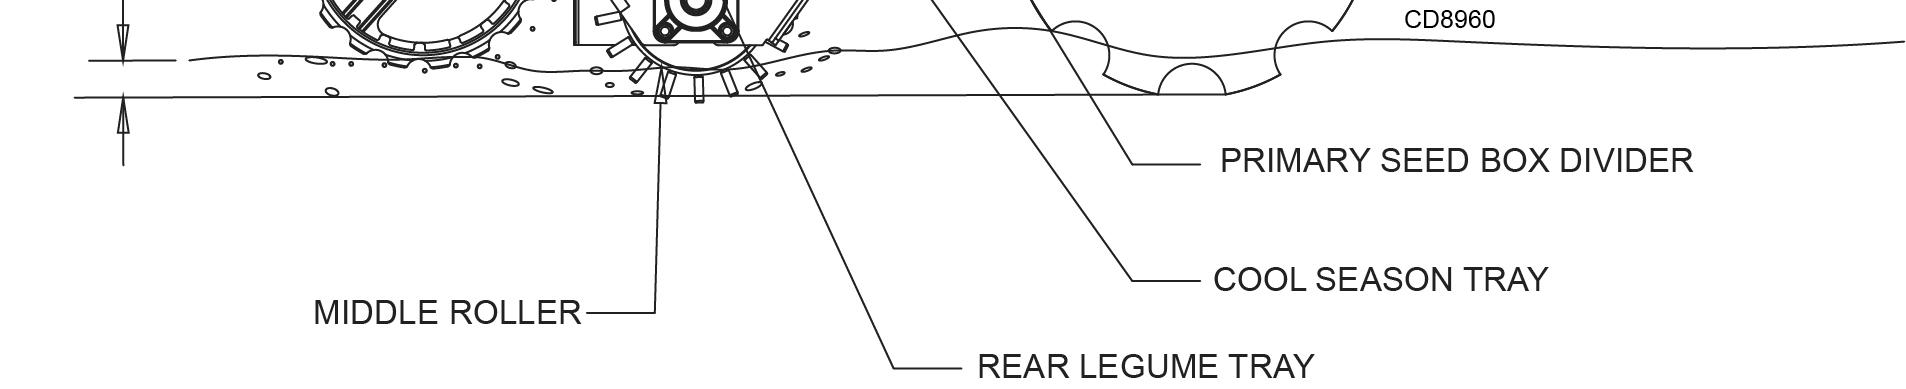
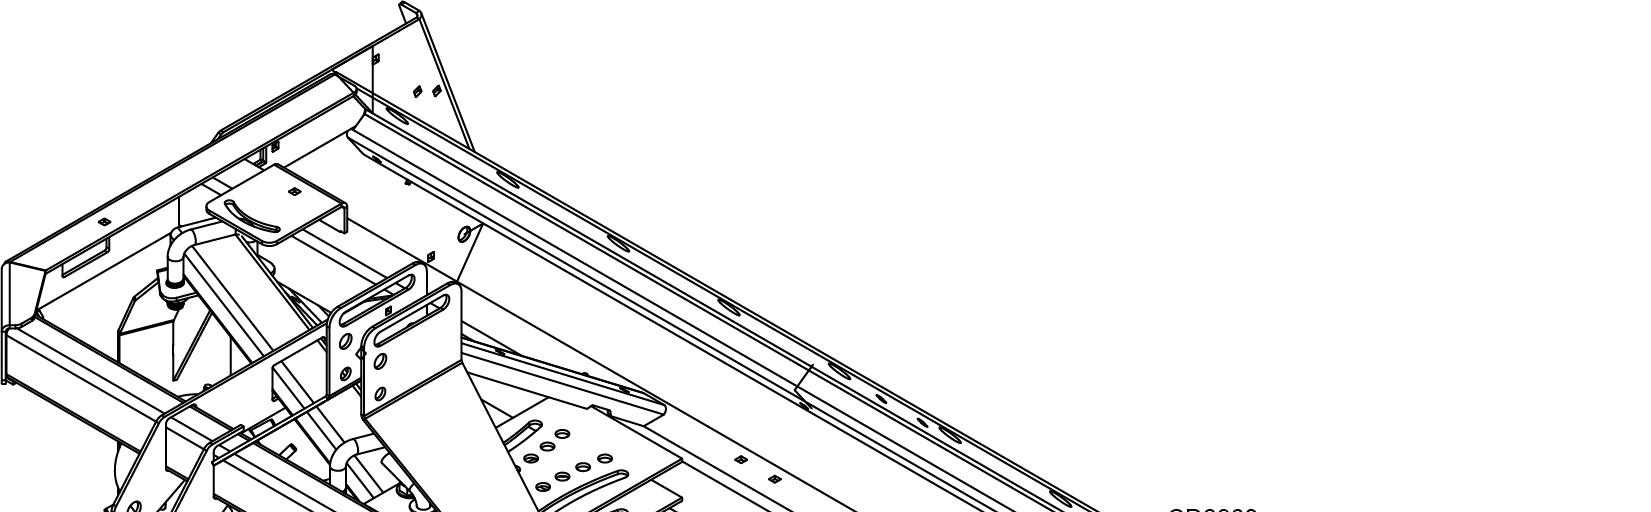
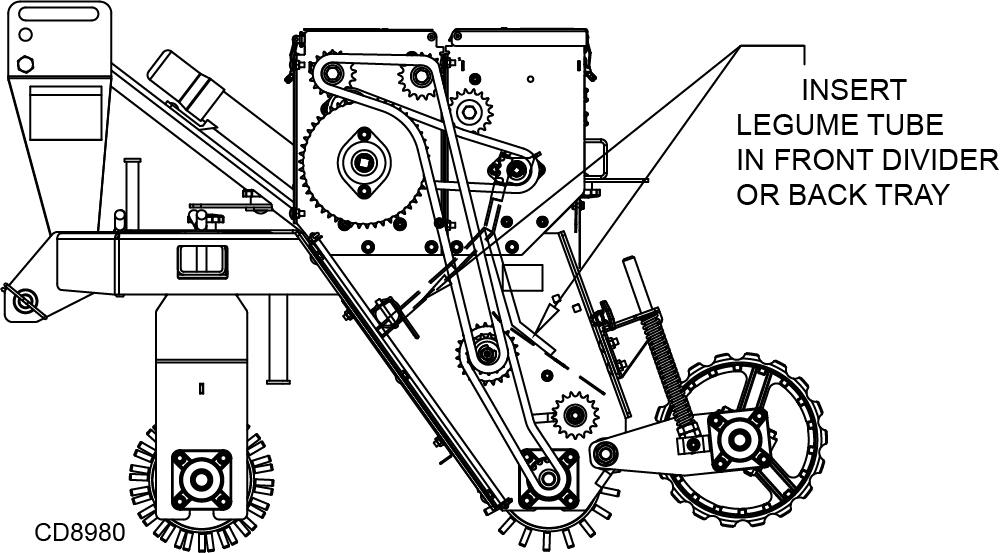
The Legume seed box is equipped with PVC tubes to place the legume seed in the transition tray for the Cool Season seed box, ahead of the middle roller. The PVC tubes can be repositioned in the legume transition tray for seed to be dropped ahead of the cultipacker.
Important
■ Before closing down the cup (reducing rates), the operator should make certain that the cups are not full of seed. If cups are full of seed (especially small, round, hard seed), it may be necessary to cover the meter holes and run seeder a short distance to reduce level of seeds in meter. Failure to do so could result in damage to seed cup.
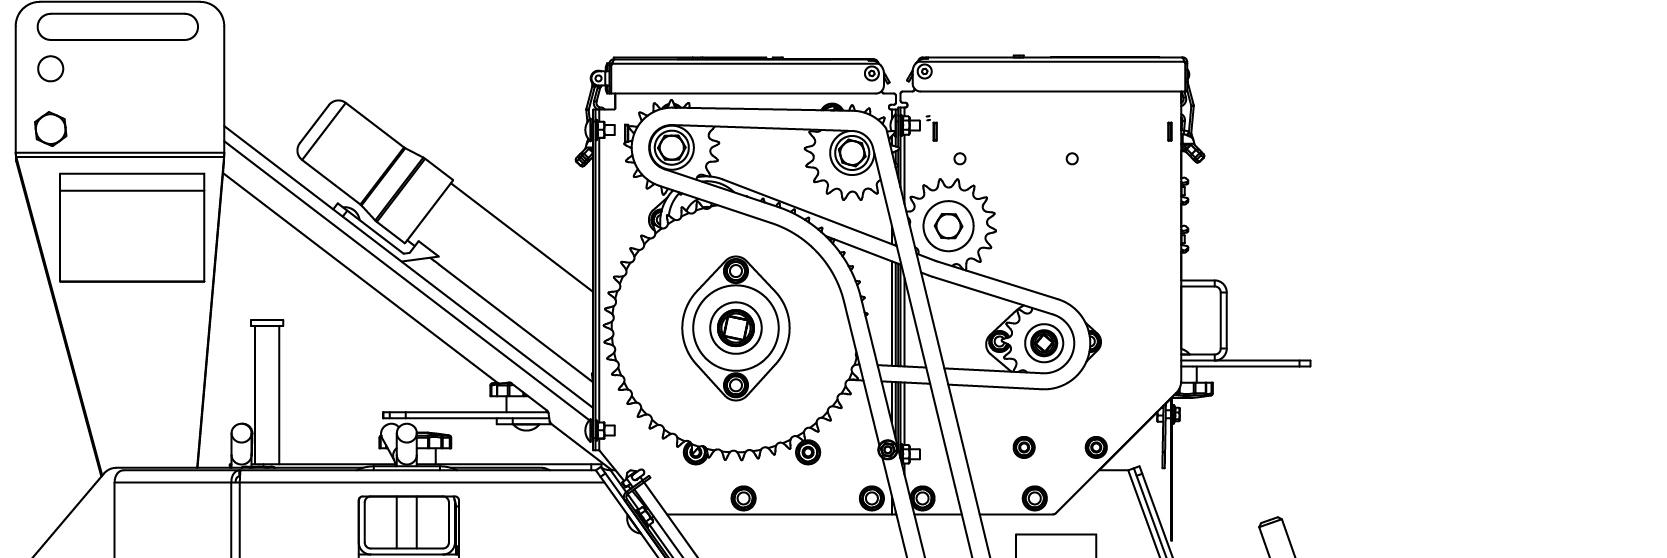
■ Do not allow dirt to build up on the roller sprockets. Clean sprockets and chain as needed. Excessive buildup of material can cause damage to the roller and idler shafts.
■ Always run the drive chain with some slack in the chain. An extremely tight chain can damage the roller shaft, the roller bearings, and the idler shaft and bearing.

Cultipacker
The optional cultipacker can be used to firm the seed bed for small seeds and increase seed to soil contact. The cultipacker is equipped to operate through an inclusive angle of 50 degrees. The springs provide the down pressure needed for an optimized seedbed. When raising the seeder, th e cultipacker will swing until it reaches its lower stop. When raising the seeder use a slow and steady motion to reduce the impact loading of the cultipacker on the frame stop.
Calibration Tray
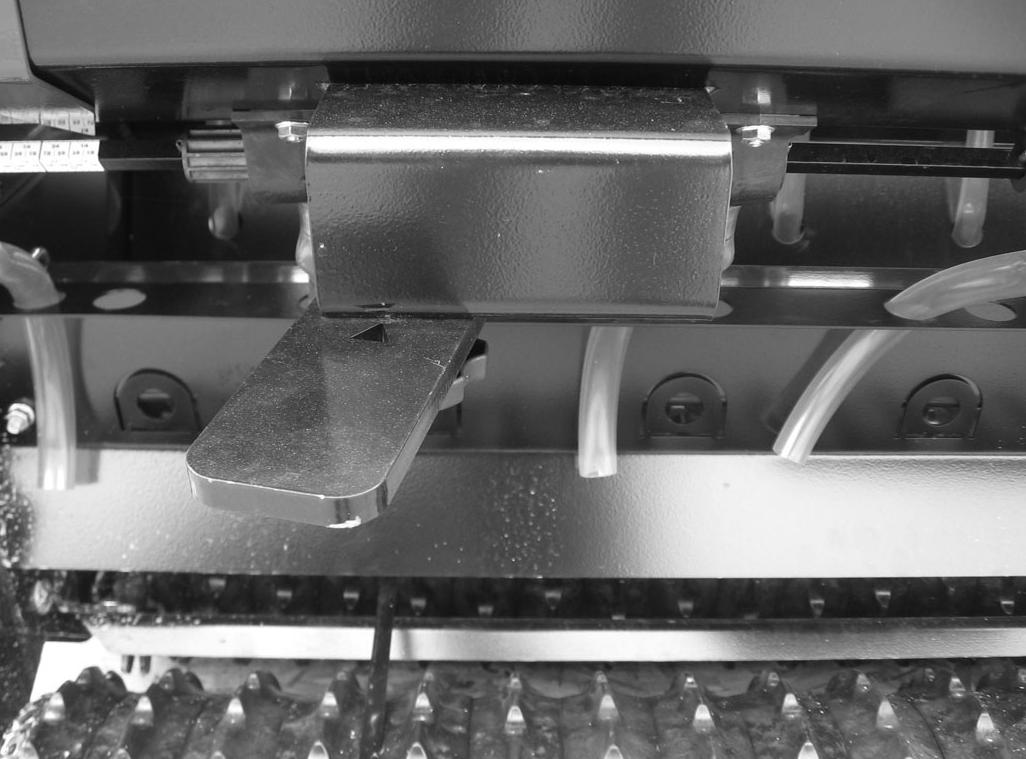
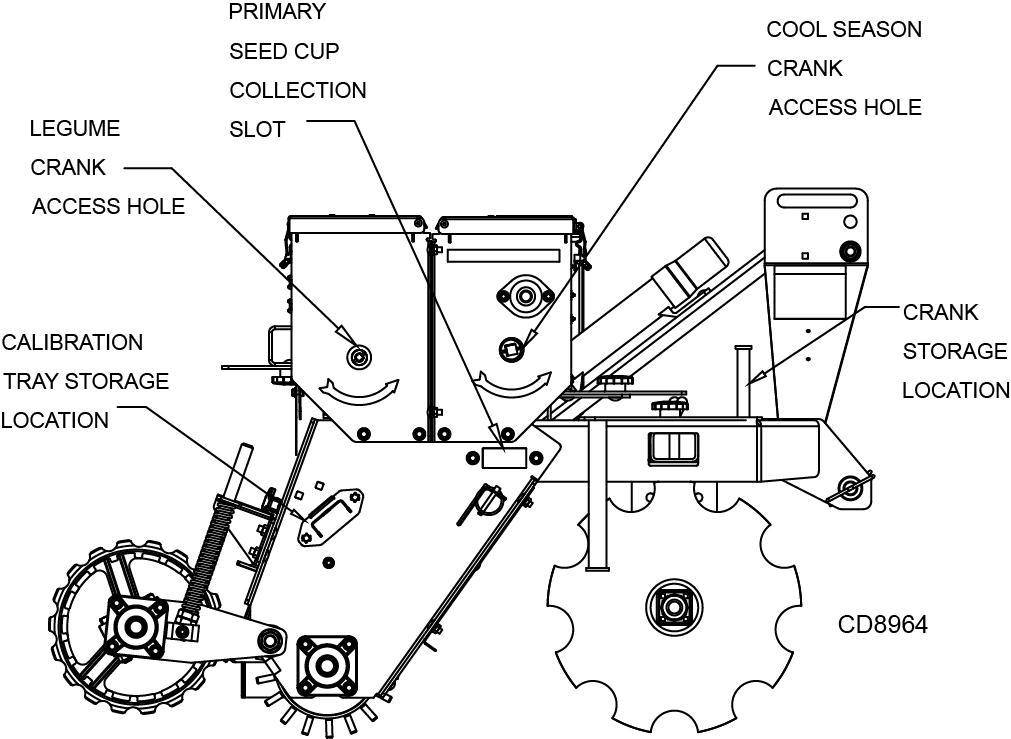
The Ground Seeder comes equipped with a calibration tray to assist in adjusting the seed cups for the desired seeding rate. The calibration tray can be used with the seeder in the stationary position or as it is pulled over a short distance of the seedbed. See Figure 27.
Stationary Calibration Procedure - Legume and Cool Season Seed Boxes
Equipment
1. One or two pounds of sample seed.
2. Calibration tray.
3. One scale capable of measuring ounces or hundreths of a pound.
Procedure
1. Position tractor and seeder on a level surface.
2. Adjust seed meter to closed position if applicable.
3. Stop engine and set parking brake.
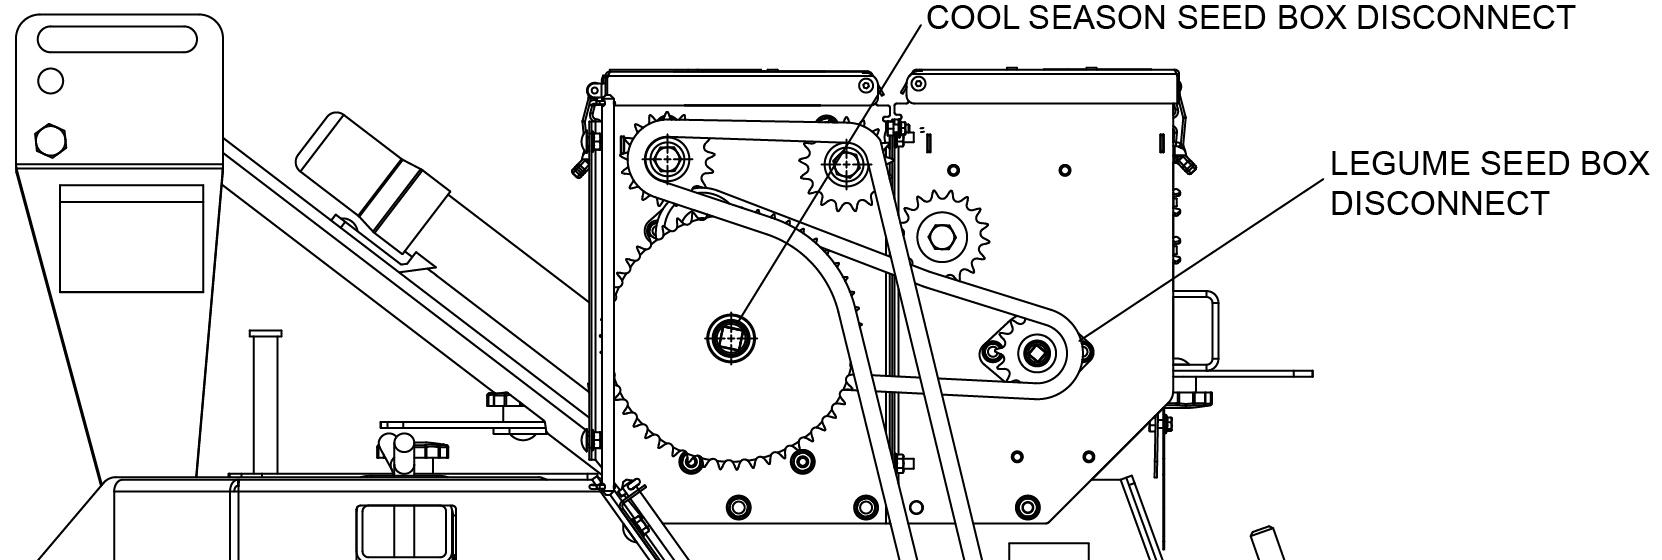
4. Disconnect seed box from seeder chain drive by removing pin from seed box driven sprocket (Cool Season or Legume).
5. Place seed over two seed meters closest to right end of seeder.
6. Remove calibration tray (34 cu. in. capacity) from storage location. Install tray in Cool Season collection slot and tighten against frame with two plastic nuts. For Legume seed box place PVC tubes inside small canister for seed collection.
7. Open seed cups to desired position (refer to chart for estimate) and lock into place. (Cool Season & Legume Only)
8. Use crank or a 12-pt socket and turn Cool Season seed cup shaft or Legume seed cup shaft counterclockwise. See stationary calibration chart for number of shaft turns. (12-pt –3/4" or 19 mm socket fits over Cool Season seed cup shaft. 12-pt 12 mm socket fits over Legume seed cup shaft)
9. Carefully remove calibration tray or canister to retrieve collected seed. Weigh seed and use formula to determine seed rate. See page25. Remember to remove the weight of the container.
10. If seed rate is not correct, adjust seed cup openings and repeat steps 7 through 9.
11. Return calibration tray and crank to storage positions when finished.
Mobile Calibration Procedure - Cool Season Seed Box
Equipment
1. One or two pounds of sample seed.
2. Calibration tray.
3. One scale capable of measuring ounces or hundreths of a pound.
Procedure
1. Position tractor and seeder on a level surface.
2. Adjust seed meter to closed position if applicable.
3. Place seed over two seed meters closest to right end of seeder.
4. Make sure the seed box being calibrated is connected to chain drive. Disconnect other seed boxes by removing pin from seed box driven sprocket.
5. Remove calibration tray (34 cu. in. capacity) from storage location. Install tray in designated collection slot and tighten against frame with two plastic nuts (check that calibration tray does not come into contact with ground roller).
6. Open seed cups to desired position (refer to chart for estimate) and lock into place. (Cool Season and Legume only)
7. Lower seeder to the ground and travel 100 feet.
8. Turn off engine and set parking brake.
9. Carefully remove calibration tray to retrieve collected seed. Weigh seed and use formula to determine seed rate.
10. If seed rate is not correct, adjust seed cup openings and repeat steps 6 through 9.
11. Return calibration tray to storage position when finished.
Calibration Formula
Stationary Calibration Chart
No. of Turns to simulate traveling 100 feet with 2 seed meters
Multiply calibration weight by 354.4.
Example: .15 lbs collected with 15/23 tooth standard sprocket and 11.3 turns of seed cup
.15 lbs x 354.4 = 56 lbs / acre
Metric Example: 68 grams collected with 15/23 tooth standard sprocket and 11.3 turns of seed cup
68 grams x 354.4 = 25.4 kg/acre or 62.8 kg / hectare
NOTICE: Overlapping and rough terrain/fast travel speeds will impact seed metering accuracy. The amount determined at calibration will increase by 10 to 30% in actual seeding depending on these factors.
Conversion For Grams To Pounds:
453.6 grams / 1 pound or .0022 pounds / 1 gram
Conversion For Ounces To Pounds: 16 ounces / 1 pound or .0625 pounds / 1 ounce
Transportation
■ Always raise unit and install transport lock before transporting. Leak down or failure of mechanical/electrical or hydraulic system can cause equipment to drop.
■ Always attach safety chain to tractor drawbar when transporting unit.
■ Never exceed 25 mph (40.2 km/h) during transport.
Lock-Up
Always transport with the actuator/cylinder in the fully extended, locked position.
Transport Lock Up
1. Fully extend actuator or cylinder.
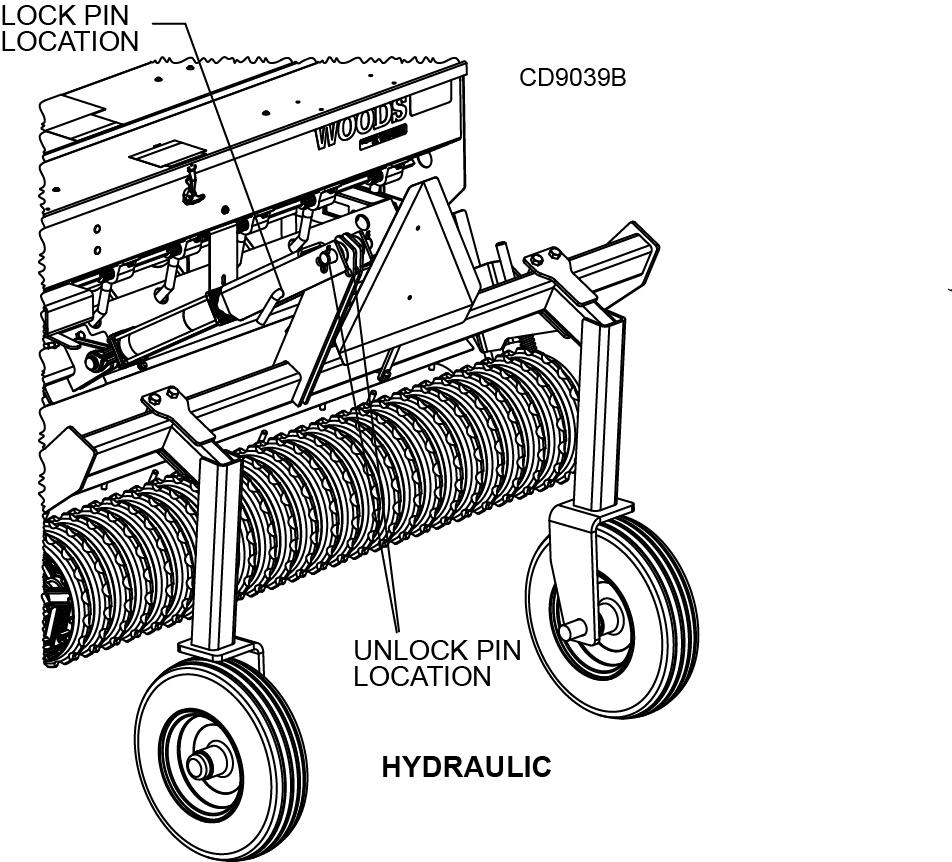
2. Remove hair clip pin and bent pin from the storage position.
3. Place bent pin and hair clip pin in the transport lock position.
4. For hydraulic tow kits, flip transport lock over cylinder rod.
PRE-OPERATION CHECK LIST
(OWNER’S RESPONSIBILITY)
___Review and follow all safety rules and safety decal instructions on page5 through page9.
___Check that equipment is properly and securely attached to tractor.
___Check that all safety decals are installed and in good condition. Replace if damaged.
___Do not allow riders.
___Check that all hardware is properly installed and secured.
___Check that shields and guards are properly installed and in good condition. Replace if damaged.
___Check all lubrication points and grease as instructed in Lubrication Information, Figure 29.
___Make sure tractor ROPS or ROPS cab and seat belt are in good condition. Keep seat belt securely fastened during operation.


