7 minute read
OWNER SERVICE


The information in this section is written for operators who possess basic mechanical skills. If you need help, your dealer has trained service technicians available. For your protection, read and follow the safety information in this manual
Full chain shielding must be installed when operating in populated areas or other areas where thrown objects could injure people or damage property.
•If this machine is not equipped with full chain shielding, operation must be stopped when anyone comes within 300 feet (92 m).
•This shielding is designed to reduce the risk of thrown objects. The mower deck and protective devices cannot prevent all objects from escaping the blade enclosure in every mowing condition. It is possible for objects to ricochet and escape, traveling as much as 300 feet (92 m).
Always wear relatively tight and belted clothing to avoid getting caught in moving parts. Wear sturdy, rough-soled work shoes and protective equipment for eyes, hair, hands, hearing, and head; and respirator or filter mask where appropriate.
Lubrication Information
Do not let excess grease collect on or around parts, particularly when operating in sandy areas.
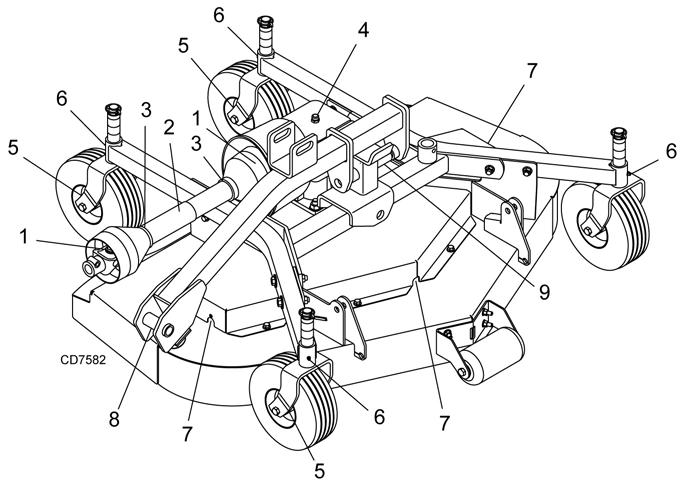
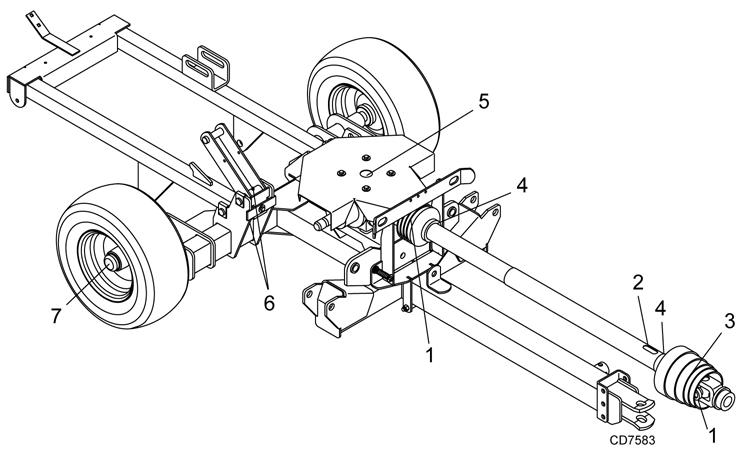
See Figure 2 and Figure 3 for lubrication points and frequency or lubrication based on normal operating conditions. Sever or unusual operating conditions may require more frequent lubrication.
Use a lithium grease of #2 consistency with a MOLY (molybdenum disulfide) additive for all locations unless otherwise noted. Be sure to clean fittings thoroughly before attaching grease gun. One good pump of most guns is sufficient when the lubrication schedule is followed.
Gearbox Lubrication
Keep hands and body away from pressurized lines. Use paper or cardboard, not hands or other body parts to check for leaks. Wear safety goggles. Hydraulic fluid under pressure can easily penetrate skin and will cause serious injury or death.
Make sure that all operating and service personnel know that if hydraulic fluid penetrates skin, it must be surgically removed as soon as possible by a doctor familiar with this form of injury or gangrene, serious injury, or death will result. CONTACT A PHYSICIAN IMMEDIATELY IF FLUID ENTERS SKIN OR EYES. DO NOT DELAY.
Keep all persons away from operator control area while performing adjustments, service, or maintenance.
Do not disconnect hydraulic lines until engine is stopped, power unit is properly secured, equipment and all components are lowered to the ground, and system pressure is released by operating all valve control levers.
Before dismounting power unit or performing any service or maintenance, follow these steps: disengage power to equipment, lower the 3-point hitch and all raised components to the ground, operate valve levers to release any hydraulic pressure, set parking brake, stop engine, remove key, and unfasten seat belt.
Use SAE 90W gear lube in gearboxes. Fill to plug on side of gearbox. Check gearbox daily for evidence of leakage, and contact your dealer if leakage occurs. Check vent plug operation periodically and clean if required.
Driveline Lubrication
Lubricate the driveshaft slip joints every eight operating hours. Failure to maintain proper lubrication could result in damage to U-joints, gearbox and drivelines.
1. Lower mower decks to the ground.
2. Disconnect drivelines from decks.
3. Separate driveline half.
4. Apply grease all around and along inner shaft.
5. Reassembly driveline halves and connect to gearboxes.
6. Raise and lower decks several time to distribute grease along drivelines.
To grease the telescoping shaft of the CV drive, the drive must be disconnected from the tractor and fully collapsed to expose the grease fitting.
Seasonal Lubrication
In addition to the daily recommended lubrication, a more extensive application is recommended seasonally.
1. Fill CV double yokes with 20 pumps of grease with the joints in a straight line.
2. Articulate CV body to maximum angle several times to ensure full coverage of joints.
3. Place joints in the straight position and add 10 additional pumps of grease to both joints.
4. Wipe telescoping drive clean of all old grease and contaminants.
5. Add a thin layer of new grease over telescoping drive.
5WPMAN0765 (9/30/2009)
1.Driveline U-Joints8 Hours
2.Telescoping Shaft8 Hours
3.CV Body8 Hours
4.Shield Bearing8 Hours
5.Splitter Gearbox (Fill 1/2 Check full w/SAE 90W gear lube Daily
6.Rear Deck Pivot Arm8 Hours
7.Transport Wheel Hub8 Hours
1.Driveline U-Joints8 Hours
2.Telescoping Shaft8 Hours
3.Shield Bearing8 Hours
4.Gearbox (Fill 1/2 Check full w/SAE 90W gear lube Daily
5.Caster Wheel Hubs8 Hours
6.Caster Pivots8 Hours
7.Blade Spindles40 Hours
8.Wing Pivot8 Hours
9.Deck Pivot8 Hours
Belt Servicing
Belt Replacement
One of the major causes of belt failure is improper installation. Before installing a new belt, check the following:
1. Check pulley shafts and bearings for wear.
2. Check pulley grooves for cleanliness.
3. Make sure spindles turn freely and without wobble.
If grooves require cleaning, moisten a cloth with a nonflammable, non-toxic degreasing agent or commercial detergent and water.
Avoid excessive force during installation. Do not use tools to pry belt into pulley groove. Do not roll belt over pulleys to install. This can cause hidden damage and premature belt failure.
Belt Installation
Notice
■ Use care when installing or removing belt from spring-loaded idler. Springs store energy when extended and, if released suddenly, can cause personal injury
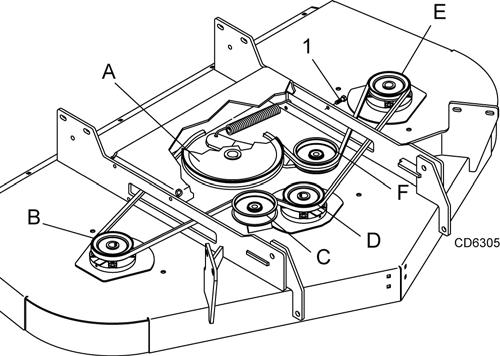
1. Slide belt under drive pulley A and over idler arm. Position belt around drive pulley A.
2. It may be necessary to remove front bolts (1) and swing gearbox stand up to gain access to pulley A. Route belt around pulley B, idler C, and pulley D as shown.
3. Make sure belt is on drive pulley A and route around idler F.
4. Grasp belt between spindle pulley E, spring-loaded idler F and spindle pulley D. Pull spring-loaded idler with belt to obtain enough belt length to route it over pulley E. Make sure spring-loaded idler pivots freely with belt installed.
Blade Servicing
Before servicing blades, raise and lock mower in transport position, turn off engine, set parking brake and remove key.
Keep all persons away from operator control area while performing adjustments, service, or maintenance.
Frequently check blades. They should be sharp, free of nicks and cracks, and securely fastened.
1. Raise mower decks to the transport position and make sure transport locks are engaged.
2. Shut off tractor, relieve hydraulic pressure in cylinders, set parking brake and remove key.
3. Inspect blades before each use to determine that they are mounted securely and are in good condition.
4. Replace any blade that is bent, excessively nicked, worn, or has any other damage.
5. Small nicks can be ground out when sharpening.
Blade Removal
Do not handle blades with bare hands. Careless or improper handling may result in serious injury.
1. Remove bolt (1), Figure 7, which has right hand threads.
2. Remove washer and blade.
Blade Sharpening
Notice
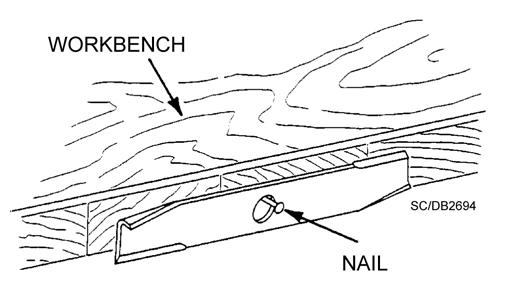
■ When sharpening blades, be sure to balance them. Unbalanced blades will cause excessive vibration that can damage blade spindle bearings. Vibration may also cause structural cracks in mower housings.
1.
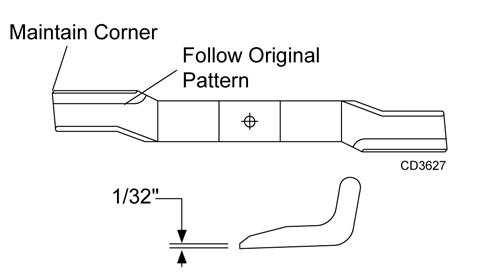
2. Do not sharpen blade to a razor edge, but leave approximately 1/64" blunt edge.
3. Do not sharpen back side of blade.
4. Sharpen both cutting edges equally to keep blade balanced. Balance blade using the method shown in Figure 5.
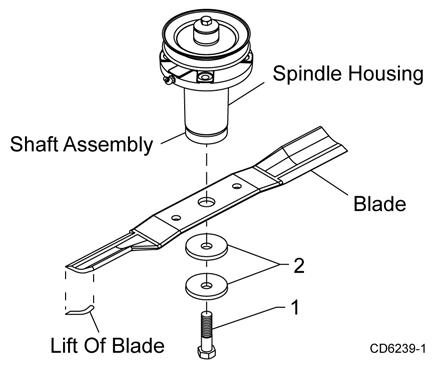
1. Place blade over blade pilot on the bottom of the shaft assembly.
2. Place bell washer (2) over blade and insert blade bolt (1). Torque blade bolt to 100 lbs-ft.
Chain Shielding
Full chain shielding must be installed when operating in populated areas or other areas where thrown objects could injure people or damage property.
•If this machine is not equipped with full chain shielding, operation must be stopped when anyone comes within 300 feet (92 m).
Your dealer can supply genuine replacement blades. Substitute blades may not meet original equipment specifications and may be dangerous.
Notice
■ When installing blade, the lift of the blade must be toward the spindle blade housing as shown in
•This shielding is designed to reduce the risk of thrown objects. The mower deck and protective devices cannot prevent all objects from escaping the blade enclosure in every mowing condition. It is possible for objects to ricochet and escape, traveling as much as 300 feet (92 m).
Check that chain shielding is in good condition and replace any damaged chain links.
Cleaning
After Each Use
● Remove large debris such as clumps of dirt, grass, crop residue, etc. from machine.
● Inspect machine and replace worn or damaged parts.
● Replace any safety decals that are missing or not readable.
Periodically or Before Extended Storage
● Clean large debris such as clumps of dirt, grass, crop residue, etc. from machine.
● Remove the remainder using a low-pressure water spray.
1. Be careful when spraying near scratched or torn safety decals or near edges of decals as water spray can peel decal off surface.
2. Be careful when spraying near chipped or scratched paint as water spray can lift paint.
3. If a pressure washer is used, follow the advice of the pressure washer manufacturer.
● Inspect machine and replace worn or damaged parts.
● Sand down scratches and the edges of areas of missing paint and coat with Woods spray paint of matching color (purchase from your dealer).
● Replace any safety decals that are missing or not readable (supplied free by your dealer). See Safety Decals section for location drawing.
Troubleshooting
Mowing Conditions
Problempossible Causesolution
Grass cut higher in center of swath than at edge
Height of mower higher at front than at rear
Adjust mower height and attitude so that mower rear and front are within 1/2 inch of same height.
Loose BladeCheck blade hardware.
Grass cut lower in center of swath than at edge
Height of mower lower at front than at rear
Adjust mower height and attitude so that mower rear and front are within 1/2 inch of same height.
Loose BladeCheck blade hardware.
Streaking conditions in swathConditions too wet for mowingAllow grass to dry before mowing.
Blades unable to cut that part of grass pressed down by path of tractor tires
Slow ground speed of tractor but keep engine running at full PTO rpm.
Cutting lower will help.
Adjust tractor tire spacing if possible.
Dull bladesSharpen or replace blades.
Loose BladeCheck blade hardware.
Material discharges from mower unevenly; bunches of material along swath
Material too high and too much material
Reduce ground speed but maintain 540 rpm at tractor PTO, or make two passes over material.
Raise mower for the first pass and lower for the second and cut 90 degrees to first pass.
Raise rear of mower high enough to permit material discharge.
Grass wetAllow grass to dry before mowing. Slow ground speed of tractor but keep engine running at full PTO rpm.