3 minute read
Operating – Tillage Components


When to use the Tillage Components
The disks and S‐tines will actively penetrate soil, allowing much needed air, water, and nutrients to enter the soil. It will also relieve soil compaction and manage weed populations.
Moderate soil moisture content is important for proper operation of the Food Plot Seeder. Penetration will not occur in extremely dry soil, and very wet conditions will cause the unit to ʺbog down,ʺpossibly causing product damage.
The tillage components should not be used when conditions are too wet or too dry. To determine condition, dig a small amount of your soil, about 3 in. (76 mm) deep:
If soil appears powdery and brittle, it is too dry. Wait until a later date, after a rainfall.
If soil appears damp, roll a small amount into a ball in the palm of your hand, if it forms a ball, then it is too wet. Ideally, the soil should fall apart when rolled in the palm of your hand. Wait till a later date for soil to dry. If soil is too wet, the S‐tines will penetrate too deep and your tractor could lose traction, causing machine damage. If soil is too dry, the S‐tines will not penetrate the soil properly.
Checking the Disks and S‐Tines during Operation on a Tractor
Operation of the disk and S‐tines will vary with soil type, condition, and amount of weight in the seed box. Make sure soil conditions are appropriate for operation. Do not exceed the seed box capacity to try and improve penetraton in overly dry conditions.
Test operation of the disks and S‐tines by driving the tractor forward about 10 ft. (3 m). Observe the operation. Check for uniform soil flow, levelness of the ground, and proper sizing of clods.
Adjust ground speed to achieve proper tillage results.
Periodically, check the S‐tines for residue build‐up. Remove any debris that might restrict or cause da mage to the S‐tines.
Grass should be less than 3 in. (76 mm) high for proper tillage action during food plot planting.
When in use, all S‐tines on the Food Plot Seeder should deflect back andʺflip ʺthe soil backward. If disks or S‐tines seem to drag, the unit is too low and should be raised. If all the disks or S‐tines stay in the free position, the unit should be lowered.
If the disks or S‐tines are not moving through the full range of motion, make up or down adjustments as required.
Checking the Disks and S‐Tines during Operation on a Utility Vehicle
NOTE: Make up or down adjustments by no more than 1/4 in. (6.4 mm) each time, until proper results are achieved.
1. Adjust height of wheels with electric motor that comes with machine.
2. Place single ‐point hitch in center hole as a starting point.
3. Tow Food Plot Seeder to a level site and test depth of machine .
4. Raise or lower wheels to place disks and S‐tine points at desired depth. Machine frame should be relatively level front ‐to ‐rear.
5. For deeper tillage, adjust single‐point hitch to lowest hole. For shallower tillage or transport, adjust it to the top hole.
Selecting the Operating Positions of the S‐Tines
CAUTION: Avoid injury! Do not make adjustments unless the machine is installed on a tractor or utility vehicle.
Keep hands and feet away from disks and S‐tines when lowering to the ground. Adjust S‐tine toolbar up and down by sliding it within the frame receivers and locking it in place using pins (A) and locking clips.
TRANSPORT AND OPERATE HIGH (B) ‐ Use bottom hole to raise S‐tines out of the ground.
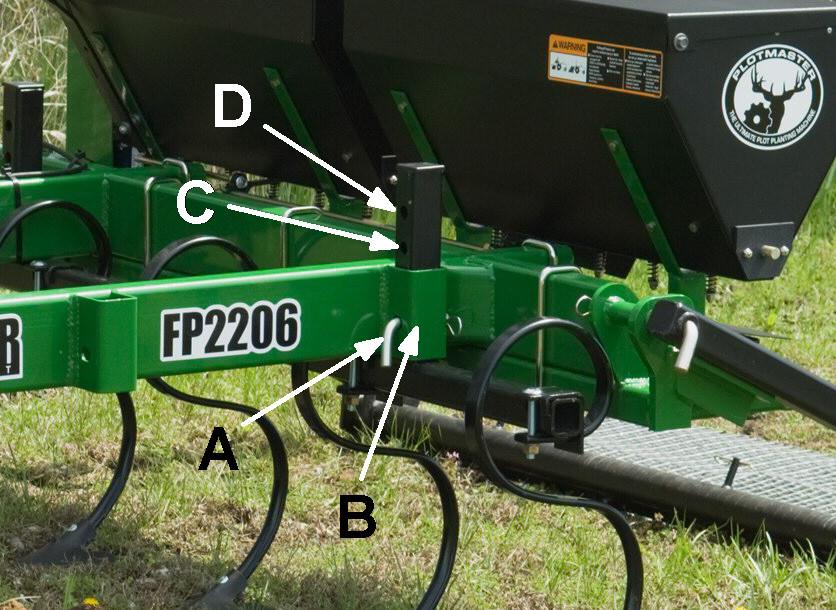
OPERATE MEDIUM (C) ‐ Use middle hole for minimum S‐tine penetration.
OPERATE LOW (D)‐ Use top hole for maximum S‐tine penetration.
Operating the Disk Gangs
CAUTION: Avoid injury! Disk blades are sharp. Wear gloves and handle with care. Keep hands and feet away from all moving parts.
The disk gangs have three angle adjustments.
FORWARD HOLE: Shallowest angle setting, use for light disking
MIDDLE HOLE: Medium angle setting, use for normal disking
REAR HOLE: Sharpest angle setting, use for aggressive disking
Operating the Drag and Optional Roller
The drag and optional roller can be used individually, or in unison to achieve your desired task.
The drag will help level the soil and break up clods. Equip your machine with the optional roller to pack down freshly planted seed and improve seed ‐to‐soil contact.
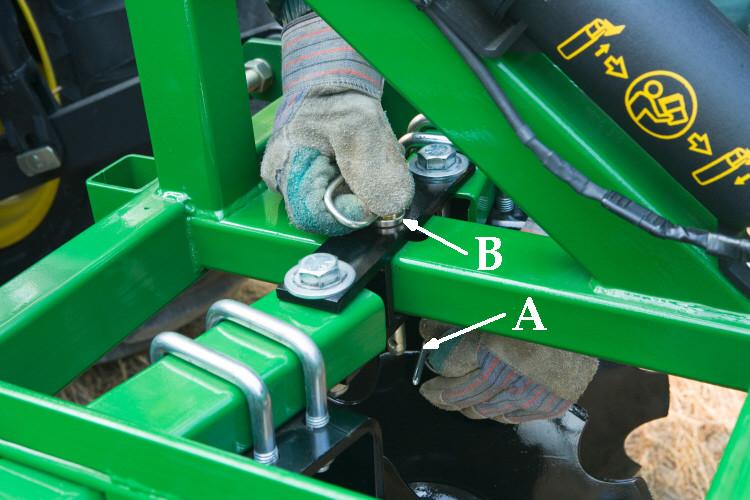
1. On the FP2206 and FP2208, use the leverage handle (A) to flip the roller over. The roller on the FP2204 does not come with a handle and can be flipped over by hand. When in the storage position, always keep the leverage handle pinned in the storage hole (B).
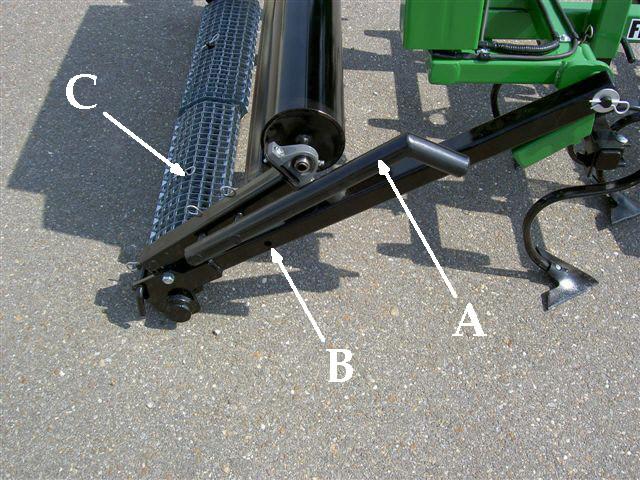
2. The roller can either be pinned in the working position, which places more down‐pressure on the soil, or allowed to free‐float depending on your requirements.
3. The drag can be rolled up when not needed. There are locking pins (C) to retain the drag in its storage position.
4. The roller can be placed on top of the drag to help break up hard clods.