3 minute read
TROUBLESHOOTING


Problem
Solution
Field not cleaned well. Rake wheels too high. Adjust rake wheels lower to ground. Hay is bunching. Tips of tines collecting dirt. Remove paint and dirt from tips of tines.
Incorrect ground speed. Increase or decrease ground speed. Steel burrs on tines or hoops. Remove burrs.
Ground wheels and wheel supports Adjust wheels and wheel supports obstruct flow of hay. toward center of rake. Minimum width for wheel spacing is 1.52 m (5 ft.)
Rake wheel hoops breaking. Excessive ground speed. Reduce ground speed.
Excessive ground pressure. Reduce ground pressure.
Tines breaking. Excessive ground speed. Reduce ground speed
Excessive ground pressure. Reduce ground pressure.
Rake wheel does not turn. Inadequate lubrication. Lubricate wheel. (See Lubrication and Maintenance section.)
Failed bearing. Replace bearing.
Poor windrow preparation. Rake wheels too high. Lower rake wheels.
Broken or missing tines. Replace tines.
Excessive ground speed. Reduce ground speed.
Slow ground speed. Increase ground speed.
Excessive ground pressure. Reduce ground pressure.
Rake wheels on one side do not Rake wheels too high. Lower rake wheels. turn.
Broken or missing tines. Replace tines. (See Replacing Wheel Tines in Service section.)
Servicing Tires Safely
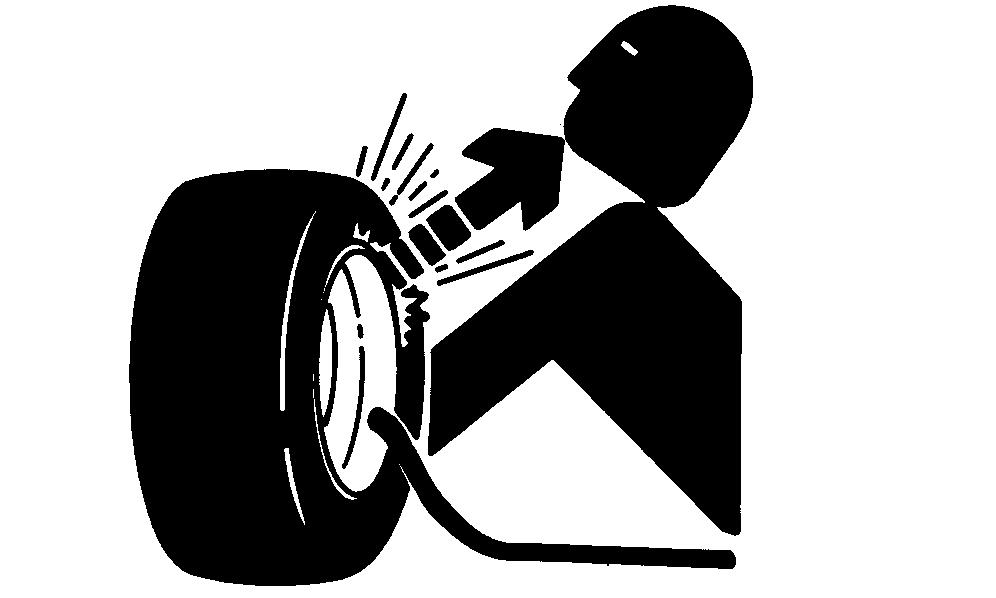
CAUTION: Explosive separation of a tire and rim parts can cause serious injury or death.
Do not attempt to mount a tire unless you have the proper equipment and experience to perform the job.
Always maintain the correct tire pressure. Do not inflate the tires above the recommended pressure. Never weld or heat a wheel and tire assembly. The heat can cause an increase in air pressure resulting in a tire explosion. Welding can structurally weaken or deform the wheel.
When inflating tires, use a clip-on chuck and extension hose long enough to allow you to stand to one side and NOT in front of or over the tire assembly. Use a safety cage if available.
Check wheels for low pressure, cuts, bubbles, damaged rims, or missing lug bolts and nuts.
Servicing Rake Safely
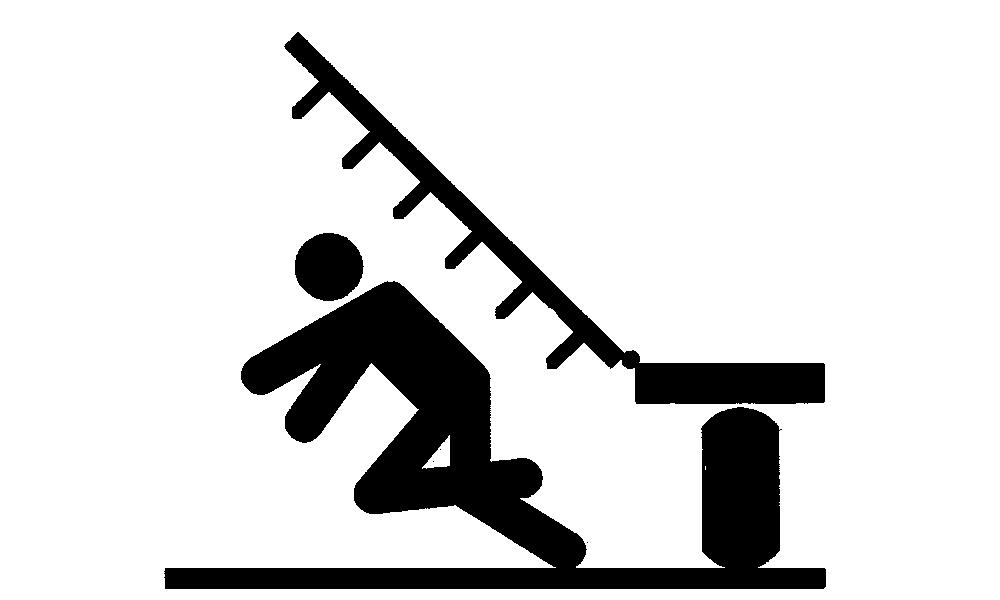
CAUTION: Avoid serious injury from falling rake wheels during service. Make sure bystanders are clear before lowering rake wheels.
Do not service or adjust machine with rake wheels raised.
Service
Replacing Wheel Tines
To replace a tine:
1. Remove two round-head bolts (A), nuts, clip and tine.
2. Install new tine. Fasten with clip, round-head bolts (A) and nuts.
IDENTIFYING LEFT-HAND AND RIGHTHAND RAKE WHEELS
To identify left-hand and right-hand rake wheels:
Put rake wheels against a wall with tine mounting clip nuts facing outward.
If the last bend in the tines curve to a clockwise direction, it is a left-hand rake wheel (A).

If the tines curve in a counterclockwise direction, it is a right-hand rake wheel (B).
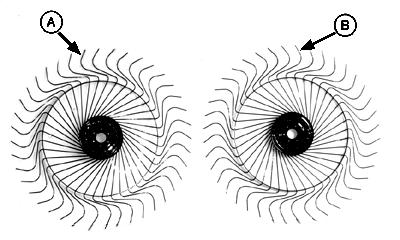
A—Left-Hand Rake Wheel
B—Right-Hand Rake Wheel
Storage
End Of Season
1. Clean rake thoroughly. Trash and dirt will draw moisture and cause rust.
2. Put rake in a dry place.
3. Thoroughly lubricate machine. (See Lubrication and Maintenance section.)
4. Apply a thin layer of grease on exposed cylinder rods to prevent rusting.
5. Check hydraulic hoses for deterioration and replace if necessary.
6. Tighten any loose bolts, nuts, and hydraulic fittings.
7. Repair or replace worn or broken parts.
8. Paint all parts where necessary.
9. Replace damaged or missing decals.
10. List replacement parts needed and order them early.
Beginning Of Season
1. Review operator’s manual and check adjustments.
2. Lubricate complete machine. (See Lubrication and Maintenance section.)
3. Check air pressure in tires. Correct tire pressure is 224 kPa (32 psi ) (2.2 Bar).
4. Check all hardware for tightness.
5. If any major moving parts have been replaced, make sure they run properly.
Carted Wheel Rake Checklists
Dealers Record
Owner’s Name: Date Sold:
Address: Model Number: City: Serial Number: State: Zip:
Predelivery
After the rake has been completely set up, make sure it is in good running condition before delivering to the customer. The following checklist is a reminder of important points to inspect. Check off each item after it is found satisfactory or after the correct adjustment is made.
- Rake has been assembled correctly.
- Check hydraulic hose and connection for oil leaks or damage.
- Check machine for loose hardware.
- Machine lubricated. (See Lubrication and Maintenance.)
- Check condition of rake wheels tines.
- Check that all rake wheels pivot freely.
- Check all phases of operation.
- Check that safety chain is installed.
- Tire pressures checked.
- Check wheel bolt torque.
- Decals intact and legible.
- Touch up paint, if necessary.
(Date set up)
(Signature)
Delivery
The following checklist is a reminder of very important information which should be conveyed to the customer at the time the machine is delivered. Check off each item as it is fully explained to the customer.
- Warranty statement.
- Safe and correct operation and service.
- Advise customer that the life expectancy of the rake, like any other machine, is dependent upon regular lubrication and maintenance as described in the operator’s manuals.
- Daily and periodic inspections.
- Servicing machine regularly and correctly.
- Advise to use safety chain.
- Make customer aware of optional equipment offered for this machine.
- Transporting machine correctly
- Storing machine correctly.
- Frontier parts and service.
- Give operator’s manual to customer and explain all operating adjustments and lubrication and maintenance intervals. Encourage customer to read manual.
- Have customer record machine serial number in the Specifications section.
- Remove and file this page.
(Date Delivered)
(Signature)