11 minute read
Driving and Threshing Instructions


Before Starting the Combine Check that:
There are no foreign bodies inside the combine. The oil levels are correct (engine, hydraulic tank). There is coolant in the cooling system. There is enough fuel in the tank. The safety switch is pressed down. Always before starting, sound the signal to warn those nearby.
Advertisement
Starting the Engine:
With the throttle lever on idle and the stopper fully depressed (models equipped with it) press the traction speed control lever to the slot on the right in its mid-position. The power is switched on by turning the ignition key to the right. The alternator and oil pressure control lights will come on. By turning the key farther to the right into position HS the starting motor will start to run the diesel engine and the engine will start. Should the control lights not go off after starting the engine, immediately stop the engine.
Stopping the Engine:
Pull the stopper to the stop position. Models with no separate stopper are stopped by turning the ignition key to the "STOP" position.
Note! Do not stop the engine, especially if turbo-charged, immediately after threshing. Idle the engine for a few minutes to allow it to cool off and the temperature to equalize. Do not have the ignition on for over 15 minutes on models equipped with distributor pumps unless the engine is running as the injection pump solenoid may overheat.
To listen to the radio, turn the ignition key left from the STOP position while pressing the key down. This turns on the current to the radio only, so there is no risk of the solenoid overheating.
Cold Weather Starting:
On engines equipped with a line-type pump, the cold weather starting automation gets always switched on when the engine is stopped.
Engines with distributor type of feed pumps are equipped with a pre-heating resistance controlled by the engine electronic control unit. In cold weather it functions automatically. When pre-heating switches itself on, control light C, fig. K9a, comes on. Start the engine as soon as the control light goes off. After the engine has started, the heater switches itself on again for some time.
If the engine has not started within 15 seconds, wait for a while and ignite again as above.
Combines with hydrostatic transmission must not be started in temperatures below -30o C as the oil is too stiff, and may damage the mechanism. (In case stiffer grade VG46 oil is used in the driving hydraulics, the lowest temperature to allow starting is -15o C.)
Select the required speed range with the traction speed control lever in the mid-position. Push the speed lever slowly forward or backward to drive the combine in the required ! direction. Select the required speed using the speed lever. Do not start off until the hydraulic oil has warmed up. The “hydraulics not ready to function” control light will stay on on the instrument panel until oil viscosity has fallen sufficiently. Stiff oil strains the shaft seals on the traction pump Test the brakes.
Note! Speed range 3 is only meant to be used when driving on the road with the grain tank empty. Using it on the field is prohibited.
Changing of Gears:
The gears are not synchronized. Therefore change gears cautiously. Do not change gears with the combine moving. Need for changing gears is minimal in hydrostatic combines. When getting off the road and starting threshing or vice versa, changing is, however, necessary. Change gears on level ground. If the gear feels stiff, that is because the combine tends to go downhill. In this case, slam the brake and carefully try to “drive” downhill to release the gear.
Driving on the Road:
The brake pedals must be latched together. ! Brake smoothly as the rear wheels easily rise from the ground when applying the brakes violently. Never drive downhill with the gear in neutral. The statutory traffic regulations stipulate that when driving on the road, the grain tank must be empty, the knife guard mounted, the lights correctly aligned and only the headlights on.
Driving on the Field:
The brakes may be used independently to reduce the turning radius.
In Soft Field Conditions:
To improve the carrying capacity, the air pressure in the front tyres may be reduced by approx. 20 kPa (0.2 bar). Do not reduce the air pressure in the rear tyres. With reduced tyre pressure, only half-fill the grain tank. When returning to normal harvesting conditions or on the road, return to recommended pressures.
On Steep Slopes:
Increase the tyre pressure by approximately 30 kPa (0.3 bar) to improve the stability of the combine. Only half-fill the grain tank to eliminate the risk of overturning.
Choose the Correct Time and Conditions
Before starting the harvest, make sure that the crop to be threshed is ripe and dry enough. The germinating power of most crops is easily reduced if the threshing moisture exceeds 25%. Moreover, moist crops complicate harvesting and overload the threshing machinery. They also easily stick onto the surfaces of the separating equipment and elevators, which means the combine must be cleaned more often.
Good Threshing Results with Even Feed
Always run the engine at maximum revolutions when threshing. When threshing, it is important to adjust the forward speed, the cutting height and the reel according to crop conditions to achieve as even feed as possible. Do not cut too low. Leafy matter moistens the straw leading to a poor threshing result. Empty the stone trap at least once a day. Before emptying, stop the engine, apply the parking brake and fit the cutting table support.
Start with the Recommended Settings
In the table at the end of this chapter you will find settings and adjustments for different crops. After adjusting your combine according to these recommended settings, test run the combine at the speed you will use in harvesting. Monitor the quality of the sample coming into the tank and the losses in the field. Note! When threshing heavy strawed crops without the chopper, it is important to make sure that all the straw comes out of the straw walkers without clogging the chaff hood.
Reel Position in Accordance With Crop
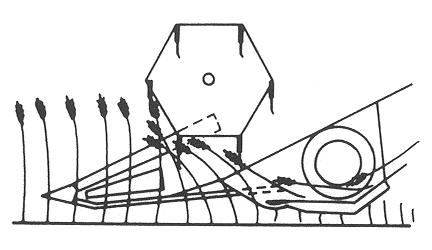
For normal standing crops, set the reel in its rear position at such a height that the reel tines lightly strike the crop. Reel speed slightly higher than the combine ground speed to ensure the crop is feeding head first, fig. M1.
For short-strawed crops, lower the reel so that the tines strike just above the knife. The reel speed increases the faster you drive and the shorter the straw is cut with the heads. The reel must pull in the heads toward the table auger. M1
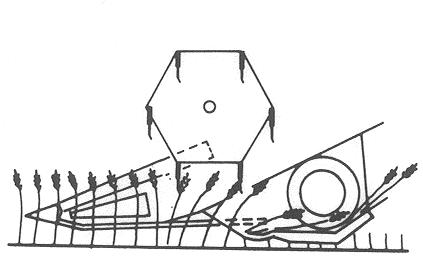
For long-strawed standing crops, set the reel in its forward position, the speed lower than the combine ground speed so that the heads are pushed forward and the crop is laid butt first onto the table, fig. M2.
M2
For laid-down crops, set the reel forward, reel speed higher than the combine ground speed and the reel angled to facilitate the gathering of the crop, the knife cutting below the heads, fig. M3. When using crop lifters, the reel should feed the cut crop onto the feed auger with the reel tines in the normal position.
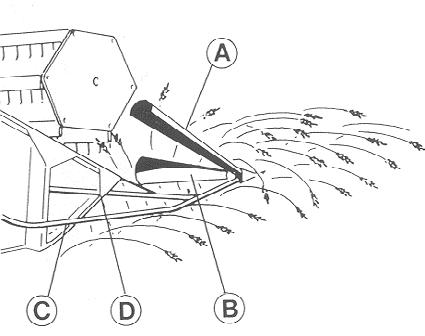
Adjust the straw dividers to reduce table losses and improve feeding
To avoid threshing losses caused by straw dividers, pay special attention to adjusting them according to the conditions and crops.
Adjust the height of the dividers with slide piece D, fig. M4, so that in laid-down crops the dividers follow the contours of the field beneath the crop. In standing crops the head of the divider should be set 10-15 cm above the knife.
Adjust side guide plate B so that it prevents the cut crop from getting between the table end and the reel end. Long-strawed reclining or laid-down crops are lifted by upper guide plate A so that the reel can gather the crop for cutting and convey it further to the feed auger.
Outside guide tube C is used in long-strawed crops to move the uncut crop aside.
Estimation of Threshing Losses
2% is generally considered to be the maximum acceptable threshing loss. The losses can be calculated as follows: With an estimated yield of 5000 kg/ha, the weight of 1000 grains 35 g. When monitoring the cutting width of the combine, max. 3 grains may be found in a palm-sized area of 1 sq.dm.
Sources of grain loss:
Shedding in the field before harvesting From the table Unthreshed grain From the shaker shoe From the straw walkers
Before readjusting, make a methodical check in the above order to isolate the cause of the loss. Make one adjustment at a time and check the result with a test run.
Check the crop in front of the combine to ensure that shedding has not occurred before the machine has touched the crops. To test for the table loss, stop the machine and reverse it one combine length; the grain loss can easily be seen in the field. M3

M4
The reel has threshed the grain onto the field due to too high or low revolutions and too wide a clearance. Local blockage in the knife causes a depressed and uncut section in the field. This may be due to a damaged knife plate or finger. Remember that uneven feed onto the cylinder causes disturbances in the whole threshing mechanism and machinery and leads to extensive grain losses.
Always aim at even feed when threshing.
Unthreshed Grain
Check that the grain gets threshed off the heads. Check the long straw on the straw walkers as the chopper also removes the unthreshed grains efficiently. Cylinder speed should be moderate and concave clearance as wide as possible to obtain unbroken grain and straw as well as minimal grain losses. It is not necessary to aim at complete threshing. Particularly when threshing seed grain, the minimal recommended speed setting for the cylinder should be used, as high cylinder speed damages germinability more easily than minimal concave clearance. If the moisture of the crop to be threshed is low and the straw brittle, the concave fore/aft adjustment ratio can be modified by changing the setting of the “ratio adjustment plate”. The normal factory setting is 2:1. Settings 1.5:1 and 1:1 can also be used, which means a narrower front clearance can be used without unnecessarily shredding the straw. The threshing effect and breaking of barbs can be improved by fitting filler plates under the front of the concave. 1-2 filler plates are usually enough.
Unthreshed grain loss can be caused by: Check the straw before it is fed into the chopper. Monitor the grain coming into the tank as well as the returns. Reasons for unthreshed grain loss can be:
Cylinder speed too low Cylinder-concave clearance too wide Uneven feed Crop too green in parts Damaged cylinder or concave.
Shaker Shoe Losses
If the sample coming from the sieves (taken on a shovel) shows grain being lost, check for the following:
Excessive or insufficient fan speed Incorrect direction of cleaning fan airflow Blocked sieves Chaffer sieve not sufficiently open Grain sieve holes too small (overloads the return system) Crop too damp Too much weed
Straw Walker Losses
If the sample coming from the straw walkers shows grain being lost, check for the following:
Uneven feed Blocked concave and/or straw walkers Excessive forward speed Cylinder-concave clearance too small Too much weed Crop too damp
If there is crushed or cracked grain in the sample, the reason could be:
Cylinder speed too high Cylinder-concave clearance too small Blocked concave Crop too green in parts If the sample is not clean, the reason could be:
Insufficient fan speed
Incorrect direction of fans Grain sieve holes too large for crop Chaffer sieve set too wide open Forward speed too low (insufficient load on the threshing mechanism)
Crop sparse in places and weedy Cylinder-concave clearance too small Too many breaks in threshing (turning, etc.)
Malfunction Problems
The cylinder winds up and gets clogged:
Crop damp or green Forward speed too high Cylinder-concave clearance too wide Cylinder speed too low
Cylinder bars damaged or worn Rear beater damaged
The grain auger gets clogged:
Chaffer sieve set too wide open
Insufficient fan speed
The return auger gets clogged:
Grain sieve holes too small Grain sieve blocked Insufficient fan speed Chaffer sieve set too wide open
Cleaning Instructions When Going From One Crop To Another
Drive the combine on level open ground. Change the gear into neutral and lock the parking brake. Remove the ignition key whenever the engine is switched off to ascertain that no outsiders can start the combine. Do not implement any cleaning operations with the engine running!
Cleaning with compressed air is recommended. An appropriate brush can also be used. Support the reel and the cutting table in their top positions. Open the stone trap and empty it with a cassette key, for instance. Open all cleaning doors (not those to the grain tank). Remove and clean all sieves. Clean the supporting grooves of the sieves in the shaker shoe. Lock the back door in the shaker shoe. Remove and clean the bottom grooves in the straw walkers. Run the threshing mechanism for 2-3 min. with the cleaning fan at maximum speed. Lift and lower the cutting table, but do not start it. Leave the table in its bottom position. Stop the threshing machinery. Check that the grain pan is empty. If necessary, remove and clean the cassettes. Check the spaces between the return and grain augers and remove any remaining grain. Shake the chain of the feed auger to make the grains run down. Clean the auger inside and out. Clean the cutting table. Remove the bottom augers of the grain tank and the part of the unloading auger in the grain tank. Brush the bottom furrows, discharging the grains through the bottom door. Clean the unloading auger by turning the auger counter-clockwise with the pipe being raised half way up to make the grains run out through the bottom door. After cleaning, refit the parts and close the doors.