2 minute read
6. PROGRAMMER OPERATION


6
PROGRAMMER OPERATION
The universal Curtis PMC handheld programmer (optional) allows you to program, test, and diagnose Curtis PMC programmable controllers. The programmer is powered by the host controller, via an RJ11 modular connector located in the adjustment panel on top of the controller (1207 models) or via a 4-pin Molex connector on the front panel (1207A models).
When the programmer is first plugged into the controller, it displays the controller’s model number, date of manufacture, and software revision code. Following this initial display, the programmer displays a prompt for further instructions.
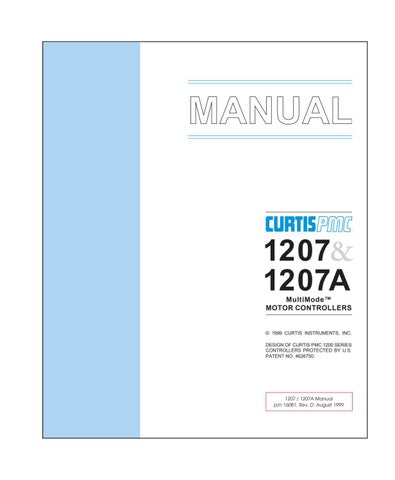
The LED in the corner of the key lights up to identify the mode of operation
Scroll the 4-line display (up and down) with these two keys
CURTIS PMC + +
PROGRAM TEST DIAGNOSTICS
SCROLL DISPLAY CHANGE VALUE
MORE INFO
A DIVISION OF CURTIS INSTRUMENTS INC. A 4-line LCD display is presented in this window
Choose the Program, Test, or Diagnostics Mode with one of these three keys
Change the selected item’s value (up or down) with these two keys
Get more information about selected items with this key. Also, use this key in combination with other keys to put the programmer in Special modes.
SCROLL DISPLAY The programmer is operated via an 8-key keypad. Three keys select operating modes (Program, Test, Diagnostics), two scroll the display up and down, and two change the values of selected parameters. The eighth key, the MORE INFO key, is used to display further information about selected items within any of the three standard modes. In addition, when pressed together with the PROGRAM or the DIAGNOSTICS key, the MORE INFO key selects the Special Program mode or the Special Diagnostics mode.
The display window presents a 4-line LCD display. The display is visible even in bright sunlight. You can adjust the display contrast in the Special Program mode.
When one of the menu keys is pressed, the LED at the corner of the key lights up, identifying the mode of programmer operation. For example, if the TEST key is pressed, the LED at the corner of the key indicates that the programmer is now in the Test mode, and the Test Menu is displayed.
Four lines of a menu are displayed at a time. The item at the top of the display window is the selected item. To select an item, scroll within the menu until the desired item is positioned at the top of the display window. The selected item is always the top line. (In the Program mode, the selected item is highlighted by a flashing arrow.) To modify a parameter or obtain more information about it, it must be scrolled to the top position in the display window.
To scroll up and down within a menu, use the two SCROLL DISPLAY arrow keys. The SCROLL DISPLAY arrow keys can be pressed repeatedly or be held down. When a key is held down, the scrolling speed increases the longer the key is held.
A small scroll bar at the left of the display window provides a rough indication of the position of the four displayed items within the entire menu. That is, when the bar is at the top of the window, the top of the menu is displayed. As you scroll through the menu, the bar moves downward. When the bar is at the very bottom of the window, you have reached the end of the menu. This sample display is from the Program Menu:
scroll bar
M1MAINC/L >250 M1PLUGC/L 70 M1RAMPC/L 250 M1ACCELRATE 1.0 selected item