3 minute read
Services


(Table 7, contd)
Type of Hitch TH220B(1) TH220(2) TH330B(1) TH330(2)
Maximum weight of towed attachment and freight 12000 kg (26400 lb) 12000 kg (26400 lb) 12000 kg (26400 lb) 12000 kg (26400 lb)
Manual Swivel Hitch Maximum vertical weight component on the hitch interface in the lowest position 2500 kg (5500 lb) 2450 kg (5390 lb) 2500 kg (5500 lb) 2450 kg (5390 lb)
Maximum vertical weight component on the hitch interface in any other position 1250 kg (2750 lb) 1000 kg (2200 lb) 1350 kg (2970 lb) 1200 kg (2640 lb)
Retrieval Hitch (4) Maximum weight of towed attachment and freight 3000 kg (6600 lb)
Maximum vertical weight component on the hitch interface 500 kg (1100 lb) 3000 kg (6600 lb)
500 kg (1100 lb) 3000 kg (6600 lb)
500 kg (1100 lb) 3000 kg (6600 lb)
500 kg (1100 lb)
(1) A work tool is attached to the front of the machine. (2) No work tool attached to the front of the machine. (3) The hitch is equipped with an additional Mechanical Auto Hitch. (4) Only for off highway use
Refer to "Types of Towing Hitches and Hydraulic Services" for illustrations of the different types of hitches that are available. Note: When you operate the machine with a towed attachment, check the engine temperature and the transmission temperature more frequently. Check the temperatures more frequently when you operate the machine on a grade. If either temperature rises above the normal operating range for the machine, operate the machine in a lower gear.
Types of Towing Hitches and Hydraulic Services
Your machine may be equipped with a number of different types of towing hitch. Refer to the appropriate section that is listed below for a description of the operation of the hitch that is on your machine.
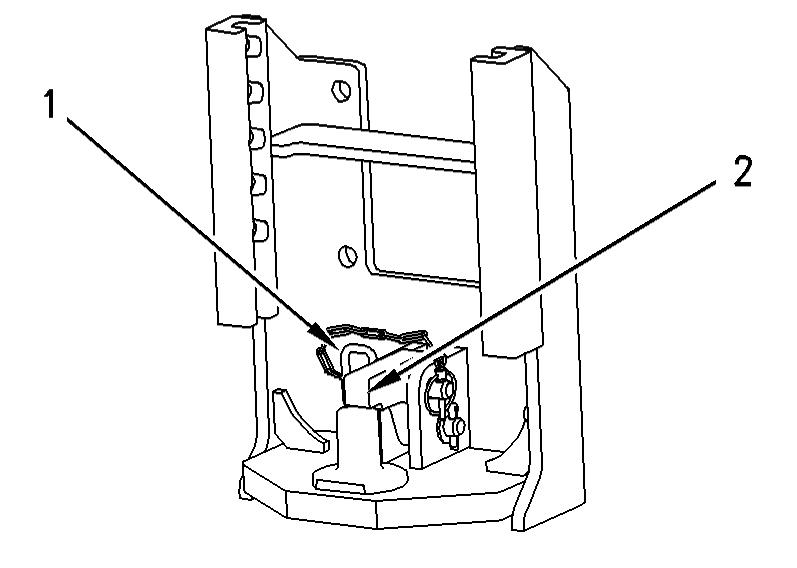
Piton Hitch
Illustration 163 g0100298
In order to connect the attachment of towing, remove pin (1) and lift locking latch (2). Insert pin (1) in order to hold locking latch (2) in the UP position. Align the machine and the tow eye. Reverse the machine with assistance in order to ensure an easy connection.
Remove pin (1) and lower locking latch (2). Secure locking latch (2) with pin (1) and the attached pin.
Mechanical Auto Hitch

Illustration 161 g01002101
In order to adjust the height of the hitch of different attachments, press pin (3) and rotate lever (4) in order to disengage the locking mechanism. Lift the hitch to the required height and rotate lever (4) back to the original position. When the locking mechanism is engaged, pin (3) will return to the original position. In order to connect the attachment for towing, rotate lever (5) until pin (6) moves vertically and pin (6) latches into the FULLY UP position. Align the jaws of the hitch and the tow eye of the attachment. Reverse the machine toward the attachment. As the tow eye on the attachment contacts the jaws of the hitch and trigger (7), the latch mechanism will release the spring-loaded pin (6) and the lever (5).
Clevis Hitch

Illustration 162 g01002103
In order to adjust the height of the hitch for different attachments, remove pin (8) and rotate lever (9) in order to disengage the locking mechanism. Lift the hitch to the required height and rotate lever (9) back to the original position. When the locking mechanism is engaged, return pin (8) to the original position. In order to connect the attachment for towing, remove pin (10). Align the machine and the tow eye for the attachment. Reverse the machine with assistance in order to ensure an easy connection. Secure pin (10) with spring pin (11).
Manual Swivel Hitch

Illustration 163 g01211715
In order to adjust the height of the hitch of different attachments, press pin (3) and rotate lever (2) in order to disengage the locking mechanism. Lift the hitch to the required height and rotate lever (2) back to the original position. When the locking mechanism is engaged, pin (3) will return to the original position. In order to connect the attachment for towing, remove locking pin (1) and remove pin (4). Align the machine and the tow eye. Reverse the machine with assistance in order to ensure an easy connection. Insert pin (4) into the hitch. Secure pin (4) with locking pin (1).