2 minute read
Boom Cylinder Lock (If Equipped


Turn the battery disconnect switch key to the OFF position and remove the battery disconnect switch key when you service the electrical system or you service any other components of the machine. Turn the battery disconnect switch key to the OFF position and remove the battery disconnect switch key when the machine is left for a period of one month or longer. Adopt this procedure in order to prevent the following circumstances: • A short circuit from draining the battery • Active components from draining the battery • Draining of the battery through vandalism Note: The battery disconnect switch should never be disconnected while the machine is running.
A raised boom can fall if a hydraulic component is removed. Sudden movement of the boom could cause personal injury or death. Remove any load from the work tool, retract the boom and install the boom cylinder lock or a suitable supporting stand before working under a raised boom.
When you are working under the boom it is necessary to install a boom cylinder lock on the boom cylinder.
Installation and Removal Procedures Installation
1. Park the machine on level ground. Retract and lower the boom. Move the transmission control to
NEUTRAL. Engage the parking brake. 2. Raise the boom to an angle of approximately 20 degrees. Stop the engine. Remove the engine start switch key. If equipped, remove the battery disconnect switch key. Note: Make sure that the front axle and the top of the main frame are clear of debris before you attempt to install the boom cylinder lock. Clean the area, if necessary. 3. Check that the cylinder lock is the correct type for your machine. Inspect the boom cylinder lock for damage. Inspect pad (4). Do not use the cylinder lock if the cylinder lock is damaged or if pad (4) is loose or missing. 4. Place the cylinder lock onto the top of the main frame above the front axle. Allow sufficient access to stand on the flat area of the frame. Make sure that both of your hands are free. Approach the machine from the front. Use the fender bracket (if equipped) and the edge of the main frame for support. Step onto the axle. Then, step onto the top of the main frame. Use the nonslip treads that are provided.
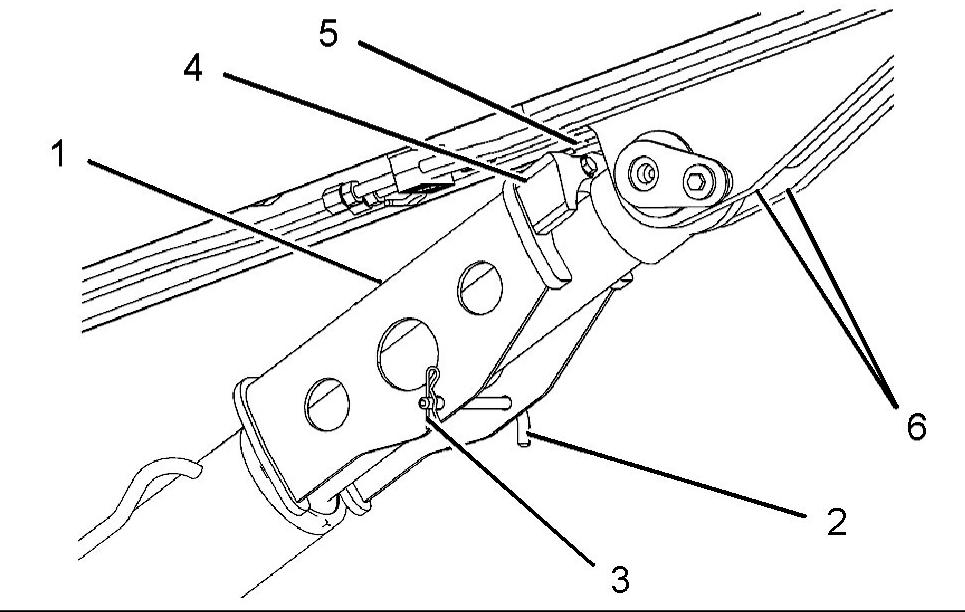
Illustration g01071433
5. Install boom cylinder lock (1) onto the boom cylinder. Insert pin (2) and retaining clip (3). Align boom cylinder lock (1). Location tongue (5) must pass between boom plates (6) when the boom is lowered. Note: When you descend from the machine, use the supports and use the nonslip treads, in the same manner that is indicated in the previous steps. 6. Replace the battery disconnect switch key (if equipped) and the engine start key. 7. Start the engine. Lower the boom slowly. Make sure that location tongue (5) passes between boom plates (6). Lower the boom until there is a clearance of 6 mm (0.25 inch) between the boom plates (6) and the yellow nylon pad (4).
NOTICE Do not operate the boom with the boom cylinder lock installed. Operating the boom with the boom cylinder lock installed will damage the boom cylinder lock and the boom cylinder.
8. Stop the engine. Remove the engine start switch key. If equipped, remove the battery disconnect switch key. Attach a "Do Not Operate" or a similar warning tag to the joystick control.