4 minute read
TOWING PROCEDURE
8. Gradual turns should be done in steps of 15 degrees each. After turning the machine a maximum of 15 degrees, the machine should be propelled straight for about one-half of the length of the machine to clear the crawler belts of dirt and rocks. Turning the drill in more than 15 degree increments will subject the crawler belts to severe strain.
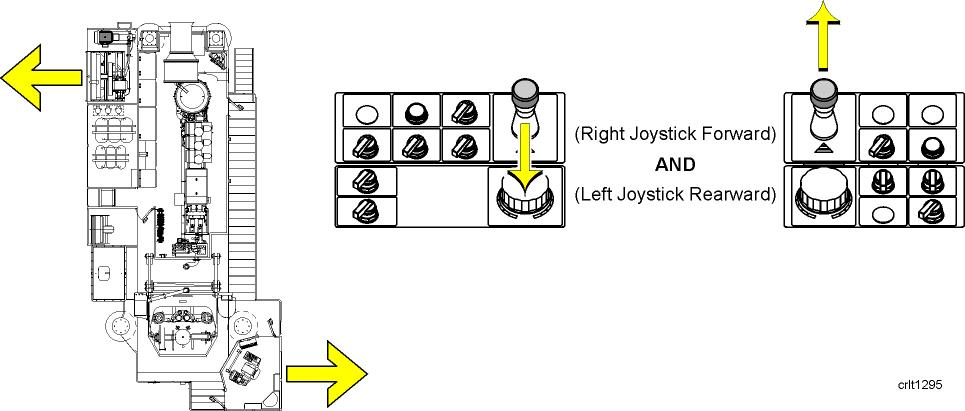
COUNTER-ROTATION LEFT HAND TURN
9. To make a sharp counter-rotation turn, push the left joystick forward and pull the right joystick to the rear. To make a turn to the left, push the right joystick forward and pull the left joystick to the rear.
ENSURE GRADUAL TURNS ARE MADE - 15° INCREMENTS
CAUTION: ENSURE THAT THE TURN IS STOPPED EVERY 15 DEGREES AND THAT THE MACHINE IS PROPELLED FORWARD, OR REARWARD, AT LEAST TEN FEET PRIOR TO RESUMING THE TURN. MAKING GRADUAL TURNS WILL GREATLY EXTEND THE SERVICE LIFE OF THE TRACKS.
NOTE: When using the counter-rotation method for turning, have a helper available who can watch that the trail cable does not get fouled and/or torn from the main junction box or cable reel.
NOTE: The ability of the machine to counter rotate is dependent on the surface on which the machine is setting. A soft surface will cause the crawlers to dig in and machine to bog down.
NOTE: The propel brakes are released whenever either joystick is lifted from its mechanical neutral detent. The propel brakes are set when both joysticks are returned to their neutral detent and released.
TOWING PROCEDURE
CAUTION: Be sure crawlers are securely blocked before disengaging gearbox clutch for towing.
1. Secure the machine by blocking crawlers.
2. Secure the tow bar to the towing vehicle.
TOWING PROCEDURE
3. Fasten a lanyard to the towing safety valve lever. The valve is mounted to the left front jack casing. Run the lanyard down the casing, along the tow bar and secure it to the towing vehicle. If during towing the tow bar should come loose from either the drill or the towing vehicle, the lanyard will trip the safety valve and set the drill propel brakes.
4. Disconnect the drive tumbler gearbox from the propel motor as follows:
a. Ensure that the propel pump controls are in neutral position b. Loosen shifter lever lock screw
c. Pull out shifter lever to disengage clutch d. Tighten shifter lever lock screw
5. Use the hand pump mounted to the right front jack casing. Pump the jack until 650 PSI (4,482 kPa) shows on the gauge near the pump.
NOTE: Anytime pressure drops below 500 PSI (3,450 kPa), brakes could drag resulting in premature brake failure.
NOTE: Do not tow at speeds greater than 0.9 mph (1.45 kph) Excessive planetary gearbox heating can occur.
6. When towing is completed, reverse the above procedure. The hand pump pressure can be released by turning the release valve on the pump.
CABLE REEL OPERATION
When the cable reel switch is in the AUTO position, is designed to pick up trail cable as the drill moves toward its power source. It is not designed to drag the trail cable over the ground.
The line pull is proportional to operating pressure. The correct line pull is when there is sufficient pull on the cable to wind it on the reel, but not too great to put unnecessary strain on the trail cable.
The line speed is dependent on the volume of hydraulic oil flowing through the system. The correct line speed is slightly faster than the travel speed of the drill.
To manually operate the cable reel, proceed as follows:
1. Start the main air compressor motor.
2. To spool the trail cable onto the reel, turn the cable reel switch to the REEL IN position.
3. To spool the trail cable off of the reel, turn the cable reel switch to the REEL OUT position.
LEVELING
To level the drill, proceed as follows:
1. Place the machine in the proper location to drill the required hole. Verify that the leveling jack pads will rest on solid footing. Cut or fill or reposition as necessary to achieve solid footing. Maximum angle for jack pad is 17°.
2. The operating mode selector switch must be in the DRILL position and the main air compressor motor must be energized.
NOTE: Normally the machine will be leveled using the automatic leveling switch, Step 3. For manual leveling use Step 4 through 7.
Lower rollers should be lifted 2 - 7 inches (5.2 - 17.8 cm) off the crawler belt
jkpd6640 3.To level the machine automatically verify that the operating mode selector switch is in the drill mode, then turn the automatic leveling switch to the EXTEND position and hold the switch in that position. The Automatic Leveling/
Propel screen will come on automatically on the operator’s display terminal. Use the screen to monitor the drill as it is being leveled. The jack cylinders will extend and raise and level the machine. When the machine is raised and leveled, release the switch and it will spring return to the CENTER or OFF position. This procedure can be performed by the operator while he is seated at the main operator’s console.


