2 minute read
Safety in Lifting (Hoisting) a Vehicle


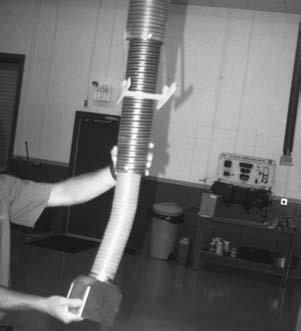
Figure 1-38. Always connect an exhaust hose to the tailpipe of the engine of a vehicle to be run inside a building.

(a)
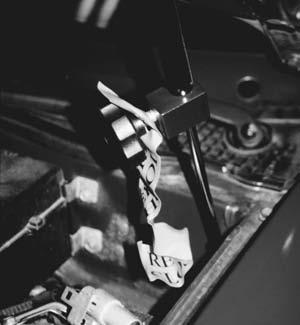
HOOD STRUT CLAMP
vent the build-up of carbon monoxide inside a closed garage space. See Figure 1-38. • When standing, keep objects, parts, and tools with which you are working between chest height and waist height. If seated, work at tasks that are at elbow height. • Always be sure the hood is securely held open. See Figure 1-39.
WARNING:Always dispose of oily shop clothsinanenclosedcontainertopreventa fire.SeeFigure1-40.Wheneveroilyclothsare throwntogetheronthefloororworkbench,a chemicalreactioncanoccurwhichcanignite theclothevenwithoutanopenflame.This processofignitionwithoutanopenflameis called spontaneouscombustion.
Many chassis and underbody service procedures require that the vehicle be hoisted or lifted off the ground. The simplest methods involve the use of
(b)
Figure 1-39. (a) A crude but effective method is to use locking pliers on the chrome-plated shaft of a hood strut. Locking pliers should only be used on defective struts because the jaws of the pliers can damage the strut shaft. (b) A commercially available hood clamp. This tool uses a bright orange tag to help remind the technician to remove the clamp before attempting to close the hood. The hood could be bent if force is used to close the hood with the clamp in place.
drive-on ramps or a floor jack and safety (jack) stands, whereas in-ground or surface-mounted lifts provide greater access.


Figure 1-40. All oily shop cloths should be stored in a metal container equipped with a lid to help prevent spontaneous combustion.
Settingthepadsisacriticalpartofthispro-
cedure. Allautomobileandlight-truckservice manualsincluderecommendedlocationstobe usedwhenhoisting(lifting)avehicle.Newervehicleshaveatriangledecalonthedriver’sdoor indicatingtherecommendedliftpoints.Therecommendedstandardsfortheliftpointsandlifting proceduresarefoundinSAEStandardJRP-2184. SeeFigure1-41.Theserecommendationstypicallyincludethefollowingpoints. 1. The vehicle should be centered on the lift or hoist so as not to overload one side or put too much force either forward or rearward.
See Figure 1-42. 2. Thepadsoftheliftshouldbespreadasfar apartaspossibletoprovideastableplatform. 3. Each pad should be placed under a portion of the vehicle that is strong and capable of supporting the weight of the vehicle. a. Pinch welds at the bottom edge of the body are generally considered to be strong.
CAUTION:Even though pinch weld seams are the recommended location for hoisting many vehicles with unitized bodies (unit-body),care should be taken not to place the pad(s) too far forward or rearward.Incorrect placement of the vehicle on the lift could cause the vehicle to be imbalanced,and the vehicle could fall. This is exactly what happened to the vehicle in Figure 1-43.
LIFT POINT LOCATION SYMBOL
Figure 1-41. Most newer vehicles have a triangle symbol indicating the recommended hoisting lift points.
b. Boxed areas of the body are the best places to position the pads on a vehicle without a frame. Be careful to note whether the arms of the lift might come into contact with other parts of the vehicle before the pad touches the intended location. Commonly damaged areas include the following. 1. Rocker panel moldings 2. Exhaust system (including catalytic converter) 3. Tires or body panels (see Figures 1-44 through 1-46) 4. Thevehicleshouldberaisedaboutafoot(30 centimeters[cm])offthefloor,thenstopped andshakentocheckforstability.Ifthevehicleseemstobestablewhencheckedata shortdistancefromthefloorcontinueraisingthevehicleandcontinuetoviewthevehicleuntilithasreachedthedesiredheight.


