4 minute read
Acer Bluetooth® VoIP Phone


Layout
# Item Description
"Launch keys" on page 10
# Icon Item Description
# Icon Item Description
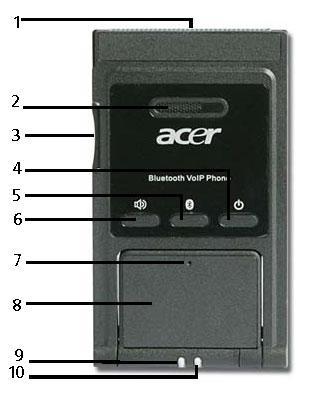
1 N/A PC Card (PCMCIA) interface connector Connects the computer’s PCMCIA card interface.
2 N/A Speaker Speaker delivers audio output. 3 N/A Volume up/down button Increases/decreases the sound volume. 4 Power button Turns the phone on and off.
5 Bluetooth connection/ pairing button Enables/disables the Bluetooth function.
6 Speakerphone button Enables/disables the speakerphone function.
7 N/A Microphone Internal microphone for sound recording. 8 N/A Flip Flips out internal microphone. 9 N/A Bluetooth connection/ pairing indicator Indicates the Bluetooth connection/pairing status. 10 N/A Charge/Power indicator Indicates the computer’s charge/power status.
LED Color Status Description
Bluetooth connection/ pairing indicator Blue Blinking fast The phone is in pairing mode. Blinking slow The phone is linking with the notebook. Off The phone is not paired or linked with the notebook.
Charge/Power indicator Amber On The phone is charging. Off The phone is fully-charged. Blinking The phone needs to be recharged.
Charging the Phone
You need to charge the phone before initial use. It takes approximately four hours for a full charge. To charge the phone: 1. Turn the notebook on. 2. Locate the PC Card (PCMCIA) slot. 3. Insert the phone to the slot label up. Make sure that the phone is completely pushed on the slot.
Note: The notebook detects the device and displays a New Device Wizard window. Click No this time, then close the window. Note: New Device Wizard No, not this time, , not 4. The power/charge indicator lights up during charge and turns off when the battery is full. Eject the phone from the PC Card slot when charging is finished.
Installing Acer VCM
Note: Quit all applications before installing Acer VCM. The Acer VCM requires system restart after installation. Please follow the steps below to install the Acer VCM application in the notebook. 1. Place the Acer VCM installation CD to the optical drive. 2. Explore the installation CD, then locate and double-click on the AcerVCM Setup.exe file to start installation. 3. Follow screen instructions to proceed. AcerVCM Setup.exe
Info Bar
After restart, the Acer VCM displays an info bar that provides information on the current audio device and IM (Instant Messaging) service status. Press (X) to close this bar.
Acer VCM Menu
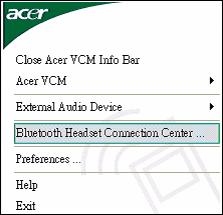
Right-click the Acer VCM icon on the system tray to display a pop-up menu. You can use this menu to manage the VCM functions.

Item
Function
Close/Open Acer VCM Info Bar Hides or displays the info bar. Acer VCM Enables or disables the Acer VCM. External Audio Device Allows you to select the external audio device. Bluetooth Headset Connection center Allows you to scan and connect a Bluetooth headset device to the notebook. Preferences IM Control tab allows you to arrange your IM priority. General tab allows you to set the hotkeys for audio and IM functions. Help Opens the online help file. Exit Closes the Acer VCM menu.
The Acer VCM Bluetooth Headset Connection Center is a convenient tool to connect the phone to your notebook. To connect the phone to your notebook: 1. Eject the phone from the PC Card slot, if necessary, then press the phone power button for three seconds. The phone beeps twice and the charge/power LED flashes to indicate that the phone is on. 2. Press the Bluetooth connection/pairing button for three seconds to put the phone in pair-link mode.
The phone beeps twice, and the connection/pairing and charge/power LEDs flash alternately. 3. Right-click the Acer VCM icon on the task bar, then select Bluetooth Headset Connection Center from the pop-up menu. If you have not paired any Bluetooth headset devices with the notebook previously, Acer VCM automatically scans all Bluetooth headset devices within range, then displays them in the Bluetooth Headset List with a New status. Otherwise, any previously paired Bluetooth headset device shows Read to Use.
4. Click the Acer Bluetooth VoIP Phone from the list, then click Connect. Acer VCM automatically pairs the phone to the notebook, then changes the phone status to Default Use.
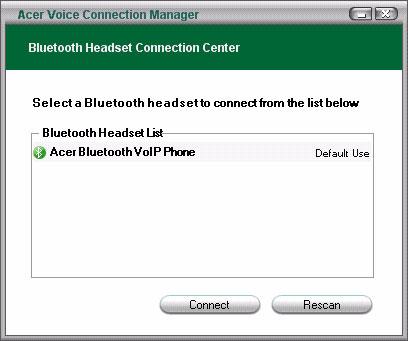
Note: Click Rescan if the Acer Bluetooth VoIP Phone does not appear on the list. After pairing, Acer VCM automatically connects the phone to the notebook each time you turn the phone on. There is no need to connect the phone again.
You can use the phone in handheld or hands-free (speaker phone) mode. When you receive an internet call from your instant messaging service (i.e. MSN® Messenger, Skype), press the Bluetooth connection/pairing button. The incoming call voice automatically diverts to the phone speaker so you can receive the call. Note:
Note: You can only receive/answer internet calls through the phone when it is linked to the notebook.
Every time you turn the phone on, Acer VCM automatically links it to the notebook. When linked, the
Bluetooth connection/pairing indicator on the phone blinks slowly. To switch to hands-free mode, rotate the phone flip counterclockwise, then press the speaker phone button. Refer to the illustration on the right.


