5 minute read
Engine-Related Items

NOTE: Whenever a part is worn excessively,
cracked, or damaged in any way, replacement is necessary.
SPECIAL TOOLS A number of special tools must be available to the technician when servicing the engine-related items. NOTE: When indicated for use, each special tool
will be identified by its specific name, as shown in the chart below, and capitalized.
Description p/n
Blind-Hole Bearing Puller 0644-500 Coolant Cap 0644-156 Drive Clutch Spanner Wrench 0644-136 Valve and Spring Retainer Tool 0644-448 Fan Spanner Wrench 0644-340 Water Pump Bearing and Seal Tool Kit 0644-557 Oil Seal Protector Tool 0644-219 Engine Leak-Down Test Kit 0644-522 Vacuum Test Pump 0644-131 Hood Harness Extension 1686-659 Hood Harness Extension 1686-660 Oil Filter Wrench 0644-551
NOTE: Special tools are available from the Arctic
Cat Service Parts Department.
Pressure Testing Engine
NOTE: To pressure test the engine, use Engine
Leak-Down Test Kit.
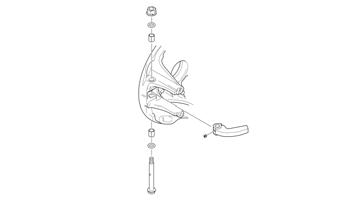
Recoil Starter
KEY
A.Cap Screw
B.Roller
C.Friction Plate
D.Cap Screw
E.Pawl Activator
F.Pawl
G.Return Spring
H.Friction Plate Spring
I.Main Spring
743-711A
REMOVING 1.Tie a slip-knot in the starter rope below the console and allow the rope to slowly retract against the starter case. 2.Remove the knot at the handle, remove the handle, and account for the handle cap; then thread the rope through the bushing in the console. 3.Remove the cap screws (A) securing the starter assembly to the magneto case; then remove the starter assembly. DISASSEMBLING
1.Secure the recoil starter in a vise.
2.Rotate the roller (B) counterclockwise until the notch of the roller is near the rope guide in the case. Guide the rope into the notch and slowly allow the roller to retract until all recoil spring tension is released.
3.While exerting downward pressure on the friction plate (C), remove the cap screw (D). 4.Slowly release the friction plate and lift the plate with pawl activator (E) free of the recoil roller; then remove the pawl activator from the friction plate. 5.Remove the pawl (F) and the return spring (G); then remove the friction plate spring (H). 6.Carefully lift the roller free of the case making sure the main spring (I) does not disengage from the case.
Account for the bushing.
7.Remove the main spring from the case by lifting the spring end up and out. Hold the remainder of the spring with thumbs and alternately release each thumb to allow the spring to gradually release from the case. ! WARNING
Always wear safety glasses and gloves when servicing the recoil starter.
! WARNING
During the disassembly procedure, continuous downward pressure must be exerted on the reel so it does not accidentally disengage and cause injury.
! WARNING
Care must be taken when allowing the recoil roller to unwind. Make sure all spring tension is released before continuing.
! WARNING
Care must be taken when lifting the roller free of the case.
NOTE: Do not remove the main spring unless
replacement is necessary. It should be visually inspected in place to save time.
8.Unwind the rope from the roller, untie the slip-knot, and remove the rope. CLEANING AND INSPECTING 1.Clean all recoil starter components.
2.Inspect springs and pawl for wear or damage. 3.Inspect the roller and case for cracks or damage. 4.Inspect the center hub for wear, cracks, or damage. 5.Inspect the rope for breaks or fraying. 6.Inspect the main spring for cracks, crystallization, or abnormal bends. 7.Inspect the handle for damage, cracks, or deterioration. ASSEMBLING 1.Hook the end of the main spring around the mounting lug in the case. 2.Insert the main spring into the case; then wind it in a counterclockwise direction until the complete spring is installed.
NOTE: The main spring must seat evenly in the
recoil case.
3.Insert the rope through the hole in the roller and tie a knot in the end; then wrap the rope counterclockwise around the roller leaving approximately 20 in. of rope free of the roller. 4.Apply low-temperature grease to the main spring and hub. 5.Align the hook in the end of the main spring with the notch in the roller. 6.Carefully slide the roller over the hub and engage the spring with the roller; then install the bushing. 7.Install the return spring making sure the short leg of the spring is properly installed in the hole in the roller; then install the pawl making sure the return spring is properly positioned in the notch of the pawl. 8.Slide the end of the rope through the rope guide of the case; then tie a slip-knot in the rope. 9.Apply a low-temperature grease to the friction plate.
Place the pawl activator into position on the friction plate making sure the arms of the activator are properly positioned to the pawl. 10.Place the friction plate into position allowing it to rest on the friction plate spring; then install the cap screw (coated with blue Loctite #243) and thread the cap screw in until it contacts the friction plate. 11.Press down on the friction plate and tighten the cap screw to 48 in.-lb. 12.With 20 in. of rope exposed, hook the rope in the notch of the roller. 13.Rotate the roller four or five turns counter-clockwise; then release the rope from the notch and allow the rope to retract. 14.Pull the rope out two or three times to check for correct tension.
NOTE: Increasing the rotations in step 13 will
increase spring tension.
INSTALLING 1.Place the starter assembly into position against the magneto case. 2.Secure the starter with cap screws (coated with blue
Loctite #243). Tighten to 60 in.-lb. NOTE: Before tightening the cap screws, slowly pull
the recoil rope until the pawl engages; then tighten the cap screws centering the recoil against the magneto case.
3.Thread the rope through the bushing in the console; then install the handle and secure with a knot. Seat the cap. 4.Release the slip-knot in the rope.
Air Silencer
The air silencer is a specially designed component used to silence the incoming fresh air and also to catch the fuel that “spits back” out of the carburetors. The carburetors are calibrated with the air silencer in position; therefore, the engine must never be run with the air silencer removed.
NOTE: To remove and install the air silencer, see
Engine section.
Cleaning and Inspecting 1.Check for holes or cracks in the silencer. 2.Periodically clean the silencer by removing the cover/tool tray assembly and vacuuming the interior of the silencer.