13 minute read
TRAILERING, STORAGE AND PRE-SEASON PREPARATION

from 2003 Seadoo GTI GTI California GTI LE GTI LE RFI RX DI GTX DI Operator’s Guide Manual – PDF DOWNLOAD

Trailering
Models with O.P.A.S. System
CAUTION: To avoid damaging O.P.A.S. side vanes, the maximum trailer wood bunks span including bunk width should not exceed 71 cm (28 in). Ends of both trailer wood bunks should not be more than 2.59m (102 in) away from watercraft bow attachment point. See following illustration.
TRAILER FOR O.P.A.S. EQUIPPED WATERCRAFT 1. Watercraft bow attachment point 2. Wood bunks A. 71 cm (28 in) B. 2.59 m (102 in)
All Models
WARNING
Always turn the fuel tank valve (if so equipped) to OFF position when trailering or docking the watercraft.
Make sure that oil reservoir and fuel tank caps are properly installed. WARNING
Never tip this vehicle on end for transporting. We recommend that you carry the vehicle in its normal operating position.
Check the applicable laws and regulations in your area concerning towing a trailer, especially the following rules: – brake system – tow vehicle weight – mirrors. Take the following precautions when towing the watercraft: Tie the watercraft to both bow and stern (front/rear) eyelets so that it is firmly retained on the trailer. Use additional tie-downs if necessary. CAUTION: Do not route ropes or tiedowns over the seat as they could produce permanent damage. Wrap ropes or tie-downs with rags or similar protectors where they can touch the watercraft body. Ensure all storage compartment covers and seat are properly latched.
WARNING
Make sure seat is securely latched before prior to trailering.
A SEA-DOO cover can protect the watercraft, particularly before driving on dirt roads, to prevent dirt entry through the air intake opening(s). Observe trailering safety precautions.
Launching/Loading
CAUTION: Before launching the watercraft, ensure the bilge plugs are fully screwed. After loading the watercraft, ensure they are removed to drain bilge.
Storage
WARNING
Because fuel and oil are inflammable, have an authorized SEA-DOO dealer inspect the fuel and oil systems integrity as specified in the periodic inspection chart.
It is recommended that the watercraft be serviced by an authorized SEA-DOO dealer for storage but the following operations can be performed by you with a minimum of tools. CAUTION: Do not run the engine during the storage period.
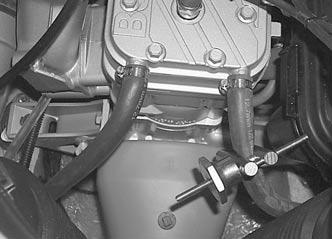
Engine Draining
Check engine drain hose (lowest hose of engine). Make sure there is no sand or other particles in it and that it is not obstructed so that water can exit the engine. Clean hose and fitting as necessary. CAUTION: Water in engine drain hose should be free to flow out, otherwise water could be trapped in engine. Should water freeze in engine, severe damage will occur. Check engine drain hose for obstructions.
Carburetor-Equipped Models

TYPICAL 1. Engine drain hose
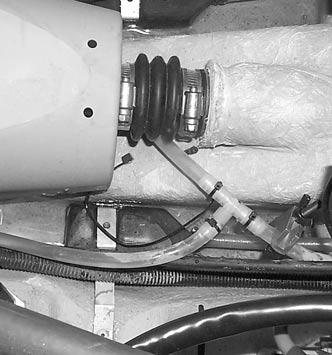
RFI Models
Disconnect the water supply hose used to cool the magneto. It features a quick connect fitting. Press both tabs and pull fitting in order to disconnect hose.
This hose is located at the bottom of the magneto cover beside the engine support.

TYPICAL 1. Press tabs here and disconnect hose
Water should flow out of the fitting (magneto cooling circuit) and hose (crankcase heat exchanger). Push and hold hose against bilge so that draining can take place.
TYPICAL 1. Fitting 2. Hose

Reconnect hose when done.
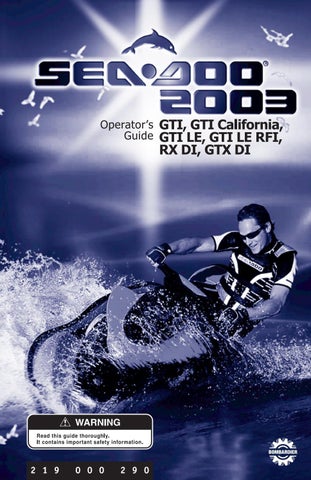
RX DI Models
Disconnect the quick connect fitting. Press both tabs and pull fitting.


DISCONNECT THIS HOSE
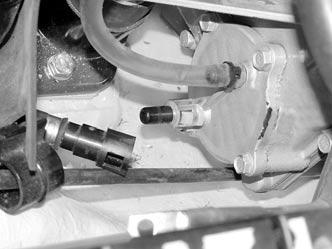
GTX DI Models

DISCONNECT THIS HOSE
All Models
Lower hose as necessary so that draining can take place. Reconnect fitting when done. Also ensure air compressor drain line is not obstructed. Clean as necessary.
All Models Body Rinsing/Repair
Wash the body with soap and water solution (only use mild detergent). Rinse thoroughly with fresh water. Remove marine organisms from the hull. CAUTION: Never clean fiberglass and plastic parts with strong detergent, degreasing agent, paint thinner, acetone, etc. For small gelcoat repairs, refer to an authorized SEA-DOO dealer. Replace damaged labels/decals.
Propulsion System
Lubricant in jet pump reservoir should be drained and reservoir cleaned. Refer to an authorized SEA-DOO dealer for this operation. Grease lubrication point(s) of propulsion system as explained in MAINTENANCE section.
Fuel System
SEA-DOO fuel stabilizer (or equivalent), can be added in fuel tank to prevent fuel deterioration and carburetor gumming. Follow manufacturer’s instructions for proper use. CAUTION: Fuel stabilizer should be added prior to engine lubrication to ensure fuel system components protection against varnish deposits.
WARNING
Always stop the engine before refueling. Fuel is inflammable and explosive under certain conditions. Always work in a well ventilated area. Do not smoke or allow open flames or sparks in the vicinity. Fuel tank may be pressurized, turn cap slowly when opening. Never use an open flame to check fuel level. When fueling, keep watercraft level. Do not overfill or top off the fuel tank and leave watercraft in the sun. As temperature increases, fuel expands and might overflow. Always wipe off any fuel spillage from the watercraft. Periodically verify fuel system. Always turn the fuel tank valve (if so equipped) to OFF position when the watercraft is not in use.
Cooling System Flushing and Engine Internal Lubrication
Refer to procedure in POST-OPERATION CARE.
Battery
Contact your authorized SEA-DOO dealer.
Antifreezing Protection
NOTE: This procedure requires approximately 2.5 L (2.6 U.S. qt.) of antifreeze. In cool regions where freezing point may be encountered, cooling system should be filled with an equal part of water and antifreeze solution.
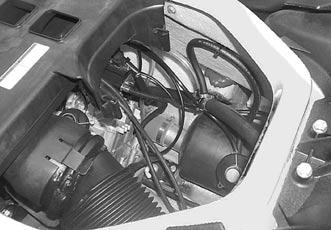
CAUTION: Antifreeze mix must be fed in cooling system. Otherwise remaining water will freeze. This operation requires a good technical knowledge of the cooling system path. If antifreezing is not performed adequately engine/exhaust system may freeze and cause severe engine damage. We strongly recommend this operation be performed by an authorized SEA-DOO dealer. CAUTION: Always use ethylene glycol antifreeze containing corrosion inhibitors specifically recommended for aluminum engines. NOTE: When available, it is recommended to use biodegradable antifreeze compatible with internal combustion aluminum engines. This will contribute to protect the environment. NOTE: The engine will not have to run during this operation but should have been ran before, to exhaust as much water as possible, from cooling system components. NOTE: On some models, it may be easier to reach hoses when you remove the vent tube support.

TYPICAL 1. Vent tube support Hose Pinchers Installation Some hoses have to be plugged to prevent draining, before filling cooling system jackets with the antifreeze.
All Models except DI Models
Install hose pinchers at the following location:

GTI, GTI LE MODELS (717 ENGINES) 1. Engine drain hose
787 RFI ENGINES 1. Engine drain hose
Make sure the fitting is properly connected to the magneto cover.
1. Fitting properly connected

GTI, GTI LE MODELS (717 ENGINES) 1. Hose pincher on injection hose going to tuned pipe TYPICAL — GTI, GTI LE (717 AND 787 RFI ENGINES) 1. Engine water outlet hose
Hose Disconnection Some hoses have to be disconnected. Disconnect hoses at the following location:

717 AND 787 RFI ENGINES 1. Disconnect engine water inlet hose
Antifreeze 717 engines only: Temporarily install a short piece of hose to engine water inlet at cylinder head.
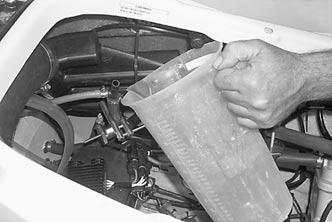
Insert a funnel into hose and pour antifreeze mixed with water in engine until the colored solution appears at the cooling system bleed outlet.

787 RFI Engines
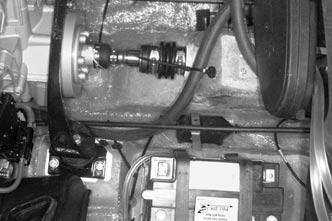
Disconnect hose just above T-fitting from as shown.

TYPICAL 1. Hose connecting to inlet fitting of cylinder head 2. Disconnect hose above T-fitting
Install a hose pincher just below T-fitting.
TYPICAL 1. Hose pincher below T-fitting
Pour approximately 300 mL (10oz) of antifreeze in the water regulator valve supply hose to allow antifreeze flowing through the valve and into muffler to protect it. Reconnect hose to T-fitting and remove hose pincher (if applicable). Remove temporary hose (on 717 engines) and reconnect engine water outlet hose. Remove remaining hose pinchers.
DI Models
Hose Pinchers Installation Some hoses have to be plugged to prevent draining, before filling cooling system jackets with the antifreeze. Install hose pinchers at the following location:
RX DI MODELS 1. Water outlet hose


GTX DI MODELS 1. Water outlet hose

RX DI MODELS 1. Crankcase cooling cover outlet hose GTX DI MODELS 1. Crankcase cooling cover outlet hose


RX DI MODELS 1. Engine cylinder drain hose


GTX DI MODELS 1. Engine cylinder drain hose
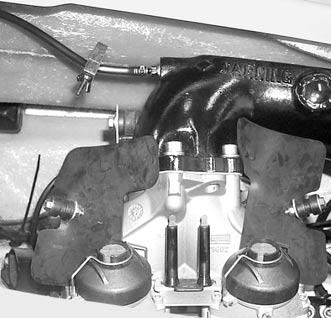
Hose Disconnection Disconnect water INLET hose at engine between T-fitting and cylinder head fitting.

RX DI MODELS 1. Disconnect this side of the T-fitting GTX DI MODELS 1. Disconnect this side of the T-fitting
Temporarily install a short piece of hose to replace the one removed. Antifreeze Insert a funnel into the temporary hose and pour antifreeze mix in engine until the colored solution appears at cooling system bleed outlet.
At this point, install a hose pincher on bleed outlet hose.
RX DI MODELS 1. Bleed outlet hose

GTX DI MODELS 1. Bleed outlet hose
Continue to pour until antifreeze flows in air compressor water outlet hose.

RX DI MODELS 1. Air compressor water outlet hose

GTX DI MODELS 1. Air compressor water outlet hose
Remove pinchers in this order to allow proper flow of antifreeze. 1.Bleed outlet hose. 2.Crankcase cooling cover outlet hose. 3.Engine cylinder drain hose. 4.Water outlet hose. Pour approximately 200 mL (7oz) of antifreeze in the water regulator valve supply hose to allow antifreeze flowing through the valve and into muffler to protect it. Remove temporary hose and reconnect engine water outlet hose.
All Models
Most of the antifreeze will drain out when removing the hose pinchers. Use a container to recover it. DISPOSE ANTIFREEZE AS PER YOUR LOCAL LAWS AND REGULATIONS. NOTE: Although antifreeze will mainly drain out, the antifreeze has mixed with the water that was possibly trapped in the water jackets and thus preventing freezing problems. At pre-season preparation, drain the remaining antifreeze from cooling system prior to using the watercraft. The following steps should be performed to provide the watercraft enhanced protection. Clean the bilge with hot water and detergent or with bilge cleaner. Rinse thoroughly. Lift front end of watercraft to completely drain bilge. If any repairs are needed to body or to the hull contact your authorized SEA-DOO dealer. For paint touch up to mechanical parts use Bombardier spray paint. Reinstall vent tube support (if applicable).
Anticorrosion Treatment
Wipe off any residual water in the engine compartment. Spray BOMBARDIER LUBE lubricant or equivalent over metallic components in engine compartment.
Lubricate the throttle cable with BOMBARDIER LUBE lubricant or equivalent.
WARNING
Do not lubricate the safety lanyard post.
Final Steps
Apply a good quality marine wax to the body. The seat and the seat extension (if so equipped) should be partially left opened and storage baskets (if so equipped) should be removed during storage. This will prevent engine compartment condensation and possible corrosion. If the watercraft is to be stored outside, cover it with an opaque tarpaulin to prevent sun rays and grime from affecting the plastic components, watercraft finish as well as preventing dust accumulation. CAUTION: The watercraft should never be left in water for storage. Never leave the watercraft stored in direct sunlight. Never completely seal watercraft in a plastic wrap. Ventilation must be provided to avoid condensation and possible corrosion.
Pre-Season Preparation
Use the following chart. Since technical skills and special tools are required, some operations should be performed by an authorized SEA-DOO dealer.
WARNING
Only perform procedures as detailed in this guide. It is recommended that the assistance of an authorized SEA-DOO dealer be periodically obtained on other components/ systems not covered in this guide. Unless otherwise specified, engine must not be running and the safety lanyard must be removed from its post for all maintenance procedures. Components inside engine compartment may be hot. When component conditions seem less than satisfactory, replace with genuine BOMBARDIER parts or approved equivalents.
Pre-Season Preparation Chart
NOTE: It is highly recommended that an authorized SEA-DOO dealer perform the annual safety inspection and factory campaigns in addition to the pre-season preparation all at the same time.
OPERATIONS
TO BE PERFORMED BY
GENERAL
Lubrication/corrosion protection Operator Spark plug replacement ➀ Dealer
ENGINE
Exhaust system condition (fasteners, hoses etc.) Dealer RAVE valve cleaning (if so equipped) Dealer Counterbalance shaft oil level (if so equipped) Dealer TDC setting (RFI and DI models) Dealer Air compressor, visual condition of hoses. Check for leaks (DI models) CAUTION: Main hose between compressor and fuel rail may be hot. Dealer COOLING SYSTEM Inspection of cooling system hoses and components Dealer
FUEL SYSTEM
Carburetor adjustment (carburetor-equipped models) Dealer Throttle ➁ and choke (carburetor-equipped models inspection/adjustment ) cable Dealer Fuel filter replacement (except RFI models) Dealer Fuel injection sensors verification (RFI and DI models) Dealer Fuel system; check valves, lines, fasteners, pressurization ➁ Dealer Direct injector, check for leakage (DI models) Dealer Filler neck, fuel tank and fuel cap condition ➁ Dealer Flame arrester inspection (DI models) ➁ Dealer Fuel tank straps Operator Refill fuel tank
LUBRICATION SYSTEM
Oil injection pump adjustment and bleeding Dealer Oil filter replacement Dealer Oil injection reservoir straps Operator Oil injection reservoir filling Operator
ELECTRICAL SYSTEM
Battery condition/charging and reinstallation Dealer Battery, starter connections and routing ➁ Dealer Monitoring beeper Dealer Digitally encoded security system Dealer STEERING SYSTEM Steering system adjustment/inspection ➁ Dealer O.P.A.S. SYSTEM Check O.P.A.S. system condition including filter. Replace all 8 square rings Dealer
PROPULSION SYSTEM
Shifter system condition and cable adjustment Dealer VTS (Variable Trim System, if so equipped) Dealer Propulsion system inspection Dealer Jet pump oil replacement Dealer HULL AND BODY Inspection of bailer pick-ups Dealer
➀ Before installing new spark plugs, it is suggested to burn the excess BOMBARDIER
LUBE lubricant or equivalent by starting the engine using the old spark plugs. ➁ Safety item covered in the annual safety inspection.