
18 minute read
Clinical


Injection moulding technique: A case study
Kostas Karagiannopoulos1
1 Kostas Karagiannopoulos, Consultant prosthodontist, King’s College, London, UK Introduction Direct composite resin restorations now have more applications and indications than ever before. Advances in adhesive dentistry have allowed clinical problems that would once necessitate a more aggressive indirect restoration to be managed in a minimally invasive, additive, direct technique. Moreover, the aesthetic outcomes that direct restorative materials can achieve can be comparable to those of indirect. Patient awareness is also changing with time and those seeking cosmetic improvements are now more reluctant to opt for materials that require some sort of tooth preparation. The injection moulding technique (IMT) involves injecting a low viscosity resin composite in a pressurised, transparent silicone index made from a diagnostic wax-up, aiming to replicate an already performed mock-up and an approved tooth form arrangement.
Injectable composite resins
Flowable composites have traditionally been considered too weak to be used as a restorative material and were merely used as lining materials under a composite paste. Their main advantage over restorative pastes is the level of adaptation on the tooth surface.
In the IMT, their ‘flowable’ nature allows for filling the space within a silicone index with a resin under compression. Modern injectable resins, such as G-aenial Universal Injectable (GC), have a high filler content, wear resistance and gloss retention as well as full coverage silane coating of filler particles using FSC technology.
The IMT has the advantage of replicating the excellent anatomy defined by a labmade diagnostic wax-up whereby it would be used for the fabrication of indirect restorations.
Indirect restorations nevertheless are more time consuming and costly. Direct composite restorations require significant chair time, good operator skills and knowledge of the material used.
1a
1c 1b
1d
1e 1f
1g 1h
Figure 1: Preoperative photographs
Compared to freehand indirect restorations, the IMT provides quicker, more consistent results with less adjustments required. Table 1 outlines the advantages and limitations of the IMT.
The following case report outlines the steps in restoring an aesthetically-driven case with G-aenial Universal Injectable based on a wax-up.
Case report A 45-year-old male presented complaining of the appearance of his front teeth. Severe multifactorial, localised tooth surface loss led to short clinical crowns. Worn teeth in occlusion due to dentoalveolar compensation has the restorative disadvantage of lack of interocclusal space.
Due to localised and mainly erosive nature of his tooth wear, the patient decided to proceed with additive resin composites on the affected teeth using the Dahl concept.
All primary disease was controlled, including the intrinsic acid erosion prior to the restorative phase. A full set of preoperative pictures (Figure 1) were taken to carry out an aesthetic assessment. Intraoral optical scans were used to do an occlusal analysis and prescribe a diagnostic wax-up for the six upper anterior teeth (Figure 2).
A mock-up was carried by using bis-acryl resin (Luxatemp, DMG) and a putty/wash matrix (Exaflex, GC) of the diagnostic wax-up. This was done to verify the aesthetic outcome as well as verify the occlusal changes as the occlusal vertical dimension was increased by 2mm (Figure 3).
The approved mock-up provided the patient with the reassurance about his new bite and also the emotional excitement about the final smile.
A clear silicone matrix (Exaclear, GC) of the diagnostic wax-up was made in the dental laboratory and pressurised
Table 1 : The advantages and limitations of the IMT
Advantages Disadvantages
Excellent anatomy More visits needed Verify aesthetics, occlusion, phonetics Polychromatic teeth not suitable Smooth, predictable workflow Lack of long-term survival data Avoid misunderstandings Easy to implement and teach Easy to repair with clear stent
in a hydro-flask for five minutes at two-bar pressure. The clear silicone was compressed against the wax-up using a spaced, Essix-style tray (Figure 4).
The upper anterior teeth were cleaned and roughened with particle abrasion of 50-micron alumina powder (Etchmaster, Groman Dental) and isolated with rubber dam (Isodam, Four D Rubber).
The teeth were etched using 35% phosphoric acid (Ultra Etch, Ultradent) and hybridised with a universal adhesive resin (G Premio Bond, GC) and a dental curing unit (D-Light Pro, GC).
The alternate tooth technique was used to carry out the IMT. PTFE tape was used to protect the teeth that were not to be etched and bonded (Figure 5).
Holes were made through the clear silicone stent at the incisal edge level to allow the tip of the injectable composite through. The syringe of the composite was inserted and injected through the holes in the clear stent once that was seated fully in the mouth.
The space to be filled in with the resin was visually inspected through the clear stent for any voids or bubbles and the resin was polymerised for 30 seconds through the
2a 2b
2c 2d


3a 3b

3c 3d 3e
Figure 3: Mock-up carried out in bis-acryl resin
4a
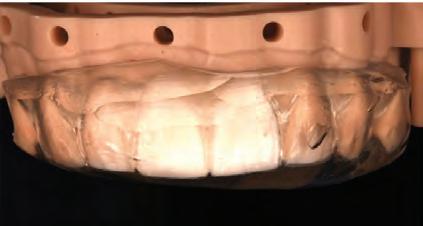
4b
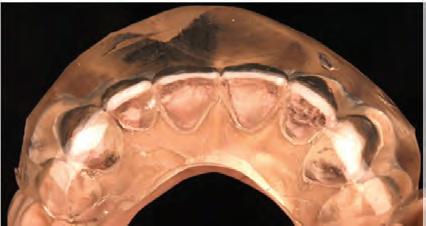
Figure 4: Exaclear stent made on diagnostic wax-up
stent and 30 seconds without the stent. A further 10 second cure was carried out after applying an oxygen inhibition layer gel (Oxygone gel, Cosmedent).
The excess from the first three restorations was managed with proximal strips (Komet strips, West One Dental) and a number 12 surgical blade (Swallow Dental) before the other three were done. The restored teeth were covered with Teflon tape to facilitate excess removal on completion.
Once proximal and gingival excess was removed on all six restorations there would be minimal finishing as the anatomy was wax driven and not freehand.
There may be a need for fine grit diamonds or discs on the cervical junction to avoid any ledges while a natural emergence is maintained. Finishing and polishing spirals (Eve Polishers, Trycare) are usually enough to achieve a high surface lustre.
An additional step would involve a nylon brush (Goat hair brush, Micerium) and a felt wheel (Shiny felt wheels, Micerium) at 5,000rpm.
The final result exhibited good surface texture and lustre while anterior guidance was maintained (Figure 6).
Discussion
With the increasing use of resin composites in cosmetic and restorative dentistry there is value in having techniques that will replicate an already approved aesthetic outcome and occlusal scheme.
The IMT aims at providing this copy/paste approach by using modern injectable resins. Alternative techniques include the index technique as described by Ammannato and colleagues (2015) and the partial and full moulding techniques as described by Dietschi and Saratti (2020).
Each technique has its limitations and the IMT has the

5a
6a

6c 5b 5c
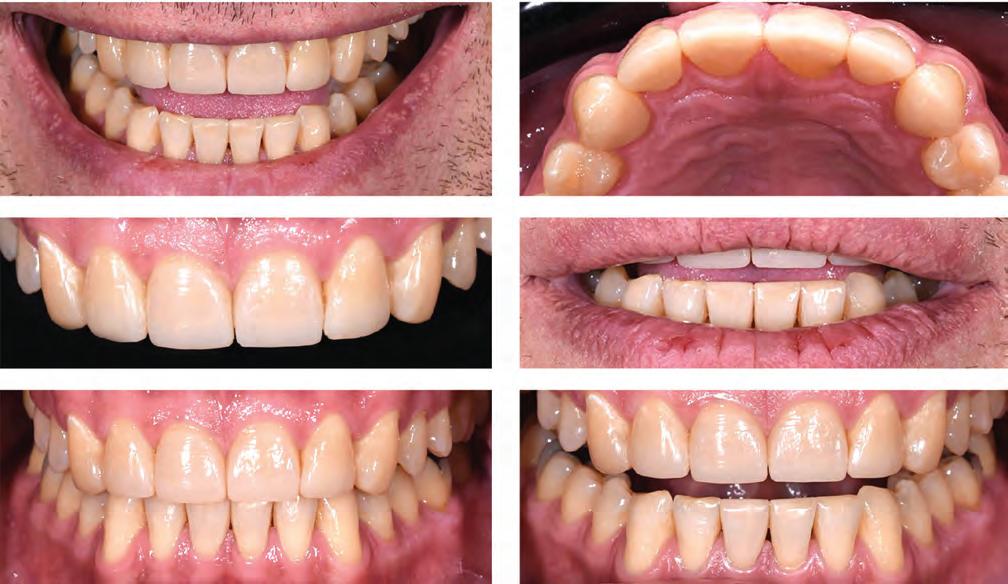
Figure 5: Isolation and etching on the alternate tooth technique
Figure 6: The final result exhibited good surface texture and lustre while anterior guidance was maintainedtooth technique
6b
6d
6e 6f
limitations of working best on mono-shade restorations and having a greater treatment time and cost than freehand composites.
The IMT does require some finishing but significantly less than freehand restorations. Its main benefit after all is the replicated anatomy of a diagnostic wax-up. There is some excess material cervically and proximally but there should not be a need to alter the shape facially/incisally with discs and burs.
It can be used for both purely additive or in subtractive/ additive techniques. However, it is mainly intended for fully additive direct restorations where a mock-up can be done to assess the proposed aesthetics and occlusion. Similarly, it is indicated for monochromatic restorations although layering is possible through cutback, a palatal silicone key or different stents made at different levels.
This novel technique aims at copying the anatomy of the diagnostic wax-up. It is more consistent and predictable than freehand techniques while avoiding unpleasant surprises for the patient. Furthermore, it does not require complex clinical skills and it is easy to teach
References
Ammannato R, Ferraris F, Marchesi G (2015) The ‘index technique’ in worn dentition: a new and conservative approach. Int J Esthet Dent 10(1): 68-99
Dietschi D, Saratti CM (2020) Interceptive treatment of tooth wear: a revised protocol for the full molding technique. Int J Esthet Dent 15(3): 264-286
Reprinted with permission by Clinical Dentistry Karagiannis K. Injection moulding technique: A case study. Clinical Dentistry June/July 2021: 19-24
Top tips in local anaesthesia
Ian Corbett¹
1 Ian Corbett, FDS (OS) RCSED, PhD, BDS Hons, BSc Hons Consultant Oral Surgeon and Honorary Senior Lecturer in Oral Surgery. Fellow in Oral Surgery of the Royal College of Surgeons of Edinburgh, UK Introduction Successful local anaesthesia is paramount to almost all that we do in clinical dentistry. Dental injections and dental pain are frequently cited by patients as reasons for nonattendance. If we can achieve pain-free dentistry, we also gain patient satisfaction, as well as making our work less stressful.
My research interest over many years has been local anaesthesia. I have had the pleasure of working with the team at Septodont throughout. Septodont supports independent research internationally and seeks advice and evidence from leading research teams on product development. This is apparent in the quality of its pain management range.
Local anaesthesia equipment 1. Buy quality.
When it comes to purchasing new needles, remember that not all needles are the same! Look for a product with a multifaceted bevel design that aids needle penetration and reduces needle deflection as it passes through the tissue. Check for a high manufacturing standard and a good quality assurance system. Inferior needles may cause greater injection pain and tissue damage due to bluntness, metal barbs or shards and damaged tips.
2. Length. It is useful to have long and short needles for blocks and infiltrations, respectively. An ultra-short needle may be useful for periodontal ligament injections, although not necessary. Never use a short needle for an inferior alveolar block: although needle breakage is rare with modern needles, it generally occurs at the attachment to the plastic hub. Do not bend needles, which will weaken them. The needle should not be inserted all the way to the hub, as if the needle breaks it will be difficult to retrieve.
3. Diameter. Needle diameter or gauge refers to the external diameter of the needle, not the internal diameter, which has complex relationship to flow, and there is little advantage in increasing diameter. Patients are unable to discriminate between the commonly used needle diameters in terms of injection pain.
4. Use safer sharps. Mandated by UK health and safety law, a safer sharps system should be used where feasible. There are several different designs are available, get samples from company representatives and find one that you feel comfortable using.
5. Avoid resheathing needles. Any form of needle resheathing device carries a risk and it is easy to be distracted while doing this. There is also a risk when removing the sheathed contaminated needle for
disposal and cleaning of the syringe. Think about the risks to the whole team.
6. Disposable items. Fully disposable syringe systems may be cost effective – the cost of a single use safety syringe may be less than that of small-scale sterilisation costs. Whereas partially disposable syringes, where the handle is reusable, will save on waste. Consider the environmental impact of waste and the disposal costs for contaminated sharps.
. Single injection. Single-use systems can be reused on the same patient at a single visit, however, surgical grade sharps, blunt very easily and needle penetration force and pain increase with each injection. Best practice is to use a new needle for each injection administered.
8. Aspiration system. Whatever system you use, make sure that you are familiar with the aspiration system. Some syringes need a compatible anaesthetic cartridge, with some designs no longer available. Take a moment to check the syringe you are using.
9. Change. If you are changing to a safety syringe for the first time, or changing suppliers, make sure you are aware of any differences in set-up or use. It takes time to adapt to change, so be patient with the learning process.
10. Needlestick. Your practice should have a needlestick policy in place in the unfortunate event that this occurs. Make sure you are familiar with it.
Local anaesthesia solutions 1. Lidocaine.
For many years, lidocaine has been considered the gold standard in local anaesthetics. Available as a 2% lidocaine, 1:80000 adrenaline dental cartridge, lidocaine is ideal for inferior alveolar nerve blocks. The highest adrenaline concentration of the dental local anaesthetics also makes this the first choice to minimise bleeding during procedures.
2. Articaine. Considered the new standard in many countries, articaine has been available in the UK since 1998, with increasing popularity. Studies have identified a potential risk of neurotoxicity when 4% articaine is used for nerve blocks, and, as efficacy for blocks is the same as 2% lidocaine, articaine is best reserved for infiltration anaesthesia where the thiophene ring structure of articaine increases lipid solubility and aids diffusion. Articaine is rapidly broken down by serum esterases, in addition to the liver, however, as articaine has a high binding to proteins, which act as a reservoir, it has a long duration of action.
3. Mepivacaine. Available as a plain solution, mepivacaine has largely replaced prilocaine with felypressin as the go-to anaesthetic for avoiding adrenaline. This is the longest acting of the local anaesthetics without adrenaline.
4. Bupivacaine. While not available as a dental preparation, bupivacaine and levobupivacaine are long acting local anaesthetics most often used for achieving post-surgical pain control.
5. Adrenaline. In dental solutions, adrenaline concentration ranges from 1:80 000 to 1:200 000. It is added to prolong the anaesthetic effect by reducing local blood flow and preventing the anaesthetic being washed out of the tissues, a secondary effect is to reduce bleeding.
Responsible for the heart racing, shaky effects reported by patients and often mistaken for allergy, aspiration will avoid inadvertent intravascular injection, although some patients appear sensitive to these effects.Lowering the dose of adrenaline does not reduce efficacy and therefore a 1:200 000 concentration is ideal for all but surgical procedures. Adrenaline is unstable and an antioxidant preservative is added to all adrenaline-containing solutions, frequently sodium metabisulphite, which is a known allergen.
6. Think volume. Always use the minimum anaesthetic volume to achieve the required effect. 2.2ml of solution is enough to achieve a block or infiltration anaesthesia. Consider a different technique if this doesn’t work.
7. Stay within dose limits. A good rule of thumb is a single cartridge of anaesthetic per 10kg patient weight, up to a maximum of seven cartridges. Keep your cartridges in sight until the end of the procedure for ease of checking your dose. If using more than one type of anaesthetic then the maximum dose is the lowest maximum for either, not twice as much.
8. Always aspirate. Systemic toxicity can be the result of intravascular injection as well as overdose. Get into the habit of always aspirating prior to injection.
9. Check the label. Always ensure you have the correct solution and it is within the expiry date. As anaesthetics are drugs, you should always record which solution, the total volume and technique used for each patient. It is good practice to record a positive or negative aspiration. There is no need to record the batch number, although this could be recorded as part of your stock control procedures.
10. Allergy. True allergy to current amide local anaesthetics is rare. Signs and symptoms, such as perioral rash and swelling, itching and hives, abdominal pain and wheezing and airway compromise. If an allergy is suspected, the patient should be referred to your local immunology service for hypersensitivity testing. Usually multiple local anaesthetics will be tested that allows for identification of those safe to use.
Local anaesthesia storage 1. Keep it dark. Local anaesthetic should be stored in its original packing, preferably in the dark, which prevents oxidation and degradation of the solution.
2. Room temperature. Solutions should be stored in a cool place or at room temperature. There is no need to refrigerate anaesthetic solutions. It is good practice to place a maximum/minimum thermometer in cupboards for storing pharmaceutical products and keep a daily record, especially in hot weather.
3. Expiry date. Anaesthetic solutions generally have long expiry times, usually in excess of one year.. Good stock control and stock rotation should ensure that the expiry date is not reached. Never use a product beyond its expiry date, as it may become ineffective and, more importantly, because of the risk of microbial contamination.
4. Don’t warm. There is no benefit in terms of patient comfort or effectiveness in warming anaesthetic solution. Keeping solution in anaesthetic warmers for prolonged periods can lead to chemical degradation. There may be discomfort from using cold solution, for example from a refrigerator. Room temperature is ideal prior to injection.
5. Perform cartridge checks. Always carefully check the cartridge prior to use. Check that you have the correct anaesthetic agent and concentration. Check whether you are using an adrenaline-containing or plain solution. Check the expiry date. Finally, check the condition of the cartridge, septum and bung for contamination or damage. Small cracks in the glass may frequently go unnoticed, which can lead to the glass breaking when injection pressure is applied.
6. Discolouration. Discolouration of anaesthetic solution is an indication of oxidation. The solution should be clear; solutions with a yellow hue should be discarded.
7. Bubbles. Anaesthetic cartridges frequently have a small bubble visible in the solution. This is part of the filling process. Anything other than a bubble of 2-3mm diameter would suggest that the cartridge has leaked and, as a result, may have bacterial contamination. Discard any cartridge with a large bubble.
8. Disinfection. While local anaesthetic solution within the cartridge is sterile, the glass cartridge itself is not. Cartridges should not be placed in disinfectant or sterilising liquids due to the risk of this entering the cartridge and then being injected into the patient. If a sterile field is required, then a clean cartridge can be placed in a sterile, fully enclosed syringe system using a four-handed aseptic non-touch technique.
Local anaesthesia techniques 1. Think patient.
Check the medical history every time. Do you need to modify your anaesthesia in terms of the solution or technique? What has worked well in the past? How anxious is your patient and how will this change your approach? The injection is often given as reason for dental anxiety and non-attendance. Getting the injection and anaesthesia right is key to a successful practice.
2. Think procedure. What do you want to achieve this visit? This dictates the technique to be used. Are you working on a single tooth or multiple teeth? Will the gingiva be involved, for example in placing a rubber dam clamp? Do you need pulpal anaesthesia? Pulpal anaesthesia is often difficult to achieve with an inflamed pulp. Are you scaling? Deep scaling can affect the tooth, soft tissues and bone, like a dental extraction. Consider your treatment plan and ensure you have anaesthetised all the relevant structures.
3. Know your anatomy. Spending a little time revising the anatomy of the jaws, becoming familiar with nerve and vessel pathways and territories, will improve your success rate and help avoid complications. It may have been a long time since BDS anatomy lectures.
4. Block versus infiltration. Block anaesthesia, where solution is deposited by the nerve trunk to anaesthetise all upstream branches, is a good way to anaesthetise large areas with low volumes.
5. Start simple. A simple buccal infiltration will be enough for most of teeth and for restorative procedures. Although articaine buccal infiltration is effective for mandibular molar anaesthesia, don’t forget your IANB technique. Combine techniques for optimum anaesthesia. I often use the anterior ramus technique for an IANB, touching bone early and deflecting the needle parallel to the ramus towards the mandibular foramen, which works well for me. Learn a new technique or refresh an old one. When was the last time you gave a closed mouth or VaziraniAkinosi IANB block?
6. Needle bevel. The needle bevel may be marked on the plastic hub of the needle in quality products. This allows the bevel to be orientated during needle penetration and injection. The bevel should be rotated so that the opening faces towards the bone. This prevents the needle from piercing the periosteum covering the bone, avoiding sub-periosteal injection, which can be painful as solution strips the periosteum from the bone. Bevel to bone also aids in depositing the solution towards the bone and hence the teeth or foramen, rather than out into the tissues. 7. Speed. Slow injections increase efficacy. Ideally, a cartridge should be administered over one minute, which increases the efficacy of an inferior alveolar nerve block by around 50%. Try timing your own injections, it is surprising how long a minute feels. Slow injection keeps the solution localised.
8. Rapid and forceful injections can damage the tissues and lead to necrosis. This can be particularly painful in the palatal mucosa, which has little space to accommodate volume.
9. Foramen. Don’t inject into a foramen! The mental foramen is usually palpable through the buccal mucosa. The nasopalatine foramen is landmarked by the incisive papilla. Injecting within the canal may disrupt the nerve and cause a prolonged altered sensation. If the needle enters the foramen, withdraw and reposition.
10. Explain sensation, recovery time and give specific instructions regarding eating and drinking. Consider technique and solution combinations to prolong or shorten the duration of anaesthesia, depending on the procedure and predicted level of postoperative pain. Give good analgesic advice.
Supported by Septodont
With a research interest and international recognition in the field of dental anaesthesia, having published extensively, lectured internationally, and awarded a European Federation for the Advancement of Anaesthesia in Dentistry prize, Mr Ian Corbett shares his thoughts in on all things anaesthesia – from solutions and storage, to measuring success and dealing with failure.


