

DENTAL SOLUTIONS

Cosmetic & Restorative

Endodontics
Equipment
Handpieces & Instruments
Preventative
Orthodontics
Pain Control
Practice Resources

Transform your Dental Practice
With The New BA International Ulticlean
As dental professionals, you strive to provide the best care, comfort, and efficiency for your patients. The BA International Ultimate UC500L Unit (Ulticlean) is an efficient cost-effective modern solution that redefines dental hygiene and periodontal care. Here is why investing in this innovative technology is a game-changer for your practice.
1. Comprehensive Cleaning and Polishing
The Ulticlean (UC500L) unit combines air polishing and ultrasonic periodontal treatment to deliver unmatched plaque and stain removal.
Its advanced air-polishing system gently sprays water and powder to remove plaque, biofilm, pigment, and soft dirt, leaving the tooth surface smooth and resistant to future build-up.
Unlike traditional methods, the Ulticlean is gentle on enamel and does not scratch the tooth surface, ensuring an enhanced patient experience.
2. Versatility Across Treatments.
The unit supports multiple applications, including:
• Biofilm and stains removal
• Supragingival and subgingival scaling
• Endodontic cleaning and irrigation
• Implant maintenance
Its specialised handpieces and a range of tips allow precise cleaning, even in challenging areas like periodontal pockets and around implants.
3. Enhanced Patient Comfort
Patients often hesitate to undergo dental procedures due to discomfort. The Ulticlean (UC500L) addresses this with:
• Warm water supply, ensuring a soothing experience.
• Elliptical vibration trajectories in the ultrasonic handpiece, dispersing impact force for gentle scaling.
4. Efficiency and Hygiene at Your Fingertips
Designed with modern practices in mind, the Ulticlean (UC500L) comes with:
• Dual water supply bottles for easy integration of solutions like chlorhexidine or sodium hypochlorite.
• Sterilization boxes for air polishing and ultrasonic handpieces, ensuring optimal hygiene.
• The compact cart system offers seamless mobility and ergonomic storage, making your workspace functional and organised.


5. Cost-effective Maintenance and Repair
Built with high-quality materials, the UC500L ensures a longer lifespan, reducing the need for frequent replacements with easy to replace parts to minimize the downtime in your practice.
Backed by Henry Schein Hayes team, you will have access to expert technicians and quick turnaround times ensuring your unit stays in optimal condition allowing you to deliver exceptional results without inflating your budget.
6- Cutting-Edge Prophylaxis Powders
Pair the Ulticlean Prophylaxis Powder Series, available in variants for supragingival and subgingival use. With formulations designed for specific needs, including sensitive teeth and implant care, these powders elevate treatment outcomes
Why Invest Now?
With a growing body of research linking oral health to overall well-being, patient demand for advanced, minimally invasive care is on the rise. The Ulticlean not only meets these expectations but positions your practice as a leader in dental innovation. A cost effective solution for your Practice in investment and maintenance.
Discover how the BA International Ultimate Ulticlean (UC500L) can transform your workflow and patient outcomes. Contact Henry Schein today to learn more or schedule a demo!

Unveiling The Morita T100
What makes the T100’s design philosophy unique?
The T100 is a well-balanced option for dental professionals who seek both quality and efficiency in their equipment while prioritising patient comfort and ease of use. Its thoughtful design and intuitive functionality make it an ideal choice for many clinics looking to enhance their daily operations without breaking the bank.
Design Collaboration
The unit combines the precision and design aesthetic of F.A. Porsche with MORITA’s high-quality dental equipment standards. The result is a timeless look with a focus on ease of use and comfort for both dentist and patient.
User-Friendly Operating Panel
The tactile buttons make the unit easy to operate, streamlining the daily workflow for dentists.
Patient Comfort
Oil Hydraulic System: The unit can be smoothly lowered to 400mm, making it accessible for older patients and children.
Cushion
The optional wide cushion offers added comfort, ensuring patients are at ease, even during longer procedures.
Backrest Design
The wide backrest adds to patient comfort and provides support for various treatment positions
Pantograph Lift Mechanism
The cantilevered chair is coupled with a pantograph lift mechanism, the most widely used height adjustment mechanism in the world. Patients can stretch out their legs during treatment, which means they are less stressed and can cope with longer treatments.


Efficient LED Surgical Light
Luna Vue TS: The light is energy-efficient, with an adjustable brightness of up to 30,000 lux, ensuring optimal illumination of the treatment area. The light can be activated or turned off with a simple gesture, enhancing hygiene and convenience during procedures.
Easy Maintenance
The MORITA hygiene standard for the T100 emphasises ease of maintenance and cleanliness, which is crucial for ensuring both efficiency and a hygienic environment. Some key design features that contribute to this standard are:

• Permanently Integrated Instrument Holders: The holders have a simple, streamlined design with wide openings, making them easy to clean and reducing the risk of contamination.
• Water Supply System at the Spittoon: The water not only fills the beaker but also automatically cleans the bowl, minimizing manual intervention and ensuring the spittoon stays hygienic.
• Hose Rinsing System with onboard Storage: The adapter for the hose rinsing system is stored onboard, which helps to save space and ensures that the equipment remains readily available for cleaning when necessary.
These design elements reflect a focus on both functionality and hygiene, making the T100 an efficient, low-maintenance solution for dental practices.


Spittoon System
The unit has an automatic cleaning function for the spittoon, ensuring hygiene with minimal effort.

Space-Saving Design
The hose rinsing system adapter is conveniently stored on the unit to save space.

This unique combination of elements in the T100’s design philosophy results in a dental treatment unit that not only looks sophisticated but also enhances the overall treatment experience for both practitioners and patients. The unit provides exceptional value, offering reliability and durability at a competitive price point in the market.
View Product

Functionality, ergonomics, aesthetics
The Morita T100 is a dental treatment unit designed to combine functionality, aesthetics, and comfort for both dentists and patients. It incorporates features that enhance usability and efficiency in endodontic and general dental procedures.
Developed in collaboration with Studio F.A. Porsche, the T100 features a timeless aesthetic with a pure white body and customizable upholstery colors. Its compact design integrates seamlessly into any dental practice environment.
The pantograph lifting mechanism allows for smooth seat height adjustments (400 mm to 750 mm), ensuring accessibility for all patients, including children and elderly individuals. A wide backrest and optional luxury cushions provide additional patient comfort during extended treatments. The double-articulated headrest ensures optimal positioning of the patient’s head.
Intuitive controls include a tactile operating panel and a low-angle footswitch to minimize strain on the dentist’s ankle. The integrated instrument holder is designed for smooth movement and easy accessibility during procedures.
The Luna Vue TS LED light provides up to 30,000 lux brightness with four adjustable levels, ensuring clear visibility. An optional touchless sensor enhances hygiene by allowing contact-free operation.
The unit includes easy-to-clean holders and surfaces, supporting efficient infection control protocols. A large spittoon bowl and optional trays for personal items enhance patient convenience.
Compatibility with various tools, including ultrasonic scalers and micromotors, supports diverse dental procedures.
The Morita T100 is an excellent choice for dental professionals seeking a reliable, aesthetically pleasing, and functional treatment unit that balances cost-effectiveness with high-quality features.
Morita T100 Dental Chair
Find Out More

A Lithium Disilicate Block With 100% Survival
Achieving 100% Survival After 4 Years Of Clinical Service
Published in the April issue of American Journal of Dentistry 2024, “A randomized controlled clinical trial on press and block lithium disilicate partial crowns: A 4-year recall” authored by Edoardo Ferrari-Cagidiaco, Giulia Verniani, Andrew Keeling, Ferdinando Zarone, Roberto Sorrentino, Daniele Manfredini, Marco Ferrari, a clinical trial¹ compared the performance of adhesively bonded partial coverage crowns manufactured either with a digital workflow using Initial™ LiSi Block or with an analog workflow using LiSi Press.
“No statistically significant difference emerged between the two groups in any of the assessed variables (P>0.05) … and no one restoration was replaced or repaired, and the survival rate was 100% after 4 years of clinical service.”
Am J Dent. 2024 Apr;37(2):85-90
Initial™ LiSi Block, featuring HDM lithium disilicate technology, shows comparable clinical performance to pressed lithium disilicate with the added advantages of:
• Productivity benefits from faster workflow; patient convenience & practice profitability
• Quality benefits from a ceramic with superior marginal fit, greater wear resistance & lower wear on the antagonist²
• Aesthetic benefits from a high gloss, naturally opalescent lithium disilicate with exceptional anterior aesthetics— meaning no requirement to cut back on the incisal edge; thus retaining incisal edge strength
The HDM (High Density Micronisation) technology features submicron lithium disilicate crystals which are densely packed into the glass matrix.
Aside from beautiful opalescence, the structure of Initial™ LiSi Block ensures high strength and surface polish while enabling the fully crystallised block to be milled without deep microcracking or damage to margin detail.
GC Initial™ LiSi Block offers reduced process time: no need to fire because it is fully crystallised. Just mill, polish and place! Available in high translucency (HT) and low translucency (LT), giving you a natural opalescence in any light. See the new and revised preparation guidelines and transform your CAD/CAM workflow today.
Reference List
1. Ferrari-Cagidiaco, E., Verniani, G., Keeling, A., Zarone, F., Sorrentino, R., Manfredini, D., & Ferrari, M. (2024).
A randomized controlled clinical trial on press and block lithium disilicate partial crowns: A 4-year recall. American journal of dentistry, 37(2), 85–90.
2. GC R&D, Japan, Data on file [marginal gap was quantified by μ-X ray CT system] available from info.australasia@gc.dental.

View the full study Read Now >

View Now >

Go for a Trustworthy Ceramic and Metal Primer
Choose CLEARFIL™ CERAMIC PRIMER PLUS
Ceramic primers vary widely in composition and effectiveness, despite what their name might suggest. Most common primers include silane, but silane alone is insufficient for pre-treating all materials commonly used in indirect restorations before bonding.
Silane—typically in the form of γ-MPS—has a strong affinity for silica- or glass-based materials. While certain metals and their oxides can chemically react with silane, other components provide a stronger and more reliable bond to metals and metal oxides and should be seriously considered. For metal(oxide) pretreatment in bonding, the MDP monomer is far more reactive than silane. The original MDP monomer, developed by Kuraray Co., Ltd. in 1981, remains the highestquality MDP available, as confirmed by research1
CLEARFIL™ CERAMIC PRIMER PLUS is a single-component adhesive primer that forms strong bonds with a wide range of restorative materials. This two-in-one primer incorporates the original MDP monomer, which establishes a robust bond with metals and zirconia. Simultaneously, the silane coupling agent (γ-MPS) ensures excellent adhesion to resin composites, hybrid ceramics, and glass-based ceramics such as lithium disilicate and porcelain.
Enhanced Bottle Design
The primer bottle is designed for effortless one-handed operation. Its unique nozzle ensures precise dispensing, minimizing the risk of contamination and spills.

Proven Effectiveness of MDP-Containing Primers
Pre-treatment with MDP and Silane
To enhance the bonding of prosthetic materials, use a primer containing both MDP and silane. Numerous studies have demonstrated the effectiveness of this combination.
A study by Cao, Y., et al2 confirmed the superiority of CLEARFIL™ CERAMIC PRIMER PLUS (Kuraray Noritake Dental Inc.) over three other primers in improving the bond strength between zirconia and two different resin cements.
Reymus, M., et al. concluded in their study3 that before adhesive cementation of air abraded CAD/CAM resin composites, pretreatment with a specific primer, not only containing silane but also methacrylate monomers results in successfully bonded restorations. Pretreatment using an only silane containing primer results in inadequate adhesion.
Study by Cao, Y., et al.
The effects of four primers and two cement types on the bonding strength of zirconia.
• Clearfil Ceramic Primer outperformed three other primers in improving the bond strength between zirconia and two different resin cements.
Findings from Reymus, M., et al.
Bonding to new CAD/CAM resin composites: influence of air abrasion and conditioning agents as pretreatment strategy.
• Adhesive cementation of air-abraded CAD/CAM resin composites benefits from pre-treatment with a primer containing both silane and methacrylate monomers.
• Primers with only silane provided inadequate adhesion, while the combination significantly enhanced bonding success.
Four different types of CAD/CAM ceramic materials where tested in a study by Uğur, M., et al.4 Vita Mark II, IPS E.max CAD, Vita Suprinity and Vita Enamic were primed with three different primers CLEARFIL™ CERAMIC PRIMER PLUS, G-Multi Primer (GC) and Monobond S (Ivoclar Vivadent), either after hydrofluoric acid etching or no etching. It was concluded in this study that the combined effects of MDP and γ-MPTS resulted in a significant increase in the bonding strength of the resin cement to the used ceramics.
Research by Uğur, M., et al.
Effect of ceramic primers with different chemical contents on the shear bond strength of CAD/CAM ceramics with resin cement after thermal ageing.
• Four types of CAD/CAM ceramic materials (Vita Mark II, IPS e.max CAD, Vita Suprinity, and Vita Enamic) were tested with three primers: Clearfil Ceramic Primer Plus, G-Multi Primer, and Monobond S.
• Pre-treatment included hydrofluoric acid etching or no etching. Results showed that primers combining MDP and γ-MPTS substantially improved bond strength to ceramics.
Pilo, R., et al. concluded in their study5 investigating the effect of tribochemical treatment and silane reactivity on the bonding to zirconia that MDP greatly contributes to the bonding mechanism of the silane containing primers. CLEARFIL™ CERAMIC PRIMER PLUS showed to be the most reliable and effective primer in this study.
Pilo, R., et al. Study
Effect of tribochemical treatments and silane reactivity on resin bonding to zirconia.
• Examined tribochemical treatment and silane reactivity on zirconia bonding.
• MDP significantly contributed to the bonding mechanism of silane-containing primers.
• Ceramic Primer Plus was the most reliable and effective primer.
In his study6 that forms a part of his well-known dissertation, Masanao Inokoshi and others concluded that a combined mechanical/chemical pre-treatment of sintered IPS e.max ZirCAD (Ivoclar Vivadent) results in the most durable bond to zirconia. In this case when the chemical pretreatment was performed with CLEARFIL™ CERAMIC PRIMER PLUS or Monobond Plus (Ivoclar Vivadent). Scotchbond Universal (3M ESPE) and Z-PRIME Plus (Bisco), also used in this study as chemical pretreatment primers showed significant lower bond strengths.
Optimal Priming for Adhesive Cementing
Research by Masanao Inokoshi
Bonding effectiveness to different chemically pre-treated dental zirconia.
• Investigated mechanical/chemical pre-treatment of sintered IPS e.max ZirCAD for durable zirconia bonding.
• Clearfil Ceramic Primer (Kuraray Noritake) and Monobond Plus (Ivoclar Vivadent) yielded the most durable bonds, outperforming Scotchbond Universal (3M ESPE) and Z-PRIME Plus (Bisco), which showed significantly lower bond strengths.
These studies underscore the critical role of MDP-containing primers in achieving reliable and durable adhesion for prosthetic materials.Products containing only silane, such as RelyX™ Ceramic Primer (3M ESPE), are less effective at creating a durable bond between resin cements or composites and ceramic- or metal-based prosthetic materials.

Straightforward and Efficient
The use of CLEARFIL™ CERAMIC PRIMER PLUS is straightforward: just apply it to the bonding surface, dry it, and proceed with the following treatment step. Incorporated into your process to streamline adhesion preparation and achieve reliable results!
Image from clinical case by MDT Rondoni and Dr. Attanasio
Henry Schein
Just Apply and Dry
CLEARFIL™ CERAMIC PRIMER PLUS may be applied to any restoration surface after the required pretreatment. Pretreat the adherent surface of the restoration as indicated:
Metals Metal oxides (Zirconia) Implant abutments and Frames Silica-based ceramics Glass-fiber posts** Composite resins

OR *
Sandblast, rinse & dry
Apply hydrofluoric acid, rinse & dry”
Apply K-ETCHANT Syringe, leave for 5 sec, rinse & dry
Universal prosthetic primer designed for a strong bond and procedural simplicity
* If your laboratory already treated with a hydrofluoric acid, cleaning and activating with K-ETCHANT Syringe just before applying CLEARFIL™ CERAMIC PRIMER PLUS is recommended.
**When using with PANAVIA™ V5 or CLEARFIL™ DC CORE PLUS


By Peter Schouten
Technical Manager Kuraray Dental Benelux
References:
1. Yoshihara K., et al.(2015) Functional monomer impurity affects adhesive performance, Dental Materials, Volume 31, Issue 12, https://doi.org/10.1016/j.dental.2015.09.019.
Pilo, R., et al. (2018). “Effect of tribochemical treatments and silane reactivity on resin bonding to zirconia.” Dent Mater 34(2): 306-316.
2. Cao, Y., et al. (2021). The effects of four primers and two cement types on the bonding strength of zirconia. Annals of Translational Medicine. 10. 10.21037/atm-21-4909.
3. Reymus, M., et al. (2019). “Bonding to new CAD/CAM resin composites: influence of air abrasion and conditioning agents as pretreatment strategy.” Clin Oral Investig 23(2): 529-538.
4. U ğ ur, M., et al. (2023). Effect of ceramic primers with different chemical contents on the shear bond strength of CAD/CAM ceramics with resin cement after thermal ageing. BMC Oral Health. 23. 10.1186/s12903-023-02909-z.
5. Pilo, R., et al. (2018). “Effect of tribochemical treatments and silane reactivity on resin bonding to zirconia.” Dent Mater 34(2): 306-316.
6. Inokoshi, M., et al. (2014). “Bonding effectiveness to different chemically pre-treated dental zirconia.” Clin Oral Investig 18(7): 1803-1812..
View Product
Simplifying Esthetic Composite reconstructions using
CLEARFIL MAJESTY™ ES-2 UNIVERSAL
A Chameleon Supercomposite
Introduction
The name of the game in modern-day esthetic and restorative dentistry is that of Responsible Esthetics. The goal of treatment typically strives to correct any structural and cosmetic shortfalls in both biologically-driven and traumaaffected teeth with the precise, artistic placement of various replacement layers, all whilst respecting and retaining a maximal volume of residual tooth structure. Anterior teeth can be affected by enamel and dentin dysplasia, caries and sclerotic conditions and are characterized by a laundry list of genetically-derived and environmentally-acquired conditions with an esthetic deficit that often threaten an individual’s functional and psychosocial integrity if not restored to the seamless picture of health.
Missing and defective tooth structure must be categorized into its attendant enamel and dentin components. Both substrates are distinctly different in composition, with enamel being highly inorganic in nature and dentin proportionately more collagenous in nature. The latter stratum is responsible for the refraction of light, the expression of the true colour of the tooth, namely the hue and the endowment of fracture toughness or resilience in functional performance. The value and chroma are the other elements of colour and are modified by the thickness of enamel. The replacement of enamel has been found to be best substituted from a biomechanical perspective by adhesively-bonded indirect porcelain restorations, and dentin using both composite resin and short fibre reinforced composite (SFRC), the latter imparting increased fracture toughness in large volume replacement restorations, especially those with pericervical structural deficits.
In adolescent patients, the gold standard of treatment involves direct composite resin, as often zero to minimal
tooth structure preparation is required as a foundation to the bonded restorative. It would be impractical to use bonded indirect restorations when the development of the dentition in puberty is continuous, especially with the retraction of gingiva as one progresses to young adulthood. Resin composite allows prescience in the opportunity to predictably modify and/or add to the existing restoration if dental bleaching for the other teeth is desired or if a further traumatic incident is encountered. The ability to modify bonded porcelain is not predictable and frequent marginal failures occur due to a lower shear bond strength to bonded composite, especially after thermocycling. This is despite our ability to establish a chemical linkage via silane coupling agents from silicate ceramics to resin composite especially at a blended interface.
Statement of Problem
Dental shades in clinical dentistry have long been classified using the VITA* Classical A1 – D4 shade guide. Despite being ubiquitous in dental practices, composite resin systems with corresponding shade systems do not satisfactorily match to their purported shade1. Floriani et al found that various mixtures of different shades in one system was required to achieve an acceptable color match with the VITA* Classical shades using the CIEDE2000 formula. Testing another composite resin, they found that none of the A1, A2 or A3 shades matched acceptably to the standard shade guide2 Indeed, even with indirect ceramic layering systems, a wide range of unacceptable discrepancy was noted between VITA* labelled porcelain shades and the actual shade guide3. The VITA* Classical shade guide became the standard in dental shade classification with the release of its A1-D4 shade guide in 1985. The majority of human-tested dental shades has been found to be in the A-family (78.5%), followed by C (13.2%), D (5.2%) and B (3.1%)1. As such, the shade accuracy of a given composite system must be important if they are to be visually naturomimetic.
Chameleon Effect Development
There are myriad composite resin systems featuring a simplified shade Universal system that have acceptable chameleon effects due to their balance of translucency, light transmission, diffusion and refractive index properties. There is a concern over how these optical properties may change after both thermocycling and wet storage, potentially compromising the excellent initial esthetic blend4. Refractive index (RI) is best optimized when the RI of the inorganic fillers match closely with the RI of the cured organic matrix, typically in a range between 1.47 and 1.525. If the match is dissimilar, this drives up the opacity of the restoration due to heightened refraction and reflection at the filler/matrix interface6 Layering of composite to mask an intraoral defect is complicated by the need to mask any linear defects such as fracture lines superimposed over the shadowing of the dark intraoral cavity in addition to regional colour variations. It is confounded by the requirement to recreate natural maverick and translucent effects particularly in the incisal window region of upper and lower incisors and canines, giving the illusion of a virgin, healthy tooth. This has been historically difficult to accomplish in anterior teeth given the need to block out restorative interfaces with natural tooth structure and recreate a seamless internal structure and details. This detailed layer belies a well contoured enamel layer with realistic translucency, polishability and accurate primary and secondary anatomy.
Adding to the complexities described above, the histoanatomical approach to composite layering dictates that missing enamel is replaced by enamel shades, and dentin by the corresponding dentin shade in the appropriate shade. This shade must be selected at the very start of the appointment, as often even a minute of dehydration has a negative effect on both the perceptibility threshold and acceptability threshold of teeth7, resulting in the incorrect shade.
Development
CLEARFIL MAJESTY™ ES-2 is a value-based supernanofilled composite system that covers 15 VITA* shades in just 4 shade options with its Universal series. This Universal series provides a chameleon effect and has 4 variants: Universal (U), Universal Light (UL), Universal Dark (UD) and Universal White (UW). It is the VITA*-approved shading concept relative to colour accuracy. Incorporating nano-fillers that consist of silanated barium glass fillers and slanted silica nanoclusters, its wear resistance is high and features minimal abrasiveness against the functional antagonist. The RI of both inorganic filler and organic matrix are well-matched, and the high refractive index of the composite mimics and is extremely similar to natural enamel (1.613) and dentin (1.540), thanks to an innovation labelled Light Diffusion Technology (LDT), which distorts light in a similar way dental tissue does8
There is comfort that the stability of refractive index and other optical transmission properties remains statistically stable even after artificial thermocycling and water-storage aging studies4. The colour stability of CLEARFIL MAJESTY™ ES-2 has been proven over time, where a direct comparison to Filtek Ultimate showed CLEARFIL MAJESTY™ ES-2 to feature significantly less colour variation from baseline and marginal functional wear over a three to four year period in teeth featuring amelogenesis imperfecta9. This colour substantivity is important as dietary and environmental stressors applied over time should have as minimal effect on the restoration to ensure continued esthetic integration.
Clinical Protocol
CLEARFIL MAJESTY™ ES-2 Universal is a monochromatic solution that covers the five key shades featured in the CLEARFIL MAJESTY™ ES-2 Premium. As such, it exhibits the most significant LDT relative to all five shades, as its ability is equal when blending to higher value translucent shades as it does to cervical chromatic shades. In a Class IV restoration with a defined fracture line, the challenge is to restore the tooth in a minimal volume of available space. The alchemy requires a complete visual occlusion of the fracture line position, and recreation of internal and external opaque and translucent anatomy along with maverick staining, craze lines and effects. In anterior teeth, the idiom of “the less you see, the less you notice” is not true, especially due to the presence of incisal edge window effects as above, however, materials with the best light diffusion and structure transference properties should be utilized to ensure the highest probability of success.
A 15 year old ASA I female presented to the practice exhibiting aged, chromatic composite restorations with poor marginal integration and gross axial overhangs; essentially a gross failure of primary anatomy and esthetics. She had been involved in a bike accident where she high-sided off braking sharply in a face-meets-concrete scenario, resulting in an uncomplicated moderate enamel-dentin fracture with blushing, affecting both the facial and palatal aspects of tooth 1.1 and a mild uncomplicated enamel dentin fracture affecting the distoincisobuccolingual aspect of tooth 2.1. The restoration overhangs were significant, extending into the proximal contour zone, thus obviating effective interdental cleaning. Vitality tests were confirmed along with radiographs to exclude the presence of apical pathology. The patient accepted the option of pre-prosthetic whitening, to improve the value characteristics of the adjacent teeth, allowing the selection of a brighter value shade combination. Intraoral digital scans were acquired and custom bleaching trays with a no-reservoir, cervical seal-priority design were fabricated. The patient was instructed to bleach overnight for a 2 week period using a 10% carbamide peroxide solution
(Opalesence, Ultradent Products, UT) until her maximal value was reached. Her baseline shade of the incisors was a 1M1/2M1 combination in the upper incisors and a 2M1 in the lower incisors. On final post-bleach assessment she exhibited a lightened shade of VITA* 0M3 in all incisors. The patient was instructed to use a fluoride-containing, amorphous calcium phosphate complex (ToothMousse Plus, GC America) during the following 2 weeks after cessation of whitening whilst the residual oxygen radical species dissipated from the teeth. On the day of the procedure, the pre-dehydrated shade was assessed using the supplied “real composite” shade guide tabs featured in the CLEARFIL MAJESTY™ ES-2 Premium system, with the enamel shade being WE (White Enamel) and the dentin shade WD (White Dentin). It was assessed that both white maverick effects as well as a moderate halo effect

was desired along with moderate to strong translucency in the incisal window. The patient was anesthetized using 1.5 carpules of 2% Lignocaine with 1:100,000 epinephrine (Septodont) before a rubber affixed with individual ties for the central incisors (NicTone Medium). Excavation of the old restorative material was undertaken, and the residual natural incisal edge was found to be undermined by a through-andthrough fracture. Thus, the preparation was converted into a true Class IV design, with the facioincisal cavosurface margin subjected to an infinity bevel. The maxillary central incisors were isolated from the lateral incisors by way of a serrated metal strip (Komet) and the prepared surfaces subjected to micro particle abrasion using a 29 micron aluminum oxide powder in 17.5% ethanol carrier (Aquacare). The surfaces were subsequently treated with a calcium sodium phosphosilicate powder (Sylc, Aquacare) to increase the inorganic content of the prepared surface especially extending into the exposed tubules. The teeth were etched using a 33% orthophosphoric acid before a 1 minute 2% chlorhexidine scrub (Vista Products). The surface was reduced to a moist dentin surface before the bond applied, air thinned and cured.
Mylar strip was pre-crimped in the palatoproximal line
angles and positioned on the linguoaxial surface of both teeth 1.1 and 2.1. There is no shade guide for the CLEARFIL MAJESTY™ ES-2 Universal U shade, as it bears a significant chameleon effect however it does come in a light (L) and dark (D) variant. The UL shade was deemed the most suitable for the palatal or lingual shelf, with an average thickness of 0.3mm. This layer was applied in a freehand fashion with a focus on establishing the desired outline form of the tooth relative to the contralateral 2.1. The Mylar matrix setup was removed and a precurved metal matrix (Garrison Slickband, Garrison Dental) was oriented in a position perpendicular to its normal placement interproximally, and the end of the curved band tucked into the sulcus before being secured by a wedge. In this way, there is light separation of the central incisors and an intimate contact between the matrix band and the mesial edge of the freshly applied lingual shelf. A 0.5mm frame extending more than halfway through the contact point was created and cured. The process was repeated on tooth

2.1 with the goal of recreating both lingual and proximal walls of the restoration, leaving only the facial volume to be replaced.
Block-out of the composite extensions against the natural tooth structure was achieved by opacification using an opaque composite resin (WD, CLEARFIL MAJESTY™ ES-2 Premium, Kuraray Noritake Dental Inc.) layered in both horizontal and vertical increments. It is noted that the restorative join line must be completely obscured at the end of layering the dentin volume, otherwise the case will have almost certain esthetic failure. The internal dentin anatomy and its inherent variation was created to mirror that of the 2.1, which had minimal compromise of its incisal window with details intact. A supertranslucent composite resin (Clear, CLEARFIL MAJESTY™ ES-2 Premium, Kuraray Noritake Dental Inc.) was placed between the lobes of the dentin layers and cured. A 9:1 ratio of white:orange tint was mixed and placed on the incisal edge and proximoincisal corners to recreate the halo effect. A pure white tint was placed in gentle
A
Figure 1. Pre-operative unrestricted smile 1:2 ratio view, teeth 1.1 and 2.1 with old, defective composite restorations with excessive chroma
Figure 2. Pre-crimped Mylar matrix repeated on the DIBP aspect of tooth 2.1 to close the available space. CLEARFIL MAJESTY™ ES-2 Universal UL is used here.
dentin mamelon-connecting spider legs up to the incisal edge to impart the realism. This was layered in a manner consistent with the appearance of the 2.1.
Discussion
The esthetic merit of this case is foundationally supported by composite resin technology on multiple levels. The colour and physical stability over time needs to be proven in order for the clinician to have faith in its prognostication. Specifically, the material needs to have an excellent and well-matched refractive index, and one that is unaffected by both water and thermocycling stressors.
The palatal shelf was fabricated using a new-generation super nano-filled universal composite system that boasts a strong chameleon effect. If it is our intention to fool the eye, to obscure, then this first layer works well to start the blockout process of the darkness of the mouth behind the fracture line of the restored tooth. Following this, the chroma and value of the tooth are corrected using the dentin, simultaneous to its continued opacification of the fracture line and intraoral darkness. Both dentin and enamel layers are applied histoanatomically, that is, in a manner respecting the various thickness zones observed in nature.
Ultimately, esthetic success in direct composite resin is not dictated on the first day post-operatively. Factors are in play, from dehydration to occlusal wrinkles that need to be ironed out and corrected. The win depends on what material is used, along with how that material was developed to what standards, and why shade accuracy is so important in a world of variety. In a dental world with myriad composite options, we are looking for precision. Precision in technology leads to efficiency and physicoesthetic maintenance in clinical results. This ultimately results in a boost to clinician-patient confidence and an optimal prognosis.


View the Range
References:

1. Elamin HO, Abubakr NH, Ibrahim YE. Identifying the tooth shade in group of patients using Vita Easyshade. Eur J Dent. 2015 Apr-Jun;9(2):213-217.doi: 10.4103/1305-7456.156828. PMID: 26038652; PMCID: PMC4439848. 2. Floriani F, Brandfon BA, Sawczuk NJ, Lopes GC, Rocha MG, Oliveira D. Color difference between the vita classical shade guide and composite veneers using the dual-layer technique. J Clin Exp Dent. 2022 Aug 1;14(8):e615-e620. doi: 10.4317/ jced.59759. PMID: 36046166; PMCID: PMC9422970. 3. Gurrea J, Gurrea M, Bruguera A, Sampaio CS, Janal M, Bonfante E, Coelho PG, Hirata R. Evaluation of Dental Shade Guide Variability Using Cross-Polarized Photography. Int J Periodontics Restorative Dent. 2016 Sep-Oct;36(5):e76-81. doi: 10.11607/prd.2700. PMID: 27560681. 4. Almasabi W, Tichy A, Abdou A, Hosaka K, Nakajima M, Tagami J. Effect of water storage and thermocycling on light transmission properties, translucency and refractive index of nanofilled flowable composites. Dent Mater J. 2021 May 29;40(3):599-605. doi: 10.4012/dmj.2020-154. Epub 2020 Dec 24. PMID: 33361663. 5. Arai Y, Kurokawa H, Takamizawa T, et al.. Evaluation of structural coloration of experimental flowable resin composites. J Esthet Restor Dent. 2020;e12674. 6. Ota M, Ando S, Endo H, et al.. Influence of refractive index on optical parameters of experimental resin composites. Acta Odontol Scand. 2012;70(5):362–367. 7. Suliman S, Sulaiman TA, Olafsson VG, Delgado AJ, Donovan TE, Heymann HO. Effect of time on tooth dehydration and rehydration. J Esthet Restor Dent. 2019 Mar;31(2):118-123. doi: 10.1111/jerd.12461. Epub 2019 Feb 23. PMID: 30801926. 8. Meng Z, Yao XS, Yao H, Liang Y, Liu T, Li Y, Wang G, Lan S. Measurement of the refractive index of human teeth by optical coherence tomography. J Biomed Opt. 2009 May-Jun;14(3):034010. doi: 10.1117/1.3130322. PMID: 19566303. 9. Tekçe N, Demirci M, Sancak EI, Güder G, Tuncer S, Baydemir C. Clinical Performance of Direct Posterior Composite Restorations in Patients with Amelogenesis Imperfecta. Oper Dent. 2022 Nov 1;47(6):620-629. doi: 10.2341/21-106-C. PMID: 36281978.
*VITA is a trademark of VITA Zahnfabrik, Bad Sackingen, Germany

Figure 3. Both horizontal and vertical dentin composite increments are demonstrated mimicking the contralateral tooth.
Figure 4 & 5. Final immediate post-operative result after finishing and polishing
Dr. Clarence Tam
HBSc, DDS, FIADFE, AAACD
Bonding in Minimally Invasive Repair Procedures: Tips And Tricks
Resin composites are wonderful restorative materials: They allow for minimally invasive, defect-oriented tooth preparation, may be modelled as desired, and can be modified and repaired whenever necessary. To achieve all of this, however, a strong and longlasting bond is an absolute requirement. The bond needs to be established either between enamel and dentin on one side and the resin composite on the other, or between the existing and the newly applied composite material.
Universal Adhesive
Committed to keeping clinical procedures as simple as possible, I use an 8th-generation bonding agent –CLEARFIL™ Universal Bond Quick (Kuraray Noritake Dental Inc.) in my dental office. Containing Rapid Bond Technology, it allows for a particularly easy and straightforward use without the need for extensive rubbing or long waiting times. At the same time, it bonds well to various substrates including enamel, dentin and resin composite as it contains the original MDP monomer.
Its composition and resulting versatility make CLEARFIL™
Universal Bond Quick the first choice for many indications including non- to minimally-invasive repair procedures. As it works extraordinarily well in situations where we want to bond to dentin, enamel or old composite (Fig.1), it is usually

not necessary to remove the whole existing restoration that needs to be repaired or modified. Instead, preparation may be limited to the composite part, so that no additional tooth structure needs to be removed.
Clinical Protocol
Depending on the condition of the existing restoration surface, the repair protocol may be slightly different. The basic steps are as follows:
Protocol 1: Oxygen inhibition layer still on the surface
• No surface treatment required, rinse with water in case of contamination with blood or saliva, followed by air-drying and (optionally) adhesive application
• Apply new layer of composite immediately
Protocol 2: Oxygen inhibition layer already removed from the composite surface
• Remove the composite around the defect and create a bevel at the cavity margin with rotating instruments
• Sandblast the surface with aluminium oxide particles
• Fresh composite surface: Clean the surface with KATANA™ Cleaner (Kuraray Noritake Dental Inc.) or etch with phosphoric acid etchant
• Composite surface older than two weeks: Etch with phosphoric acid etchant
• Apply the universal adhesive (which contains silane)
• Apply a new layer of composite
Figure 1. CLEARFIL™ Universal Bond Quick establishes a strong bond to dentin, enamel or old composite.
Henry Schein
Clinical Recommendations
1. Stay in the composite during preparation
When an old composite restoration needs to be replaced –e.g. because the existing restoration shows discolouration or the patient asks for a brighter shade – it is possible to remove only a part of the composite and leave the rest in place to save the underlying healthy tooth structure. Accurate control over the amount of material removed and the amount of material left in place is offered by the use of UV light. Under UV light, the composite is perfectly visible (Fig.2). Hence, a highly conservative structure removal is supported (Fig.3).


2. Increase adhesion by sandblasting
Creating a clean, micro-retentive composite surface ideal for bonding: This is the aim of sandblasting the affected composite area with aluminium oxide particles (Fig. 4). The particle size I prefer is 27 μm. Residual particles, may be removed with 37% orthophosphoric acid, which needs to be rinsed off thoroughly before air-drying the surface (Figs. 5a and 5b).


Figure 2. Controlling structure removal with UV light, which nicely reveals the old composite.
Figure 4. Air-abrasion with 27 μm aluminium oxide particles.
Figure 3. Tooth preparation with rotating instruments.
Figure 5A. Phosphoric acid etching. Adjacent teeth are protected with PTFE tape.
Figure 5B. Thorough rinsing to remove the etchant from the surface.
3. Use a universal adhesive that contains silane
When bonding to old composite, silanisation of the surface is recommended to increase the bond strength. On dentin, a separate silane shows no positive effect. Hence, it is recommended to apply a separate silane to the composite surface only, a challenging task in situations with a surface consisting of tooth structure and composite. As CLEARFIL™ Universal Bond Quick contains silane, the separate silane application step may be skipped, which clearly simplifies the procedure (Figs. 6a and 6b).
4. If in doubt, use a universal adhesive during repair procedures
Whenever detected during restoration, defects in the composite layer or air bubbles can be repaired or eliminated right away. As long as the oxygen inhibition layer is still present, another layer of composite may be applied immediately without any prior steps. However, if the surface has been contaminated by saliva or blood (Figs. 7a and 7b) or it is unclear whether we are bonding to dentin, enamel or composite, CLEARFIL™ Universal Bond Quick may be applied (Fig. 8). On top, a new layer of composite is placed to restore the defect (Fig. 9).


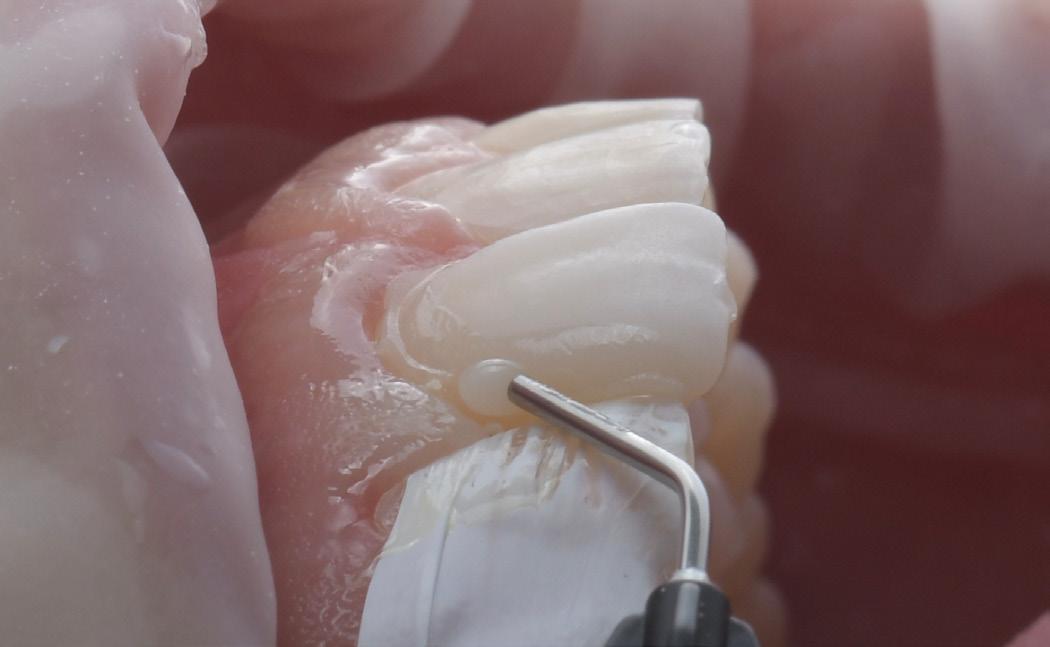
Figure 6A. Application of CLEARFIL™ Universal Bond Quick to the prepared surface
Figure 7A. Composite surface with a defect near the margin with blood contaminating the affected area.
Figure 6B. Solvent evaporation with a gentle stream of air.
Figure 7B. Composite surface with a defect near the margin after thorough rinsing and drying.
Figure 8. Application of the universal adhesive.
Figure 9. Application of composite material to restore the defect.
Henry Schein
5. If available, place a silicone index to simplify anatomical shaping
If the defect is small, it is possible to apply the flowable composite directly and remove the excesses (Fig. 10). The obtaining of a natural shape and smooth transition between old and new composite, however, is simplified by the use of a silicone index or matrix (Fig. 11), which might still be present from the original restoration procedure. A possible outcome of this type of repair is shown in Figure 12; both images were taken prior to finishing and polishing.


Conclusion
Elimination of bubbles or defects in a freshly created restoration, changes in the colour of an existing filling or a shape correction due to wear processes: Modifying composite restorations can be easy – provided that appropriate materials and techniques are used. One of the key elements on the path to success is the selection of a suitable adhesive system, preferably a universal single-bottle adhesive like CLEARFIL™ Universal Bond Quick, which allows for streamlined procedures and supports excellent outcomes. By respecting the provided tips, it is possible to create the desired outcomes in a minimally invasive, straightforward way, laying the foundation for long-lasting aesthetics and function.


Figure 10. : Flowable composite spreading and excess removal.
Figure 11. Silicone index placed over the teeth including the tooth with the defect.
Figure 12. Outcome of the flowable injection procedure.
Dr. Michał Jaczewski City of Legnica, Poland.
Effective Solution For a Defective Amalgam Restoration
Brilliant Everglow Composite
Introduction
Dental amalgam has been used for the restoration of Class I and Class II cavities for many years. However, concerns about its lack of aesthetics, health and environmental issues have led to an increase in demand for tooth coloured restorations in the posterior region. Resin composite offers the opportunity for clinicians to provide both aesthetic and conservative restorations that are sealed to the underlying tooth. This case demonstrates the replacement of a defective amalgam restoration using BRILLIANT EverGlow (COLTENE), which is a universal submicron hybrid composite that can be used for both anterior and posterior restorations.
Patient presentation
In this case, a 44-year-old male presented with persistent temperature sensitivity localised to the upper left first molar (Fig. 1). The patient had previously expressed interest in replacing the existing amalgam filling that was over 20 years old for a new tooth coloured alternative.


Examination and diagnosis
Following investigation the tooth was hypersensitive to sensibility testing particularly around the occlusal margins of the restoration. Fracture testing proved to be negative and no irreversible pulp problems were detected. Radiographs revealed some areas of cervical burnout but no significant bone loss or strong evidence of caries. A provisional diagnosis was made as marginal microleakage from the existing amalgam restoration +/- underlying secondary caries.
Treatment plan
Due to the symptoms it was agreed to remove the previous restoration to explore for cracks and remove any caries. A definitive direct composite replacement was planned to restore the tooth to full functionality and meet the patient’s aesthetic expectations. Prior to isolation, a shade selection (A2/B2) was made using the combined kit shade guide. It uses a simplified shade system with seven body shade groupings making single shade restorations very simplistic, which is ideal for posterior restorations. The inclusion of selective translucent and opaque shades allows for creative colour correction or incisal effects, which are particularly useful for anterior restorations.
Treatment protocol
Following anaesthesia, the upper left quadrant was isolated using a rubber dam. Meticulous isolation is required to facilitate contaminant free bonding and reduce the likelihood of microleakage. Once achieved it can make restoration placement less stressful by producing a very clean and tidy working field. Removal of the restoration revealed no underlying cracks and areas of secondary caries were fully removed until hard dentine was reached.
Fig 1: Cavity prep and sectional matrix
Fig 3: First incremental cuspal build up
Fig 2: Construction of proximal wall
Fig 4:
Sculpting tip wetted with ochre tint

A sectional matrix was used to best rebuild the proximal wall (Fig. 2). Enamel was selectively etched using 37.5% phosphoric acid (Etchant Gel S, COLTENE) then fully rinsed and dried. A universal one step bonding resin (ONE COAT 7 UNIVERSAL, COLTENE) was applied to both enamel and dentine using a microbrush in a scrubbing motion for two periods of 20 seconds followed by light air dispersion using a three-in-one syringe.
The first stage of restoration involved transforming the Class II cavity to a Class I by directly building up the proximal wall (Fig. 3). This increment was adapted to the cavity floor and matrix foil using a microbrush. The firm yet pliable consistency of BRILLIANT EverGlow allows efficient packing of the material with minimal pull back. The base of the proximal box was then filled using smaller 2mm increments until it reached cavity floor level. A 20 second cure between each increment was completed using a high power LED curing light (Coltolux, COLTENE).


The adapted cavity was then restored using individual cuspal increments to recreate each incline (Fig. 4). The material was injected into the chosen cavity wall with firm and steady pressure to ensure full adaptation to the cavity walls. A technique called point sculpting was then employed. This involved dipping a fine tipped probe into a light brown tint (Paint on Colour, COLTENE, Fig. 5). The probe was then used to sculpt the fissures directly, the tint helping to lightly colour the fissures whilst simultaneously acting as a wetting resin when removing excess. Once the shape of the cusp was satisfactory, a microbush was then used to adapt the composite to the peripheral margins to create a more seamless junction. The cuspal increment was then cured.

The same process was then repeated for the remaining cusps. To reproduce the more saturated and finer fissure stains, a dark brown tint was applied using an endodontic file (Fig. 6) at two points where the fissure patterns adjoin one another. This was then gently brushed using a microbrush to remove excess until a good saturation was achieved. Following the final cure, the matrix band was fully removed and the restoration cured from each side for 40 seconds. Excess resin was removed using an excavator and white Arkansas stone in a slow handpiece. Following rubber dam removal, occlusion was checked and adjusted using an Arkansas stone in a fast handpiece.
Finishing
A very simple polishing protocol was employed using the DIATECH ShapeGuard Composite Polishing Kit (COLTENE). The cup was first used to broadly polish the cuspal surfaces followed by the pointed cone, which was used to more finely polish towards the fissures. The polishing wheel was then used in a light feathering motion to produce a very generous final lustre over the entire restoration (Fig. 7), and was particularly useful in reaching the proximal areas. Final occlusal checks were performed (Fig. 8) to ensure a comfortable bite for the patient that also conformed to maximum intercuspation. Shimstock holds on adjacent teeth were verified to those noted preoperatively.
ExaFinal appraisal
BRILLIANT EverGlow proved to be a very pleasant material to use and handled very well to help produce a truly anatomical restoration that not only integrated well but also fully resolved the patient’s initial symptoms. The unique shade system allows for simple and efficient restoration of posterior teeth and avoids the need to stock numerous different shades. Inclusion of glass filler particles that have been reduced to below one micron allows for excellent polishability, especially when used with the ShapeGuard Composite Polishing Kit. This feature along with the choice of additional opaque, translucent and bleach shades would also make BRILLIANT EverGlow an excellent choice for aesthetic anterior restorations.
Dr. Minesh Patel
BDS Hons, MSc, MFGDP (RCS

Fig 5: K-file used to apply dark brown tint
Fig 7:
Finishing and polishing completed
Fig 6: Cuspal build up and tints completed
Fig 8:
Final occlusal checks performed
Watch Video

Minimally Invasive Dentistry
Case Studies
Minimally invasive dentistry (MID) advocates the maximum preservation of intact and repairable dental hard tissues through minimising the unnecessary alteration of healthy tooth structure. As an enthusiastic advocate of the application of the principles of MI dentistry in everyday dental care, the AquaCare has been a revelation in helping me to achieve improved outcomes for patients under my care.
The unit allows ease of use for polishing and abrasion techniques with a change in function at the turn of a switch. For polishing, surface stains are removed efficiently and selectively without damaging the underlying sound tooth structure. There is no heat generation or damage to soft tissues and the result is immediately pleasing to both clinician and patient.
For air abrasion, the particles are emitted at high velocity within a fluid stream from an easy to use nozzle and are hence easily controlled and directed ensuring comfort for the patient as well as ease of vision for the operator. The air abrasion particles remove adherent extrinsic surface stains and debris without vibration or heat generation, minimising the risk of pulpal damage. The lack of vibration also improves comfort for the patient.
Bioactive powders have the potential for remineralisation and will selectively remove damaged tooth structures with much greater precision than conventional mechanical techniques. Bonding to the cleaned tooth surface is also enhanced making this technique ideally suited to modern adhesive dentistry, particularly with regards to the repair and refurbishment of existing restorations, which is now such a key component of MID.

From being brought up in the age of the high-speed handpiece, the Aquacare is now my go-to unit for cavity preparation and tooth repair. This is one of those pieces of kit that I can find further uses for every day and that the patients under my care much prefer compared to the conventional rotary handpiece.


View the Range

Dr. Michael Thomas Specialist in Prosthodontics, United Kingdom
After wet air-abrasion
Final restoration (GC Essentia resin composite)
Planmeca i5: Making a Real Difference

Dr. Grzegorz Pietras, a specialist in prosthodontics and endodontics, emphasizes the importance of selecting dental units that align with both the clinic’s high standards and specific requirements.
When Dr. Pietras set out to upgrade the equipment at Dentactiv, his clinic in Biała Podlaska, Poland, he knew that choosing the right dental unit was crucial. With a focus on prosthodontics, endodontics, and a variety of restorative and implant treatments, he needed units that would support the wide range of procedures performed at the clinic.
In this article, we follow Dr. Pietras on his journey to finding the right dental units and explore why the Planmeca Compact™ i5 units have been so pivotal to the success of his clinic.
About Dr. Grzegorz Pietras & Dentactiv
Dr. Grzegorz Pietras is originally a graduate of the Jagiellonian University in Kraków, Poland – one of the oldest universities in the entire world. He subsequently completed his Master of Prosthodontics degree at the University of Siena in Italy, specialising in prosthodontic and endodontic treatments.
Today, Dr. Pietras is the lead practitioner at the Dentactiv clinic in Biała Podlaska, a Polish city of just under 60,000 inhabitants. The treatment team also includes two dental assistants, two hygienists, a dental nurse, and two collaborating surgeons. The clinic is managed by Pietras’ wife.
As Dentactiv’s lead practitioner, Pietras’ focus is on planning and seeing through treatments. The clinic handles a wide spectrum of procedures – from restorative dentistry to endodontics, prosthodontics, onlays, inlays, single-unit implants and full-arch implant rehabilitation.
The work of Dr. Pietras and his staff is closely supported by certain technologically advanced helpers that set the stage for the many kinds of dental treatments that take place at the clinic.
“The heart of our clinic is our pair of Planmeca Compact™ i5 treatment units,” Dr. Pietras states

Why Choose Planmeca i5?
The Planmeca units were chosen for the clinic three years ago, after much careful deliberation. Dr. Pietras wanted to be sure that Dentactiv landed on high-quality options that were optimal fits for his clinic and its specific requirements.
“I’m a prosthodontist and endodontist and was looking for a reliable dental unit that is ergonomically suitable for my needs. I already had a Planmeca Olo™ saddle stool, so I knew the company’s products to offer great comfort,” he recounts.
Dr. Pietras does not hold back when praising his dental units, as they have truly been able to elevate the excellent work done at the clinic. The side lifting mechanism of the Planmeca Compact i5 units has particularly been to his liking, as it leaves plenty of room under the patient chair and allows the treatment team to work efficiently and close the patient.
“Planmeca units are design masterpieces in the field of dentistry,” Dr. Pietras states.
“They are unique in that the floating patient chair is supported by the unit’s column and lifted from the side. The units are also very comfortable.”
Indeed, the units bring together aesthetics and functionality in a way that allows the treatment staff to work seamlessly together.
“I work with a dental assistant and a big benefit of Planmeca dental units is that we can operate them together. Due to the construction of the units, the dentist does not have any obstructions and the assistant also has access to the instruments,” Dr. Pietras describes.

Less fatigue, tension and stress
Planmeca Compact i5’s flexibility supports the efficient way Dr. Pietras and his staff prefer to work – minimising movements and fully focusing on the treatment at hand. This was another aspect that was very crucial when choosing the clinic’s new units.”
“When I am working with a dental microscope, I don’t want to be distracted, or to operate the unit with my right hand from the control panel that is usually on the right side of the instrument console,” Dr. Pietras explains.
“The Planmeca Compact i5 unit’s control panel is on the left side of the console. This is unique and very important to me. My assistant sits to my left and can easily access the controls.”
Ergonomics can sometimes be a difficult topic to grasp, as even relatively small things can have a big impact, especially over time. Three years in, the Planmeca Compact i5 units have proven their worth and improved the overall wellbeing of the staff. “With Planmeca dental units, we can perform high quality treatments with less fatigue, less tension and basically no stress. Even though stress is common in our work, thanks to Planmeca we can now operate in a stress-free environment.” Dr. Pietras says.

Safety meets comfort
At Dentactiv, infection control has always been a priority. The clinic’s dedication towards safe treatments and preventing the spread of infections also played a part in its dental unit selection process.
“I like the Planmeca Compact i5 unit’s integrated infection control features. This is a topic that is often less discussed, but it was a selling point for me. These features help guarantee the safety of both our medical team and our patients,” Dr. Pietras tells.
“Using the internal flushing system is very easy. Our dental assistants and hygienists can perform suction tube cleaning and internal flushing between patients without any hassle. It only takes about three to five minutes.”
Dr. Pietras is very mindful of the responsibility the healthcare community has in treating patients in the best possible way. When it comes to safety, there is no room for compromise.
“We should treat our patients as our family – like our children. We must be sure that our working environment is safe,” he says.
Taking patients’ feelings into consideration is also important, as a trip to the dentist can be a serious cause for anxiety for some patients. The Dentactiv clinic has a plan in place to make sure that entering the treatment room is not an intimidating experience.
“We use the dental unit’s chair a bit differently, because we do not sit patients in front of the instrument console. We move the instruments to the other side of the unit, so the patients can’t see them when they enter the room and sit in the chair,” Dr. Pietras explains.
Of course, comfort also has a part in making patients feel at ease. Dr. Pietras always wants to ensure that even lengthier treatments do not cause unnecessary discomfort for patients. Planmeca Compact i5 has helped the clinic achieve this goal consistently.
“Our patients love the chair and the Ultra Relax™ upholstery! They find to be it very comfortable,” Dr. Pietras says.

The right choice
Dr. Pietras likes the fact that the clinic’s Planmeca Compact i5 units are fully upgradable. It means that new features can be added to them at any time – long into the future. The units also allow instruments to be conveniently shared between them. The feature is greatly appreciated at the clinic, as things have not always been this way.
“We previously had two dental units from another brand, but they were different models. Sometimes this was a problem, because it was not possible to share instruments between units,” Dr. Pietras explains.
The Planmeca units have also been simple to operate. The touchscreen allows users to control a wide range of settings and to customise the units exactly to their liking.
“The unit’s interface is very easy to use. I can flexibly change between different languages. We also like little things, like changing the colour of the interface. Our hygienists like the pink colour, but I prefer the green one,” Dr. Pietras laughs.
Overall, the Dentactiv clinic has clearly hit a homerun with its choice of units. With so many tangible benefits, the selection has further elevated daily work at the clinic and made a real difference.
“The Planmeca Compact i5 unit is unique, ergonomic, safe, comfortable, reliable – and the right choice!”
Dr. Pietras summarises.
Daniel Purssila (Planmeca)
Senior Marketing Communications Specialist, Helsinki, Finland Clinic images:
Decoding Toothpaste
A Dentist’s Guide to Educating Patients on Key Ingredients
If you were to pick up a tube of toothpaste, would you know what each of the ingredients are and what they do? This article will give you a quick 101 on what you will find in toothpaste, to help you find your patients the right toothpaste for them.
What are the main components of toothpaste?
• Fluoride
• Abrasives
• Flavours
• Humectants
• Foaming agents
• Teeth Whiteners
• Water Although a toothpaste ingredients list may seem
long and complicated, if you were to look up the toothpaste ingredients on the back of the box, there’s a good chance that each ingredient will fall into one of these seven categories.

Fluoride
Fluoride has many useful properties. Fluoride can reduce the formation of plaque acids and give teeth better protection from acid exposures. When fluoride is applied topically, for example, through the use of a fluoride toothpaste, it forms fluoroapatite in enamel during the demineralisation and remineralisation process that happens when eating or drinking. This reduces the ‘critical pH’, increasing the amount of acid required to cause demineralisation, and therefore increases the tooth’s resistance to tooth decay and erosion. As dental professionals we may have patients who have concerns about fluoride toothpaste. It is important to explain to patients the benefits
using fluoride can provide, for example, that fluoride fights cavities and protects our teeth. You can also share interesting facts such as fluoride is a mineral and can be found in rocks, and many other natural sources, including rainwater, lakes and oceans! There are multiple formulations of fluoride found in toothpastes, including stannous fluoride, which can be found in Colgate’s new Total Active Prevention, sodium fluoride and sodium monofluorophosphate. These compounds contain a salt medium to help transfer the fluoride from the toothpaste to the tooth.
The Australian Dental Association (ADA) Fluoride Guidelines (2022) can help you ensure your patients are using an appropriate amount of fluoride in their toothpaste. For example, those of a high caries risk may be recommended to use a toothpaste containing 5000ppm F instead of a toothpaste containing up to 1500ppm F.
Abrasives
An understandable concern about toothpaste some may have is the inclusion of ‘abrasives’, and that these abrasives will wear down your teeth. However, there is no correlation between the relative dentin abrasivity (RDA) value and tooth wear as long as the value does not exceed 250. Most toothpastes will contain some sort of an abrasive and any toothpaste with an RDA value of less than 250 is safe to use. Abrasives remove stain and plaque and also polish teeth. Generally, toothpastes with a very low RDA value do not have the plaque and stain removal abilities of those with a higher RDA. The abrasives most commonly found in toothpaste are ingredients such as calcium carbonate, hydrated silica, dehydrated silica gels, and hydrated aluminium oxides.
Flavouring Agents
Toothpaste can have different flavours to make the experience of cleaning your teeth more pleasurable. Flavours can be natural, synthetic, or a combination of both. Flavours such as spearmint or peppermint are used to give that signature
fresh toothpaste feeling. Menthol is an organic compound derived from mint and commonly found in toothpaste. Menthol activates cold-sensitive receptors in the mouth, and this tricks the brain into feeling “cool” without any real temperature drop.
Saccharin, xylitol, sucralose or sorbitol are sweeteners that do not share the same chemical structure of sugar, but they are also used to give the toothpaste a sweeter taste. This allows for a better tasting toothpaste, increasing the likelihood your patients will use the paste, and as a consequence improving their oral health. Colgate has a range of different toothpaste flavours, including the MaxFresh range which includes great flavours such as Peach Passion. The fluoride content in Colgate’s MaxFresh range ranges from 1000ppm F to 1450ppm F, making them suitable for most patients aged 6 years plus.
Humectants
A humectant is an ingredient in toothpaste that keeps the toothpaste from drying out and becoming crumbly by retaining water within the toothpaste, improving mouthfeel and usability. Humectants also add to the toothpaste’s flavour, and are necessary to keep the toothpaste in a gel or paste form, to form the backbone for the other ingredients. Ingredients such as sorbitol, glycol and glycerol help in this regard.

Cleaning Agents
Detergents help toothpaste to foam when you brush. This foaming action ensures the active ingredients from toothpaste coats your teeth, and loosens and removes food particles stuck to teeth, to give that clean mouth feeling. A common detergent found in toothpaste is Sodium Lauryl Sulfate (SLS). Other detergents include cocamidopropyl betaine and sodium methyl cocoyl taurate. Some patients may be sensitive to SLS. For these patients, particularly those with dry mouth, a toothpaste without SLS is often recommended. It is always great to know which toothpastes do not contain SLS, so we can make a recommendation to our patients. Colgate Sensitive Pro-Relief Gum Care Toothpaste does not contain SLS, it has cocamidopropyl betaine.
Teeth Whiteners
In the past, toothpastes which aim to have a whitening effect on the teeth may have included extra or higher-level abrasives to remove extrinsic stains mechanically from teeth. Gentler ingredients included in modern toothpastes include hydrated silica, which is an abrasive effective at removing extrinsic stains such as coffee or tea stains, and sodium hexametaphosphate, which prevents stains adhering to the tooth surface.
Peroxides, including Hydrogen Peroxide and Carbamide Peroxide, are added to some toothpastes to help break down both extrinsic and intrinsic stains. The Colgate Optic White range offers a number of whitening toothpaste options for your patients.
In Summary
Having an understanding in all of these toothpaste components helps to overall better understand the role each ingredient in toothpaste plays. This allows us to reassure our patients and help them to have the best suited toothpaste for them.
Author:
Dr Haydyn Bathurst is a recent graduate dentist currently in the Sydney Dental Hospital Recent Graduate Program. Dr Bathurst is a host on the Dental Headstart Podcast and on the recent graduate committee for the ADA NSW. Dr Bathurst aims to connect the dental industry to a new generation of patients and dental practitioners. As a member of the Colgate Advocates for Oral Health, Haydyn aims to use this platform to connect and engage with colleagues and peers across the broad field of dentistry.

1. ADA (2022) Practical Guidelines for Use of Fluorides
2. Walsh, T. et al. (2019) ‘Fluoride toothpastes of different concentrations for preventing dental caries’, Cochrane Database of Systematic Reviews. doi:10.1002/14651858. cd007868.pub3.
Dr Haydyn Bathurst
Understanding The Oral MicrobiomeWhat And Why?
As dental professionals, we are very attuned to understanding how dental plaque and biofilms contribute to dental diseases. However, one area that is still being understood better is the role of the oral microbiome and how it supports the natural functions of the oral cavity. This article I have written for Colgate Palmolive breaks down what the oral microbiome is and why it plays a pivotal role in helping our patients optimise their oral health.

What is the Oral Microbiome?
The oral cavity has the second largest and second most diverse microbiota after the gut and contains a collective of microorganisms that colonise the hard and soft tissues of the mouth. This forms an important ecosystem of bacteria, fungi, virus and protozoa that can promote health if in good balance, or lead to disease processes when unbalanced. The oral microbiome was first identified by Antony Van Leeuwenhoek after observing his own dental plaque under a microscope in 1674.1
The diversity of the human microbiome, especially the oral microbiome, can be attributed to two components - the common microbiome and the variable microbiome. The common microbiome is found amongst all humans; however, the variable microbiome is more unique to individuals and is dependent on lifestyle and physiological choices. These microorganisms colonise both hard and soft tissues of the oral mucosa. Whilst teeth are the common known hard tissue site of colonisation, the tongue, cheeks, gingival sulcus, tonsils, hard palate and soft palate provide a suitable environment for microbes to flourish. The plethora of bacteria that coat these surfaces are better known as bacterial biofilm. When the oral cavity provides a stable environment of an average core body temperature of 37℃ and salivary pH of 6.5 - 7, this allows bacteria to stay hydrated and also have nutrients transported via saliva.1
Since the oral microbiome usually exists in the form of bacterial biofilm, it is important to distinguish the general function of this collective of microorganisms. All contributing to maintaining homeostasis of the oral cavity, the oral microbiota play a critical role in physiological, metabolic and immunological functions not limited to digestion of food and nutrition, balancing pro-inflammatory and anti-inflammatory processes of the immune system and regulating fat storage.2
Helpful vs Harmful Biofilms
In a healthy state, biofilms form on the teeth and soft tissue surfaces, mainly consisting of benign “helpful” bacteria. These beneficial biofilms help the oral cavity shield against non-oral microbes and restrict the growth of pathogenic microorganisms that contribute to oral disease processes like dental caries and periodontal disease. When a neutral pH is maintained, symbiotic, beneficial biofilms create an important homeostatic balance for normal bodily function.2
When a healthy microbiome is altered by a person’s physiology of lifestyle behaviours, this enduring unbalanced state, sometimes referred to as dysbiosis, leads to proliferation of “harmful” biofilms at the gingival margin. This contributes to gingival inflammation and changes in the bacterial populations, favouring the disease-causing bacterial strains that undermine and inhibit the body’s immune systems. The resultant destruction of the tissues and bone surrounding teeth becomes the basis of periodontal disease pathogenesis.2
Similarly, the proliferation of cariogenic bacteria on the biofilm on teeth surfaces contributes to the secretion of demineralising acids when in contact with sugars from the diet. This, coupled with the decrease in bacteria that secrete acid-neutralising alkalis, means the protective effect on dental caries is reduced and favours disease progression.2
How to support the Oral Microbiome?
Since the harmful biofilms accumulate over time by sticking to the teeth and soft tissues of the oral cavity, frequent cleansing and removal of these biofilms can allow healthier bacteria to proliferate. This is the foundation behind why good oral hygiene habits, including brushing and flossing twice daily, help support the oral microbiome. Having a well-balanced and nutritious diet is equally important to supporting healthy biofilms to flourish since diets high in sugars are well known factors leading to increased dental caries risk. Finally, another great way to support homeostasis of the oral microbiome is the use of probiotics. Probiotics are the use of live strains of bacteria and yeasts that are traditionally associated with the gut microbiome to target the harmful bacteria and promote proliferation of good bacteria to support gut health. Research is now showing there is an oral benefit to probiotics: some dental probiotics now can target problematic bacteria by producing antimicrobial compounds that reduce the capacity of dental plaque to grow within the mouth.3 Reducing plaque accumulation also leads to decreased gum inflammation, and some probiotic strains also modulate the immune system to support the anti-inflammatory processes. This can bring the oral cavity from an unbalanced, dysbiotic state to a healthy state once more.3 Aside from probiotic supplements, there are some foods one can include in the diet which also contain probiotic properties. These include dairy sources such as yoghurt, kefir, cultured cottage cheese and
buttermilk. Non-dairy sources include fermented vegetables such as sauerkraut and kimchi. There are also some foods that act as prebiotics, which are plant fibres that act like fertiliser to probiotics and enhance their effectiveness. Prebiotic foods include raw Jerusalem artichokes, hickory root, oats, as well as unrefined barley and wheat.4
One area that is still being researched and developed is a future diagnostic test, which through a salivary plaque sample of a patient, can enable us as dental professionals to be able to map, measure and identify the strains prevalent in a patient’s oral microbiome. Being able to measure which strains are present before and after modification of the oral microbiome will be important to not only form evidence-based treatments for the oral microbiome but also to better treat our patients on an individual basis.5
Author:
Dr Kaejenn Tchia is a recent graduate working in a corporate private practice in Darwin, Northern Territory. He is the current President of the Australian Dental Association NT Branch Inc. He has also served leadership positions for Bupa Dental Corporation including the Clinical Advisory Panel, Clinical Procurement Committee and currently the Graduate Committee. He is passionate about helping and collaborating with fellow dental colleagues, recently embarking on a new journey to help recent graduates eliminate burnout through a 6-step B.E.L.I.E.F System through his motivational coaching platform, The Limitless Dentist. Kaejenn is a member of the Colgate Advocates for Oral Health Editorial Community and hopes to use this platform to raise awareness of the importance of mental health in dentistry and provide mindset tools, which can help his colleagues unlock their next level of growth and success.

Dr Kaejenn Tchia
Reference List
1. Deo PN, Deshmukh R. Oral microbiome: Unveiling the fundamentals. J Oral Maxillofac Pathol. 2019;23(1):122-128. doi:10.4103/jomfp.JOMFP_304_18
2. Colgate-Palmolive Company. Whole Mouth Health: The Next Generation of Everyday Prevention for Oral Health. Colgate-Palmolive Company. 2019. Accessed October 26, 2024. https://www.colgateprofessional.com/content/dam/cp-sites/oral-care/professional/global/general/pdf/colgate-whole-mouth-health-whitepaper-final-min.pdf
3. Makeham B. What is the oral microbiome and why does it matter? Activated Probiotics. August 7, 2023. Accessed October 26, 2024. https://activatedprobiotics.com.au/what-is-the-oral-microbiome
4. Colgate-Palmolive Company. Are Probiotics Good For Oral Health? Colgate-Palmolive Company. February 13, 2023. Accessed October 26, 2024. https://www.colgate.com/en-us/oral-health/plaque-and-tartar/probiotics-for-oral-health#
5. Oral microbiome mapping. NutriPATH Integrative and Functional Pathology Services. January 31, 2023. Accessed October 26, 2024. https://nutripath.com.au/product/oral-microbiome-mapping-test-code-2200/
Read More

Class II Correction with Carriere Motion
3D Appliance and Clear Aligner Therapy.
Clear aligner therapy has been shown to be effective in resolving mild to moderate malocclusions, with shorter treatment and less chairtime compared to conventional systems¹. To overcome some of the aligners’ biomechanical limitations while still enabling aesthetic treatment of more complex clinical conditions, clear aligners can be combined with various types of auxiliaries2-4
Let’s look at the case of an 14-year-old male patient with Class II relationship on right and edge-to-edge relationship on left before treatment. Below picture before treatment.


After four months of the Carriere Motion Appliance and full-time intermaxillary elastics, a Class I molar and canine relationship was achieved


To avoid relapse, we started clear aligner therapy less than two weeks after the Carriere Motion Appliance was removed. The virtual setup showed that 12 aligners would be needed in each arch to resolve the crowding and achieve leveling and alignment.


Overlay of initial (white) and post-treatment (green) occlusion in virtual setup viewer. Buccal grip points were planned on the upper right canine and first premolar, upper left canine and first molar, lower right first premolar, and lower left canine and second premolar. In addition, 0.1 mm of interproximal reduction (IPR) was planned at each contact point from the mesial surface of the upper right first molar to the mesial surface of the upper left first molar, and from the mesial surface of the lower left second premolar to the mesial surface of the lower right second premolar. IPR was used to reduce the proclination of both arches and achieve a good anterior relationship with normal overjet and overbite. Aligners were changed every two weeks. After the 12th planned set of aligners, four more were added to the series to refine the result (pictures below).


The clear aligner therapy lasted eight months. Treatment Results Post-treatment records indicated a satisfactory outcome after four months of Carriere Motion Appliance with fulltime Class II elastic wear and eight months of clear aligner therapy.


The patient showed an aesthetic profile and incisor display on smiling, along with a Class I canine and molar relationship. The midlines were centered and the crowding was resolved, but the second molar occlusal contacts were less than optimal, probably because of the presence of a palatal precontact. Post-treatment panoramic radiography evidenced good root parallelism with no sign of crestal bone height reduction or apical root resorption. Cephalometric analysis indicated that the inclination of the lower incisors with respect to the mandibular plane (IMPA) increased slightly, from 96.3° to 9.9°, demonstrating the anchorage control provided by the appliance (check Table 1 in the full article). Superimposition of the pre- and post-treatment cephalometric tracings, according to the method developed by Björk,9,10 highlighted a clockwise rotation of the occlusal plane. The appliance’s control of the vertical height and lower-incisor proclination was clear from the regional superimpositions. Even though the treatment period was short, the superimpositions revealed considerable residual growth in a downward and forward direction, since the initial radiographs were taken six months before treatment began.

Dr. Lombardo is a Professor and Chairman, Drs. Cremonini and Cervinara are residents, and Dr. Oliverio is a Research Assistant, Postgraduate School of Orthodontics, and Dr. Siciliani is chairman, School of Dentistry, University of Ferrara, Via Luigi Borsari 46, 44121 Ferrara, Italy.
Read the Full Article
1. Zheng, M.; Liu, R.; Ni, Z.; and Yu, Z.: Efficiency, effectiveness and treatment stability of clear aligners: A systematic review and meta-analysis, Orthod. Craniofac. Res. 20:127-133, 2017.
2. Robertson, L.; Kaur, H.; Fagundes, N.C.F.; Romanyk, D.; Major, P.; and Flores Mir, C.: Effectiveness of clear aligner therapy for orthodontic treatment: A systematic review, Orthod.
L.;
A.;
A.;
T.; and Siciliani, G.: Class II subdivision correction with clear aligners using intermaxillary elastics, Prog. Orthod. 19:32, 2018.
4. Lombardo, L.; Carlucci, A.; Maino, B.G.; Colonna, A.; Paoletto, E.; and Siciliani, G.: Class III malocclusion and bilateral crossbite in an adult patient treated with miniscrew-assisted rapid palatal
and aligners, Angle Orthod. 88:649-664, 2018.
Craniofac. Res. 23:133-142, 2020.
3. Lombardo,
Colonna,
Carlucci,
Oliverio,
expander
Dr. Lombardo Dr. Cremonini Dr. Oliverio Dr. Cervinara Dr. Siciliani
Why The Wand STA Is A Smart Investment
For Your Dental Practice
Introduction
As dental professionals, we constantly strive to offer the best care to our patients, enhancing not only their oral health but also their overall experience. One of the most significant concerns patients face during dental procedures is fear and anxiety related to pain, particularly when it comes to injections. Over the years, technology has advanced to help alleviate these concerns, and one standout innovation is the Wand STA (Single Tooth Anaesthesia) system.
A study conducted by Dr. Dino Re and associates, published in 2017 in the Journal of Investigative and Clinical Dentistry, titled “Minimally Invasive Dental Aanesthesia: Patient’s Preferences and Analysis of the Willingness-to-Pay Index”, presents compelling evidence that patients are willing to pay more for painless injection options like the Wand STA. This data suggests that incorporating the Wand STA into your dental practice is not only beneficial for patient care but can also be a financially sound decision.
The Study’s Findings
In the study by Dr. Dino Re and his team, the focus was on understanding patient preferences regarding anaesthesia and their willingness to pay for pain-free alternatives. The research demonstrated that the majority of patients would prefer minimally invasive anaesthesia techniques and, importantly, are willing to pay a premium for them. The study’s “Willingnessto-Pay (WTP) Index” was a key element, highlighting that the financial value patients place on painless injections is significant.
Patients often associate traditional injections with discomfort, leading to increased anxiety and, in some cases, avoidance of
necessary treatments. The Wand STA offers a more comfortable and precise injection experience, dramatically reducing pain, and, as this study shows, patients are keen to invest in their comfort.
Why The Wand STA is a Worthwhile Investment
The benefits of the Wand STA extend beyond patient satisfaction:
• Painless Anaesthesia Delivery: The Wand STA system is designed to provide controlled and gradual administration of anaesthetic, ensuring that patients do not feel the discomfort usually associated with injections. This painless experience reduces patient anxiety, creating a more pleasant visit and potentially increasing the frequency of their appointments.
• Increased Patient Retention: As the study indicates, patients value comfort and are willing to pay for it. By offering painless anaesthesia, you enhance the patient experience, leading to higher satisfaction, increased wordof-mouth referrals, and greater retention.
• Justifying Premium Fees: With patients willing to pay more for a painless experience, practices can charge a premium for using the Wand STA system. This positions your practice as a leader in advanced, patient-centric care while also improving your bottom line.
• Minimally Invasive Approach: The Wand STA is highly precise, allowing dentists to anesthetize a single tooth without numbing the entire area. This precision leads to faster recovery for the patient and less disruption to their daily routine, which they highly appreciate.
Incorporating the Wand STA into your practice has both clinical and financial benefits. The willingness-to-pay data provided in Dr. Dino Re’s study supports the idea that patients not only prefer this technology but are also willing to pay a premium for it. With a growing demand for painless dentistry, offering the Wand STA gives your practice a competitive edge in a market where patient comfort is paramount.
Investing in this technology could pay off quickly, considering the potential for increased patient flow, improved satisfaction, and higher revenues from the ability to charge for premium services. As the dental industry becomes more patient-centered, the practices that adopt such innovations early will be positioned for success.
Conclusion
The findings from the study by Dr. Dino Re and associates clearly indicate that patients are willing to invest in a more comfortable, pain-free dental experience. By incorporating the Wand STA system into your practice, you can meet patient demand, improve their satisfaction, and grow your practice’s profitability.
For more details on the study, view below link:

Click Here
Dr. Mariam Henien
BDS Category Manager – Pain Control & Preventive Article summarized from the published study “Minimally-Invasive Dental Anesthesia: Patient’s Preferences and Analysis of the Willingness-to-Pay Index” with AI-assisted content generation.
How To Deal With Young Patient’s Pain?
Complex answer for sure!
Options To Manage Young Patients’ Pain
Successful procedural outcomes depend on effective pain management; it is especially relevant when providing treatment to children. Pain is the response to nociceptive stimuli. The response to stimulus varies greatly from one child to another child. The delivery of quality dental treatment relies heavily on the ability to prevent and relief pain. Controlling pain is critical to successful dental treatment. It was not too long ago that many in the dental and medical community doubted that children were susceptible to pain. Pediatric patients may not be able to provide a very detailed description of the pain, including the intensity. Fortunately, there are several pain scales that can be used with children to estimate the intensity and severity of the pain.
Different options to help with the pain are available to the dentists who provide care to children. These options include:
• Behavioral management
• The use of local anesthetics (like articaine)
• Nitrous oxide (if available in your country)
• Analgesics
• Bioactive dental materials like BiodentineTM
Behavioral Management, Local Anesthetics & Nitrous Oxide
The use of behavior management techniques when treating young patients is the key to pain control in the dental office. “Tell-Show-Do” is the core approach for behavior management. The correct use of local anesthesia is also a fundamental component in the algorithm to control pain in children. A good understanding of the pharmacology of the local anesthetics and the specific techniques for children are critical in the successful use of anesthesia. Along with the basic behavior
management techniques and the use of local anesthesia, is the correct use of nitrous oxide (if available in your Country). Without any question, the key to successful use of nitrous is patient selection. The ideal pediatric patient is slightly anxious and old enough to wear the nasal hood.
Treatment With Biomaterials
The use of biomaterials is a recent and highly effective strategy to decrease pain, especially in the post-operative phase. BiodentineTM is a calcium-silicate based material that became commercially available in 2009. The material is specifically designed as a “dentin substitute”. The spectrum of applications of BiodentineTM is wide and includes endodontic repair, indirect pulp cap, direct pulp cap, liner and dentin replacement in restorative dentistry. The composition of BiodentineTM consists of a powder (tricalcium silicate, dicalcium silicate, calcium carbonate, oxide filler, iron oxide shade, and zirconium oxide) and a liquid (calcium chloride and hydrosoluble polymer). One of the main advantages of BiodentineTM is the setting time, which is around 9-12 minutes. There is a significant difference in the setting time compared with other similar cements (like MTA). The compression strength of BiodentineTM is similar to the dentin. The use of etch over BiodentineTM does not affect the compressive strength of the material. A critical factor of BiodentineTM is the porosity. Because of the low content of water of BiodentineTM the porosity of the material is lower compared with other materials. This is a significant benefit when a perfect seal is mandatory, like in direct pulp cap treatment. The radiopacity of BiodentineTM, thanks to the content of zirconium, is ideal and allows the practitioner to visualize the material on the radiographs. The antibacterial property of BiodentineTM is attributed to the high pH of the material. The high alkalinity has inhibitory effect on the growth of microorganisms.

The biocompatibility of BiodentineTM is outstanding and has been probed in multiple studies when the material is placed with fibroblasts from the pulp. According to the American Association of Endodontics, full pulpotomy involves the removal of the coronal portion of the vital pulp as a means of preserving the vitality of the remaining radicular portion. It may be performed as an emergency procedure for temporary relief of pain, and this is a critical advantage of BiodentineTM in front of other materials that can be placed in direct contact with the pulp. The presence of spontaneous or severe pre-operative pain does not always indicate that the pulp is not capable to repair.
Vital Pulp Therapy With Biomaterials
Several recent clinical studies reported a successful medium to long term outcome of vital pulp therapy in teeth with pain, particularly young or immature teeth. The mechanisms of interaction of BiodentineTM with the dental hard tissues, explain, at least in part, the post-operatory pain control with BiodentineTM The material provides a micro-mechanical retention by infiltrating the dentin tubules. Furthermore, BiodentineTM induces the formation of tertiary dentin synthesis with provides protection to the pulp. These two combine effects might be responsible for the absence of pain and hypersensitivity.
Reducing Inflammation & Post-Operative Pain
Another critical report found that the application of BiodentineTM reduces both TRPA1 pain receptor expression and function. More importantly, when applied on odontoblast-like cells, BiodentineTM decreases pro-inflammatory TNF-α secretion. This indicates that in addition to the roles of BiodentineTM mentioned in the first paragraph, its application onto the dentin-pulp reduces the inflammation and consequently the post-operative pain.
Author:
Juan
F. Yepes DDS, MD, MPH, MS, DrPH, FDS RCS(Ed)
Professor, Department of Pediatric Dentistry
Indiana University School of Dentistry
Riley Hospital for Children
705 Riley Hospital Drive, Room 4205, Indianapolis, IN 46202
Phone: (317) 944-9601, Fax: (317) 944-9407
E-mail: jfyepes@iupui.edu

1. Malkondu O, Kazandag M, Kazazoglu E. A review on Biodentine, a contemporary dentin replacement and repair material. Biomed Research International 2014.
2. Kaur M, et al. MTA vs. Biodentine: Review of literature with a comparative analysis. J Clin Diagn Res 2017; 11(8): 01-05
3. Imad A. Biodentine: from biochemical and bioactive properties to clinical applications. Giornale Italiano di Endodinzia 2016; 30: 81-88
Juan F. Yepes
The Biodentine™ Bio-Bulk Fill Technique
For Deep Caries And Moderate Pulpitis
Summary
Introduction
Treating deep carious lesions in a time-effective and sufficient manner can be challenging in everyday practice, especially in symptomatic pulpitis.
Methods
In the present case, a pulpotomy was performed in two stages due to an extensive cervical defect on tooth 47.
Introduction
The treatment of deep carious lesions is often complex and time-consuming in practice, especially in the case of acute complaints. Reconstructing cervical marginal areas at the subgingival to epicrestal level, with adequate dental dam placement, presents a challenge even for experienced practitioners.(1) It can help to divide the treatment over two appointments, especially if pulp involvement is expected.
Pulpotomy and indirect capping are methods of preserving vitality in order to avoid root canal
treatment.(2) Subsequently, the teeth are typically restored with time-consuming composite restorations in the same session, resulting in extended treatment times.
Discussion
The use of Biodentine™ in the Bio-Bulk Fill technique, combined with a two-step restoration, made it possible to meet the patient’s need for shorter treatment sessions.
Conclusion
Bio-Bulk Fill can help to preserve the vitality of teeth and save time.
The Biodentine™ Bio-Bulk Fill technique can initially seal cavities after pulpotomy or indirect pulp capping in a bacteriaproof and time-saving manner so that a planned, definitive restoration can be carried out in a second step.(3)
Case Report
Clinical Findings
A 23-year-old female patient presented to the Department of Oral Diagnostics, Digital Dentistry and Restorative Research at Charité Centre 03 for the first time in August 2021 with acute, throbbing pain in tooth 47. Clinically, the tooth exhibited an inadequate composite restoration along with a localised enamel fracture (Fig. 1), as well as increased sensitivity to cold.
The preoperative radiograph showed a secondary caries that had extended into the pulp (Fig. 2).
Diagnosis
The clinical and radiological findings suggested moderate pulpitis.
Clinical Procedure
Due to the extension of the carious lesion, a non-selective caries excavation with pulpotomy was planned. The old filling was removed under local anaesthesia and dental dam. After excavation, an epicrestal cavity floor was revealed (Fig. 3). At this point, the patient already showed limited compliance with regard to sufficient mouth opening time, which is why the treatment steps had to be prioritized. The goals for the first treatment session were defined intraoperatively:
1) Restoration of the epicrestal cavity margin.
2) Removal of the caries-exposed pulp and capping of the healthy pulp tissue.
The final restoration with composite was planned for the second session.


In the first step of the first session, the caries at the mesial cavity margin was removed non-selectively and a sectional matrix was adapted with Teflon. The mesial cavity margin was then elevated with composite (Filtek Supreme, 3M, Saint Paul, USA). Nonselective caries removal was then performed in the area of the pulp with opening of the pulp chamber. A complete pulpotomy was performed using sterile diamond and haemostasis was achieved within five minutes using a foam pellet and 3% NaOCl (Fig. 4). In the final step, the pulp tissue was capped with Biodentine™ (Septodont, Saint-Maur-des-Fossés, France) using the Bio Bulk-Fill technique (Fig. 5).


Fig. 1
Fig. 3
Fig. 4
Fig. 2
Fig. 5
In the second session two weeks later, the patient appeared recovered and symptom-free for the final composite restoration. The Biodentine™ was partially removed under rubber dam so that a remaining layer of 2-3 mm could be ensured (Fig. 7). The restoration was then restored with Scotchbond Universal SE and Filtek Supreme A2 (both 3M; Fig. 8) and a radiological control was carried out (Fig. 9).


Follow Up
In April 2023, the patient appeared for a follow-up check of the pulpotomy at tooth 47 after 20 months. The patient was symptomfree and radiographic examination revealed physiological apical conditions (Fig. 10).
Discussion
Utilising Biodentine™ in the Bio-Bulk Fill technique eliminates the setting time and the necessity for the permanent restoration in a single session. This approach supports the effective implementation of vital pulp therapy in even sophisticated treatments. Such measures, once frequently relegated to root canal treatments, can now be efficiently managed.
In the area of pain treatment, the number of treatment steps that can be carried out may be limited by the patient’s cooperation. The opportunity to streamline the treatment phase of pulp capping has enabled the intricate reconstruction of the cervical area to be conducted during the initial session. In this case, this led to an increase in patient comfort, as the treatment could be spread over two sessions and the pulp could be preserved.
Utilising Biodentine™ within the Bio-Bulk Fill technique, coupled with a two-step restoration process,
facilitates an optimal alignment with the patient’s pain management needs. This approach ensures that treatment quality remains uncompromised, even within time-constrained scenarios.
Conclusion
Pulpotomy and capping with Bio-Bulk Fill and subsequent restoration in a two-step procedure can be a good clinical solution for deep defects. This can lead to increased patient comfort.
Fig. 9
Fig. 10
Fig. 6
Fig. 7
Fig. 8
How long have you been using Biodentine™ ?
Authors:
Since 2024: Deputy Head of the Department of Conservative Dentistry and Periodontology University Hospital - Ludwig- MaximiliansUniversity Munich - Munich, Germany 2020
2023: Deputy Head of the Department of Oral Diagnostics, Digital Health and Health Services Research - Center for Dental and Craniofacial Sciences - CharitéUniversitätsmedizin Berlin - Berlin, Germany
2020 - 2023: Co-Head of the Dental Trauma Board - Charité - Universitätsmedizin Berlin
Berlin, Germany 2016 - 2020: Assistant Professor in the Department of Operative and Preventive Dentistry, Center for Dental and Craniofacial Sciences - CharitéUniversitätsmedizin Berlin - Berlin, Germany

Since 2024: Assistant Professor at the Department of Conservative Dentistry and Periodontology - University Hospital - Ludwig-Maximilians-University MunichMunich, Germany
2019 - 2023: Dentist in private practice

Dr. Chantal Sophie Herbst
“In my clinical practice, I have employed Biodentine™ for an extended period of six to seven years.”
Why do you use the Bio-Bulk Fill procedure with Biodentine™ ?
What are the main advantages for you?
“This technique enables clinicians to simplify direct posterior restorations, including both direct and indirect pulp capping, through the utilisation of a bioactive material such as Biodentine™ as a dentine substitute. Indeed, the placement of a protective barrier over exposed or unexposed pulp induces the formation of a dentinal bridge and maintains its vitality and function. The combination of Biodentine™ and a resinbased composite for cavity filling ensures a safe outcome, preserving pulpvitality within a single visit.”
When/in which cases do you use the Bio-Bulk Fill procedure?
“I use it mainly in very deep cavities as a protective base, or for vital pulp therapy, both for indirect and direct pulp capping.”
Reference List
1. Eggmann F, Ayub JM, Conejo J, Blatz MB. Deep margin elevation-Present status and future directions. J Esthet Restor Dent. 2023 Jan;35(1):26-47.
2. By ES of E (ESE) developed, Duncan HF, Galler KM, Tomson PL, Simon S, El-Karim I, et al. European Society of Endodontology position statement: Management of deep caries and the exposed pulp. International Endodontic Journal. 2019;52(7):923-34.
3. Koubi G, Colon P, Franquin JC, Hartmann A, Richard G, Faure MO, et al. Clinical evaluation of the performance and safety of a new dentine substitute, Biodentine, in the restoration of posterior teeth - a prospective study. Clin Oral Investig. 2013 Jan;17(1):243-9.
Dr. Sascha Herbst
Safe endodontics every step of the way
Modern treatment systems for perfect procedures
Endodontic procedures on the most delicate structures in confined spaces require a maximum of precision and tactility on the part of the operator. Safety will always have to come first — safety for the patient as well as safety for the dentist. Morita and its portfolio of endodontic solutions meet these requirements at the highest level, setting benchmarks for treatment perfection. The individual systems seamlessly integrate into the modern clinical workflow, from the initial clinical examination to complex chairside procedures and regular recall appointments.
Precise diagnosis
The first step in every successful endodontic treatment is a precise diagnosis based on accurate highresolution 3D images provided by cone-beam computed tomography (CBCT). Morita supports these diagnostic efforts with its new Veraview X800 X-ray system for 3D, panoramic, and cephalometric images, slated to supersede the previous units. It offers a level of image quality that is unprecedented in a 2D/3D imaging system (resolution: 2.5 lp/mm MTF).

Safety always comes first – this versatile system not only produces quick and accurate images but also provides maximum operator and patient safety with minimum effective doses (ALARA, “As Low As Reasonably Achievable”). The system uses the proven dosereducing R100 field with its triangular shape. Other advantages include exposures in both 180-degree and 360-degree mode, fast cephalometric exposures in just 3.5 seconds, or a zoom reconstruction function that derives an 80-μm recording from a 125-μm voxel recording without requiring a retake.
Morita X800 CBCT Unit

Precision and safety for the root canal
Once the endodontist proceeds with the actual intraoral procedures, several high quality instruments are available to assist his or her delicate work. For convenient preparation of the access cavity, Morita offers the powerful TwinPower turbines and the handpieces of the TorqTech series. Offering maximum torque at small instrument-head diameters, they provide a good view of the area to be instrumented as well as sufficient space when treating molars. The essential next steps of the treatment are measurement, instrumentation, filling, and polymerization.
Morita has now added its new TriAuto ZX2 Plus cordless endo motor with apex locator. This system integrates the tasks of apex location and root canal preparation in a single handpiece. With its intelligent and innovative reciprocating motion, OGP2 mode was created to help you maintain the original root canal shape, regardless of whether it’s curved or narrow. OGP2 mode is all-encompassing, allowing you to perform patency, glide path, and shaping. Additionally, with no limits on file size or cutting direction, your current file system is compatible. From a #10 scout file to the widest sizes available, the Tri Auto ZX2+ handles any CW/CCW file all in one mode.


This endo motor is the best for doctors who want to focus on treatment rather than settings and allows them to finish treatments with higher efficiency and reduced possibility of file breakage. Dealing with fractured files during endodontic treatments is often not easy. OGP2 reduces file binding and, when it does occur, the chance of the file breaking in the canal is greatly reduced. This is due to the OGP2 mode’s intelligent reciprocating motion that prevents rotational deviations from accumulating.
All work steps for root canal treatment can be done with just one motor, from the establishment of patency and glide path to final shaping. OGP2 mode allows you to take advantage of the capabilities of your favorite files, both reciprocating and rotary, throughout the process.
In combination with the OGP2 function, the clinician can bring the endodontic instrument down to working length without fractures, blockage, or ledge formation. Ingeniously simple and absolutely safe. All in all, the TriAuto ZX2 Plus conserves natural tooth structure and makes the treatment even more efficient because only a limited number of files is required. Another striking feature of this endodontic system is its small head and low weight, making it very handy to use. The future-proof cordless concept significantly improves treatment flexibility for the operator and optimizes the clinical workflow.
Simple and intuitive operation and automated functions ensure reliable and safe results at all times. Increase patient comfort through shorter and smoother treatments by optimizing your workflows with Morita technology.
View Range

Tapered Pro Conical
Surgical Manual

This surgical manual serves as a reference for using the Tapered Pro Conical implants and surgical instruments. It is intended solely to provide instructions on the use of BioHorizons products. It is not intended to describe the methods or procedures for diagnosis, treatment planning, or placement of implants, nor does it replace clinical training or a clinician’s best judgment regarding the needs of each patient. BioHorizons strongly recommends appropriate training as a prerequisite for the placement of implants and associated treatment.
Surgical Manual - Surgical Protocols
Two-Stage Protocol

In a two-stage surgery, the implant is placed below the soft tissue and protected from occlusal function and other forces during osseointegration. A low-profile cover cap is placed on the implant to protect it from the ingress of soft tissue. Following osseointegration, a second procedure exposes the implant and a transmucosal healing cap is placed to allow for soft tissue healing and development of a sulcus. Prosthetic restoration begins after soft tissue healing.


The procedures illustrated and described within this manual refl ect idealized patient presentations with adequate bone and soft tissue to accommodate implant placement. No attempt has been made to cover the wide range of actual patient conditions that may adversely affect surgical and prosthetic outcomes. Clinician judgment as related to any specific case must always supersede any recommendations made in this or any BioHorizons literature.
Single-Stage Protocol

Single-stage surgery may be accomplished by placing a healing cap at the time of implant surgery. This eliminates the need for a second procedure. Although the implant is not in occlusal function, someforces can be transmitted to it through the exposed transmucosal element. Prosthetic restoration begins following osseointegration of the implant and soft tissue healing.

Single-stage surgery with non-functional immediate provisionalization provides the patient a non-functioning provisional prosthesis early in the treatment plan. A temporary abutment is placed on the implant at or shortly after surgery, and a provisional restoration is secured using temporary cement. The provisional can help contour the soft tissue profile during healing.
Immediate Function Restoration

Single-stage surgery with immediate function is possible in good quality bone where multiple implants exhibiting excellent initial stability can be splinted together. Splinting implants together may offer a biomechanical advantage over individual, unsplinted prostheses. (Not intended for Tapered Short Conical implants)
Surgical Manual - Implant Placement Level & Spacing
Placement
in Uneven Ridges

When placing the implant in an uneven ridge, prepare the osteotomy and place the implant so the bone/soft-tissue junction is within the Laser-Lok transition zone. This will allow both soft tissue and bone to attach to the Laser-Lok collar. If the ridge discrepancy is more than the Laser-Lok transition zone, leveling the ridge can be considered.
Implant-to-Tooth Spacing

The osteotomy centerpoint required to maintain a specific implant-totooth spacing is calculated according to this formula: 1/2 (implant body diameter) + the desired spacing.
*During implant placement, clinicians must apply their best judgment as to the appropriate spacing for individual patient conditions.
Implant-to-Implant Spacing

The osteotomy center-to-center measurement required to maintain a specific edge-to-edge spacing between two implants is calculated according to this formula:
1/2 (sum of 2 implant body diameters) + the desired spacing. *During implant placement, clinicians must apply their best judgment as to the appropriate spacing for individual patient conditions.
29TH 6PM

How to Properly maintain and extend the lifetime of KaVo instruments

More than 50% of handpiece and contra-angle failures are caused by improper cleaning and care. With a few tips from us, you will be able to extend the service life of your KaVo instruments and avoid the most common defects.
1. Chuck system
1.1 Rotating instruments with shafts intact
We always recommend that you use burs that are approved by KaVo, otherwise the instrument may suffer significant damage. Damage includes defects involving the chuck system or bur shaft.
1.2 Comply with dimensions for cutters/grinders.
For manufacturer information concerning the length, diameter, shaft shape and max. speed, please refer to the relevant instructions for use.
1.3 Removal of crowns and bridges/ separation of crowns
Bur manufacturers offer crown separators to suit different crown materials. Please comply with the speeds recommended by the bur manufacturer. In the case of straight- or cross-toothed crown separators, these are often lower than for diamondcoated crown separators.
1.4 Never leave the bur in the chuck after a treatment. The chuck should not bear any load when stored, in order to prolong its service life. Storing instruments with burs in can lead to a risk of injury or infection.
1.5 Close the tensioning ring on the handpiece.
Never start operating a straight handpiece while the chuck is open because:
• The straight handpiece blocks.
• The chuck will block.
1.6 Never press the pushbutton during operation.
Never press or wipe the pushbutton on the turbine or handpiece/contraangle while the instrument is rotating because this may cause:
• Excessive wear and tear on the drive/rotor
• Damage to the push-button/chuck Never position the push-button close to the patient’s cheek. The friction between the push-button and the chuck system generates heat, which may cause burn injuries.
2. Ball bearings
Ball bearings must always be lubricated. Using other than original KaVo oils or applying insufficient oil to ball bearings causes excessive wear and tear and may lead to defects. To prevent any secondary damage, replace ball bearings regularly with original KaVo ball bearings.

3. Surgical instruments
Surgical instruments require special treatment. After each use, clean the instrument immediately under lukewarm running water to remove all external soiling. Wherever possible, dismantle the instrument and clean the inside under lukewarm running water as well.
4. Damage after dropping
4.1 Avoiding damage caused by dropping instruments
Visually inspect the instrument at the preparation stage for any changes in order to protect both the instrument and the patient.
4.2 Listen for the click when attaching instruments to the coupling.


The instrument must be heard to click into place on the motor/turbine coupling. Otherwise, it may not be secure and could fall and be damaged.
5. Disinfection
The instrument must never be immersed in a disinfection/ultrasonic bath because:
• The ball bearings might be destroyed
• Other technical defects involving the instrument may occur Instruments can be manually disinfected. If excessive disinfectant or a non-approved disinfectant is sprayed onto the instrument or the motor/turbine coupling, malfunctions may occur.

6. Care
• Automated care with the QUATTROcare PLUS
• Manual care with KaVo Spray
• Chucks must be treated at least once a week with KaVo Spray or in the QUATTROcare PLUS.
7. Storage
Always use an instrument stand to store instruments after cleaning them. Any excess residual oil will be able to drain away. Otherwise, the instrument may become too hot when used again, leading to further damage to ball bearings.

Sterilisation Wrap Update | Packaging
Why wrap?
Hu-Friedy sterilisation wrap is a wet formed, nonwoven fabric compromised of natural wood pulp bonded with resin binder.
During manufacturing, the wrap components are bonded together by entangling their fibres of filaments mechanically, thermally, or chemically. This bonded web of materials creates what is called a tortuous path.
During steam sterilisation, steam is able to enter the wrap due to the extreme pressure present. Post sterilisation, the tortuous path created by the fibres prevents bacteria from entering.
Hu-Friedy wrap material is mostly composed of wood pulp, but there is an added polymer that aids in bonding the wood fibres. There is a sustainability advantage in that the main component, wood pulp, is a fully renewable resource. Many other wraps are composed of petrol/oil derived plastics, which have no sustainability.

Sterilisation packaging requirements
• Must be an FDA cleared medical device
• Suitable for steam sterilisation (temperature resistance up to at least 141 °C with sufficient steam permeability)
• Sufficient protection of the instruments and the sterilisation packaging against mechanical damage
• Sterilisation wrap should be used in accordance with the recommendations of the following standards:
i. ANSI/AAMI ST79: Comprehensive Guide to Steam Sterilisation and Sterility Assurance in Health Care Facilities
ii. CDC Guidelines for Infection Prevention in Dental Healthcare Settings
Tips for packaging
• Ensure all instruments and cassettes are dry before packaging for sterilisation.
• After cleaning, critical & semicritical instruments should be inspected for remaining debris.
• An internal chemical indicator should be placed inside each instrument package prior to sterilisation. If the internal indicator is not visible from outside the package, an external indicator should be affixed to the pack.
• Packages should be labeled with the date and, if multiple sterilisers are used within the facility, the steriliser used should also be labeled. (This simplifies retrieval of processed items in case of a sterilisation failure.)
• When packaging instruments and cassettes, ensure packaging does not have open gaps.
After sterilisation, wrapped items must be stored in a dedicated space free from dust and contamination. It is also important to note they must ideally be stored in ‘enclosures’ due to risks of environmental contamination. Often there are open shelves for storage in the sterilisation area or treatment room. To ensure your sterile packs are not compromised, you may want to consider doors or draws as a more suitable storage option.
Visual representation of the path that a potential bacteria would have to take.


Adhesive Remover with Special Features
In cooperation with Dr. Radlanski, Freie Universität Berlin, the AGK burs have been developed as specialist instruments for removing adhesive residues. The instruments are able to remove the soft adhesive quickly and, thanks to their special toothing, without damaging the hard enamel. At low contact pressure, the instruments operate with low vibration and achieve perfectly smooth surfaces while generating merely a minimum of heat.
This is possible thanks to the innovative blade geometry. The twisted blades made of durable tungsten carbide are optimally suited for precise reduction of soft materials and assure smooth operation and high treatment comfort.
In order to avoid the risk of damaging the gingiva, all adhesive removers are provided with smooth, non-cutting tips (tip without blades). Moreover, the safety chamfer at the head end eliminates the formation of grooves.
The tapered adhesive remover is available for the contra-angle and the turbine in 2 head lengths (4.75 mm and 8.00 mm). The long version – the H22ALGK – is specifically designed for canines and longer anteriors.
The egg-shape (H379AGK) and the grenade-shape (H390AGK) are specially suited for palatinal reduction of adhesive in the lingual technique.


Clinical sequence


2. Removing orthodontic brackets.


4. Removing the adhesive residues with H22ALGK.204.016.

5. Palatinal removal of adhesive residues with H379AGK.204.023.

6. Polishing the labial tooth surfaces with prophylaxis polisher 9631.204.060
Recommendations for use
• The adhesive removers are used without pressure. Always supply plenty of water coolant (at least 50 ml/min.)
• Recommended speed for shank 314:
- Use in the red contra-angle at (120.000 rpm)
- Use in the turbine at (160.000 rpm)
• Recommended speed for shank 204:
- Use in the micro-motor/contra-angle at approx. (40.000 rpm)
• Apart from this general information, please observe the individual speed indicated on the packaging. The instruments must be used with utmost care to avoid damage to the dental enamel. After complete removal of the adhesive the enamel will be shiny.
1. Pre-operative situation.
3. Brackets removed from tooth 11.

Batch Control Identification (BCI) with GKE
Batch Control Identification (BCI), also referred to as instrument tracking, is the process of assigning the steam steriliser’s cycle details to a ‘batch’ or group of packaged reusable medical devices (RMDs).
This creates a definitive link between 1. the patient, and 2. the sterilised RMDs used on said patient in the procedure and offers sound evidence that the RMDs used came from a successful steam sterilising process.
BCI is a ‘Shall’ in AS5369:2023, which means all healthcare facilities including dental are mandated to implement a BCI system.
The ADA Gudelines for IP&C (5th Ed.) state the same mandatory requirement.
At a minimum, the steam steriliser identification number, the cycle number and the date of processing is recorded to the label, which is then adhered to the sterile barrier system (SBS), i.e. pouch or wrapped cassette prior*1 to the steam sterilisation cycle.
BCI is mandated for critical RMDs*2 (used in surgical procedures) but not for semi-critical procedures – although you may consider labelling all your wrapped critical / semi-critical RMDs

to identify all patients where a recall is required. Labelling all wrapped RMDs also reduces the risk of a missed critical RMD through error.
GKE’s documentation system is a low cost, simple to administer BCI system using rolls of ‘stickers’ (labels) with Type 1 process indicators, inserted to a label gun, allowing easy change of process details and quick attachment to the SBS – noting to place the label on the ‘plastic’ side of the pouch to avoid impeding air removal and steam penetration through the paper-side!

The ‘piggy-back’ design of the adhesive labels allows details to be transferred to patient notes, with the Type 1 indicator a convenient chairside visual reference of process exposure.
The GKE logbook allows for the recording of the cycle details by adhering a label from the label gun alongside a description of the RMDs within the load. The logbook also incorporates space to adhere the
Process Challenge Device (PCD) indicator for both the daily performance test3 (mandatory) as well as for batch monitoring of steam penetration (recommended). Should an adverse event occur with a patient, we can use the recorded details in the patient’s notes (steriliser identification number, the cycle number and the date of processing) to find the appropriate daily logbook entry as well as the steam sterilising cycle record or print-out.
This links the RMDs used on the patient that day (description of RMDs in logbook) to a successful sterilising process. Environmentally friendly, all chemical indicators are protected from bleeding by a polymer binder and surface coating and can be disposed with normal garbage. They are also guaranteed to not change colour or revert during storage.
Talk to your Henry Schein Team Member about either implementing new or enhancing your existing BCI system to offer increased assurance and reduced workflow to your dental practice.
*1, *2 – AS5369:2023, 6.4.2 (vi)
*3 – PCD conforming to ISO 11140-6

Chris Jobson
Territory Manager and Dental Market Specialist GKE Australia chris@gkeaustralia.com
Figure 1 GKE Documentation System
Figure 2 GKE labelling gun and rolls
KaVo Unveils MASTERmatic LUX M45 L Handpiece
Puts your ergonomics and patients safety first.
Thanks to the unique head/knee angle combination of the new KaVo MASTERmatic LUX M45 L, we achieve the better results, even in hard-to-reach areas.
This latest addition to the MASTER series collection marks a significant breakthrough in access, visibility, and patient care within the dental industry. Designed with a commitment to ergonomics and patient safety, the MASTERmatic LUX M45 L sets new benchmarks for precision and efficiency in dental procedures.
The new high-speed contra-angle MASTERmatic LUX M45 L features a unique head/knee angle combination for optimum visibility in the molar area. The CoolHead technology and the optimized spray water of this new contra-angle handpiece ensure even greater patient safety during treatments.


The innovative features of the KaVo MASTERmatic LUX M45 L allow to achieve the best possible results even in hard-to-reach areas of the patient´s mouth. The KaVo MASTERmatic LUX M45 L offers improved visibility, optimum access, maximum precision and exceptional reliability at the same time.