MAKING THINGS
FINDING USE, MEANING & SATISFACTION IN CRAFTING EVERYDAY OBJECTS
ERIN BOYLE & ROSE PEARLMAN

Rose Pearlman and Erin Boyle met in 2018 and immediately struck up a friendship, united by a reverence for everyday objects. Their approach to craft reflects a shared commitment to sustainability and accessibility—as they write in the introduction, “Craft can be exquisite and exacting, the result of formal training and years of practice, but it can also be experimental and messy and not quite perfect.”
Scouring sidewalks, stoops, thrift stores, and their own recycling bins, the authors repurpose materials to create projects that range from the functional to the fun and even frivolous. Clay incense burners, boxes made from discarded magazines, pom-poms, and sewn cardboard toys are just a few of the over 100 projects included in this book, intended to bring a sense of playfulness and flair to the quotidian. Step-by-step guides make it simple to start and finish each project, while the book’s stunning photographs show how each craft can fit within an organized, thoughtfully curated home.
As Making Things demonstrates, relying on a limited range of supplies and repurposing the same materials can spur our creativity, encouraging us to look at a pile of junk on a stoop and see endless possibility.

“This dreamy book has my head spinning with future project possibilities! I am inspired and ready to create!”
LEANNE FORD, INTERIOR DESIGNER AND CREATOROF
FEEL FREE MAGAZINE“A magnum opus of fun, clever, aesthetically pleasing projects for home and family! Beautifully presented and bound to become a classic.”
—MELANIE FALICK, AUTHOR OF MAKING A LIFE: WORKING BY HAND AND DISCOVERING THE LIFE YOU ARE MEANT TO LIVE
“This is not your ordinary crafting book but a beautiful reminder of all the handy and practical things we can actually make ourselves— everything from pot holders to market totes to storage baskets & caddies—items that will help us organise our homes and simplify our busy lives. I am brimming with ideas after reading this.”
—COURTNEY ADAMO, WRITER“Armed with warmth, creativity, and know-how, Erin and Rose pack a one-two punch: They make me itch to create things, and they deliver on their promise to hand-hold me the whole way. Filled with projects you can do right now—using supplies and scraps you have lying around—this book turns making things into an everyday art form, fueled by Erin and Rose’s unmatched sense of calm and cool.”
—ERICA CERULO, CO-AUTHOR OF WORK WIFE AND CREATOR OF “A THING OR TWO”
“Making Things is a delightful book full of wonderful crafts and home projects. Erin and Rose have such a distinctive style, and I’m so happy to have some insight into their creative process. Their thoughtful approach to materials is accessible and broad, and they have kindly spelled out every step of each project with beautiful photography for those of us who are easily flummoxed!”
—SANDEEP SALTER,
OWNEROF SALTER HOUSE AND PICTURE ROOM
MAKING THINGS
Hardie Grant North America 2912 Telegraph Ave Berkeley, CA 94705 hardiegrantusa.com

Text © 2024 by Erin Boyle and Rose Pearlman
Photographs © 2024 by Erin Boyle and Rose Pearlman
All rights reserved. No part of this book may be reproduced in any form without written permission from the publisher.
Published in the United States by Hardie Grant North America, an imprint of Hardie Grant Publishing Pty Ltd.
Library of Congress Cataloging-in-
Publication Data is available upon request.
ISBN: 9781958417270
ISBN (eBook): 9781958417386
Printed in CHINA
Design by Amanda Jane Jones
First Edition
MAKING THINGS
FINDING USE, MEANING & SATISFACTION IN CRAFTING EVERYDAY OBJECTS
ERIN BOYLE & ROSE PEARLMANcontents
introduction 08
tools & supplies 16
01
corral & display
Finger Cording 36
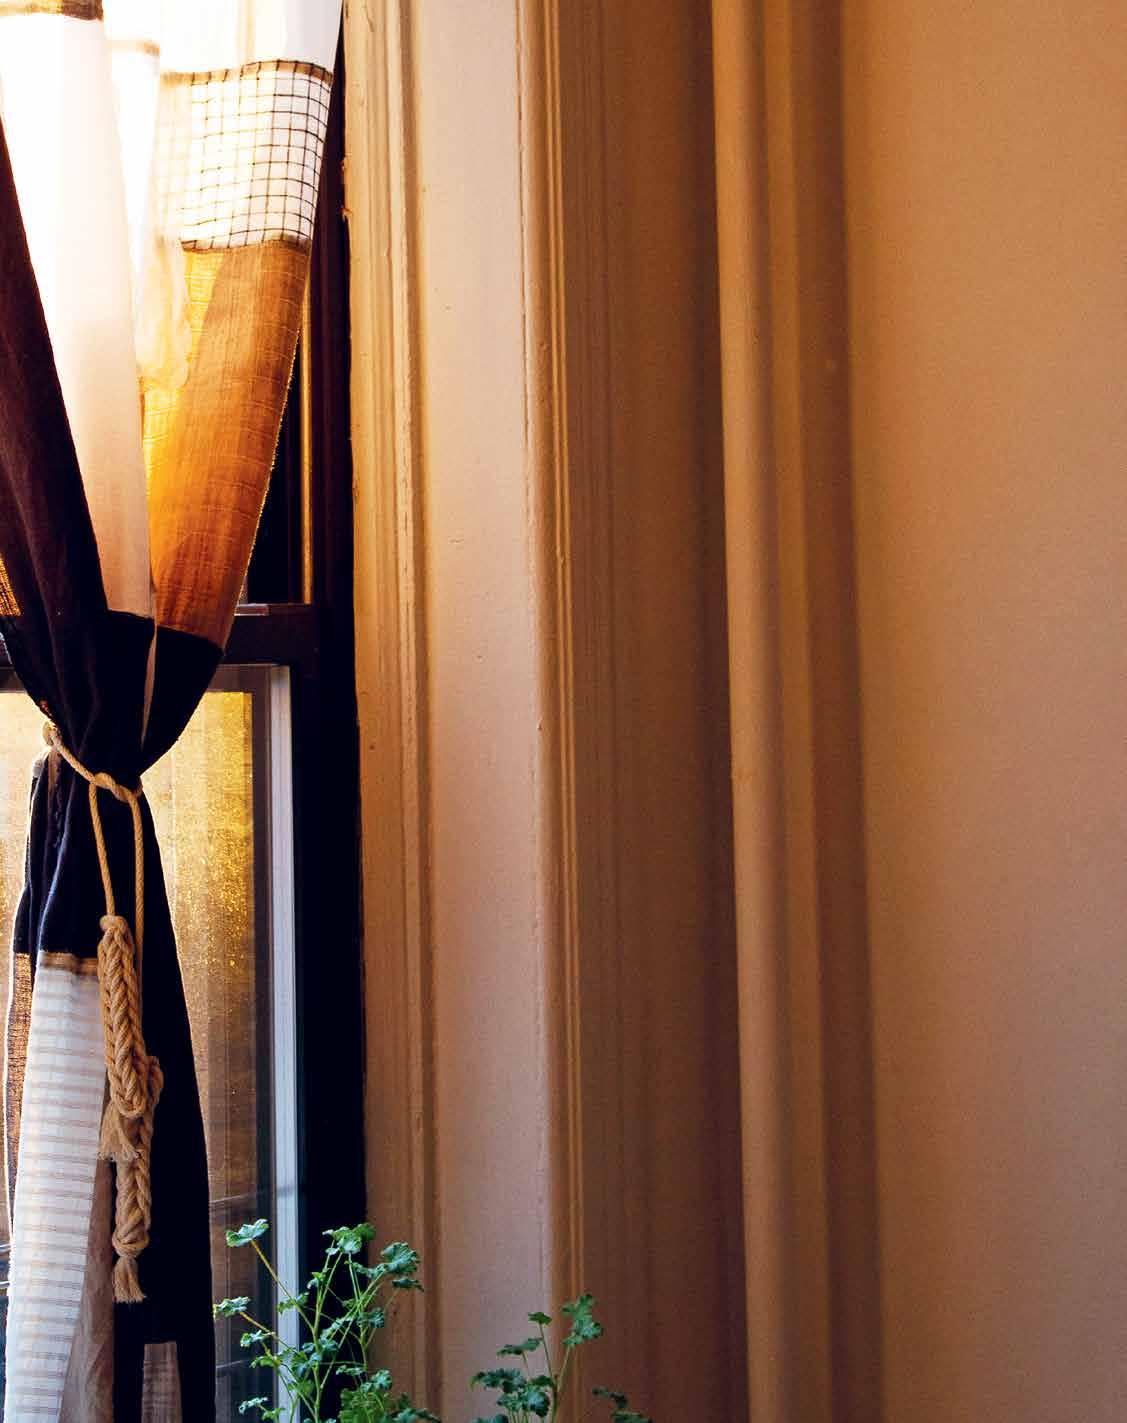
Curtain Tieback 42
Kitchen Hanger 45
Clothes Hanger 45
Paper Roll Hanger 46
All-Purpose Carrier 49
Herb Hanger 50
Wreath/Flower Crown/ Headband 50
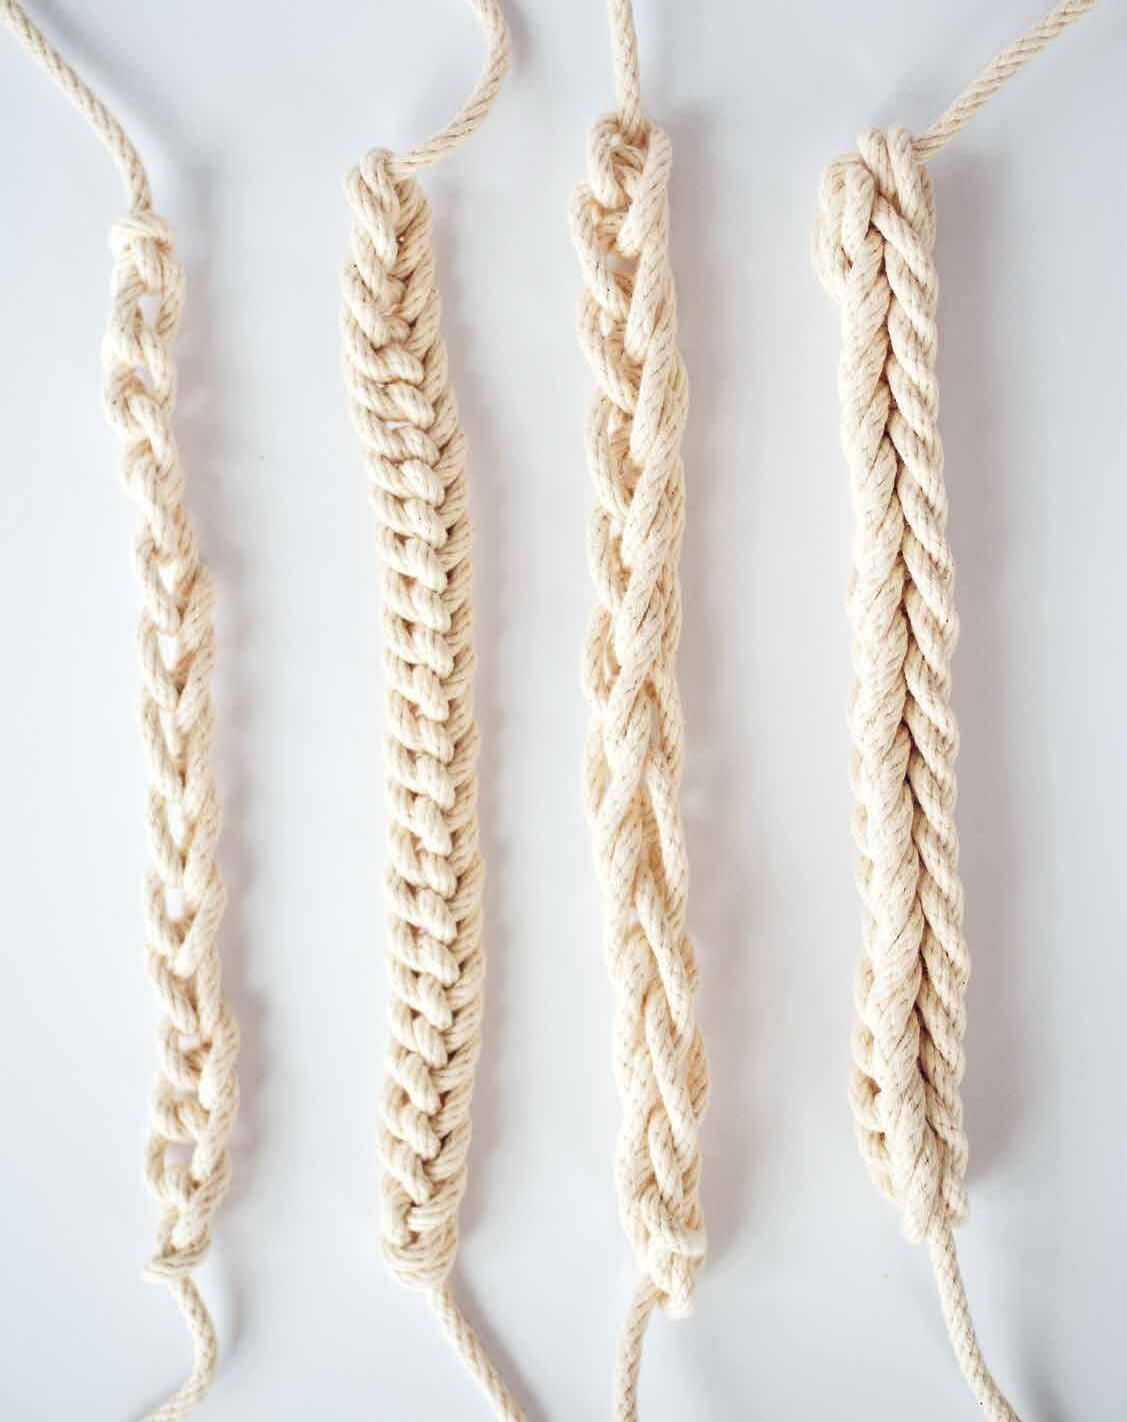
Four-String Braid 52
Belt 55
Clip Storage 55
Lanyard 57
Pacifier Clip 57
Clay Vessels 58
Clay Incense Burner 62
Match Strike 62
Pincushion with Magnetic
Bottom 65
Clay Beads 66
Clothespin Knitting Loom 68
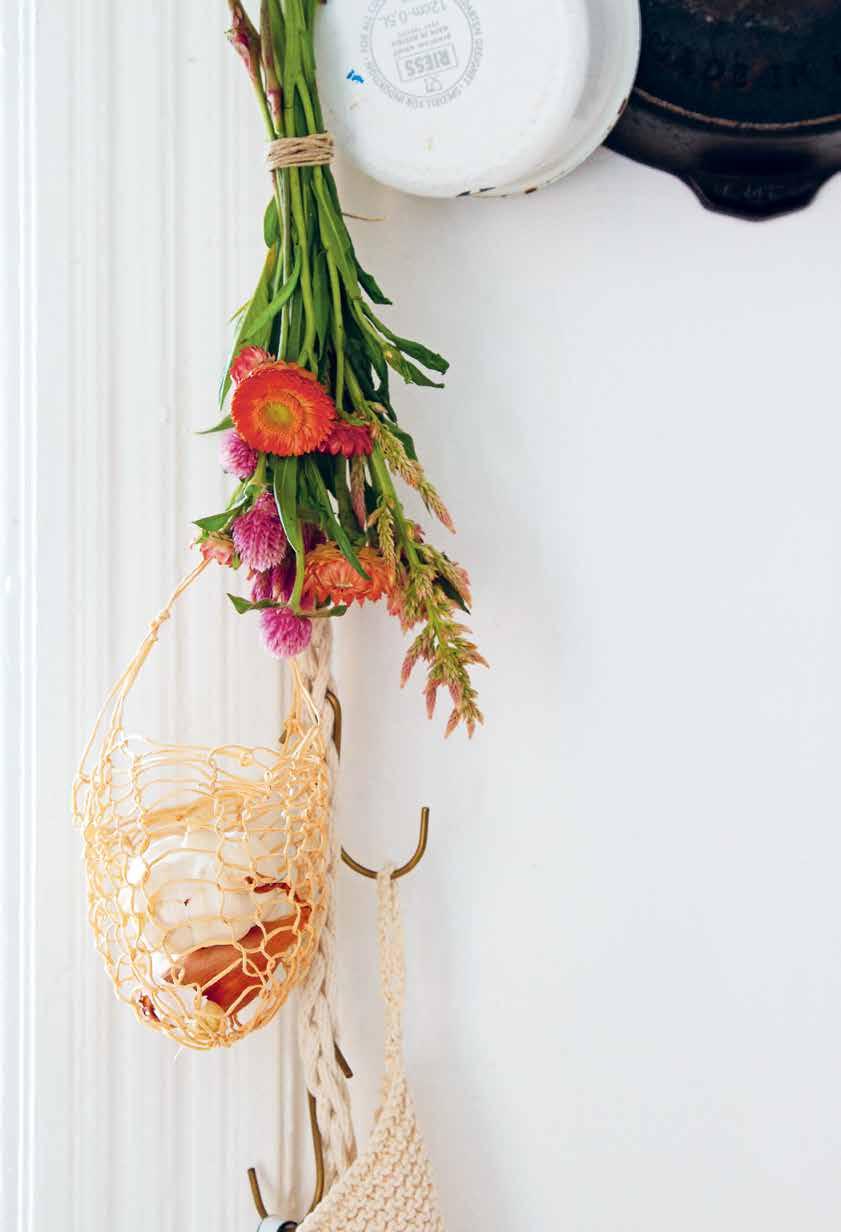
Simple String Bag 70
Floral Wire Basket 76
Flower Frog 80
Macramé 82
Cow Hitch 84
Square Knot 85
Floral Wire Macramé Basket 86
Rope Bowls 90
Pinboard 98
02
conceal & hold
Sewing 104
Drop Cloth Satchels 106
Fold-over Pouches 108
Kit Case 112
Apron Tool Roll 115
Pencil Case 116
Canvas Wall Caddy 120
Tote Bag 124
Papier-mâché Fruit Bank 126
Starching Fabric 130
Canvas Tissue Box with Pockets 135
Paper Boxes 140
Masu Box 143
Magazine Box 146

protect The Basics of Knitting 156 Make Your Own Knitting Needles 160 Knit Cotton String Potholder 164 Knit Rope Potholder 165 Knit Bath Mitt 166 Knit Kitchen Scrubber 166 Upcycling Fabrics into Yarn 168 Knit Bathmat 176 Weaving 178 Woven Potholder 180 Cardboard Loom 182 Paper Bag Woven Fly Swatter 184 Knotted Jute Trivet 186 Upcycled Coasters 189 Dust Mitt 191 Hot Water Bottle Cozy 192 Bulky Yarn Winter Hat 193 Scout Scarf 194
03
04
comfort & carry
Punch Needle 200
Reversible Butcher’s Twine and Wool Punched Rug 208
Upcycled Fabric Punched Bag 212
Envelope Pillow Covers 214
Upcycled Jersey Punched Pillow 217
Wipes Cover 218
Hanging Lavender Sachet 219
Tea Leaves Dye Bath 220
Upcycled Hankie/Kerchief 222
Rolled Hem 222
Jogak-bo (Patchwork Bojagi) 226
Ssamsol Seams 228
Lampshade 230
Extra Large Lampshade 234
Night-light 236
05 play
Cardboard Toys and Games 242
Cardboard Magnets 244
Time-telling Practice 244
3-D Cardboard Notch Puzzle 245
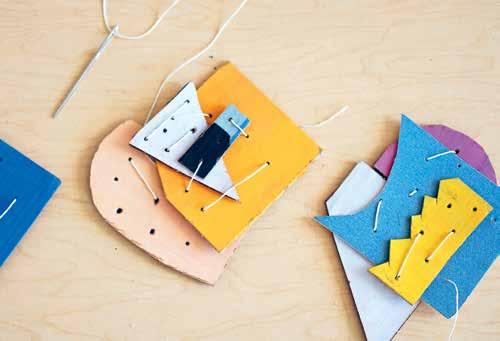
Sewing Boards 245
Papier-Mâché Bank 246
Bracelet Loom 247
Geometric Shape Stencils 248
Activity Spinner 248
Nail-painting Practice 249
06
give
Shoe
Weather
Bracelet
Lollipop
Puppet
Emotional Check-in
Cardboard and Brad
249
250
Tie Practice
250
Board
251
Organizer
Binoculars 252
Cup Sleeve
and Cuff 253
252
Cardboard
Mask
Lips and Mustache 253
Woven Pouch on a Cardboard Loom 254
Checkerboard 258 Clay Checker Pieces 258 Freezer Paper Printing 260 Block Stamps 262 Jump Rope 264 Kumihimo Braiding 266 Bracelet 268 Eyeglass Cord 268 Kumihimo Corded Dog Leash 270
Upcycled
Woven
Accordion Memento Book 284 Matchbook Notebook 288 Tear-off Scrap Paper Pad 292 Envelope and Gift Tag Templates 295 Kid Art Envelopes 296 Mini Envelope 297 Starched Fabric Bunting 298 Pom-poms 300 Scrap Fabric Hair Bows 302 Scrunchie 304 Origami Folder with Closure 306 Travel Watercolor Kit 310 Cloth Gift Wrap 312 Giving Suggestions 314 Acknowledgements 315 Index 316 Whipping Knot 274 Cat Toy 276 Cat Scratch Board 276 Kumihimo Rope Dog Toy 277 Twining 279
introduction
It was learning of each other’s enchantment with a small closet in the American Wing of the Metropolitan Museum of Art that first brought me and Rose Pearlman together. I’d made the trek by subway with an infant strapped to my chest to see the neatly appointed shelves of Sara Berman’s closet. Rose had stumbled across them en route to teach a class to schoolchildren visiting the museum.
Tucked in next to a display of Arabella Worsham’s grandiose nineteenth-century West 54th Street dressing room, the re-creation of a twentieth-century West Village studio apartment closet was a master class in order and simplicity. Berman, a Belarusian and Israeli emigrant (and the mother of beloved artist Maira Kalman, who mounted the exhibit with her son, Alex), had made art out of everyday objects. In the red pom-pom affixed to the end of the lightbulb pull cord, in the stacks of her starched and folded white T-shirts, in the potato grater kept on the high shelf and used for making latkes, we saw evidence of Sara’s delight and reverence for objects.
Rose and I met in person for the first time nearly a year after seeing that exhibit. We had discovered each other online. Neither of us had forgotten those perfect shelves or that fluffy red pom-pom. To that first meeting Rose came bearing craft supplies—as she always does—and a punch needle bag she’d made herself. A week later, she taught me how to make a pom-pom
using two clothespins and the cardboard center of a roll of tape.
For the past six years, we’ve delighted in each other’s company and in making things together. I live in a crumbly brownstone apartment with layers of paint and longtime rental quirks. Two miles away, Rose lives in a cookie-cutter rental seventeen floors up. Both of us make these places home in large part through a scrappy pursuit of useful beauty-making. In a moment when quick access to consumer goods is easier than ever, we’ve found use and meaning in a practice of making that provides a tactile and emotional reconnection to our belongings.
materials & supplies
We’ve purposefully pulled from a simple supply closet for this book, hoping to avoid highly specialized tools or materials in favor of those that are easy to come by.
In New York City, a place where most any specialty craft item can be found, we wanted to stick to materials on the shelves of our neighborhood hardware stores. We’re well aware that with a few keystrokes new materials can be sourced and ordered and delivered to our doorsteps, but in using what’s readily available, harvesting elements from what we already have, and rethinking the craft closet as something that’s stocked as much with upcycled materials as craftstore purchases, we’ve found

What you need is likely within easy reach and what you already have can be remade.
inspiration and abundance in constraint.
Relying on a limited range of supplies and repurposing the same few materials and techniques over and again are at the heart of this book. And that’s the message we want to offer readers: what you need is likely within easy reach and what you already have can be remade and given new life.
In his book Fewer, Better Things: The Hidden Wisdom of Objects, Glenn Adamson writes at length about material intelligence, which he describes as “a deep understanding of the material world around us, an ability to read that material environment, and the know-how required to give it new form.” As materials themselves have proliferated, he argues, our distance from understanding them has also grown. We’re hoping this book might be one small entry point for folks
INTRODUCTION 8


INTRODUCTION 9
We’ve found that a deeper understanding of materials makes room for thrift & resourcefulness.
we train our eyes to look closer, past the decay and the stains and the holes, we begin to find value in a shape, a material, a texture, a color.
yearning for a different kind of relationship to the materials at our fingertips.
In our own practice of making things, we’ve found that a deeper understanding of materials makes room for thrift and resourcefulness. It’s what enables us to stumble upon a collection of junk at a stoop sale or in a sidewalk free box and instead of seeing trash, to see opportunities.
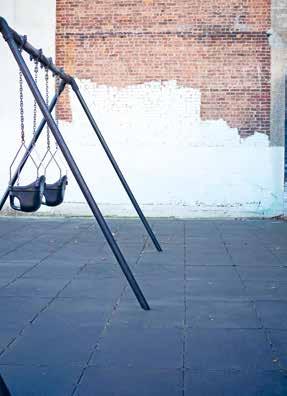
It’s a long stretch between our two apartments, forty-five minutes by foot and without many sensible public transit options. On busy or rainy days the distance has felt like a schlep, but mostly we’ve seen these walks as sources for finding inspiration. Along those city blocks, we pass rows of brownstones, boarded up construction sites, schools, shops, restaurants, and highrises. We pass places of worship, playgrounds, and chain-link fences. Pounding the pavement between our two apartments we’ve come to see the built environment as an object lesson in shapes, texture, and color. It’s not always easy to see beauty in crumbling concrete, but when
In the course of writing this book and putting into words and pictures these projects we’ve come to know by heart, it was important to us also to find new ways of seeing these projects. We wanted to challenge ourselves and our readers to find beauty and utility in materials we might not always remember to value. On our long walks between each other’s apartments, we’re scavengers: spotting the good black plastic garbage bags to turn into twine, the high-quality cardboard neighbors have put in their recycling bins, the flannel shirt someone left hanging on a wrought iron fence. As we rifle through the goodie bags that come home with our elementary schoolers, we train ourselves to glean what’s useful. A novelty keychain might not earn a spot in our permanent collection, but its hardware can be used to make one that does. A craft foam crown brought home from a children’s party might not be cherished, but the materials can be used to make a set of one-of-a-kind block stamps. The nice junk mail catalogs—with the matte pages and good colors—get sorted and saved for future projects. The moth-eaten sweater becomes a felted dust mitt and hot water bottle cover. The night-light with the broken shade can be made anew. The dress, the T-shirt, the old baby carrier become yardage or yarn for our next project.
The imperfections and quirks of the city we call home have found form in our crafts, and in
turn, we’ve come to see our crafts in the city: The fading brick that mimics a weave; the construction cone that’s the same shade of orange as the old Mets T-shirt we cut up to make a woven pouch; the rusted metal siding of old warehouses that mimic the corrugated folds inside a cardboard box. Maybe gritty sidewalk cracks aren’t in abundance near you. Yet there’s poetry and inspiration in the chainlink fence at the baseball field, the painted lines of a parking light, the angled shadows that streetlights cast at the end of a cul-de-sac. Point is, inspiration’s everywhere, even where we least expect it.
finding value
“It’s true that a farm family of the 1930s had to depend on their material intelligence for survival, while today’s city dwellers and office workers can get away with ignoring their physical environment and make a fine living. Maybe this feels like a sort of progress. But basic necessity is only one side of our relationship to materials. There are others, too: pleasure, discovery, inventiveness, and particularly important, responsibility. Our relationship to materials determines much about the way we live on Earth.”
–Glenn AdamsonIn writing this book we’ve asked ourselves how making things changes the way we see the objects in our home. How does the process of weaving a bag or basket or bowl from rope help us to pause and consider these objects from a different vantage point? How can making things—even remarkably simple things—get us to recon-
INTRODUCTION 11
We’re hopeful our pared-down instructions will offer a comfortable starting place.
sider how everything else in our lives gets made—even those items we might never imagine endeavoring to make ourselves?
We’ve found the answers lie in the making itself. Getting out of our brains and into our bodies—getting lost in the rhythmic meditation of knitting or weaving or tying wire into knots—allows us the time and space to think more critically, to make more creatively, and to consume more thoughtfully.
In her 2020 book Fixation: How to Have Stuff without Breaking the Planet, Sandra Goldmark writes that the mystique of making things by hand is pervasive in American literature. She cites the romanticization of making things in popular children’s literature like the Little House on the Prairie series. And, while she takes care to note that these stories are often “incomplete at best and racist and sexist at worst,” she argues that they did emerge in part from a fundamental truth: Americans of all kinds—Native, African, and European— were makers. She goes on to write, “the challenge for us today is to take these frayed but still extant threads of
myth, and making, and mending in our culture, and weave them into our modern lives.”
In our experience, making things ourselves changes the way we value them. On a planet increasingly filled with the detritus and damage of a consumer culture, we find great value in becoming a maker. If making things engenders even a fraction of reverence for our belongings, for the materials at our fingertips, for our own ability to be resourceful and thrifty and creative, it’s a worthy pursuit.
experience, expertise & mastery
Beyond using simple supplies, we have also deliberately kept our techniques simple. If you are a master sewist or a lifelong knitter, the particulars of technique and method in this book will be familiar, but we’re hopeful that a new application of those skills will still be inspiring. And if you have never picked up a pair of knitting needles or sewn a stitch with thread, we’re hopeful our pared-down instructions will offer a comfortable starting place. Many of the projects in these pages piggyback off one another, building on the same sets of skills and supplies to yield different results.
As any crafter does, we’ve leaned heavily into tradition here. The methodology and techniques shown in these pages are in many cases millennia old. We owe a debt of gratitude to makers the world over who have come before us and who work alongside us. For many of these makers, crafting is the basis of
their lives and livelihoods.
In the writing of this book we spoke with many of our favorite artists and makers about the goals for this book. These folks, who inspire us daily with their creativity and their skill, all agree: mastery is an ongoing process. The most important step is to begin. We hope that this book encourages you to dive right in. Craft can be exquisite and exacting, the result of formal training and years of practice, but it can also be experimental and messy and not quite perfect. We hold master crafters in reverent esteem at the same time that we recognize in ourselves—and in our readers—an ability to craft the world around us, perfection be damned.
measurements & exactitudes
We’ve done our best to give the steps needed to get these projects made successfully, but that comes with the risk of having you think there’s only one way to make them. In our own quirky creative practice we feel free to experiment, to try things on for size, to try one material and then another and see how an idea that started out as one thing might develop into something else.
We confess, we are not the kind of crafters who swatch our fabric before embarking on knitting a bathmat from a threadbare sheet. This means that there have been times when we’ve started and stopped and begun again. We embrace this as part of the process and not something that should be shied away from. What a joy it is to get something right the first time, but through
INTRODUCTION 12


INTRODUCTION 13
Our fervent hope is that readers will see the ideas in this book and run with them.
failure we can shift and reshape our craft and our process and come out with something wholly different and surprising even to us. (Even as we sweat and swear.)
This book is filled with crafts we’ve made hundreds of times, but as with any craft that becomes built into the memories of muscles and fingertips, each time we make them we try something slightly different. We discover a new way of working, a different use, a variation in supplies, or dimensions that bring a whole new meaning to the process and product.
This, of course, is the point of making things. Whether it’s as simple as braiding together strands of hardware-store string or shaping a bowl from clay, we develop our own way of knowing those materials. Our fervent hope is that readers will see the ideas in this book and run with them—that these projects will be taken in directions that we haven’t yet thought of or didn’t have the room to describe in a finite number of pages.
In an interview with the podcast On Being’s Krista Tippett, music producer Rick Rubin said:
“Everything we make is the sum total of everything we’ve learned and done . . . our creativity doesn’t come from our ideas. All of everything in us comes from somewhere else. And we get to take those elements, and . . . re-present. We have this information, and we get it, and we get to mix it up and re-form it and re-present it back to the world. And sometimes we re-present it back to the world in a way that no one’s seen it before. And it’s exciting. And someone else can see the thing that we share that hadn’t occurred to them before in that form. And that inspires them to make something—it opens a door in them that allows them to see, ‘Oh, it doesn’t have to be the way I thought it was . . . ’”
Rose herself is a seasoned rug hooker and fiber artist whose deep knowledge of the craft she learned from her mother. Her vibrant geometric designs and use of upcycled fibers are just one example of the kind of inspiration we hope our readers feel empowered to channel. Where Rose takes a left turn with her punch needle, you can take a right. Where she incorporates yarn cut from a tea-dyed T-shirt, you can strip your tattered jersey maternity dress and put that to use instead. It doesn’t have to be the way we think it does.
inspiration
We offer our thanks to the people who have paved the way. In the course of our research for
this book, we folded ourselves into the deep, blue bookshelves of the Tatter Textile Library in Gowanus, Brooklyn. We were drawn over and over to the quirky paperback books of the 1970s stuffed in between shinier crafting tomes. From the vantage point of fifty years later, it’s impossible not to notice that they assume a certain amount of general material understanding. Instructions are often sparse, if present at all. Subject matter is wide-ranging and freewheeling and readers are enthusiastically invited to learn by doing.
The title of our book is a nod to Ann Sayre Wiseman’s 1973 classic, Making Things: The Handbook of Creative Discovery. From her experience as program director at the Boston Children’s Museum visitor’s center, Wiseman filled her paperback book with creative projects kids could craft at home. In the book’s introduction she directly encourages a hands-on approach:
“Learning by experience is profound knowledge, more deeply recorded in the memory than theory or speculation. The most direct, immediate and satisfying path to knowledge is visual and manual experience linked with the urgency of interest.”
Learning by doing connects products with ideas and history. It breeds creative thinking, self-expression, and originality, the confidence to experiment, and the courage to make mistakes, learn control, and perfect skills.
We’re hopeful that fifty years later, we can invite folks to join us in a similar tradition of making things and also of seeing things.
INTRODUCTION 14


Craft gets denigrated as unserious or unnecessary. When put against the demands of a capitalist system that exploits labor and devalues time, it’s easy to be dismissive of things that take time and care to produce. As working parents with young mouths to feed, and a global pandemic to navigate, and bills to pay, there have been plenty of moments in the past few years when sitting down to make something has felt simply impossible. Would you like me to sit down and make my own twine from a plastic garbage bag before or after I make dinner? Am I to knit my own bath mitt while rinsing the shampoo from a screaming child’s hair or wait until the pre-bedtime temper tantrum? When my boss emails me, shall I leave an OOO reply letting them know I’ll be stripping some cotton sheets and cording my own dog leash for the foreseeable future? It can all sound downright laughable. And yet, we’re simultaneously guilty of spending an enormous amount of time lulled into the hypnotism of the cell phone screen. We might spend hours online shopping for a kitchen organizer that will never, ever bring us joy or satisfaction.
In making things, we find meaning and satisfaction but also solace. This is something crafters have always known: An elderly neighbor crochets to take her mind off her husband’s cancer diagnosis, a child passes a boring car ride making a friendship bracelet, a grandmother folds origami while she’s watching the evening news. There’s comfort in making things separate and apart from any monetary reward—or even the finished product itself. There’s
value in the process itself, value that with any luck is only amplified by the pride and intimacy embedded in the finished object.
May readers of this book be inspired to sit down and make something. The comfort we’ve found in making these simple crafts has been invaluable. In the face of a rising climate crisis, amidst the chaos of family life in a busy city, in between deadlines and in moments of anxiety or dread, we’ve found comfort and respite in turning to our own two hands and making things.
INTRODUCTION 15
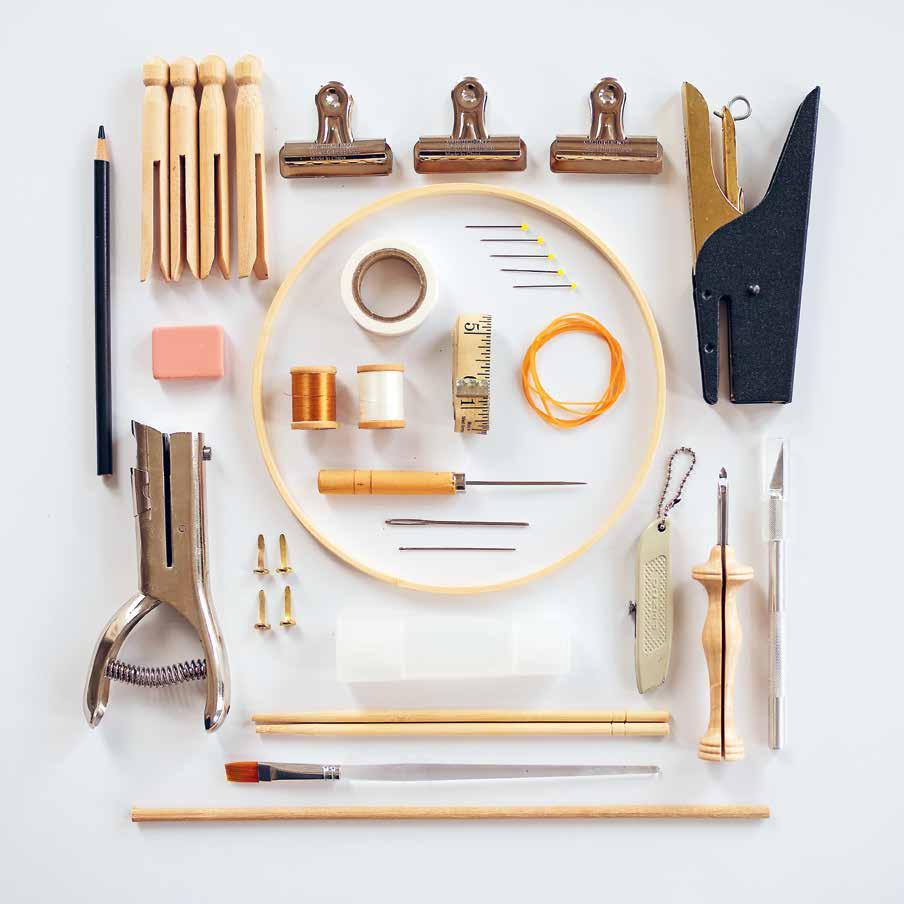
tools & supplies


In the pages that follow we’ll share the humble tools and supplies that make up the bulk of our craft closets and what you’ll need to make the projects in this book. You likely already have many of them, and we’ve done our best to ensure that what might still need to be gathered is easily sourced.
fabric
cotton weave
Cotton plant fiber that is woven rather than knit, resulting in fabric that has structure but no stretch. Muslin, organdy, and poplin are all examples of cotton weaves.
WHERE TO FIND IT: Cotton bedsheets, structured button-up shirts
WHAT TO MAKE WITH IT:
Envelope Pillow Covers 214
Masu Box 143
Patchwork Bojagi 226
Punch needle projects 200
Scrap Fabric Hair Bows 302
Scrunchie 304
Starched Fabric Bunting 298
Starched Fabric Cube 139
Upcycled Hankie/Kerchief 222
canvas
A woven cotton fabric that is very thick and durable. We prefer a lightweight canvas (4–6 oz.) when sewing it with a machine. Cotton canvas, especially in the form of hardware store dropcloths, does not typically come pre-washed; wash and dry before sewing to avoid the material seizing up when washed later.
WHERE TO FIND IT: Hardware store drop cloths, fabric stores, Canvas Etc. (www.canvasetc.com)
WHAT TO MAKE WITH IT:
Apron Tool Roll 115
Canvas Tissue Box with Pockets 135
Canvas Wall Caddy 120
Drop Cloth Satchels 106
Envelope Pillow Covers 214
Fold-over Pouches 108
Kit Case 112
Wipes Cover 218
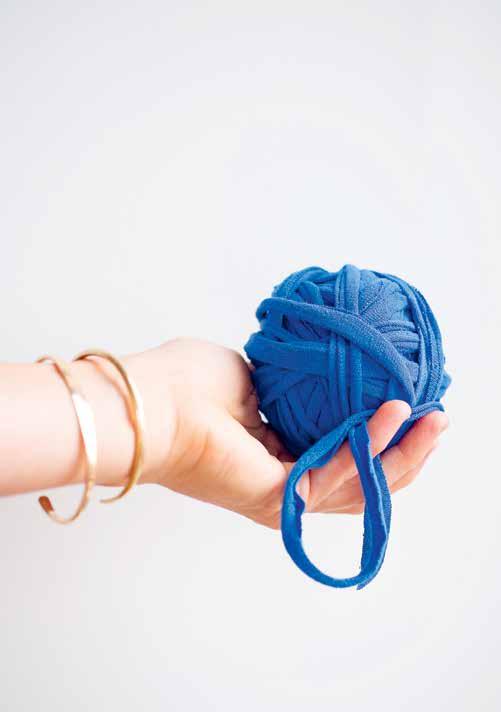
jersey
Fabric that is knit rather than woven, resulting in material that has “give” or stretch to it. Jersey can be made up of a variety of fibers including cotton, cotton blends, and synthetic materials. It can be upcycled from old clothing and cut into a stretchy, soft yarn. (See page 168 for Upcycling Fabrics into Yarn.)
WHERE TO FIND IT: T-shirts, athletic wear, jersey bedsheets, jersey baby slings and wraps
WHAT TO MAKE WITH IT:
Finger cording projects 36
Kumihimo projects 266
Upcycled Fabric Punched Bag 212
Upcycled Jersey Punched Pillow 217
Woven Potholder 180
knit wool
An animal fiber that’s naturally antibacterial, antimicrobial, warm, and durable. When knit, wool naturally has give and stretch. Upcycling knit wool, whether in the form of a motheaten sweater or a beloved camp blanket shrunk in the washing machine, is a way to extend the life of this valuable fiber. Felt is wool that is matted together through a process of friction, heat, and moisture and is especially great for crafting and kids’ projects because the raw edges won’t fray. Felt can be purchased in yardage or sheets, but knit wool can easily be felted at home. When searching for knit wool for upcycling and making into felt, look for labels mentioning 100% wool, cashmere, merino, alpaca, mohair, llama, vicuña, or angora. Be wary of blends containing synthetic materials as they won’t felt up and do not contain the natural antibacterial properties of 100% wool.
WHERE TO FIND IT: Sweaters, blankets, coats, blazers, shawls
WHAT TO MAKE WITH IT:
Dust Mitt 191
Hot Water Bottle Cozy 192
TOOLS & SUPPLIES 18
linen & hemp weave
Linen and hemp weaves are usually heavier and thicker than cotton weaves. Unlike cotton, which tears relatively cleanly, linen and hemp are not a great fit for weaving and punch needle projects because of their thick, frayed edges. But we love both for projects that require a bit more heft and durability.
WHERE TO FIND IT: Structured shirts, pants, dresses, bed linens
WHAT TO MAKE WITH IT:
Envelope Pillow Covers 214
Fold-over Pouches 108
Hanging Lavender Sachet 219
Kit Case 112
Upcycled Hankie/Kerchief 222
monk’s cloth
Woven cotton fabric made specifically for rug hooking and punch needle projects. To ensure you are purchasing the right material, your monk’s cloth should have 10 to 12 holes per inch / 2.5 cm and be purchased only where rug hooking supplies are sold. Monk’s cloth should not be prewashed before using.
WHERE TO FIND IT: The Oxford Company (www.amyoxford.com); The Woolery (www.woolery.com)
WHAT TO MAKE WITH IT:
Punch needle projects 200

TOOLS & SUPPLIES 19

paper
Not all paper is interchangeable when making these projects. Because there is such a wide variety of paper types and thicknesses, we’ve divided them into three rough categories to give you an idea of which paper is best suited for which project. Keep in mind that something as common as cardstock can vary in thickness and range from medium weight to heavyweight depending on the manufacturer, and it’s always good to check a paper’s weight before purchasing. Of course, the very best papers are the ones you already have! Think of all the unwanted pages in an old notebook, children’s doodles, grocery lists, old folders, junk mail, letters, magazines, holiday cards, catalogs, calendars, posters, wrapping paper, sketch pads, flyers, and homework sheets. Gently bend a sheet of paper to get a better sense of its weight and how it will crease, tear, and fold. The more personal and colorful the better!

MATERIALS NOTE:
In paper-speak, the thickness of paper is described in pounds—as in the actual weight of a ream of that paper. The smaller the pound measurement, the thinner the paper.

lightweight paper (20–55 pounds)
Paper as thin as newsprint and as thick as copy paper is considered lightweight paper. Tracing paper, some thinner kraft papers, origami paper, and wrapping papers are all also considered lightweight. These papers fold, crease, and tear very easily.
WHERE TO FIND IT : Kids’ easel pages, magazine and catalog pages, newspapers, and circulars
WHAT TO MAKE WITH IT:
Envelopes 296
Magazine Box 146
Masu Box 143
Papier-mâché Fruit Bank 126
medium-weight paper
(50–100 pounds)
Medium-weight paper has a bit of structure but is still easily cut and, with slightly more effort, folded. Many kraft papers, cardstocks, sketch papers, charcoal papers, and some mixed-media papers are medium weight.
WHERE TO FIND: Kids’ drawing papers, construction papers, paper grocery bags, matte catalog covers, posters
WHAT TO MAKE WITH IT:
Masu Box 143
Matchbook Notebook 288
Origami Folder with Closure 306
Paper Bag Woven Fly Swatter 184
heavyweight paper
(100 pounds and up)
Heavyweight paper is thick with lots of structure. It can be easily cut with scissors but is not easily torn. When folding heavyweight paper, a bone folder or the back of a butter knife is helpful to get a
smooth crease. It absorbs a wide range of drawing and painting mediums without tearing, buckling, or warping. Examples include watercolor paper, heavier cardstock, Bristol paper, acrylic paper, and heavier mixed-media papers.
WHERE TO FIND IT: Posters, cover stock
WHAT TO MAKE WITH IT:
Gift tags 295
Origami Folder with Closure 306
Matchbook Notebook 288
parchment paper & wax paper
These food-safe papers have different uses in the kitchen (parchment paper can go in the oven and wax paper can’t), but for our purposes they’re fairly interchangeable. Parchment paper has a more matte finish and wax paper tends to be shinier. Both are typically brown or white in color and semi-transparent.
WHERE TO FIND IT: Grocery stores
WHAT TO MAKE WITH IT:
Accordion Memento Book 284
Envelopes 296
freezer paper
A plastic-coated paper used to wrap meat for freezing. We avoid plastic products as much as possible, but a roll of freezer paper can be used so effectively in simple, low-cost, and small-space friendly printmaking operations that we’ve made an exception.
WHERE TO FIND IT: Grocery stores
WHAT TO MAKE WITH IT:
Freezer Paper Printing 260
TOOLS & SUPPLIES 21
cardboard
Cardboard is as versatile as it is common. In the United States alone, many billions of cardboard boxes are used each year. Once you begin to craft with cardboard, you’ll want to hoard the “good stuff.” We like to keep a bag in our craft closets stocked with salvaged, nondescript, unblemished cardboard in a variety of thicknesses for whenever a project strikes.
corrugated
The cardboard mostly associated with shipping boxes and packaging materials. While the thickness can vary greatly, by definition it is a packaging material consisting of a fluted corrugated sheet and one or two flat liner boards. Corrugated cardboard is lightweight and flexible enough to cut through and bend and can be used for a wide range of crafts. Not all corrugated cardboard is created equal, though, and you can easily notice the cardboard that arrives at your door ready to fall apart versus the higher-quality variety used to ship more delicate objects. Safeguard the special stuff!
WHERE TO FIND IT: Recycling bins! There’s never a need to buy new cardboard, just rifle through your (or your neighbor’s) recycling bins and pick out the best pieces.
WHAT TO MAKE WITH IT:
Cardboard Loom 182
Cardboard Toys and Games 242
Envelope and Gift Tag
Templates 295
chipboard
The most substantial and structured among the cardboard varieties and therefore more expensive and difficult to come by. This cardboard takes time and sharp tools (heavy-duty scissors or a craft knife) to cut, but the durability and strength of this material make it worth the effort.
WHERE TO FIND IT: The cardboard backing of drawing and watercolor pads, mat boards
WHAT TO MAKE WITH IT:
Accordion Memento Book 284
Cardboard Toys and Games 242 (especially Cardboard Clock, Weather Board)
Tear-off Scrap Paper Pad 292
paperboard
A single-layer cardboard. Paperboard is easily cut with sharp scissors and can double for medium- to heavyweight paper.
WHERE TO FIND IT: Cereal boxes, toilet paper rolls, and boxed grocery items
WHAT TO MAKE WITH IT:
Cardboard Loom 182
Cardboard Toys and Games 242 (especially Lollipop Lips and Mustaches, Activity Spinners, Binoculars)
Envelope and Gift Tag
Templates 295
Origami Folder with Closure 306
TOOLS & SUPPLIES 22

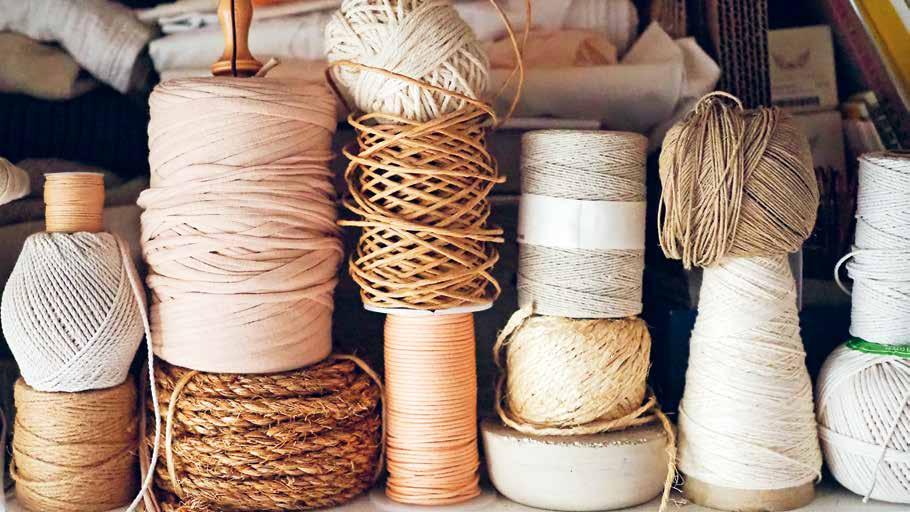
rope, string, thread & yarn
rope
Strong, thick cord made by twisting or braiding fiber strands together. Most commonly made of cotton, jute, and/or synthetic material. A wide variety of cotton rope can be used for these projects, but we like using 100% cotton rope in the 3/16-inch / 5.6 mm size—standard for most clotheslines. If you’re someone who wants to avoid synthetic materials, know that the rope stocked in hardware stores and sold as clothesline often comes with a reinforced nylon core. (Though we tend to avoid it, this heftier rope can be useful in applications like the Jump Rope, page 264, where a bit of added weight is helpful.) Beware of anything labeled cord sash. It can look like cotton clothesline at first glance, but it’s a much stiffer cord that will be very difficult to work around your fingers.
WHERE TO FIND IT: Hardware stores; Knot & Rope Supply (www.knotandrope.com); Ganxxett (www.ganxxet.com)
WHAT TO MAKE WITH IT: Finger cording projects 36 Kumihimo Rope Dog Toy 277 Rope Bowls 90
elastic cord
Composed of elastic and used for its ability to stretch. We generally use 1 mm round elastic cord sold in spools. Elastic also comes in the form of thick, wide, woven lengths commonly used and concealed inside garments.
WHERE TO FIND IT: Craft and sewing supply stores; Mandala Crafts (www.mandalacraftsinc.com)
WHAT TO MAKE WITH IT:
Accordion Memento Book 284 Origami Folder with Closure 306 Scrunchie 304
paper-wrapped
floral wire
Also called bind wire, paperwrapped wire is most commonly used in gardening or floristry and comes in a range of colors and thicknesses. We prefer the finer 26-gauge wire for most projects in this book.
WHERE TO FIND IT: Craft and floral supply stores
WHAT TO MAKE WITH IT:
Floral Wire Basket 76
Floral Wire Macramé Basket 86
Flower Frog 80
string, twine & cord
Common, economical, and versatile, string, twine, and cord are all created when thinner threads are twisted together. Twine and cord are generally understood to be thicker and stronger than string, but the three terms are often used interchangeably. They can be made from a variety of fibers and fiber blends such as cotton, jute, hemp, nylon, and other synthetic materials. For this book we used 24-ply cotton butcher’s twine, 3-ply jute twine,
and 1 mm hemp cord or twine (both unrefined and polished). For the Kumihimo Dog Leash project we found that a 4 mm single-strand cord works best. Remember, in most cases with these crafts, you can substitute the suggested materials with whatever you have on hand, including upcycled T-shirt yarn!
WHERE TO FIND IT: Cotton butcher’s twine and jute twine are both commonly found in hardware stores, while hemp cord and twine are more often found in craft stores. You can find 4 mm single-strand rope online at Knot & Rope Supply (www.knotandrope.com) and Ganxxett (www. ganxxet.com).
WHAT TO MAKE WITH IT:
Reversible Butcher’s Twine and Wool Punched Rug 208
Four-String Braid 52
Knit Cotton String Potholder 164
Knotted Jute Trivet 186
Kumihimo Corded Dog Leash 270
Simple String Bag 70
Upcycled Woven Pouch on a Cardboard Loom 254
twill tape
A flat woven tape used most commonly in finishing projects and as decoration. We like using 100% cotton heavyweight twill tape in the ⅜-inch / 9.5 mm size because it holds its shape without curling and holds up well to frequent use.
WHERE TO FIND IT: Sewing and craft supply stores; www.twilltape.com
WHAT TO MAKE WITH IT:
Kit Case 112
Pencil Case 116
TOOLS & SUPPLIES 24
thread
A fine, long strand of cotton, nylon, polyester, or other fiber. Most commonly used in sewing.
WHERE TO FIND IT: A diligent upcycler can harvest thread from old denim and other clothing, but we typically head to our local sewing supply or craft store to re-up our supply.
WHAT TO MAKE WITH IT:
Patchwork Bojagi 226
Rope Bowls 90
Upcycled Hankie/Kerchief 222
yarn
Spun and twisted fibers used for weaving, knitting, or crochet. It’s often used to make clothing, accessories, and soft goods. Yarn comes in a wide variety of fibers, including wool, cotton, and synthetic materials; it varies in size, thickness, and weight. For many projects in this book, we recommend making your own yarn out of upcycled clothing and fabric. For the Clothespin Loom Knit Hat, we suggest buying traditional bulky or super bulky yarn, and for the Scout Scarf, we recommend a lighter worsted-weight yarn.
WHERE TO FIND IT: Upcycled clothing; sewing and knitting supply shops
WHAT TO MAKE WITH IT:
Bulky Yarn Winter Hat 193
Pom-poms 300
Scout Scarf 194
rug yarn
Pre-boiled, 100% wool yarn made specifically for punch needle rug hooking. It’s durable and colorfast and comes in a large selection of colors and hues. This yarn usually comes in a bulky weight (perfectly suited for a punch needle rug) and is heirloom quality to ensure your rugs will last for years and years to come. We recommend Seal Harbor Rug Yarn, known for its expansive color options and exceptional quality.
WHERE TO FIND IT: Rug-making specialty shops like Seal Harbor Rug Yarn (www.sealharborrug.com)
WHAT TO MAKE WITH IT: Punch needle projects 200
TOOLS & SUPPLIES 25
tools
ALLIGATOR CLIP: A simple hinge clip commonly associated with hair accessories. We like the 2-inch / 5 cm ones for making small hair bows, but feel free to supersize the clip and the bow itself if desired.
ANNEALED WIRE: A flexible strong wire easily found at your local hardware store. We use it for the night-light project and prefer a 19-gauge wire for a sturdy hold with a still-delicate appearance.
AWL: A sharp needle-like tool with a handle that can pierce everything from paper to fabric and leather. An awl is useful because it can punch where traditional hole-punching tools cannot reach. The hole it pierces is generally small, and a protective craft mat or thick cardboard needs to be laid underneath to protect your work surface.
BULLDOG CLIP: A metal fastener with a spring clip that is most widely used for temporarily binding sheets of paper. We love these for holding down rolls of drawing paper and holding our Tear-off Scrap Paper Pad together.
BRADS: We use brads—metal stationery fasteners—for making all sorts of cardboard toys and games move, spin, and swing.
CHOPSTICKS: Common takeout restaurant chopsticks can be
sharpened to make knitting needles in a pinch. We also use them as handles on shadow puppets and fly swatters and to turn fabric tubes and poke out the corners of sewing projects.
CLOTHESPINS: Round wooden clothespins without springs are typically used for hanging laundry on a clothesline; however, projects in this book use old-school round clothespins because their open slot can easily be slipped on and off of an embroidery hoop and because their round shape makes pulling loops quick and easy. We also use them for making tassels and pom-poms and keeping our strings tidy when we take projects on the go.
CRAFT FOAM: We’re not huge fans of craft foam (found in craft stores or, even better, scavenged from preschool art projects), but a little bit can go a long way to make crisp, long-lasting stamps.
CRAFT KNIFE: A cutting tool with a small sharp blade, often retractable, best used for cutting paper, cardboard, and wood. A craft or hobby knife (X-Acto is the common brand name) has a fine point and pen like handle that is almost indispensable for cutting with precision, especially where scissors won’t reach and for thicker materials like cardboard.
DARNING NEEDLE: Also known as blunt point needles or tapestry needles, these large sewing
needles have a large eye and a rounded point, making them safe for kids to use. Darning needles are great for weaving projects and are also used for finishing techniques in punch needle and knitting techniques.
DOWELS: Wooden dowels come in a range of thickness, most typically from ¼-inch to 1-inch / 0.6 to 2.5 cm diameter, and can be found in both craft and hardware stores. When purchasing from a hardware store, dowels typically are 36 inches / 91 cm or 48 inches / 122 cm long and will need to be cut down to size with a small saw or knife and smoothed out with sandpaper.
EMBROIDERY HOOPS: Round wood frames used to keep fabric taut while creating needlework. Easily found in any craft store. The projects in this book use embroidery hoops in conjunction with clothespins to create a DIY version of a knitting loom. For this purpose, look for the less expensive and less thick varieties often sold in craft stores.
FABRIC CHALK: Used to make temporary lines and marks that act as a guide when cutting and sewing fabric. The chalk can easily be wiped clean once it’s no longer needed.
GLUE: Any craft or white glues can be used for the paper projects in this book. As an alternative to the store-bought variety, we make our own easy paste (page 129).
TOOLS & SUPPLIES 26
TOOLS & SUPPLIES 27

TOOLS & SUPPLIES 28
HOLE PUNCH: A tool to make clean, round holes in paper and other thin materials. Hole punches run the gamut in terms of size and strength. The hole punch used for the projects in this book is a single ⅛-inch / 3 mm, heavy-duty hole punch. It can pierce through everything from paper to cardboard and fabric. A typical handheld hole punch only has a reach of 2 inches / 5 cm. For punching places that are hard to reach with a hole punch, we use an awl.
KEY RINGS: When making our Belt, we often use common key rings as they come in many different sizes and metals. You probably have a few lying around in a junk drawer. If not, try your local hardware store. (If you’d like a round ring without a slotted opening, search online for solid O-rings.)
LOBSTER CLASP: A metal fastener that is held closed by a spring. They come in all sizes, shapes, and materials. They are widely found in the hardware store but can also be easily harvested off something you might already have.
POCKET MULTITOOL: A compact tool that combines several common tools in one unit. A good multitool can take the place of many common larger ones. While not used frequently in this book, a good set of tools (albeit mini and compact) always
comes in handy. Our multitools have pocketknives for whittling down our DIY knitting needles, a flathead screwdriver for pulling out staples, pliers for twisting wire, and a mini saw for trimming down dowels.
PAPER GUM TAPE: A paper tape that sticks to paper and cardboard surfaces when moistened. We like it because it has a wide surface area that’s great for drawing and labeling. Gum tape blends seamlessly into our cardboard projects and can also double to pack and ship boxes. Easily found online or in mail and shipping centers.
PAINTBRUSH: No need to get particular; to make the cardboard games and toys in this book, any medium-size paintbrush will work.
PUNCH NEEDLE: A punch needle is a manual tool used to make rugs with long lengths of yarn and other fiber material. While there are many different punch needle tools available on the market, investing in a well-made one makes all the difference in the ease and enjoyment of
this craft. Rose strongly recommends the Oxford Punch Needle for its efficiency, ergonomic design, and neat stitches. When purchasing, make sure you buy the regular size 10 punch needle. The term “regular” refers to the thick, bulky weight of the fiber used, and size 10 makes a ¼-inch / 6 mm loop or pile. This is also the only size punch needle that works efficiently with repurposed and alternative materials like clothing, bedsheets, and string.
RUBBER BANDS: While any type of rubber band can work to bundle things together, in the Kumihimo Eyeglass Cord project, we use tiny orthodontist bands as a delicate way to tie off the looped ends of our strings.
RULER: We use both a straightedge ruler for drawing and cutting straight lines and a measuring tape for measuring longer lengths.
SANDPAPER: A small square of fine-grit sandpaper is all you need for filing down your DIY knitting needles.
SCISSORS: Ideally, you should have two scissors for crafting: one for fabric and one for paper. While this might sound fussy, scissors will cut a lot better and last a lot longer if you use them for their specific use. A good pair of shears makes a huge difference in their ability to cut clean, sharp lines efficiently.
TOOLS & SUPPLIES 29
SEWING NEEDLES: For the average sewing projects found in this book, we recommend a generalpurpose needle.
SEWING PINS: When piecing two or more pieces of fabric together, we recommend simple sewing pins to secure material into place temporarily.
STAMP PADS: For our Block Stamp project, we recommend using water-based ink pads for printing on paper and fabric because water-based ink won’t clog the surface area of your stamp. Ink pads come in a huge selection of colors and sizes (and many can be refilled with ink from the craft store); however, if you’re in a pinch, a washable kids’ marker can be substituted because the water-soluble ink is also stamp-friendly.
STAPLER: To make the Matchbook Notebook project in this book, all you need is a common office supply stapler and staples to fit it.
STAPLE GUN: A heavy-duty stapler used to fasten together thick, porous material like wood stretcher bars or to secure fabric to wood when stretching a frame.
STRETCHER BARS: For punch needle projects, wooden bars with notched ends, called stretcher bars, can easily be assembled to create any size frame needed. Stretcher bar frames are sold in art supply stores in a large range of sizes. While easy to use, they do require a staple gun to secure the joint angles and to stretch with fabric. Look in art supply stores for medium-weight stretcher bars.
SQUEEZE BRUSH PENS: Squeeze brush pens are refillable brushes that store water inside a seethrough barrel. They release water when squeezed with light pressure. They’re perfect for kids and watercolor projects on the go.
TAPE: For most craft purposes, we recommend Japanese washi tape for its assortment of colors and patterns and because it can be removed from surfaces without damage. For sturdier jobs, “painter’s tape” is a masking tape that can also be used on delicate surfaces and removed without damage.
TEMPERA PAINT: We prefer tempera paint for adding color to our cardboard projects because it’s nontoxic and safe for kids. Basic primary colors, plus white, are easily mixed to create many shades. It also dries fast and has a nice matte finish when used on cardboard.
WATER BALLOONS: We use water balloons to help mold our Papier-mâché Fruit Bank and Clay Vessel. Even though latex water balloons will decompose with time, we are also mindful that they can still be harmful to birds and marine life. Please use sparingly and make sure to dispose of them properly.
WATERCOLOR TUBES: When making Travel Watercolor Kits, we like dabbing a little bit of liquid watercolor (sold in tubes)
on paper to make a portable paint palette. Once the colors have dried, a wet paintbrush can activate them just like in a watercolor cake.
WINE CORK: A wine cork can be cut with a pocketknife to make a block stamp handle or used as a handy-dandy way to keep your stitches from falling off your knitting needles.
WOODEN BLOCKS: For our Block Stamps, we recommend using any wooden block you have on hand, even—and especially—if it’s from that long-forgotten Jenga set.
TOOLS & SUPPLIES 30


01

corral & display
pride intention practicality purpose
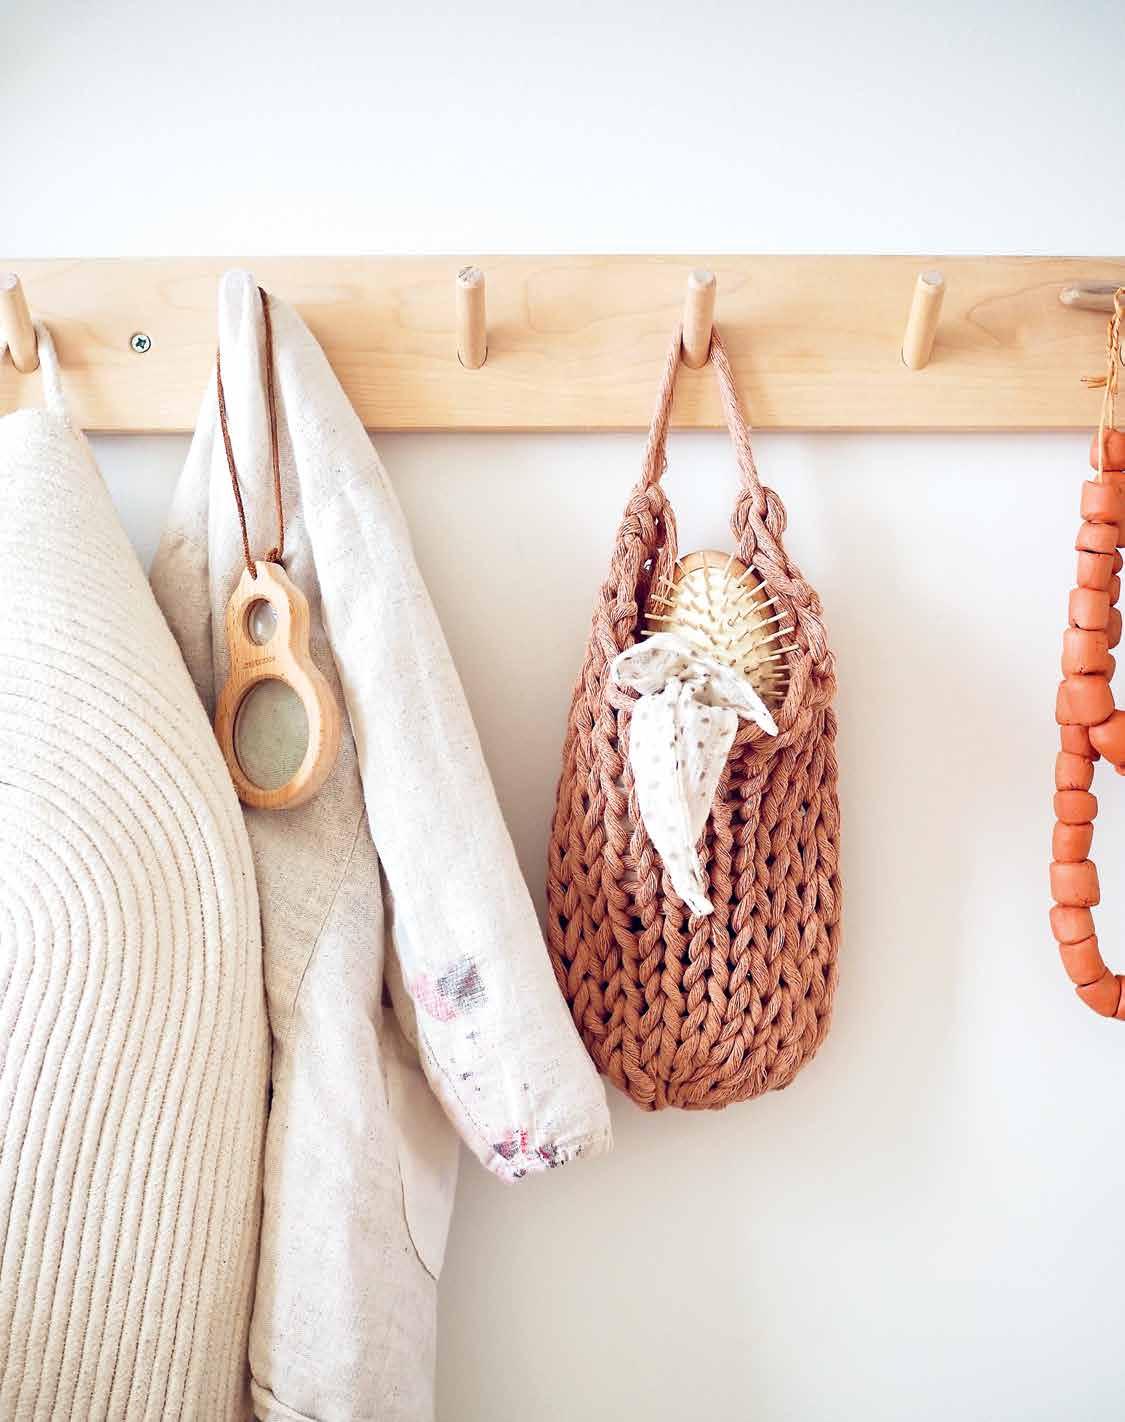
In his 1967 book about the art of Japanese packaging, How to Wrap Five Eggs: Traditional Japanese Packaging, Hideyuki Oka writes about the lineage of Japanese packaging as being “driven by two considerations: an aesthetic philosophy that said everything could and should be made beautiful and a value system in which all objects, large or small, expensive or cheap, were of real value.”
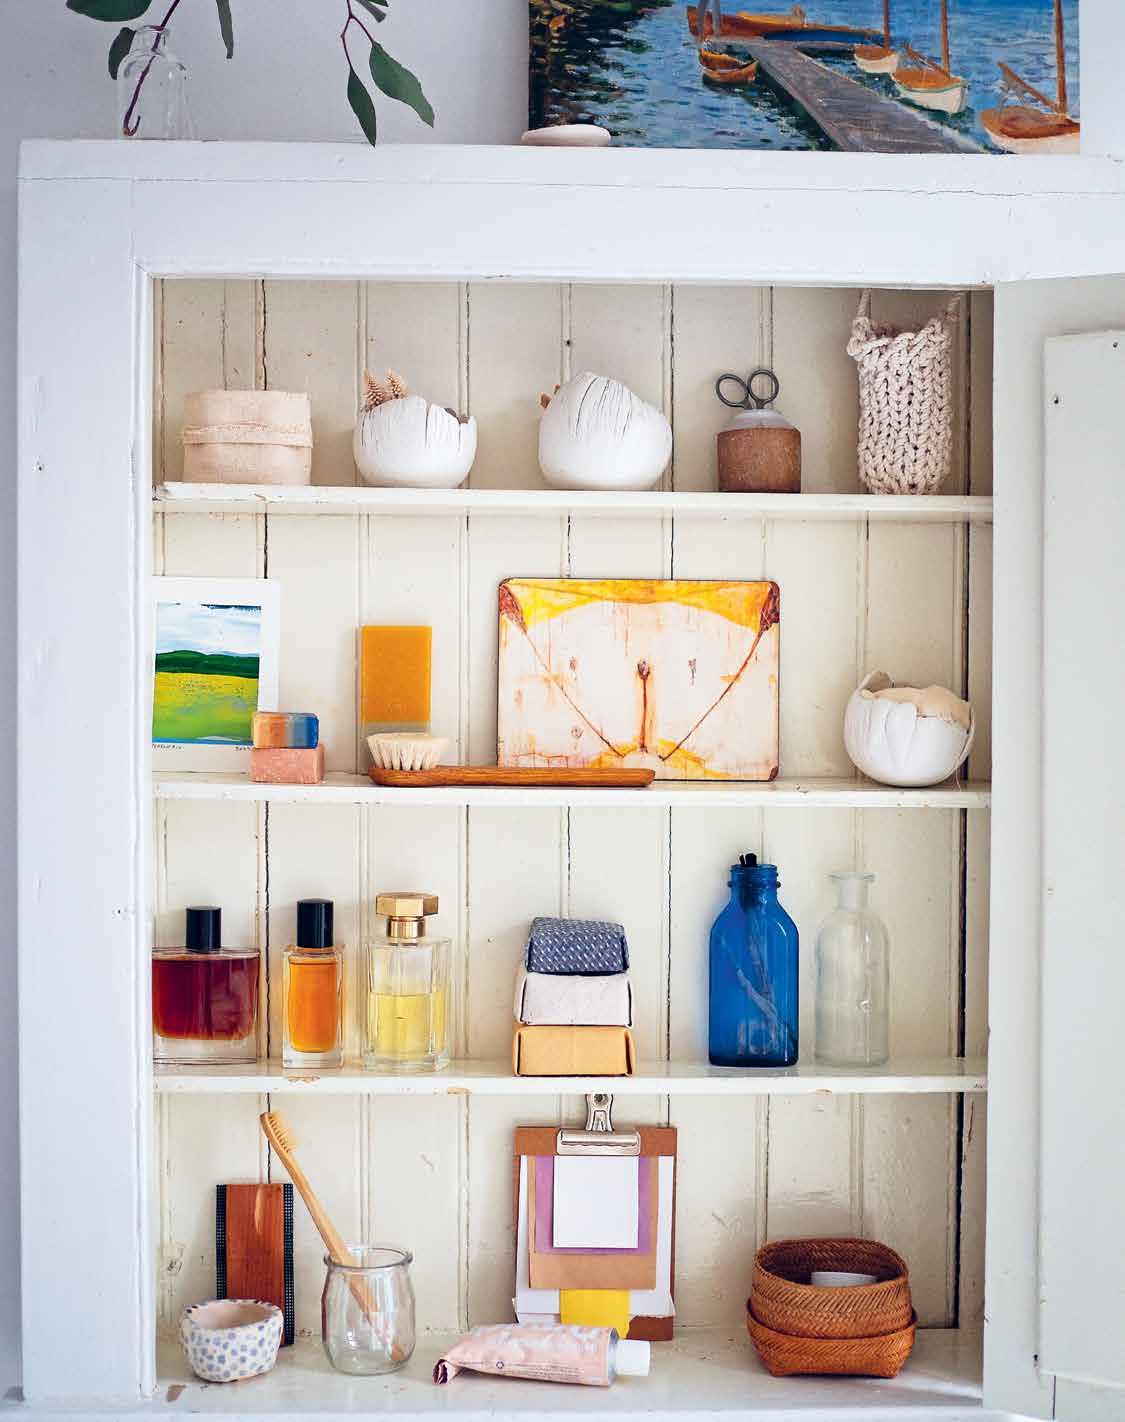
The projects in this chapter are suited for display, but they’re also imbued with purpose and practicality—a way to bring a bit of order to the objects we use every day. When we need to reach for a cup measure and there’s not a cabinet to put it in, let’s make the object that holds it also lovely to look at. When we’re looking for a place to store garlic and onions, why not have those items displayed as small works of art themselves? Keys on a hook, spare change in a bowl, scraps of ideas and inspiration; the stuff of life needs a place to live and sometimes, also, a place to be seen.
In our rental apartments, the particulars of which we might not have chosen or we might not prefer, we’ve found a sense of ownership and placemaking in the small, moveable objects we’ve crafted ourselves. Outdated countertops, bathroom medicine cabinets with paint ten layers deep, and closetless rooms are no match for a few hardworking objects made by hand.
CORRAL & DISPLAY 34

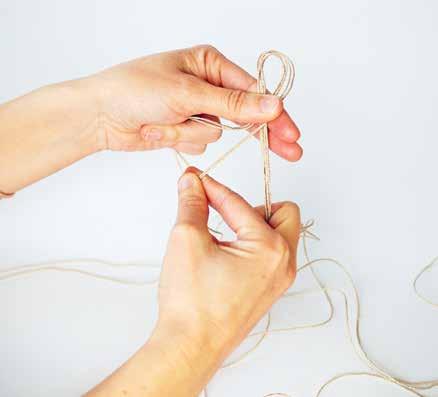
finger cording
If you’re familiar with finger knitting at all, it might be because you’ve witnessed crafty day-campers with yards of rainbow-colored yarn attached to their fingers. For parents of those kids, the craft might be associated with very long, looseknit cords that seem somewhat, dare we say it, lacking in purpose First, we’ll remind ourselves that there’s utility in practicing a craft, regardless of the final product. For kids and adults alike, the repetitive, methodical work of finger knitting is particularly soothing. It’s handwork that can reset the spirit, calm a worried mind, and otherwise occupy anxious hands. Happily for everyone, simple finger-knitting techniques can also be applied to make a number of decidedly practical home objects.
Here we use humble cotton clothesline to make functional, beautiful, finger-knit cords that we put to work in our own lives every single day.
For instructional purposes here, we’ll share the step-by-step process for the most robust cord of the bunch—the one using two fingers and three loops—but simply swapping the number of fingers and loops being used will result in cords of totally different styles. See variations on page 40.
CORRAL & DISPLAY 36 TECHNIQUE


CORRAL & DISPLAY 38


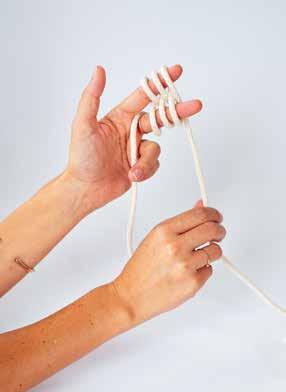
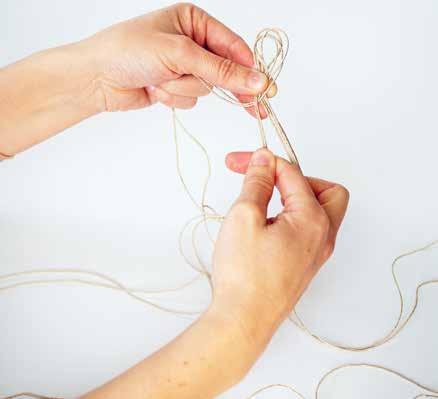
two-finger/three-loop cording technique
1. Start by placing the rope between the pointer finger and middle finger, leaving an 8-inch / 20 cm tail hanging in front of your palm.
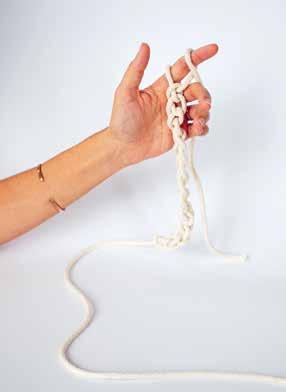
2. Working with the long end of the cord, make a figure eight around your pointer and middle fingers as follows: Wrap the cord around your middle finger (clockwise) to the front of your hand, then circle it back between your fingers at a diagonal and wrap counterclockwise around your pointer finger.
3. Complete the figure eight two more times. You should now have three loops on both your middle finger and your pointer finger. Leave the working cord hanging to the back of your hand between your two fingers.
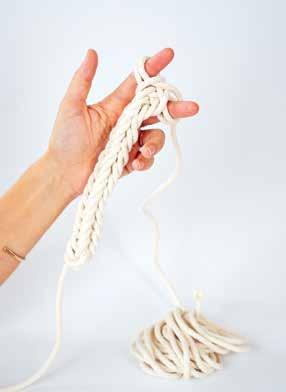
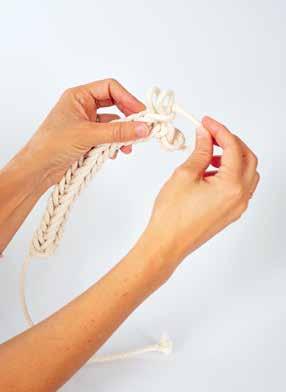
4. Working with the three loops on your pointer finger first, carefully bring the bottom loop over the top two loops and off your finger. You will have two loops remaining on your pointer finger.
5. Repeat for the middle finger by again slipping the bottom loop over the top two loops and off that finger.
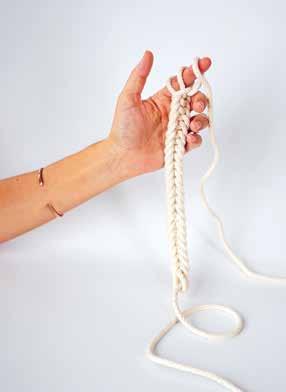
6. Continue to cord in this manner, making a figure eight around your two fingers, so you have three loops on each finger before sliding the bottom loop over the top two and off. Wiggling your fingers while you work will help create space. If the tension becomes too tight around your fingers, pull on the bottom loop to create some slack.
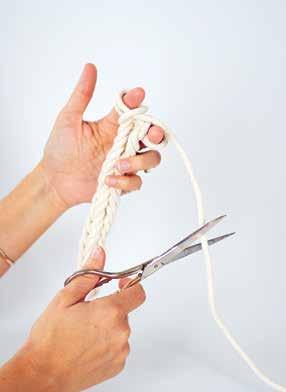
7. When you reach your desired length, cut a tail end from your working rope. Thread the cut end through the two remaining loops from the middle finger (from the inside out), releasing the loops from your finger. Then thread the tail end through both loops on the pointer finger (from the inside out) and off your finger. Carefully pull to cinch together.
CORRAL & DISPLAY 39
technique variations
one finger/ two loops
To make this loose cord, wrap rope around your pointer finger twice and pass the bottom loop over the top loop and off the finger. Repeat, adding one wrap and then passing the bottom loop over the top loop until you achieve the desired length.
one finger/ three loops
For a thicker, flatter cord, try this variation. Wrap the rope around your pointer finger three times and pass the bottom loop over the top two loops and off your finger. Repeat, adding one additional loop until you achieve the desired length.

two fingers/ two loops
For a loose cord that’s still substantial enough to tuck hangers or hooks for kitchen utensils, wrap rope in a figure eight around your pointer and middle finger twice. Pass the bottom loop over the top loop and off each finger. Repeat the figure eight and pass the bottom loop over the top on each finger until you reach your desired length.
MATERIALS NOTE: 3/16-inch / 5.6 mm cotton rope is pictured here, but you can use a wide variety of cotton string or rope for these projects.

CORRAL & DISPLAY 40
curtain tieback
A dramatic and chic curtain tieback is a quick and simple cording project with immediate practical use. Start with a long length of rope, approximately 5 ½ yards / 5 m. Leave a 3-inch / 7.6 cm tail between pointer and middle finger and cord for 5 inches / 13 cm using the two-finger/three-loop technique. Bind off the cording by pulling the long remaining length of rope through the four loops at the top. Leave approximately 20 inches / 50 cm of rope uncorded, then begin to cord again (the first corded section and uncorded midsection will be on the palm side of your hand). Cord another 5 inches / 13 cm of rope to match the first side. Bind off the second side of cord, leaving a matching 3-inch / 7.6 cm tail, and cut any extra rope. Try the one-finger three-loop cord for a different look.

TIPS:
For a bit of visual interest, add an oversize bead to the tail end of your rope and tassel out the ends. See page 66 for instructions on making air-dry clay beads yourself.
To create a tasseled fringe on the tail ends, use a darning needle or the sharp point of an open pair of scissors to fray the braided rope ends.


CORRAL & DISPLAY 42 PROJECT

CORRAL & DISPLAY 44

kitchen hanger
These corded hangers are so pretty you don’t need to tuck them away in cabinets. In kitchens short on storage, a vertical hanger creates the perfect spot for tucking in slender S-hooks and hanging kitchen items you reach for regularly, like measuring cups and potholders. Use string to tie on bundles of herbs or flowers for drying.
clothes hanger
Make custom closet organizers with help of finger cording. Whether you’re slipping S-hooks or clothes hangers through the loops of your cord, you can create a vertical hanger that will maximize limited space and offer a beautiful alternative to standard-fare closet organizers. A looser two-finger/two-loop cord will make inserting the hooks or hangers easiest, but any of the cord variations can work here. Cut a long tail and tie a loop on one end. Pass the whole cord through the loop to secure it around the closet rod.
CORRAL & DISPLAY 45 PROJECTS
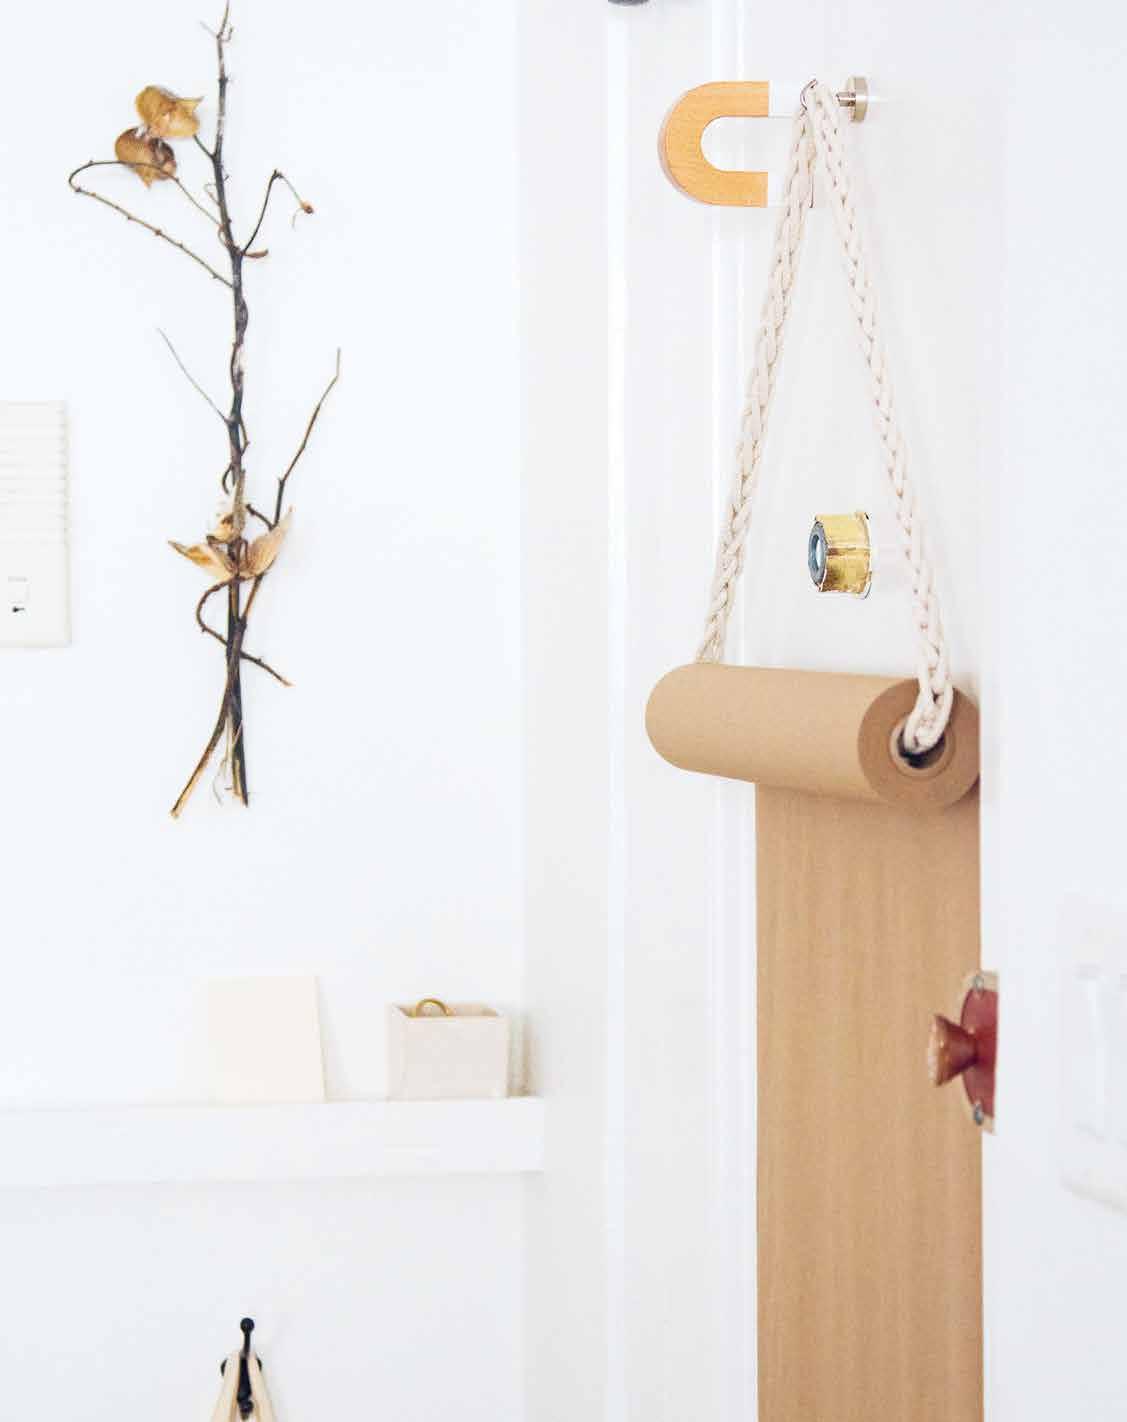
paper roll hanger
If you have rolls of anything in your life that need hanging—toilet paper, paper towels, kraft paper—a corded rope hanger is a sturdy, inexpensive option that’s more interesting than whatever can be found in your average big-box home goods store, not to mention it’s totally customizable.
Start with an 8-inch / 20 cm tail between your middle and pointer fingers. Using any of the cording methods outlined on pages 39–40, work your cord until it’s one and a half times the length of your roll. If you’re hanging an 18-inch / 46 cm roll of kraft paper, for instance, you would cord 27 inches / 69 cm. When you reach your desired length, cut an 8-inch / 20 cm tail and cinch closed. Thread your corded rope through your paper roll and tie a knot. Adjust your cord so that the knot lies inside the tube of paper and only the cord is visible. Hang from any sturdy hook or knob.
TIP:
We’ve loved hanging kraft paper rolls on our steel apartment doors with a heavyduty magnet. If you don’t have a magnetic door, an off-duty wreath hook is another easy way to hang your paper roll without adding permanent hardware.
CORRAL & DISPLAY 46 PROJECT

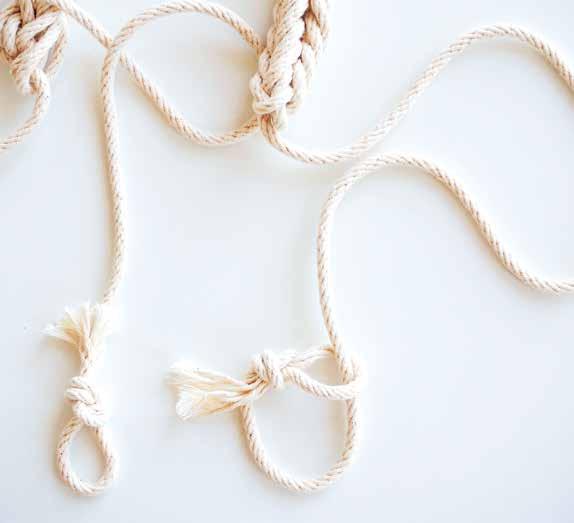
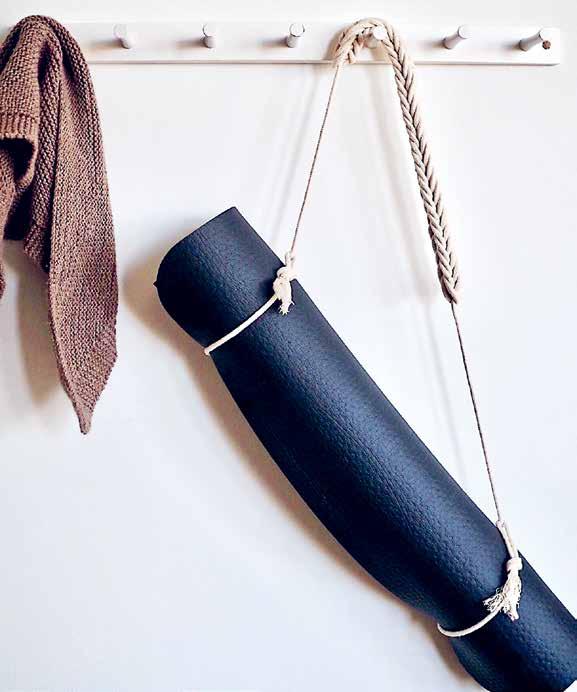
all-purpose carrier
A corded strap with two end loops is the ultimate low-profile helpmate for schlepping. We’ve used these simple carriers for our picnic blankets, yoga mats, bouquets of farmers’ market flowers, and beach umbrellas. (Our kids have tucked cardboard swords and quivers of cardboard arrows in theirs.) The two-finger/ three-loop cord is our preferred technique for this project because it creates a nice thick shoulder strap.
Begin by leaving a 30-inch / 76 cm tail in the front of your palm. Work your cord for roughly 18 inches / 46 cm. When you reach your desired length, cut a 30-inch / 76 cm tail end from your working rope and cinch closed. You can easily increase or decrease the length of the beginning and ending tails (and the corded section itself) to accommodate schleppers of all sizes. To create the slip-knots, tie 3-inch / 7.6 cm loops on either end. On each side, thread the knot through the loop and pull the rope to create a larger, self-adjusting loop. To use, widen the loops to slip over your blanket, spacing them evenly on either side. Pull the center of the strap upward to secure and tighten the strap closed. To open, pull apart either side of the loop to release the hold.
CORRAL & DISPLAY 49 PROJECT
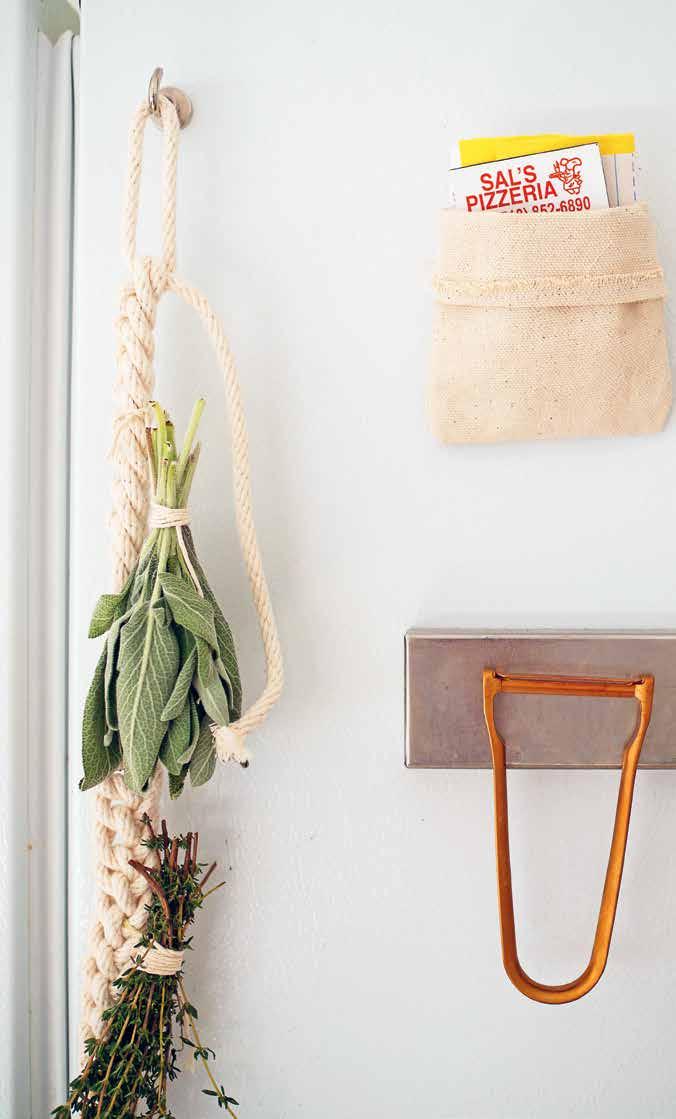
herb hanger
A one-finger/two-loop cord makes a great flat spot to hang drying flowers or herbs. Secure your bundles of herbs using a whipping knot (page 274) and tie the bundle directly into the finished cord. If you prefer a daintier hanger, use this same technique with the Four-String Braid (tutorial on page 52).
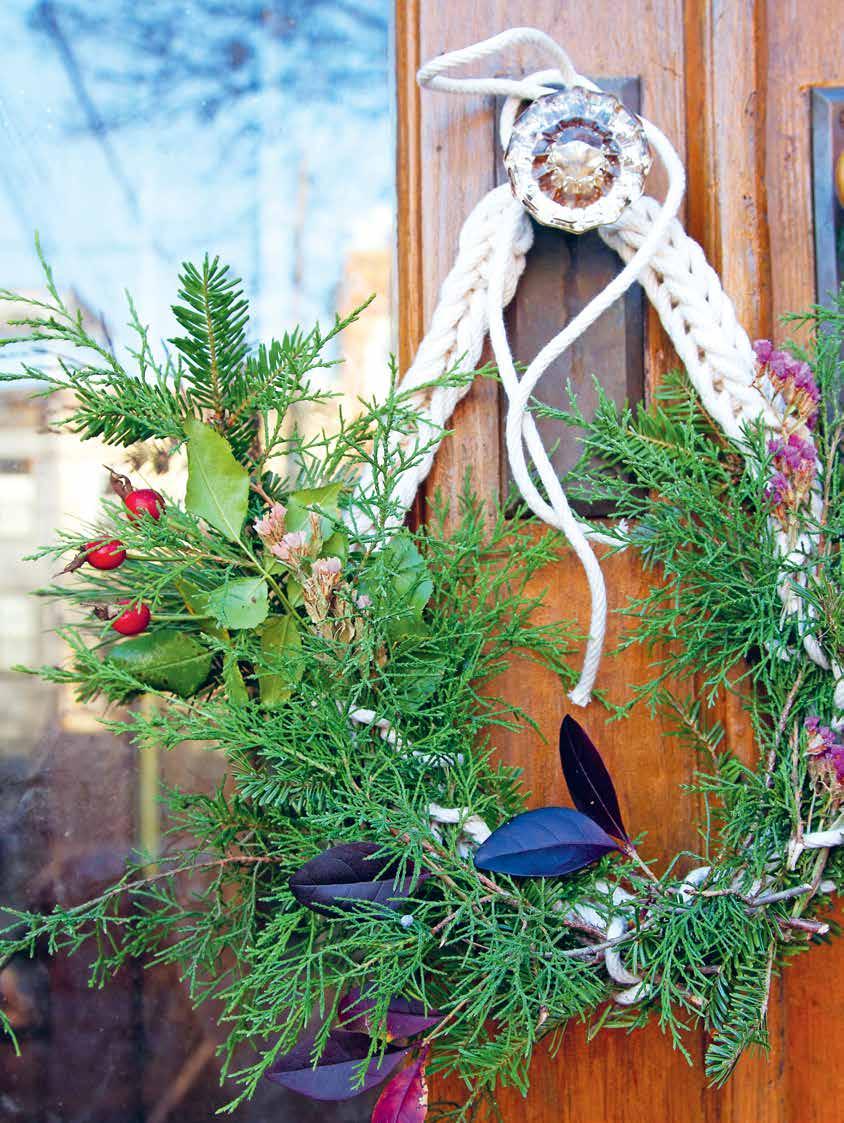
wreath/ flower crown/ headband
If you’re a plant enthusiast, finger cording makes a good base for botanical wreaths and swags. (This general technique can also be used to make a quick and easy flower crown!) Cord up a length of rope using any of the four cording methods and tuck in the stems of dried or fresh flowers or greenery.
CORRAL & DISPLAY 50
PROJECTS

CORRAL & DISPLAY 51
four-string braid
It’s a braid, but made even lovelier by incorporating four strands instead of three. Once you get the hang of the technique, it’s no more difficult than standard three-strand braiding. We like to think of this braid as a good gateway craft for someone who thinks they’re not crafty. If your mind is headed back to long summers of your childhood and making friendship bracelets, well, excellent.
This technique results in a delicate yet sturdy braid—perfect for making into belts, lanyards, and daintier versions of the projects we finger-cord with cotton clothesline. We especially love the texture and weight of these braids when made from refined hemp cord. Easy adjustments can be made, creating your desired thickness by working with either four strings, doubling it up to four strands of two (eight strings; like we use here), or even going thicker with four strands of three (twelve strings!) depending on the fiber you are using and the desired use. As always, the material you decide to use is up to you. Feel free to experiment with embroidery floss or upcycled cotton or linen stripped into thin yarn. For something very special, we love the ⅛-inch / 3 mm woven organic cotton tape from Habu Textiles.
SUPPLIES AND TOOLS
+ 1 mm Polished hemp cord
+ Scissors
+ Safety pin (optional)
1. Start by cutting four equal lengths of hemp cord.
2. Fold the four lengths of cord in half to create four loops at one end and eight hanging strings at the other.
3. Pinch all the strands together ¾ inch / 2 cm down from the looped end.
4. Working with four sections, you will begin to braid. Each section contains two strings.
5. Starting at where you are pinching, bring the section on the far right across the middle two sections and pinch it in place.
6. Pass the section on the far left over the nearest section to the right.
7. Continue the same way, passing the far right section over the middle two sections, then crossing the far left section over the one on its right. Take care not to twist the strands while braiding. You can safety-pin the top of the braid to a cushion to stabilize the braid while you work.
8. Continue until you reach your desired length.
9. When finished braiding, tie a simple knot with all the ends together. Trim the ends and you are finished.

MATERIALS NOTE:
Since you’ll need to cut your fiber before beginning to braid, a good rule of thumb is that you’ll need your strands to be roughly one and a half times the length of your desired braid before you start braiding. This will depend somewhat on the particular size and structure of the fiber used and braiding technique applied, but we’ve found it to be a helpful guideline.

CORRAL & DISPLAY 52 TECHNIQUE


CORRAL & DISPLAY 53

CORRAL & DISPLAY 54
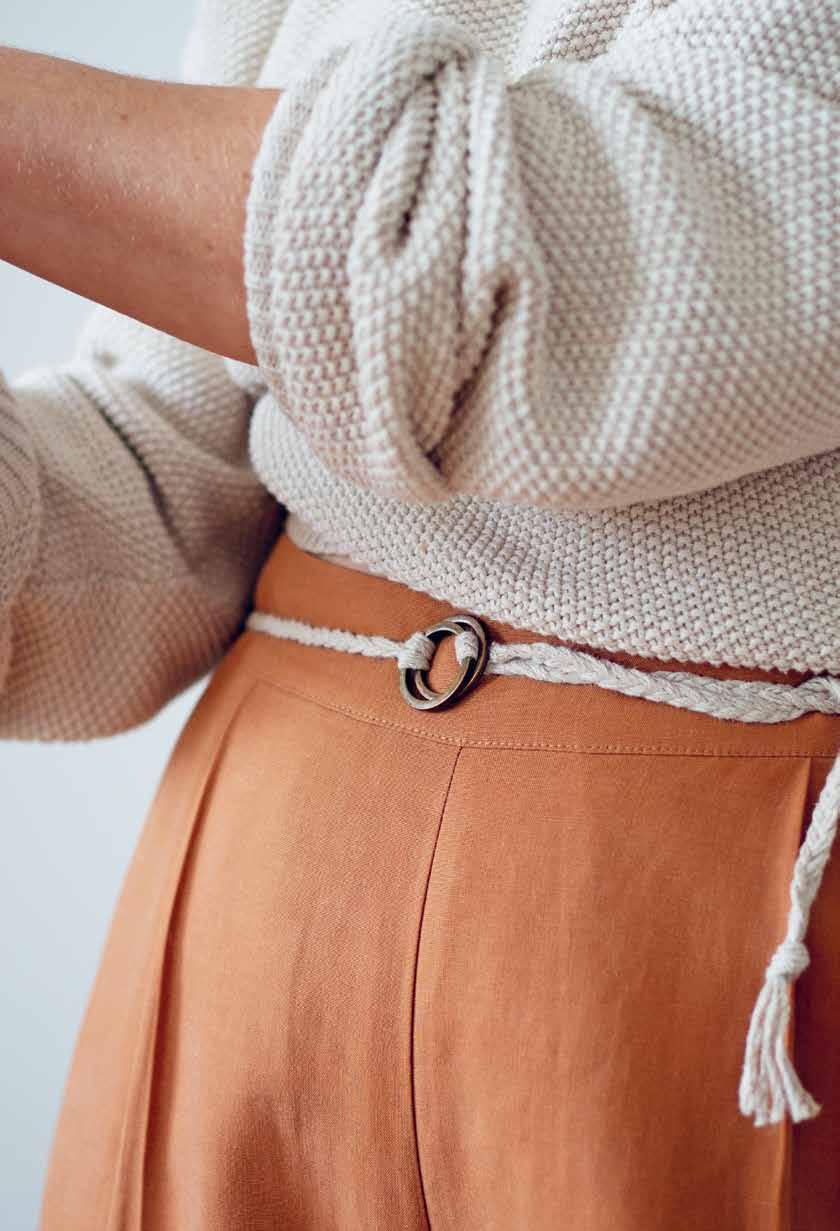
belt
With the small addition of two brass O-rings (or key rings), a four-string braid becomes an easy-to-make belt for keeping jeans hitched or dresses cinched. For a 30-inch / 76 cm belt, begin with four 90-inch / 229 cm long strings. Hitch all four loops to the O-rings to provide some nice structure and ensure that the top of your braid begins tightly. At the end of the braid, tie a simple knot and leave a few inches of unbraided string to tassel on the end.
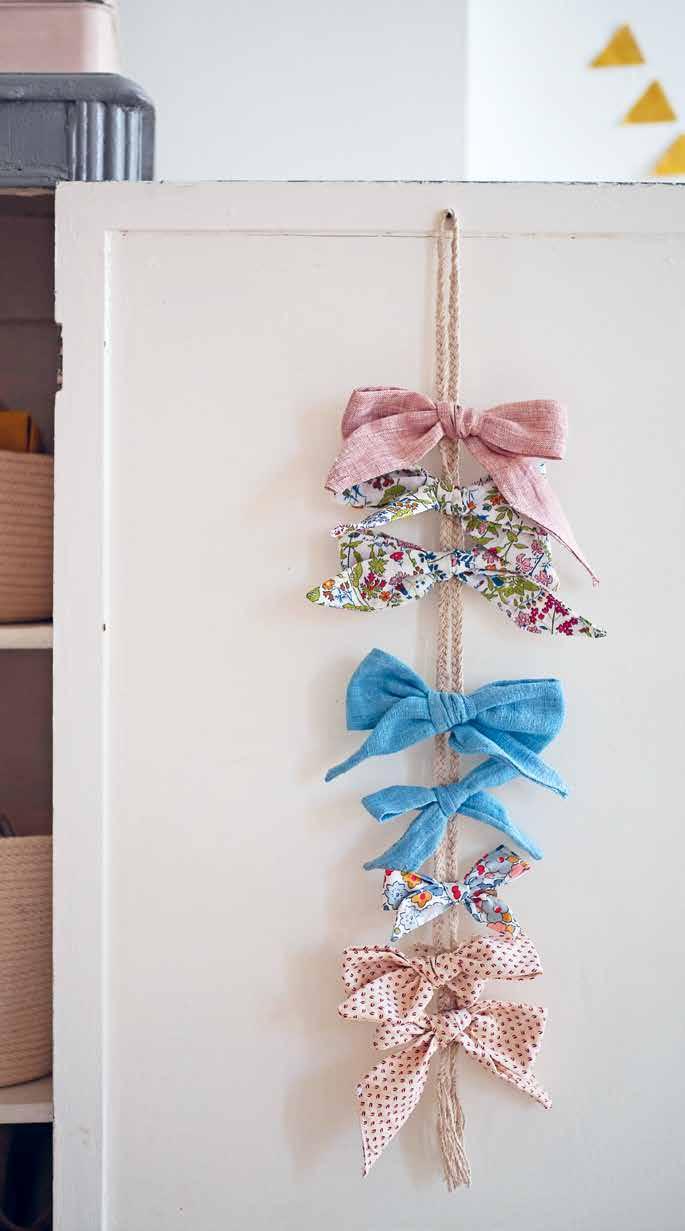
clip storage
A four-string braid tacked into the inside of a cupboard door or closet is the perfect slender spot for clipping things like barrettes, clothespins, or other clips that might otherwise go missing. And if you’re a person who hangs Christmas cards or valentines to display, look no further than a four-string braid and a few clothespins. If you have hair bows that need wrangling, we’ve got you. No special technique needed here, just hang the loop at the top of the braid to a small nail or pushpin, clip, and carry on.
CORRAL & DISPLAY 55
PROJECTS


CORRAL & DISPLAY 56

lanyard
Both of us are married to schoolteachers who, like all kinds of workers in service positions, are daily wearers of lanyards for wrangling keys, IDs, and MetroCards. We made these lanyards as an homage to our own beloved essential workers, but we’ve since become so enamored of wearing our keys around our neck, we’re regular wearers of them too.
pacifier clip
If you’ve ever offered a baby a pacifier, you’re familiar with how quickly that sterilized ounce of rubber can be jettisoned overboard and onto the floor. A four-string braid secured to a brass suspender clip makes the perfect foil for a pacifier with an escape plan. For a 6-inch / 15 cm braid, begin with four 18-inch / 46 cm long strings. Tie the end of the braid to the suspender clip and use the loop at the start of the braid to make an easy-on, easy-off hitch to secure the braid to the pacifier loop.
CORRAL & DISPLAY 57 PROJECTS
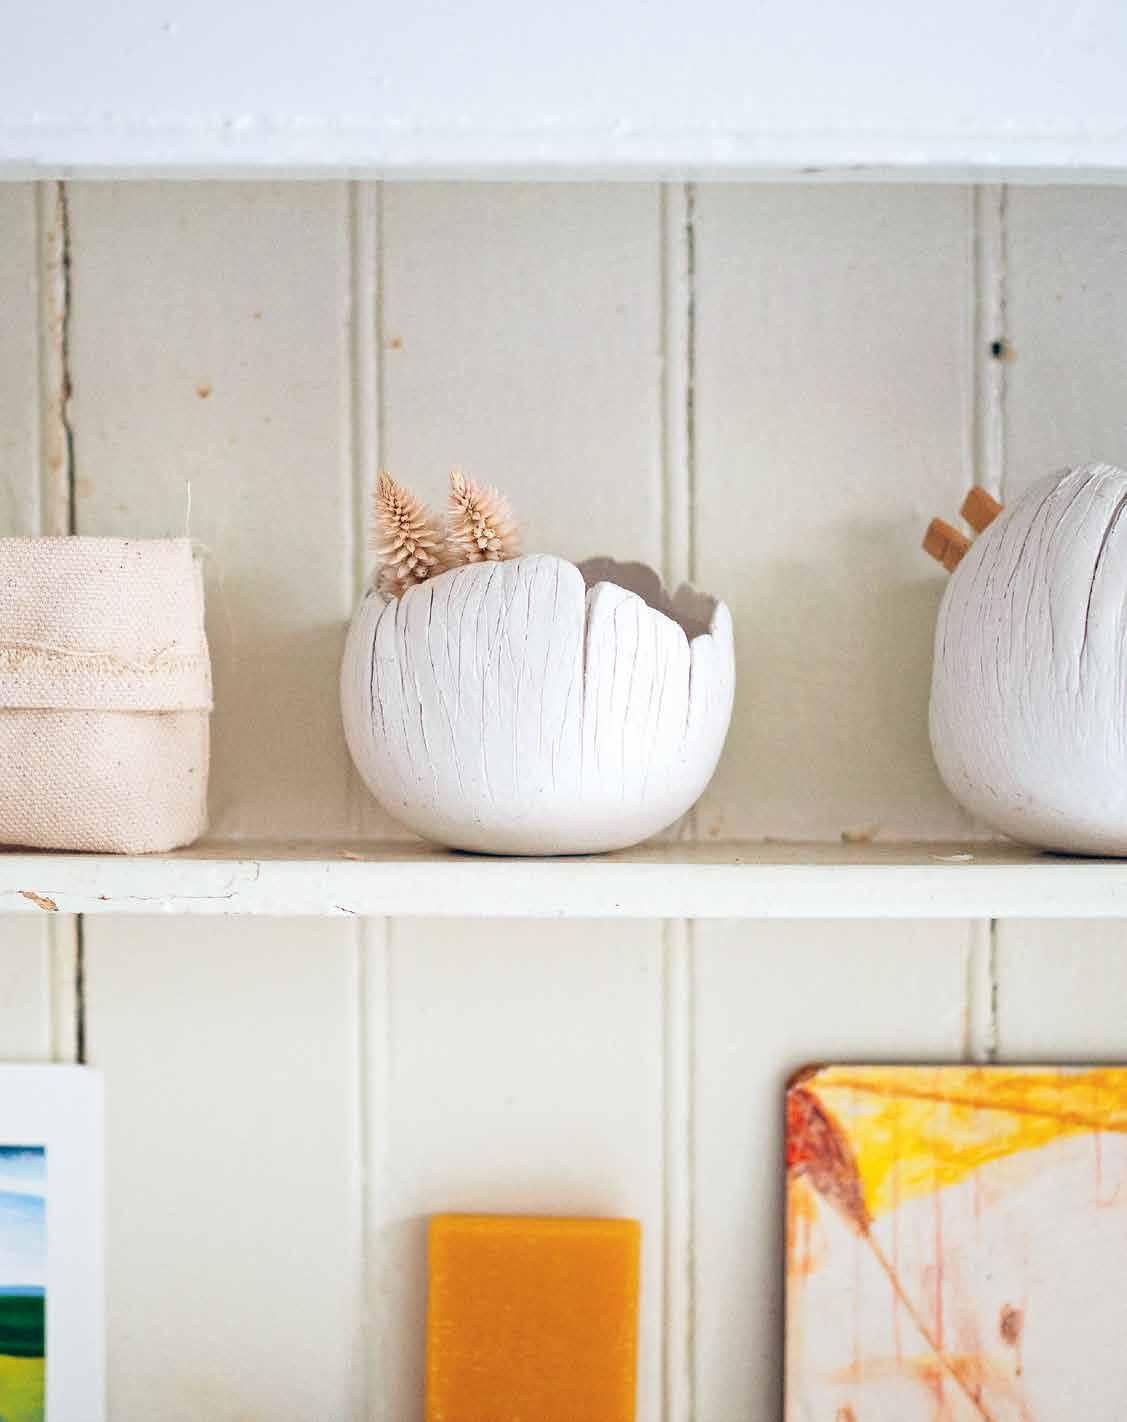
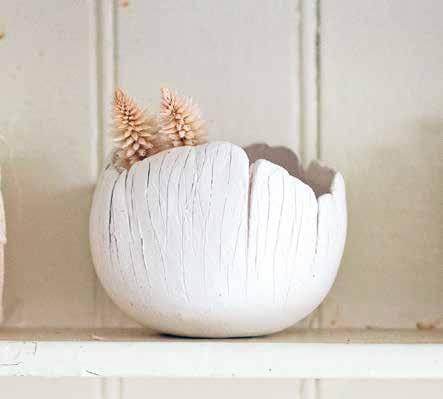
clay vessels
These clever clay catch-all vessels remind us of barnacles, and isn’t that fitting? On a dresser or shelf they can function in a similar way, filtering and safekeeping the good stuff—keys, coins, and bobby pins—that might otherwise get swept away with the tide of household activity. Our solution to all the missing earbuds, vanishing hair ties, and collected acorns of the world are to gather them in small shallow containers, preferably ones that are pretty enough to have on a counter, small enough to fit inside a dresser drawer, and durable enough to survive a toddler. Beyond their role as tiny-thing catchalls, these little vessels will glow beautifully with the addition of a small tealight. If you need a pincushion for any sewing projects, look no further than the pincushion tutorial on page 65.
CORRAL & DISPLAY 58 TECHNIQUE

CORRAL & DISPLAY 60
SUPPLIES AND
+ DAS air-hardening modeling clay
+ Plastic wrap or film (a single sheet can be used multiple times)
+ Biodegradable latex water balloons
+ Rolling pin or wooden dowel (optional)
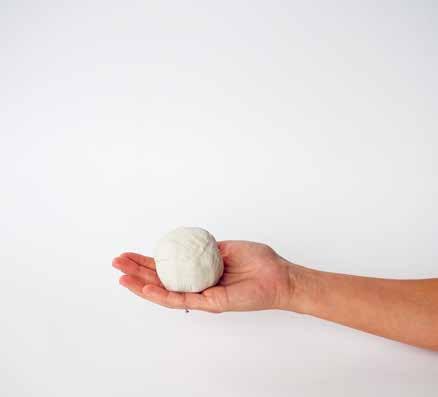
1. Soften a large handful of DAS clay, working it between two hands and forming into a ball.
2. Flatten the clay ball using the palm of your hands to form a disk. Continue to press the clay outward until the disk is 6–7 inches / 15–18 cm in diameter. You can use a rolling pin if desired but do not roll it out too thin.
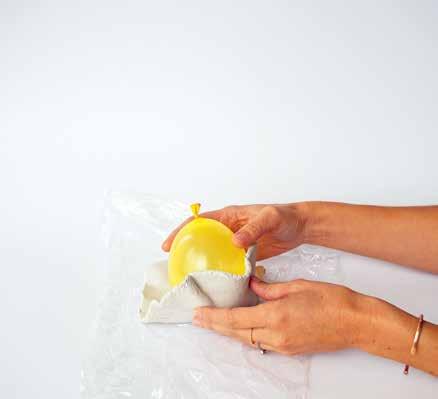
3. Blow up a water balloon but not to its maximum capacity; leave at least one-quarter empty.
4. Place the clay disk in the center of a square of plastic wrap big enough to cover the balloon completely. Place the balloon in the center of the clay with the knot side of the balloon facing up.
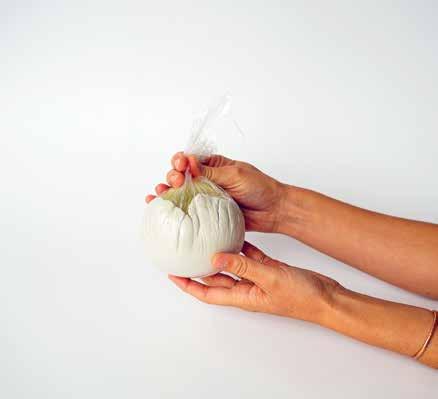
5. Bring the sides of the plastic wrap up over the balloon and twist the plastic at the end over the balloon. Use your fingers to press the clay upward toward the tied end of the balloon, working around the balloon evenly.
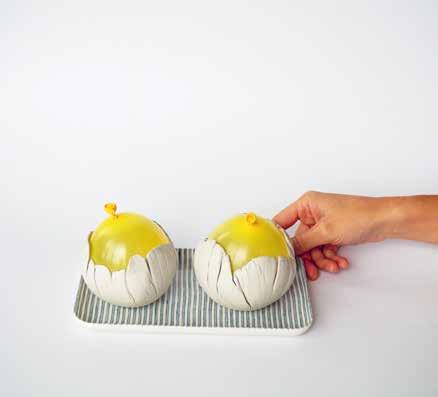
6. Once you are happy with the size of the vessel, gently remove the plastic wrap and place the clay-wrapped balloon somewhere safe to dry. Depending on the sun exposure and the thickness of the clay, it can take a few days to become completely dry. The balloon will naturally deflate over time, so you can gently remove it when the clay becomes solid. Once the balloon is removed, turn your vessel upside-down to let the bottom dry out completely before using.

MATERIALS NOTE:
For this project, we’ve found DAS air-hardening modeling clay the best material for its all natural, nontoxic, biodegradable ingredients, as well as its natural color, texture, and durability. To keep the waste impact of this project low, reuse a single sheet of plastic wrap (or a square from a plastic grocery bag) to make all the vessels.


TIP:
If you’re hoping to go totally plastic free here, you can experiment with alternative materials and get similar, though not identical, results. A bundle of lentils can be gathered into a ball-like shape and used in place of the balloon. (This method worked best for the smallest bowls and it does result in a slightly flatter bottom and the kind of textured interior you might expect from pressing clay around a bundle of lentils. If you’d like a smoother look on the inside, try using flour or another fine-grained pantry staple.) You can also try cloth in place of plastic wrap. A textured linen dish cloth pressed around the clay leaves a pleasing, subtle texture on the exterior of the bowl. Overall, we concede that clear plastic and latex water balloons are the easiest materials to work with in terms of being able to see the shape the clay takes, working it into place, and achieving a rounded vessel shape with a tapered top.
CORRAL & DISPLAY 61
TOOLS
clay incense burner
To turn a clay vessel into an incense burner, you’ll add a clay stand to the bottom.
1. Begin by rolling a lump of clay into a smooth ball the size of a Ping-Pong ball. (The key here is that the clay stand has a bit of heft so that the incense stands upright and the ash falls into the vessel below.)
2. Place the ball on your work surface and press down lightly to flatten out the bottom.
3. Insert a slim skewer (or the end of an incense stick) into the ball, stopping before puncturing the bottom. Widen the hole slightly by rotating the skewer. (The clay will naturally shrink when it dries, so make sure the hole is not too small for your incense sticks.)
4. Place your clay in a dry, warm spot until it hardens.
match strike
The easy addition of an adhesive match strike sticker (found online) to the bottom of your vessel turns it into a sweet little match striker for your bathroom vanity or bedside table.

CORRAL & DISPLAY 62 PROJECTS


CORRAL & DISPLAY 63


CORRAL & DISPLAY 64
pincushion with magnetic bottom
If you’re going to be sewing, you’re going to be pinning, so you might as well start with sewing a spot to wrangle your pins. This easy hand-sewn pincushion uses scrap fabric tucked into a clay vessel with a clever magnet hiding in the bottom.
SUPPLIES AND TOOLS
+ Clay Vessel (page 61)
+ Scrap fabric
+ Magnet
+ Pencil or marker
+ Scissors
+ Needle and thread
1. Begin by cutting two circles of fabric: one that’s twice as large as the diameter of your bowl and a second that’s roughly 1 ½ inches / 4 cm in diameter.
2. Using your needle and thread with a knot tied on one end, create a loose running stitch (page 105) around the outer edge of your larger circle.
3. Carefully cinch the fabric along the thread, drawing the fabric circle into a loose bowl shape.
4. Stuff the interior of the fabric bowl with additional fabric scraps.
5. Cinch the fabric bowl all the way closed and tie a second knot in the thread to keep it shut tight.
6. Whipstitch the smaller circle of scrap fabric over the cinched bottom.
7. Place a strong magnet in the bottom of your vessel and tuck the pincushion into the bowl over the top of the magnet. The magnet will be strong enough to pick up stray sewing pins through the clay.
CORRAL & DISPLAY 65 PROJECT
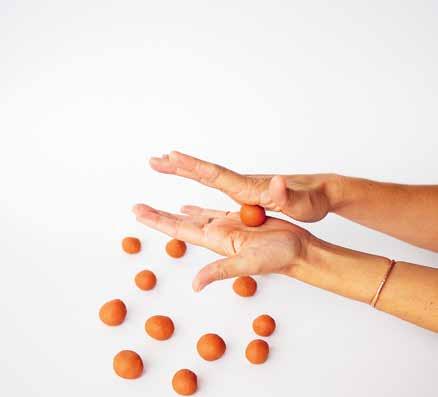
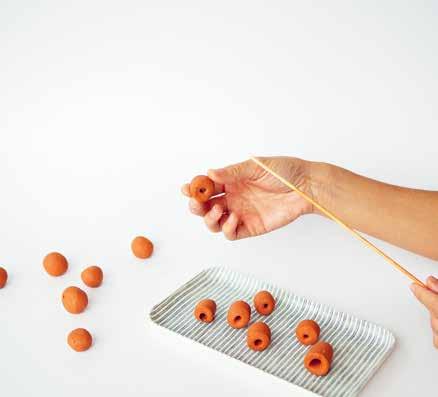
clay beads
DAS clay dries out relatively quickly, so we like to use up a whole package once we’ve opened it. One of our favorite ways to use up extra clay is by rolling simple clay beads. We’ve used these beads to add to the ends of jump ropes and curtain ties, and they’re also appealing strung up in multiples to wear around your neck or hang as a bit of visual intrigue on a wall.
SUPPLIES AND TOOLS
+ DAS air-hardening modeling clay
+ Bamboo skewer
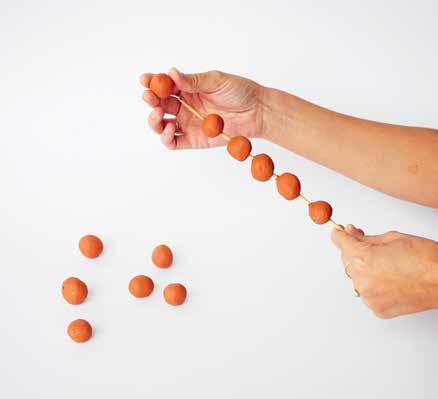
1. Begin by rolling small balls of clay between your palms.
2. Insert a skewer through the center of the first clay ball. Repeat, stacking all the balls on a skewer with a little space between each one.
3. With the palms of your hands, roll the skewer forward and back on your working surface. The round balls will lengthen outward, taking on a cylinder shape, and the center hole will grow wider.
4. Gently remove the beads and allow to dry.

CORRAL & DISPLAY 66
PROJECT

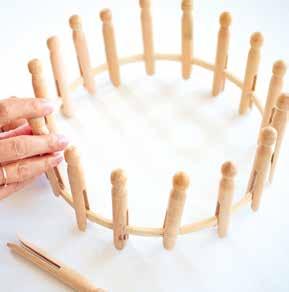
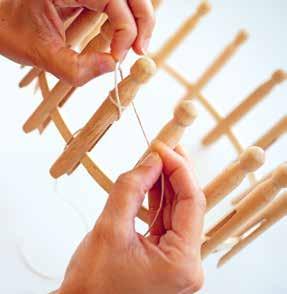
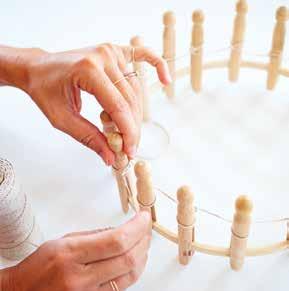
clothespin
knitting loom
This is our homespun answer to round plastic knitting looms. We’ll take knitting in whatever form it comes to us, but knitting on a round loom simplifies the process a bit and can feel more straightforward than needles for folks just getting started. Here you’ll make your own knitting loom from an embroidery hoop and wooden clothespins. Cheap, wooden embroidery hoops tend to work best here because they’re thin enough to accommodate the slit in the wooden clothespins. Look for old-school round wooden clothespins in craft and hardware stores and, of course, online. These looms are delightfully quick to make and can be taken apart and put back together for easy storage and reuse.
There’s no shortage of things you can make on a knitting loom, but our favorite entry project is a simple, loose-knit string bag made from polished hemp cord. On a knitting loom, the bag knits up quickly, doesn’t require any seaming, and finishes with a simple cinch. Even better, a quick change of material will get you a whole different kind of bag, or even a hat!

CORRAL & DISPLAY 68 TECHNIQUE

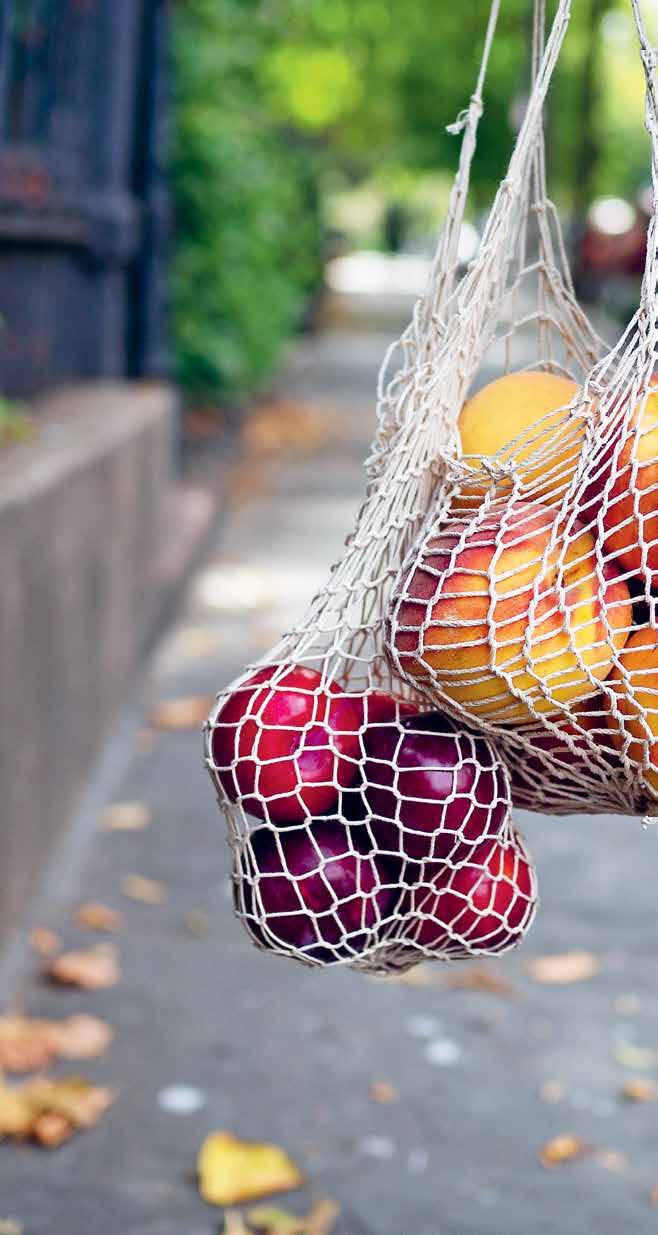
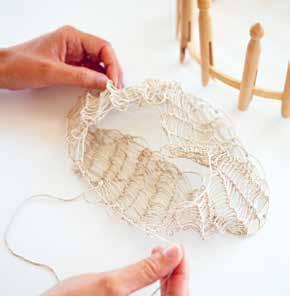
simple string bag
This simple string bag is one of the first projects we made together. Over the years, we’ve used these bags to bring home fruit from the farmers’ market, to wrap homemade gifts of bread and baked goods, to offer bottles of wine and whiskey, to cradle mason jars for hanging bouquets of flowers in winter windows, and to store all kinds of alliums for easy, airy access. (We also use them for less glamorous uses like stashing rolls of trash bin liners and dog poop bags.) These bags tend to take the shape of what’s in them, lending them a whimsical, sculptural quality while in use.
SUPPLIES AND TOOLS
+ 9-inch / 23 cm embroidery hoop (use the inner circle, without the tightening screw)
+ 18–20 round wooden clothespins (you might need a few extra if they crack while placing them on the hoop)
+ 1 mm polished hemp cord (roughly 120 yards / 110 m)
INSTRUCTIONS ON PAGE 72
CORRAL & DISPLAY 70 PROJECT


CORRAL & DISPLAY 71
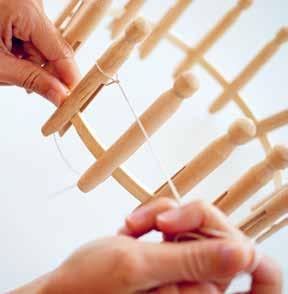
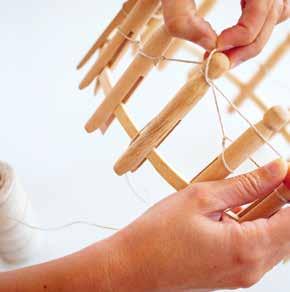
to cast on
1. Evenly space clothespins around the embroidery hoop. Press down firmly, making sure each peg fits tightly.
2. To begin, place a 20-inch / 50 cm tail end of the string through the center of your frame. Wrap this string around the bottom of a peg so it doesn’t get in your way.
3. Begin by wrapping the working string twice around the first peg to the right of the peg where you’ve placed the tail end.
4. Pass the bottom loop over the top loop and off the peg. Repeat with the next peg to the right, looping twice and passing the bottom loop over the top and off the peg. Repeat for all remaining pegs until you are back to the first peg with a single loop on it.
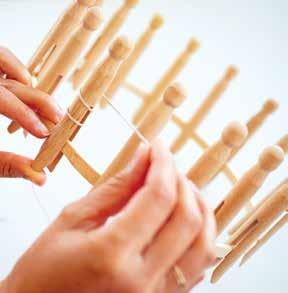
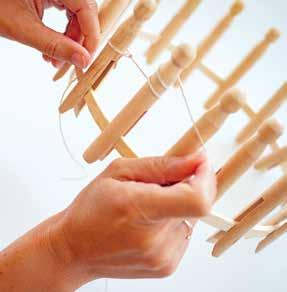
to knit the bag
5. To begin knitting, bring the working string in front of the peg with one loop on it. Pass the bottom loop over the working string and off the peg. Repeat this technique on all the pegs, rotating the loom clockwise to the right. You will need to go around the circle many times to form the bag. Knit in the round for 4–6 inches / 10–15 cm, depending on the size you want your bag. The bag will stretch significantly once off the frame.
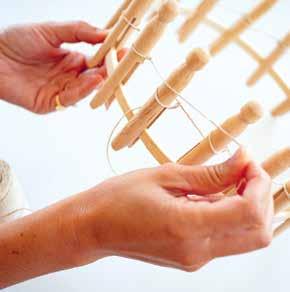
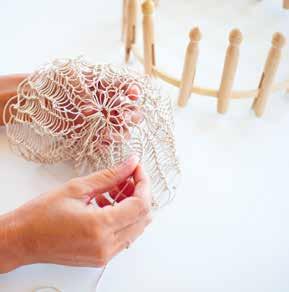
to finish the bag
6. Once you reach your desired length, you will begin the process of removing the bag from the loom. Cut the working string, leaving a 12-inch / 30.5 cm tail. Starting on the same peg where you began weaving, carefully slip the first loop off the peg and pass the tail you just cut through the loop. Repeat for all the loops and pegs.
7. Pull the tail end to cinch the bottom of the bag together. Tie a few secure knots through the adjacent loops and weave the tail end into the bag.
8. To make a handle, use the tail end of the string at the start of the bag. Connect it to the opposite side of the bag, weaving it through an available loop (or two). Bring the tail end back over to where it started and secure a knot.
9. Shape your bag and use it to package small gifts and treasures.
CORRAL & DISPLAY 72


CORRAL & DISPLAY 73

drawstring
To draw your bag closed, weave an additional piece of string in and out of the top edge of your bag, going in and out of the open knit weave.
OPTION 1: Weave once around with the two tail ends entering and exiting through the same side. The bag will cinch when you pull the string and push the loops together (see image to the right).
OPTION 2: You can weave once around the perimeter and continue to weave to the opposite side. (You are weaving around the top one and a half times.) One tail end of the string should enter at the opposite side where the tail end exists. When the two strings are pulled out in opposite directions the bag will cinch closed.

MATERIALS NOTE:
A wide variety of fibers can be used to construct these bags, ranging from thin cotton string to bulky yarn.
To make a larger bag, you can use a hoop that is wider or even the perimeter of a large cardboard box. (Indeed, if you don’t have an embroidery hoop handy, you can replace the embroidery hoop with a small corrugated cardboard box from the get-go!)


CORRAL & DISPLAY 75
floral wire basket
With just a simple material switch—swapping paper-wrapped floral wire for the string—a string bag takes on the characteristics of a more structured basket. As you knit the thin wire on the clothespin loom, the stiff material forms a basket. Instead of cinching closed as with string, the wire naturally forms a small round opening where the bottom is pulled taut. We love to use these baskets for crafts and in kitchens since the opening acts as a perfect dispenser for a ball of string. Of course, don’t stop with string! All sorts of small items pair beautifully with these little baskets. Erin hangs one in her kitchen filled with hardneck garlic and another in the bathroom with extra hand soaps. Don’t be afraid to mold the finished basket around a favorite bottle or vase to create a hanging arrangement.
SUPPLIES AND TOOLS
+ 6-inch / 15 cm embroidery hoop (use the inner circle, without the tightening screw)
+ 9 round wooden clothespins
+ 26-gauge paper-wrapped floral wire (3 yards / 2.7 m should be enough for a small bag)
+ Scissors
1. Evenly space the clothespins around the embroidery hoop.
2. Cast on and knit (as in the Simple String Bag instructions, page 72) for 10 to 12 rotations, until the knitting reaches your desired length.
3. Cast off and cinch the bottom of the vessel closed.
4. Weave in any tail ends.
CORRAL & DISPLAY 76 PROJECT
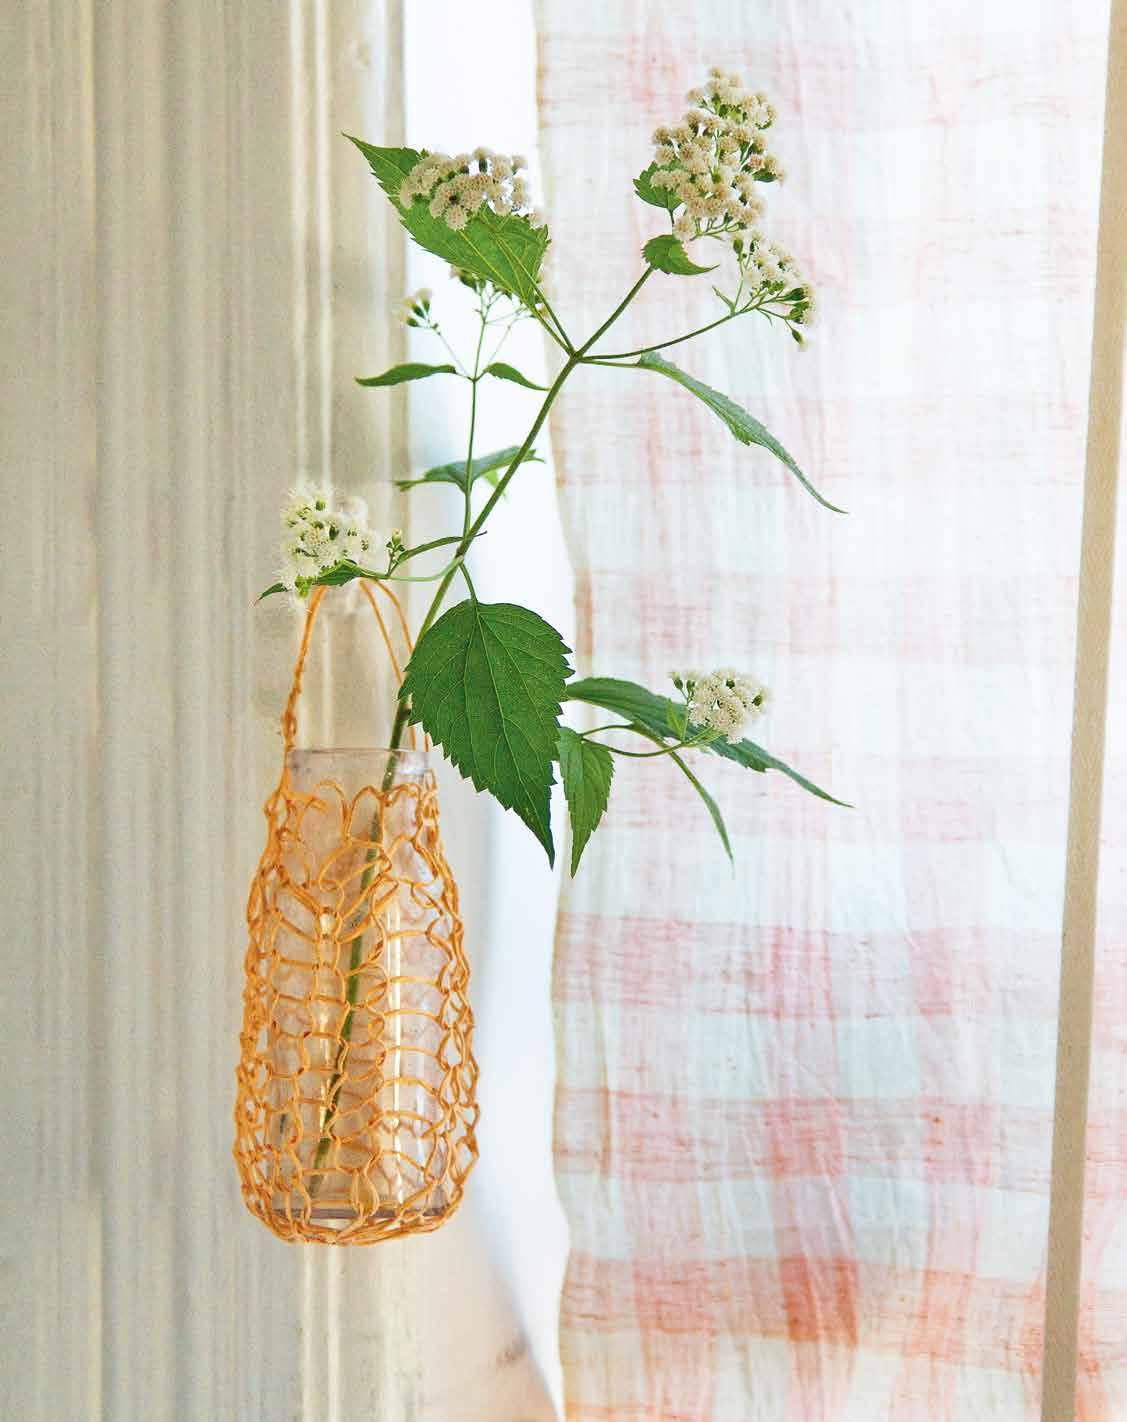


flower frog
These little wire flower frogs are perfect for arranging summer stems without the need for foam, florist tape, or heavy vintage flower frogs. This woven jar topper is made from the same paper-wrapped floral wire as the Floral Wire Basket (page 76). I’ve used one on the top of a cup of water to keep scallions upright on the counter, and Rose uses one to keep her parsley tidy in the fridge. They help make wide-mouthed mason jars and water glasses into the site of your next flower arranging masterpiece, and they can be used over and over again. To make a small wire flower frog, we scale down the size of the loom by using a cardboard tape roll core in place of an embroidery hoop. (See the Simple String Bag instructions on page 72 for how to cast on and knit using the loom.)
SUPPLIES AND TOOLS
+ Empty 3-inch / 7.6 cm cardboard tape roll core
+ 5 round wooden clothespins
+ 26-gauge paper-wrapped floral wire (you’ll only need 2–3 feet / 61–91 cm)
+ Scissors
1. Place the clothespins evenly spaced around the perimeter of the tape core.
2. Cast on the wire and knit in the round for six rows.
3. Cast off, weaving the working end of the wire through each loop as you remove them from the pegs.
4. Pull the working wire tight, cinching it to form a tight circle at the center of your floral frog.
5. Wrap the wire end a few times around the center circle and trim any excess wire.
6. To use, place the frog over the mouth of a glass jar or vessel and weave the tail end through the loops of the outer edge, twisting the end of the wire to tie off the end.

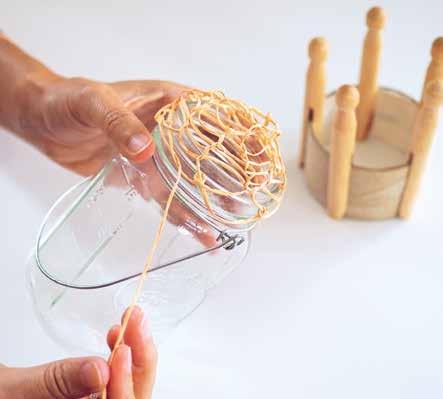

CORRAL & DISPLAY 80 PROJECT

macramé
Macramé projects can range from the very basic to the truly ornate. We keep things exceedingly straightforward with two simple knots—one for casting onto a dowel and another for forming the bag itself. In lieu of traditional string, we put our macramé chops to use with paper-wrapped floral wire, which lends structure and shape to these knots and forms a netted bag that functions like a basket. How open your net will be depends on how close your knots are, and the size of the finished basket depends on how many knots you start with and how long you go!
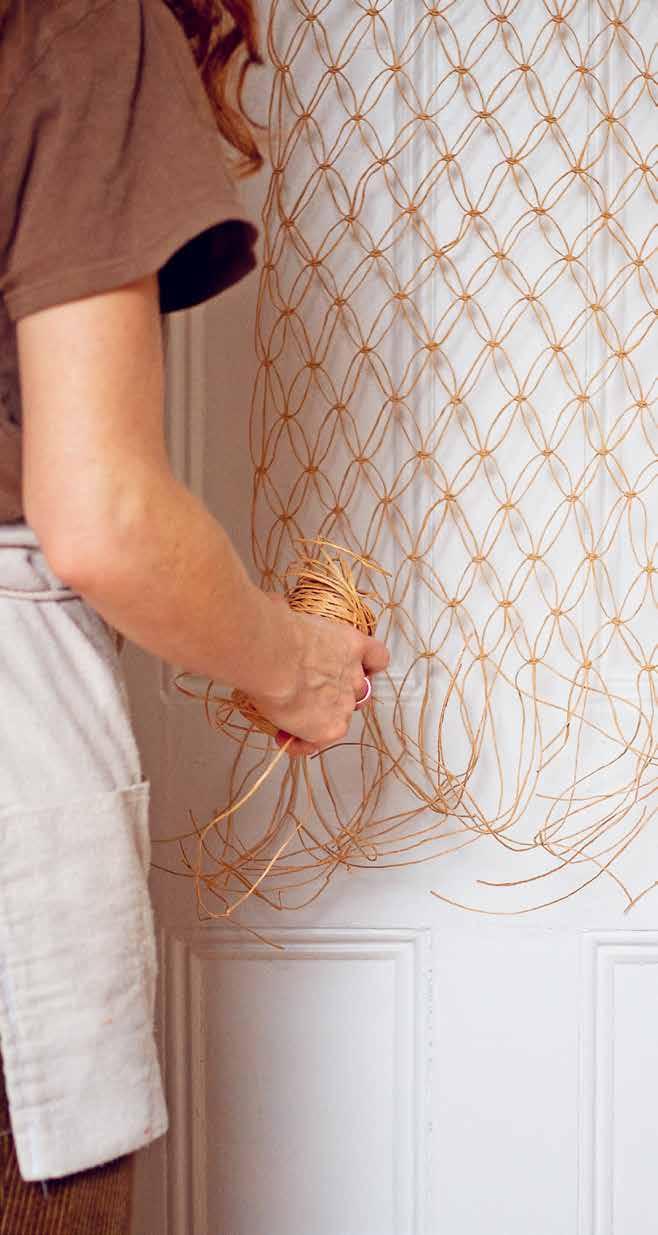
CORRAL & DISPLAY 82 TECHNIQUE


CORRAL & DISPLAY 83
cow hitch
A cow hitch is a simple knot that secures a length of string—or, in our case, wire—to something fixed like a dowel, a pot rack, a metal or wooden ring, or even a hole punched in paper. You probably use this style of hitch already in your day-to-day life, and now you have a word for it! Fancy!
Take any string (yarn, rope, wire, etc.), double it over to form a loop (called a bight in knotspeak!) on one end, and place it up against a dowel (or through a hole) so that the working ends can be drawn through the loop and cinched closed—hitching the rope to whatever it is you want to attach it to.
This hitch is generally used for decorative purposes, since it requires some tension to hold, but for our crafting purposes it’s very handy.

where to use a cow hitch
Belt 55
Clothes Hanger 45
Envelope and Gift Tag
Templates 295
Four-String Braid 52
Kitchen Hanger 45
Kumihimo Corded Dog
Leash 270
Pacifier Clip 57

CORRAL & DISPLAY 84 TECHNIQUE
square knot
A square knot is made using four separate strings (or, in our case, wires).
1. Start by crossing the first string on the far left over the front of the middle two hanging strings, forming a number 4 shape.
2. Bring the string on the far right over the tail of the previous traveling string, under the two center cords, and through the 4-shaped loop on the far left, moving back to front. Pull both working strings (on the left and right) out to either side and up to about ½ inch / 1.3 cm from the top. Tighten to secure your first knot.
3. You will now reverse direction, working with the same four strings. Now the string on the far right will travel over the two center strings and out to the left, forming a letter P shape.
4. The string on the far left will go over the traveling string, under the two center ones, and through the P-shaped loop, moving back to front. Pull both the right and left strings out and up to secure a second knot underneath the last one. You’ve completed a square knot.
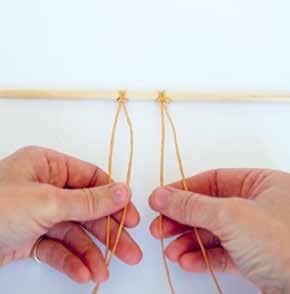
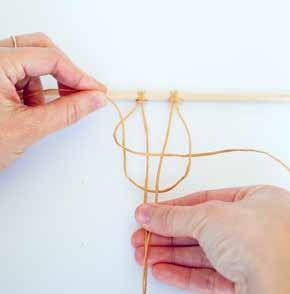


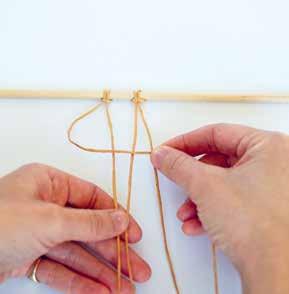

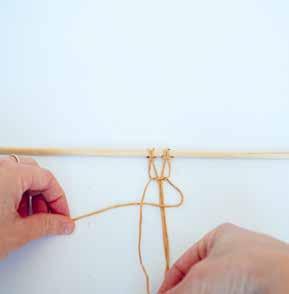
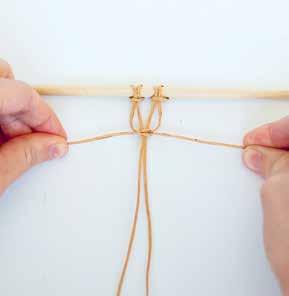
CORRAL & DISPLAY 85 TECHNIQUE
floral wire macramé basket
A macramé bag knotted from paper-wrapped floral wire takes on the structure of a basket but maintains the loose netting of a string bag. It takes some care and patience to evenly space your knots, but the technique isn’t any more complicated than repeated rows of square knots. Spacing between the square knots is up to you and will determine whether your bag has a tight or loose net. For a finely netted bag of the sort you might fashion into a small bike basket, leave roughly ½ inch / 1.3 cm between each square knot. For a more loosely netted bag for storing larger items, leave roughly 1 ½ inches / 4 cm between knots.
SUPPLIES AND TOOLS
+ Paper-wrapped floral wire (we like 26-gauge, but thicker varieties will also work)
+ Wooden dowel, ¾-inch / 2 cm diameter, cut to 12 inches / 30.5 cm long
+ Packing tape or string
+ Ruler
+ Scissors cast on
1. Cut twelve pieces of floral wire, each roughly 8 feet / 2.5 m long.
2. Fold each piece of wire in half. Place one folded loop over the top of the dowel. Pass the ends of the wire through the loop and pull, forming a cow hitch. Repeat for the remaining eleven pieces
of wire.
3. With all the wire secured onto the dowel, fasten the dowel to a working surface (like a table) with heavy-duty tape. Or you can tie a piece of string to either end of the dowel to hang off a knob or hook.
to macramé the body of the bag
1. Working in groups of four, construct square knots across your dowel. Make sure to keep the placement of knots consistent in each set of wires so the knots line up evenly. (The rest of the knots will follow from this initial set, so working with care at the onset will mean more even netting throughout.)
2. For the next row of square knots, you will begin again on the left side of your piece. This time, skip the first two pieces of wire and use the next four (two from the first knot, two from the second knot above). In this way you are staggering the weaving between the last row of knots.
3. Work the same square knots along the second row, securing all knots evenly. You will have two pieces of wire left at the end of the row.
4. To begin the next row, go back to the far left four wire strings, and work in the same manner as the first row.
5. Continue until your netting is approximately 18 inches / 46 cm long, or you’ve reached your desired length.
to form the handles
1. Start by cutting two 24-inch / 61 cm pieces of wire for the handles. Fold each piece of wire in half and twist the two strands
together tightly so you have two 12-inch / 30.5 cm twisted wires.
2. Carefully remove the dowel from the loops by slipping it gently out through one end.
3. Thread one of your twisted wires through the released loops and secure in place by twisting the two ends together. (This secured end can lie inside the loops so it stays concealed.)
4. To create the loops for a handle on the opposite end of the netting, you will work with two wires at a time. Starting at the left edge, hold the first two wires together, loop them over the dowel (similar in size to the cast-on loops on the opposite end), and twist at the base to secure in place. Repeat with the remaining strands to create twelve loops in all. Trim off any extra length with scissors.
5. Thread the second twisted wire through the loops you just created and secure by twisting the ends together.
6. Gently fold your macramé piece in half so the two handles line up.
to seam the sides
1. Cut one 24-inch / 61 cm length of wire and fold in half.
2. Starting at the folded bottom, crisscross the ends of the wire in and out of the outermost edges of one side, drawing the front and back of the bag together into a seam.
3. Stop 2 inches / 5 cm before the top. Trim each wire end to 1 inch / 2.5 cm and twist around the adjacent edge to secure in place.
4. Repeat for the second side.
CORRAL & DISPLAY 86 PROJECT
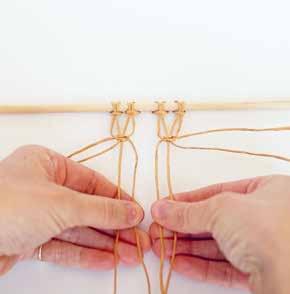

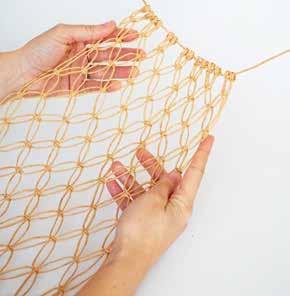

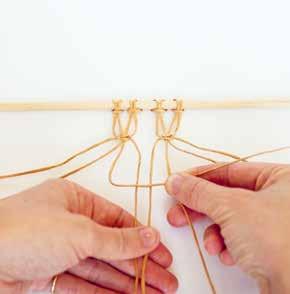


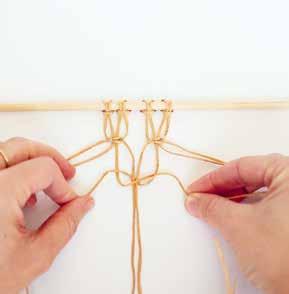

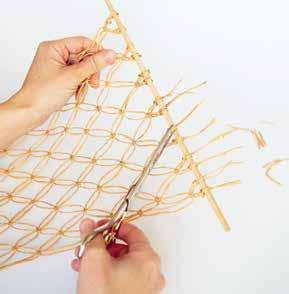

CORRAL & DISPLAY 87


rope bowls
Don’t be afraid of your sewing machine. This project might seem on the heavy-duty side, but all it really boils down to is lots of thread and one repetitive, hypnotic sewing machine function. While commercial rope bowls are created on industrial machines, this tutorial was adapted to suit a home machine. Once you have the settings in the right gear and ready to go, it really all comes down to steering. Make sure you sew with the needle connecting one rope to the other, side to side, then all you have to do is coast along. Go as slow as you need and take breaks to keep your eyes from crossing. In under an hour you might find yourself lulled into the machine’s trance—with a new rope bowl to show for it.
We left this project openended without dimensions so you can control the width, depth, and height of your bowl, but we recommend starting small and growing from there. With a little practice and enough rope, it’s possible to make rope bowls big enough to store a toddler’s worth of stuffies. For a rough estimate, 100 feet / 30.5 m of rope will make two small bowls.
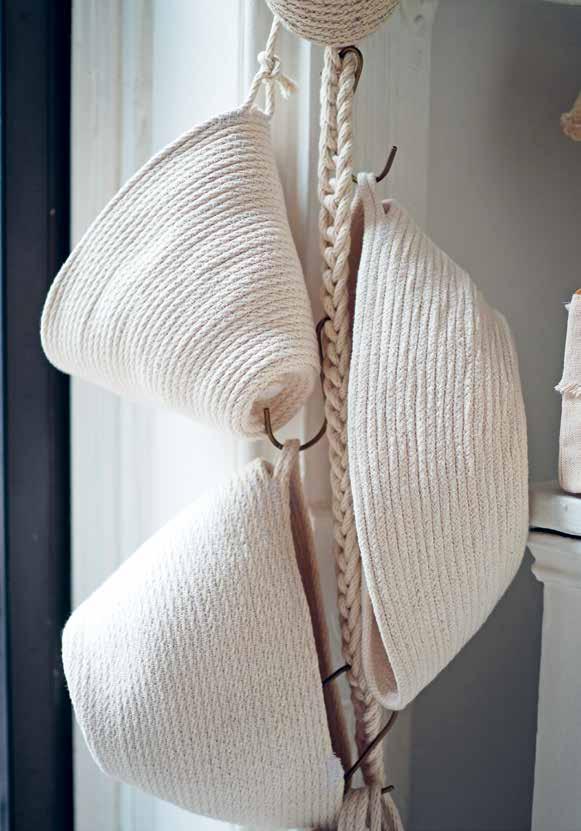
CORRAL & DISPLAY 90 PROJECT
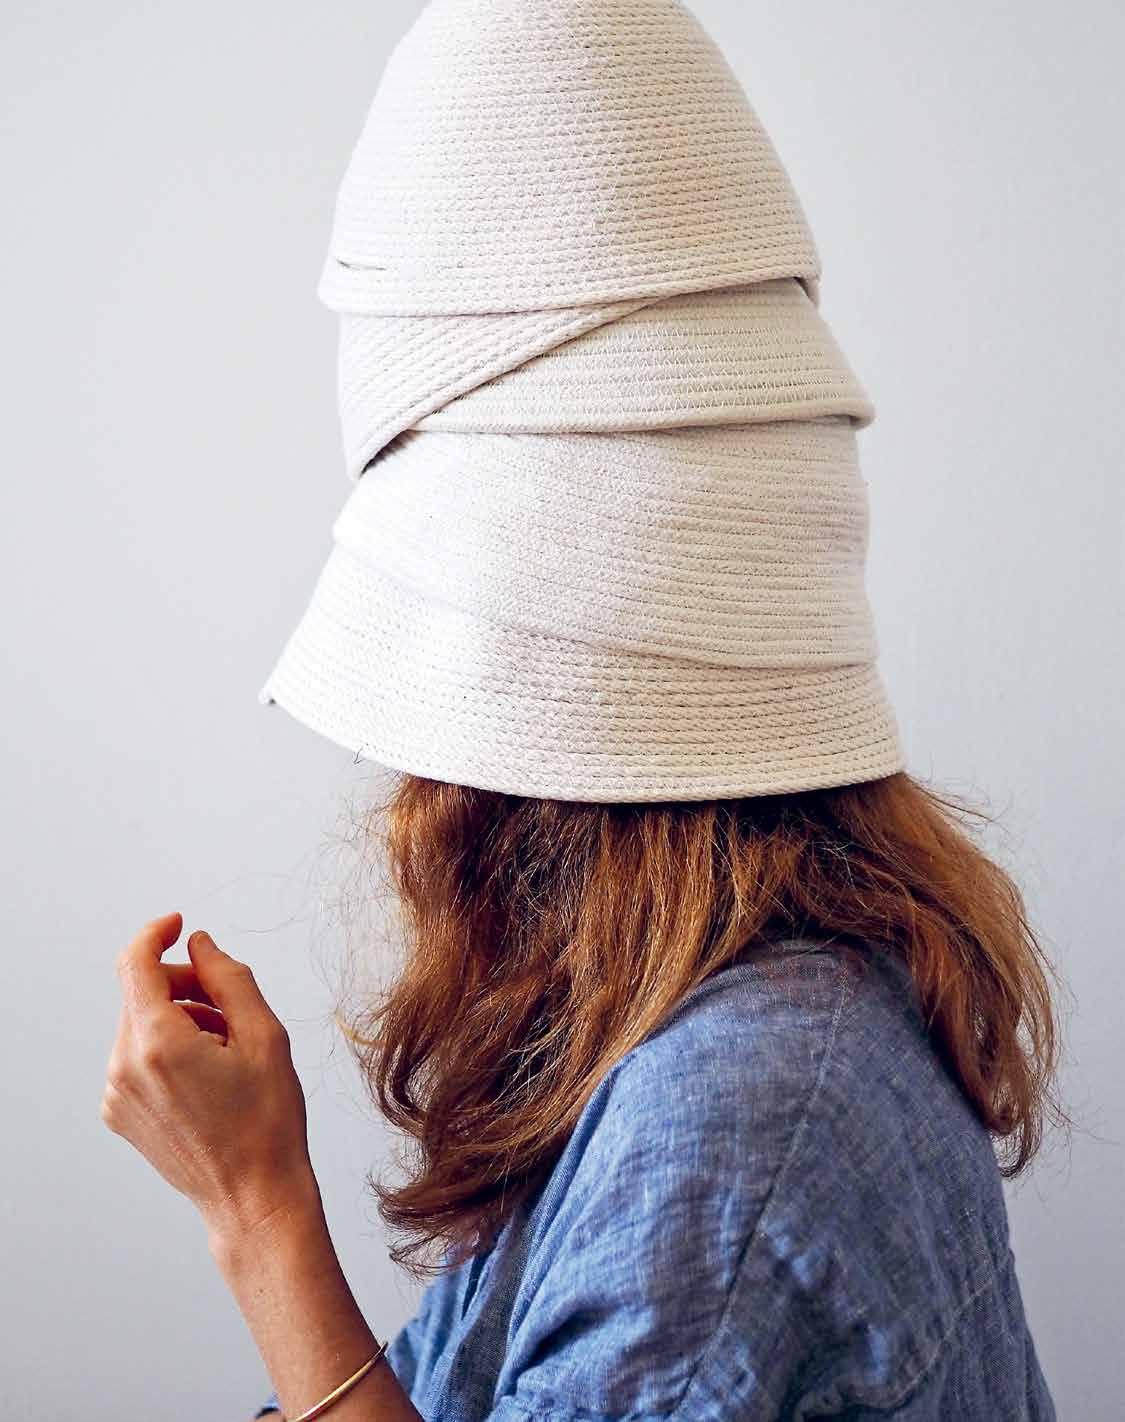

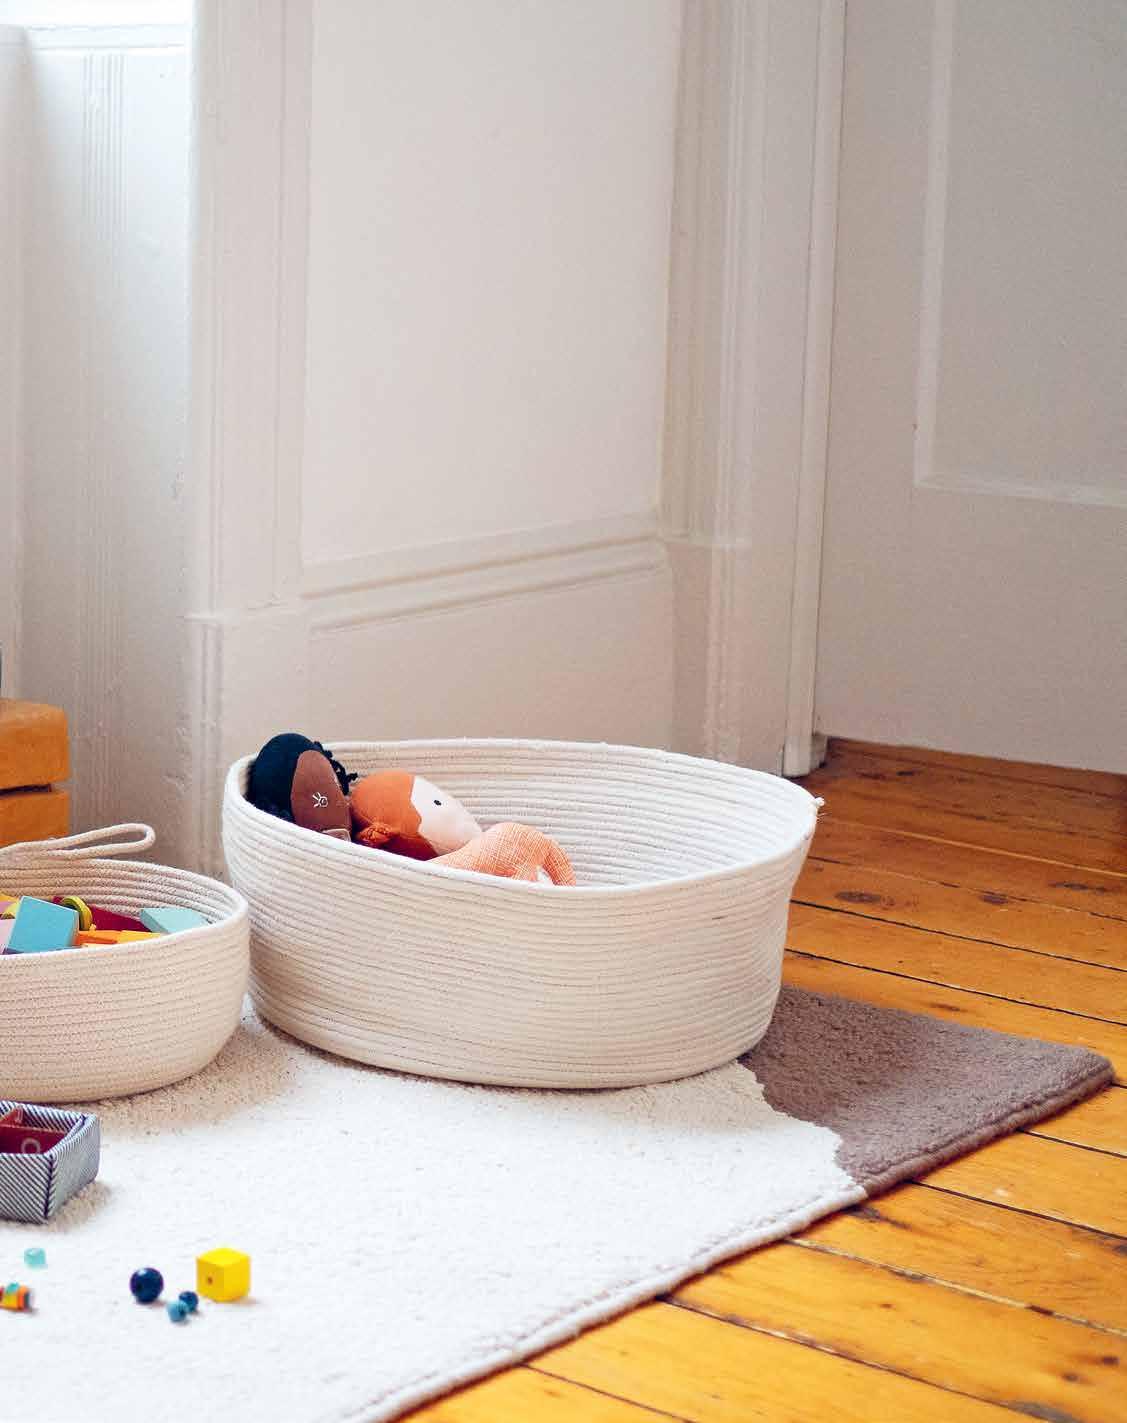


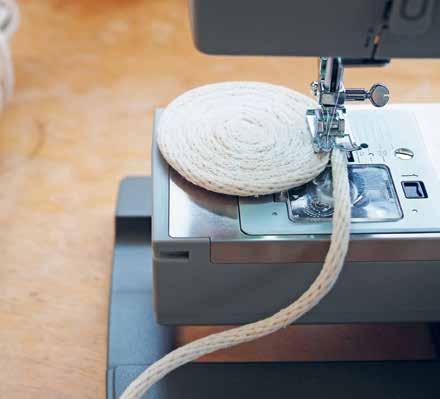
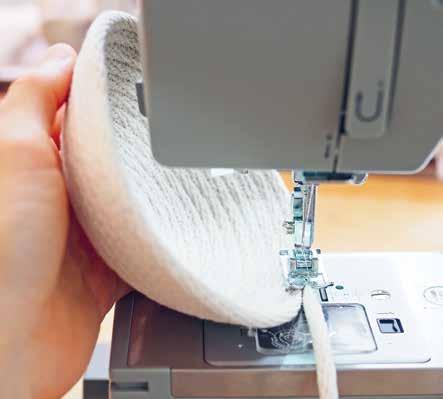
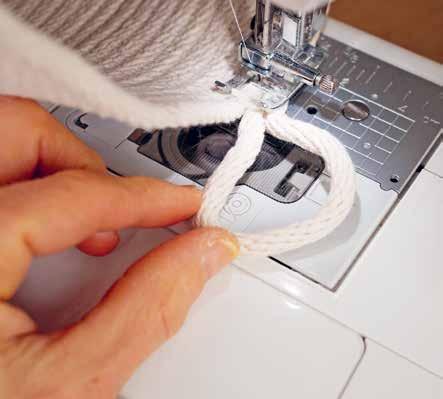
CORRAL & DISPLAY 94
SUPPLIES AND TOOLS
+ Cotton clothesline
+ Sewing machine and thread
+ Scissors setup
THREAD: Before you begin, make sure you are using the same thread in both the upper bobbin and the bobbin inside the compartment that lies under the presser foot of your machine. A durable thread such as an all-purpose polyester works best. Using white thread will conceal the stitches and a lot of beginner’s mistakes. However, if you desire a contrasting thread, you can choose any color you wish.
NEEDLE: Using a heavy duty needle is a great choice when sewing thick material like canvas, jeans, or rope.
MACHINE SETTINGS:
The stitch selection dial on your machine should be set on the zigzag function with the width set to ⅛–¼ inch / 4–5 mm wide. The stitch length should be 3.5 to 4 mm / 6–7 stiches per inch, and the tension should be set between 4 and 5.

TIP:
If you break the thread, need to rethread your bobbin, or need to go back and fix a gap, make sure to backstitch over the area where the thread needs to be cut to secure your stitches.

to form the base
1. Begin by coiling the tail end of your rope into a small disk, roughly 2 inches / 5 cm in diameter.
2. Carefully keeping the coils together, place the center of the coil under the presser foot of your sewing machine.
3. Using a zigzag stitch, sew straight across the coil. Without adjusting the foot, reverse and sew backward to the opposite end. Repeat to secure those stitches.
4. Lift up the foot and rotate the coil so you are sewing another straight line across the first one, making an X. Repeat step 3 to secure. (This first part will often appear a bit messy, but it will not be so noticeable once the bowl is finished.)
to grow the base
1. Once the center of the base is stable, begin sewing in the round to expand it, linking one side of each rope into a coil as you go. The size of your base depends on what shape you want your bowl to take and is entirely up to you.
2. Position your base under the needle so that the rope that’s secured in a coil is to the left of the needle and the loose rope is to the right. Lower the presser foot to secure and begin to slowly sew a zigzag stitch. The needle should go down into the left rope, up, and down again into the right rope, back and forth, to connect the loose rope to the bowl. Continue carefully following this line as you sew and the coil grows.
to shape the sides
1. Angle the coiled circle upward and continue to sew so the sides of the bowl begin to form.
2. Continue in this way until you are satisfied with the height of the sides. If you continue to sew at an angle, the sides of the bowl will naturally widen with every revolution. If you want to build the sides up straighter, without the bowl also growing wider, hold the base of the bowl at a more vertical angle, with the top edge reaching over the machine’s top. Continue to coil in this manner.
3. Once your bowl reaches your desired size, cut a 6-inch / 15 cm end from the working rope and tuck the cut end in a loop to form a handle. Continue to sew, stitching the cut end together with the lower and the top cord. Sew forward and back a few times to make sure the frayed end of the rope is completely covered in stitches and the handle is secure.

CORRAL & DISPLAY 95

CORRAL & DISPLAY 96
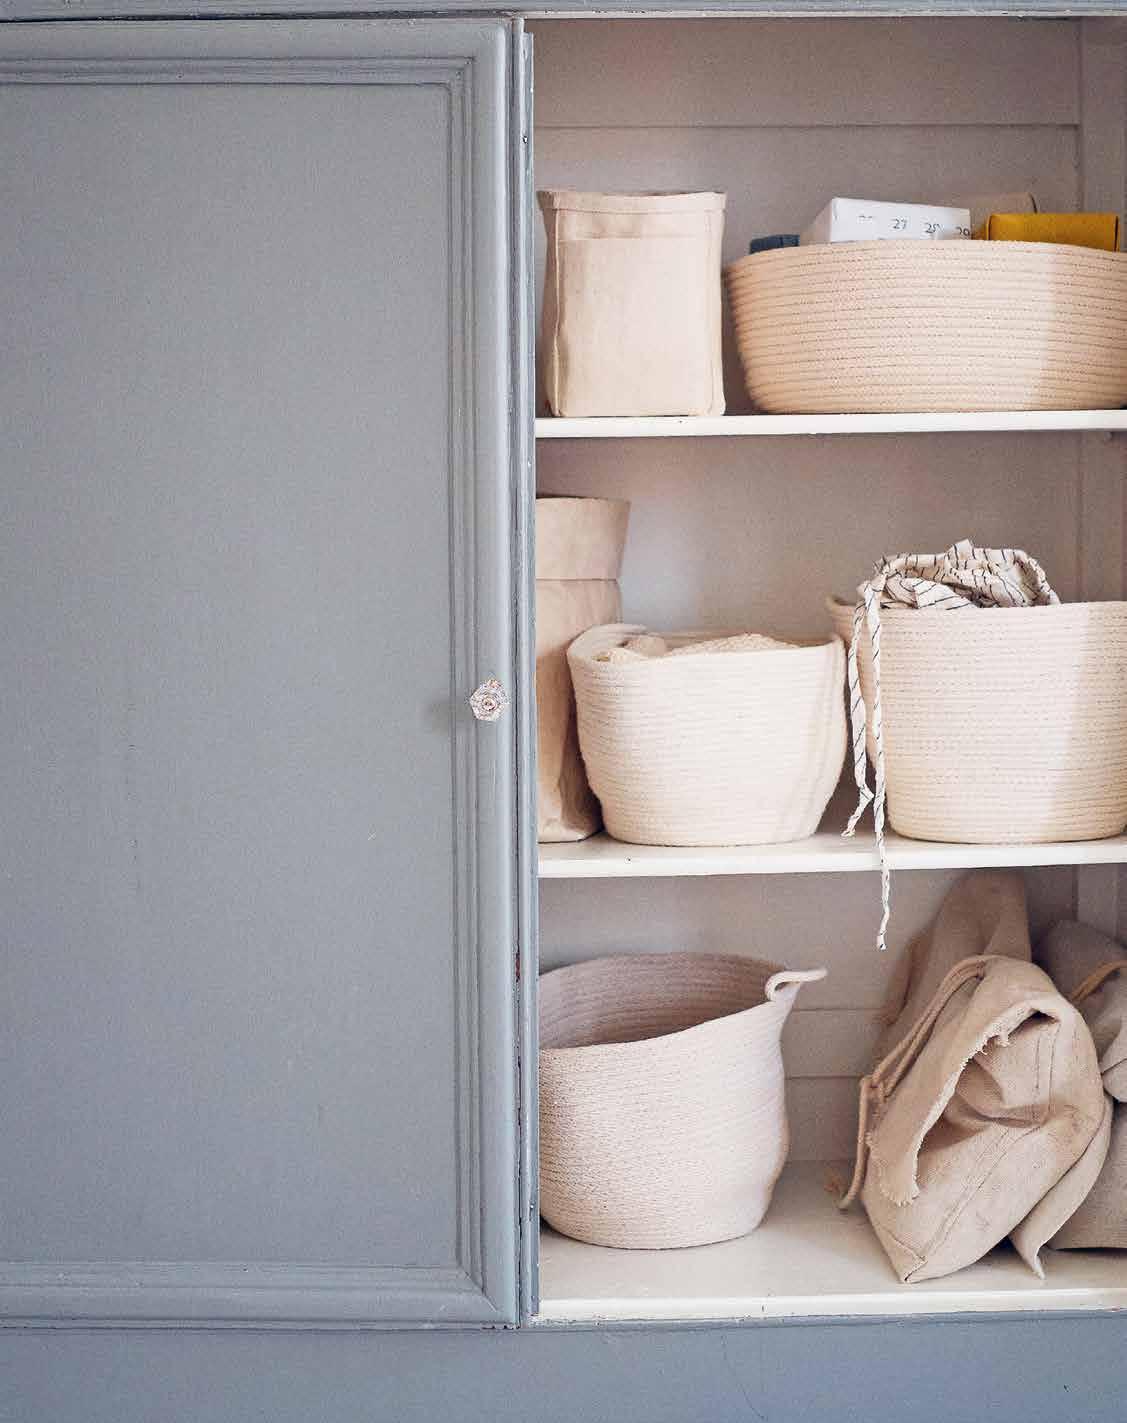
pinboard
Making a fabric-covered pinboard doesn’t have to be any more complicated than stretching a canvas drop cloth over an old cork board. Keep your eye out for used cork boards at thrift stores, yard sales, and on local Buy Nothing groups. Because you’ll be covering the board, it doesn’t matter much how marked up or filled with holes it is, but if you can’t find one used, new cork boards are common at office supply and craft stores.
SUPPLIES AND TOOLS
+ Cork board (salvaged, hopefully)
+ Fabric (enough to measure several inches larger than the board on all sides)
+ Staple gun and staples
+ Picture-hanging supplies
If your cork board has an existing frame, start by prying it off with a flathead screwdriver and a hammer so you’re left with flat edges and corners. Next, lay the board cork side down on top of your flattened fabric and staple into place following the instructions for Building and Stretching a Frame with stretcher bars, page 202.
If the corkboard you’re covering doesn’t have a way to hang it, install picture hanging hardware on the back and mount it on the wall.

CORRAL & DISPLAY 98 PROJECT
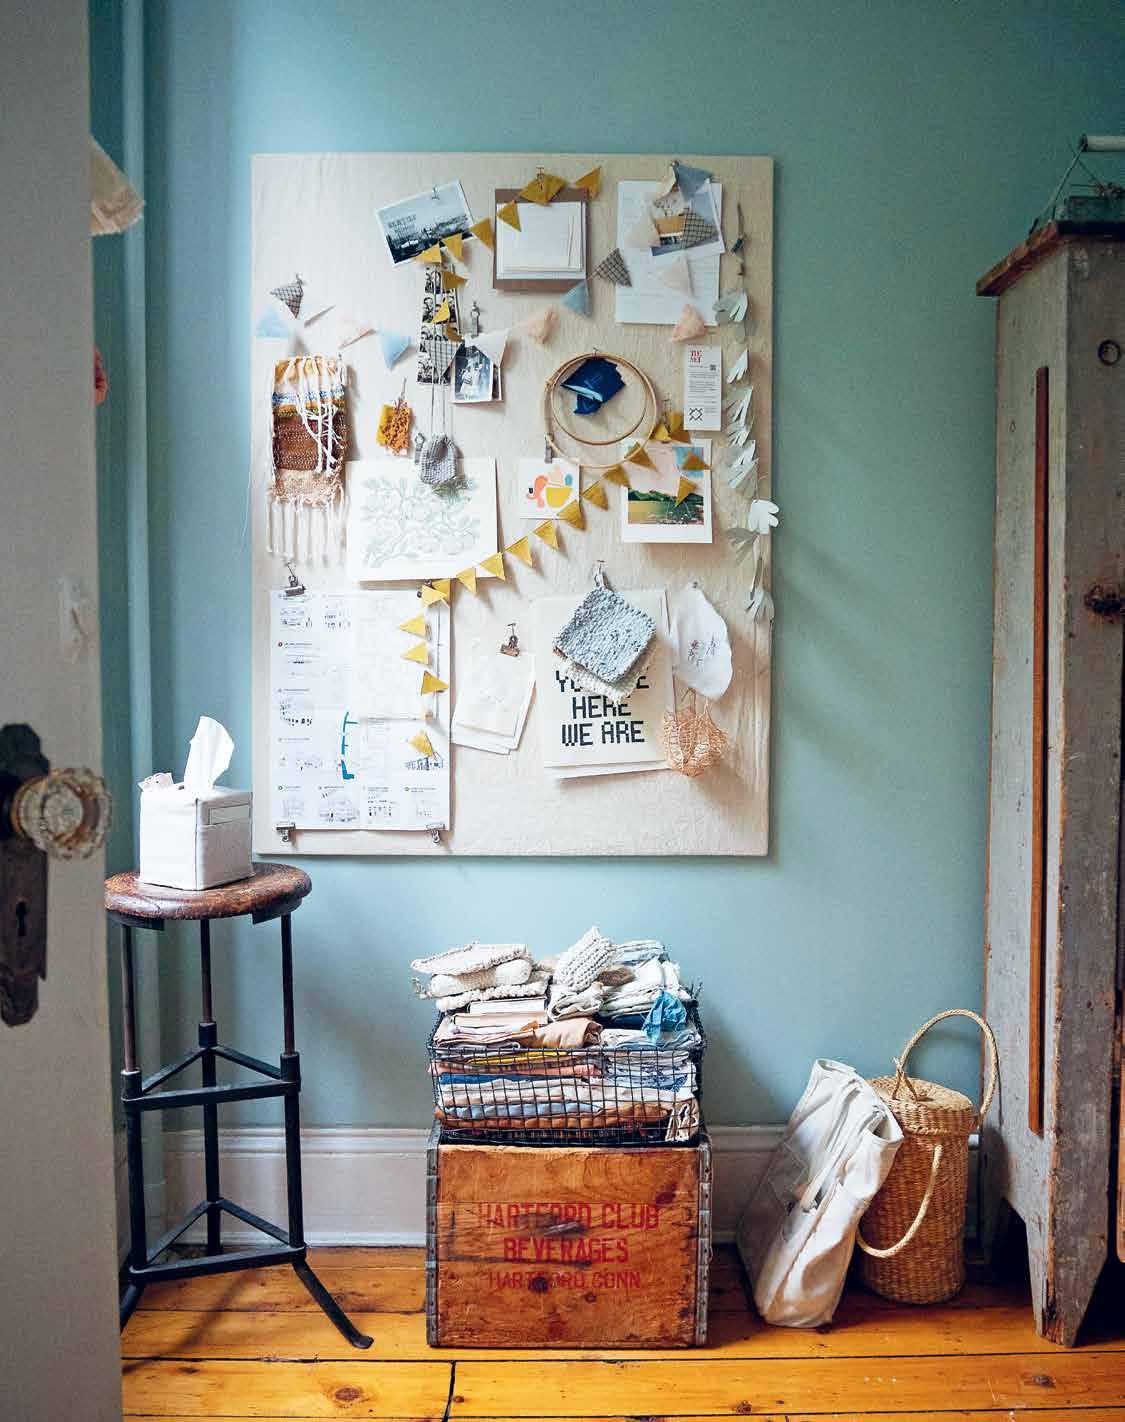


02
conceal & hold

constraint problem-solving thrift
Bespoke objects are often seen as being the purview of the very wealthy, but that belies the opportunities for resourcefulness. When we take on the task of making things for ourselves to suit our own, very particular needs, we can rely on our own intimate knowledge and understanding of our space and our sensibilities to shape, quite literally, the objects we use. In crafting what we need, we slow down and access the care and consideration required not to only solve a problem but to figure out the particulars that work best for our needs.
Out of hundreds of wall caddies available for purchase, not one of them is designed exactly to fit the space you have between your apartment door and the bathroom wall. You might need a spot to cache your hard drive cords, but only you can make the box sized to fit your desk drawer. These objects don’t need to be overdesigned or perfectly wrought, they just have to work for you. It’s not money that defines bespoke objects but thrift and problem solving.
CONCEAL & HOLD 102

sewing
Rose and I are not what you might call precise crafters. We go on instinct and feel and a smattering of pure adrenaline, propelling us to finish a project whether or not it’s perfect. The sewing projects in this chapter and others forgo finer finishes without giving up durability or utility. We’ve left out some time-consuming steps like linings or zippers that more accomplished sewers might decide to add to the projects, but these omissions never compromise the final results. Details like hemmed edges are sometimes avoided with quick tricks like doubled-over fabric and zigzag stitching along cut edges to disguise and protect frayed cloth.
We also fall back on time-saving tactics like “eyeballing” the center seams used to make pockets instead of measuring and drawing out guidelines. If you’d rather err on the side of caution, then by all means measure and mark your fabric accordingly, but in each project we’ve tried to only give the most crucial measurements in hopes folks won’t get too hung up on details. Remember: the great value in making something for yourself is that you get to customize it to suit your needs.
The sewing projects in this book are most easily tackled with a no-frills sewing machine. If you’re without a machine, many are still workable by hand. Here are a few basic sewing terms and techniques that we use throughout that might be helpful to define for folks sewing for the first time.
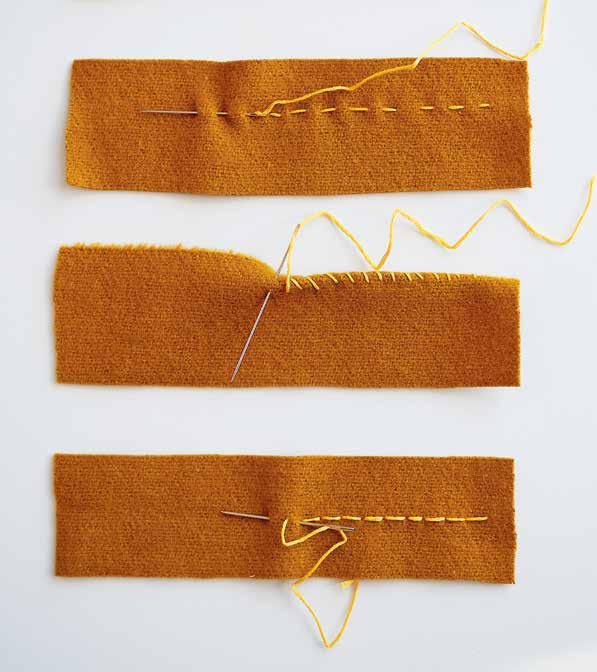
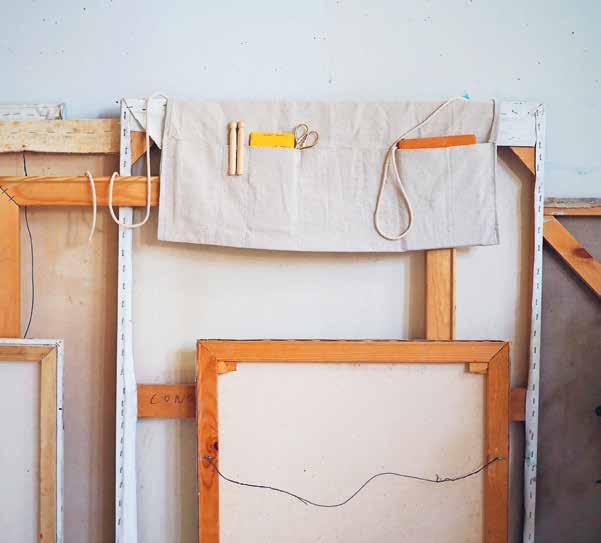
CONCEAL & HOLD 104 TECHNIQUE
STITCH
RUNNING
WHIPSTITCH
BACKSTITCH
running stitch
The easiest sewing stitch and likely what you think of when you visualize hand-sewn stitches. The running stitch is often used to create a simple basting stitch, which is just a loose stitch meant to tack two pieces of fabric together temporarily.
to sew a running stitch by hand
1. Insert the needle through the back of the fabric to the front. Draw your thread straight across the fabric, inserting from the front to the back this time, and pull taut.
2. Roughly a stitch length away from where you last inserted your needle, insert your needle again, back to front, then front to back a stitch length away. Repeat this pattern, inserting your needle in a straight line, leaving a stitch length between each stitch.
SEAM ALLOWANCE: A sewist’s term for the space left between a row of stitches, or seamline, and the raw edge of the fabric. The extra space ensures that both sides of the fabric will be caught by stitches and securely joined together.

whipstitch
Whipstitches are often slightly slanted on the side of the seam facing the sewist. When opened up, the stitches will appear straighter on one side and slanted on the other. See our Jogak-bo (Patchwork Bojagi) tutorial on page 226 for a handsewn project that uses this stitch.
A whipstitch, also called an overcast stitch, joins two pieces of fabric together by sewing over the edges of the fabric.
to sew a whipstitch by hand
1. To hide the knot in the end of your string, start by placing your needle between the two layers of fabric and inserting it in the back layer from front to back.
2. Bring your thread over the top of both fabric pieces and push your needle through both layers of fabric from front to back.
3. Repeat, drawing your thread over the top of your fabric and inserting your needle through both layers of fabric, again from front to back, spacing your stitches evenly in a row.
backstitch
When using a sewing machine, it’s important to lock your stitches into place using a backstitch. This means sewing forward and in reverse a few times in the same spot to prevent stitches from falling out.
The backstitch is also an important stitch for hand sewing. Unlike a running stitch, which leaves space between each stitch, a backstitch returns to the empty space between two stitches and fills it in, creating a solid line of stitches.
to sew a backstitch by hand
1. Insert the needle through the back of the fabric to the front and then back through, front to back, to make one stitch.
2. Bring the needle back through to the front, skipping a stitch length as if doing the running stitch, but this time, insert the needle back at the end of your last stitch instead of advancing it forward. You’ll now have two stitches right next to each other.
3. Bring the needle back through to the front again, leaving a stitch length between it and the end of the last stitch. Again, instead of advancing the needle forward, return it back to the base of the previous stitch. Continue in this way to form a continuous line of backstitches.
CONCEAL & HOLD 105
drop cloth satchels
An easily made satchel with wraparound cord is an excellent beginner sewing project and handy for all sorts of uses. We use these satchels to organize bed linens, wrangle socks and underwear in suitcases, and generally keep things tidy. We especially like making these from canvas drop cloth because it’s inexpensive, available at any local hardware store, and typically has at least two hemmed edges you can put to use without needing to sew them yourself. Still, an old bedsheet, tablecloth, or other yardage you happen to have could easily work as well.
SUPPLIES AND TOOLS
+ Canvas drop cloth, 13 by 30-inch / 33 by 76 cm (For a finished 12 x 11 inch / 30.5 by 28 cm satchel when closed.)
+ Scissors
+ Sewing machine and thread
+ String or cord
+ Ruler
+ Sewing pins (optional)
1. Measure and cut a 13 by 30-inch / 33 by 76 cm rectangle from your canvas drop cloth. Fold over and stitch the two short sides of the drop cloth to make a ½ inch / 1.3 cm simple hem. (Or use an existing hem on your drop cloth!)
2. With the right side facing in, fold the bottom hemmed edge three-quarters of the way up toward the top. (Pin if needed.)
3. Zigzag stitch the overlapped edges closed with a ½ inch / 1.3 cm seam allowance, sewing front and back together and continuing to stitch up the entire length of the flap. (This prevents the raw edge from fraying and omits the need for a hem along the side.) You can reinforce this stitch by stitching over a second time. Cut any loose threads.
4. Turn the pouch inside out, pushing out the bottom corners.
5. Cut a piece of cord that is roughly six times the length of the sewn pouch. Fold the cord in half to create a small ¾-inch / 2 cm loop and sew to the top flap of the satchel with a few passes of zigzag stitch.


TIPS:
We don’t always hem both short sides of the drop cloth for this project! If you like the frayededge look, it can still be useful to sew a zigzag stitch across the frayed edge to prevent the fabric from continuing to fray too much.
For a custom-sized pouch, determine the length and width you want your finished pouch to be and cut a long rectangle of fabric that is two and a half times the desired length and 1 inch / 2.5 cm wider than the desired width and proceed from there.

ZIGZAG STITCH: Zigzag is kind of like a sewing machine’s answer to a whipstitch. Even most very basic sewing machines have a zigzag stitch feature, so it’s usually just a matter of adjusting a wheel or hitting a button to get yours going. Zigzag stitches are great for finishing and reinforcing seams, and we’ve found them to be especially helpful in simple projects as a way to avoid more complicated hemming. If raw or zigzag-stitched edges are not for you, feel free to add a hemmed edge instead. If you’re sewing by hand, a simple hem will save you time and aggravation. Also, depending on the canvas being used, you might find that the fabric shrinks slightly when it’s (inevitably) washed. In case your fabric is the shrinking kind, we’ve created a tissue box cover with a little extra room on the bottom edge of the box (page 135).
CONCEAL & HOLD 106
PROJECT
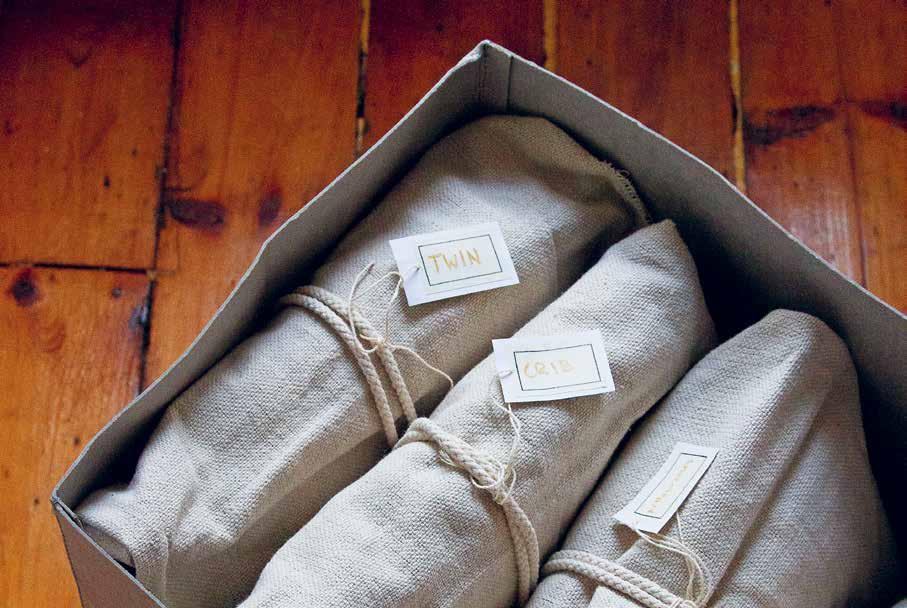

CONCEAL & HOLD 107
fold-over pouches
Smaller than a satchel and with a useful fold-over closure that tucks in on itself, these little pouches are our answer to toting all sorts of things from snacks to craft and art supplies. Modeled on the fold-over plastic baggies of the sort common before Ziploc came around, we like to think of these as little cloth pockets you can put anywhere. For on-the-go snacks, we fill them with dried mango, nuts, and crackers. (And when pouches get dirty, we just toss them in the wash.) For diversions for young diners at restaurants, we tuck in tiny notebooks and crayons. For easy access, we stash lip balm, Band-Aids, and hair elastics that might otherwise get lost in the abyss of a tote bag. A long and narrow fold-over pouch is the perfect place to carry a set of cutlery or stainless steel straws for waste-free lunches. At home, we’ve made pouches sized to fit pickup sticks and paintbrushes.
SUPPLIES AND TOOLS
+ Canvas drop cloth or other medium-weight fabric, 15 by 6 inches / 35.5 by 15 cm (For a finished 6 by 6-inch / 15 by 15 cm pouch)
+ Sewing machine and thread
+ Scissors
+ Ruler + Pins
1. Fold over and stitch the two short sides of the canvas to make two ¼-inch / 6 mm simple hems. You can skip this step if you’d like, but the canvas will continue to fray when used.
2. Fold one hemmed edge down 2 inches / 5 cm and make a crease on that fold.
3. Bring the opposite hemmed edge up all the way up to meet the folded edge.
4. Using a zigzag stitch, sew down the raw edges of the pouch, leaving a ½-inch / 1.3 cm seam allowance. Enforce the stitching where the flap lays underneath by sewing forward and back a few times over the 2-inch / 5 cm overlap.
5. Trim any extra fabric along the sides and reverse the pouch, pushing out the corners. The small flap will now sit on the outside of the pouch and can be folded over for storing purposes.

TIPS:
In what feels like a real superhero move, these little pouches can be made to stand upright with a simple fold of the bottom. Use your thumbs to push in the two bottom corners and form a temporary flat base. Stiff canvas fabric will hold its shape beautifully, allowing these little bags to be propped and filled and used upright. To return the pouch to a flat pocket, just flatten out the corners again.
A fold-over pouch uses very similar construction to a simple Envelope Pillow Cover. After you master these little pouches, head to page 214 to discover you’re ready to cover pillows!
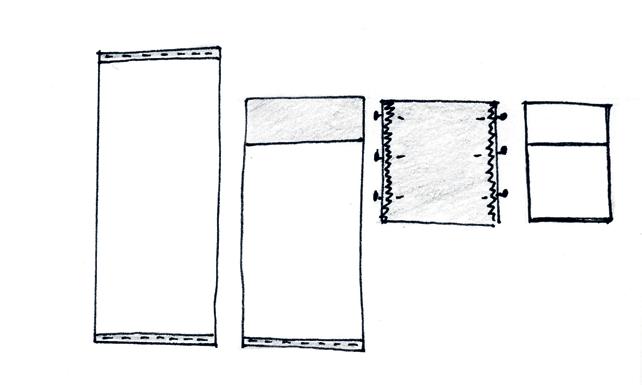
CONCEAL & HOLD 108 PROJECT
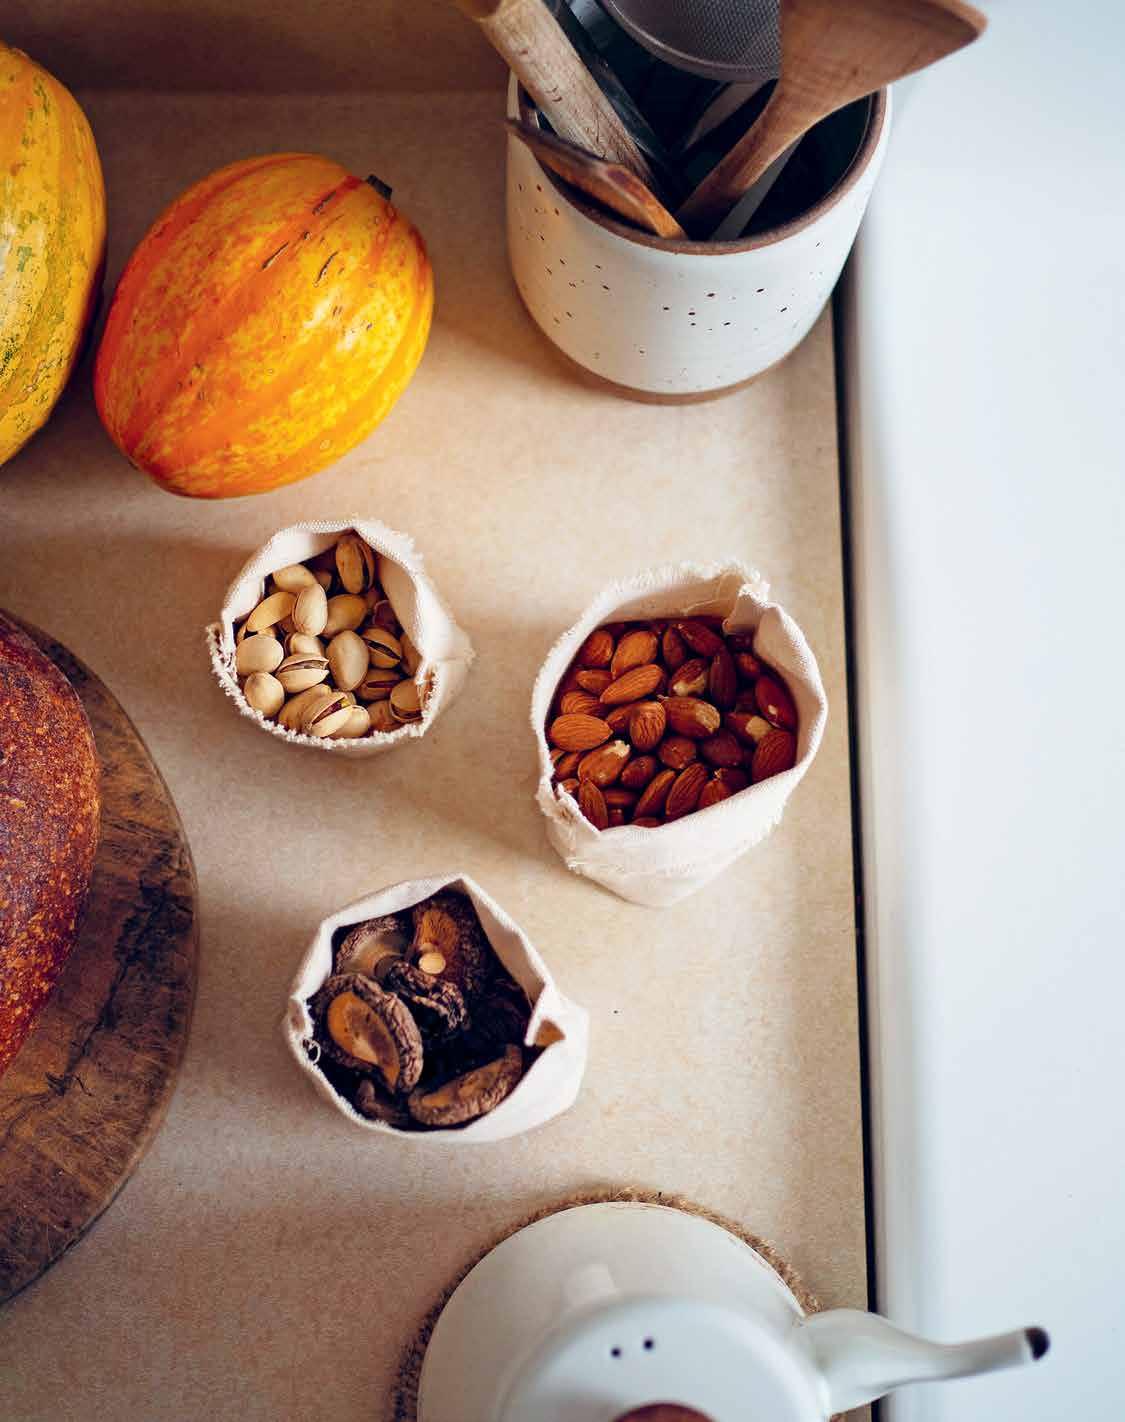


CONCEAL & HOLD 111
kit case
It’s a sewing kit, a first-aid kit, an emergency crafting kit! This sweet fabric kit case has pockets on two sides and ties up with a piece of twill tape.
SUPPLIES AND TOOLS
+ Canvas drop cloth or other medium-weight fabric, 12 by 15.5 inches / 30.5 by 39 cm (for a finished 5.5 by 4-inch / 14 by 10 cm case when closed)
+ Twill tape, 18 inches / 46 cm long
+ Sewing machine and thread
+ Scissors
+ Ruler
+ Sewing pins


1. Place your fabric on a table so the 15.5-inch / 39 cm side is oriented horizontally in front of you. Fold one short end over ½ inch / 1.3 cm and sew to make a quick hemmed edge.
2. Fold your fabric in half from bottom to top to make a long, narrow rectangle, 6 by 15 inches / 15 by 38 cm. Pin in place.
3. Sew along one short end and the long top edge of the folded rectangle, leaving a ½-inch / 1.3 cm seam allowance. Leave the other short end open.
4. Trim any extra thread around the edges and turn the rectangle inside out. Poke out the fabric corners.
5. Fold each short end in toward the center 3.5 inches / 9 cm. Secure these flaps to the top and bottom edge of the case using a straight stitch.
6. Double over your twill tape and sew the center edge of the tape to one side of your case. If desired, fold the very ends of the twill tape and sew a simple hem to prevent them from fraying.
CONCEAL & HOLD 112 PROJECT
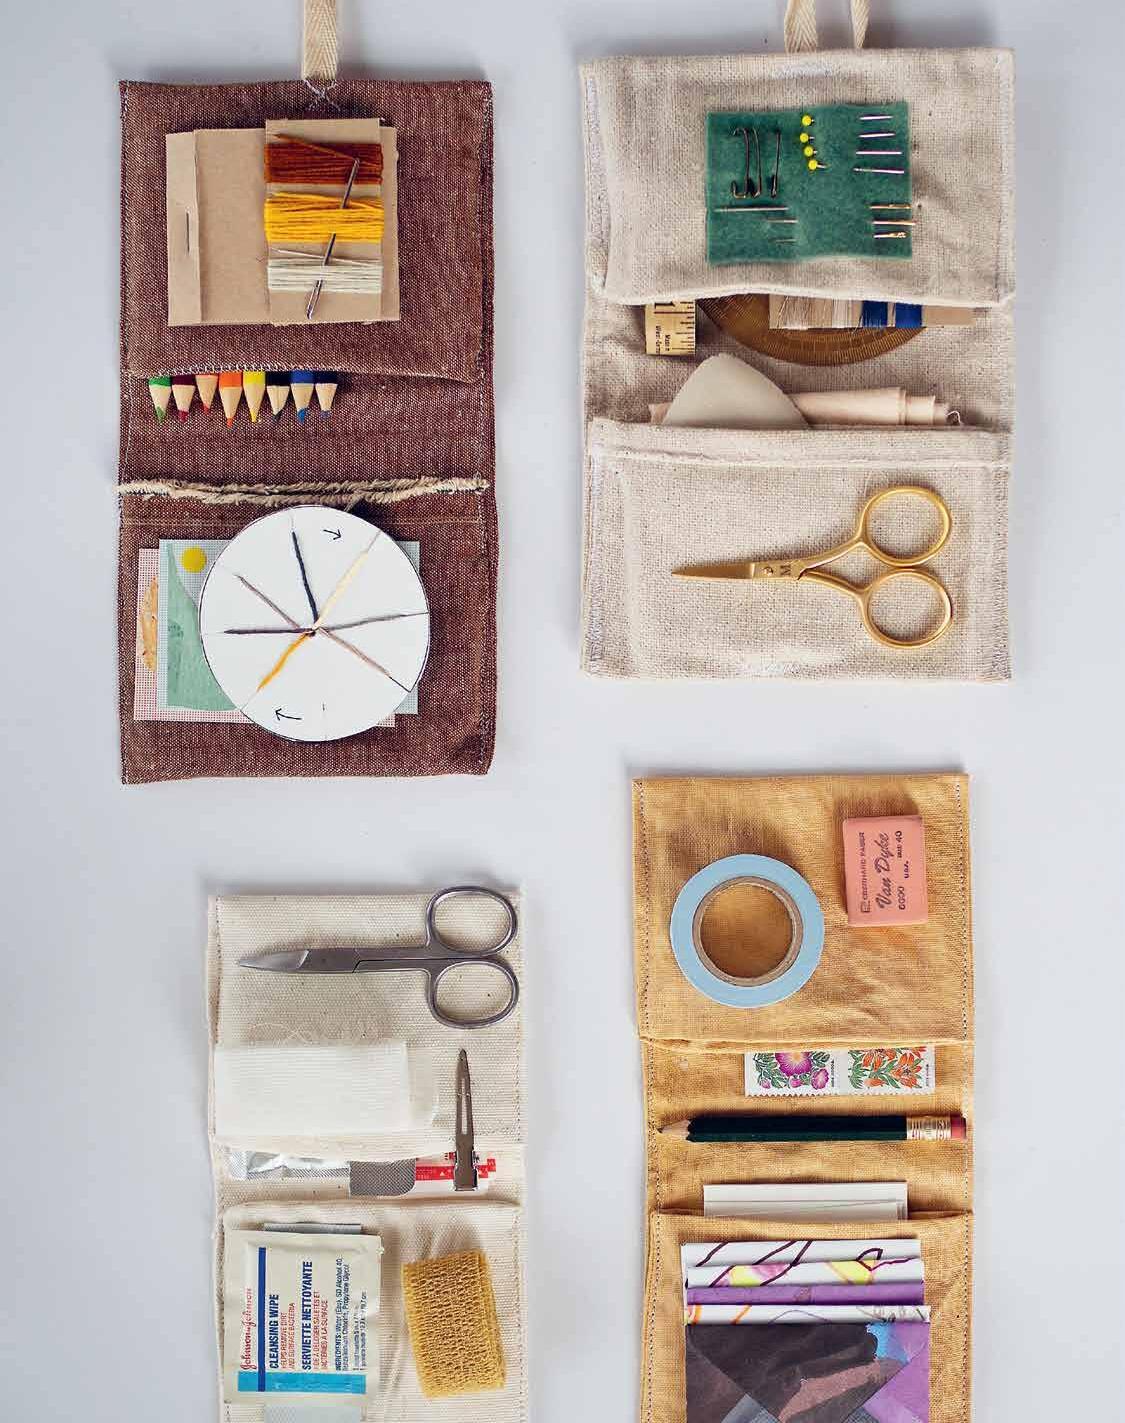

PROJECT
apron tool roll
It’s a spot for safekeeping tools when you’re not using them and a way to wear them when you need them close at hand. Sewn from hardware store drop cloth, we keep these tool rolls in heavy rotation on project days. They’re perfect for keeping track of phone, scissors, pencil, and measuring tape, and when a break is in order, they’re easy to roll up and keep everything gathered in one place.
While the tutorial for this apron comes with specific dimensions, you are welcome to adjust them to create a more personalized fit. We have made many of these aprons and honestly spend little time pulling out the measuring tape. Don’t let the sewing diagram deter you; the project is as simple as folding a rectangular piece of fabric, creating seams for pockets, hemming the edges, and inserting a cord. Even with wonky edges and uneven seams, it will still be hard-wearing and great-looking.
SUPPLIES AND TOOLS
+ Canvas drop cloth or other medium-weight fabric, 25 by 28 inches / 63.5 by 71 cm
+ Cotton clothesline (90 inches / 229 cm)
+ Sewing machine and thread
+ Ruler
+ Fabric marker or chalk
+ Scissors
+ Sewing pins
1. Measure and cut a 28 by 25-inch / 71 by 63.5 cm rectangle from your canvas drop cloth. If the drop cloth comes with a prehemmed or selvage edge, you can use it for the bottom 25-inch / 63.5 cm edge.
2. Fold the 25-inch / 63.5 cm hemmed bottom edge up 8 inches / 20 cm and pin in place. (If there is no hem, fold the raw edge inward ½ inch / 6 mm and pin in place.)
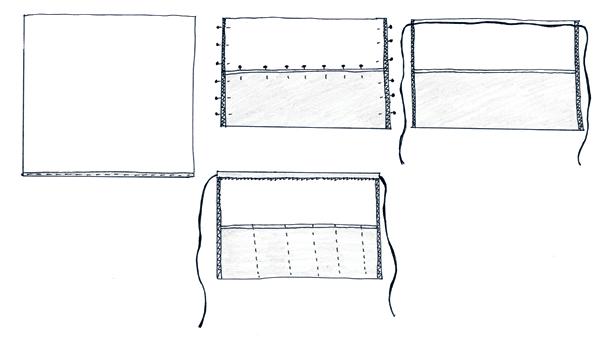
3. Fold both 20-inch sides of the rectangle in ½ inch / 1.3 cm, making sure to include both layers of canvas where the sides overlap. Pin in place and sew with a zigzag stitch to make two hemmed edges.
4. Center the rope along the top long edge of the rectangle. Fold the raw edge of the fabric over the rope. Pin in place and sew with a zigzag stitch.
5. With a ruler and a fabric marker or chalk, mark off vertical lines for the pockets. You can take into account the different supplies you use to determine the size.
6. Sew along the marked lines using a straight stitch. Make sure to secure with a backstitch at the beginning and the end.
9. Cut all loose threads.
TIP:
This project can easily be customized to suit your particular needs. A good rule of thumb is to start with a rectangle that’s slightly longer than it is wide and to fold your bottom pocket approximately ⅓ of the way up to create a pocket deep enough for your needs. For kids’ aprons, we often start with a 20 by 16-inch / 50 by 40 cm rectangle and go from there!

CONCEAL & HOLD 115
pencil case
Here we’ve riffed on the Apron Tool Roll to make simple pencil rolls for the kids’ colored pencil collections. Colored pencils are in heavy rotation in both of our households, and we love that the kids can see the full array of colors displayed before them when the roll is open, but also that the collection can be rolled up and tucked neatly away when not in use. We omitted the top flap of the Apron Tool Roll to make a more compact pencil case when opened and used on a crowded drawing table. If you want to make sure that no pencils slip out in transit, you could certainly expand the height of the case and use the extra space above as a flap to fold over the tops of the pencils before rolling.
As written, this pencil case holds roughly thirty-six colored pencils, but the beauty of making things yourself is being able to craft them to your own specifications. In our homes we’ve adjusted this roll to accommodate thick toddler pencils and thinner adult ones, using the pencils themselves as a guide for rough measurements. Here again, we haven’t been overly precious about measurements. Sometimes pockets fit several pencils and sometimes they fit just one. We haven’t found that matters a bit. Bottom line: feel free to adjust the size to accommodate different art supplies and quantities.
SUPPLIES AND TOOLS
+ Canvas drop cloth or other medium-weight fabric, 16 ½ by 11 inches / 42 by 28 cm
+ Twill tape
+ Sewing machine and thread
+ Ruler
+ Fabric marker or chalk
+ Scissors
+ Sewing pins
1. Fold over and stitch the two short sides of the canvas to make two ½ inch / 1.3 cm simple hems.
2. Fold up the bottom 3 inches / 7.6 cm along the long edge and pin in place.
3. Fold both sides of the rectangle in ½ inch / 1.3 cm, making sure to include both layers of canvas where the sides overlap. Pin in place and sew with a zigzag stitch to make two hemmed edges.
4. Sew pockets for the pencils, anywhere from ¾ inch / 2 cm to 1 ½ inches / 4 cm. The size can vary given how thick your pencils are and how many you might place in a pocket. The one pictured has seventeen pockets of various sizes. No need to get too precise!
5. Double over your twill tape and sew the center edge of the tape to one side of your case. If desired, fold the very ends of the twill tape and sew a simple hem to prevent them from fraying.
bedside caddy
Supersize the Apron Tool Roll to create a bedside or couchside catchall. In Rose’s kids’ rooms, she’s made catchalls that run the length of their twin beds and stash everything from school supplies to grooming necessities to stuffies that need a cozy spot to hide. Sizing up is really just a matter of giving some thought to your general size requirements and how large you want your pockets to be. Replace the top ribbon or cord with a pocket big enough to accommodate a dowel ½ inch / 1.3 cm in diameter to give the catchall more structure and weight-bearing capacity.
CONCEAL & HOLD 116 VARIATION

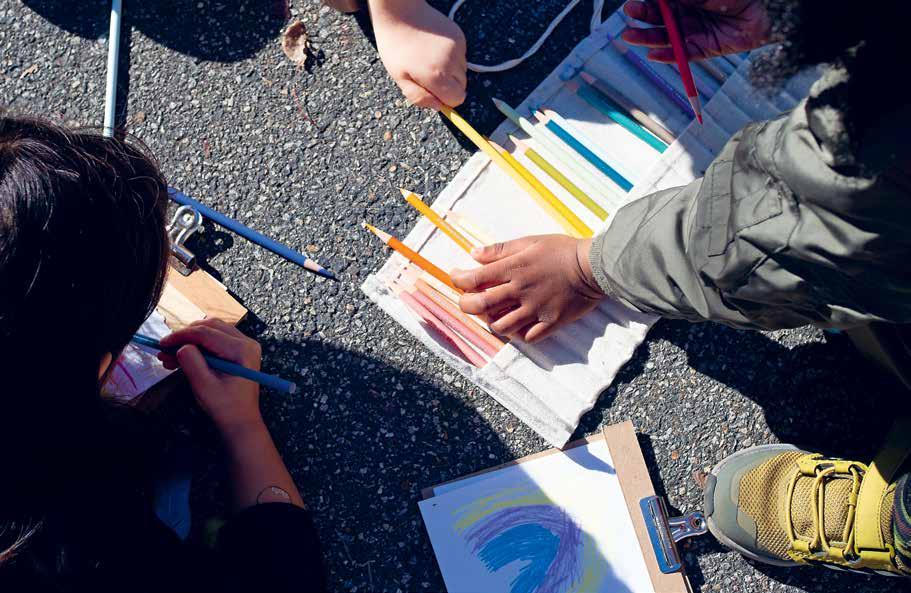
CONCEAL & HOLD 117
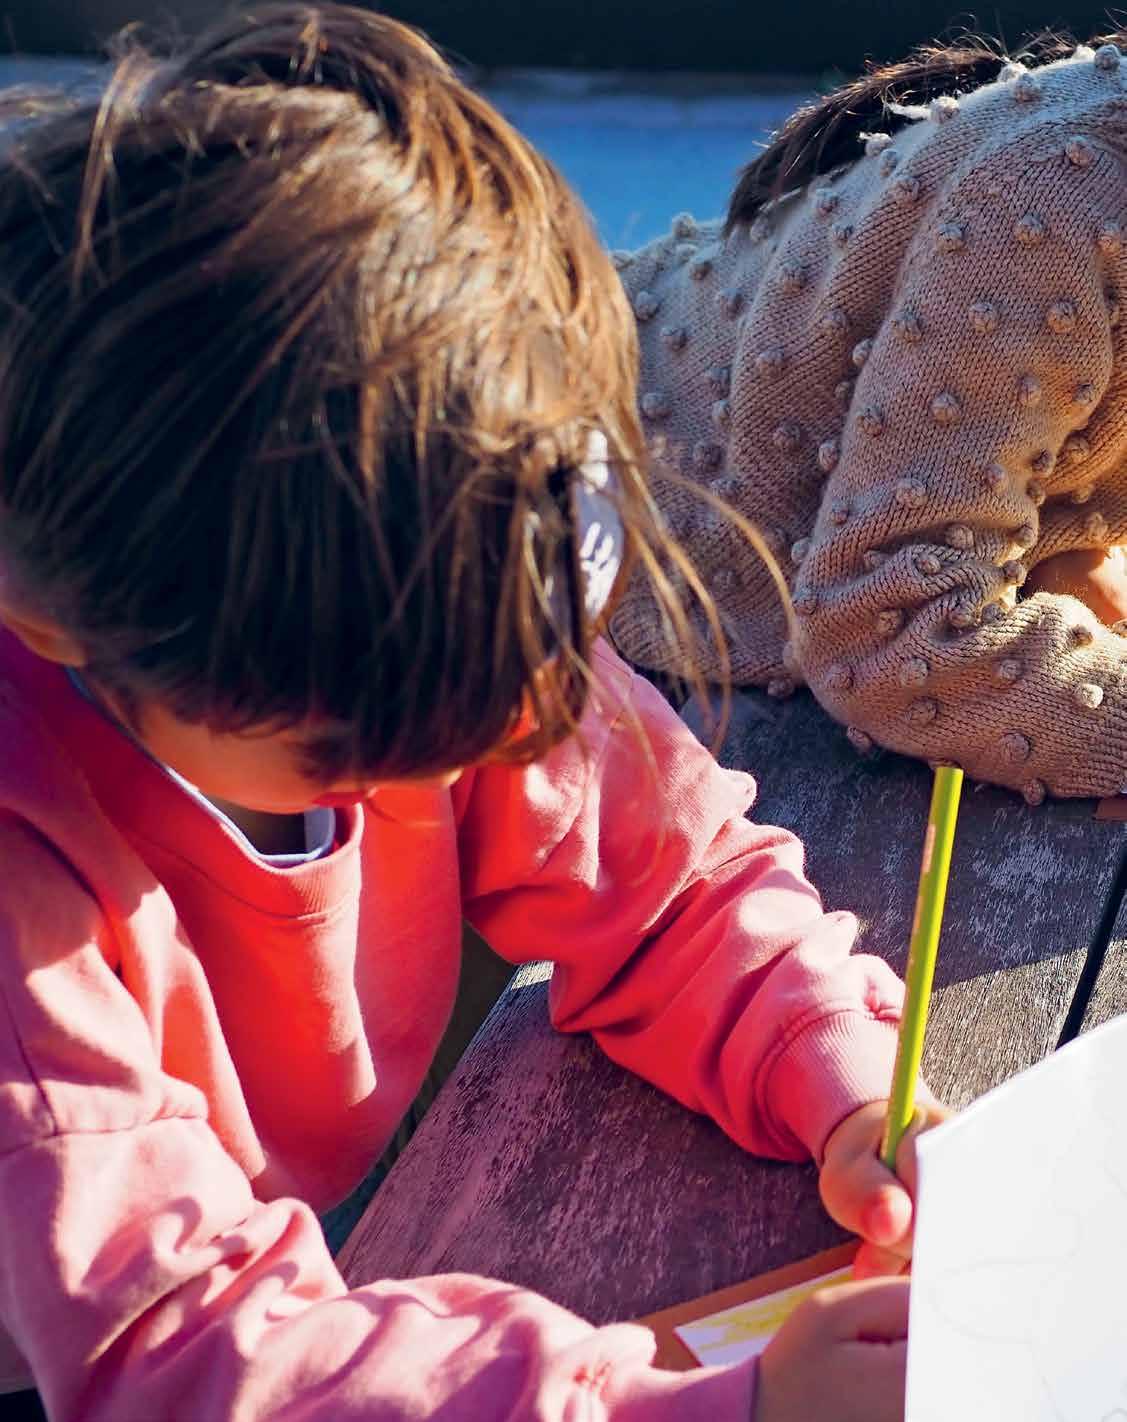

canvas wall caddy
In our attempts to keep a handle on the stuff of family life in small apartments, we do our best to subscribe to the old adage: a place for everything and everything in its place. This simple caddy helps us put that into practice. We use canvas caddies to organize office, craft, and homework supplies. In our nonexistent entryways, we use them to stash family papers and mail. Hanging in closets and from wall hooks and tied around the back of car headrests, we have them ready to wrangle whatever comes their way.
SUPPLIES AND TOOLS:
+ Cotton canvas or drop cloth (or other medium-weight fabric, 1 yard / .9 m)
+ Sewing machine and thread
+ Wooden dowel, ½-inch / 1.3 cm diameter, 12 inches / 30.5 cm long
+ Sewing pins
+ String
+ Tape measure or ruler
+ Scissors
1. Begin by measuring and cutting your fabric. You will need two canvas rectangles that are twice as long as they are wide and three squares that are the same width as the rectangle. As a starting point, we typically start with two 22 by 11-inch / 56 by 28 cm rectangles and three 11-inch / 28 cm canvas squares.

2. Fold the three squares in half. These will become the pockets. Pin the first folded square to the bottom of one of the larger rectangle pieces so that the folded edge runs horizontally across the width of the canvas rectangle and the open edge lines up with the bottom of the rectangle. Pin into place. Pin the second folded square 1 inch / 2.5 cm above the folded edge of the first square, and pin the third folded square 1 inch / 2.5 cm above the second square. You’ll have a few inches of extra space above the last pocket.
3. Using the zigzag stitch on your sewing machine, sew the open bottom of each pocket in place. The zigzag stitch should be tight and wide enough that it conceals the cut edge of the squares and securely attaches all three layers together. (The zigzag stitch on your sewing machine with the width set to ¼ inch / 5 mm and the stitch length at about 3 mm / 10 stitches per inch is typically great.) Check your work to make sure that the bottom edge is securely attached. If not, sew over any weak seams.
CONCEAL & HOLD 120 PROJECT
4. Place the second large rectangle piece of canvas directly over the top of the first, concealing the pockets inside. Pin in place.
5. Zigzag stitch along the two long sides and the bottom edge of the rectangle, but leave the top edge open. Leave a ½-inch / 1.3 cm seam allowance, and be sure you go through all the layers of the canvas. (This means that in some areas, you are sewing both the pockets and the front and back rectangles together.) Use care when sewing over bulky areas.
6. If needed, trim any extra fabric along the sewn border and reverse your work through the open edge of your rectangle so the pockets face out. Poke out the two bottom corners and flatten the piece with your hands.
7. Sew a center line straight through all three of the pockets using a straight stitch. Make sure to backstitch at the top and bottom of every pocket. This will turn the one long pocket into two smaller pockets. You will be sewing through all four layers of fabric.
8. Fold down the top edge of the rectangle to the back 1½ inches / 4 cm and zigzag stitch the raw edges of the fabric in place. This will create a small pocket for the dowel to go through. Be sure the zigzag stitch is secure. If needed, sew over the stitches a second time. Cut a piece of string 14 inches / 35.5 cm long. Insert the dowel through the opening and tie the two ends of the string to either end of the dowel. See whipping knot on page 274.
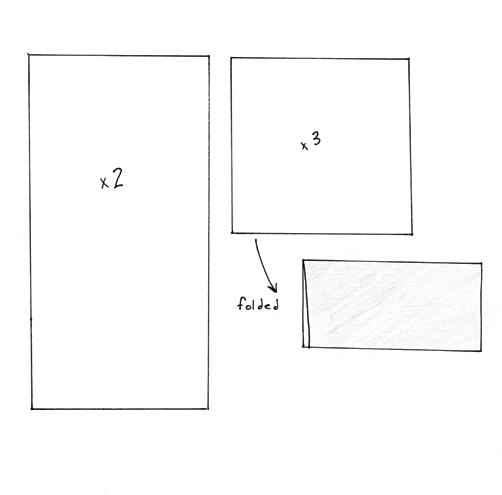

CONCEAL & HOLD 121
car caddy
We’ve made simple travel-ready caddies by replacing the dowel in the top of our wall caddies with cotton clothesline and tying the caddy to the back of our car seats. What’s better than a personalized place to stash snacks and road trip diversions? A big lower pocket is great for a coloring book or two, and with any luck a car caddy might just help the backseat from becoming a disaster zone. (No promises.)

CONCEAL & HOLD 122

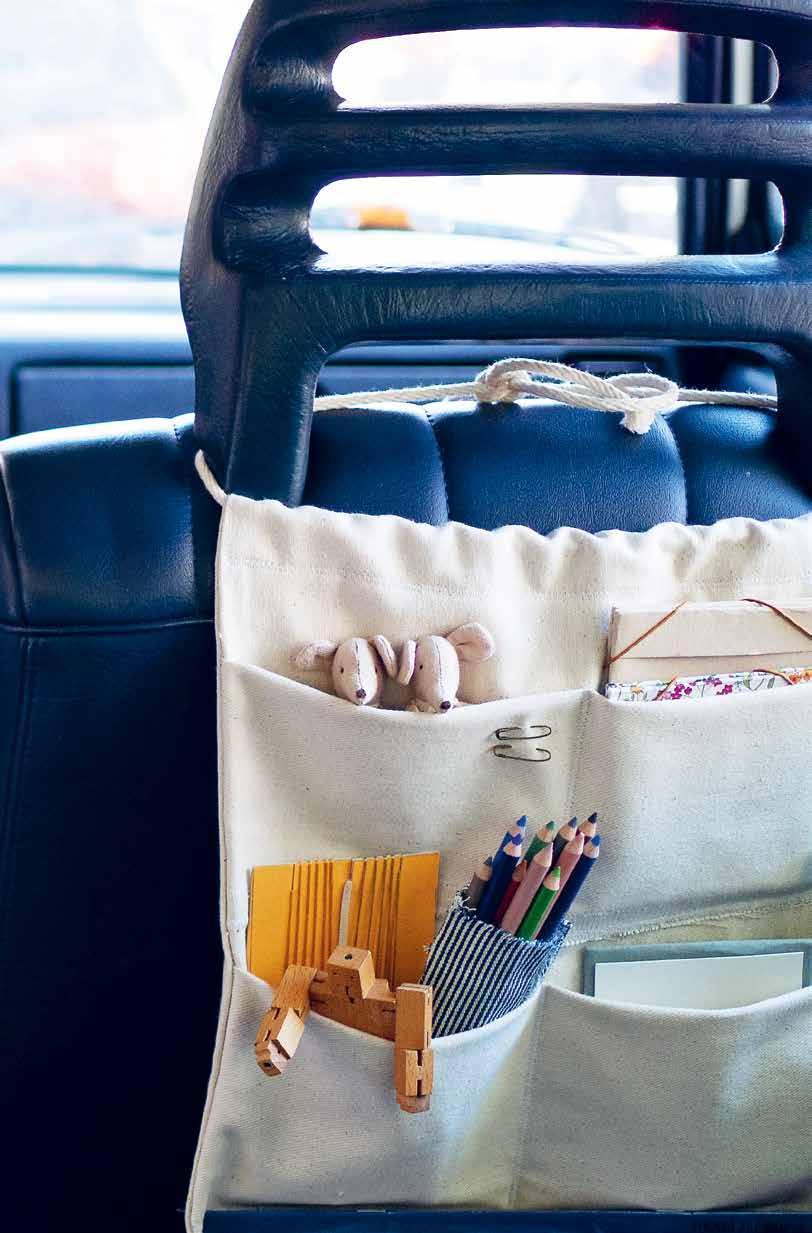
CONCEAL & HOLD 123
tote bag
Turn a wall caddy into a mobile studio by opening up the top and adding sturdy handles. For the handles seen here, we corded up a few quick handles using the two-finger/two-loop finger corded method (page 40).
SUPPLIES AND TOOLS
+ Cotton canvas (1 yard / .9 m)
+ Cotton clothesline (3 yards / 2.7 m)
+ Sewing machine and thread
+ Scissors
+ Sewing pins
+ Ruler
To make a slightly smaller canvas caddy turned multipocket tote bag, cut two rectangles 18 inches by 13 inches / 46 cm by 33 cm of canvas for the front and back of the bag and two smaller rectangles for the pockets, 12 inches by 13 inches / 30.5 cm by 33 cm. Follow the tutorial for the Canvas Wall Caddy (page 120), sewing vertical stitches to make the pockets (before attaching the back to the front) in whatever size suits your needs. Next, sew the back canvas to the front (with pockets facing inside), trim your inseam to ½ inch / 1.3 cm, reverse your work, and sew a ½-inch / 1.3 cm hem all the way around the top. Cord two identical rope handles (using the two-finger/ two-loop method on page 40) so that you have 9 inches / 23 cm of rope on either end with 9 inches / 23 cm of cording between. Attach the handles by zigzag sewing 3 inches / 7.6 cm of each end to one side of the bag and repeat for the opposite side.
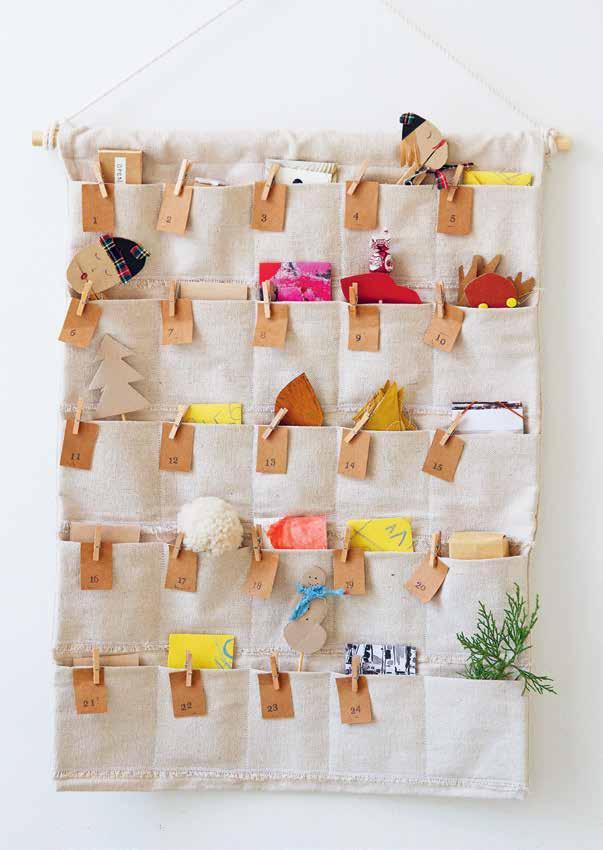
advent calendar
Scale up the Canvas Wall Caddy a bit and add a few more rows of smaller pockets to make a twenty-five pocketed caddy that’s perfect as an advent calendar and can moonlight as a catchall for all kinds of tiny treasures.

TO MAKE: Start with two rectangles measuring 18 by 24 inches / 46 by 61 cm and five rectangles measuring 18 by 7 inches / 46 by 18 cm. Follow the instructions to the Canvas Wall Caddy to make five rows of five 3-inch pockets each. Fill with tiny versions of the Cardboard Toys and Games (page 242)...and chocolate.
CONCEAL & HOLD 124 VARIATION
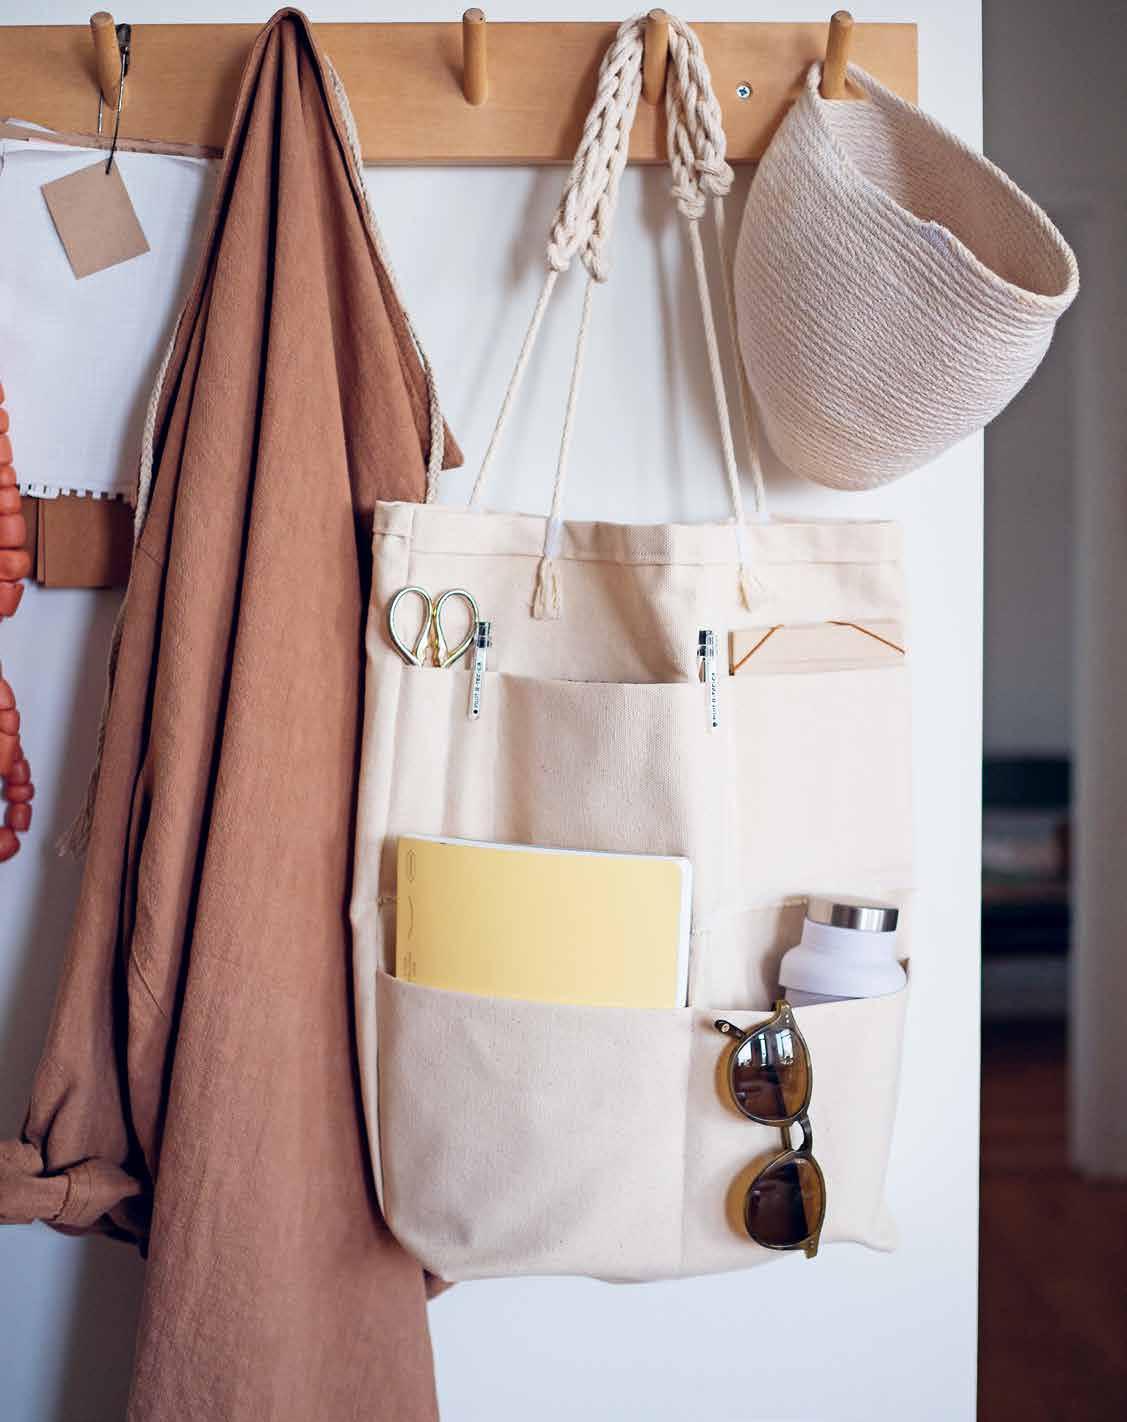
papier-mâché
fruit bank
Lemons into lemonade, anyone? Papier-mâché banks can be a gift to give or a project to pass the time. For little kids, let these lemon-shaped banks inspire simple lessons in savings and generosity: a lemon for saving, a lemon for spending, a lemon for offering somebody else. For anyone emptying their pocket change at night, there’s somewhere for it to go. Rose describes it as a kind of fruit-shaped pushke box of the sort Jewish families might keep for collecting small charitable donations. When the bank is filled, crack it open and watch the change spill out. (Or carry a sack of your “lemons” directly to a coin-sorting machine to make quick work of the counting.)
Small water balloons are used here to make a sweet lemon shape. Larger banks, like the big green pear on page 246, can be made following the same basic method and a larger balloon. In the case of a pear, a rubber band can be fitted around the balloon to help create the desired shape.
SUPPLIES AND TOOLS
+ Newspaper/newsprint
+ 1 cup / 120 grams flour
+ Small water balloons
+ Acrylic or tempera paint
+ Scissors
+ Paintbrush
+ Sharp blade/knife
+ Small saucepan or bowl
+ Small cups
YIELD: 6–8 LEMON-SIZE BANKS
1. Prepare your paste by thoroughly mixing the flour with 2 cups / 16 fl. oz. of water. Place in a saucepan and heat on a stove top until the mixture simmers and thickens. (You can safely use your cooking pots for this!) Alternatively, you can microwave for 30 seconds. Stir your mixture to remove any clumps and let cool.
2. Tear your newsprint into 1-inch / 2.5 cm strips of varying lengths.
3. Blow up the water balloons partway (too large and the lemons will look oversized) and tie a knot at the end.
4. (Optional) To exaggerate the tip of a balloon to resemble a lemon’s pointed end, add crumbled pieces of newsprint and cover with tape.
5. Saturate the newspaper strips in the flour paste.
6. Run two fingers down each wet strip to remove extra paste and begin to wrap the strips around the balloon. When working, it helps to have each balloon sit in a small cup so you can work using both hands.
7. Cover the entire surface of the balloon with the paste-covered newsprint. Rotate the balloon so all sides are covered and overlap newspaper strips, alternating between horizontal and vertical pieces. The more layers, the stronger your bank will be, and there’s no need to dry between layers.
8. Repeat for the remaining balloons.
9. Let the balloons dry completely in a sunny window for approximately 12–24 hours.
10. Paint the entire form yellow and allow to dry for approximately 12–24 hours.
11. Use an X-Acto knife to cut a small slit the size of a coin into the side of the bank, and fill!
CONCEAL & HOLD 126 PROJECT
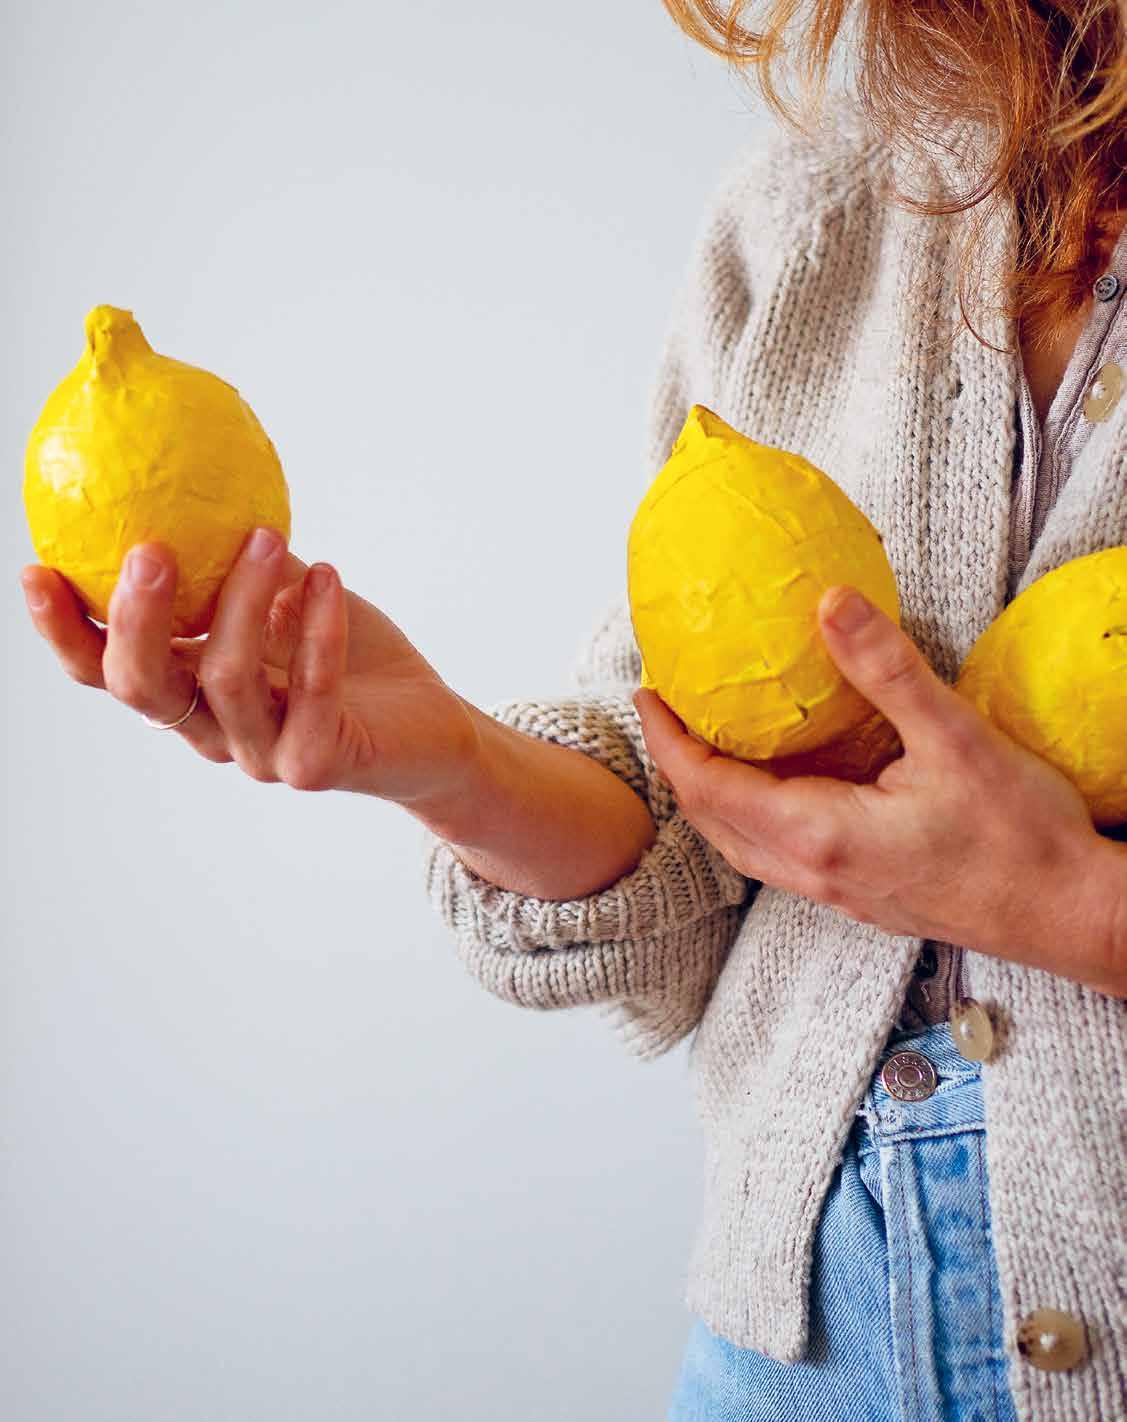

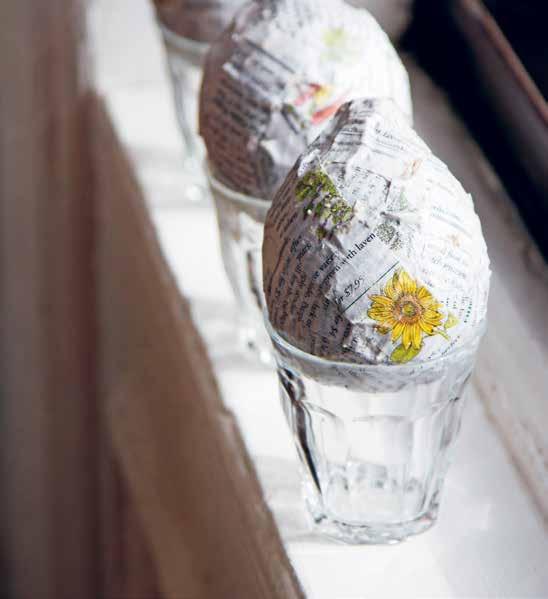
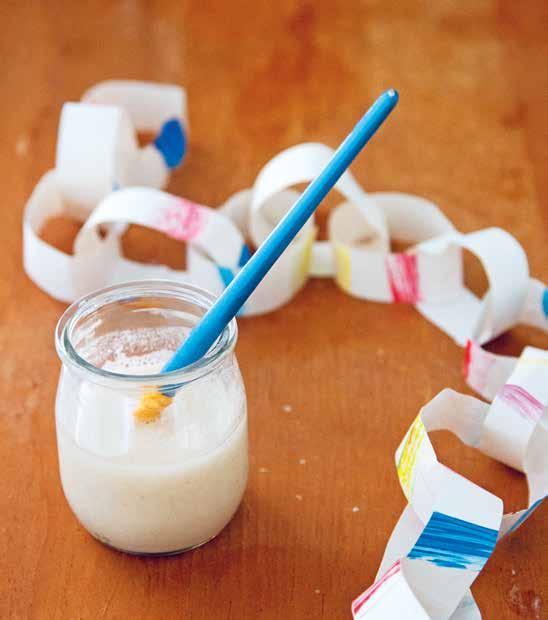
paste
You can make your own glue for general use by whipping up a small batch of papier-mâché paste. We do this so regularly we don’t even measure anymore. A spoonful of flour (rice flour is nice and soft and well suited to the task!) and an equal amount of warm water, stirred into a little glass jar and applied with a paintbrush, works perfectly and can be used as paste on paper in tons of applications.
CONCEAL & HOLD 129
starching fabric
This isn’t exactly alchemy, but it feels that way. As a fiber artist, Rose wanted to find a way to fold fabric the way she was folding paper. Turns out the answer is in a simple cornstarch paste. What feels magical is actually fairly straightforward—starching fabric to such a degree that it turns, for all intents and purposes, into paper. These stiffened sheets of fabric can be creased and folded and shaped into boxes (see Masu Box on page 143), or anything else your imagination might send you. A common technique for quilters, heavily starched fabric is exceedingly easy to cut and won’t fray. We use this technique for all kinds of projects that might otherwise employ a heavyweight paper.
CONCEAL & HOLD 130 TECHNIQUE
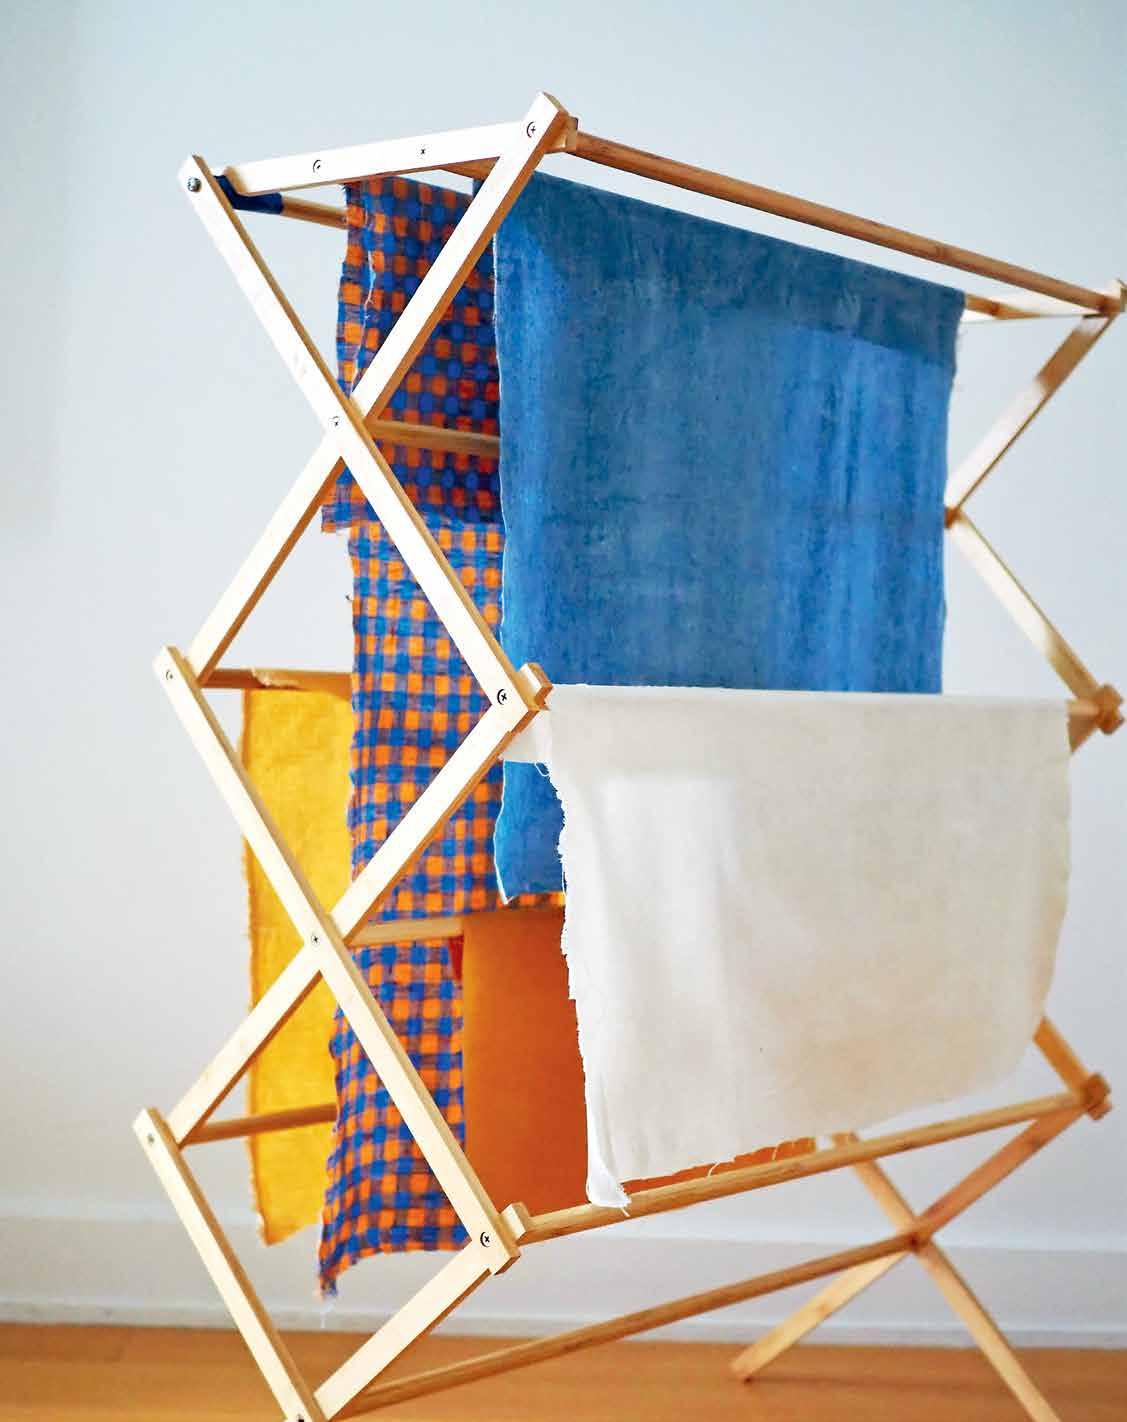
SUPPLIES AND TOOLS
+ Fabric (lightweight to medium-weight material and natural fibers like cotton or linen work best)
+ 1 tablespoon cornstarch
+ ½ cup / 4 fl. oz. water
+ Small saucepan
+ Small mixing bowl or jar
+ Spoon or small whisk
+ Small chip brush or pastry brush
1. Mix 1 tablespoon of cornstarch with ¼ cup / 2 fl. oz. of cold water.
2. Boil another ¼ cup / 2 fl. oz. of water in a small saucepan.
3. When the water boils, pour the cornstarch water into the boiling water, lower the heat, and stir.
4. The mixture should thicken up quickly, turning into a viscous paste.
5. Spread the paste (with a brush or cool mixture and slather with hands) onto both sides of the fabric.
6. Hang the fabric to dry.
7. The fabric can take anywhere from a few hours to overnight to stiffen up and achieve a paperlike texture.
8. Once dry, press with a hot iron (without steam). This will help to flatten and remove any wrinkles in the fabric.


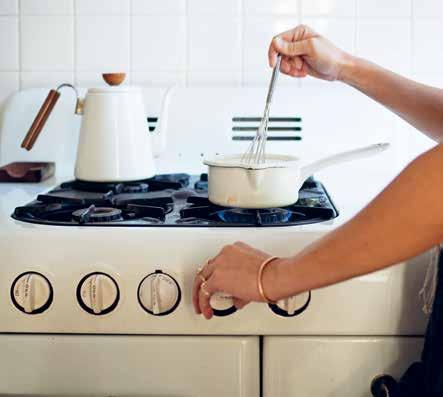
CONCEAL & HOLD 132


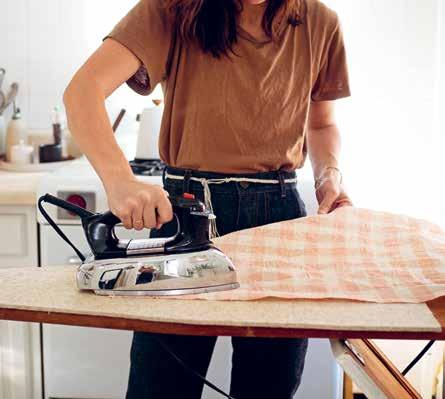


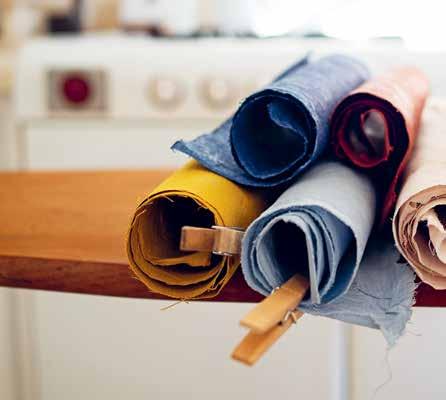
CONCEAL & HOLD 133
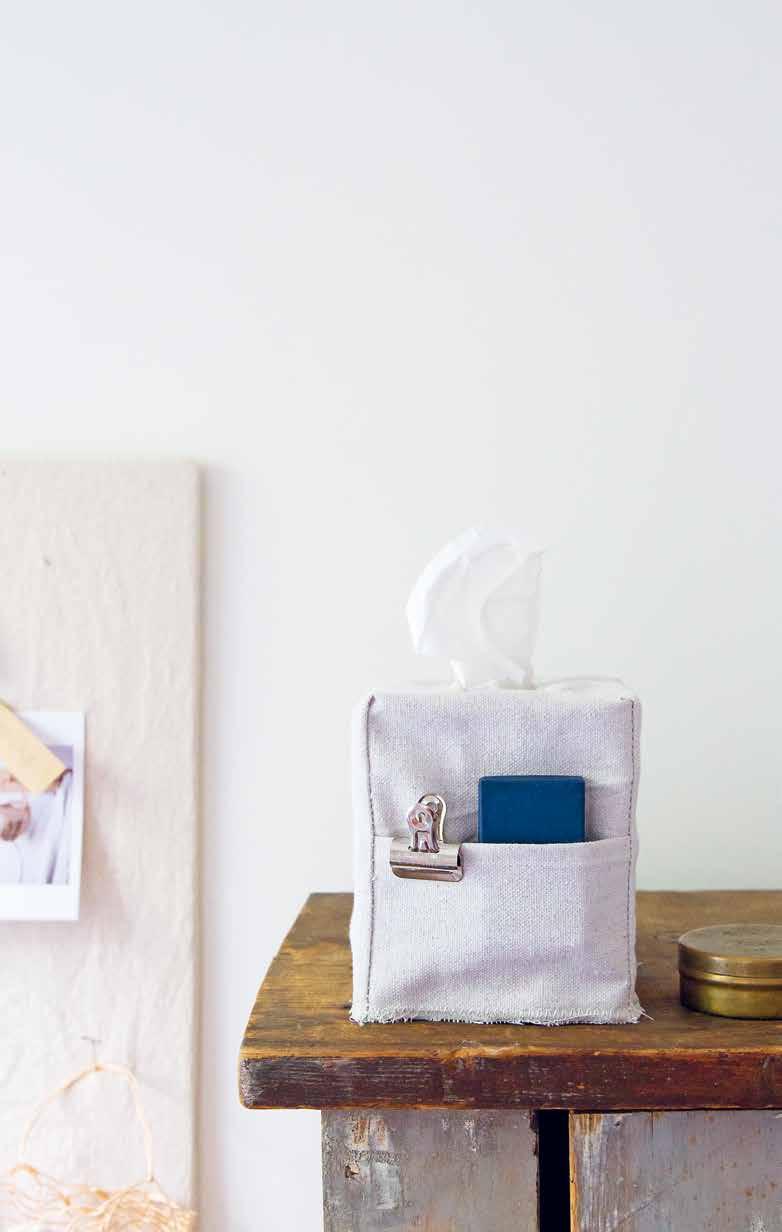

CONCEAL & HOLD 134

canvas tissue box with pockets
This is a tutorial for covering up your average drugstore tissue box. The box itself serves as the pattern maker, so as long as you’ve got one to cover, trace it and you’re guaranteed a proper fit. We like the cube-like boxes best for their tall sides that leave ample room for pockets. The pockets are made from remnant fabric from cutting the pattern, so the scraps don’t go to waste, and they make a perfect place to stash lip balm, a pencil and notebook for scribbling, or whatever it is you’d like to have handy.
CONCEAL & HOLD 135
PROJECT
SUPPLIES AND TOOLS
+ Square tissue box (to cover and use as a template)
+ Fabric pen
+ Canvas or medium-weight fabric (17-inch / 43 cm square or larger)
+ Sewing machine (or needle) and thread
+ Sewing pins
+ Scissors
1. Lay one rectangular side of your tissue box ½ inch / 1.3 cm from the bottom edge of your fabric and center it in the middle. Trace around all sides lightly with a fabric pen.
2. Without moving the position of the box, carefully flip the box onto its top (where the opening is) and trace around the square so it is lined up and connected to the first rectangle.
3. Flip the box again so it lays on a rectangular side directly above the center square. Trace around that rectangle.
4. Line up the top of your box on the center square again, then lay it to the right side. Trace around the rectangle.
5. Repeat for the left and fourth side. You should now have one square in the middle connecting the four side rectangles. The shape will look like a plus sign or Swiss cross.
6. In the middle of the center square, draw an oval-shaped opening—roughly 3 inches / 7.6 cm wide and 2 inches / 5 cm deep—for dispensing tissues.
7. Using a ruler and a fabric pen, mark a ½ inch / 1.3 cm seam allowance around the original tracing. With scissors, cut out the + shaped box template, including the ½-inch / 1.3 cm seam allowance you just added.
8. Using the zigzag stitch on your sewing machine, sew around the traced oval perimeter on the top of your box. Go over the same stitches a second time.
9. From the remnant fabric that you cut away from your + shape, cut two 5-inch / 13 cm squares.
10. Fold over and stitch one side of each square to make a ½-inch / 1.3 cm simple hem.
11. Place the hemmed squares on the rectangles on the left and right-hand sides of the cross, 2 inches / 5 cm below the top of the box shape. The raw edge will be concealed on the inside (right side facing out). If properly placed, the remnant squares will line up with both sides of the rectangles and have extra length along the bottom edge. Pin into place.
12. With the wrong sides facing out (pockets facing inside), pin together all four adjacent side edges of your cut rectangles to create corner seams, leaving a ¼-inch / 6 mm seam allowance. (You can do this by lining up each edge, carefully removing the pin from each pocket side and repinning it to catch all three layers.)
13. Using a zigzag stitch, sew together all four side seams, leaving a ¼-inch / 6 mm inseam. You can lay the fabric flat on your sewing machine as you sew each seam. Stitch from the top corner of the square edge and down to the bottom of each side base. Be sure to sew through all three layers of fabric (two side seams and pocket) and backstitch every time you start and stop sewing.
14. With sharp scissors, trim any excess pocket fabric along the bottom edges so they are all roughly the same length.
15. Using a zigzag stitch, sew around the bottom perimeter of your tissue box ¼ inch / 6 mm from the bottom edge, turning your work as you go and incorporating all four corner seams. Go over the same stitches a second time to create a secure edge.
16. Using sharp scissors, trim any remaining bottom fabric/threads on the base of your tissue box and inner side seams.
17. Carefully cut inside the stitched oval by folding the top square in half and making a small incision with scissors inside the oval. Then use the incision to slowly cut away the inside of your sewn oval right up to the zigzag stitches. The sewn seam will prevent your fabric from fraying outside of the oval.
18. Turn your work inside out and place the cover over the tissue box, pulling the first tissue out through the center oval.
CONCEAL & HOLD 136


TIP:

To easily mark the center of the square, and to help align the placement of the oval, fold the square fabric in half and press the seam with your hands to make a crease. Then, opening it up, fold it in half the opposite way, again creasing it with your hands. Open it up once more, and you should see faint lines where the two folds meet. This is your center point, and the center of where your oval will go. Don’t stress about making this perfect; any misshapen oval will be concealed by tissues!
CONCEAL & HOLD 137

starched fabric cube
Think tissue box cover, upside-down, and without a hole. These stackable, soft but structured boxes have become our go-tos for stashing things like extra mason jar lids in the kitchen cabinets, goody bag loot the recipient isn’t ready to part with just yet, hair doodads, extra toiletries, etc. We follow the same steps as for the tissue box, down to using a tissue box to make the pattern. We love replacing the canvas fabric with starched canvas to give the box more structure and, of course, we omit the oval-shaped opening. Flipped on its end, the top of the tissue box cover becomes the base of the storage cube. The side pockets edges can be hemmed or left raw. Once finished sewing, you can leave the top edge unhemmed, or you can fold down ¼ inch / 6 mm and sew around the perimeter to finish.
CONCEAL & HOLD 139
paper boxes
There’s utter delight to be found in taking something that is one-dimensional and in a matter of minutes—less than that—transforming it into three dimensions.
Two of our favorite boxes are made using simple Japanese origami folds. These boxes hold together without tape or glue, and they’re addicting to make once you memorize the folds. Luckily, they’re also endlessly useful. How many tiny boxes does one person need? How many bobby pins do you have? How many thumbtacks, acorns, feathers, hair elastics? Are your children magpies like ours? We’ve got folded paper boxes filled with ribbon scraps and spare buttons and carefully salvaged lengths of twine rescued from gift wrap piles and hang tags. Playing card boxes in our families, inevitably torn open by eager players, have been replaced with our magazine boxes folded from sturdier cardstock. A box folded from an old calendar page keeps cords tidy inside a kitchen drawer.
Since we began folding these boxes, we’ve started squirreling away starched fabric and special papers for the purpose—favorite old calendar pages, the matte page of a stunning foreign-language magazine, one of a hundred drawings made by the most prolific artists in the household. Once you learn to fold your own boxes, you’ll start seeing papery possibilities everywhere. Refer to Starching Fabric on page 130 or our paper pointers on page 21.
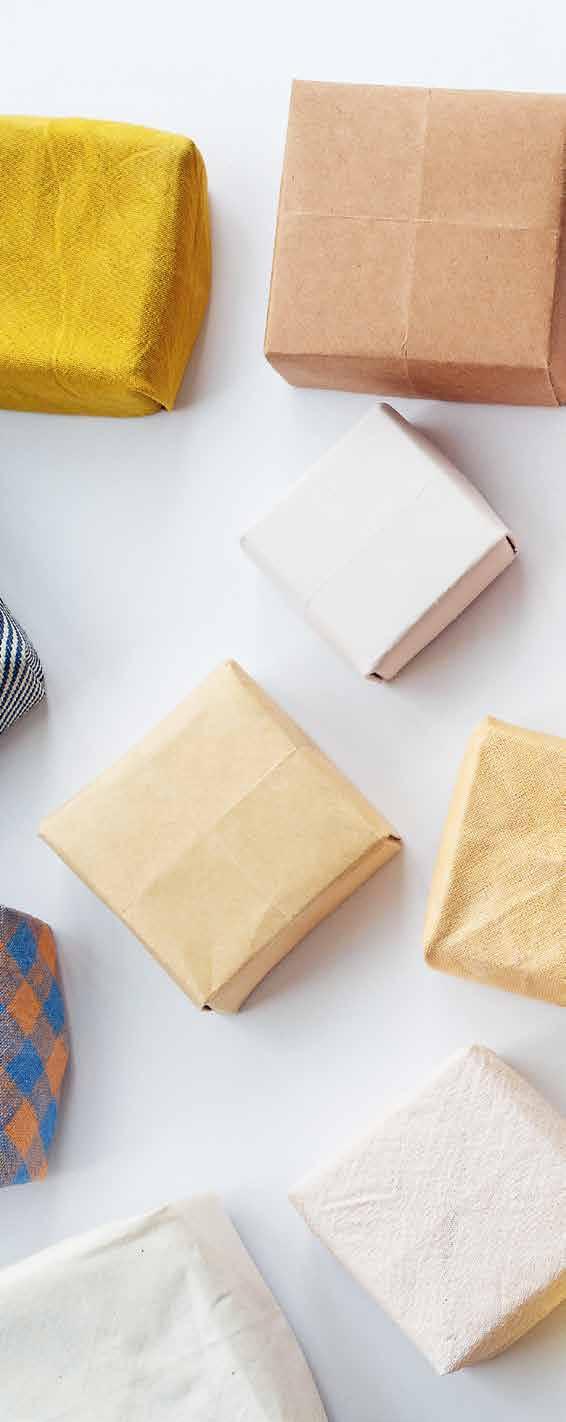
CONCEAL & HOLD 140 TECHNIQUE
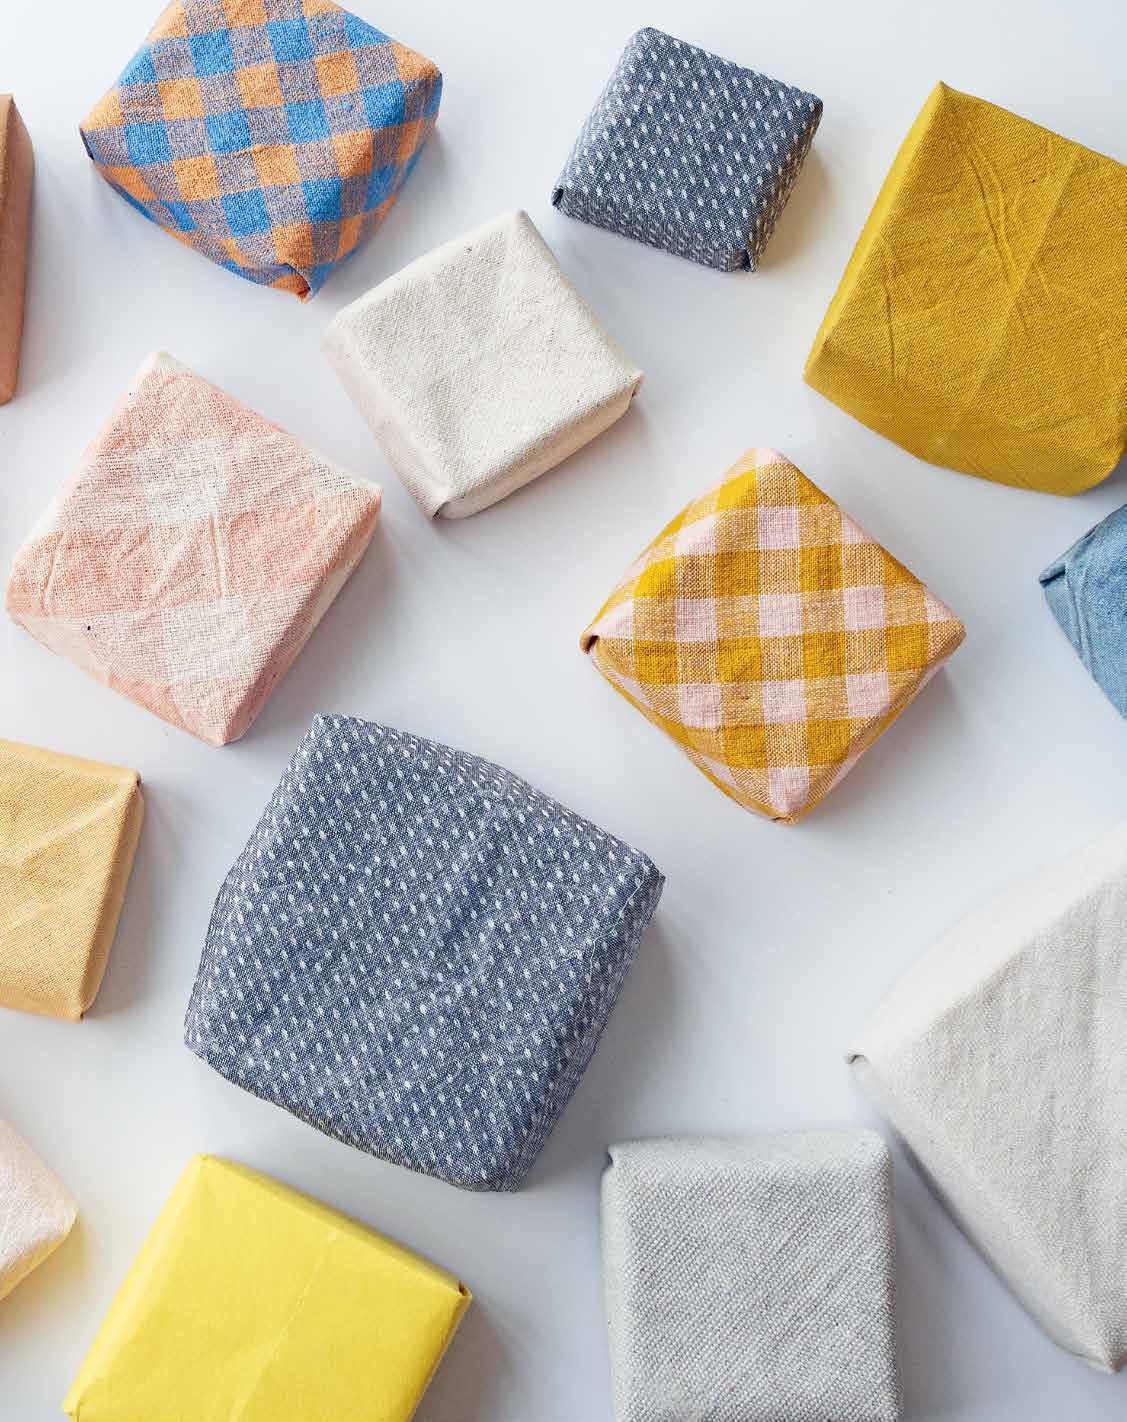
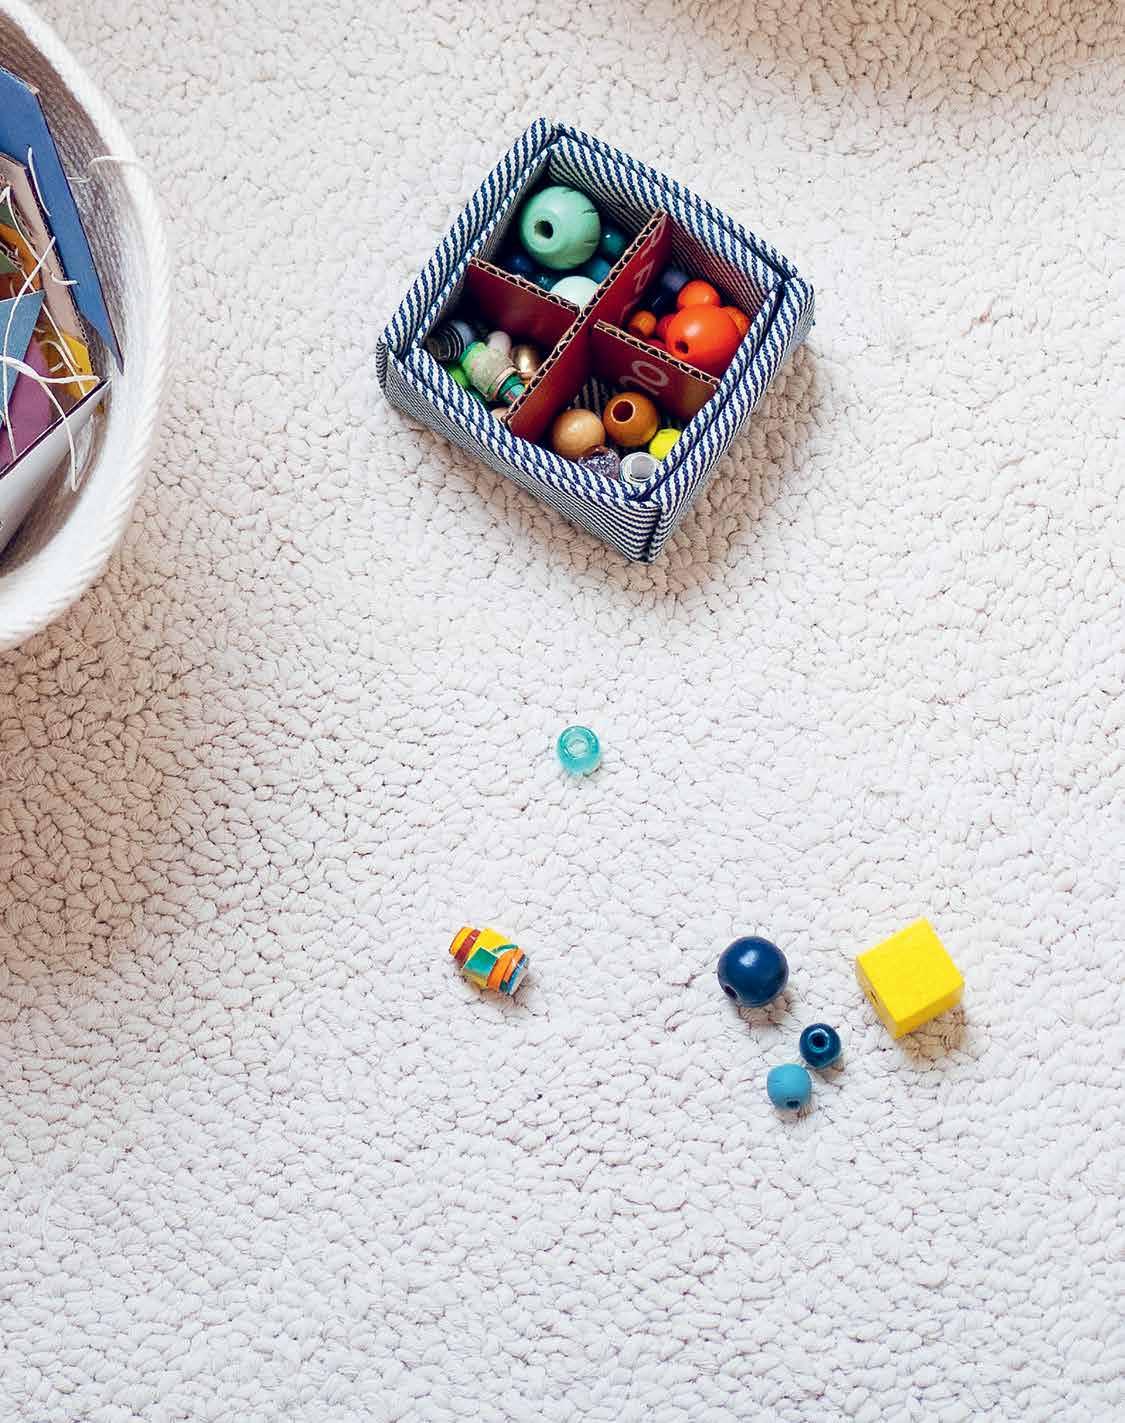
masu box
Masu boxes were originally small square wooden boxes used for measuring rice in Japan. In origami, the name applies to this classic square box with a fitted lid that can be filled up and used for just about anything.
SUPPLIES AND TOOLS
+ 2 sheets of kraft paper (or any light to mid-weight paper or starched fabric of your choice)
+ Scissors
to prep the paper squares
When making a masu box with a lid, you want the bottom of the box to be a little bit smaller than the top so that the two pieces can fit snugly together. To achieve this you’ll need two squares of paper, one slightly smaller than the other. Here’s how to make that happen:
1. Begin by holding one paper vertically in front of you.
2. Fold down one top corner to meet the opposite edge of the paper, forming a triangle. Crease.
3. Cut off the rectangle of paper below the triangle.
4. You will be left with a square sheet of paper with a diagonal crease (the first crease needed to make a masu box).
5. Now make a smaller square from another sheet of the same sized rectangular paper, folding down one top corner (same as above) but this time, stop ½ inch / 1.3 cm from the edge. Cut off the
excess rectangles on both sides of the triangle and you’ll be left with a square sheet of paper, ½ inch / 1.3 cm smaller than the first one.
to fold the box
1. To begin, fold one corner of the paper to meet the opposite corner and form a triangle. Crease the center fold.
2. Open the paper up again and fold in the opposite direction (so that the opposite corners meet). Crease well and open. You will now have a square with four triangles meeting in the center.
3. Starting with one corner of the square, fold the point to the center mark and crease. Repeat for the remaining three corners (you will have folded the paper to form a square).
4. Fold one flat edge of the square into the center line and crease. Repeat for the opposite side so that both straight edges meet in the middle to make a rectangle. (This is called a cupboard fold because it looks like two doors of a cupboard.)
5. Open the two sides up, turn the square 90 degrees, and repeat on the opposite two sides, folding both edges into the center. Open the last two sides up. You will find you have a square shape with creases for sixteen small boxes inside.
6. Open up two of the triangles on opposite sides from each other and leave the other two triangles folded in.
7. Fold the long edges on opposite sides into the center (the previously creased folds should make this easy). Your shape will now be a long rectangle with two
pointed triangles at each end.
8. Using the creases you already created with previous folds, fold up the triangle end by bending the two angled points in toward the center. Then fold the flap downward over the side and in toward the inside of the box. Crease there. Repeat for the opposite side. Fold the triangle flap in toward the center of the box by folding the side flaps in. Repeat these instructions with the larger piece of paper to create the lid of your masu box. Refer to the photographs on page 144 for guidance. Repeat these instructions to create the lid of your masu box.
box divider
If you’ve got reason to further organize the contents of your masu box—think sorting different colored beads or sewing notions, a simple box divider can be made by splicing together two pieces of corrugated cardboard. Cut two pieces of cardboard that are just a little shy of the length and depth dimensions of the bottom of your box. Use scissors to cut a narrow V-shaped notch in the center of each and interlock the cardboard by sliding the notches into one another and forming a plus sign. Place inside the box to create four separate compartments and fill as desired.

CONCEAL & HOLD 143
PROJECT
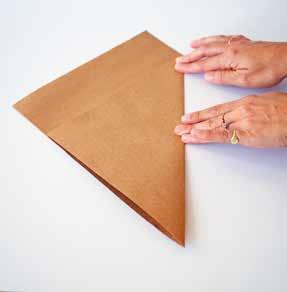

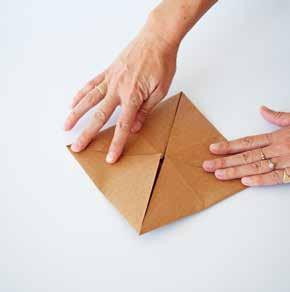


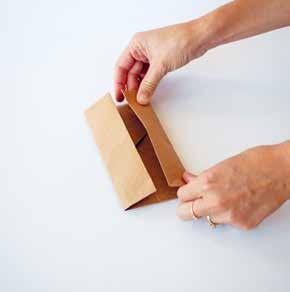


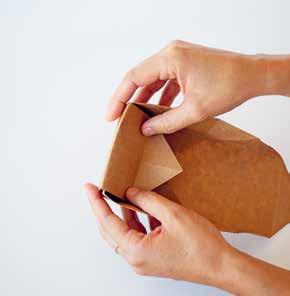
CONCEAL & HOLD 144
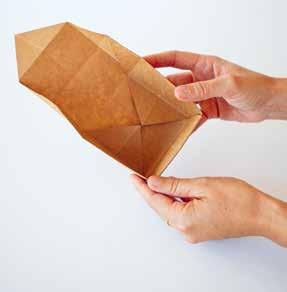
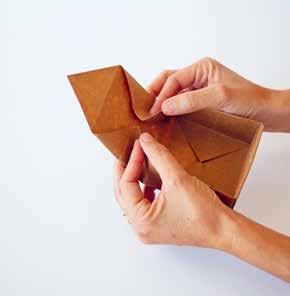
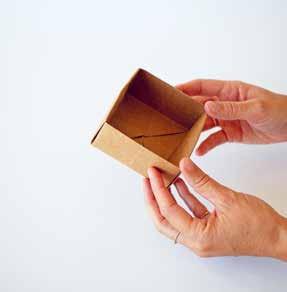


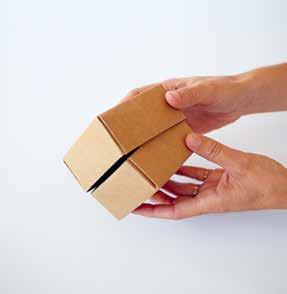
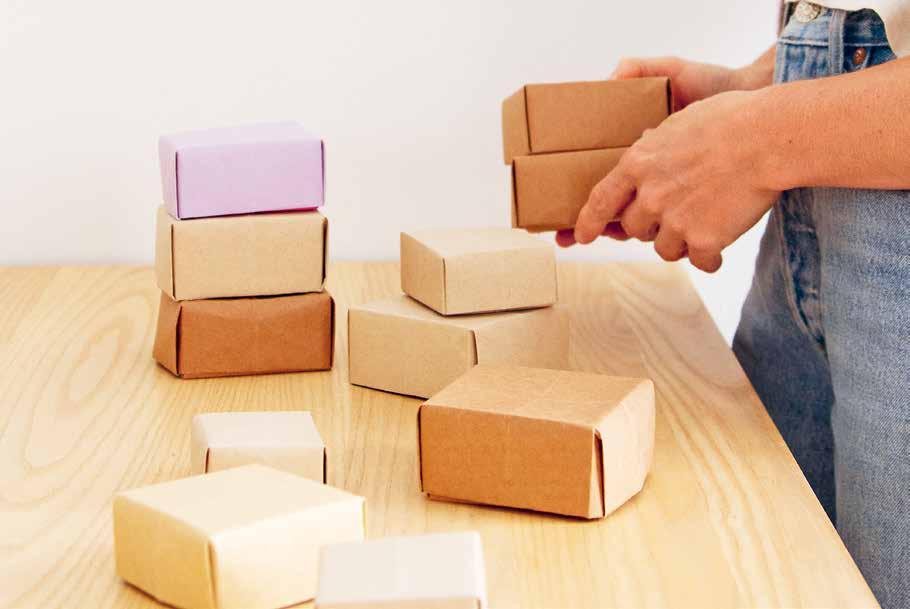
CONCEAL & HOLD 145
magazine box
We learned this genius fold from Sok Song, a master of origami generally and of useful origami in particular. “Magazine box” refers to the material used; unlike many classic origami folds, this method was developed to work with the thin, glossy, rectangular pages ripped from magazines instead of square origami paper. We especially love to use our favorite matte pages from fancy magazines for these boxes, but any creasable paper of a foldable weight will do. We love this box because it doesn’t require any paper prep or scissors and because both lid and bottom are the same size but fit together perfectly. Our very favorite boxes are little—made from a single sheet of a magazine, creased and torn in half, with each side of the box made from half the sheet of paper. You can size up, but the sweet spot is found in the smaller examples, and the boxes lose stability if made from sheets larger than a standard magazine page.
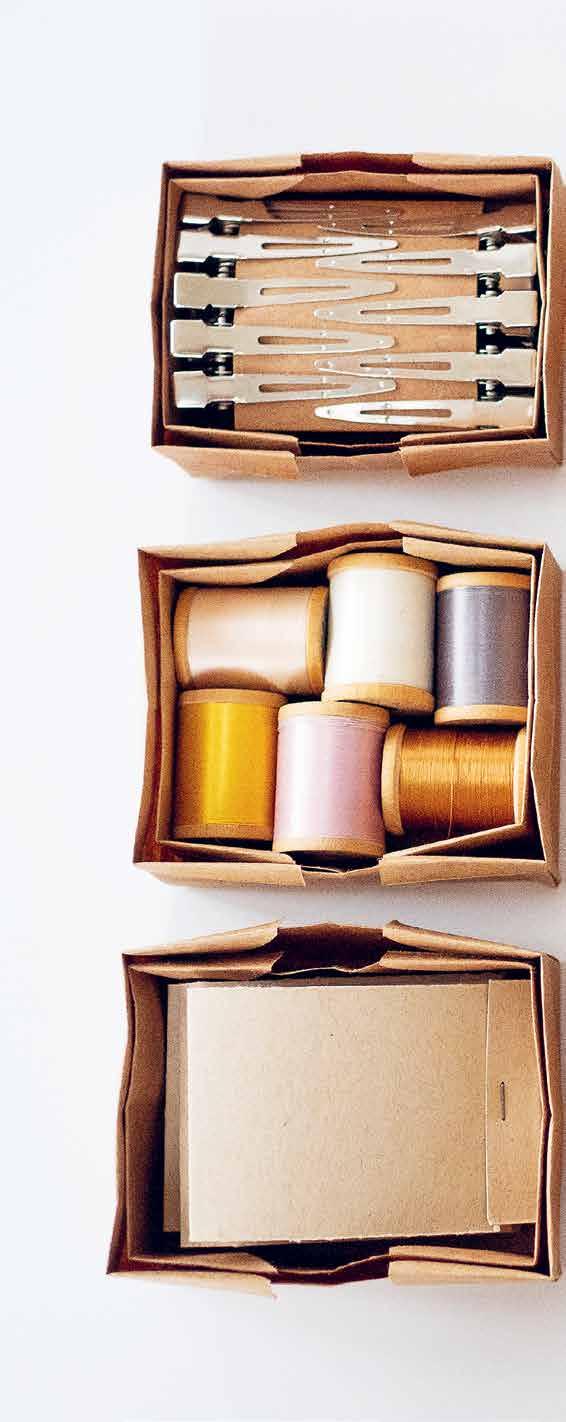
CONCEAL & HOLD 146 PROJECT
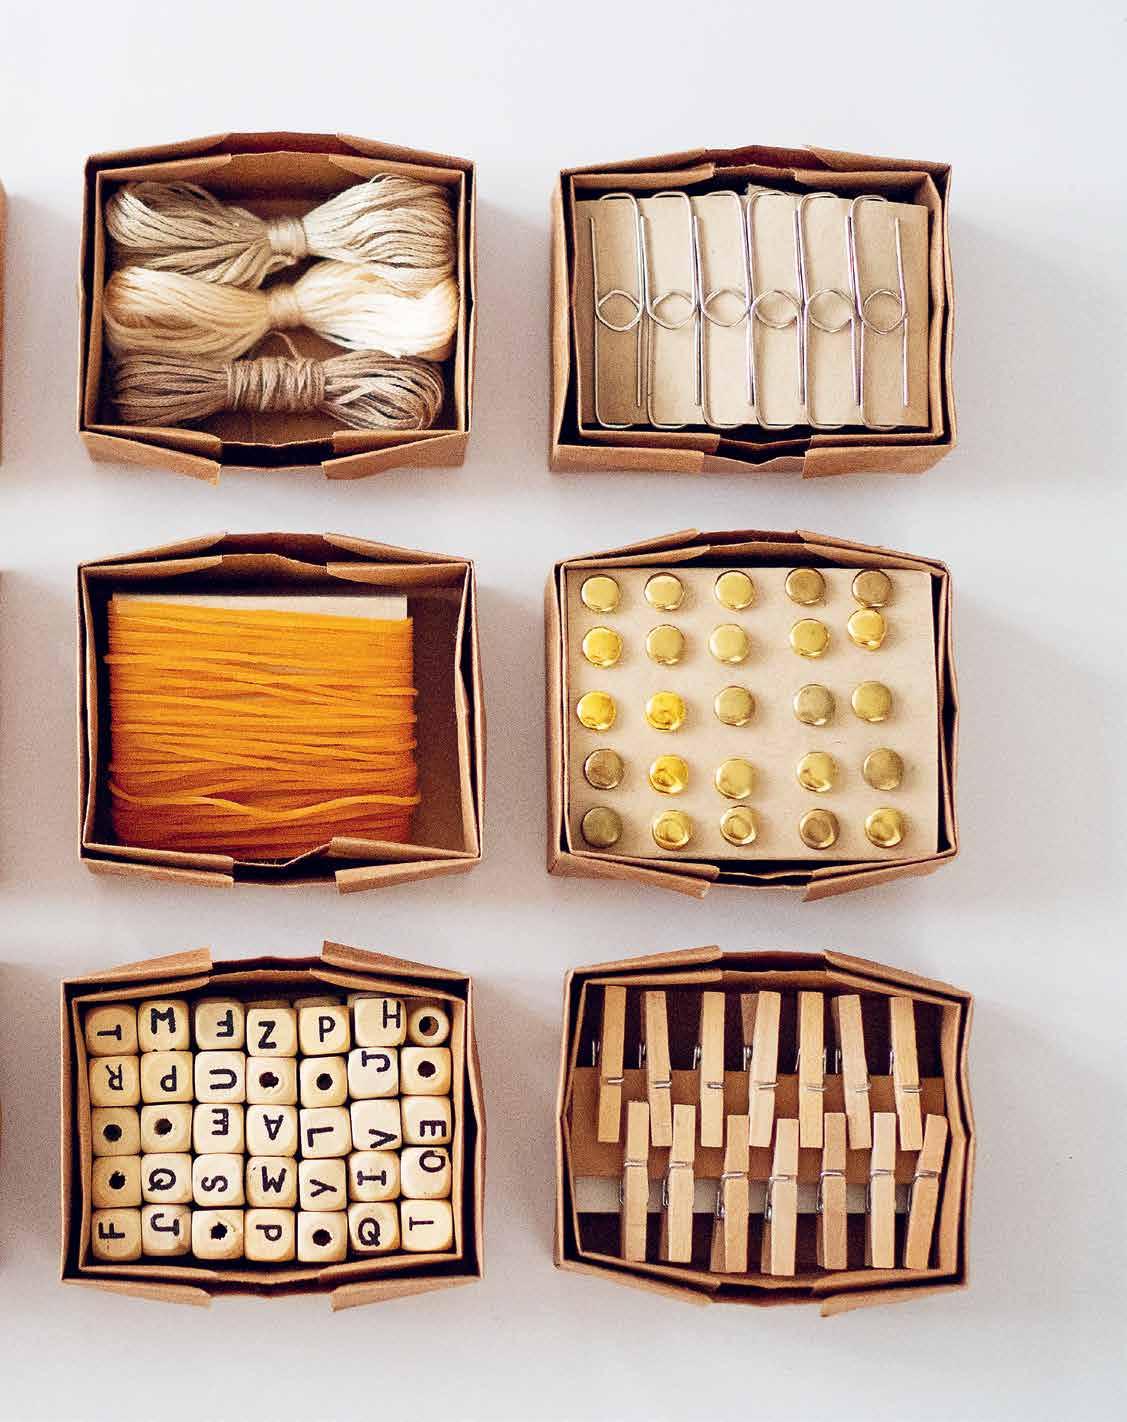
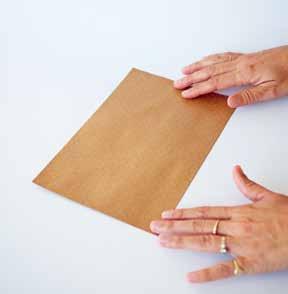
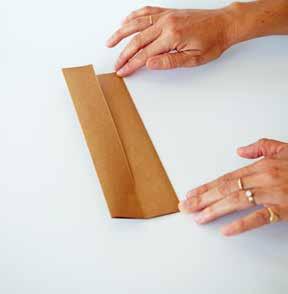

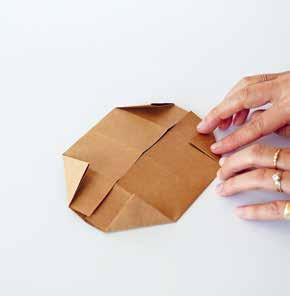
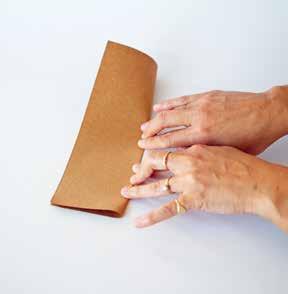
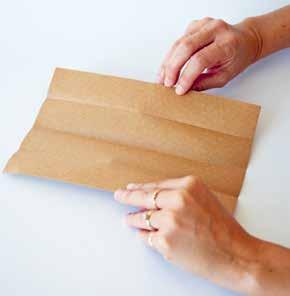
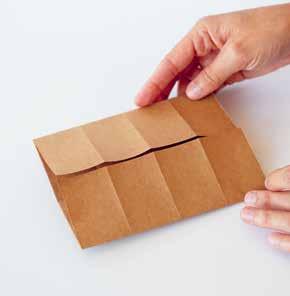
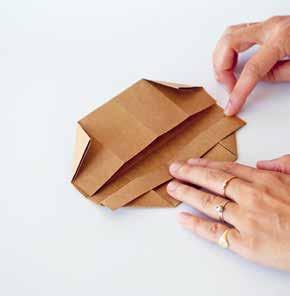

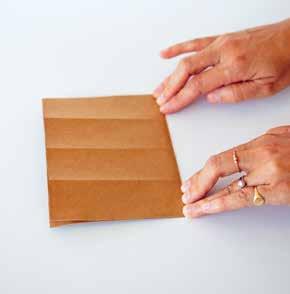


CONCEAL & HOLD 148

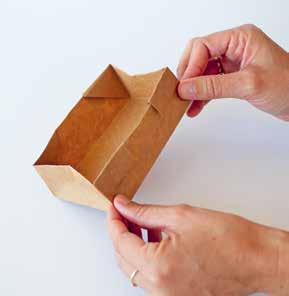
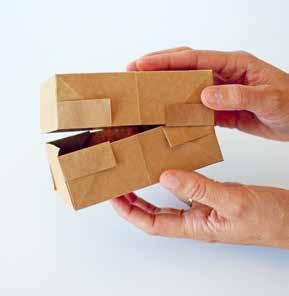

SUPPLIES
+ Two rectangular pieces of paper of identical size
1. Fold one piece of paper in half lengthwise.
2. Open the fold, then fold the two long ends into the center crease you just made.
3. Open all folds.
4. Next, fold the paper in half widthwise.
5. Open the fold, then fold the two short ends into the new center crease.
6. Fold one corner on an angle until it lines up with the first crease and crease the paper.
7. Repeat for the remaining three corners.
8. Working on one side, then the other, fold down and crease the edge of paper over the top of the triangles.
9. Turn your work so one short end faces you. With both hands, open up both folded edges by gently pulling them from the center and out.
10. Pinch the corner creases to make them sharp and square.
11. Repeat all the steps to make the second part of the box.
CONCEAL & HOLD 149

CONCEAL & HOLD 150


paper band
Thin strips of paper scraps, kid art, or magazine pages can be used to create a neat band for wrapping up bundles of homemade stationery to give as gifts or securing a paper box closed.
TO MAKE:
Cut a strip of paper roughly 1–1 ½ inches / 2.5–4 cm wide in a length that fits around what you plan to wrap with the ends, overlapping by 1 inch / 2.5 cm or so. Glue or tape the ends together to create a paper band that can be slid on and off your paper box or bundle as needed.

MATERIALS NOTE:
Paper gum tape is one of our favorite little supplies to keep on hand, and it’s perfect for this use because it’s only sticky where moistened and pre-cut to the perfect width.

CONCEAL & HOLD 151

03 protect

utility care meditation
How do our things protect us? Potholders cover hands, trivets protect countertops, dust mitts clean our surfaces, rugs warm our toes. We need stuff to protect ourselves and our belongings, but when approached from a certain vantage point, there’s extra protection offered in the process of making these objects: solace for mind and body and spirit found in quietly making.
In her book Wintering: The Power of Rest and Retreat in Difficult Times, Katherine May writes of knitting:
In the very depths of her own winter, [Sylvia] Plath seems to reach for a way to survive through work—women’s work, the kind that entails quiet hours in the house. ‘Winter is for women,’ she says in ‘Wintering.’ It is perhaps a time when the feminine arts come into their own, but she is also commenting, I think, on the lean times that women can survive. It leaves me wishing that there had been more for her to do: more honey to spin; more bees to feed.
Plath’s instincts towards keeping your hands moving in the winter turned out to be correct. One recent study found that knitting can lower blood pressure as much as yoga and can also help to relieve sufferers of chronic pain by releasing serotonin...
I take up my knitting needles for the first time in years, producing a series of wonky hats that wear their dropped stitches like badges of honour. It feels good to be making something, even while my contribution to the world feels very small. It allows me to imagine I’m part machine, fluid and efficient.
For the projects in this chapter, it’s the process as much as the product that offers a protective element, but the win is twofold, because after the meditative and restorative process of making, you’ll be left with simple and hardworking solutions ready to serve your most basic needs.
PROTECT 154
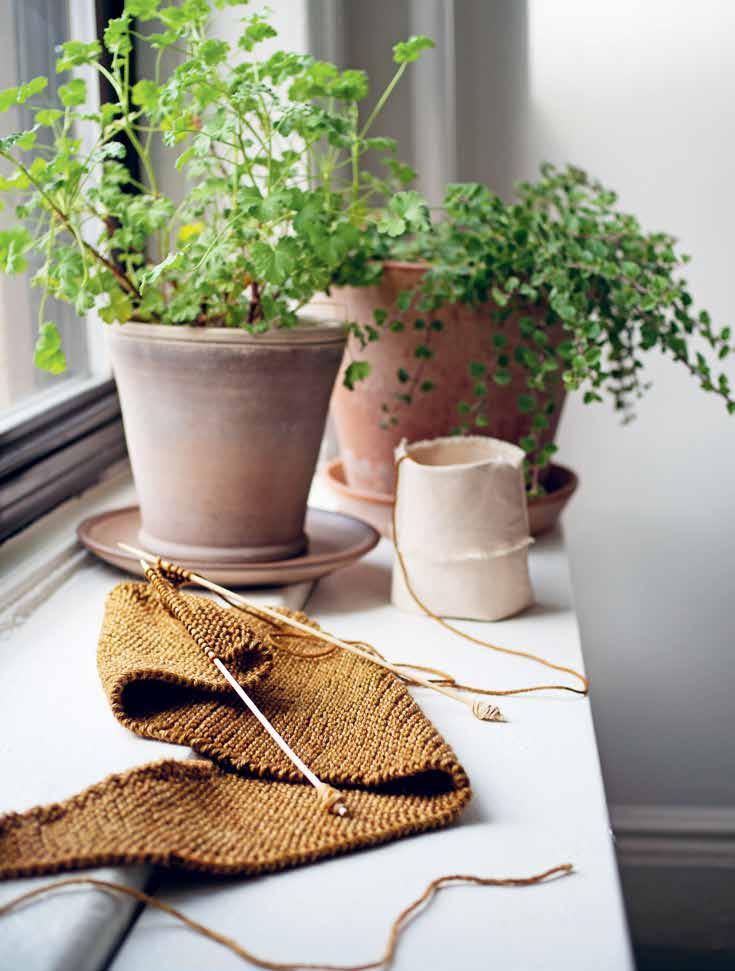
the basics of knitting
For beginner knitters, the most important techniques are casting on, the knit stitch, binding off, and weaving in ends. With these four techniques you can make so many knitted projects. Practice and have fun.
casting on
1. Make a simple slipknot with a long tail. (Tail length depends on the number of stitches you are casting on.) Slip one knitting needle into the slipknot and hold the needle with your right hand. Put your left thumb and pointer finger between the two tails of yarn so each strand rests on the outside of those fingers. You can hold down the tail ends of yarn with the remaining three fingers of the same hand.
2. Wrap the needle tip under and around the string coming from the outside of your thumb, and bring it over toward the index finger.
3. With the thumb yarn on the needle, wrap the needle over the top and around the yarn on the index finger.
4. Bring the yarn loop from the pointer finger down and under the loop coming off the thumb.
5. Release the yarn from your pointer finger and thumb and pull down tight. Now you should have two stitches on your needle.
6. Repeat steps 2 through 5 to cast on as many stitches as you need. If you lose track of the number, count the loops on your needle to see how many stitches you made.
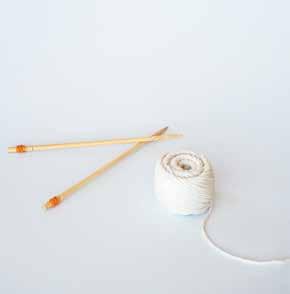

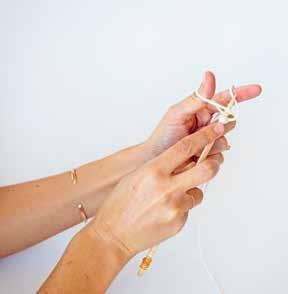

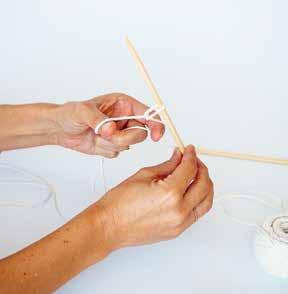

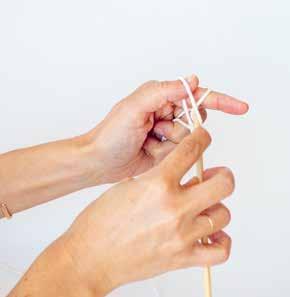
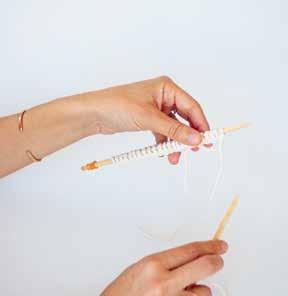
PROTECT 156 TECHNIQUE
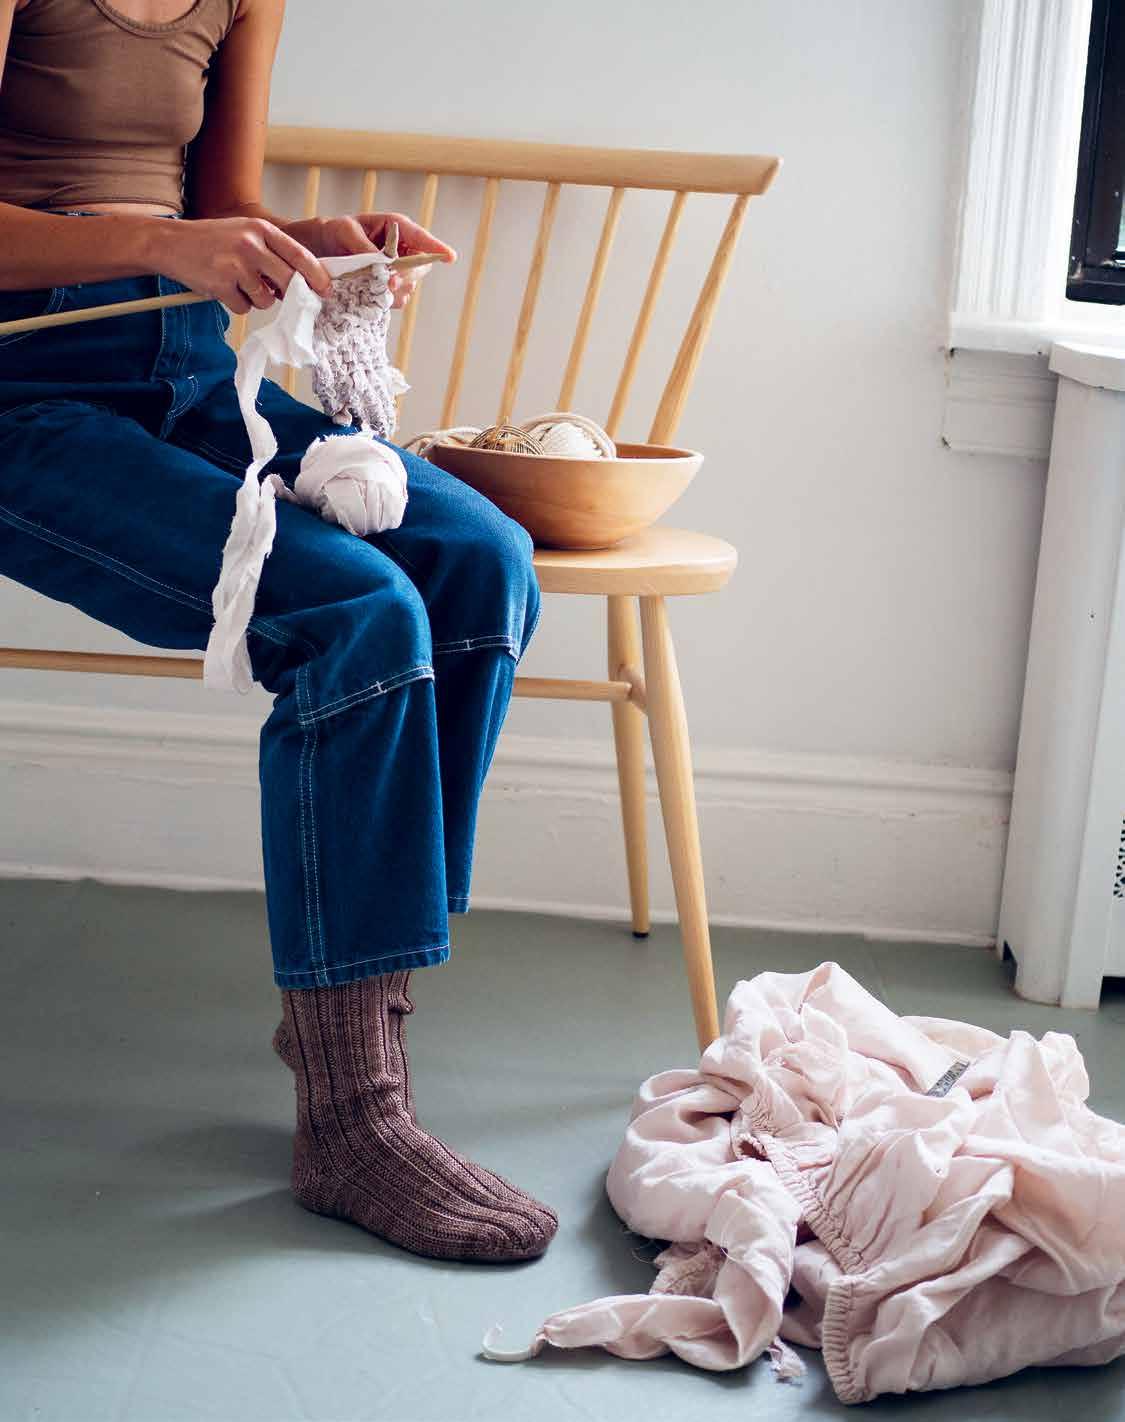
the knit stitch
1. Hold the needle with stitches in the left hand. With the ball of yarn lying behind the needles, insert the empty needle in your right hand through the left side of the first stitch and under the left-hand needle, front to back.
2. Use your right hand to wrap the yarn counterclockwise around the right needle.
3. Holding the right-hand needle, carefully move it down through the loop on the left needle, catching the wrapped yarn on the right needle.
4. Then remove the loop of yarn from the left needle by gently sliding the yarn up to the top and letting the loop on the left needle fall off. You now have one stitch on the right needle.
5. When finished with the entire row, switch hands so the needle with the stitches is back in your left hand. Repeat steps 1 through 5 to continue knitting.
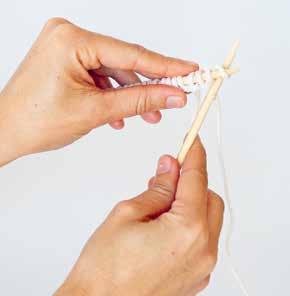


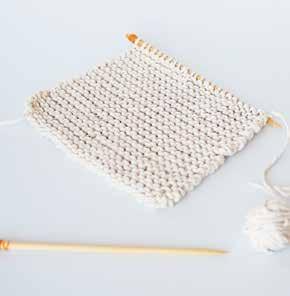
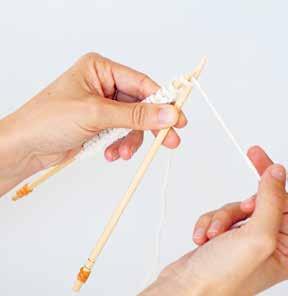
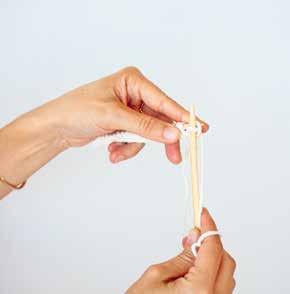
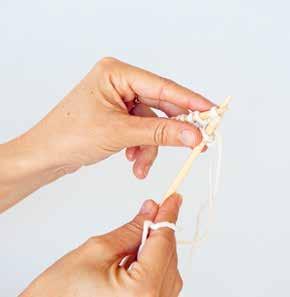

GARTER STITCH: Knitting every stitch on every row.

PROTECT 158
binding off
1. Knit two stitches onto your right needle.
2. Pick up the bottom stitch with the needle in your left hand.
3. Pass the stitch over the top stitch and off the right needle.
4. You now have one stitch left on your right needle. To continue, knit another stitch onto your right needle and pass the bottom over the top loop and off.
5. Repeat until one stitch remains on your right needle. Cut the yarn and thread the tail end through the last loop.
weaving in
Weaving in ends is the way you conceal and secure the tail ends of string or fiber when weaving or knitting. Thread the eye of a darning needle with the end of the yarn and weave in and out of the knit surface. For knits, it’s advised to weave in two opposite directions— down a few stitches and over a few stitches—to lock in the fiber. Cut any remaining tail end to ¼ inch / 6 mm.

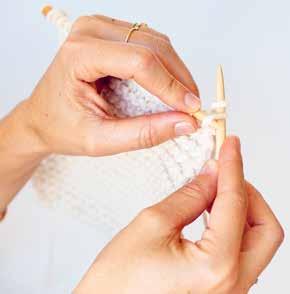
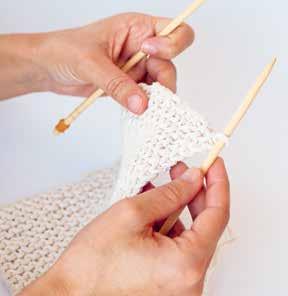

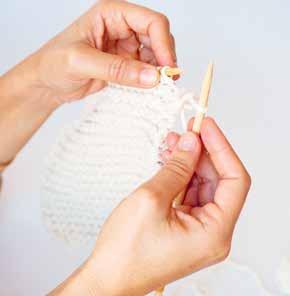
PROTECT 159
make your own knitting needles
Some serious knitters might balk at the suggestion, but there’s no reason that a newbie knitter need invest in knitting needles straight off the bat. Rose has taught school-age kids across New York City how to knit using needles made from takeout restaurant chopsticks. For projects needing a smaller gauge, bamboo skewers serve the purpose, and for oversize projects where both a bigger gauge and a longer needle are helpful, a ½-inch / 1.3 cm diameter, 48-inch / 122 cm long hardware store wooden dowel cut in two is perfect for a range of projects.

TIP:
If you’d like, use a standard knitting gauge to best determine the gauge of your homemade needles.
SUPPLIES AND
+ Chopsticks
+ Bamboo skewers
+ Wooden dowel, ½-inch / 1.3 cm diameter
+ Pencil sharpener
+ Sandpaper
+ Utility or pocketknife
+ Rubber bands or paper masking tape
BAMBOO SKEWERS Pointed bamboo skewers come practically ready to use. Just give them a quick once-over with fine-grit sandpaper and wrap rubber bands around each blunt end. Roughly equivalent to US size 2–3 needles or UK size 10–12.
CHOPSTICKS Sharpen each end in a standard pencil sharpener until a fine point forms. Gently use fine-grit sandpaper to smooth over the pointed tip and along the length of the chopstick. This will remove any wooden splinters and create a rounded, smooth tip. Wrap each blunt end with rubber bands or masking tape. Roughly equivalent to US size 8 needles or UK size 6.
WOODEN DOWELS For knitting projects that require large needles, you’ll need to flex your whittling skills. Use a pocketknife to carefully whittle the end of wooden dowels into a sharp point. After whittling, take care to smooth the points and lengths of the needles with finegrit sandpaper before casting on. A ½ inch / 1.3 cm diameter dowel is roughly equivalent to a US size 17 needle or a UK size 000.
PROTECT 160 PROJECT
TOOLS
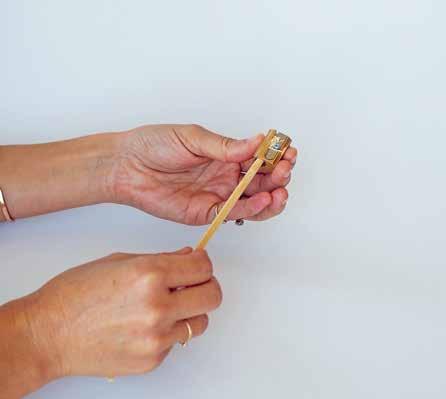

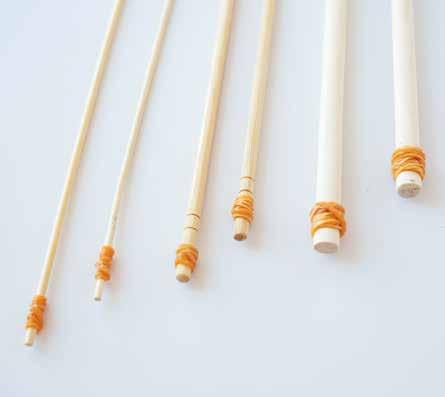


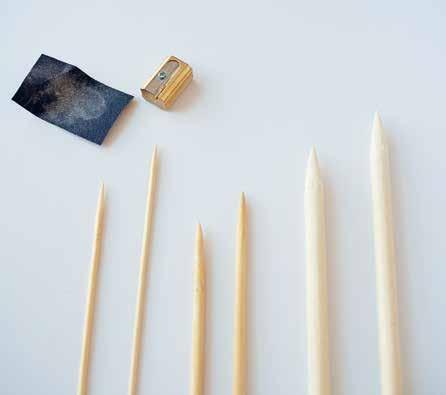
PROTECT 161

cork knitting needle stoppers
To prevent stitches from slipping off the end of needles, stoppers can be useful when you need to set things down for a minute. To make your own, use a sharp craft or utility knife to cut a wine cork into ½-inch / 1.3 cm thick rounds. Use a darning needle to poke a hole in the center of each cork round and add one cork round to the tip of each needle when not in use.


PROTECT 162
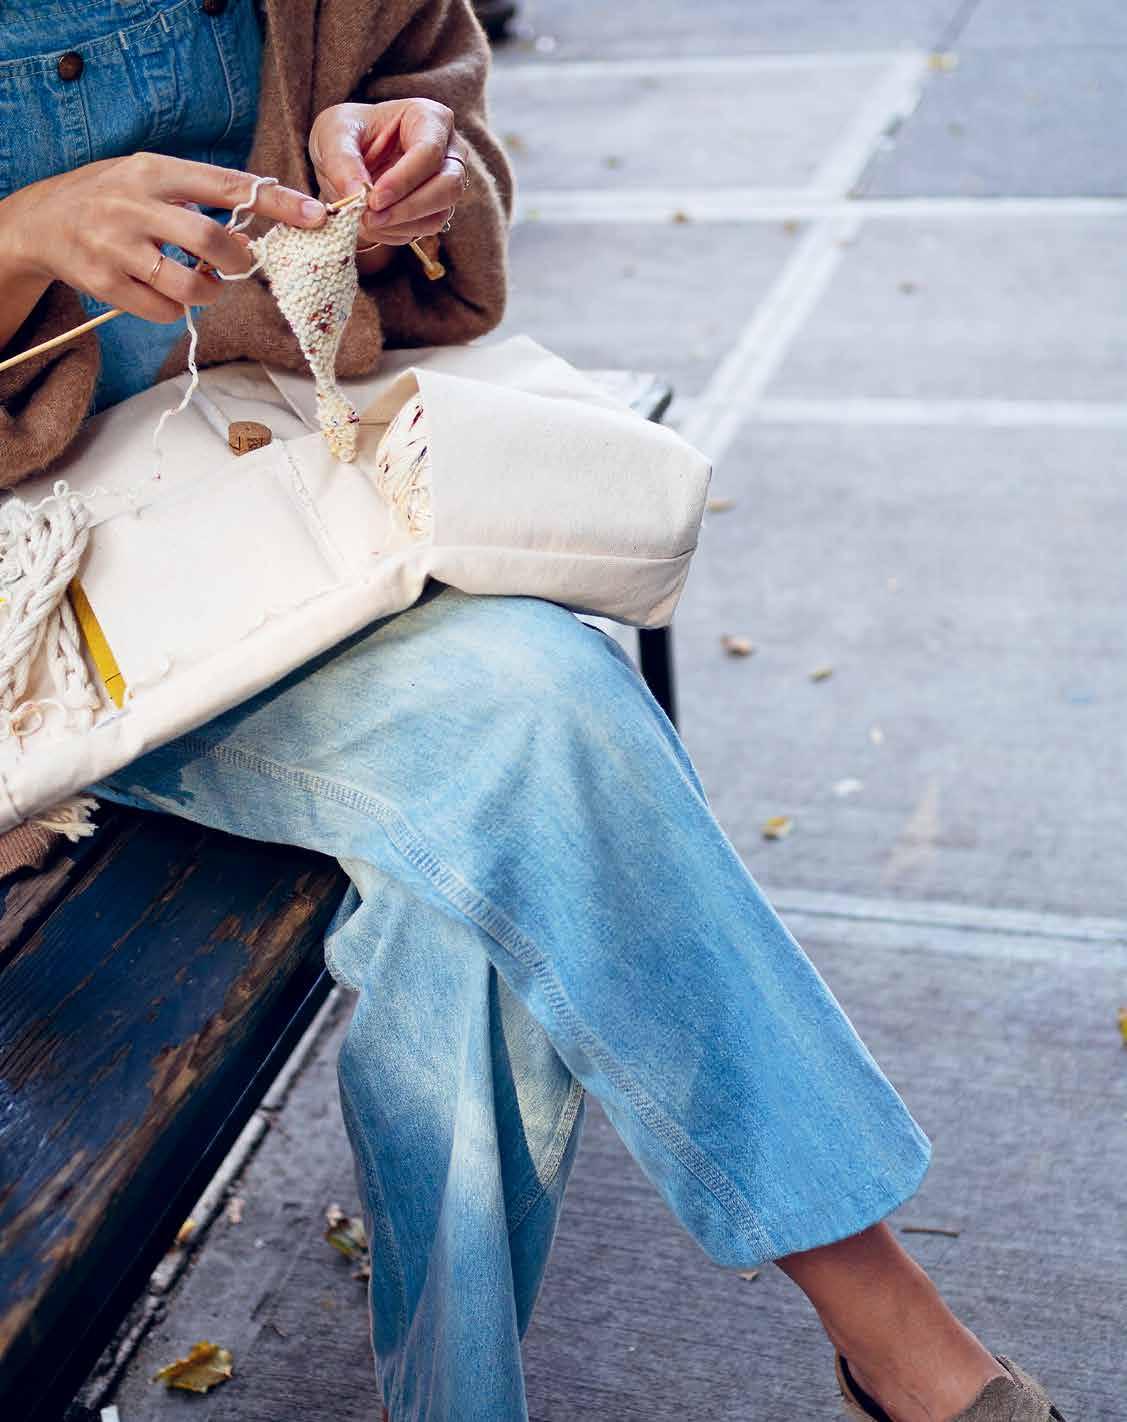
knit cotton string potholder
Sometimes the simplest household items are the most difficult to find. Which is, of course, why we endeavor to make those things ourselves. This very simple potholder can be made of cotton butcher’s twine from the hardware store and a pair of takeout chopsticks. You can easily customize the size and shape to suit your needs and liking, and if you’re just learning to knit, it’s an excellent project for practicing your garter stitch.
We’ll concede that cotton butcher’s twine doesn’t glide off knitting needles with exactly the same ease as a lanolin-rich wool yarn, and the loose fibers of the 24-ply hardware store twine can sometimes split, but that hasn’t stopped us from making dozens of these simple, affordable potholders over the years. They’re as beautiful with a bit of kitchen grease patina on them as they are brand new, and they rival store-bought potholders for a tiny fraction of the price.
SUPPLIES AND TOOLS
+ 24-ply cotton butcher’s twine
+ DIY chopstick knitting needles (page 160) or US size 8 or 9 / UK size 5 or 6 knitting needles
+ Darning needle
+ Ruler (optional)
+ Scissors
1. Leaving a 6-inch / 15 cm tail, cast on 24 stitches.
2. Knit the first row and continue knitting in garter stitch (knitting every row) for 23 additional rows, or until the piece measures almost 8 inches / 20 cm from your cast-on edge (roughly 24 rows).
3. Bind off all stitches except for the last one.
4. To create a loop for hanging your potholder, continue to knit the last stitch using both needles to create a chain roughly 5 inches / 13 cm long.
5. To bind off the last stitch, cut an 8-inch / 20 cm tail and thread the tail end through the last loop on your knitting needle.
6. Using your darning needle, connect the tail end of your chain stitch to the corner of your potholder by threading it through a corner stitch. Wrap the tail around the base and tie a single or double knot to secure.
7. Weave in the extra tail end with your darning needle and cut off any extra length. Repeat with the tail end at the beginning.
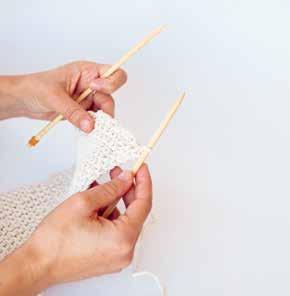

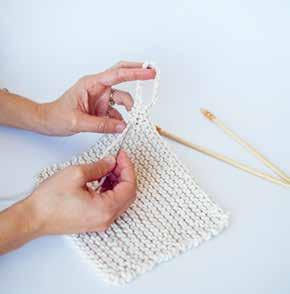

PROTECT 164 PROJECT
knit rope potholder
For a much bulkier potholder— verging on a trivet—we work cotton clothesline on our chopstick needles into a chunky, sturdy knit ready for cast iron skillets and dutch ovens right out of the oven.
SUPPLIES AND TOOLS:
+ Cotton clothesline
+ DIY chopstick knitting needles (page 160) or US size 8 or 9 / UK size 5 or 6 knitting needles
+ Darning needle
+ Ruler (optional)
+ Scissors
1. Leaving a 6-inch / 15 cm tail, cast on 12 stitches.
2. Knit the first row and continue knitting in garter stitch (knitting every row) for 11 additional rows, or until the piece measures approximately 8 inches / 20 cm from your cast-on edge.
3. Bind off all stitches except for the last one.
4. Cut your rope after your last stitch, leaving a 7-inch / 18 cm tail. Thread the tail end through the last stitch and pull tight to secure.
5. With the extra rope create a 2-inch / 5 cm loop and tie a double knot at the base of the loop.

MATERIALS NOTE:
These are projects that we’ve developed with quick knitting and using up what you have in mind. If you find a half a roll of butcher’s twine in the junk drawer, this is the moment for it to shine. If you start a project and need to reup on string halfway through, none of these materials are so precious as to be hard to find. Consider this our invitation to use what’s available without worrying about precision and exactitudes. In nearly every case, the most commonly sold quantity—a 200 foot ball of twine from the hardware store, or a 100 foot bundle of clothesline for instance—will see you through to completion of the project, several times over.

PROTECT 165 VARIATION
knit bath mitt
A little shower-time exfoliation never hurt anyone. Hemp cord is naturally antimicrobial and antifungal, plus it’s pretty, making knit cloths or mitts the perfect handmade addition to your bathing ritual—and a lovely gift.
SUPPLIES AND TOOLS:
+ 1 mm Polished hemp cord + DIY chopstick knitting needles (page 160) or US size 8 or 9 / UK size 5 or 6 knitting needles (For a more structured, tighter-knit mitt, use DIY bamboo skewer knitting needles (page 160) or US size 2 or 3 / UK size 10 or 12).
1. Leaving a 6-inch / 15 cm tail, cast on 18 stitches.
2. Knit the first row and continue knitting in garter stitch (knitting every row) for 35 additional rows, or until the piece measures almost 8 inches / 20 cm from your cast-on edge (roughly 36 rows).
3. Bind off all stitches except for the last one. Cut your string, leaving a 6-inch / 15 cm tail. Thread the tail end through the last stitch, pulling tight to secure.
4. Fold the rectangle in half and use the tail ends or extra string and a darning needle to sew up the sides of the pouch, leaving the top open.
5. To create a loop for hanging your mitt, use the extra string from step 4 to create a 1-inch / 2.5 cm loop and tie a double knot at the base of the loop. Weave in and cut any remaining cord.
knit kitchen scrubber
These nubby little scrubbers are great compostable alternatives to store-bought scrubby sponges. Knitting with unrefined hemp string isn’t exactly easy on the hands, but small hemp scrubbers are so quick and easy to make, it’s silly not to. (Keep your favorite hand cream close by to keep your fingers protected!)
SUPPLIES AND TOOLS:
+ 1–2 mm Unrefined hemp string
+ DIY bamboo skewer knitting needles (page 160) or US size 2 or 3 / UK size 10 or 12 knitting needles
1. Leaving a 6-inch / 15 cm tail, cast on 18 stitches.
2. Knit the first row and continue knitting in garter stitch (knitting every row) for 18 additional rows, or until the piece measures almost 4 inches / 10 cm from your cast-on edge (roughly 19 rows).
3. Bind off all stitches except for the last one.
4. To create a loop for hanging your scrubber, follow the instructions for the Knit Cotton String Potholder (page 164) or, after binding off all stitches, use a 4-inch / 10 cm tail to make a simple single-string loop and tie it off at the base.
5. Weave in all the loose ends.
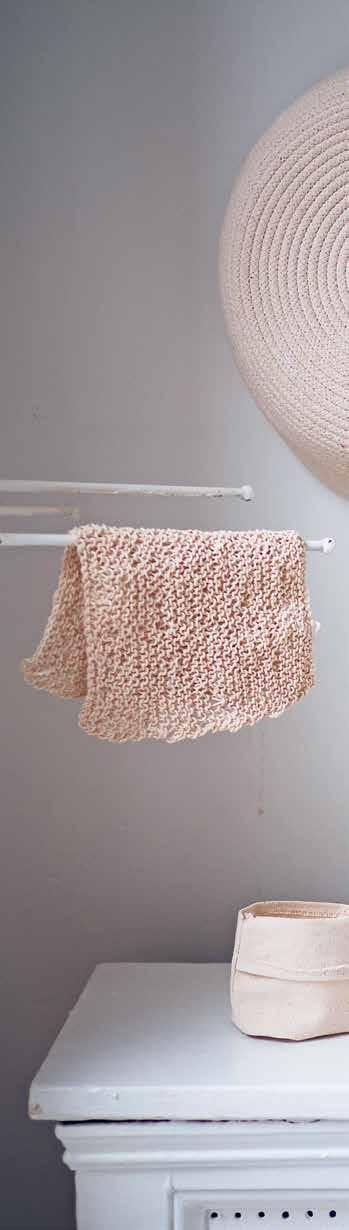
PROTECT 166 VARIATION
VARIATION


PROTECT 167
upcycling fabrics into yarn
Old T-shirts and bedsheets can easily be upcycled into continuous yarn to use for knitting, punch needle, and weaving projects in a few easy steps. Many different fibers will work for making yarn suitable for a large variety of crafts. While 100% cotton is ideal, modal, viscose, cotton/linen and cotton/hemp blends, and mixed synthetic material will work too.
The thickness, weight, and fiber composition of the fabric will all determine how much the material stretches and shrinks up when turned into yarn. For best results, test your fabric beforehand by cutting a strip and stretching it out with both hands. If the stretched-out strip appears too thin for your project, cut wider strips; if it’s too thick, cut subsequent strips narrower. As an example, punch needle projects will need significantly narrower yarn than knitting or weaving projects might. Cut your yarn accordingly.
PROTECT 168 TECHNIQUE

continuous yarn from a flat sheet
SUPPLIES AND TOOLS
+ Any square or rectangular length of fabric
+ Scissors
1. Fold the fabric lengthwise, matching bottom to top and both sides as evenly as possible. (If dealing with a wonky fabric scrap, trim into a neat(er) rectangle or square at this stage.)
2. Bring the folded bottom edge up toward the cut ends and lay it down 1 ½ inches / 4 cm lower than the cut fabric edge.
3. Starting ½ inch / 1.3 cm to 1 inch / 2.5 cm from the side edge, use sharp scissors to cut a straight line through the bottom folded edge and up toward the top. Cut just past the top fold but stop 1 inch / 2.5 cm before cutting all the way through the raw edge.
4. Repeat this cut, leaving ½ inch / 1.3 cm to 1 inch / 2.5 cm in between each cut strip and stopping roughly ½ inch / 1.3 cm to 1 inch / 2.5 cm from the opposite side edge. (Don’t panic if you have a slightly wider final strip, just trim the edge so it’s even with the rest.)
5. Open all the folds. You will find that there are even cuts running inside a fabric frame.
6. Starting at the bottom left corner, cut through the first corner joint. Continue along the bottom edge of your fabric snipping every other strip through its joint.
7. Repeat along the top edge of the fabric, but this time leave the first joint intact and snip through the second. Continue along the top edge of your fabric, snipping every other strip through its joint. Leave the last joint before the edge intact.
8. If you’d like, finish by rounding off the square on each joint corner with scissors. This will make the connection point less bulky for weaving, knitting, or punch needle projects.
9. Wind into a ball.
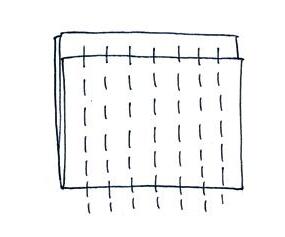


PROTECT 170
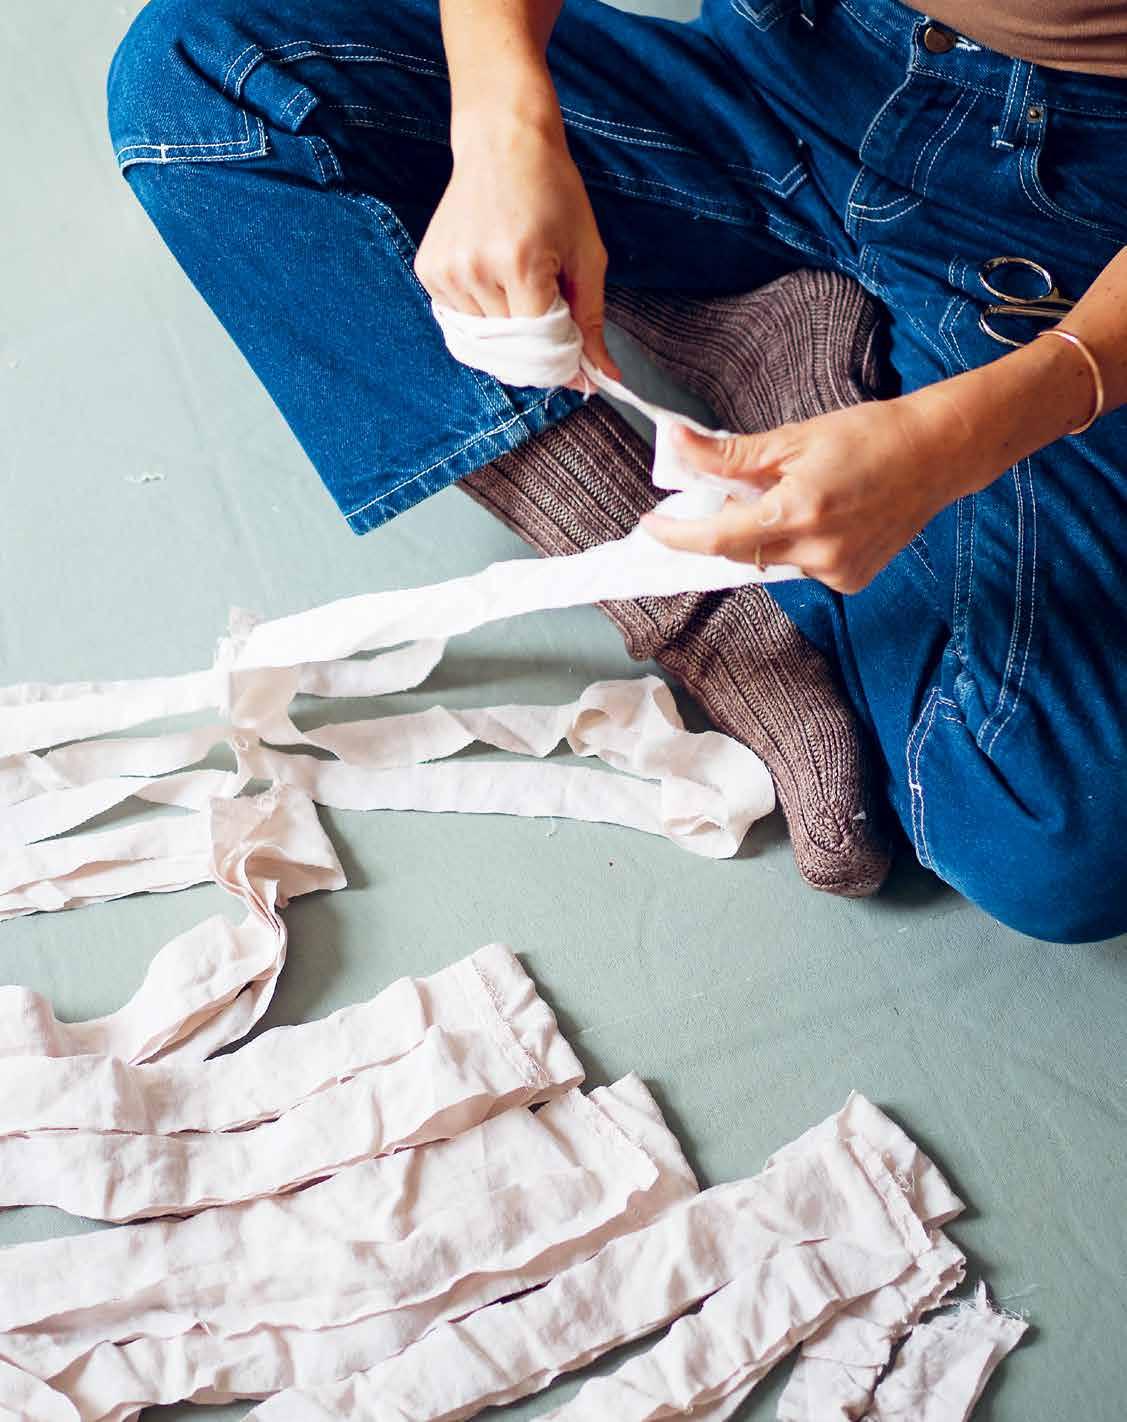
t-shirt yarn
SUPPLIES AND TOOLS
+ T-shirt
+ Scissors
+ Fabric chalk or marker
To cut the tubular bottom torso of a T-shirt into continuous yarn, follow the instructions below. To cut the remaining parts of the T-shirt, trim out the collar and sleeve hems and cut flat portions following the continuous yarn instructions on page 170.
1. Begin by cutting off the bottom hem, then cut across the chest just below the armpits to disconnect the lower torso from the upper portion of the shirt. Set aside the upper portion.
2. Fold the fabric of the torso lengthwise, bringing one side seam to rest 1 ½ inches / 4 cm lower than the other. (If you have a large adult T-shirt, begin by bringing both seams together, then bring the folded edge up to rest 1 ½ inches / 4 cm lower than the side seams to save on time spent cutting.)
3. Starting at the folded edge, cut ¾-inch / 2 cm to 1-inch / 2.5 cm wide strips up past the first side seam and stop 1 inch / 2.5 cm before the top edge. Continue cutting strips across the length of the fabric.
4. Open your folded torso and you will find the area where the connecting fabric joins the strips together.
5. Mark diagonal lines and cut through these joints (see image).
6. Once you finish cutting the diagonal joints, gently pull the strips—the material will stretch and become longer and more uniform in size—as you wind the fabric strip into a ball.

TIP:
Weaving and knitting can often be worked with small joint seams left intact, while for a punch needle, all seams need to be cut out ahead of time so the yarn doesn’t get caught in the punch needle. If your T-shirt has side seams and you’d like to make your yarn for a punch needle, start by removing the side seams and continue cutting following the instructions for making continuous yarn on page 170. PS: Some T-shirts are woven without side seams. Score!
PROTECT 172
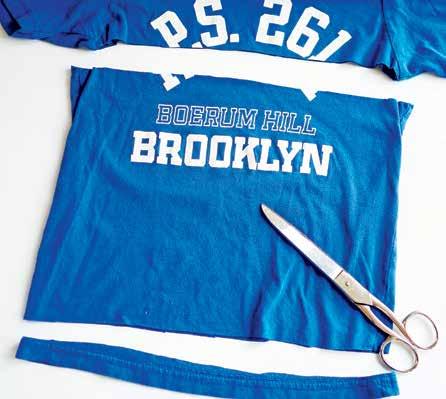
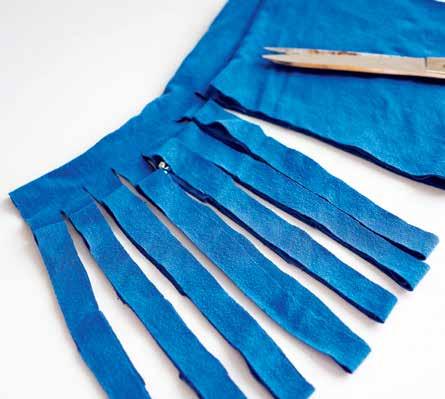
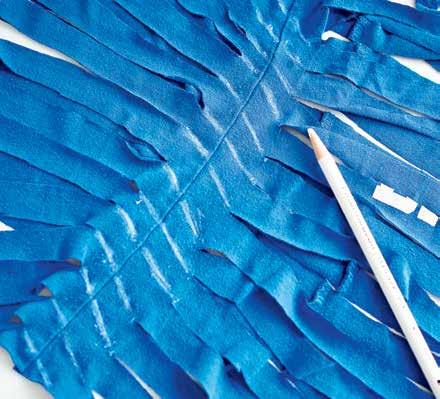
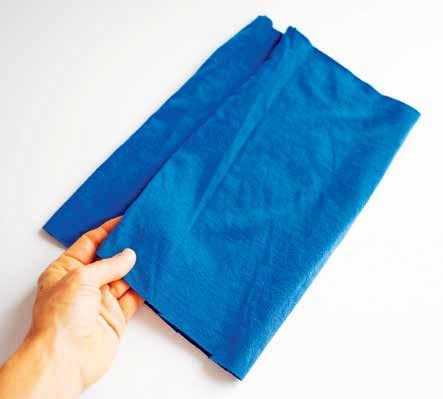
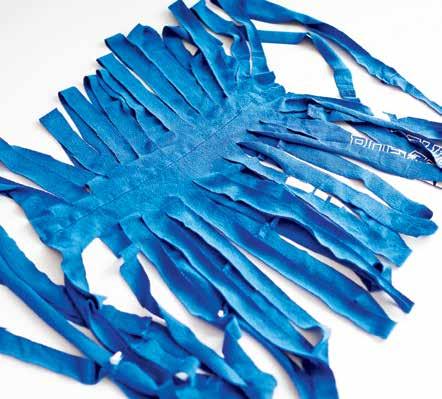

PROTECT 173
to strip cotton fabric
Tearing cotton fabric—like cotton bedsheets and cotton fabric yardage—intro strips is extremely easy and very satisfying. This won’t make continuous yarn, but if you need shorter lengths of cotton fabric quickly, it’s nice to know you can achieve that quickly with no extra fussing.
1. Remove any seam in the fabric; in the case of sheets, this is usually the hemline border. Any sewn area will prevent you from tearing your fabric.
2. With sharp scissors, make small cuts along one edge of your fabric for your desired width.
3. Working from one side to the other, tear your fabric by holding onto either side of the cut and pulling apart with equal tension. This will tear the fabric straight along the grain.
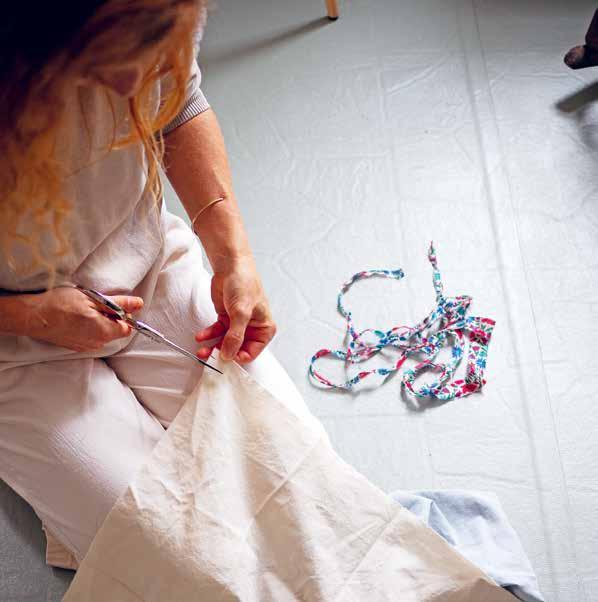

PROTECT 174
to join two strips together
To join two lengths of fabric, use sharp scissors to cut a vertical slit on the end of the two pieces of fabric you wish to connect. (This is most easily done by folding over the end of the fabric and making a small incision in the fold. Careful— too big a cut and you’ll slice through the end of the strip.)
Insert the slit end of the second strip into the slit cut in the first. Draw the tail end of the second strip up through the slit in its opposite end, creating a loop of fabric. Continue to pull the tail all the way through the slit, shrinking the loop until the fabric locks into place. You can continue adding strips in this same way every time you reach the end of a strip.
This method of joining two strips of fabric together works especially well in weaving projects that need to incorporate more fiber as you weave. This technique will create a little knot at the end, but is easily concealed in a weave.
Remember, in most projects, joining strips with a slit isn’t strictly necessary. In weaving, knitting, and twining, fabric can be incorporated by simply overlapping two pieces of fiber.
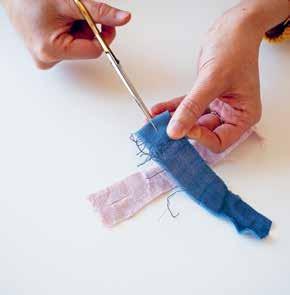


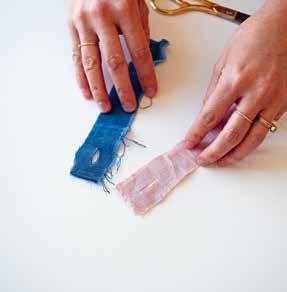
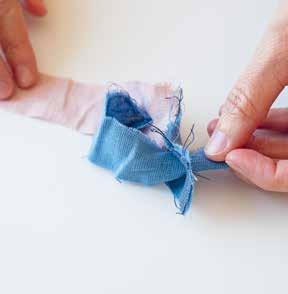
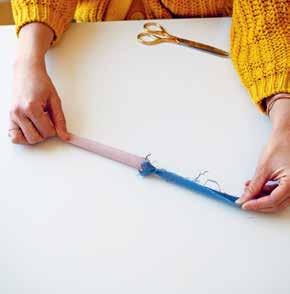
PROTECT 175
knit bathmat
If you find yourself with a threadbare bedsheet that needs to be replaced, know that with a little bit of muscle flexing and some time, you can turn that sheet into a new-to-you bathmat or other small rug. We’ll cut to the chase: while knitting a small potholder or bath mitt can qualify as a meditative, even leisurely activity, knitting a bathmat requires a bit more . . . oomph. To accommodate the size of the rug, you’ll need to work with extra-long needles like the ones we make from wooden hardware store dowels (page 160). And to work with 24-inch / 61 cm long needles is to realize that you can’t knit in bed or slumped into the corner of the couch. This is a knitting project that requires a straight-back chair and working out your upper body strength. But don’t let the aerobic nature of the project put you off entirely. Once you’re done, you’ll have made yourself an entire rug and earned considerable bragging rights.
SUPPLIES AND TOOLS
+ Upcycled cotton or linen bedsheet or duvet cover, cut into 1-inch / 2.5 cm wide strips (see continuous yarn tutorial, page 170.)
+ DIY knitting needles made from ½ inch / 1.3 cm diameter wooden dowels (page 160) or US size 17 / UK size 000 knitting needles
+ Darning needle with a large eye
+ Ruler (optional)
+ Scissors
1. Leaving a 6-inch / 15 cm tail, cast on 36 stitches (feel free to adapt).
2. Knit the first row and continue knitting in garter stitch (knitting every row) until your piece measures roughly 28 inches / 71 cm from your cast-on edge. (Feel free to adapt this length to suit your needs.)
3. Bind off all stitches.
4. Weave in any loose ends and trim.
PROTECT 176
PROJECT
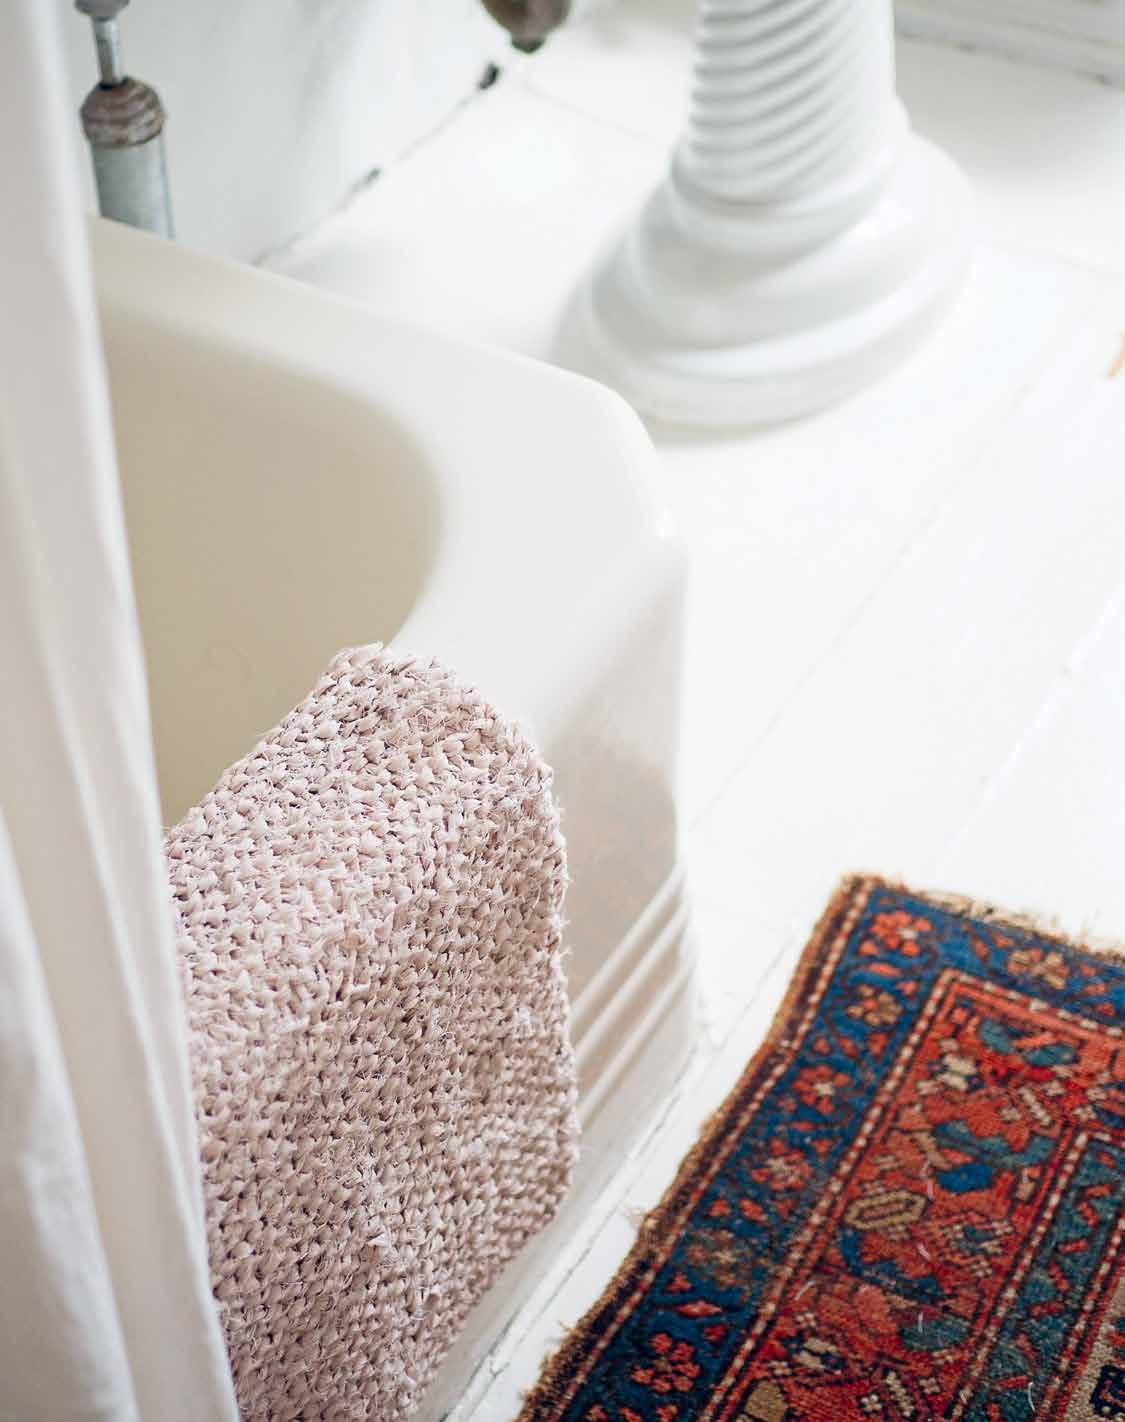
weaving
Over, under, over, under. Don’t worry if you need to chant as you work. We certainly do. The basics of weaving aren’t any more complicated than running one piece of material—the weft—over and then under a series of others— the warp. We make simple looms out of cardboard later in this chapter (and again in Chapter 5, “Play”), but to get our feet wet in the world of weaving, we love using humble potholder looms. They’re one of those funny little fairly specific tools that lots of people have hanging around in the backs of closets, even those who don’t consider themselves to be particularly crafty. Erin uses her mom’s metal potholder loom from the 1970s, and Rose uses a plastic loom that was given to her daughter as a gift.
While the cotton loops commonly used with these looms are easy to find and increasingly sold in all kinds of beautiful colors, we found a very useful upcycled alternative in the ripped-up leggings of our elementary-school kiddos, and our favorite material of all is continuous yarn cut from old T-shirts.
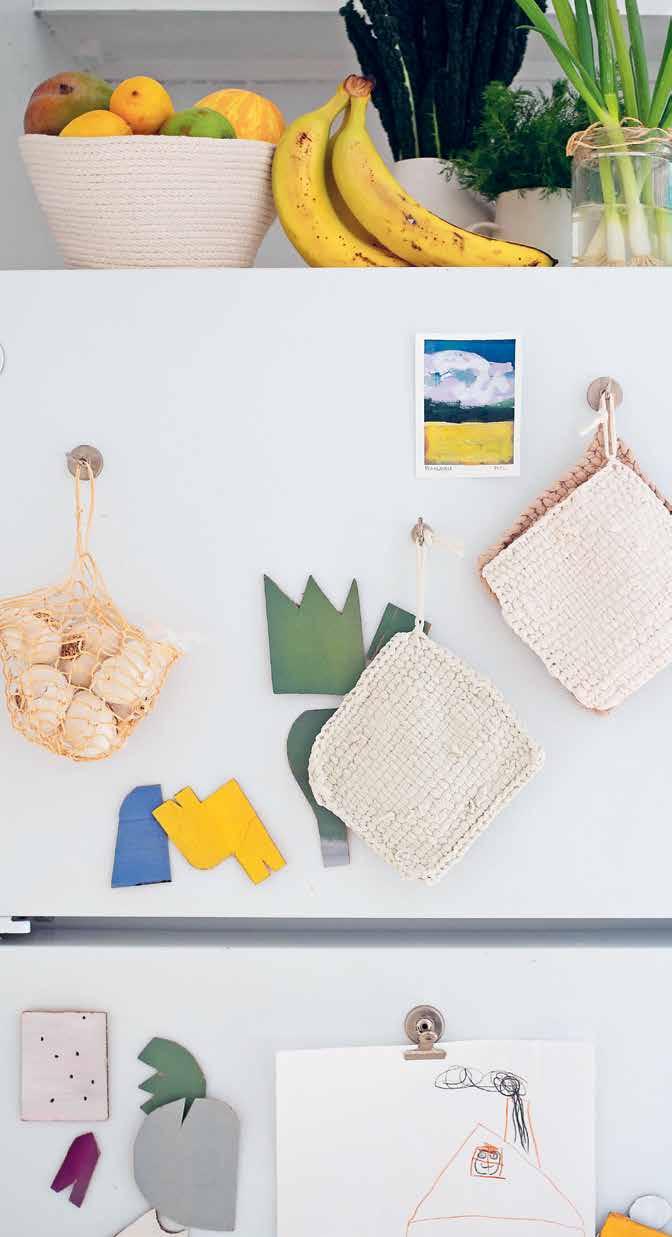
PROTECT 178 TECHNIQUE


PROTECT 179
woven potholder
Stripped jersey is stretchy and cushiony once woven, and even your nicest cotton or hemp T-shirts need replacing eventually. In a world of overflowing landfills, giving a favorite tee (or a least-favorite tee!) new life as a beautiful potholder feels like a small triumph. With a bit of a bath in tea dye (page 220), even a stark white Hanes T-shirt with pit stains can be reclaimed and made beautiful. Cross our hearts and hope to dye. (Sorry.) Because potholders are used near high heat, steer clear of T-shirt yarn made with synthetic blends, which might be more flammable.
SUPPLIES AND TOOLS
+ 7-inch / 18 cm potholder loom (no hook required)
+ Upcycled T-shirt yarn (or other jersey material)
+ Darning needle
+ Crochet hook (optional)
+ Scissors
to warp
1. To warp the loom with your T-shirt yarn, start on a corner peg, leave a 4-inch / 10 cm tail, and bring the yarn directly across the loom and wrap around the corner peg on the opposite side. Bring it back toward the first side and loop it around the second peg.
2. Keep going in this manner until you’ve gone around all the pegs on the opposite two sides of your loom.
to weave
1. You will now begin to weave over and under the warp you just created. Cut off a long tail (4–6 feet / 1.2–1.8 m) and thread the end through the darning needle. Starting right where you finished the warp (no need to cut the yarn from the warp), begin weaving over and under each strand. When you get to the end, wrap the yarn around the peg and weave back to the opposite side, alternating the over-under pattern of the row before.
2. Repeat for all the rows and pegs, making sure you wrap your yarn around the peg after completing each row.
3. Once you finish weaving, leave a 4-inch / 10 cm tail at the end.
to finish the potholder
1. Moving right to left, start at one corner, take the first loop off the peg, and pass the next loop through the first one. (A crochet hook makes this go faster.) Release the first loop once the second one is passed through.
2. Repeat until all the loops have been fed through the previous one.
3. Tie off the last loop by threading it through the previous loop and pulling tight. Make a simple loop with the extra fiber and tie a knot at the base. Trim or weave in any tail ends.

weaving tips
1. Make sure you check your work for accuracy every few rows to be sure that you have an accurate weave that alternates the over-under pattern from row to row.
2. Packing your fibers tightly will ensure that you have a densely woven fabric. You can use the prongs of a kitchen fork to firmly pack down the woven fibers to ensure a densely woven surface.
3. Weaving is most easily done using several shorter lengths of fiber rather than trying to pull through a single, very long working string. When you use up the length of your working fiber and need to add another strand, you can either join the two ends of the T-shirt yarn using the method described on page 172 or make sure the two tail ends overlap each other for a few stitches and continue with the new fiber. These tail ends can be woven in at the end or trimmed.
PROTECT 180 PROJECT

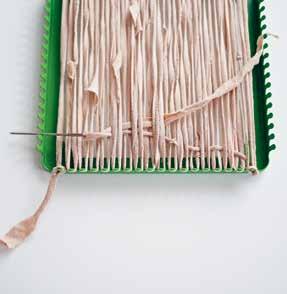

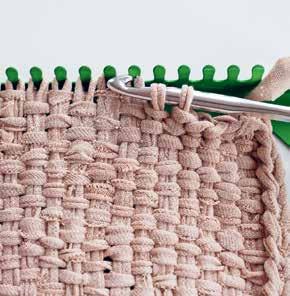
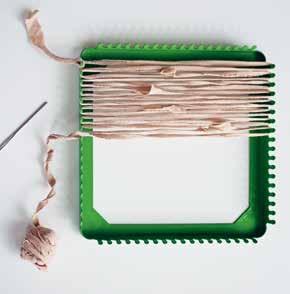
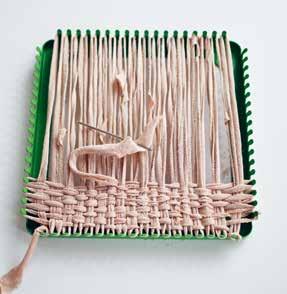
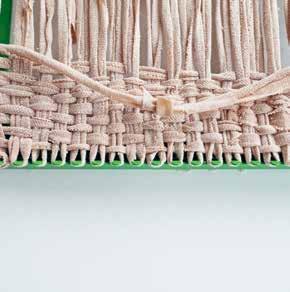


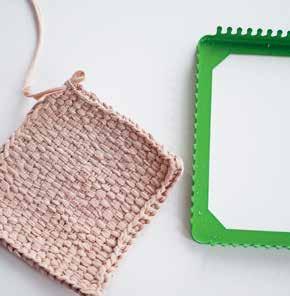
PROTECT 181
cardboard loom
For folks without a loom of their own, we return to good old chipboard of the sort found on the back of drawing pads. Making a potholder loom out of chipboard is as easy as cutting the same number of notches into all four sides of a chipboard square. If you’re feeling particular, you can certainly get out a ruler and pencil and mark accordingly, but after many iterations of this loom, we’ve found them all to be very forgiving. And though stringing a chipboard loom is slightly more laborious because of tight notches, we’ve found that there are other advantages. Those same tight notches tend to hold onto the warp nicely, meaning you’ll have less fear of popping the ends off the tabs while weaving, and the loom’s low profile means packing it into a tote and bringing it to the park is a no-brainer.
For another woven project that uses cardboard for the loom, see our Upcycled Woven Pouch on a Cardboard Loom, page 254.
SUPPLIES AND TOOLS
+Chipboard
+Scissors
+Ruler (optional)
+Pencil (optional)
1. Measure and cut a 9-inch / 23 cm square out of chipboard. (Many metal or plastic potholder looms are a standard 7 inches / 18 cm, and we size up a bit on the cardboard loom to create a satisfactorily sized potholder.)
2.Using a ruler or eyeballing measurements, mark ½ inch / 1.3 cm in from each corner of your chipboard square. This should give you eight marks, two on each side of each corner.
3. With a pencil, proceed to draw roughly evenly spaced marks approximately every ¼ inch / 6 mm between each corner mark. Resist the urge to get too particular here—as long as each side has the same number of notches, the weave will work out.
4.Follow the instructions for warping and weaving in the Woven Potholder project (page 180)and you’re off!
MATERIALS NOTE:
Past-their-prime kids’ leggings can be snipped into loops that can stand in for classic cotton potholder loops.
Cut the sewn cuff off the leggings with scissors. Working in roughly ½-inch / 1.3 cm increments and starting from the bottom edge, cut widthwise through the pant leg from one side to the other. Continue to cut loops from the ankle all the way up to the top of the thigh and repeat for the second leg.
You’ll need 36 loops for a typical 7-inch / 18 cm potholder loom, so cut a few extra just in case.

PROTECT 182
PROJECT
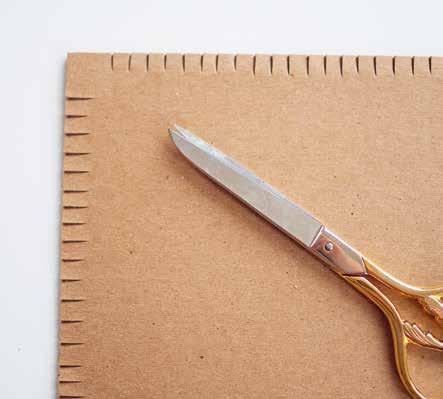
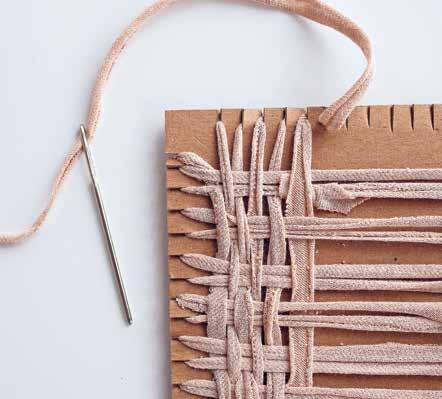
torn sheet woven potholder
If using woven cotton yardage like an old bedsheet, tear it into long strips and weave on a potholder loom for a larger, flatter project such as a place mat. Instead of finishing the edges by threading one pegged loop inside the other (as in the T-shirt version), use the remaining tail end and thread them through all the pegged loops. Any extra length can be knotted to make a simple loop for hanging.

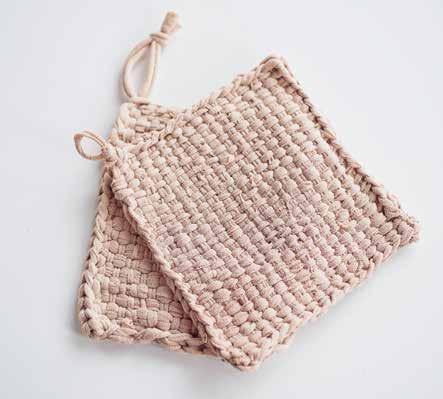

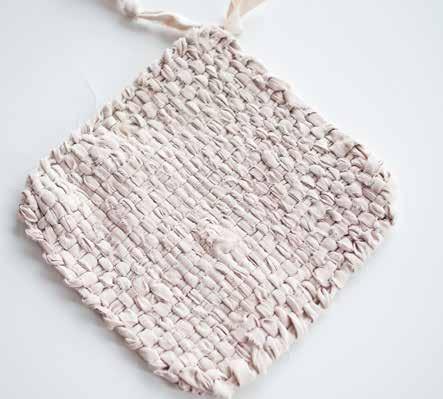
PROTECT 183
paper bag woven fly swatter
It took Erin some persuading to consider this project, but in the end, Rose’s impassioned stories about battling flies, plus the extremely satisfying work of weaving a plain paper bag into something so very beautiful and useful, convinced her. We’ve used a pair of chopsticks for the handle, but any slim stick—from craft dowels to unsharpened pencils—will work here.
SUPPLIES AND TOOLS:
+ Paper bag (handles removed)
+ Scissors
+ Chopsticks + Ruler
1. Carefully open the glued seams of your paper bag until you have a flat surface to work with. (It’s okay if you accidentally rip the bag; you can work around any tears.)
2. Use your ruler to mark off ¾-inch / 2 cm wide strips that are at least 11 inches / 28 cm long. You will want to make roughly 24 strips.
3. Fold the paper strips in half lengthwise, so they’re roughly ⅓ inch / 0.8 cm wide.
4. Starting with four folded strips, weave them over and under each other to make a woven cross.
5. Keep weaving in additional folded strips, making sure to go over and under opposite to the
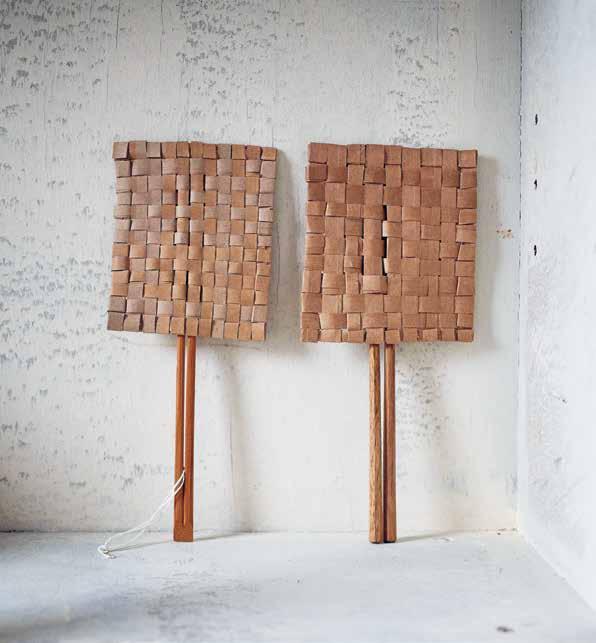
previous strip. While you weave outward, keep pushing the strips in toward the center to form a tight weave.
6. Weave the strips in this manner until you have a tightly packed rectangle that is roughly 11 strips wide and 13 strips long. You can always make the rectangle larger with extra strips if desired.
7. To finish the sides, start by working with every other strip. Beginning along one edge, find the perpendicular strips that lie underneath the last strip. Fold each of these underlying strips over (creasing them as you go), and then tuck it underneath the next strip so that it covers the first strip entirely. If you find you have too much length, pull the
opposite end so you only have 1 inch / 2.5 cm or so to tuck under. If you find it difficult to tuck the end under, you can cut the end into a slanted tip or use a blunt needle or scissors tip to gently press it underneath.
8. Repeat for all four sides using every other underlying strip.
9. Once finished with the first side, flip the woven surface to the other side and repeat with the remaining strips. This time, cut any extra paper length that is not easily tucked underneath the second strip from the edge.
10. Insert one chopstick at a time under and over three of the woven tabs in the center back of the woven rectangle. Repeat right next to the first for the second chopstick.
PROTECT 184 PROJECT
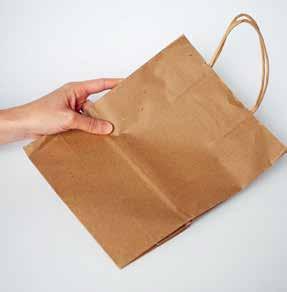
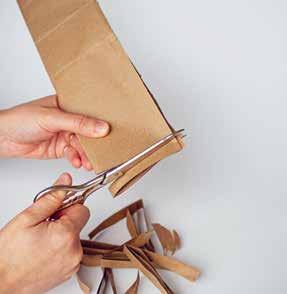
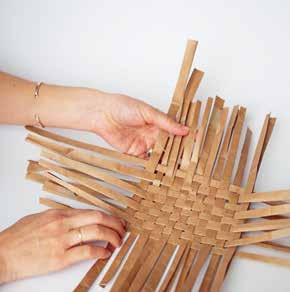
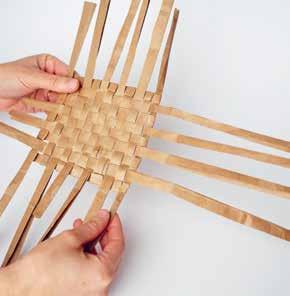
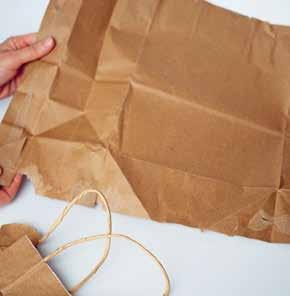


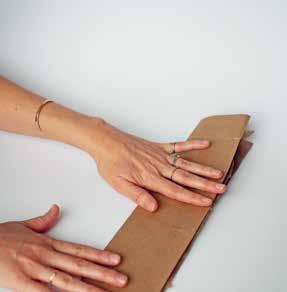


PROTECT 185
knotted jute trivet
This kitchen basic has many uses: a resting place for the hot kettle when it’s off the stove, a skillet on the countertop, or a hot casserole on your wooden table. Inspired by round rush trivets made on Sado Island in Japan, Rose set out to make a knotted trivet using only one, easy-to-source material—jute twine—and forgoing the need for additional craft supplies like round wooden rings.
You can explore making these trivets with different fibers, but we’ve found jute twine to be the best suited for this craft because the textured fiber conceals any mistakes when knotting and will not slip around on slick surfaces.
SUPPLIES AND TOOLS
+ 1 ball 2-3mm / 3-ply jute twine or any other string (approximately 100 feet / 30.5 m)
+ Cylinder jar or container roughly 4–6-inches / 10–15 cm in diameter
+ Darning needle
+ Scissors
1. Start by wrapping the jute twine around the circumference of the vessel, layering the rope in a thick bundle as you circle around. You will want at least 30–40 revolutions around the jar to get a thick inner core. Cut off the end and tuck it underneath the wrapped string to temporarily secure it.

2. Use a darning needle to thread three 6-inch / 15 cm lengths of jute under the bundle at evenly spaced intervals and tie. These strings will temporarily hold the bundle in place while you’re working.
4. Carefully slip the bundled string off your jar.
5. Cut an additional piece of twine roughly 40 feet / 12 m long and wind it into a tight ball. This will be the working twine.
6. Make a 6-inch / 15 cm loop with the tail end of your working twine and bring it underneath the bundle. Thread the wound up ball through the folded loop and pull to cinch it tight. This is your first hitch knot. The small tail end will remain loose and be incorporated at the end.
7. Starting with the working twine bundle, create a loop toward the outside edge of the bundle. Cross the traveling twine back over the front of the
bundle, then around the back and through the loop. Pull tight to secure; this is your second hitch knot.
8. Repeat that same hitch knot with the working twine, stacking your loops tightly and cutting off any holding ties as you come to them. (If you run out of twine before you finish, simply cut extra length and begin the same way you did in the beginning, incorporating any tail ends into the hitch knots as you work.)
9. Once you’re back where you started, tie the beginning tail end together with the working end about 1 ½ inches / 4 cm from the trivet to make a hanging loop. Trim any remaining twine.
PROTECT 186
PROJECT
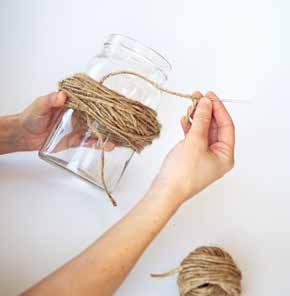


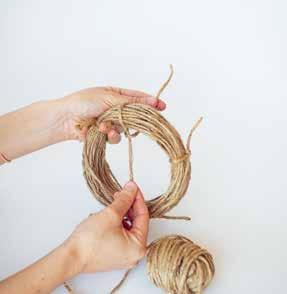
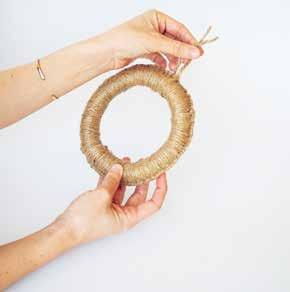

MATERIALS NOTE:
This tutorial can easily be adapted to make large or small trivets. Large yogurt containers, oatmeal cartons, and mason jars all work here, just keep in mind that the finished trivet will end up only slightly larger than the circumference of your jar.
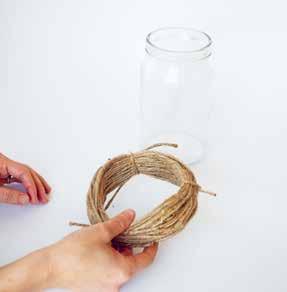
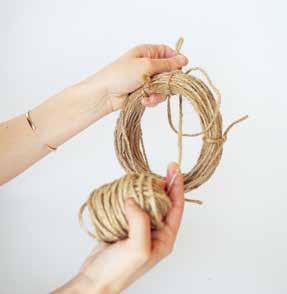
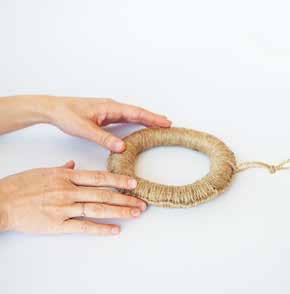
PROTECT 187

PROTECT 188
upcycled coasters
We’re not fussy when it comes to table dressings, but even no-frills folks like us can find value in a simple coaster for absorbing weeping water glasses or preventing red wine rings on furniture. These coasters require little more skill than cutting two squares of fabric and sewing up the sides, so a set is the perfect project for a beginning sewist. If you’ve recently made a pair of cutoffs, consider upcycling the legs of your old denim, expert sewing skills very much not required.
SUPPLIES AND TOOLS
+ Canvas drop cloth, denim scraps, or any other medium-weight fabric
+ Scissors
+ Sewing machine (or needle) and thread
+ Ruler

TIP:
If you feel like your corners aren’t turning out neatly, trim the triangle tip off each corner before reversing!
1. Cut out two 4 ¼ inch / 11.5 cm squares of fabric.
2. Stack the fabric squares on top of each other, lining up all the edges. If your material has a “right side,” the right sides should face in. Sew around the perimeter of the square ⅛ inch / 3 mm from the edge, leaving at least 2 ½ inches / 6.3 cm open on one side.

3. Reverse your work, pushing the sewn edges of the fabric square out through the 2 ½-inch / 6.3 cm opening. (Poke out the fabric corners with a scissors or pencil if need be.)
4. Fold the open seam inward to conceal the frayed edge and stitch the seam closed, ⅛ inch / 3 mm from the edge. Continue to stitch around the perimeter ⅛ inch / 3 mm from the edge. Be sure to backstitch every time you start and stop sewing.
5. Trim loose threads and repeat all steps to make additional coasters.

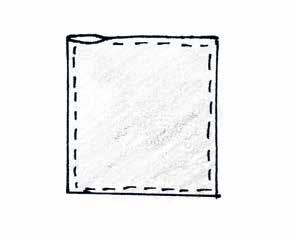

PROTECT 189
PROJECT


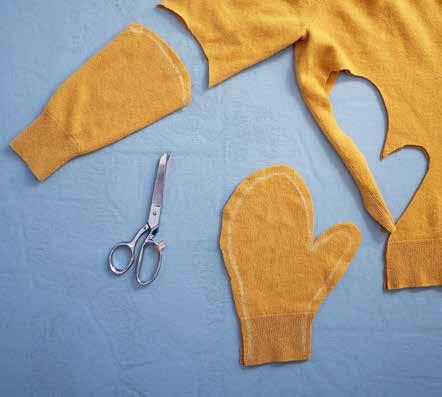

PROTECT 190
PROJECT
dust mitt
A felted 100% wool sweater makes the perfect material for an easy dust mitt. Antibacterial and antimicrobial properties of the wool inhibit the growth of mildew and bacteria, while naturally occurring lanolin in wool captures dust instead of pushing it around a surface, and the soft fibers won’t scratch delicate surfaces.
SUPPLIES AND TOOLS
+ 100% wool sweater, felted (see Felting/Shrinking Wool on page 192)
+ Sewing needle and thread
+ Scissors
+ Fabric marker or chalk
1. Place your shrunken sweater on a flat surface so the front and back are perfectly lined up.
2. Line your wrist up with the bottom hem of the sweater while placing your hand on the body of the sweater. With fabric chalk, trace the rough outline of your hand, making a space for your thumb and a larger space to fit the rest of your fingers. Leave a large margin around your fingers, forming a large mitt shape.
3. With sharp scissors, cut out the traced shape. Make sure to go through both the front and back layers of the sweater as you cut.
4. Cut an additional small strip from the remaining fabric, roughly 3 by ¾ inches / 7.6 by 2 cm. This will be made into a loop to hang your mitt.
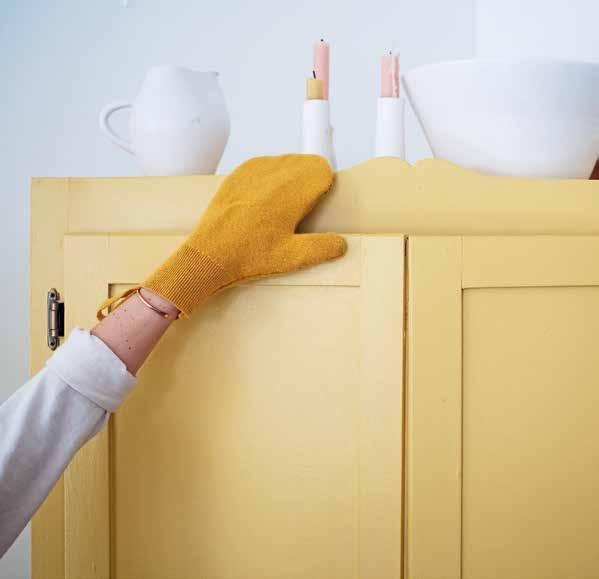
5. Pin cut-out mitt layers together.
6. With a needle and thread, start sewing the two sides of your mitt together. A simple whipstitch (page 105) works best, wrapping the thread around the edges of the fabric with every stitch.
7. Sew all the way around the cut-out form, up and over the finger area, then around the thumb, leaving the bottom of the cuff open.
8. Cut off any loose threads and flip the mitt inside out to conceal the sewn seam.
9. With the extra strip of felt, sew the two short ends together and attach to the base of the mitt right below the thumb and concealed in the inside of the mitt.
CARE: Dust off your mitt by shaking it into a trash can. To wash, use mild soap and water and let air-dry. The wool dusting mitt will improve with use and washing.

TIP:
Entice your kids to do some light cleaning by turning this mitt into a dust-eating puppet. Embellish the mitt with eyes, nose, or ears, making note of where these features would lie when wearing the mitt on your hand. Details can be added by felting, stitching, or even gluing additional fabric.

PROTECT 191
PROJECT
hot water bottle cozy
If you’re someone comforted by a good old-fashioned rubber hot water bottle, keeping it extra warm in a soft cover takes it to the next level. A hot water bottle cozy helps insulate the hot water inside, keeping it warmer for longer, and it protects skin from getting scalded by a too-hot bottle. Every sweater will behave differently, but we’ve had luck fitting both ½ and 1 liter bottles into the cuffs of small and large felted sweaters.
SUPPLIES AND TOOLS
+ 100% wool sweater, felted
+ Hot water bottle, ½ or 1 liter
+ Scissors
+ Needle and thread
1. Insert the water bottle through one cuff of the sweater. Tug into place so any side seams line up along the sides of the bottle.
2. Mark a straight line along the bottom of the bottle and cut along the sleeve, leaving a ¼-inch / 6 mm seam allowance. (The cover will fit best if snug and stretched a bit over the bottle, so don’t be tempted to leave too much extra room.)
3. Turn the cut-off cuff inside out and use a whipstitch to bind the cut edge together.
4. Reverse the cover and insert the empty bottle through the neck of the cover and fill.
FELTING/SHRINKING
WOOL: Any sweater that is 100% wool (alpaca, merino, cashmere, angora) will shrink if washed and dried in a conventional machine. And while this is unfortunate when it happens by accident, it’s a good thing when upcycling an old sweater into a water bottle cozy or a dust mitt. Just how much a knit will shrink is hard to predict, but it usually will still have some give to it and can stretch to accommodate a hot water bottle through the narrow opening of the cuff. To increase the felting potential of a garment, place the garment in a pillowcase and wash using hot water. Felted wool is excellent for all sorts of crafts and especially helpful because it doesn’t fray and doesn’t require hemming. Consider putting it to use to make a Kit Case and Fold-over Pouches (pages 112, 108).

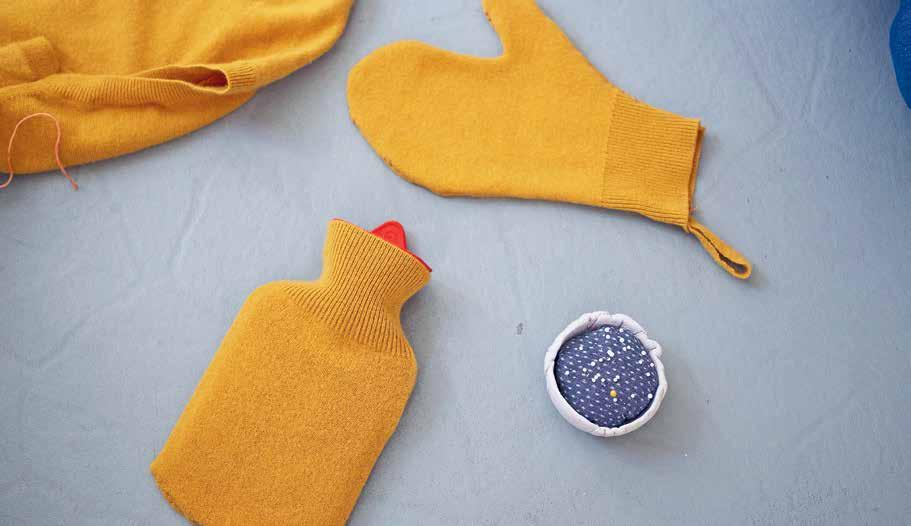
PROTECT 192
bulky yarn
winter hat
While we’re on the subject of staying cozy, we couldn’t help but mention that the same method you might have used to make the Simple String Bag in chapter 1 (page 70) can be used to create a simple and sweet winter hat, no expert knitting skills required. Soft, fluffy yarn of the sort used for pompom making works into a quick winter hat on a round knitting loom.
SUPPLIES AND TOOLS
+ 12-inch / 30.5 cm embroidery hoop (use the inner circle, without the tightening screw)
+ 25 round wooden clothespins
+ 1 skein bulky or super-bulky yarn
+ Darning needle
+ Scissors
+ Masking tape cardboard core (optional)
+ Extra bulky yarn (optional)
1. Fasten the clothespins evenly spaced around the perimeter of the embroidery hoop.
2. Cast on and knit (as in string bag instructions) until the knitting reaches 13 inches / 33 cm in length.
3. Cast off and cinch the top of the hat closed (as instructed for string bag).
4. Weave in any tail ends.
5. Optional, add a matching pompom (see Pom-pom on page 300). Secure the pom-pom tie through the cinched opening of the hat and tie a few knots to secure. Trim any tail ends.
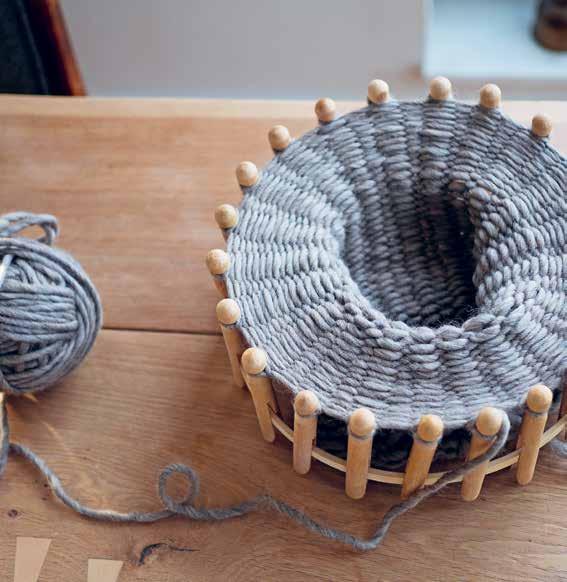

PROTECT 193
PROJECT
scout scarf
The Scout Scarf is a wonderful triangle-shaped mini-shawl designed by knitwear company Misha & Puff. It can be worn over the shoulders, around the neck, made bigger or smaller to suit the wearer, and—we promise—even though the needle size is somewhat smaller than recommended, it can be knit on bamboo skewers.
SUPPLIES AND TOOLS
+ 1 skein of worsted-weight yarn
+ DIY knitting needles made from bamboo skewers (page 160) or US size 4 / UK size 9 knitting needles (straight or circular)

MATERIALS NOTE:
This scarf can be made using many different types of yarn weights because it just works up into a simple triangle where sizing doesn’t really matter. This pattern is worked in garter stitch, which means every row will be knit, creating a ridged surface.
finished measurements
32 inches / 81 cm along long side of triangle by 8 inches / 20 cm deep casting on
Cast on 4 stitches (see page 156 for tutorial).
increase
ROWS 1–3
Slip the first stitch knit-wise, then knit to the end of the row.
ROW 4 (RIGHT SIDE)
Slip one stitch knit-wise, knit until three stitches remain, knit front and back, knit 2 (1 stitch increased).
Repeat rows 1 through 4 until there are 45 stitches on the needle.
Knit 5 rows, slipping the first stitch of each row knit-wise and ending with a wrong side row.
decrease
ROW 1 (RIGHT SIDE)
Slip one stitch knit-wise, knit until 4 stitches remain, knit 2 together, knit 2 (1 stitch decreased).
ROWS 2–4
Knit 3 rows, slipping the first stitch of each row knit-wise.
Repeat decrease rows 1–4 until there are 3 stitches on the needle.
Cast off 3 stitches.
finishing
Weave in ends and block (see Blocking tip for details).
SLIPPING A STITCH:
Passing a stitch from the left needle to the right needle without knitting it.

BLOCKING: Wetting a finished knit to even out stitches and give shape to the form. While there are many ways to go about it, all include wetting the knit, removing excess water, laying the garment on a flat surface (sometimes pinning it in place), and letting it dry completely. For this pattern it is completely optional and definitely okay to skip altogether.
KNIT 2 TOGETHER: Inserting the right needle into two stitches at the same time and wrapping the working yarn around the right-hand needle, pulling through the two stitches as you normally would one, to create a new stitch.
PROTECT 194
PROJECT
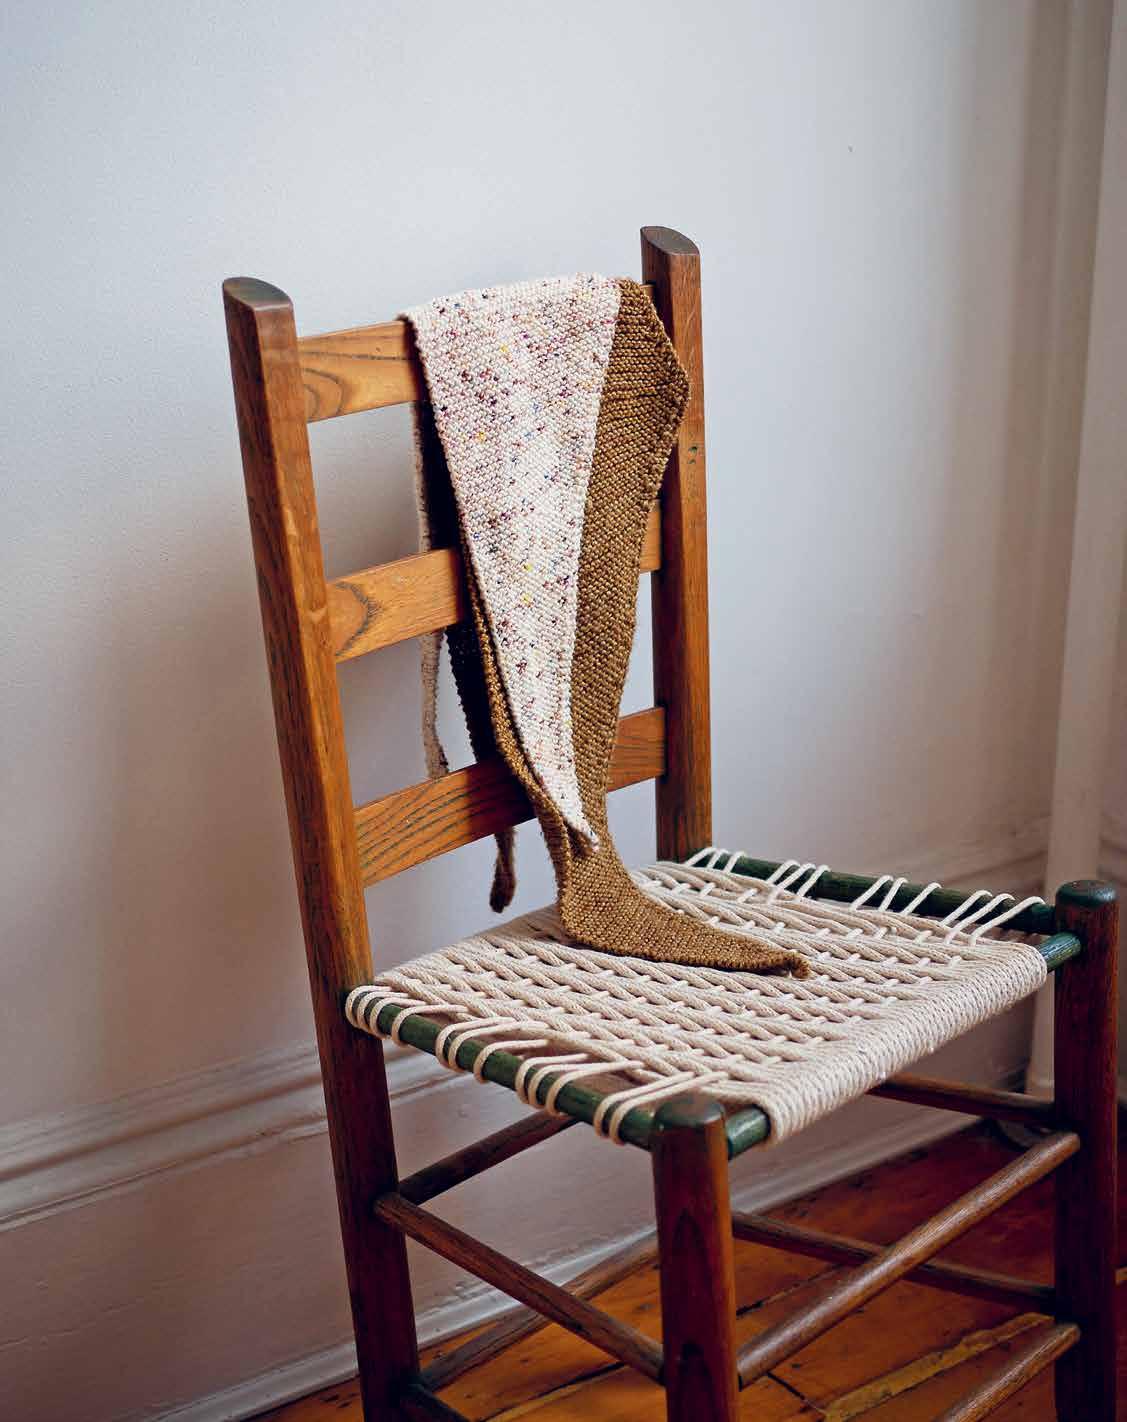

comfort & carry


04
meaning comfort expression
Objects around us hold our attention and our love.
It is hard work to hold everything and it never ends.
—Maira KalmanIn a way, and at the risk of overstating things, we keep company with the objects in our midst. This company can sometimes feel burdensome—encumbered with the weight of time or relationship or value. But it can also be a comfort. Objects that fill an apartment—or a lifetime—serve as physical reminders of memories and people and places we’ve loved. They might be opportunities for self-expression, a way to communicate our particular sensibilities in a complicated world. They might bring mundane and inexplicable delight—a favored mug for morning coffee, a basket that fits on a shelf just so. (Sometimes, no doubt, they’re entirely pragmatic, and we end up with whatever plunger was available during one very-late-night run to the pharmacy. We can’t be precious about everything.)
In this chapter, we’re exploring what happens when objects comfort and carry our belongings in the physical sense—providing literal soft spots to land in the form of pillows and rugs or helping us carry our loads in the form of pouches and bags—and also in a more spiritual sense. When curtains and pillowcases and even the rugs under our feet are made by hand, using materials that have value to us personally, how does that change our relationship to that item? A curtain sewn together with a great aunt’s embroidered handkerchiefs or a bag refashioned from a no-longer-needed baby wrap can comfort and carry us, two ways.
Embracing that comfort sometimes means eschewing the quick fixes and easy access of consumer culture. Rug making or patchwork piecing can be a slow-burn kind of route to tending to our creature comforts. But the finished projects are all the richer—and, we’d argue, more comforting—for the time they take to make. Try not to be too intimidated by the projects in this chapter. Remember that particulars of scale and scope are up to you, and dollhouse-sized rugs and pillows are just as welcome as human-sized ones.
COMFORT & CARRY 198
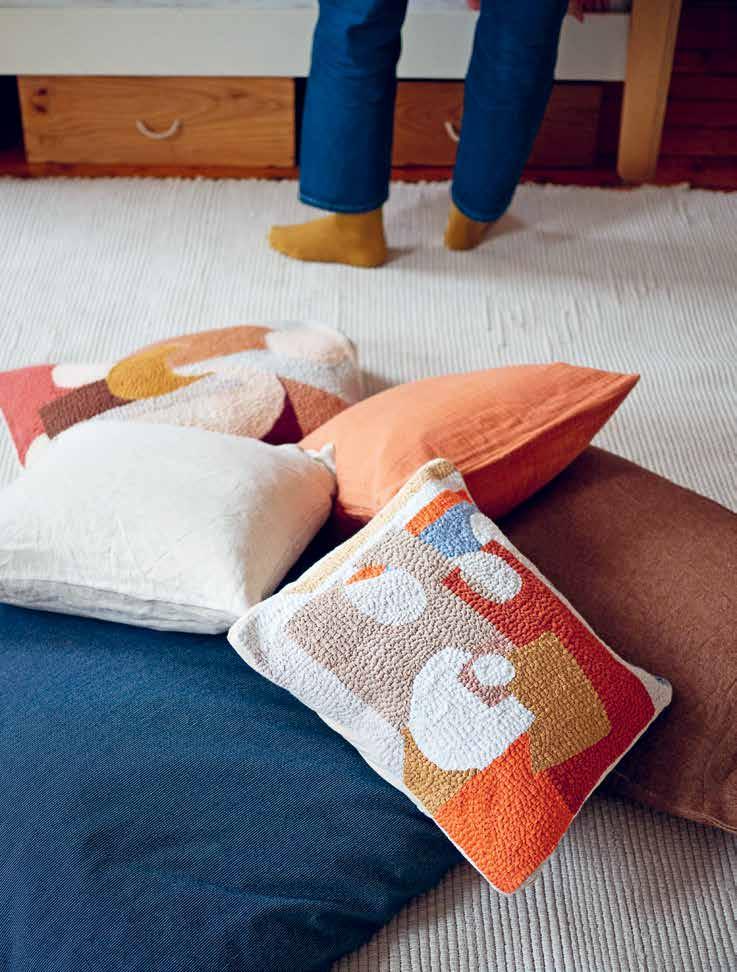
punch needle
Rose learned the art of punch needle rug hooking from her mom nearly twenty years ago and has been teaching it to other folks for the past decade. The simple, meditative craft can turn something as common as old bedsheets or T-shirts into objects of value and meaning. You might see the list of punching supplies and be put off by the quantity and specificity, but this one simple and efficient needle opens the door to so much open-ended creativity. Making rugs can fill a home with soft goods ranging from large floor coverings to cushions, bags, baskets, toys, and art. You can keep things simple, sticking to a solid color, or design to your heart’s content. Punch needle rug hooking is easy to learn, simple in its technique, and incredibly soothing to practice.
Projects can be quickly tucked away under sofas and couches, and stitches can be worked up in short spurts over long periods of time. It’s the perfect craft for a small apartment, a busy parent, and an active mind. With your foundational materials—a punch needle, backing cloth, and a frame—there’s an unlimited number of options and possibilities. We suggest using upcycled yarn and hardware store butcher’s twine in combination with specialty yarns as a way to use what you already have and help keep costs to a minimum.
Don’t be fooled by the simple practice of punching—these stitches are made to last. Handmade rugs have been used for decades in Rose’s family and she’s known other rugs to last generations. They get walked on and spilled on and washed and never seem to diminish in quality.
RUG HOOKING: Dating
back to the 1840s in New England, the Canadian Maritimes, and Newfoundland. Considered to be a craft for the poor, constructing rugs with simple tools and repurposed materials was a way to recreate the expensive woven rugs seen in the homes of wealthy merchant families. While a simple crochet-like hook with a wooden handle was the first and most common tool for making rugs, the punch needle, like the one used in this book, was invented forty years later, in 1880, as a faster and easier alternative to the hook. Both the traditional hook and punch needle are used to create a pile, or looped surface, of fiber and can make a large variety of rugs and other soft goods.
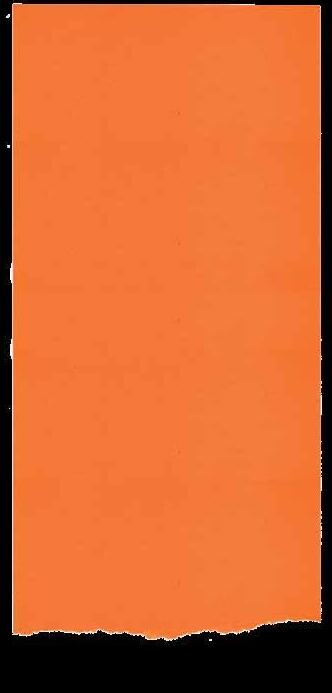
COMFORT & CARRY 200 TECHNIQUE
foundational punch needle supplies
MONK’S CLOTH: Sometimes also called backing cloth or foundation cloth, this tough woven cotton fabric is the surface which will be filled in with fiber.
WOODEN STRETCHER BAR FRAME: A frame built to size that will tightly secure the monk’s cloth and make a secure surface to punch. Stretcher bars are widely available at art supply stores.
PUNCH NEEDLE: Tool used to create stitches and loops of fiber. (We recommend the Oxford Punch Needle; if using a different brand, instructions for threading might vary.)
FIBER: Yarn or stripped material used with a punch needle to create punched rugs.
MATERIALS NOTE:
Due to the woven nature of the monk’s cloth, the cut edge will easily fray, and anything not cut on the same grain line will slowly unravel until it is even.

building and stretching a frame
SUPPLIES AND TOOLS
+ Four stretcher bars to make either a rectangle or square
+ Monk’s cloth that is 4 inches / 10 cm longer and wider than your stretcher bar frame
+ Staple gun
+ Staples
1. Connect the corners of the four stretcher bars to form right angles.
2. Secure each corner where the stretcher bars meet with a staple or two.

three rules to punching
1. Keep your needle close to the foundation cloth while creating stitches. Lifting too far from the backing cloth will create messy stitches and pull out your loops.
2. Press the needle all the way down, until your handle meets the cloth. This will ensure you are creating the same size loops every time you punch.
3. The open slot of your punch needle should face in the direction you are punching. When changing the direction you are punching, make sure to turn your needle with it in the backing. When you stop working, always make sure your needle is left in the backing cloth.
3. To stretch the monk’s cloth, place the wooden frame in the center of the cloth, making sure it’s equal distance from all sides of the fabric. Starting with one edge, fold the cloth up over the frame and place a staple in the center. Working out to the corners, pull the fabric taut as you place the staples, working both sides evenly. Stop before stapling the corners.

4. Now, turn your work to the opposite side of the stretcher bar frame. This is where you want to stretch your cloth as much as possible while you secure it with staples. Start in the center and work out to the corners, pulling the fabric as tight as it will go and then securing with a staple. Again, do not secure the corners yet. Repeat for the remaining two sides.
5. For the corners, fold the triangle down toward the center of the frame, fold the right side of the extra fabric over the center triangle, and tuck the fabric from the left side in with it. Secure the fold with two staples. Repeat for the remaining three corners.
Once you become used to assembling and stretching a stretcher bar frame, you will be free to create any size rug you want.
COMFORT & CARRY 202
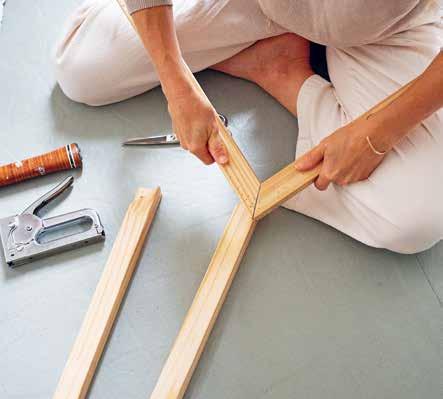
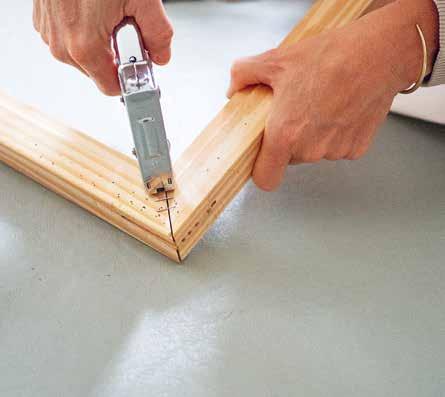

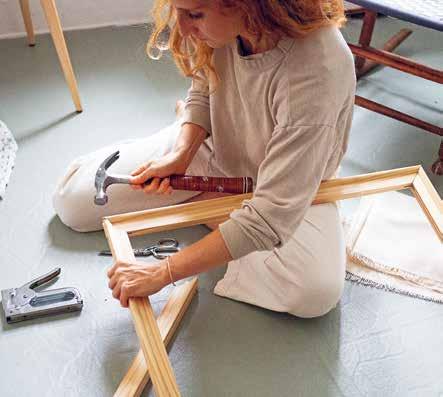
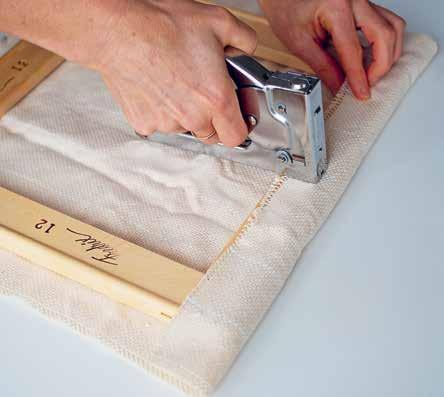

COMFORT & CARRY 203
threading your punch needle
1. Insert the end of the yarn through the hole on the tip of the Oxford punch needle from the side of the tool with the slit in the handle and out through the back, leaving a small tail hanging.
2. Bring the remaining yarn down the slit of the tool and secure the yarn into the bottom by pressing it into the bottom of the slit.
3. To make the yarn lie flat inside the slit, pull the tail end forward and back until the yarn is inserted into the tool. You must make sure the yarn is sitting all the way inside the punch needle before you start.
beginning to punch
Whether you’re following a drawn shape or working freehand, you’ll begin by punching the outline of your design.
1. To begin punching, insert your needle into the fabric all the way to the wooden handle. Make sure the open slot on the needle is pointing in the direction you are punching.
2. Gently pull the needle out, but keep it as close to the fabric as you can.
3. Move the needle forward a small increment without lifting the needle tip, and then reinsert it into the fabric all the way to the wooden base. (As a rule of thumb, shoot to make 4–7 stitches per inch / 2.5 cm.)
4. Continue in this manner to complete the entire outline and continue to fill in the interior of the shape.

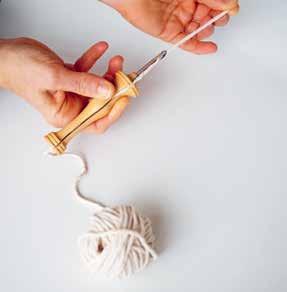


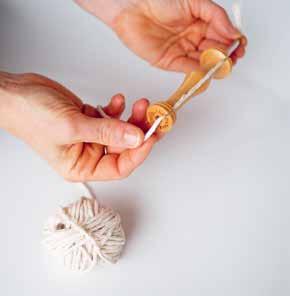

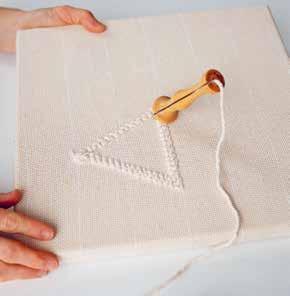
TIP:

To begin punching where you last left off, start in the same hole as your last stitch. You will not notice where one piece ended and the other began. If stitches are pulled out while you are punching, you will need to pull back the extra slack of fiber and begin after the last intact stitch.
COMFORT & CARRY 204
filling in a design
1. As you change the direction in which you are punching, leave the needle inserted all the way in the backing cloth to rotate the needle in the new direction.
2. The quickest way to fill in a shape is by circling the path of the outline (and slowly filling in the center) or with straight vertical lines, forward and back.
3. When you want to change fibers or are finished filling in an area, gently pull out your punch needle from the backing cloth, pinch the fiber with your non-punching hand, and pull the needle farther back. Still pinching the fiber with your non-punching hand, cut, leaving a ¼-inch / 6 mm tail. With the closed end of your scissors, poke the tail back through to the loop side to be trimmed later.
removing your work from the frame
Use a flathead screwdriver to pry out all the staples that are securing your monk’s cloth. You will have a good deal of extra fabric around your punched fiber. Depending on your finished project, you will be either whipstitching your edges or incorporating them into a sewn project. In either case, a quick border of white glue applied around your design (not directly on your punched fiber) will help protect the cut cloth from unraveling too close to the stitches.
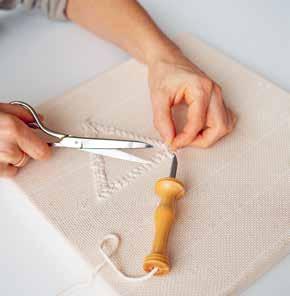

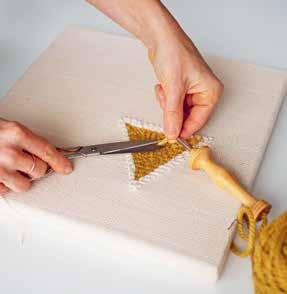
TIP:
When hooking smaller pieces, it’s easiest to hold your frame with your nonpunching hand on top of the frame and rest the bottom edge on your waist or lean the frame against a table. Since the tool is poking through the fabric, it cannot sit flat on a surface or your lap!
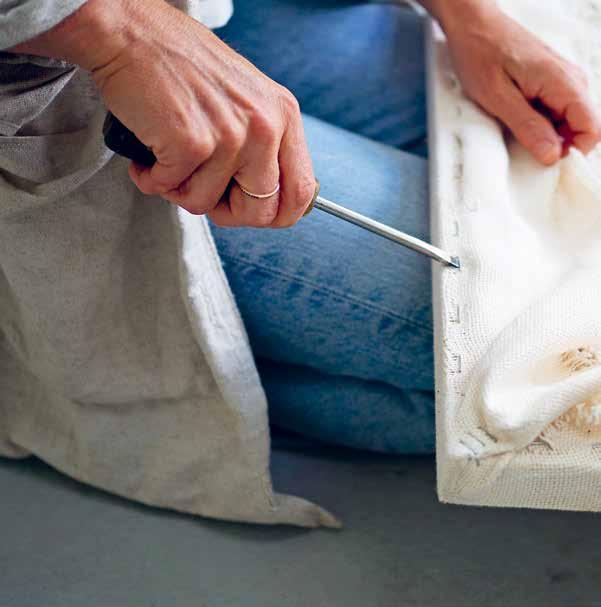
COMFORT & CARRY 205
loop side cleanup
The stitches lie flat on the side of the rug you are working on. The reverse side of the fabric (the back) will have small loops also called a pile. You can choose either side of the rug to display. Do not be alarmed if the loop side appears to be messy. You can trim any long loops later by cutting stray yarn down to size. It does not matter how many blunt ends you end up snipping, your fiber is still very secure in your backing and cut ends blend in seamlessly with the loops. If you want a textured surface that contains both flat stitches and a looped pile, you can alternate punching on the front and back of your frame.
fixing mistakes and removing stitches
To remove an area of punched fiber, loosen a single stitch by carefully pulling it up with your fingers or the tip of a punch needle from the stitch side of your rug. Gently working with that one stitch, pull out the stitches that you would like to remove. Cut the pulled-out yarn from the rest of the stitches leaving a 1/4-inch tail. Poke any tail ends back through the foundation cloth with the point of your punch needle. Re-punch the pulled-out section, starting in the same hole as you left off.
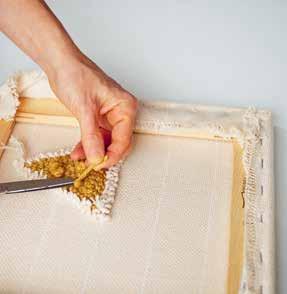


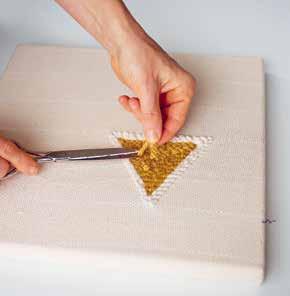
TIP:
Sometimes stitches come out while you punch. This can happen because your fiber is too thick for your punch needle, there is a knot in your fiber, or because something is preventing the yarn from moving freely.
COMFORT & CARRY 206
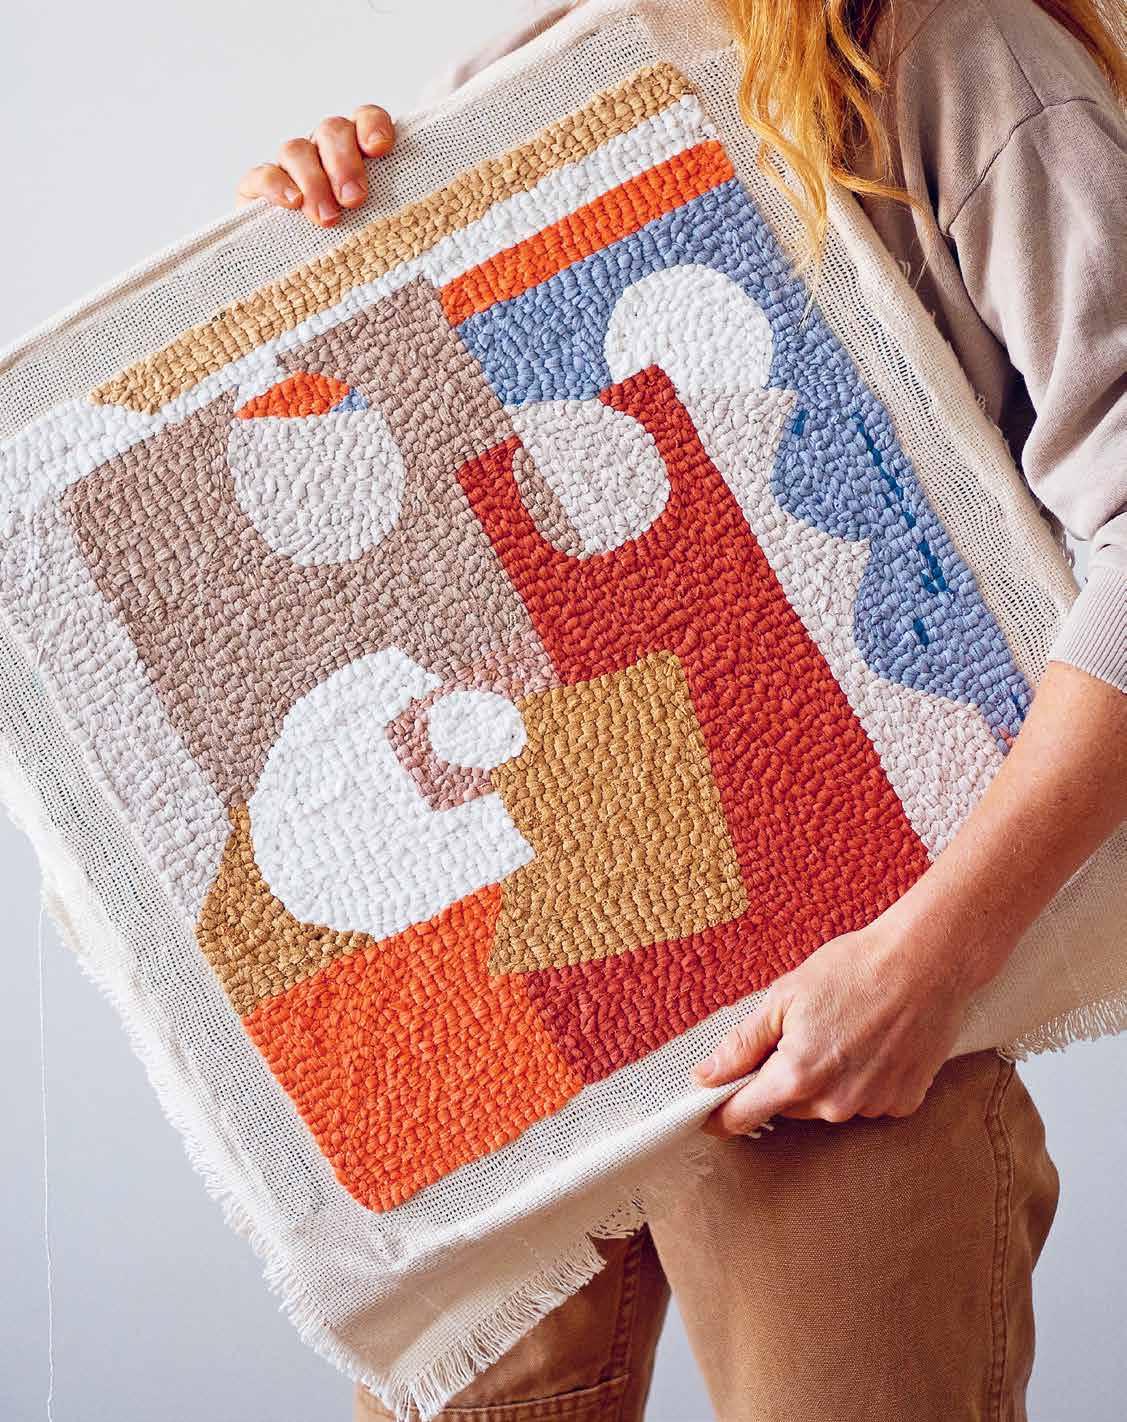
reversible butcher’s twine and wool punched rug
The hardest part of making a rug is starting. If you’ve never built or stretched a frame before, the process might feel daunting, but it’s actually quite a simple process.
Cotton butcher’s twine from the hardware store is a common, durable, and cost-effective material that works beautifully with a punch needle and can be used in combination with other luxury yarns—like the brown rug yarn shown in our finished rug— to help stretch your dollar.
Rose filled this rug in wavy stripes and in no particular order, but it can just as easily be filled in with neatly stacked straight lines. Just be sure to outline your perimeter first so your border is nice and neat, then fill it in any way you like. Pile side up or down (or mixed) is up to you, and when it’s time for washing, just throw it into the machine and dry flat.
SUPPLIES AND TOOLS FOR THE FRAME
+ Stretcher bars (4): two 46 inches / 116 cm long and two 30 inches / 76 cm long
+ Piece of monk’s cloth, 50 by 34 inches / 127 by 86 cm
+ Staple gun
+ Staples
FOR THE RUG
+ Fabric marker or chalk (optional)
+ 8 balls 24-ply cotton butcher’s twine (375 feet / 114 m each)
+ Rug Yarn (12-ounce / 100–130 m / 100 g) or Super Bulky Weight Yarn 200 yards / 100 g
+ No. 10 regular punch needle
+ Scissors
FOR FINISHING
+ Darning needle
+ Iron and dishcloth (see Tip on page 210)
1. Begin by building and stretching your frame (see page 202).
2. Sketch out your design onto the stretched surface. Remember that you cannot punch into the wooden frame and take that into account when designing. If it helps, draw a rectangular border on the cloth’s surface to give yourself a visible perimeter.
3. With your punch needle and fiber, begin to fill in the design.
4. Once finished, trim any tail ends and long loops on the back (loop side) of the rug.
5. Remove work from frame. (See page 205.)

TIP:
The finished dimensions of the rug are 43 ½ by 27 ½ inches / 110 by 70 cm, but you can use bigger or smaller stretcher bars and monk’s cloth to suit your need and space.)

COMFORT & CARRY 208 PROJECT


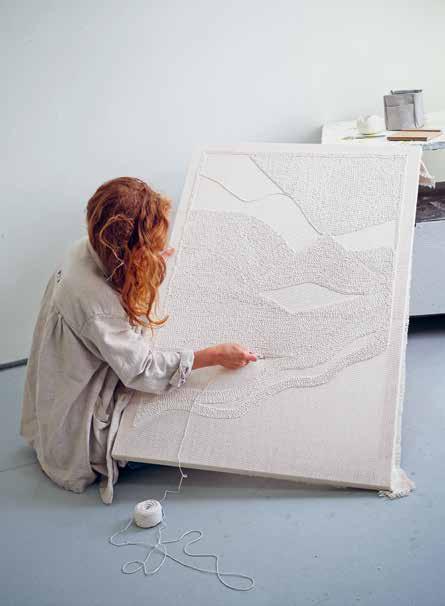

COMFORT & CARRY 209
to finish the edges
1. Glue and trim your backing cloth to within 1 ½ to 2 inches / 4 to 5 cm from the hooked fiber.
2. Thread a darning needle with a long piece of extra yarn and insert your needle into the top edge of the rug as close to the top of the stitches as you can get. You will be inserting your needle from the side you consider the wrong side of the rug and exiting out through the right side. Pull the yarn almost all the way through until all that remains is a small tail. Circle the needle and yarn back over the top of the cloth and reenter right next to the previous stitch. Continue to whipstitch around the entire perimeter, working corners as tightly as you can and rethreading your needle with extra yarn as you need it. Conceal the tail end by reinserting it back into the loops and cutting off the rest.
TIP:
To relax any uneven loops, or uncurl the rug, apply a cold, wet dishcloth to the loop side of your rug and press with a dry, hot iron. Press the iron down and hold for 5–10 seconds before moving it to another area. Work around the rug in this way till satisfied. (When the dishcloth gets dry, dip it in cold water and wring it out as needed).
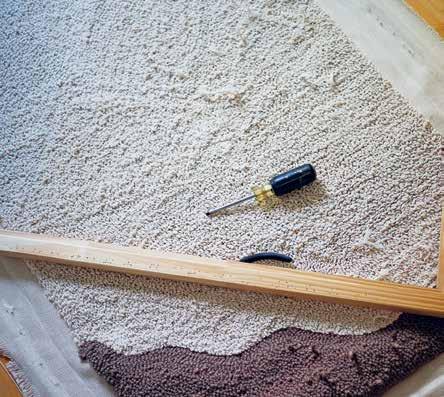

COMFORT & CARRY 210
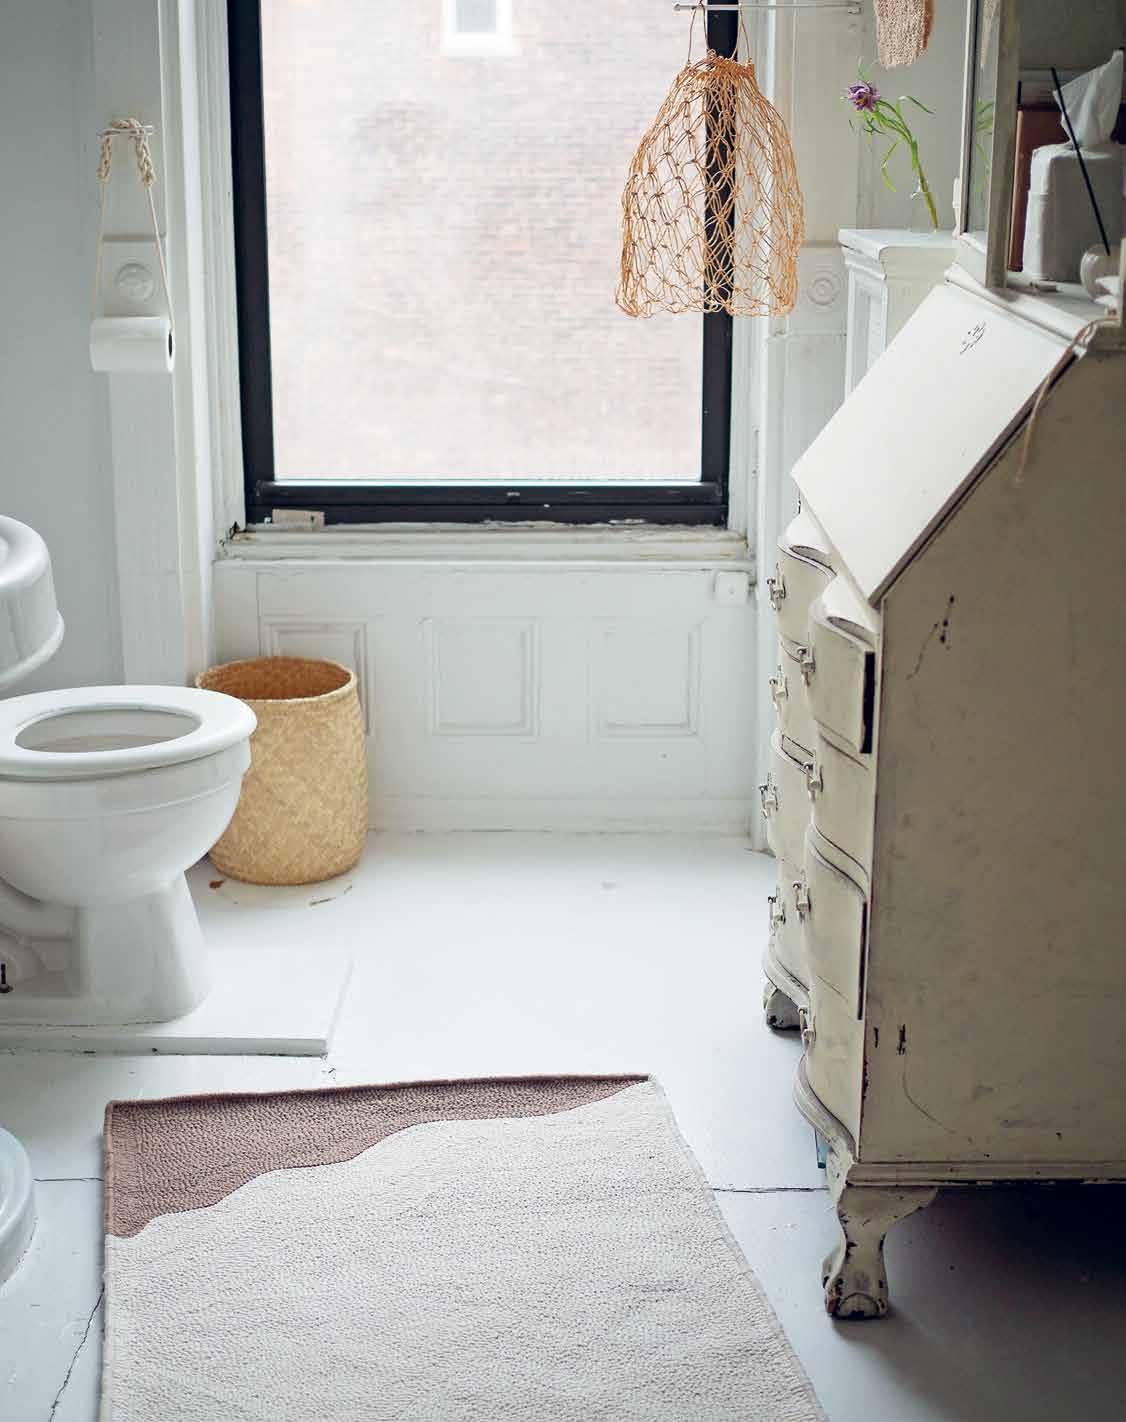
upcycled fabric punched bag
We’re officially past our baby-wearing days, but we carry a little bit of those memories with us in the form of a bag made from yarn we cut from a jersey baby sling. No sling, no problem: any upcycled jersey yarn made from old T-shirts or jersey sheets would work here! See Upcycling Fabric into Yarn on page 168 for instructions. This project gives you texture, color, form, and function. We kept our design simple with a solid color and an open top. Punched in one piece, the front and back sides of the bag mirror each other so they can easily be hand seamed with a darning needle. If you punch your stitches carefully, this bag could even be reversible.
SUPPLIES AND TOOLS
+ Frame large enough to accommodate both sides of the body of your bag
+ Piece of monk’s cloth that is 2 inches / 5 cm longer than each side of your frame
+ Staple gun and staples
+ Upcycled T-shirt yarn (or other jersey material)
+ No. 10 regular punch needle
+ Darning needle
+ Chalk or fabric pen
+ Paper and pencil
+ Iron and dishcloth (optional, for finishing; see Tip on page 210)
+ Scissors
+ White glue (optional)
+ Leather strap
1. Sketch out the shape of your bag, to scale, onto a piece of white paper. Rectangles, squares, and symmetrical oval shapes are the best and easiest to create. Cut out your shape from the paper.
2. Stretch a frame with monk’s cloth large enough to accommodate the two sides of your bag.
3. Position your shape so its top edge sits 2 inches / 5 cm below the top edge of the frame. Trace using a fabric pen.
4. Flip the shape so the bottom edges line up and trace again to make a mirror image of the opposite side.
5. Refer to Punch Needle technique for outlining, filling in your design, cleaning up loops, and removing from frame (pages 205–206).
6. Glue around the border of the punched shape and trim the monk’s cloth so a 2-inch / 5 cm perimeter remains.
7. With a darning needle and matching upcycled yarn, whipstitch the top edges of the bag to conceal the raw monk’s cloth edge. See “to finish the edges” on page 210 for more details.
8. Fold the bag in half so the front and back match up. Whether the loop or stitch side faces out is up to you. Whipstitch the remaining raw edges of the monk’s cloth together to seam.
9. Press the bag with a wet, cold dishcloth and hot iron to even out the stitches. (Optional).
10. Attach a strap to either side of your bag using thread and a needle. If you have a leather strap, use an awl to make three adjacent holes that can then be sewn onto either side of the bag.

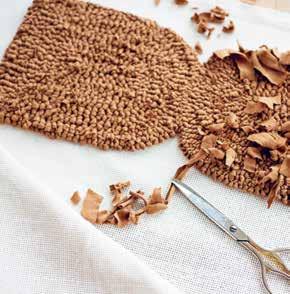

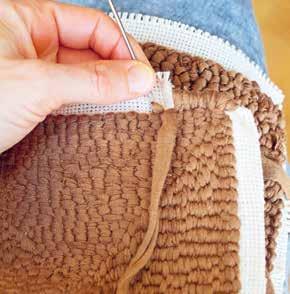
COMFORT & CARRY 212 PROJECT

envelope pillow covers
The simplest way to cover a pillow is with an envelope-style case. These cases don’t require anything in the way of special skill or hardware—no need for zippers or buttons or even, truly, a measuring tape. Use your pillow insert as a guide and eyeball the rest, and you’ll be able to re-cover every pillow in your collection should the mood strike.
SUPPLIES AND TOOLS
+ Medium-weight fabric (roughly two and a half times longer and 4 inches / 10 cm wider than the pillow form you are covering)
+ Sewing machine and thread
+ Sewing pins
+ Pillow form
1. Fold over and stitch the two short sides of the fabric to make a ½ inch / 1.3 cm simple hem.
TIP:
The best way to gauge the exact fabric dimensions needed is to cover the pillow form with fabric and mark off where you need to trim. Make sure you leave an inch or so on the right and left sides, and at least 6 inches / 15 cm of overlap in the center of your cushion.

2. With the right side of the fabric facing up, place the pillow form in the center of the hemmed fabric. Fold one hemmed edge over the pillow and bring the opposite edge over to meet it. The ends should overlap by roughly 5 inches / 13 cm in the center.
3. Slide the pillow form out the bottom opening and pin the unhemmed sides in place.
4. With a sewing machine, sew the two unhemmed sides, leaving a 1-inch / 2.5 cm seam allowance.
5. Trim the seam allowance to ½ inch / 1.3 cm and turn your work right side out through the envelope seam.
6. Gently poke out the four corners and insert the pillow form through the open center flap.


COMFORT & CARRY 214 PROJECT
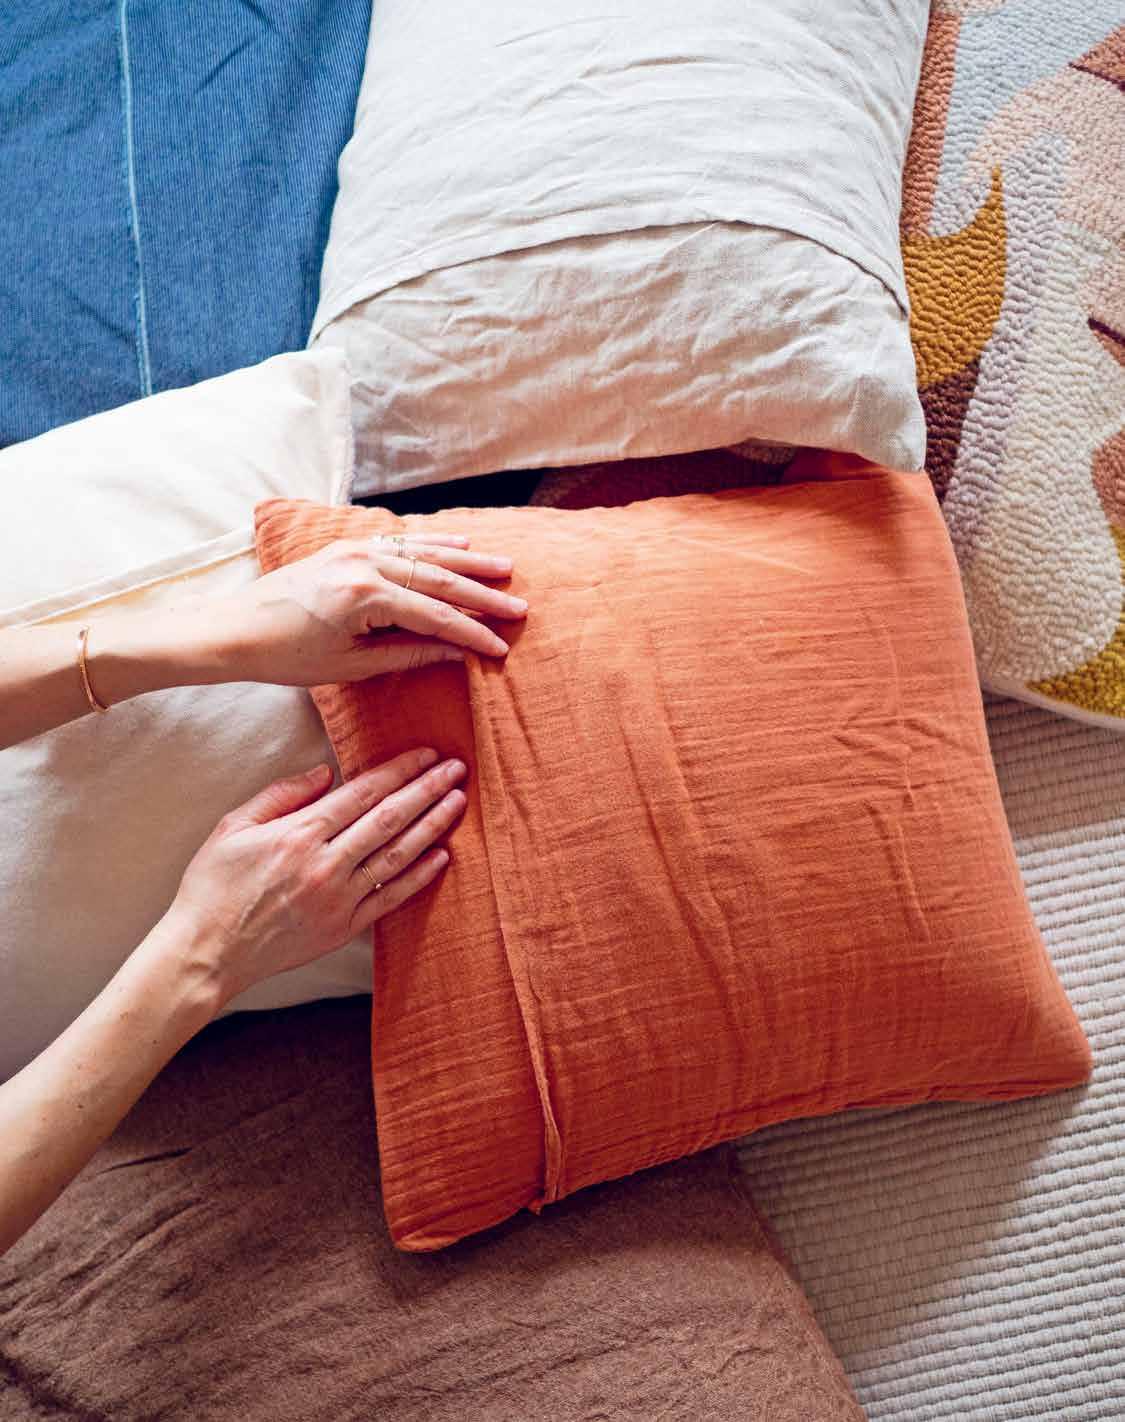
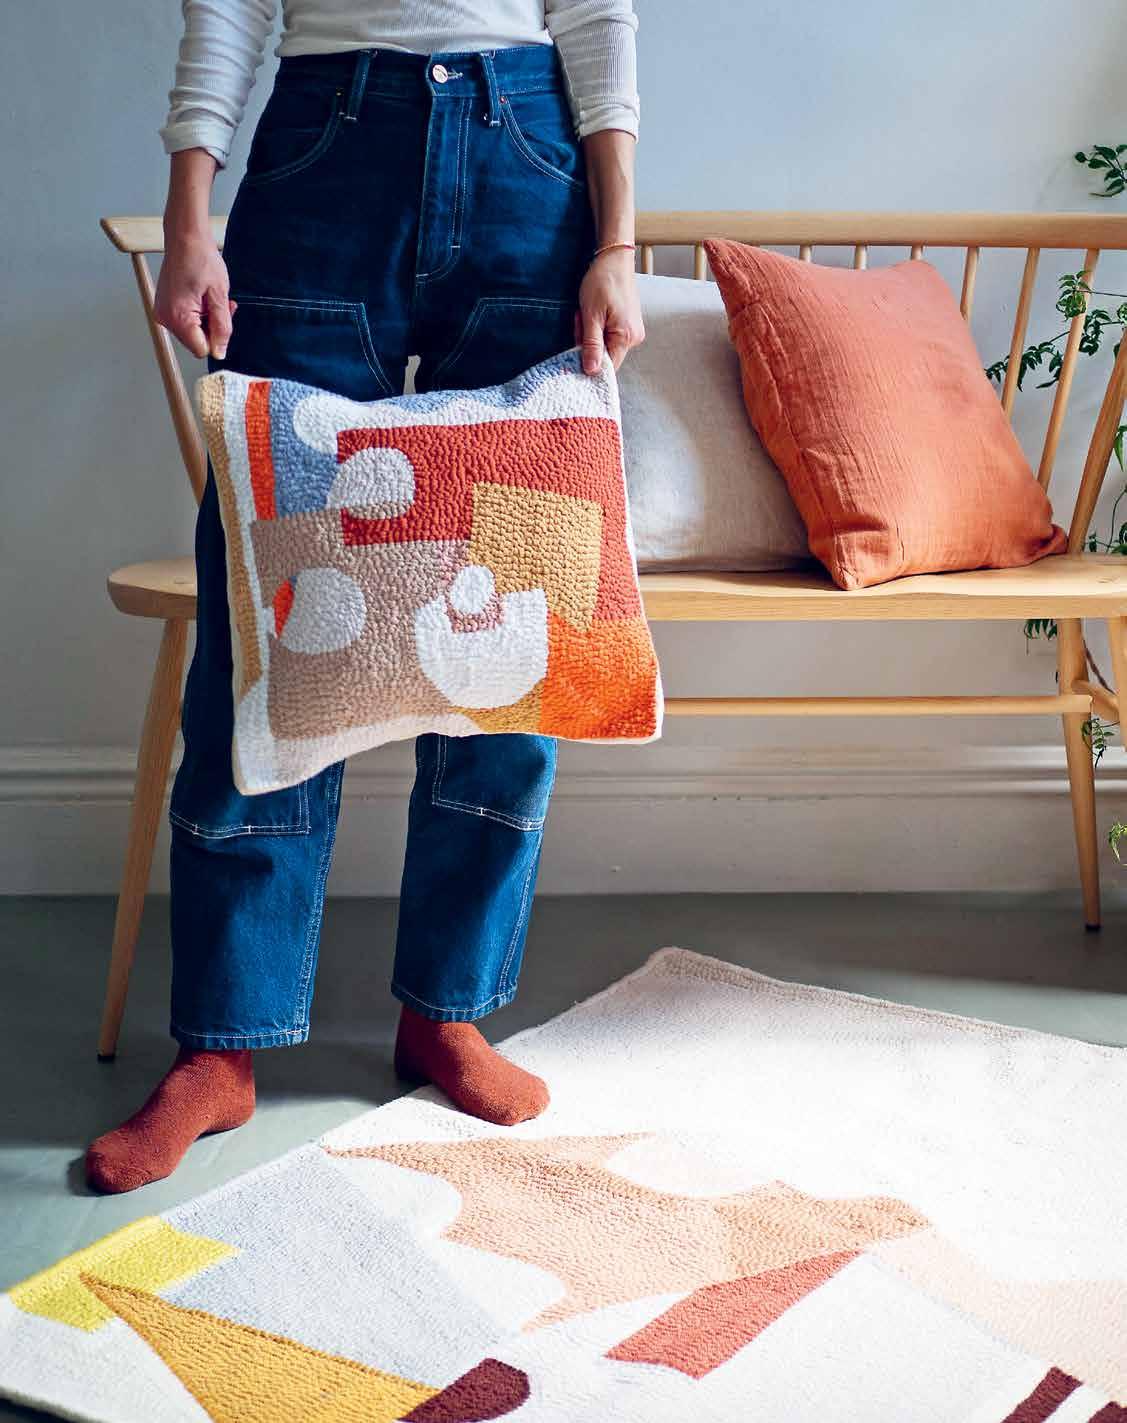
upcycled jersey punched pillow
Making a cushion out of old T-shirts? Absolutely! While you might start out with a bunch of stained, ripped, and worn schmatta, the end result will look anything but. The average large T-shirt can be stripped down into enough yarn to fill a 6-inch / 15 cm punched square (give or take). And if your closet doesn’t provide enough reused material, go visit your local thrift store or Salvation Army. Many used clothing locations sort their T-shirts by hue, making it just as easy to choose a color palette as it would in a yarn shop. See Upcycling Fabric into Yarn on page 168 for instructions.
Remember that when punching you can always change your mind, pull fiber out, and repunch. I like my upcycled cushions to display the clean, sharp, flat stitch side of a rug and use medium-weight fabric or canvas to make an envelope opening on the back.
SUPPLIES AND TOOLS
+ Punched pillow top
+ Fabric
+ Sewing machine and thread
+ Sewing pins
+ Pillow form
1. After removing your punched piece from the frame, trim the monk’s cloth to leave a 2-inch / 5 cm border around the perimeter of the piece.
2. Using the perimeter of the monk’s cloth as your guide, cut two pieces of cloth to use as the pillow backing. These pieces should overlap each other by at least 4 inches / 10 cm and should each be hemmed ½ inch / 1.3 cm along the edges where they overlap.
3. To compile your pieces, overlap the two hemmed pieces of fabric and layer the punched piece on top, with the rightside (your choice!) facing in. Pin around the perimeter of the fabric so that the overlapped
backing cloths and the punched piece are firmly held in place.
4. Use the zigzag stitch on your sewing machine to sew as closely as you can to the punched fiber border. Sew around the perimeter twice for strength.
5. Trim any excess fabric, leaving a ½-inch / 1.3 cm seam allowance, and reverse your work through the envelope opening.
6. Stuff your cover with a pillow insert and you’re finished!

COMFORT & CARRY 217 PROJECT
wipes cover
If you’re the parent of young children, chances are you rely on the occasional (or very regular) wet wipe to get through the day (and diaper changes). This simple cloth cover can be used for disguising crinkly plastic wipe packages or for keeping stacks of folded cloth wipes tidy and at the ready. A sewing machine makes very quick work of this project, but the seams are simple enough that even while hand stitching, this is finished in no time.
SUPPLIES AND TOOLS
+ 13-inch / 33 cm square of canvas drop cloth or other medium-weight fabric
+ Sewing machine and thread
+ Scissors
+ Ruler
+ Package of wet wipes or stack of cloth wipes
1. Fold over and stitch two opposite sides of the canvas to make two ½-inch / 1.3 cm simple hems.
2. Fold the two hemmed edges toward the center (with the right sides facing in) and overlap them by ½ inch / 1.3 cm.
3. Leaving at least 7 ½ inches / 19.5 cm of the center flap open for dispensing and replacing wipes, sew together 1 ½ inches / 4 cm of the overlapped edge on the far right and far left, making sure to backstitch.
4. Sew together the right and left short sides of the folded rectangle, leaving a ½-inch / 1.3 cm seam allowance.
5. Trim loose threads and reverse the envelope, gently poking out the four corners.
6. Insert the wipes package (or stack of cloth wipes!) through the open center flap.
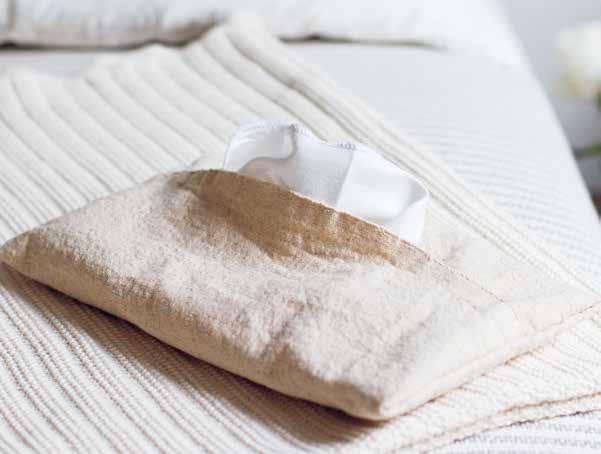
travel tissue pouch
Size down the wipes cover to make an easy place to stash a stack of tissues (or create a dedicated pocket for a used cloth hankie!) No need to buy special travel tissues to fit into the case, just take a small stack of tissues from the box, fold into thirds with the top fold facing up, and tuck into your case!
See image on page 135.


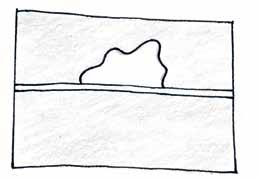
COMFORT & CARRY 218 PROJECT
hanging lavender sachet
A hanging lavender sachet is easy to sew, lovely to sniff, and will help keep unwanted bugs away from wool knits. We designed these with a small envelope opening that allows a fresh bunch of dried lavender to be swapped in whenever the original flowers lose their potency. A hang tab means you can easily add a sachet to closet hooks and hangers.
SUPPLIES AND TOOLS
+ Dried lavender flowers in a spice sack*
+ A piece of fabric that is two and a half times longer and 1 inch / 2.5 cm wider than the bundle of lavender
+ Twill tape or ribbon, 3 inches / 7.6 cm long
+ Sewing pins
+ Sewing machine and thread
1. Fold over and hem the two short sides of your fabric (this hem is optional as raw edges are fine for this project).

2. With the right side of the fabric facing up, overlap the two short (hemmed) edges by 1 inch / 2.5 cm or so and pin in place.
3. Fold the twill tape in half and place it in between the layers of fabric so that the loop lies hidden inside and the ends are poking out through one of the sides.
4. Pin the two sides together and sew, making sure to sew over the tape ends, securing them in place.
5. Trim loose threads and reverse the envelope, gently poking out the four corners. Insert the lavender sachet through the open center flap and hang where desired.

TIP:
You can add dried flowers to a small muslin spice sack or use a premade lavender dryer bag.

COMFORT & CARRY 219
PROJECT
tea leaves dye bath
A stained white T-shirt from the teenagers or toddlers in our lives might not seem like the most attractive fabric choice for craft projects, but submerge it in a simple dye bath and it gets a new lease on life. This isn’t to say the stains will disappear in the dye bath (to the contrary, some stains act as a mordant and become even more pronounced), but when stripped into fabric for weaving or knitting, the richness of the naturally dyed fiber steals all the attention.
Tea makes for a simple, uncomplicated dye bath that’s home kitchen safe. Natural tannin in the tea bonds well to natural fibers like linen and cotton and omits the need for a mordant. We’ve dyed and then stripped into yarn everything from toddlers’ cotton lap tees to linen and cotton sheets, and each time, the tea dye bath produces a slightly different, deeply beautiful soft brown that makes the small amount of effort feel eminently worth it.
SUPPLIES AND TOOLS
+ 1 to 1 ½ yards / 0.9 to 1.3 m of fabric for dyeing (100% natural fibers work best like cotton, linen, silk, and wool)
+ 15–20 tea bags or equivalent loose tea leaves (roughly one tea bag for every 1 cup / 8 fl. oz. of water)
+ Large cooking pot (a kitchen pot is fine)
+ Kitchen tongs or spoon
+ Salt (optional)

1. Bring a large pot of water to a boil with the tea and ¼ cup / 68 grams table salt (optional).
2. Simmer the tea for an hour, then remove the tea bags (or strain the tea leaves).
3. Prerinse the dye fabric by saturating it under running water, then wringing out the excess water.
4. Submerge the fabric in the dye bath and simmer for an hour or so, stirring occasionally to allow the material to dye evenly.
5. Turn off the heat and let the fabric soak for a few hours or overnight for a darker outcome.
6. Pour out the dye bath and rinse out the newly dyed fabric until the water runs clear. Linedry or tumble-dry your fabric.
COMFORT & CARRY 220 TECHNIQUE


COMFORT & CARRY 221
upcycled hankie/kerchief
This is a tutorial for a hemmed square of fabric. You might call it a hankie, though it’s not just for blowing your nose. You could call it a kerchief, but that sounds a touch old-fashioned. A neckerchief? A bandana? Bigger, it’s a babushka. Scrappier, it’s a schmatta. But this is no rag!
Whatever you call it, we’re here to convince you that hemming a square of cloth is a thing to do. In the first summer that we spent working on this book together, we both made hankies together. Erin cut a square from a favorite threadbare nightgown that had torn under both arms. Rose cut an almost-square from a silk blouse that never fit quite right. We sat at Rose’s kitchen table together and rolled our wonky hems and drank a glass of midday wine and reminded ourselves why making things matters in the first place.
This is a hemmed square of fabric, but it’s more than that. It’s useful and practical and has the unique and particular quality of something that’s been stitched by hand. It’s a practice in pragmatism and patience. It’s a practice in practice. It’s stitch by stitch, something old made new again.
When finished, it offers a bit of comfort. It’s something to tie around your neck or wrap around a gift. You can blow your nose in it if need be, or use it to soothe a scraped knee, or lend a little je ne sais quoi to a ponytail.
SUPPLIES AND TOOLS
+ Upcycled lightweight fabric like fine cotton lawn, lightweight linen, or silk
+ Needle and thread
1. Cut a square of fabric 18 by 18 inches / 46 by 46 cm. (For reference, a standard American bandana is 22 inches / 56 cm square. We wanted something a touch smaller, but the size is entirely up to you and your needs.)
2. With needle and thread, sew a rolled hem around the perimeter of the square.
TECHNIQUE rolled hem
A rolled hem is a simple but elegant stitch that’s useful for making delicate stitches in lightweight fabric.
1. Working from right to left, roll the edge of the fabric between your fingers to achieve a single fold that’s as narrow as possible. Crease with your fingertips.
2. Anchor the thread with a few horizontal backstitches made just below the folded raw edge.
3. Insert the needle toward the top of the edge of the hem fold at a slight angle away from the bottom stitch, catching just a few threads.
4. Repeat this, creating a zigzag pattern—alternating catching a few threads in a horizontal stitch below the fold and catching threads at the top of the hem fold. Keep your stitches loose so they lie flat and you can see the zigzag pattern emerge.
5. After five or six stitches, gently pull the working thread. This motion will cause the seam to roll in on itself, concealing the zigzag stitches inside of it. Continue around the perimeter of your fabric until your hem is complete.
COMFORT & CARRY 222 PROJECT


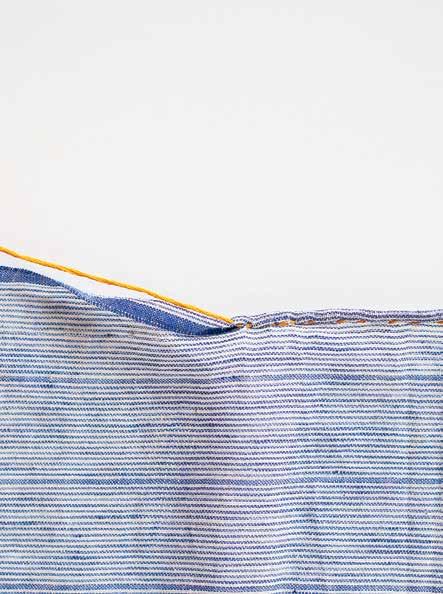
COMFORT & CARRY 223

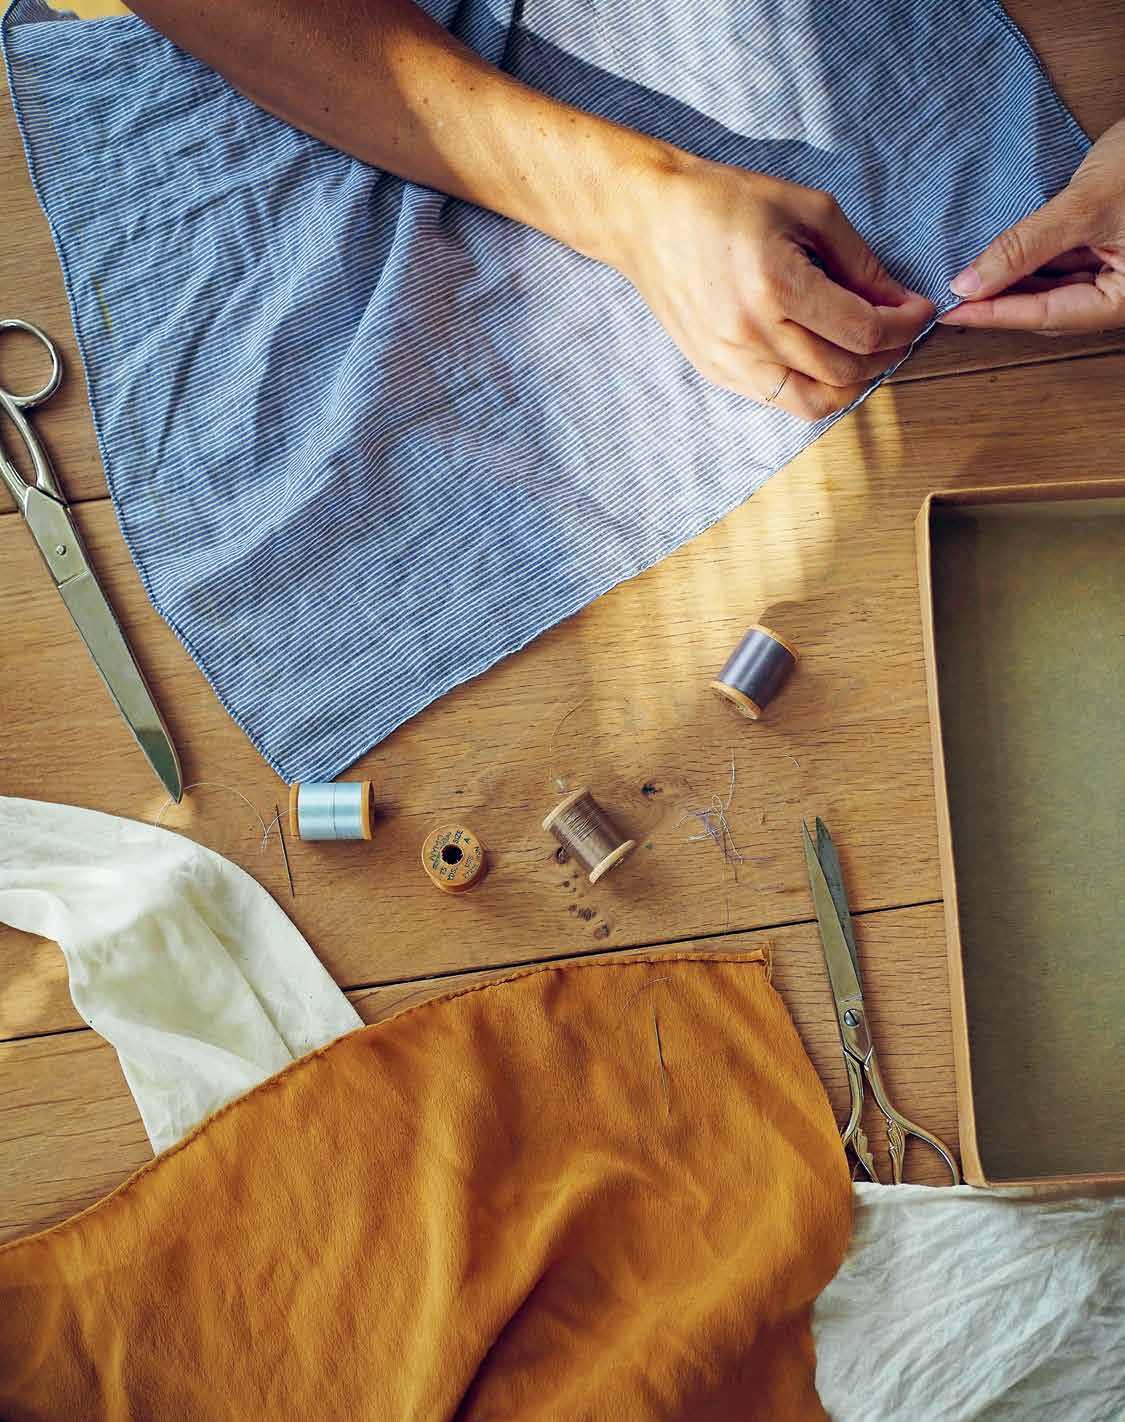
jogak-bo (patchwork bojagi)
Jogak-bo, or patchwork bojagi, is a Korean textile tradition that uses fabric remnants to create geometric patchwork compositions for textiles used as wrapping cloths. Most often made from an assortment of lightweight silks and ramie, many lightweight fabrics can be used to create these patchwork pieces. In the jogak-bo-style curtains Erin has made for her windows over the years, she’s used an assortment of saved and upcycled fabrics, ranging from silk organza leftover from making her wedding dress, to linen baby swaddles, to thin cotton handkerchiefs passed down from her grandfather and great-aunts.
Ssamsol—as beautifully modeled for us by bojagi artist Youngmin Lee—is the seam technique used here to piece fabric together in patchwork bojagi. It’s both durable and decorative, creating a flat-felled seam with no raw edges that looks the same on both sides of the finished textile. We love how the flat, overlapping seams create darker lines of fabric, making ssamsol particularly beautiful in textiles that are hung to catch the light.
COMFORT & CARRY 226 TECHNIQUE

ssamsol seams
SUPPLIES AND TOOLS
+Fabric remnants (see Note)
+Scissors
+Blunt knife or bone folder
+Needle and thread
1.Begin by folding a ½-inch / 1.3 cm seam allowance on each of the two patchwork pieces you hope to join. Use the blunt side of a butter knife, a bone seam folder, or your fingertips to crease the fabric.
2.Line up the two creased edges of the fabric with the fabric flaps facing inward and join together with a whipstitch (called gamchimjil in Korean; see page 105 for basic whipstitch guidance).
3.Open the seams and trim one seam allowance to ¼ inch / 6 mm so that one seam allowance is twice that of the other.
4.Make a crease in the middle of the wider seam allowance.
5. Using this crease, fold the larger seam allowance over the flap of the shorter seam allowance and fold again so that the smaller seam allowance is encased in the larger one.
6. Gently fold the fabric backward on the side that you folded toward in step 5 and use the same whipstitch to join the edges together.
7.Gently press the seam flat with fingertips or iron.
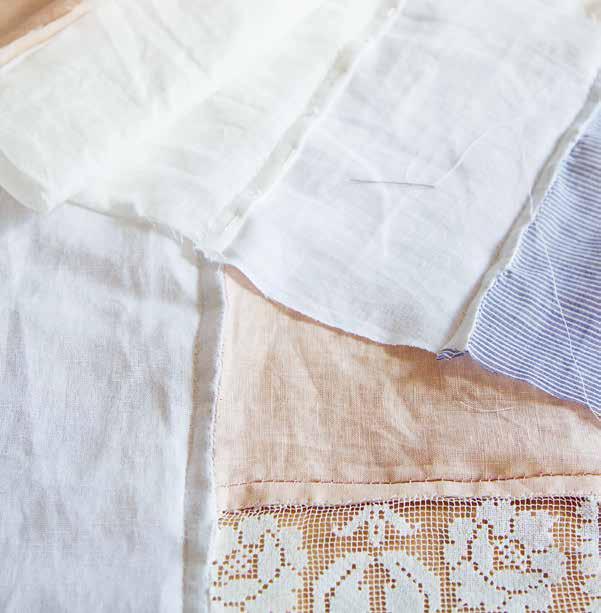
TIPS:
If you’re a careful folder, you can also begin with one ½-inch / 1.3 cm seam allowance and one ¼-inch / 6 mm seam allowance).
The size and quantity of your remnants depends on the end project that you’d like to make. One easy rule of thumb for beginners is to make all of the widths for one block consistent. For example, if all remnants are 5 inches / 13 cm wide with varying lengths, joining together two blocks is made more simple.


curtain
To make larger patchwork curtains, Erin worked in small sections called blocks, joining smaller squares and rectangles to form larger ones and then joining those patchworked pieces together to grow the piece. The process is extremely organic, building slowly block by block.
Photo on page 227.
COMFORT & CARRY 228 TECHNIQUE

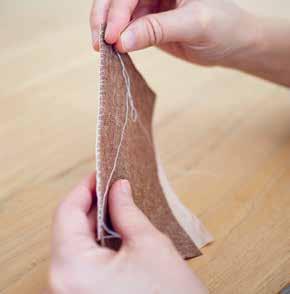
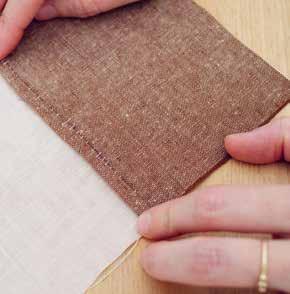
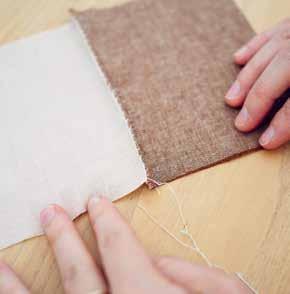
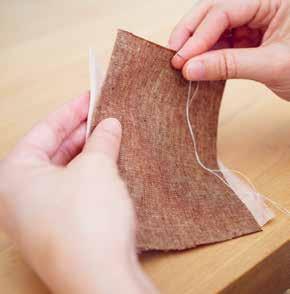

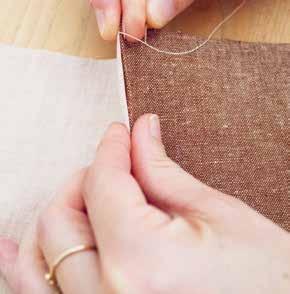
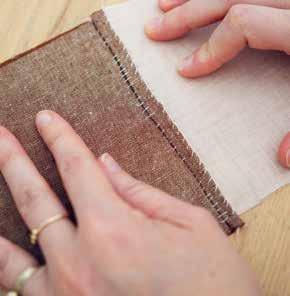
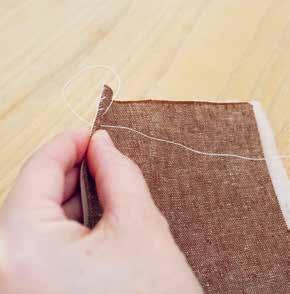
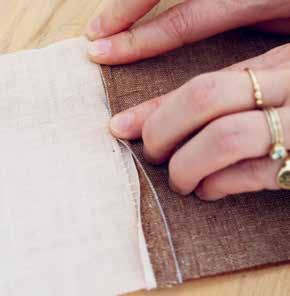
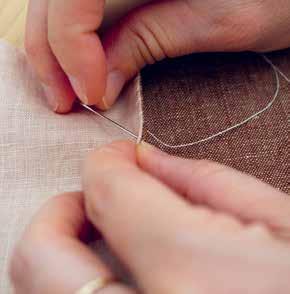

COMFORT & CARRY 229
lampshade
After three years spent hemming and hawing over reading lamps for her kids’ bunk beds, Erin settled on two very affordable clip-on reading lamps from IKEA. The little gooseneck LED lamps are innocuous enough, if not what you might call beautiful, so when she first brought them home, she decided to experiment with dressing them up slightly. Her first iteration used kids’ paintings on watercolor paper. She cut a few inches off the width of the pages and pleated them, lengthwise. Next, she pushed a threaded darning needle through the top end of each pleat, tied the top around the waist of the lamp, and glued the two short edges together to create a wide tutu of a lampshade.
Over time, we’ve improved the technique a bit, moving onto starched fabric and using a thin round elastic cord to get a good tight cinch at the top. We hand stitch the sides where the pleats meet and have chalked up all manner of selvedge edges, wonky cuts, and imperfect pleats to our desire to add just a bit of warmth and character to otherwise undistinguished lighting. We’ve since added these pleated shades to simple bare bulb hanging pendants to lovely effect. As renters, these plug-in lights make for easy accent lights that don’t require anything in the way of hardwiring or major investment.
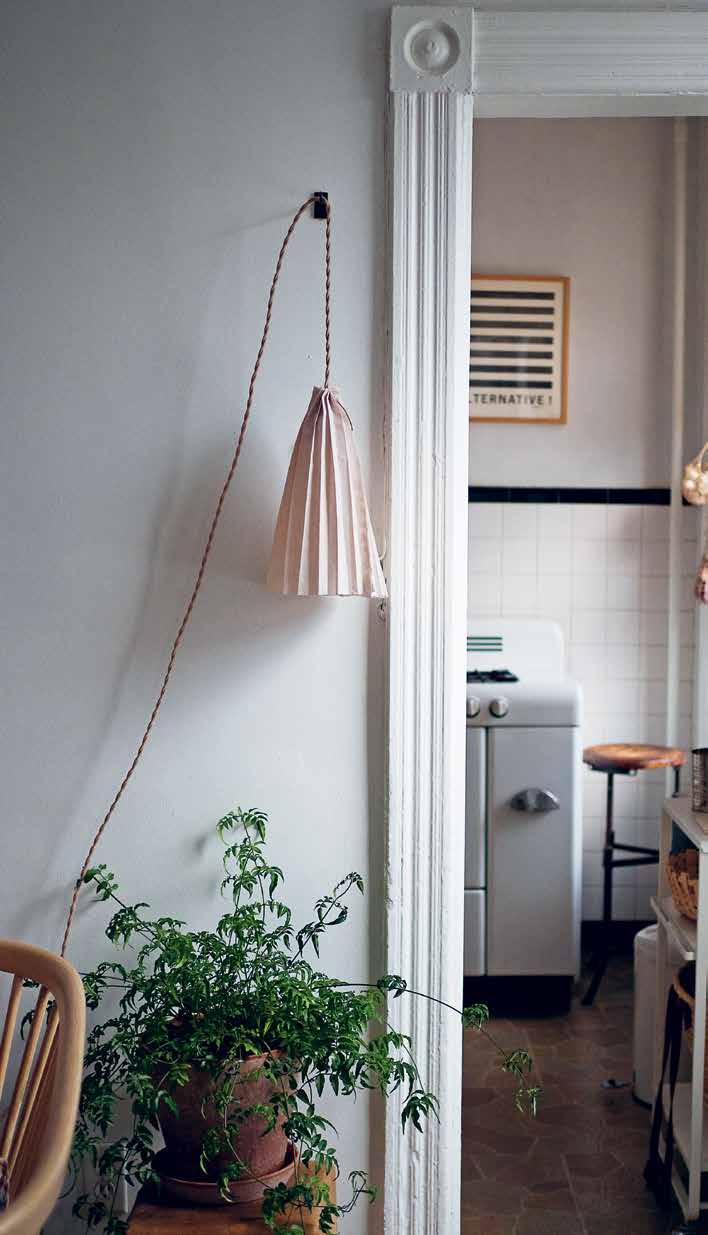
COMFORT & CARRY 230
PROJECT

COMFORT & CARRY 231
SUPPLIES AND TOOLS
+ Rectangle of starched fabric, length roughly twice as long as width (see Starching Fabric on page 130)
+ Iron
+ Hole punch or large upholstery needle
+ Round elastic cord (4–8 inches / 10–20 cm)
+ Large darning needle
+ Sewing pins
+ Standard needle and thread
1. Starting on a short end of the rectangle of fabric, fold up the edge between ¼ and ½ inch / 0.6 to 1.3 cm and crease with an iron on a low-heat setting. Flip the fabric over and fold again in the opposite direction, lining up to match the size of the first. Iron in this pleat. Continue pleating the fabric in this way, stopping to iron each crease, until the fabric is fully pleated. It doesn’t matter if the last pleat is slightly narrower than the others.
2. With a sharp hole punch, make a hole in the center of each pleat, roughly ½ inch / 1.3 cm from the top edge. (If your hole punch is not sharp enough to pierce fabric, use a large upholstery needle instead.)
3. With a loose knot on one end of your elastic cord, use a darning needle with a large eye to insert the elastic cord through the punched holes.
4. Cinch the pleats toward each other along the elastic cord and tie the two ends of the elastic together into a knot. The resulting loop of elastic should have enough give that it will be able to stretch over a small lamp socket
but be tight enough to stay put around the pendant cord.
5. Use sewing pins to tack together the free edges of the pleated shade where they meet.
6. Use a needle and thread to stitch the ends together using a simple running stitch (see page 105 for running stitch instructions) and knot the thread.
TO USE: Carefully stretch the gathered end of the shade over the hanging pendant socket. Arrange the top pleats evenly around the cord, making any small adjustments needed for the shade to hang neatly. Take care to ensure that the shade is cinched tightly onto the cord, allowing the socket to hang freely from the sides of the shade. This is a simple shade
MATERIALS NOTE:

Plug-in hanging pendant kits are available at a wide range of price points from online shops. Our favorites use bare-bones porcelain sockets with twisted cloth cords and an in-line toggle switch in the cord. that doesn’t require anything in the way of a frame or special hardware, which is why we love it. Still, it should be noted that because the shade doesn’t use a frame, it will fit relatively close to the lightbulb. Be sure to pair it with a low-heat LED bulb to avoid any fire hazard.

COMFORT & CARRY 232
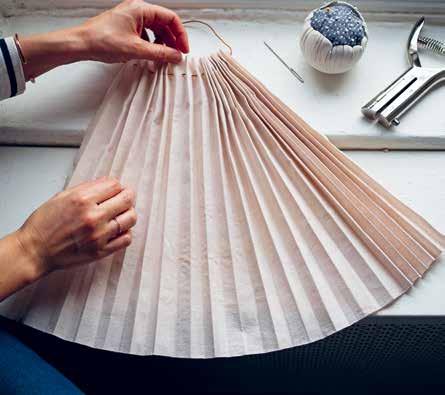


COMFORT & CARRY 233
extra large lampshade
If you’re looking for a bit of drama in the form of a wider pendant shade, you’ll need to increase the length of the fabric you pleat and also provide a bit more structure. Instead of making the shade from a rectangle of fabric where the length is twice that of the width, try a rectangle where the length is five to six times the size of the width, seaming together two shorter lengths if need be. To provide structure, we use a craft knife to cut the wire ring out of sidewalk-found lampshades, and to support the weight of the additional fabric, we make an easy chipboard support.
SUPPLIES AND TOOLS
+ Rectangle of starched fabric with length roughly six times the width (in this example, 11 inches / 28 cm wide by 66 inches / 168 cm long; see Starching Fabric on page 130)
+ Thin wire ring roughly the size of the preferred circumference at the shade’s bottom
+ Craft or utility knife
+ Iron
+ Hole punch (optional)
+ 4–8 inches / 10–20 cm of round elastic cord
+ Large darning needle
+ Sewing pins
+ Needle and thread
+ Chipboard
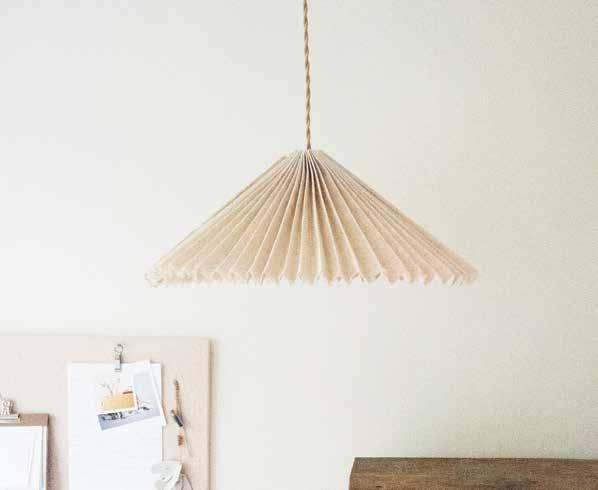
1. Cut the existing shade off the metal frame until you have only the interior frame parts—typically this will include a top ring with an attached fitter (the portion of the frame that attaches to the lamp or bulb itself) and a second larger ring that sits at the bottom of the frame. For this pendant-shade design, you’ll be using only the larger ring.
2. Pleat starched fabric with iron, as described on page 232, making folds every ½ inch / 1.3 cm.
3. Punch holes in the top of each pleat, thread with elastic, cinch, and tie with a knot.
4. Seam the two loose edges of the shade together to form a large circle.
5. Place the pleated circle on top of a large salad bowl and press the center (or top) of the shade down to the bottom of the bowl to achieve your desired shape. (You might experiment with higher- and lower-sided bowls to get the shape you’re looking for.)
6. Place the lightweight ring on top of the pleated shade and use a needle and thread to stitch the ring into place, taking care to stitch into the pleat fold, wrapping the thread around the ring with each stitch. No need to stitch every pleat to the ring— securing them every few inches around the ring will do the trick.
7. Cut a small circle out of a piece of chipboard and cut a slit halfway across, twisting the end of your utility knife to enlarge the slit into a larger opening in the center of the circle.
8. Stretch the elastic opening of the shade over the porcelain lamp socket, so the socket is on the interior of the shade.
9. Slide the cardboard support around the cord of the lamp so that the cardboard circle sits above the socket.
10. Hold upright by the cord, so the cinched top of the shade rests evenly on top of the cardboard support. Hang as desired.
COMFORT & CARRY 234 VARIATION

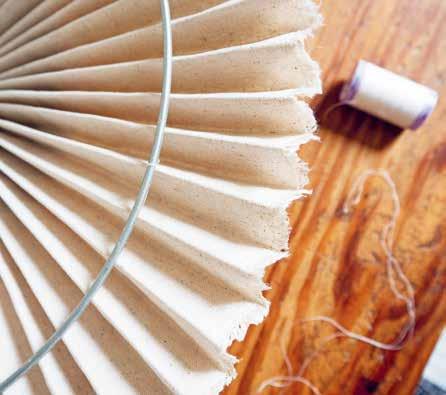


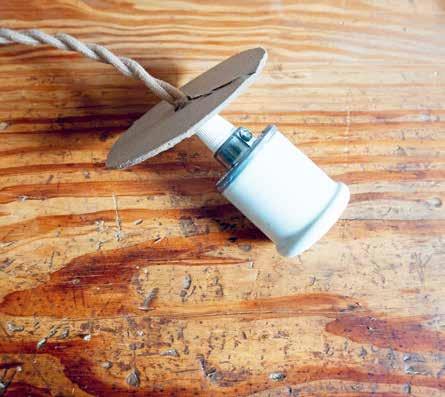
COMFORT & CARRY 235
night-light
The concept for this simple night-light came from Erin’s wandering through the local hardware store, followed by a quick rifling through the supply closet back home. The design she landed on is simple enough—a small bracket made from annealed wire that fits around the lamp base and is twisted to hold any kind of lightweight and flattish paper or object that might look pretty with a bit of golden light shining through. We’ve used photos printed on cardstock, wax paper envelopes filled with dried flowers, opaque cardstock poked with holes, cut-up letterpress greeting cards, vintage photographs, and even flat, translucent seashells.
SUPPLIES AND TOOLS
+ 1 hardware store plug-in nightlight with removable shade + 19-gauge annealed wire (paper-wrapped floral wire works, too!)
+ Pliers and wire cutters (the sort found in a generic multipurpose tool are more than sufficient)
+ Shade material of choice; cardstock, old photographs, etc.
1. Remove the plastic shade from your night-light and recycle.
2. Wrap a length of wire around the base of the light (as shown) and cross both sides.
3. Using pliers or your fingers, twist the ends of the wire together so that it becomes tight around the base of the lamp and you have about 1 inch / 2.5 cm of twisted wire extending from the light. (Note: It’s important to make sure you’ve twisted at least 1 inch / 2.5 cm of wire so that the paper shade stays far away from the bare bulb. You can also replace the incandescent bulb with a cool LED bulb if you’d prefer to stay on the safe side.)
4. Use the wire cutters to snip one side of the wire and clamp with pliers.
5. Using the tip of your finger as a guide, twist the remaining long wire twice around your finger. The two loops should be roughly the same width and about 1 inch / 2.5 cm tall. (Of course, you can adjust according to the kind of shade you’re going to use, but we’ve found that the same length works for all of our shade experiments so far.)
6. If needed, bend the loops upward and trim or clamp any remaining wire.
7. Finally, select a small shade, trim it to size if necessary, and slip it between the two loops, the way you might secure a paper clip to a piece of paper.

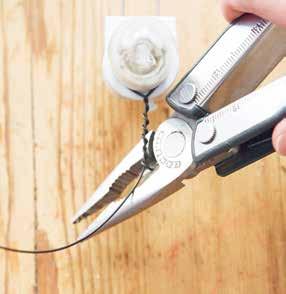
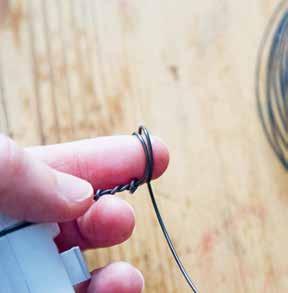
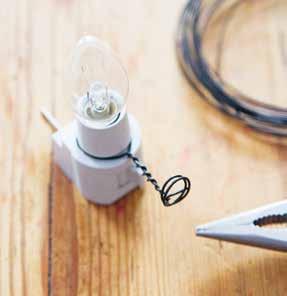
COMFORT & CARRY 236 PROJECT


05 play
experimentation creativity curiosity
In the introduction to Ann Sayre Wiseman’s Making Things: The Hand Book of Creative Discoveries, Wiseman speaks directly to young makers:
Remember, you know more than you think you know. And what you learn now in your early years will last longer and be firmer in your memory bank than anything else you learn later . . . These skills and concepts can set your imagination free and inspire you to try your own variations. As you train your eyes to see and hands to know, you will strengthen your belief in yourself. Don’t be afraid to ask questions and go beyond the rules. Experiment in safety, and learn by doing.
Give any child a full recycling bin and permission to root through it and you’ll see the art of human resourcefulness and imagination spring to life. Still, sometimes we all need a bit of encouragement or a nudge in the right direction. Some of the toys in this chapter are perfect for kids to make themselves, while others might best be tackled by a parent wanting to provide a bit of novelty and fun for their kids without spending a lot of time or money.
As parents of kids that range from firmly in the toddler years straight up through high school, we’ve seen firsthand the onslaught of consumer goods that are leveraged at kids. We hope some of these playful projects and cardboard alternatives might provide some inspiration, some encouragement, some opportunities for creative play.
PLAY 240
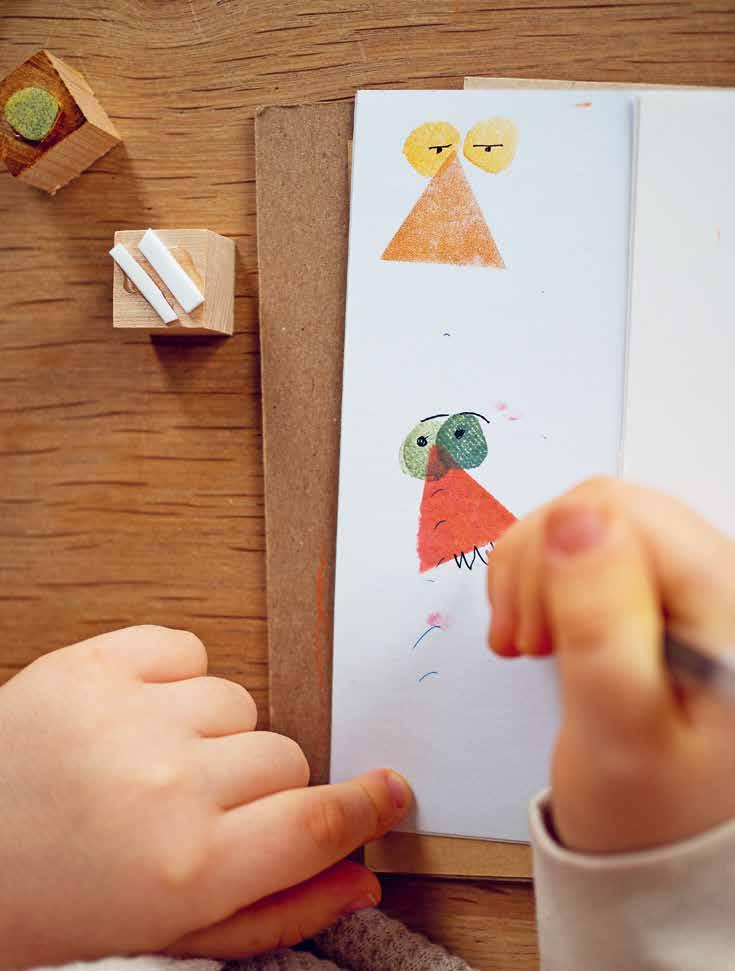
cardboard toys and games
Don’t overthink these simple cardboard toys. They are just as straightforward as they appear, no illustration skills, architecture degree, or laser die-cut machine necessary. We haven’t wanted to be overly prescriptive or complicated, so feel free to make your own adjustments or embellishments. These simple, upcycled toys can take the place of just about any store-bought distraction and will serve just as well on long train rides, in doctors’ waiting rooms, and at restaurant tables before the Shirley Temples arrive.
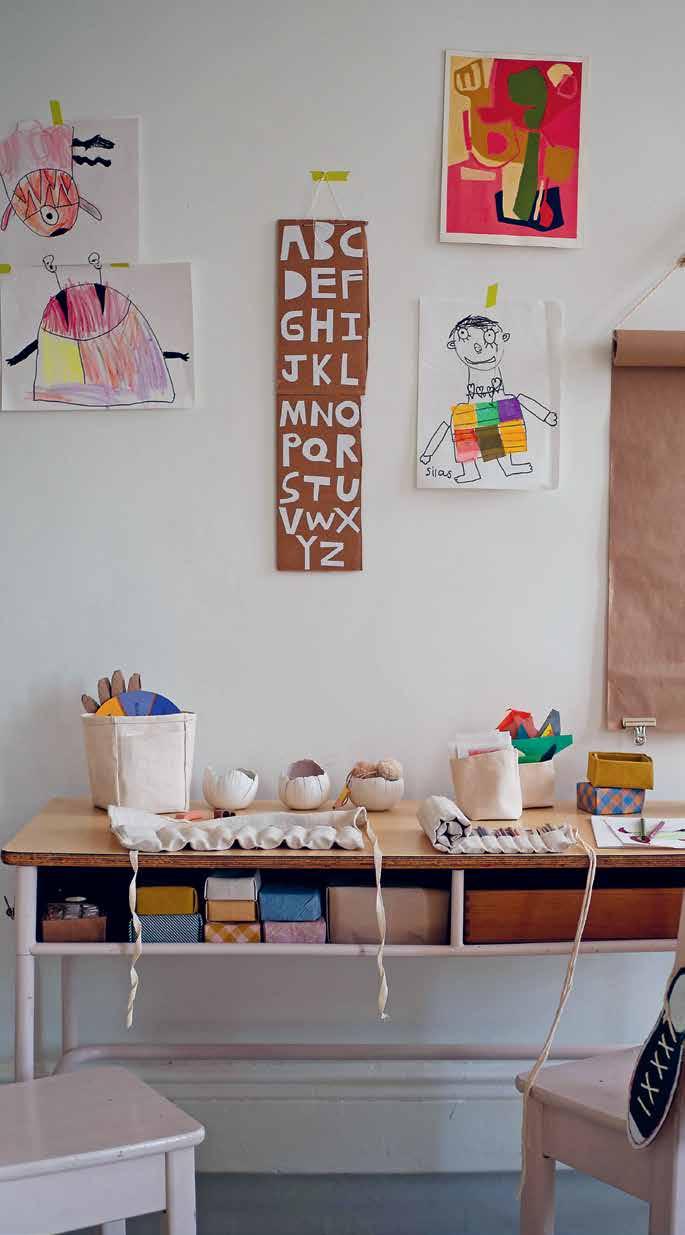
PLAY 242 TECHNIQUE

PLAY 243
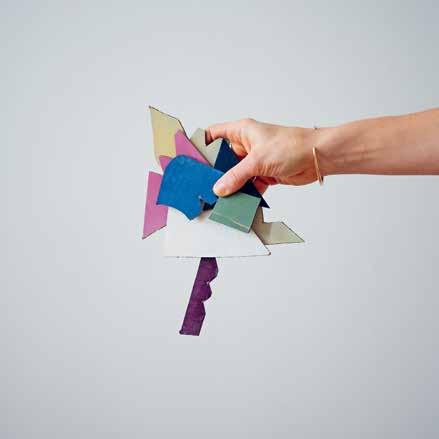
cardboard magnets
SUPPLIES AND TOOLS
+ Cardboard
+ Magnets
+ Glue
+ Tempera paint
+ Scissors or craft knife
Cut geometric or organic shapes from cardboard. Paint the cardboard and allow to dry completely. Adhere magnet strips to the back with glue or adhesive.

time-telling practice
SUPPLIES AND TOOLS
+ Cardboard
+ Scissors or craft knife
+ White shipping label stickers
+ Awl + Brads
Cut a cardboard circle. Freehand or stencil numbers onto white shipping label stickers and cut them out. Evenly space numbers around the clock face and adhere using the sticker adhesive. Puncture a center hole with an awl. Cut an hour hand and a longer minute hand from extra cardboard or cardstock and secure to the center of the clock with a brad.
PLAY 244

3-D cardboard notch puzzle
SUPPLIES AND TOOLS
+ Corrugated cardboard or chipboard
+ Scissors
Cut out an assortment of shapes. Make multiple small V-shaped notches in the sides of each shape and finish with tempera paint if desired. Connect shapes at notches to build free-form puzzle sculptures.

sewing boards
SUPPLIES AND TOOLS
+ Cardboard
+ Awl
+ Tempera paint (optional)
+ String
+ Darning needle
+ Scissors
Cut out an organic or geometric cardboard shape and paint it if desired. Use an awl to puncture many small, randomly placed holes. Tie a knot into the end of a long string. Thread through a blunt needle and insert through a punched hole. Continue to sew through the boards, connecting additional boards if desired.
PLAY 245

papier-mâché bank
SUPPLIES AND TOOLS
+ Newspaper
+ Tempera paint
+ Balloon
+ String or rubber band
+ Flour paste
+ Jute twine
Partially blow up a regular-sized balloon. Use string or a rubber band to cinch a top section of the balloon and create a pear shape. For the stem, fold a two-inch loop of jute twine and coil twine around the loop working from the top, down. Seal the coils with paste or a dab of glue. Attach the stem to the top of the balloon using several layers of paste-covered newspaper strips. Finish using papier-mâché instructions on page 126.
PLAY 246
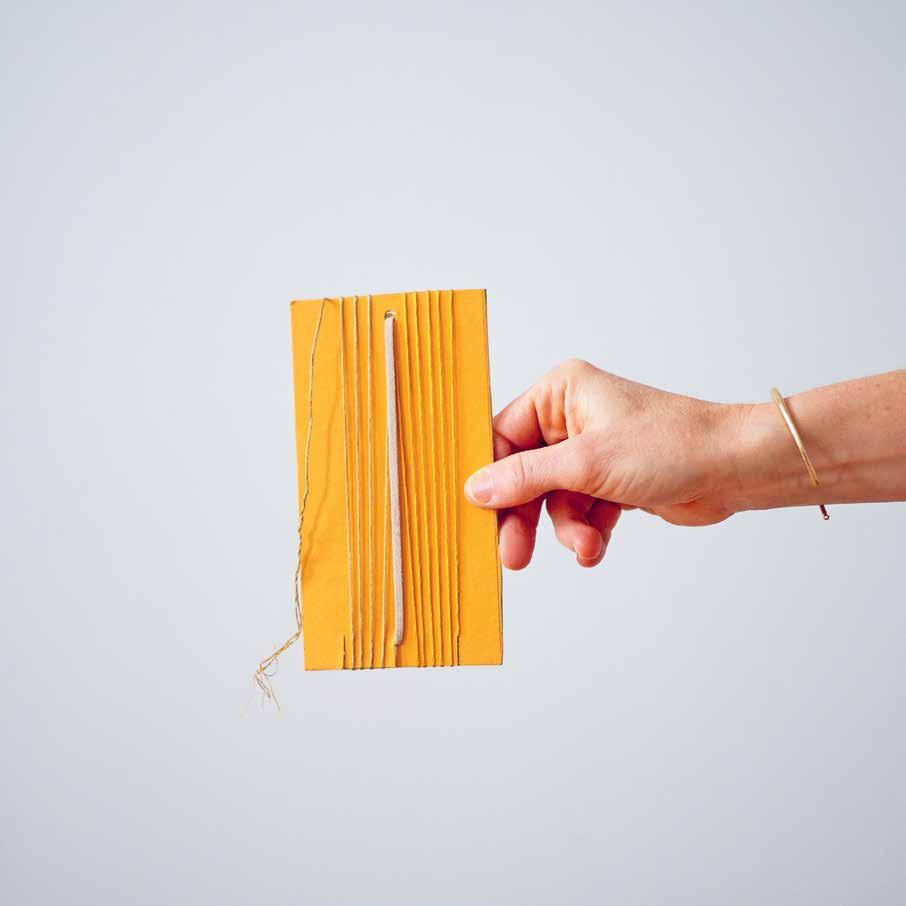
bracelet loom
SUPPLIES AND TOOLS
+ Cardboard
+ Hole punch or awl
+ Shoelace or similar thick string
+ Embroidery thread
+ Scissors
Cut a rectangle from cardboard; roughly 6 inches / 15 cm long by 3 ½ inches / 9 cm wide. Pierce a center hole ½ inch / 1.3 cm down from the top. Cut three notches in the bottom of the cardboard. Cut two 24-inch / 61 cm lengths of embroidery thread and one 6-inch / 15 cm length of shoelace. Insert all three strings through the top hole and secure with a knot on the back side. Notch the shoelace in the bottom center notch. Wrap each side string several times around either side of the center string and secure the ends in the empty bottom notches. To make a bracelet, tie macramé square knots (see page 85) around the center lace, alternating embroidery threads.
PLAY 247
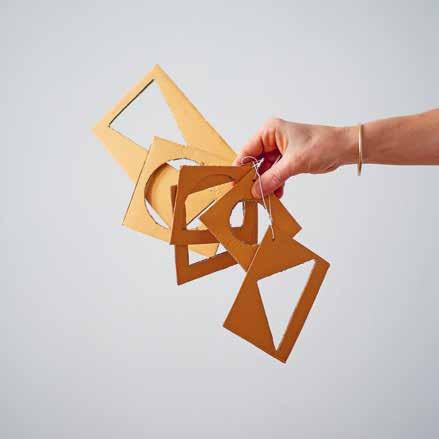
geometric shape stencils
SUPPLIES AND TOOLS
+ Cardboard
+ Objects to trace (bowls, cups, boxes, etc.)
+ Ruler
+ Pencil
+ Craft knife
Cut out cardboard rectangles and squares. Use objects and/or a ruler to trace shapes inside the center of each piece of cardboard. Use a craft knife to remove the center of each shape. The resulting negative space can be used as a stencil for tracing.

activity spinner
SUPPLIES AND TOOLS
+ Cardboard or paperboard
+ Scissors
+ Ruler
+ Permanent marker
+ Tempera paint (optional)
+ Awl
+ Brad
Cut a circle from the cardboard. With a ruler, divide the circle into even sections. Label each section with an activity and paint to decorate if desired. Puncture a hole in the center and secure a cardstock arrow with a brad.
PLAY 248
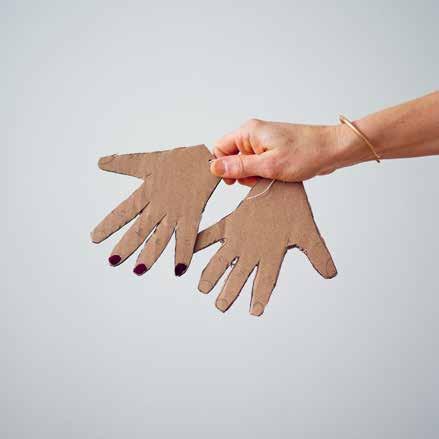
nail-painting practice
SUPPLIES AND TOOLS
+ Cardboard
+ Pencil
+ Nail polish
Trace and cut out two hands from cardboard. With a pencil, sketch fingernails for kids to paint with polish.

cardboard and brad puppet
SUPPLIES AND TOOLS
+ Cardboard
+ Scissors
+ Brads
+ Hole punch or awl
Cut out a variety of whimsical and vaguely human or animal shapes from cardboard. Punch holes at joints and use brads to connect the shapes together so they can move and swing.
PLAY 249
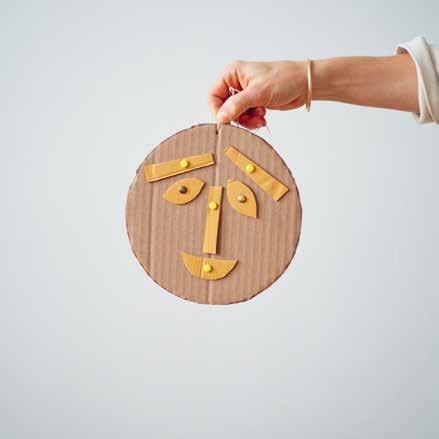
emotional check-in
SUPPLIES AND TOOLS
+ Cardboard
+ Scissors
+ Awl
+ Brads
Cut a circle from cardboard. Cut two eyes, two eyebrows, a simple nose, and mouth from leftover cardboard scraps. Pierce each small cardboard piece through the center and pierce a hole in the large circle where you’d like those facial features to go. Secure each facial feature in place with a brad. Kids can use the resulting movable features to work out their feelings, big and small.

shoe tie practice
SUPPLIES AND TOOLS
+ Cardboard
+ Scissors
+ String (or shoelaces)
+ Awl
+ Tempera paint (optional)
Trace shoe shapes onto cardboard and cut out. Paint to resemble shoes if you’d like. Puncture with two rows of eight holes each and lace them with string or actual shoelaces.
PLAY 250
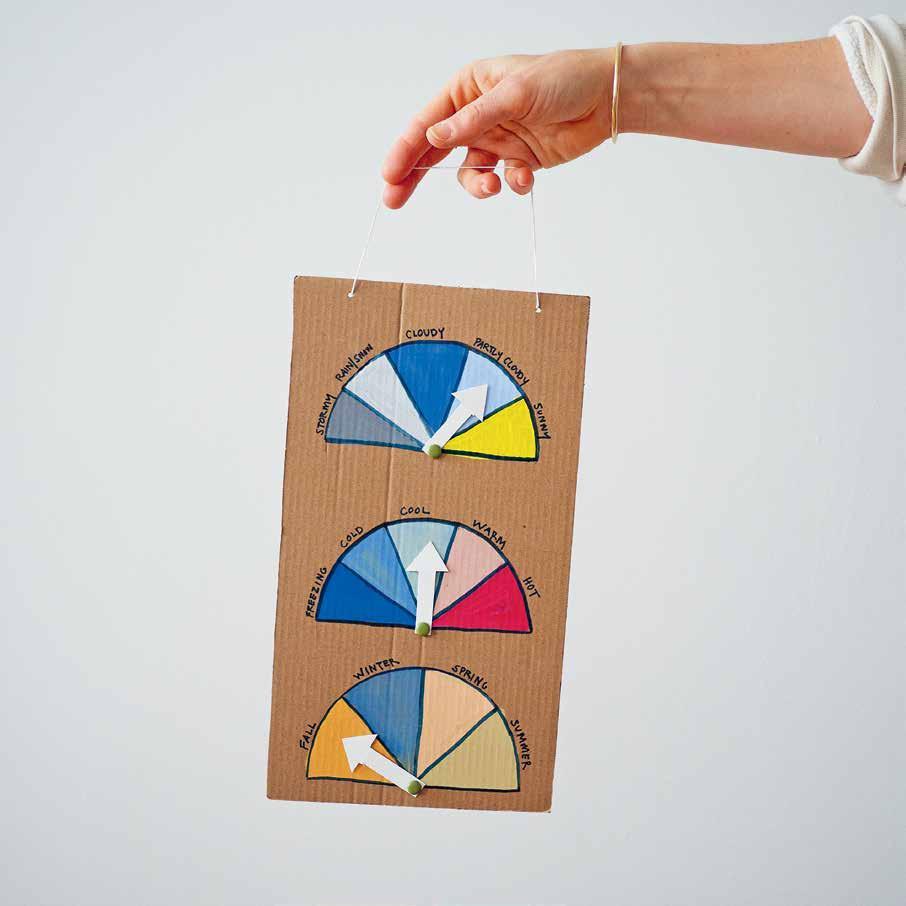
weather board
SUPPLIES AND TOOLS
+ Cardboard
+ Tempera paint
+ Brad
+ Scissors
+ Cardstock
+ Hole punch or awl
+ Marker
Cut out a rectangular piece of cardboard. Use a small bowl to trace around the top half of the shape for a semicircle. Draw a straight line to connect the semicircle and divide into five equal parts for different types of weather (e.g., stormy, rain/snow, cloudy, sunny, etc.). Trace two more semicircles, leaving 1 inch / 2.5 cm or so between each one. Divide the second one into five equal sections for temperature ranges and the last one into four equal sections for the seasons. Label and color if desired. Pierce a hole in the center bottom of each semicircle for attaching a cardstock arrow with a brad.
PLAY 251
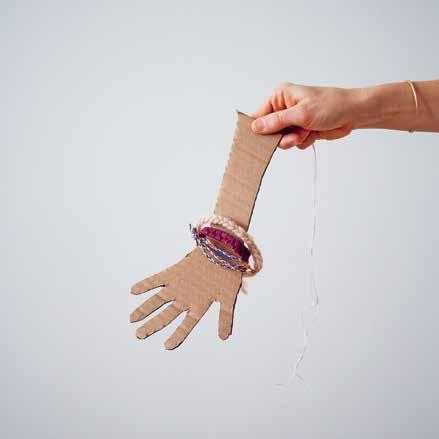
bracelet organizer
SUPPLIES AND TOOLS
+ Cardboard
+ Scissors
+ Pencil
+ String
+ Hole punch or awl
Trace and cut out a hand plus 5 inches / 13 cm of wrist and arm from cardboard. Pierce the arm end with a hole and tie with string to hang. Bracelets or scrunchies can be stacked for safekeeping.

binoculars
SUPPLIES AND TOOLS
+ 2 toilet paper tubes
+ Gum tape
+ Scissors
+ String
+ Hole punch or awl
Attach two toilet paper tubes together with gum tape. Decorate if desired. Punch a hole in the top of each side and knot a long string to either side for wearing.
PLAY 252

cardboard cup sleeve mask and cuff
SUPPLIES AND TOOLS
+ 2 cardboard hot cup sleeves
+ Crayons or markers
+ Scissors
+ Hole punch or awl
+ String
Decorate two cardboard hot cup sleeves. Open one sleeve along the glued seam and punch a hole on each end. Cut two 8-inch / 20 cm pieces of string and knot each in opposite holes. Cut out a wide upside-down V-shape in the center of the cardboard sleeve for the nose and two ovals for the eyes. For the cuff, keep the glued seam together and slip over the wrist to wear.

lollipop lips and mustache
SUPPLIES AND TOOLS
+ Thin cardboard
+ Tempera paint
+ Scissors
+ Hole punch or awl
+ Lollipop
Trace and cut out mustache and lip shapes from thin cardboard. Paint with tempera paint and punch a hole through the center of each one. Insert a lollipop into the hole through the back side of each cutout.
PLAY 253
upcycled woven pouch on a cardboard loom
By weaving on both sides of a two-sided cardboard loom and working in the round, you can make a pouch that doesn’t require any additional sewing or piecing together for it to take its shape. Made small and threaded with a necklace-length cord, small versions of these pouches can be worn close to the chest for keeping track of tiny treasures. (Indeed the smallest versions of these pouches remind us of the sacred medicine bags worn by Indigenous people across the Americas.)
Slightly larger bags might cradle a small bottle and serve as a hanging vase. Larger still, and you can make a pouch for safekeeping of cellphone or sunglasses.
The upcycled T-shirt yarn we used here works up quickly and fills in the loom with a satisfying heft that we love, but we’ve made these from leftover bundles of string and yarn of all types.
Warp your loom ahead of your next train ride or car trip and pack it up with some yarn and a darning needle and you’ll have a new pouch by the time you reach your destination.
If you’d like to size up, the process is as easy as cutting a larger cardboard loom to warp and weave on. If you have a cell phone or tablet you’d like to create a pouch for, for instance, just mark and measure its dimensions on a rectangle of cardboard, cut evenly spaced notches along the top and bottom, and proceed from there.
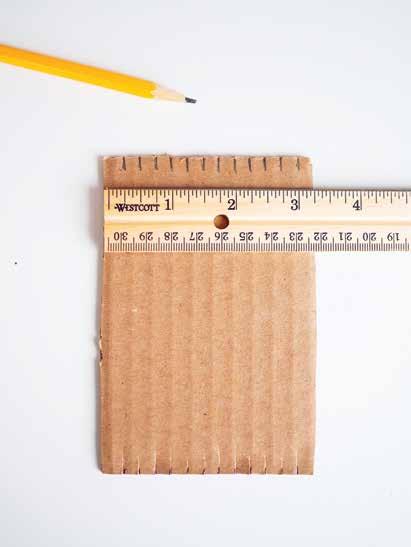
SUPPLIES AND TOOLS
+ Corrugated cardboard
+ T-shirt yarn
+ Cord or string (about 27 inches / 69 cm) for the cord tie or necklace strap (optional)
+ Ruler
+ Pen/pencil
+ Scissors
+ Darning needle
+ Tape
to make the loom
1. Start by cutting out a rectangle of corrugated cardboard roughly 3 ¼ by 4 inches / 9.5 by 10 cm.
2. On the two short ends of the cardboard, mark off ¼-inch / 6 mm segments using a pencil or pen. These marks should line up.
3. Using scissors, cut ¼-inch / 6 mm incisions along the marked lines.
PLAY 254 PROJECT
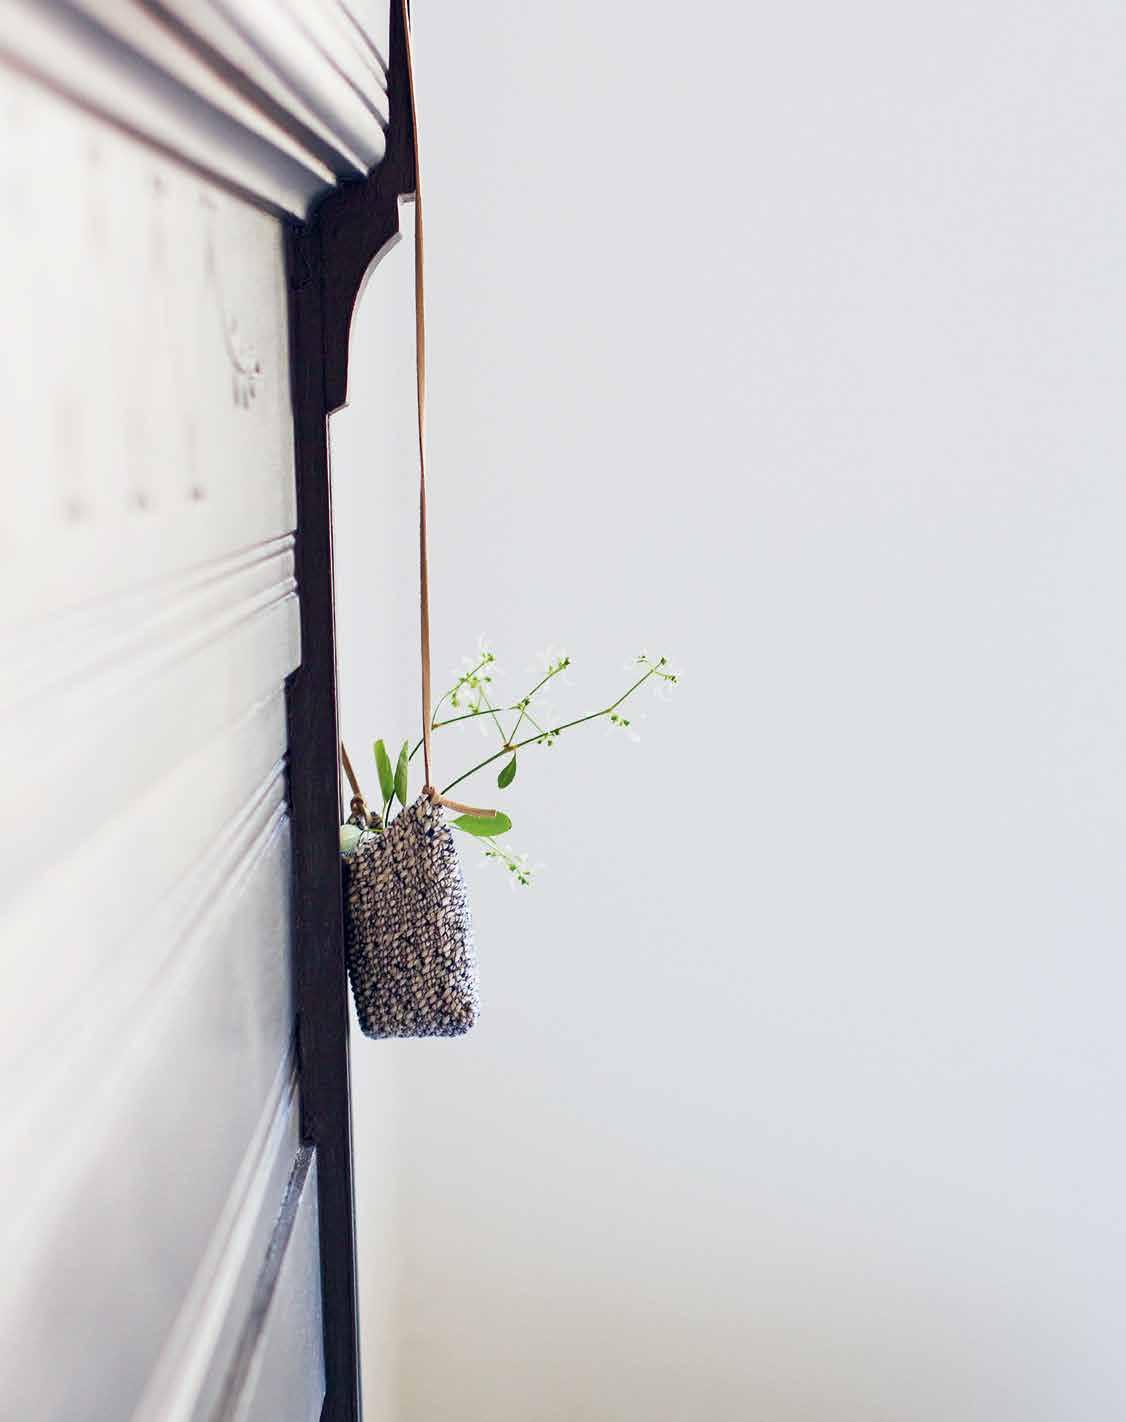
to warp the loom
1. Leaving a 3-inch / 7.6 cm tail, begin to warp your loom starting from the upper right corner.
2. Bring the working string down from the first top notch into the opposing notch on the bottom edge. Draw the string back up and around the back of the cardboard and through the same notch that you started in.
3. Continue by drawing the string across the front of the first tab and into the second notch. Bring the string down the back of the cardboard, and secure in the second bottom notch, drawing the string up the front of the loom and again through the second upper notch.
4. This time, continue by wrapping the string around the back of the second tab. Continue to warp your loom in this manner so that every other top tab has a visible wrapped string, and the back side of the cardboard loom will have the alternate wrapped tabs. Make sure you have set your warp up so that the tension is nice and taut and the string is drawn tightly through every cut slot.
5. When you reach the last lower left notch of your cardboard loom, cut 2 inches / 5 cm of extra string and tape it to the back side of your cardboard loom so it will not be in your way when weaving. (Note: Do not draw the warp back up the top notch. You want to have an uneven number of warping strings so you can properly weave from front to back.)


PLAY 256
to weave
1. Begin with a piece of T-shirt yarn roughly two arm-lengths long and thread it in your darning needle. (See Weaving Tips about fiber length, page 180.)
2. Start to weave on the bottom right of your loom, going under the first warp string and over the second and continuing in this pattern, called basic tabby stitch.
3. Pull your T-shirt yarn all the way through the bottom row until there is 3-inch / 7.6 cm tail left. (This tail will be woven in at the end.) When you finish weaving the last warp string on the front of your cardboard, flip the loom over and continue weaving in the same manner on the back side, taking care not to weave into the taped string on the back side of your loom.
4. Fill your loom up to the top and make sure you have very little extra space left and the fibers are all packed in tightly.
to finish
1. Using your darning needle, remove the warp strings from the notches on the top of your cardboard by slipping them over the tabs. It’s fine to bend and break off the tabs of cardboard in the process.
2. Slide the woven pouch off the cardboard loom, making sure to carefully remove the warp from the bottom notches. Bending the cardboard makes it easier to remove your work.
3. Weave in the long ends of the warp fiber (weaving in and out into the existing woven fiber for a few inches) and cut off
any extra length. Similarly, trim any long overlapping weaving threads (you can knot the ends before trimming if desired). Turn your pouch inside out to conceal the tail ends.
4. To create a strap, knot a necklace-length string through a few stitches on opposite sides of your pouch. Alternatively create a drawstring pouch, using the drawstring instructions on page 75.
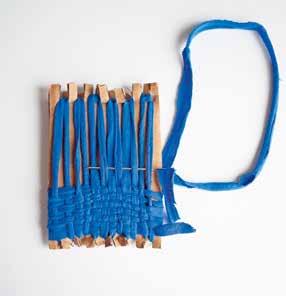


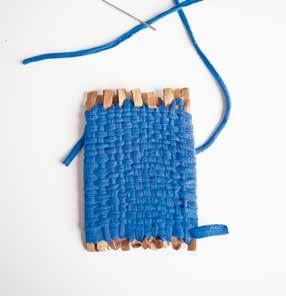

TIP:
If your cardboard becomes overworked, the tabs might become weak and the yarn can pop off. To prevent that from happening, you can cover the top of the warped tabs with a piece of washi tape to secure your yarn while weaving. This can easily be removed when it’s time to finish the pouch.
PLAY 257
woven checkerboard
When Erin’s five-year-old became obsessed with checkers at his grandparents’ house one summer and was bereft to return to a checkerless apartment, Erin drummed up a quick scrap fabric solution based on the construction paper weaving projects she remembered from grade school. The result is a loosely woven board that comes together without fuss or pretense. This isn’t the most polished checkerboard possible, but it’s easy to make, and after hundreds of games of checkers and chess, it’s proven it can hold its own, raw edges and all. In other words: don’t let the perfect be the enemy of the good and just play checkers.
SUPPLIES AND TOOLS
+ Light-colored canvas drop cloth, cut into a 14-inch / 35.5 cm square
+ Contrasting or darker-colored canvas or other heavy-weight fabric, also cut into a 14-inch / 35.5 cm square (we used upcycled charcoal canvas from an old shower curtain)
+ Ruler
+ Fabric chalk or marker
+ Needle (or sewing machine) and thread
+ Scissors
+ Sewing pins
1. Leave your first square of light-colored canvas whole for now. From the second square of fabric in the contrasting color, cut eight strips, each 1 ½ by 12 inches / 4 by 30.5 cm.
2. Fold the square of light-colored canvas in half and place it in front of you with the folded edge closest to you.
3. Measure and mark two small vertical lines along the fold, each 1 inch / 2.5 cm in from the left and right edges respectively.
4. Between these two lines, mark seven additional vertical lines, each 1 ½ inches / 4 cm apart.
5. With your fabric still folded, cut through the fold on each of the seven interior lines, stopping 1 inch / 2.5 cm from the top of the fabric. Open up the fabric and lay flat.
6. Take your first strip of darker or contrasting fabric and weave it over and under these slits at one end of the cuts until it’s evenly placed between each slit.
7. Weave a second strip of dark fabric below the first, alternating your weave so it goes under then over at a contrasting pattern to the woven strip above.
8. Continue until all eight strips have been evenly woven between the slits of the base layer. You should see a clear checkerboard pattern of eight alternating-color rows appear. Double-check your weave to make sure it’s right and pin the strips into place where they overlap on each edge of the base layer.
9. Using a straight stitch, sew along the interior perimeter of the base layer, making sure to catch the end of each strip as you go.
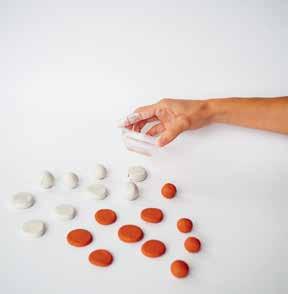
clay checker pieces
Use two colors of DAS clay— white and terra-cotta—to form round disks that can be used as simplified checker pieces. Begin with balls formed by rolling clay between your palms. Flatten each ball with a smooth, flat surface, like the bottom of a drinking glass. After the clay dries, sand the edges a bit with a piece of sandpaper to smooth out any rough spots.
PLAY 258 PROJECTS
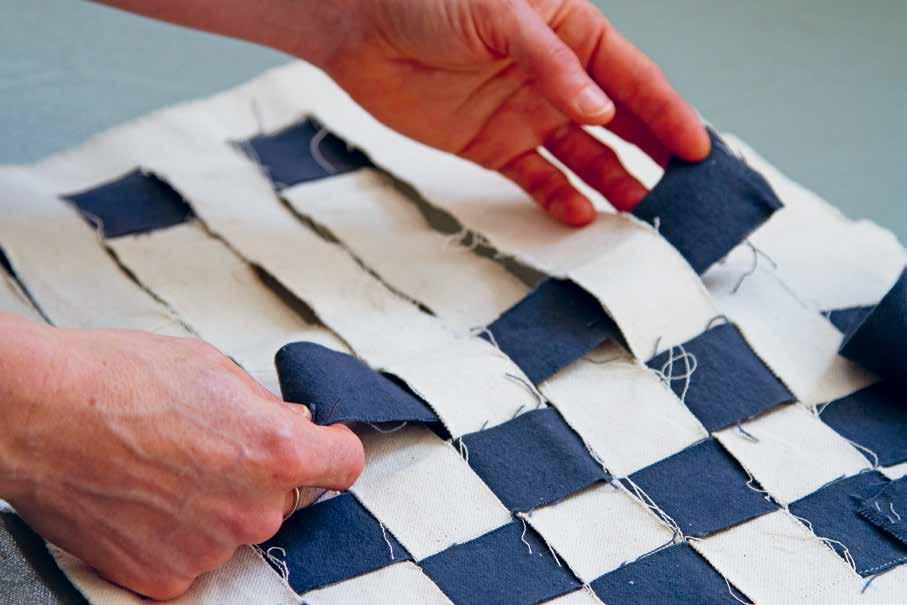

PLAY 259
freezer paper printing
We don’t exactly find ourselves wanting for tote bags, but wanting for tote bags we want, well, that’s another story. Dressing up otherwise blah or plain tote bags with sharp, graphic lines can be an exercise in creative expression. Freezer paper printing results in sharp lines and crisp designs that are otherwise hard to achieve when painting on woven fabric. When pressed with an iron, this grocery-store staple is a quick and inexpensive alternative to silk screening and gives you the artistic license to design any way you like. You can design freehand by cutting out shapes with a craft knife.
SUPPLIES AND TOOLS
+ Fabric (preferably lightweight cotton or linen)
+ Fabric paint or acrylic paint
+ Paintbrush
+ Freezer paper
+ Scissors or craft knife
+ Iron
+ Cardboard or parchment paper to protect the working surface
1. Tear off a piece of freezer paper that is roughly the size of your design.
2. Using scissors or a craft knife, cut out a design from the paper. Be sure you make your cut inside the paper so there is a border around the cut-out shape.
3. Using the stencil, lay the paper flat on your fabric with the shiny side facedown. This is the side
that will adhere to your fabric. You do not want it faceup or it will stick to your iron!
4. Using the cotton or linen setting on your iron, run the hot iron over the stencil and smooth all the paper parts down. Go over any fine cuts carefully to be sure that all parts are sticking to the fabric material. Turn off your iron.
5. Lay a piece of cardboard or paper on the underside of the fabric to protect your surface area from paint. (If painting on a cotton tote bag, line the inside).
6. With a paintbrush, cover the area inside the stencil with paint. The beauty of the freezer paper is that you don’t have to be neat or careful along the cut-out edges. Be sure the paint is thickly applied, taking special care on the border edges of the paper and your fabric.
7. Let the paint dry, then carefully peel away the stencil to reveal your design.

TIP:
To make a symmetrical free-form shape with scissors, fold your freezer paper in half. Cut into the folded edge at least 1 inch / 2.5 cm away from either corner end. Cut your design inside the perimeter of the page. Your cut can be free and unplanned with as many angles and squiggles as you’d like. Open up your paper to find the cut-out stencil.

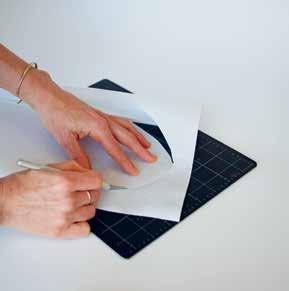
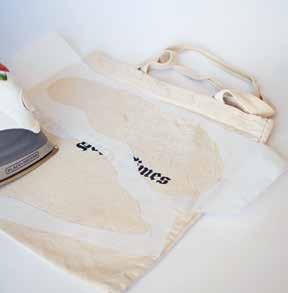
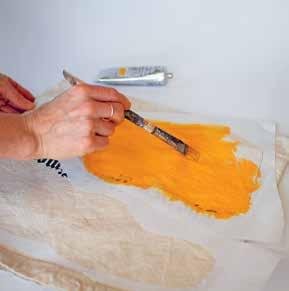

PLAY 260 PROJECT
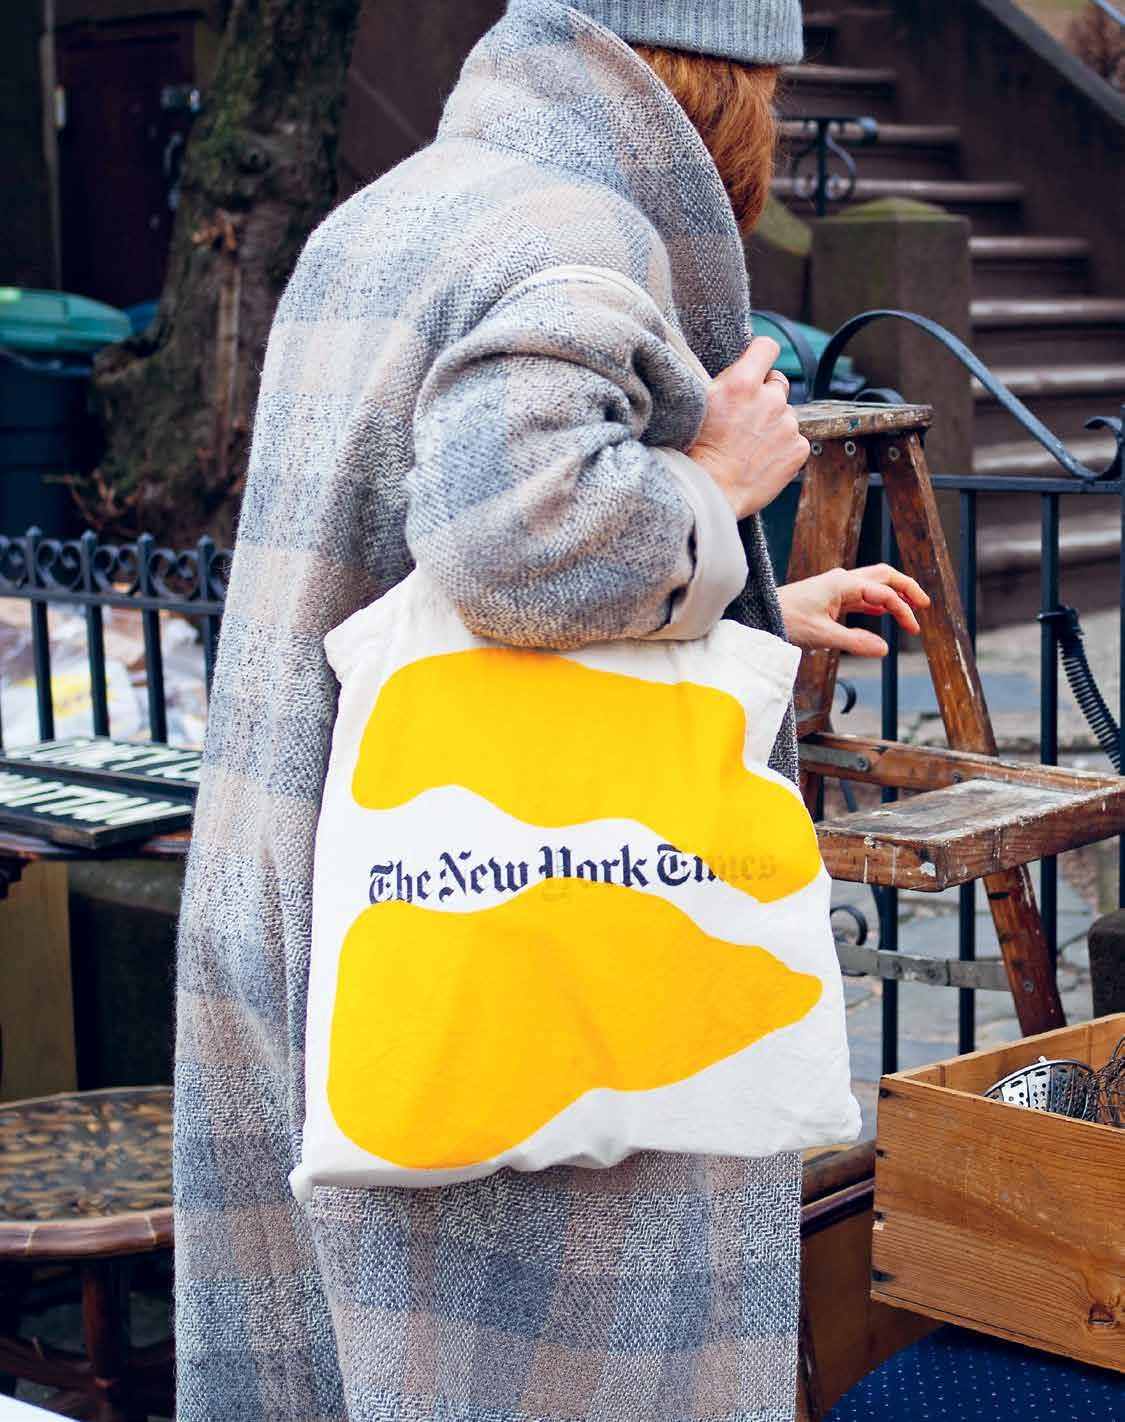
block stamps
Root around in collections you already have to find wooden blocks—old Jenga blocks are perfect for this—and glue shapes of your wildest imagination or most basic geometry knowledge, cut from small pieces of craft foam. The result is a crisp, clean stamp that will give traditional rubber stamps a run for their money and hold up just as well.
SUPPLIES AND TOOLS
+ Small wooden blocks
+ Craft foam
+ Scissors
+ Wine cork (optional)
+ Ink pad
+ Glue
1. With scissors, cut out shapes from your foam and arrange them on your block.
2. Secure your foam design to the wood block with glue.
3. If using a wine cork for a handle, secure it with glue to the back side of your block (a strong glue works best for securing the cork). Make sure it is centered on the back.
4. Let the glue dry and you’re ready to stamp.

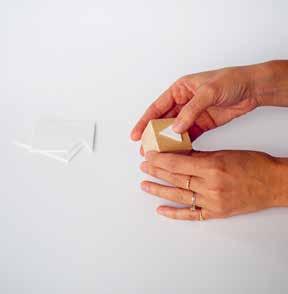
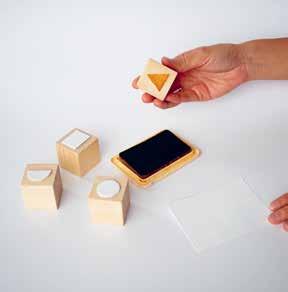

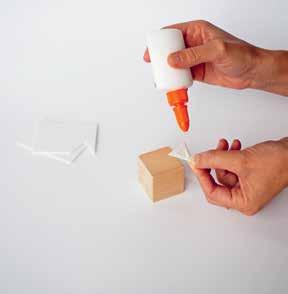
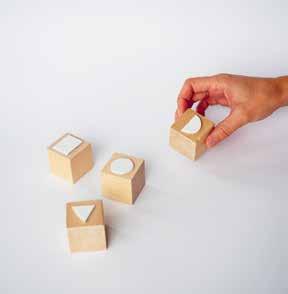


PLAY 262 PROJECT
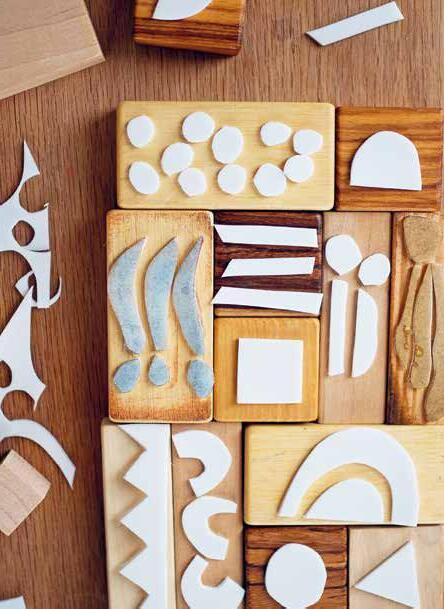
TIP:
Test out your first block stamp print on scrap paper to make sure it is properly inked up and you are happy with the design. You can always add to your design with extra foam, but remember that any foam that hangs off the edge of a block will not print, so be sure all the pieces are positioned on the block’s surface.
Press the stamp down firmly onto your printing surface. A gentle rocking motion (without moving the stamp) will help get an even print.
When printing with different ink colors, be sure to let the stamp dry out before using a different ink pad (or else you get muddy prints and stamp pads).

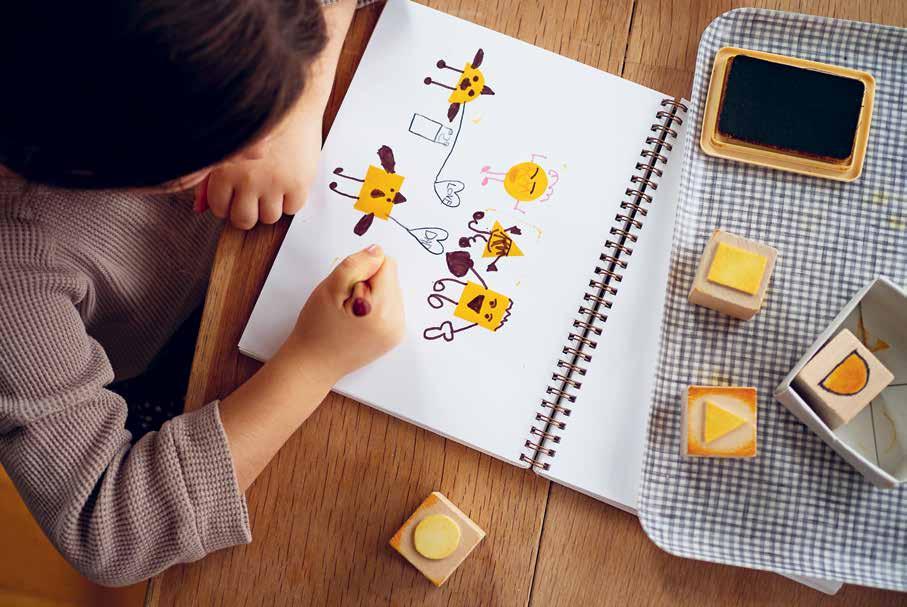
PLAY 263
jump rope
Faced with a choice between cheap plastic versions or expensive wooden ones, we decided to make our own. We found with a few minor adjustments, we could turn our Curtain Tieback (page 42) into an easy jump rope. The heft and thickness of the two-finger/three-loop cord lends itself well to this project, and because you’re only making 7–8 inches / 18–20 cm of cord for each handle, these work up extremely quickly. Each handle will take about nine rotations around your fingers. Start with a long length of rope (see the Tip on this page for finding the right length). Leave a 3-inch / 7.6 cm tail and finger cord for nine loops using the two-finger/three-loop technique to make the first handle. Bind off the corded handle by pulling the remaining length of rope through all the loops. Leave the center length of rope for jumping uncorded, then begin to finger-cord another nine rotations to match the first handle. Bind off the second side of cord, leaving a matching 3-inch / 7.6 cm tail and cut off any extra rope. Adorn the jump rope by adding clay beads and/or fraying the cut ends.

TIP:
If you want to make a custom-size jump rope for a specific jumper—and we think you do—use this trick to find the right length: Have the jumper stand with the end of the rope in one hand, raised up to their armpit. Have them stand on the rope and draw the other end of it up to their other armpit. The length between the hands and under the feet is the ideal length for that person’s jump rope. Each handle will take approximately 8 feet / 2.5 m of rope, so add that to your total calculation of rope length before cording and you’re ready to go.

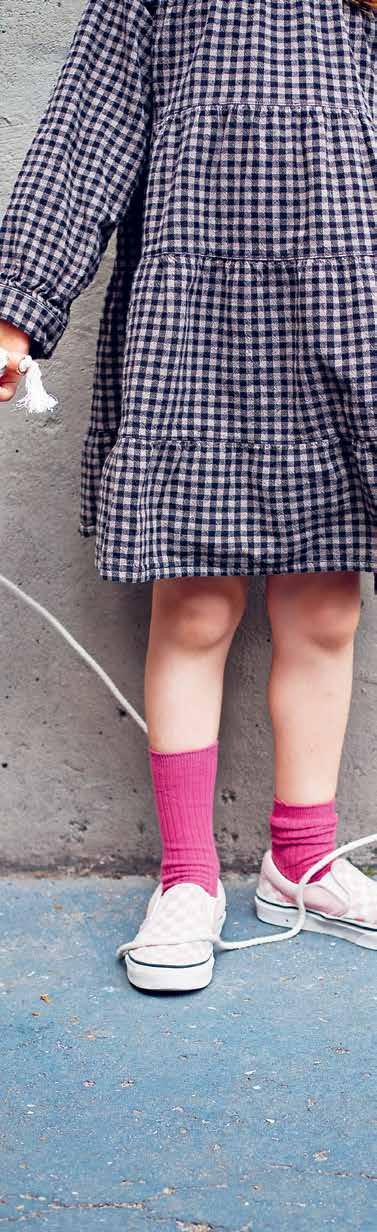
PLAY 264 PROJECTS
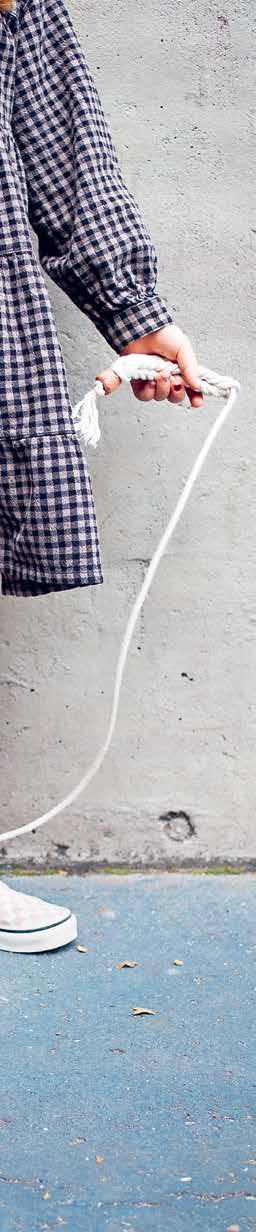

PLAY 265
kumihimo braiding
Kumihimo translates roughly from the Japanese to mean braided string. It’s a general term that refers to all forms of traditional Japanese silk braiding. Traditional kumihimo braids are made with fine silks and wrought by master craftspeople, but we were first introduced to this pared-down style of kumihimo braiding using embroidery thread and cardboard disks to create delicate but exceedingly strong bracelets in beautiful contrasting colors.
Since then, we’ve experimented with braiding many different fibers in a range of sizes and textures. No matter the fiber, we braid on a simple cardboard kumihimo disk cut with eight notches to accommodate seven strings. It’s a simplified version of the thirty-two-string kumihimo disk designed by Makiko Tada as a mobile alternative to round-topped wooden marudai stands of the sort master braiders might use. These cardboard disks take minutes to make and are exceedingly simple to use, providing hours of meditative braiding for anyone who could use a quiet, repetitive craft.
SUPPLIES AND TOOLS
+ Small piece of cardboard or chipboard
+ Sharp scissors or craft knife
+ 3-inch / 7.6 cm circular object to trace (optional)
+ Embroidery thread in desired colors or any type of yarn
+ Pencil
+ Ruler (optional)
+ Hole punch or awl
to make the cardboard disk
1. Trace a circle onto your cardstock or just draw a circle by hand as best you can.
2. Cut out the circle shape with sharp scissors or a craft knife.
3. Mark eight evenly spaced dashes around the perimeter of the circle.
4. Using scissors, cut each dash. (For thicker string, notch each dash into a narrow V shape.)
5. Puncture a hole in the center of the circle.
to string the disk
1. Cut seven pieces of string to your desired length.
2. Thread the bundle of strings through the hole in the center of the cardboard loom and knot to prevent the strings from coming back through the hole opening.
3. On the side of the loom opposite the knot, insert each of the seven strings into a slot. There will be one slot left empty.
to braid on the kumihimo disk
1. Hold the cardboard circle knot side down with the strings visible and secured in their slots and the empty slot at the position of 11:00 if you were looking at a clock (between the 9:00 and 12:00 position.)
2. The string pointing toward you is in the 6:00 slot position. Gently pull out the string at 6:00 from its slot and bring it up to the empty place at 11:00, securing it in that slot.
3. Turn the disk clockwise so the now empty 6:00 slot is in the 11:00 position.
4. Continue in this way, bringing the string in the 6:00 slot up to the 11:00 slot and turning the circle so the 11:00 always begins empty. Make sure you are turning your circle clockwise every time. Running your fingers through the strings on the back of the disk will loosen any tangles that might form.
5. The braid will form on the back side of the disk. To prevent stitches from building up on the front of your disk, gently pull the braid downward every few revolutions. This will also help maintain an even tension. You are finished when you have your desired length of braid. Remove all strings from the slots, gently pull out the braid through the center hole, and secure the end with a knot.
PLAY 266 TECHNIQUE


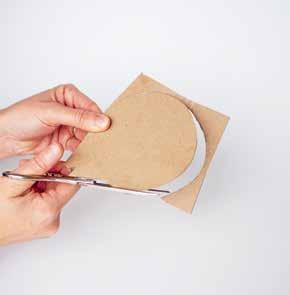
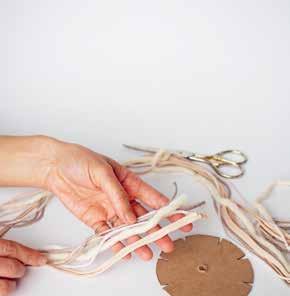


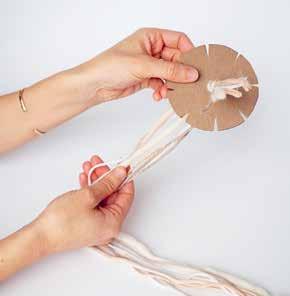
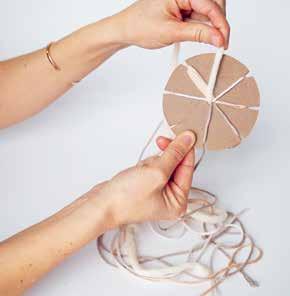
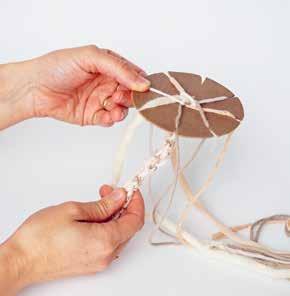
PLAY 267
bracelet
Pre-stringing cardboard kumihimo disks and toting them in your bag is a surefire way to make friends at the playground. We’re not kidding. When Erin’s oldest kid turned seven, she made a disk for each child at the birthday gathering, and it was the parents who sat around chatting, heads down, braiding what would become bracelets.
eyeglass cord
Tiny rubber bands (of the sort an orthodontist might use for braces) work great for securing sunglasses/reading glasses to a kumihimo cord. Make a tiny ½-inch / 1.3 cm loop with each tail end of your cord (the loop should be big enough to slide onto the arm of your sunglasses but not so large that it can easily slide off). Use a mini rubber band to tie the loop into place, looping the band a few times right underneath the knotted strings. Trim any remaining threads.

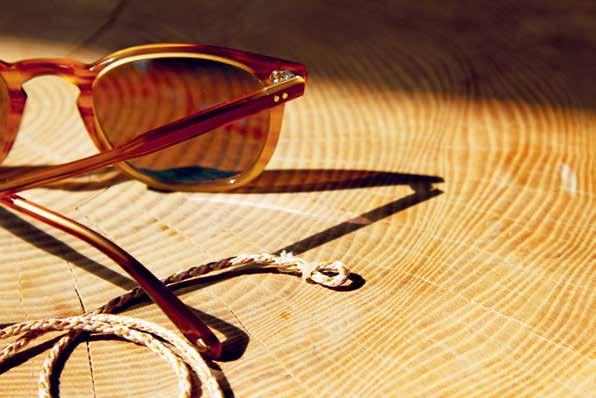
PLAY 268 PROJECTS

kumihimo corded dog leash
With Pants! (exclamation point hers) as our muse, we studied dog leashes all over this city until Rose came up with a beautiful, sturdy leash that’s quick to make. Thick cotton string braided into a seven-strand cord on a cardboard disk has a satisfying weight and heft, and gosh if it doesn’t make the prettiest leash on the block.
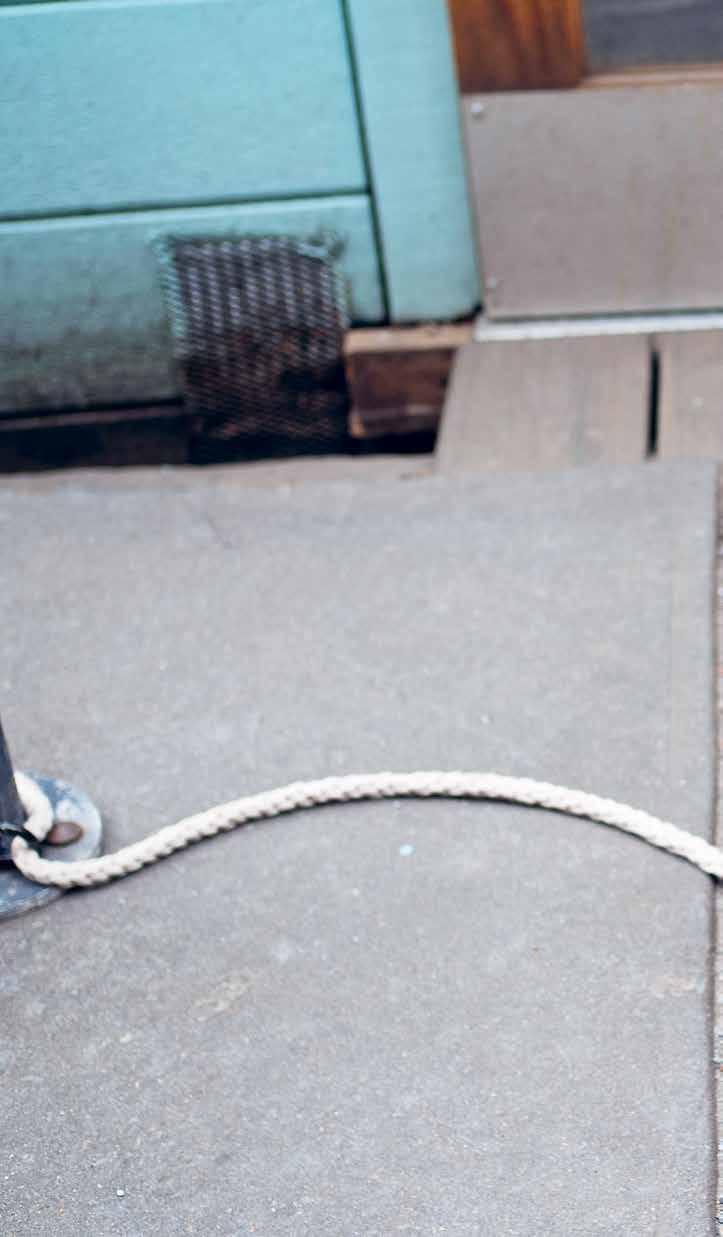
PLAY 270
PROJECT
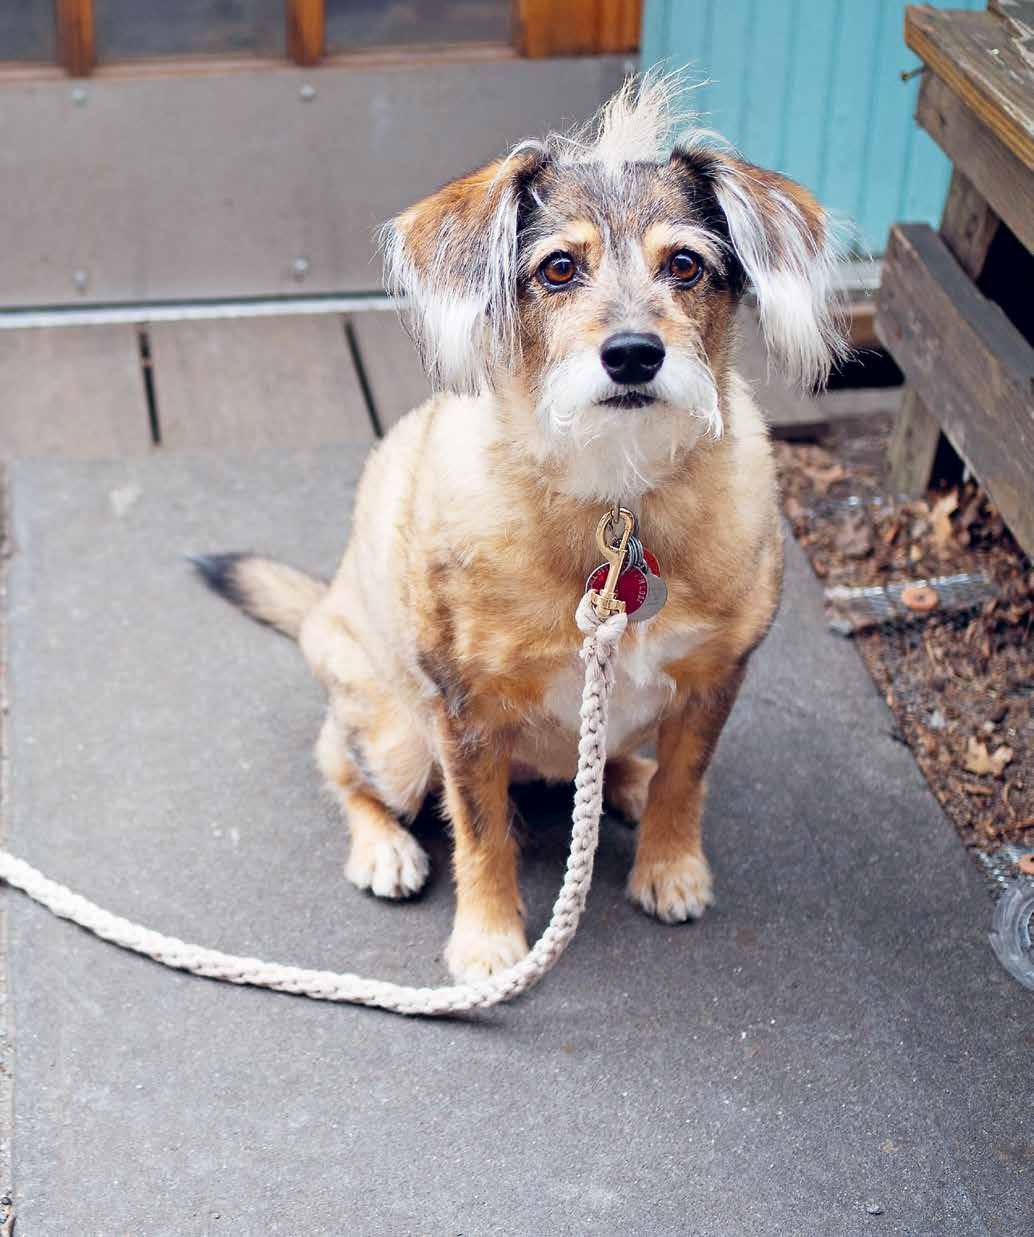
PLAY 271
+ 49 feet / 15 m (plus 24 inches / 61 cm extra for the whipping knot method) of thick string or rope. This will make a 56-inch / 142 cm leash. If you would like a longer one, increase the length of rope used.
+ Brass or metal lobster clasp, 1–3 inches / 2.5–7.6 cm
+ 4-inch / 10 cm cardboard kumihimo disk (see page 266) with slots cut large enough to fit the chosen fiber
+ Scissors
+ Darning needle
+ Finer string or thread for sewing

MATERIALS NOTE:
For this project we recommend a 4 mm single-strand cotton string as it is durable and strong and, despite the long length, the thick fiber will braid up quickly.
to string the disk and braid
1. Measure and cut three pieces of string, each 14 feet / 4.3 m in length, and a fourth string 7 feet / 2.1 m in length. Fold the three longer strings in half. Push the folded strings through the hole in the kumihimo disk so that the looped middle pokes through the hole Insert the 7-foot / 2.1 m string into the hole, pulling through just 4 inches / 10 cm. Use that tail end to tie a simple knot around the base of the looped strings, creating a 2- to 3-inch / 5 to 7.6 cm loop. (The tightness of this knot is not
crucial for the strength of the leash, as all the strings will be tightly secured into the braid.)
2. Insert each of the seven strings into a slot and weave as directed in the Kumihimo Braiding instructions, page 266. Comb your fingers through the strings while you work to prevent tangles.
3. The leash will form on the back side of the disk. Gently pull the cord in back as you work to help it move along.
4. Work until you reach the end. Remove all strings from the slots and gently pull out the newly corded rope through the center hole. Secure the end with a knot.
to finish the leash
1. Pull the loop end of the leash through the ring of the lobster clasp. Thread the opposite end of the leash through the loops and pull tight to hitch the clasp in place.
2. Fold the last 6 inches / 15 cm of the leash to create a comfortable looped handle. Use finer string and a darning needle to sew the two sides of the leash together. You want to make sure to create a strong handle that will not pull apart. It’s okay if the sewing is a bit messy as it will eventually be concealed.
3. Trim loose ends below the knot.
4. Use the remaining thick string to conceal both knot and sewn stitches with a whipping knot (see page 274 for details).
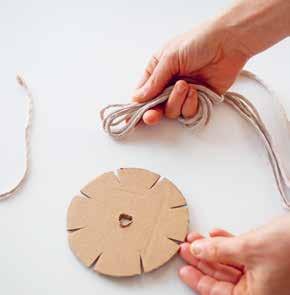

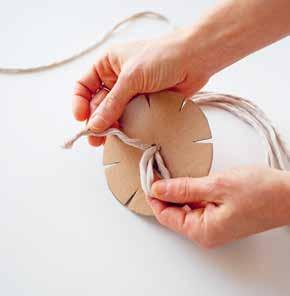

PLAY 272
SUPPLIES AND TOOLS

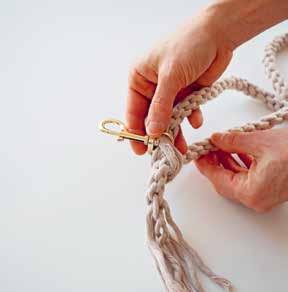
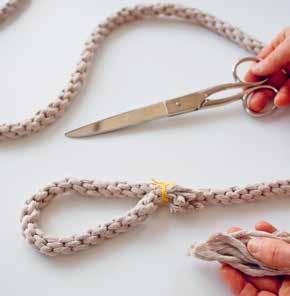

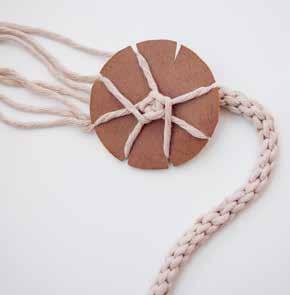
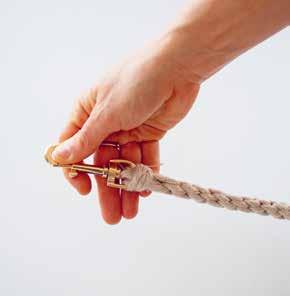

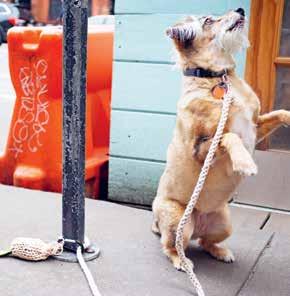
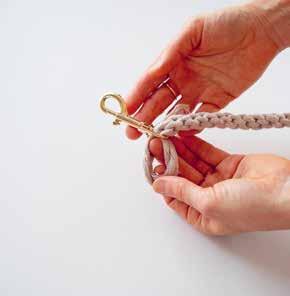


TIP:
Is that a handmade dog poop bag holder you see? Why yes, yes it is. Our furry friends deserve bespoke soft goods, too.
PLAY 273
whipping knot
A whipping knot is a simple knot typically used on the end of a piece of rope to keep the ends from fraying. We love using this knot in all kinds of applications, from gathering the stems of herbs together, to wrapping a neat knot over a wooden dowel, to covering stitches on a kumihimo dog leash.
SUPPLIES AND TOOLS
+ String, cord, or twine + Center material (this might be a stick, a dowel, a length of rope, multiple strings, a piece of wood, etc.)
*Depending on the thickness of materials you are covering and the length of your wrap, the amount of string needed can vary from a few inches to a few feet in length.

where to use a whipping knot
Canvas Wall Caddy 120
Cat Scratch Board 276
Cat Toy 276
Herb Hanger 50
Kumihimo Corded Dog Leash 270
1. Lay a bight (a U-shape of string) over the area you wish to wrap. The length of your bight depends on the length of what you’re wrapping. The curved edge of the bight should point in the direction you want the string to exit the knot.
2. Wrap the working string around, starting at the straight ends of the bight and working up toward the curve, taking care to keep your coils as neat as possible and to leave the short end of the string exposed enough to pull on at the end.
3. Wrap the length of the bight until there’s just a small bit of the U-shaped loop exposed. Insert the working tail through the exposed bight. Pull the working end and, at the same time, the shorter tail end in opposite directions until the bight slides under the wrapped string and out of sight.
4. Trim the two tail ends.
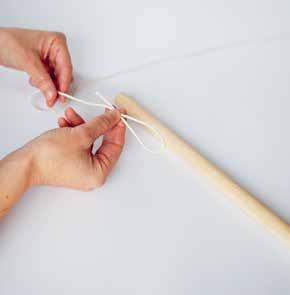

TIP:
If you’d like to make two whipping knots on either side of a handle (for example, to hang the Canvas Wall Caddy, page 120, on a wooden dowel), you’ll need double the amount of string to wrap a second side. After wrapping your first bight, pull your working string across the dowel, leaving enough slack for hanging, and begin your second whipping knot, this time with the bight facing in the opposite direction from the other side.

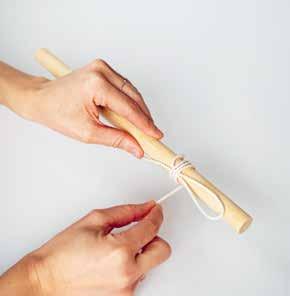

PLAY 274 TECHNIQUE
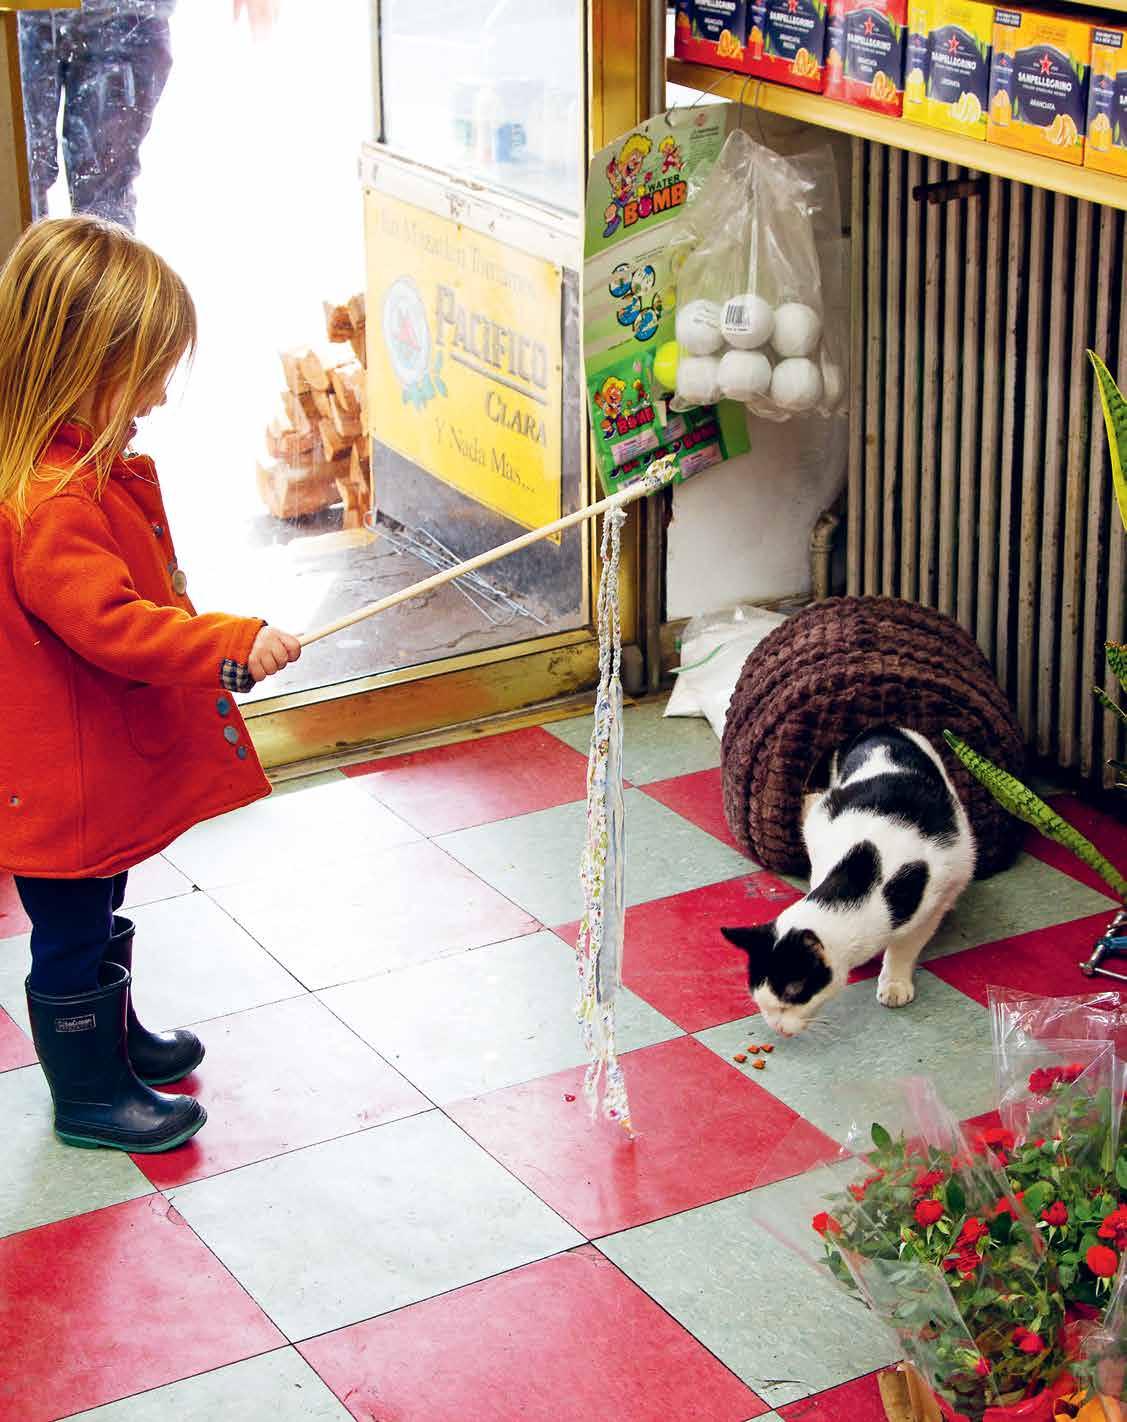
cat toy
Dig into your fabric stash and flex your fabric stripping muscles to make this easy cat toy. Or is it a fairy wand? You decide.
SUPPLIES AND TOOLS
+ Dowel or stick, 12 inches / 30.5 cm long (dowel pictured is ¼ inch / 6 mm thick)
+ 9 strips of cotton fabric roughly ¾ inch / 2 cm wide and 24 inches / 61 cm long
+ Safety pins (optional)
+ String (hemp twine pictured)
+ Scissors
+ Glue (optional)
1. Divide the nine strips of fabric into three groups of three.
2. Braid each group of three, leaving 1–2 inches / 2.5–5 cm of fabric loose at the beginning (use a safety pin to keep them together while braiding if you’d like) and braid for roughly 8 inches / 20 cm.
3. Tie a simple knot at the end of the braid and leave the 12 inches / 30.5 cm of remaining fabric loose.
4. Gather all three braids together. Remove safety pins if you used them and stack the braids together along the top 1–2 inches / 2.5–5 cm of your dowel. Use the hemp string to secure the loose ends to the dowel with a whipping knot (page 274).
OPTIONAL: Use a thin layer of glue to secure the fabric to the dowel first before securing the string over the fabric.
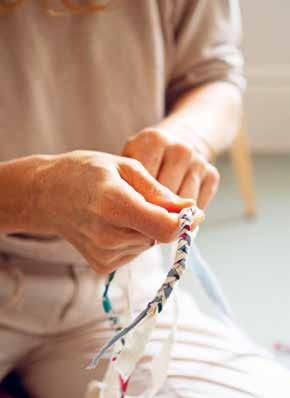
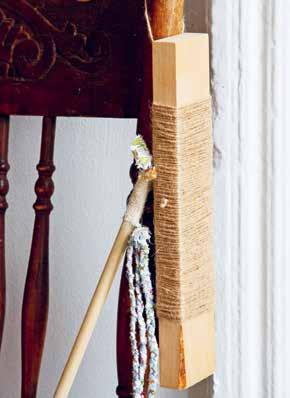
cat scratch board
Jute string plus scrap wood equals the prettiest cat scratch board we’ve ever seen. Any string will do, but jute has a nice scratchy texture perfect for the job.
SUPPLIES AND TOOLS
+ Rectangular piece of scrap wood (thickness and size can vary; ours was 8 by 4 by 1 inches / 20 by 10 by 2.5 cm)
+ Jute string
Use a whipping knot (page 274) to cover a large portion of the scrap wood with string. Wrapping tightly as you go, leave some wood exposed on the top and bottom edge. Trim the bottom string to be flush with the wrap and use the working string to hang your cat scratch board.
PLAY 276
PROJECTS
kumihimo rope dog toy
Maybe you’ve been bitten by the kumihimo braiding bug and you simply can’t stop. Don’t! Make a giant rope pull toy instead! Seven lengths of our go-to cotton clothesline works into a hefty dog chew, so Pants! (or Spot, or whoever you call your best friend) can floss those canines in style.
SUPPLIES AND TOOLS
+ Cotton clothesline (35 feet / 11 m)
+ 4-inch / 10 cm cardboard kumihimo disk (see page 266) with a large center hole to accommodate all the rope + Darning needle (optional)
Cut the clothesline into seven 5-foot / 1.5 m lengths. Thread all seven pieces of rope through the center hole of your kumihimo disk. Tie a knot on the back side, leaving 2–3 inches / 5–7.6 cm of loose tail ends. Insert all seven strands into the slots on the front side of your disk. Weave as directed in the Kumihimo Braiding tutorial (page 266) until you have roughly 4 inches / 10 cm of rope remaining. Remove the woven cord from your disk and knot the end. Trim the remaining tail ends to match the opposite side. If desired, use a darning needle to fray the ends of the rope.

MATERIALS NOTE:
You can use a wide range of cotton fabric scraps to make this toy. Refer to page 174, To Strip Cotton Fabric, for tearing cotton fabric and have fun selecting different and contrasting prints and colors to make your braids.

PLAY 277 PROJECT

twining
Twining is the basis for many fibers—taking two things that are fragile and delicate alone and twisting them together to create something much stronger. Twining by hand is laborious but also deeply satisfying and meditative, not to mention just plain handy. Twist together lengths of string, paper, even plastic bags or dried plant fiber with this simple technique and you’ll be fascinated by the sturdy hardworking twine you can make out of the most unsuspecting materials.
SUPPLIES AND TOOLS
+ 2 lengths of string, paper, plastic, or plant fiber
1. Pinch the ends of the strings in the thumb and forefinger of your left hand.
2. Twist the right string to the right (twisting it once over your pointer finger) and pass it over the left string. What was the right-hand string is now the left-hand string.
3. Continue twisting and passing the string on the right-hand side.
4. Don’t think too hard; your hands will naturally know what to do.
5. When you reach your desired length, make a simple knot at the end.


TIPS:
If you want to twine using plant fiber, you’ll have the best luck by allowing that fiber—grasses, leaves, etc.—to dry and then rewetting it to twine.
If you run out of string but you want to continue working, overlap two tail ends together and continue twining. This needs to be done on just one string at a time for the strongest hold.
PLAY 279 TECHNIQUE
06

give
generosity abundance care
What does gift giving look like in a consumer-centered culture? How can we rethink what we consider to be giftable items? How can we become comfortable offering what we’ve made ourselves, upcycled from trash, pulled out of the recycling bin? Can we value time and care as much as the finished product? Can we delight in process over end result?
When Erin’s cousin Mildred turned one hundred in the course of making this book, there was no question that a small accordion-fold book made from the cardboard back of her kids’ watercolor paper pad and fabric cut from her kid’s shredded jumpsuit would be a suitable present. Into the folded wax-paper pages, Erin and her kids stuck photos and drawings and love notes. Also, if you’ll allow it, love itself. As a final chapter, we offer ideas for giving—of ourselves, our time, our creativity, and our materials, no matter how scrappy they are.
GIVE 282

accordion memento book
Maybe you’d like a spot to press summer’s fleeting flowers. Maybe you need a place to display photographs or stash movie stubs or tuck notes to a special someone. This small book with double-sided accordion-style pocket pages is here for all of your ephemera-hoarding needs.
We love forming the pages from translucent kitchen papers—either waxed paper or parchment—because they’re thin but still durable and they come in long lengths on a roll that can be easily folded. If you don’t have a need for translucent pages, Kraft paper makes a great alternative and a sturdier booklet. Just be sure that the paper you use is not too thick and can be easily folded and creased a number of times without creating too much bulk.
The finished press pictured is roughly 3 ¾ by 5 inches / 9.5 by 13 cm, but the paper size is only suggested—you can size up or down to suit your needs.
To view, the book can be opened wide to expose all the pockets at once, or thumbed through like pages in a traditional book. With eight pockets on one side and six on the other, there’s a lot of storage space for pressing flowers or tucking photos. If you want to make like a Victorian and save a lock of hair, that’s possible, too! The elastic closure will securely press all the pages together and keep the contents safe and secure.

GIVE 284 PROJECT
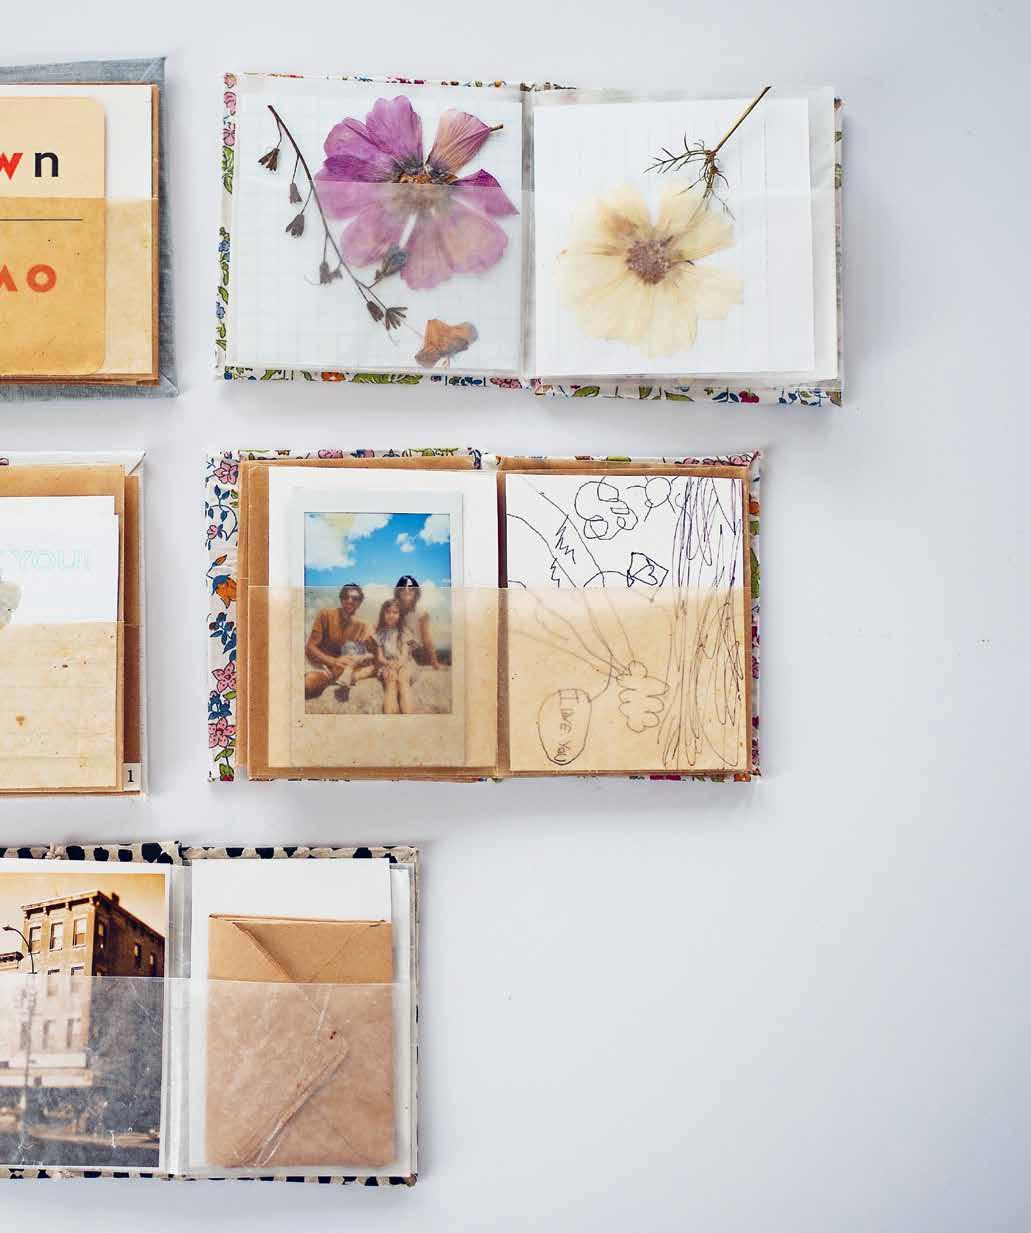
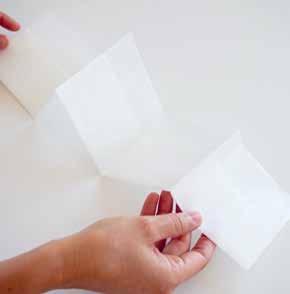

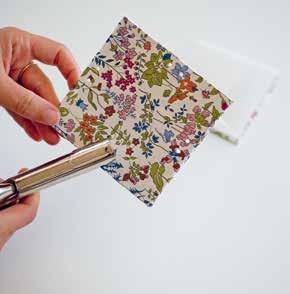
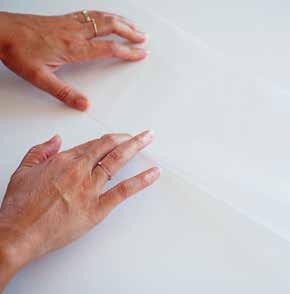
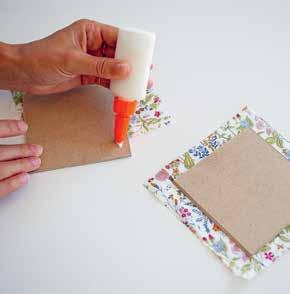


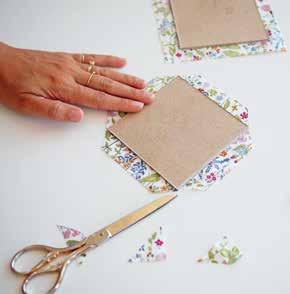
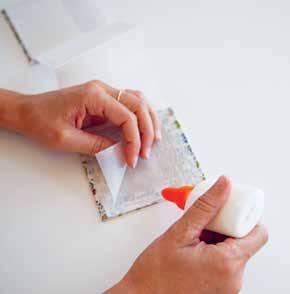
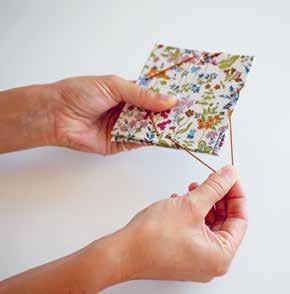
GIVE 286
SUPPLIES AND TOOLS
+ 3 ¾ by 10-inch / 9.5 by 25 cm piece (or larger) of noncorrugated recycled chipboard
+ Waxed or parchment paper, roughly 18 by 12 inches / 46 by 30.5 cm
+ Glue
+ Round elastic cord, 10 inches / 25 cm long
+ Hole punch or awl
+ 5 by 12-inch / 13 by 30.5 cm (or larger) sheet of lightweight paper or thin scrap fabric (wrapping paper, kraft paper, upcycled kids’ artwork, notebook pages all work)
+ Scissors
+ Pencil
to make the folded accordion pockets
1. Tear off or cut a sheet of waxed or parchment paper from the roll (roughly 18 inches / 46 cm long and whatever width the paper comes in, usually 12 inches / 30.5 cm).
2. Fold this sheet in half lengthwise and crease the fold.
3. Fold the long edge of the top layer down 2 inches / 5 cm and crease the fold.
4. Flip the paper to the opposite side and fold the other long edge down 2 inches / 5 cm to match the previous fold. Crease.
5. Starting at one end of the folded paper, begin your accordion folds, making a crease every 3 inches / 7.6 cm, back and forth. (You can adjust the size of the folds to accommodate anything you might be planning to add to your pockets.)
to make the cardboard covers
1. Trace the perimeter of the folded accordion pages onto the chipboard. Repeat for the second cover.
2. Cut both covers from the chipboard.
3. Position your covers on the wrong side of your fabric or paper, making sure there’s a roughly ¾-inch / 2 cm border of fabric on all sides of both covers. Lightly trace the perimeter of the covers.
4. Cut the fabric or paper ¾ inch / 2 cm from the traced shape all the way around, preserving a border.
5. Spread glue evenly on one side of the chipboard cover. Match the cover to the traced lines on the fabric and press the cover down to adhere. Repeat for the second cover.
6. Cut off all four corners of the fabric or paper on a diagonal. You will want to cut right up to the cardboard corner.
7. Working one edge at a time, apply glue evenly to the border fabric or paper and bring that edge up and over the cardboard. Press down to adhere. Repeat for all four edges on both covers.
8. Evenly spread the glue to the inside of the exposed cardboard cover. Line up the folded accordion book to the glued center and press to adhere. Repeat for the second side.
to attach the elastic closure
1. With a hole punch or awl, punch two adjacent holes in the center of each of the four sides ¼ inch / 6 mm from the edge. Don’t worry if while punching the holes in the cardboard you also punch through the inside accordion pockets.
2. Starting on the inside of your cover, lace the elastic through all the holes. The first hole should be along one of the edges where you open the book. From the first hole, weave the tail end into the adjacent hole on the neighboring edge of cardboard (not the hole directly next to it). Continue to weave the elastic in and out of all the consecutive remaining holes (it’s okay if the elastic also threads through the first layer of the inside paper folder as well).
3. When you reach the last hole, the two elastic ends should meet on the inside of the cover. Tie the ends of the elastic together in a double knot and cut off any extra length. The elastic should easily stretch around each corner of the book.
TIP:
The first and last page of your accordion book will need a little glue to adhere further to the cardboard. Also note, the side edge of the first and last page will also need a little glue along one edge of the flap.

GIVE 287
matchbook notebook
These tiny notebooks have become go-to gifts for favorite people in our lives, both big and small. They’re an excellent way to put kids’ artwork to use and to salvage half-used sheets of paper. And who could resist the diminutive size and neat closure?
No need to stop at filling these with paper, either. You can fold a simple matchbook cover for all sorts of giftable treats. Some of our favorite things to wrap up this way: tea bags, friendship bracelet thread, seed paper cut into “matches,” sticky notes, confetti, or flower seeds tucked into a mini envelope (see page 297)
SUPPLIES AND TOOLS
+ Recycled cardstock art, 5 by 7 inches / 13 by 18 cm or larger
+ 8–10 sheets of lightly used recycled paper (from a notebook or journal; these will be cut into strips)
+ Scissors
+ Stapler
+ Ruler (optional)
+ Pencil (optional)
1. Cut cardstock into a strip roughly 2 ¼ by 7 inches / 5.7 by 18 cm (the dimensions can easily be adjusted to create smaller or larger notebooks).
2. Cut recycled paper into 8–10 equal strips that are a little bit smaller than the size of the cardstock measurements, roughly 2 by 6 ¼ inches / 5 by 16 cm.
3. Fold the stack of recycled paper strips in half.
4. Fold down and crease one edge of the cardstock strip ¾ inch / 2 cm.
5. Insert the folded edge of your recycled paper stack into the folded cardstock end and staple in the center to secure.
6. Fold the remaining length of cardstock over the paper and toward the stapled edge.
7. Make sure that the cardstock edge goes past the overlap but not under the staple. If it’s too long, trim with scissors.
8. Tuck the remaining overlap underneath the stapled flap to close and crease the fold.
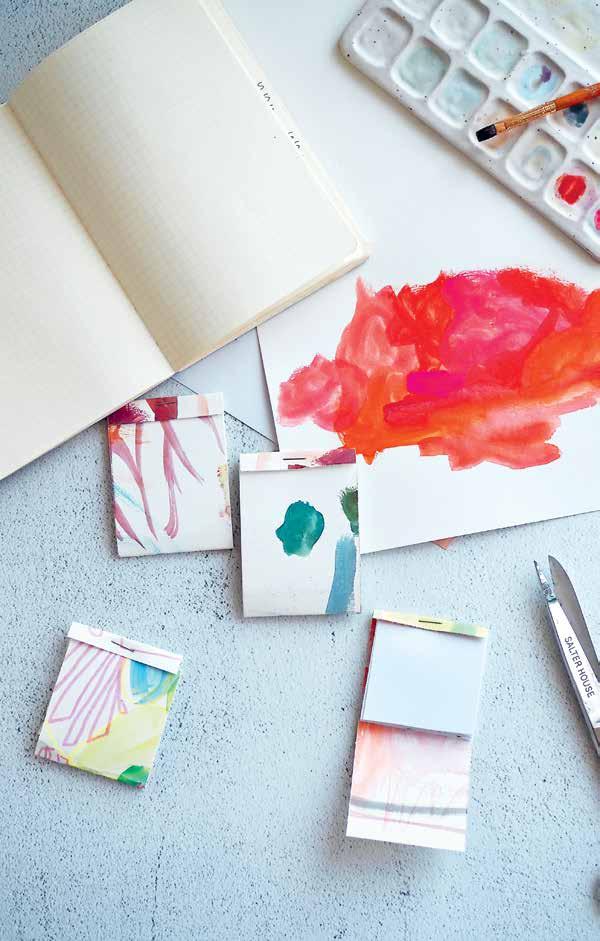
GIVE 288 PROJECT


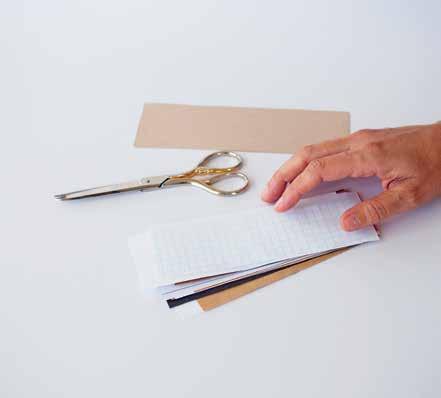
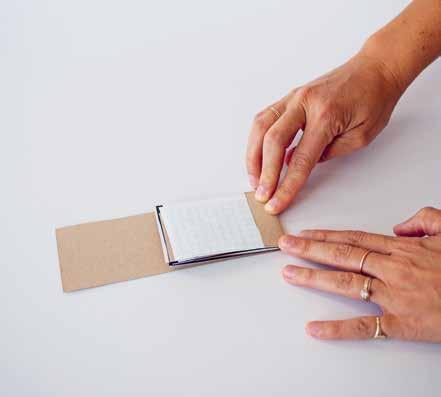
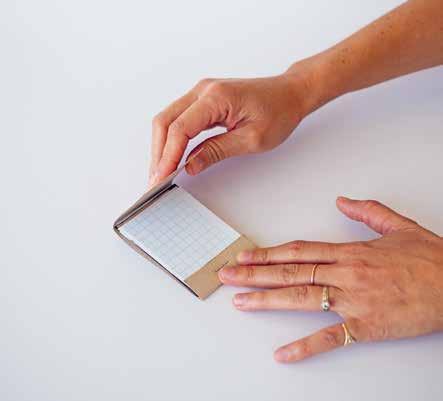
GIVE 289
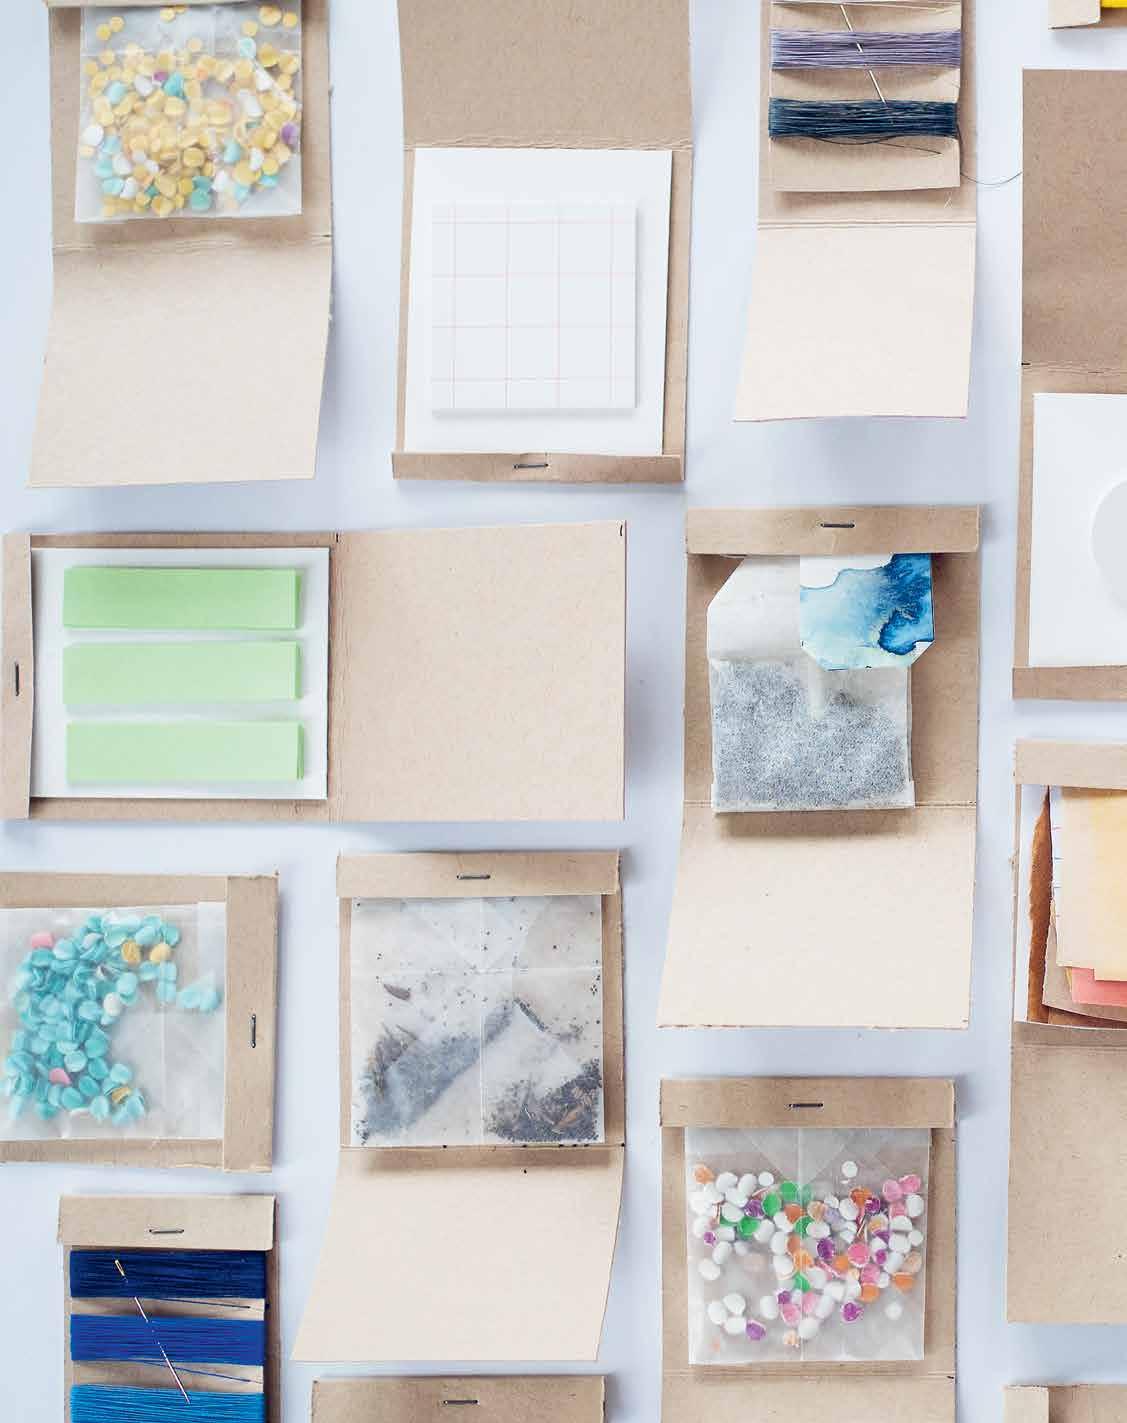

tear-off scrap paper pad
Is it fair to pick favorites? In a book full of projects that are arguably more . . . elevated, this humble tear-off scrap paper pad is one of Erin’s most beloved things to make. It’s a pad for scribbling notes to self and grocery shopping lists. It’s something to slip into a car caddy for the next great License Plate Game. It’s a party trick, it’s a workhorse, it’s somewhere to stick all of the bottoms of your kids’ homework pages, the empty pages at the end of a journal you just can’t manage to fill, a spot to clip and hold onto any manner of paper scraps that still have life but that need to find their purpose. The bulldog clip means that new sheets of paper can be added when they accumulate, while the extra length of chipboard tucked on top of the scraps provides a straight edge so you can rip off a page cleanly without unclipping the whole bundle.
SUPPLIES AND TOOLS
+ Chipboard (size can vary, but a square roughly 7 by 7 inches / 18 by 18 cm is a useful size)
+ Bulldog clip, size 2 (2 ¼ inches / 5.7 cm wide)
+ Craft knife
+ Ruler
+ Scrap paper
1. Begin by cutting your chipboard square to size.
2. Make a second cut, taking off a ¾-inch / 2 cm strip along one edge of the chipboard. Set this piece aside.
3. Place scrap paper to fit on the chipboard (trimming any big pieces if necessary).
4. Place the narrow strip of chipboard over the edges of the paper and flush with the top edge of the chipboard base.
5. Sandwich all the layers (base chipboard, papers, and top chipboard strip) and secure together in the center with the bulldog clip.
TO USE: Sketch, tear along the top chipboard edge, repeat, and refill when needed.


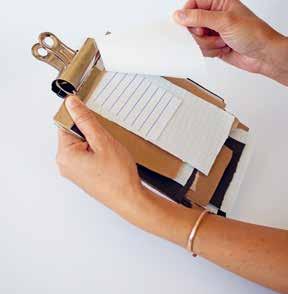
GIVE 292 PROJECT

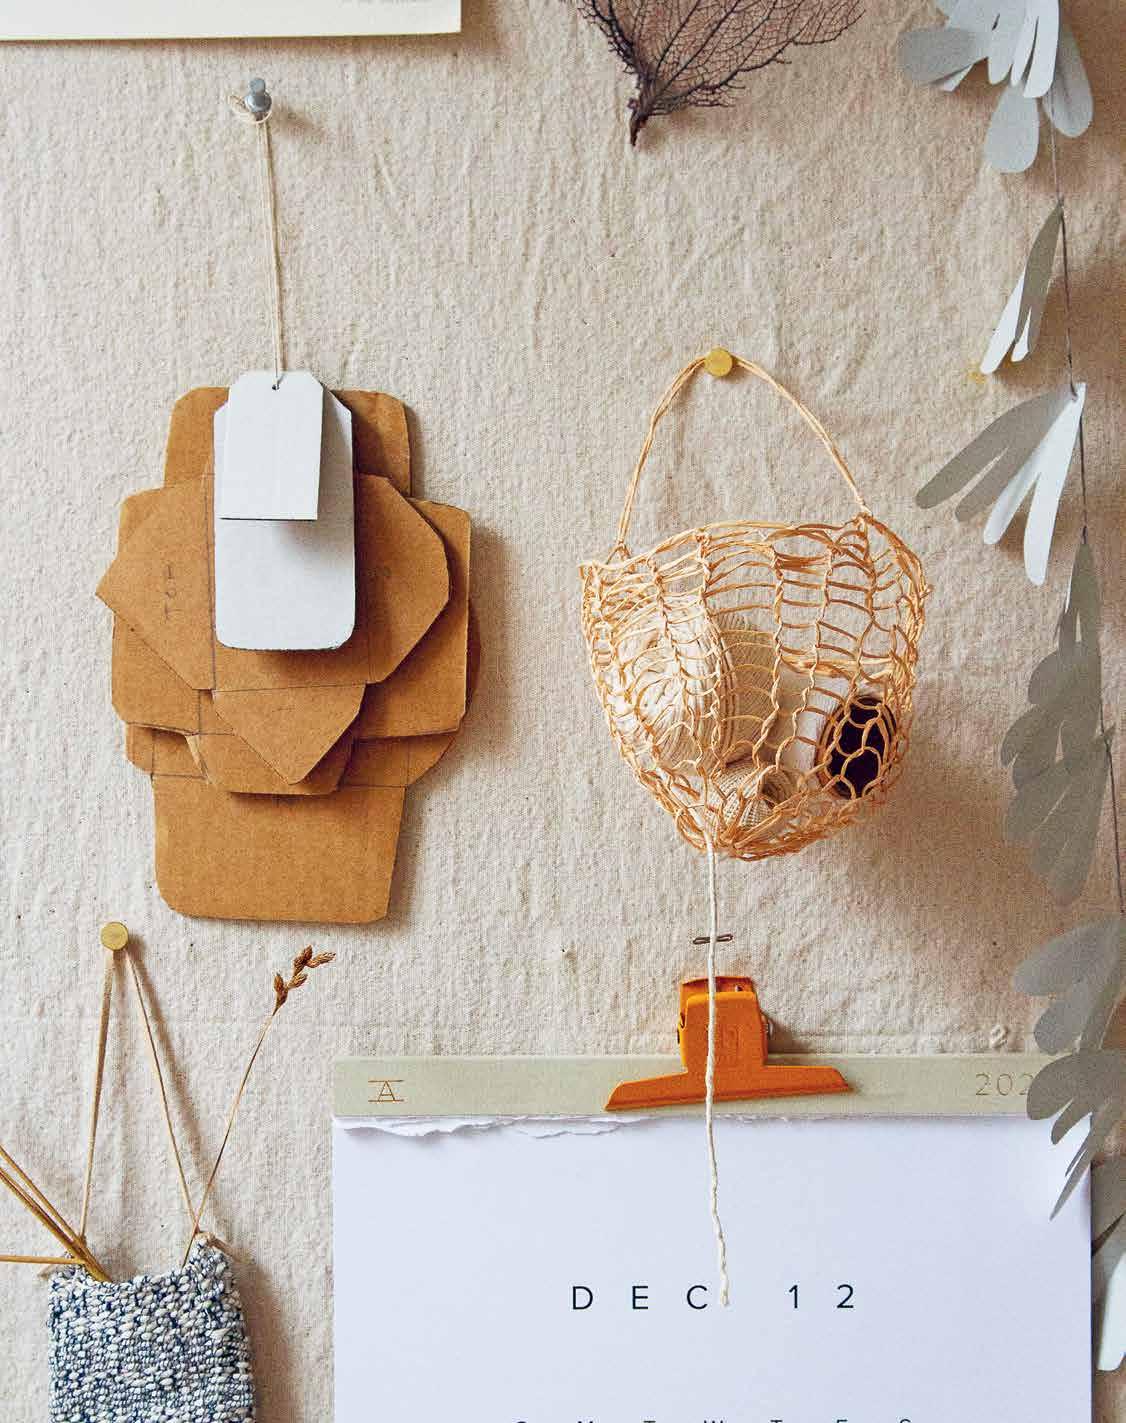
envelope and gift tag templates
The next time you receive an envelope or gift tag that you like the shape of, save it to make a cardboard template you can trace again and again.
SUPPLIES AND TOOLS
+ Corrugated cardboard
+ Pencil
+ Scissors or craft knife
+ Hole punch or awl (Optional)
+ String (Optional)
1. Carefully open up the seams of an existing envelope, trying not to tear where the paper is sealed with glue. (Sliding a pair of open scissors under the seams makes this task easy.)
2. With a pencil, trace your opened, flattened envelope onto a flat piece of corrugated cardboard. Repeat with any gift tags you’d like to trace. Optional: most envelope folds are pretty self-explanatory, but feel free to trace lines or add numbers to the template to help you remember how the flaps fold.
3. Cut out the shapes you traced with scissors.
4. Punch a hole in the top of the templates and lace a piece of string through it for easy hanging.


GIVE 295 PROJECT
kid art envelopes
The young artists in our lives are extraordinarily prolific (and very demanding regarding snacks). In an effort to put so much production to good use, we make paper envelopes from some of the lesser works in their collections. In case anyone finds themselves with a preponderance of artwork and an overflowing recycling basket, here is a simple way to make a paper envelope from kids’ artwork.
SUPPLIES AND TOOLS
+ Kid art, any medium, on paper 8 by 10 inches / 20 by 25 cm or larger (thin to medium-weight paper or kraft paper works best)
+ Cardboard envelope templates (see tutorial, page 295)
+ Tape or glue
+ Scissors
+ Pen/pencil
+ White sticker labels or light paper (optional)
1. With a pencil, trace an envelope template over the existing artwork.
2. Cut out the shape you traced.
3. Fold all the flaps (top, sides, bottom) into the center to touch. Leave the top flap open so that the envelope can be stuffed and glue the other flaps shut. A dab of glue or piece of tape can be used to seal it when ready for sending.
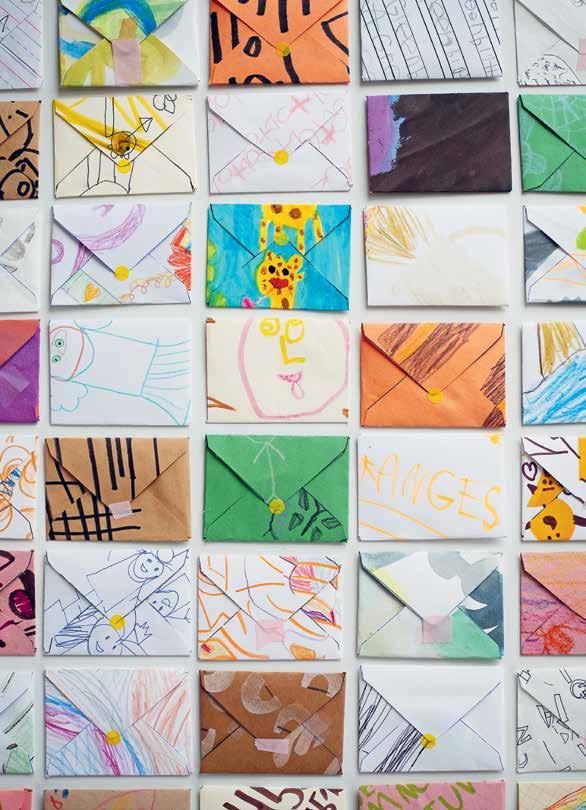
GIVE 296 PROJECTS
mini envelope
One of our favorite mini envelopes to make is shaped from a simple square of paper, no template required. We often make these from kids’ artwork and homework pages and especially love to make translucent glassine envelopes out of waxed paper for tucking inside matchbook notebook covers.
SUPPLIES AND TOOLS
+ Thin paper
+ Glue
+ Scissors
1. Cut your paper to 4 inches / 10 cm square.
2. Fold the square in half, corner to corner, to form a triangle and crease the center. Open.
3. Fold the square again in the opposite direction and crease again. Open.
4. Holding the square like a diamond, fold the two opposing corners on the right and left toward the center where the existing creases intersect. Crease the outer edges.
5. Fold the bottom triangle corner up toward the center, this time slightly past the center mark and creating a ¼-inch / 6 mm overlap along the edges of the adjacent triangles. Crease the fold.
6. Cut the triangle tip off the last fold (or you could just fold the very tip of the triangle downward; it will be concealed in the end).
7. Open the last triangle fold and glue along the ¼-inch / 6 mm edges where it overlaps with the side triangles. Press to seal the glue.

8. Fold the top triangle flap down past the center point, again overlapping the edges of the adjacent triangles, and crease to close the envelope shape.
9. To seal, glue along the overlapping edges.

rubber band tie

MATERIALS NOTE:
Don’t have kid art on hand? Envelopes can be made from all sorts of sturdy, foldable paper, including the pages of old books, notebooks, magazines, hand-stamped paper, recycled paper, gift bags, wallpapers, homemade papers, marbled papers, and so on! Let your imagination and your paper stash be your guide.
While one rubber band can easily slide off or slip around a surface, a two-way hold is a great way to secure an unstable pile of papers, or to apply equal pressure on all sides of a magazine box.
Simply interlock two matching rubber bands by overlapping them just slightly, and pulling the top overlapped section under the other and through itself. A small knot will form in the center, connecting the two parts.
TO USE: Place one side of the rubber band in one direction and twist the other side in the other direction to form a +.
GIVE 297
starched fabric bunting
If the idea of sewing on paper (or papery starched fabric) blows your mind, you are not alone. Besides making bunting in minutes, just think of the stitching that can be done to seal envelopes and embellish stationery.
SUPPLIES AND TOOLS
+ Scrap cardboard
+ Fabric marker or chalk
+ Scraps of starched fabric (or paper) (see Starching Fabric, page 130)
+ Sewing machine (or needle) and thread
+ Scissors
+ Triangle shape for tracing or straightedge (optional)
1. Cut a triangle template from cardboard.
2. Use your template to trace repeated triangles onto starched fabric.
3. Cut out the triangle shapes and stack them so they sit uniformly on top of one another. You will want to feed them through the sewing machine so all the triangles are symmetrical.
4. Using the running stitch on your sewing machine, leave a long starting tail of thread to start (pulling it outward from both the top spool and the bobbin spool), then sew a straight line through the top edge of your first triangle (sew forward and back to secure the first few stitches, then continue sewing
forward). Keep the sewing machine running so you are sewing with nothing underfoot for 1 inch / 2.5 cm or so, then feed the next triangle through the machine in the same way you did the first.
5. Space all the triangles out equally so they are sewn in the same direction and with roughly the same amount of space in between each one.
6. When you’ve run through all the triangles, stop sewing and pull the thread out for about a foot before cutting with scissors.

TIP:
If you don’t have a sewing machine, you can easily sew the bunting triangles together by hand. We used a simple running stitch along the top edge and left about 1 inch / 2.5 cm of space between each triangle.


GIVE 298
PROJECT
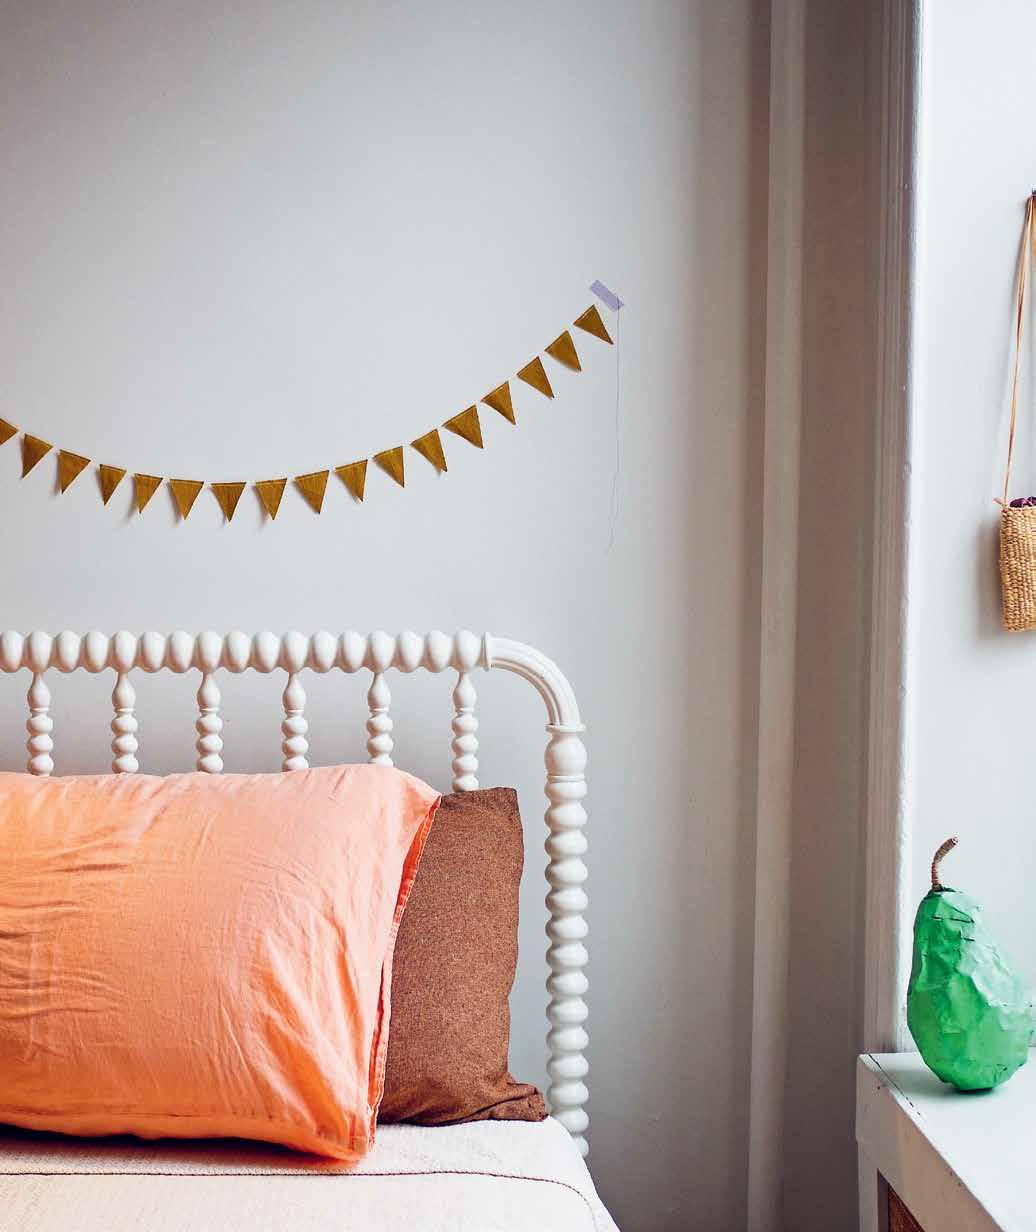
GIVE 299
PROJECT
pom-poms
Lots of pom-pom instructions either have you using a specialized tool or cutting a complicated DIY version from cardboard. This technique is extremely easy, virtually foolproof, and uses supplies you already have.
SUPPLIES AND TOOLS
+ Empty 3-inch / 7.6 cm cardboard tape roll core
+ 2 round wooden clothespins
+ Scrap yarn
+ 6 inches / 15 cm of round elastic cord (if using string, any length over 8 inches / 20 cm)
+ Scissors
1. Secure two clothespins onto the edge of a tape core so they fit tightly. The distance between the two pegs determines the size of the pom-pom, so if you’d like a smaller ball, move your pegs closer together.
2. Wrap the yarn around the two pegs until you reach the desired thickness. (Given the weight of the yarn, this can be between 30 and 60 revolutions.) The thicker the wrap, the fluffier the pompom. Cut the tail end of the yarn.
3. Using the additional string, tie a knot in the center of the bundle, cinching tightly to secure. Wrap the string again to the other side, repeating the cinch and knot.

4. Remove the pegs from the tape core and slide the bundle off the pegs.
5. Cut both sides of the bundle right down the center of the loops using sharp scissors. Make sure all loops are cut through.
6. Trim around the pom-pom to give it a “haircut.” Cut the strands so they are all the same length, being careful not to cut the string attached. The more you cut, the fluffier the pom-pom becomes.
7. Fluff out the pom-pom and tie the string around your gift.
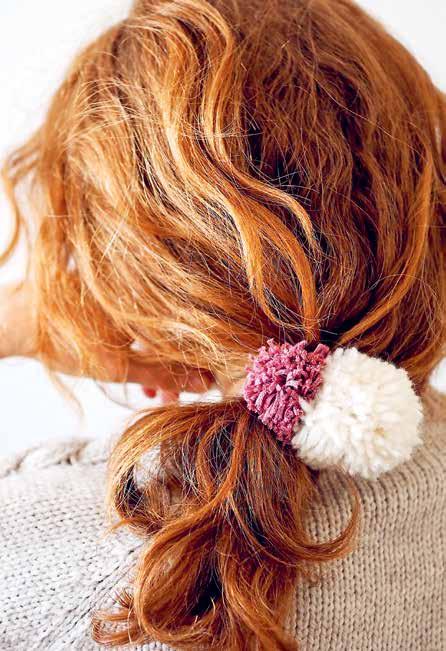
GIVE 300

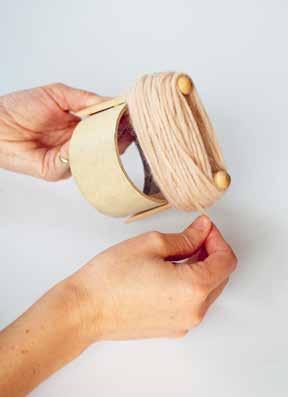


tassels

You can use the same laundry peg and tape core setup to make a perfect tassel for attaching to a present, tying onto the end of a lamp pull, or festooning a necklace. Swap fluffy pom-pom yarn for something finer. After winding your string around the pegs, tie a second piece of string around the bundle directly under the peg and tie tightly. Remove the tied bundle from the pegs. Cut through the bottom center of the loops on the long end of the tassel and thread extra string through the center of the smaller top loop. Secure with a knot.
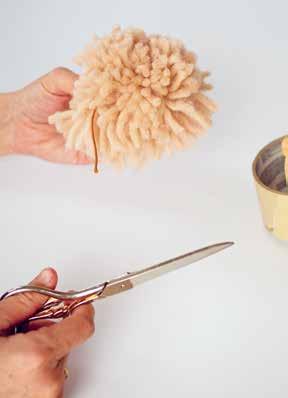
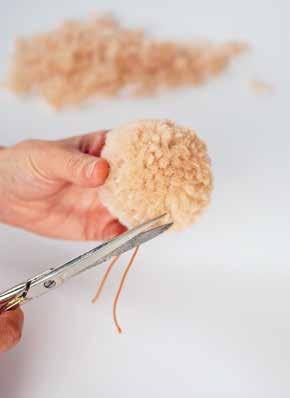
GIVE 301
scrap fabric hair bows
Use up fabric scraps and look cute doing it? Yes, please. Long, narrow scraps of fabric are perfect for turning into easy hair accessories for kids (or anyone) headed to parties with bows in their hair. Clip a pair onto a piece of cardstock or watercolor paper and you’re ready with the present too.
The dimensions of these bows can vary greatly depending on your personal preferences and the clips and scraps you happen to have on hand. The goal here is to make a long, thin ribbon and to tie it into a bow. Attaching that bow to an alligator clip makes for easy use and perfect bows without fussing every time. That’s it! Experiment with tying ribbons into bows before sewing them to make sure you’ve got a bow in the size and shape you’d like and then play around with the size and length of your loops and tails.
SUPPLIES AND TOOLS
+ Fabric scraps, roughly 3 ½ by 17 inches / 9 by 43 cm
+ 2-inch / 5 cm alligator clip or barrette
+ Sewing machine and thread
+ Sewing pins (optional)
+ Scissors
+ Chopstick or skewer
+ Iron (optional)
+ Glue (optional)
1. Fold fabric in half lengthwise with the right sides facing in and raw edges lined up. If using pins, tack the two sides together.
2. Sew a diagonal line on one short end of the fabric to close it up, then turn the fabric and continue sewing up the long edge until 1–2 inches / 2.5–5 from the center. Backstitch every time you start and stop sewing.
3. Repeat for the other end. Stop 1–2 inches from the center and leave a 2–3-inch / 5–7.6 cm opening in the middle of the long edge of the ribbon.
4. Trim any remaining threads and excess fabric, leaving a ⅛-inch / 3 mm inseam.
5. Using a chopstick or skewer, turn the fabric strip inside out through the center hole, poking out the corners to the best of your ability. If you like, press with an iron.
6. Tie the strip into a bow like you would tie your shoes. Make two bunny ears, pinching each side with your thumb and forefinger. Tuck one loop under the other and through the hole. Pull both loops to make a knot and adjust the sides as needed.
7. Insert the alligator clip or barrette through the center knot on the back side. If desired, use a small dab of glue to secure.
TIP:
If you prefer slanted ribbon ends, sew the ends diagonally and trim excess fabric before reversing the fabric.

reversing fabric tubes
TO REVERSE A TUBE OF FABRIC WITH ONE SIDE OPEN: Any long stick—chopstick, knitting needle, bamboo skewer—will work. Start by tucking an inch or so of fabric into the tube with your thumbs and continue by pushing your stick toward the open end of the tube until the tube has been turned right side out.
TO REVERSE A TUBE OF FABRIC WITH BOTH ENDS OPEN: Attach a safety pin to one end of the fabric tube. Close the pin. Face the pin head side down into the fabric tube and begin to scrunch the fabric up around the pin. The gathered fabric you’ve scrunched over the pin will begin to fold in on itself. Pull this fabric gently away from the pin to allow you to continue scrunching fabric until the pin pokes through the opposite end and the entire tube has been turned right side out. (If you’d prefer, you can also use your safety pin to temporarily clamp one end of the tube shut and use a stick as described in the method described for one open side.)
GIVE 302 PROJECT

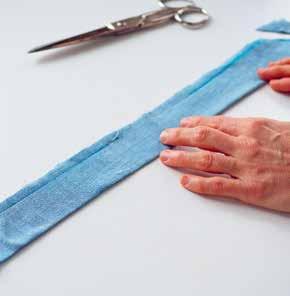
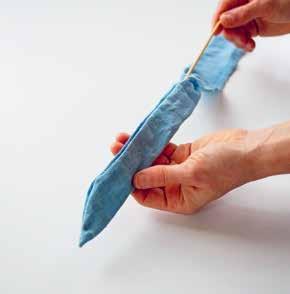
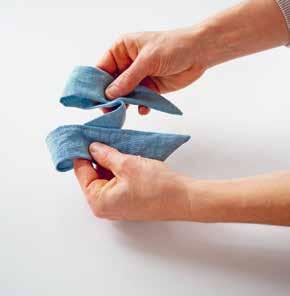


GIVE 303
PROJECT
scrunchie
Making a scrunchie isn’t so different from making a hair bow. Instead of tying your fabric tube into a bow, you’ll just scrunch it along some elastic.
SUPPLIES AND TOOLS
+ Fabric scrap, roughly 3 ½ by 17 inches / 9 by 43 cm
+ Round elastic cord, 7–10 inches / 18–25 cm
+ Sewing machine and thread
+ Sewing pins (optional)
+ Scissors
+ Chopstick or safety pin
1. Fold fabric in half lengthwise with the right sides facing in and raw edges lined up. If using sewing pins, tack the two sides together. Sew the entire length of the fabric closed and leave both ends open. Backstitch every time you start and stop sewing.
2. Turn the tube inside out using a chopstick or safety pin.
3. Insert the elastic through the fabric tube, scrunching the fabric along the elastic cord until the ends meet. (It might be easiest to grasp the elastic if it’s secured temporarily to a safety pin.)
4. Knot (or sew) together the two ends of the elastic.
5. Overlap one raw edge over the other and tuck under the exposed raw edge of the visible end. Stitch closed to conceal the elastic and form a round.
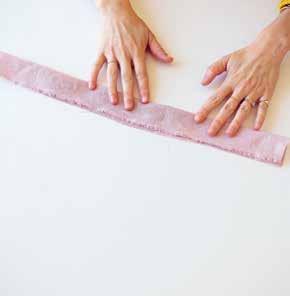


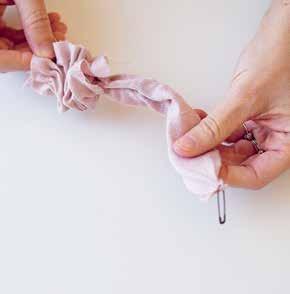


TIP:
A scrunchie can be as dramatic as you want it to be. Increase the width to as much as 7 inches / 18 cm to make a giant statement.
GIVE 304
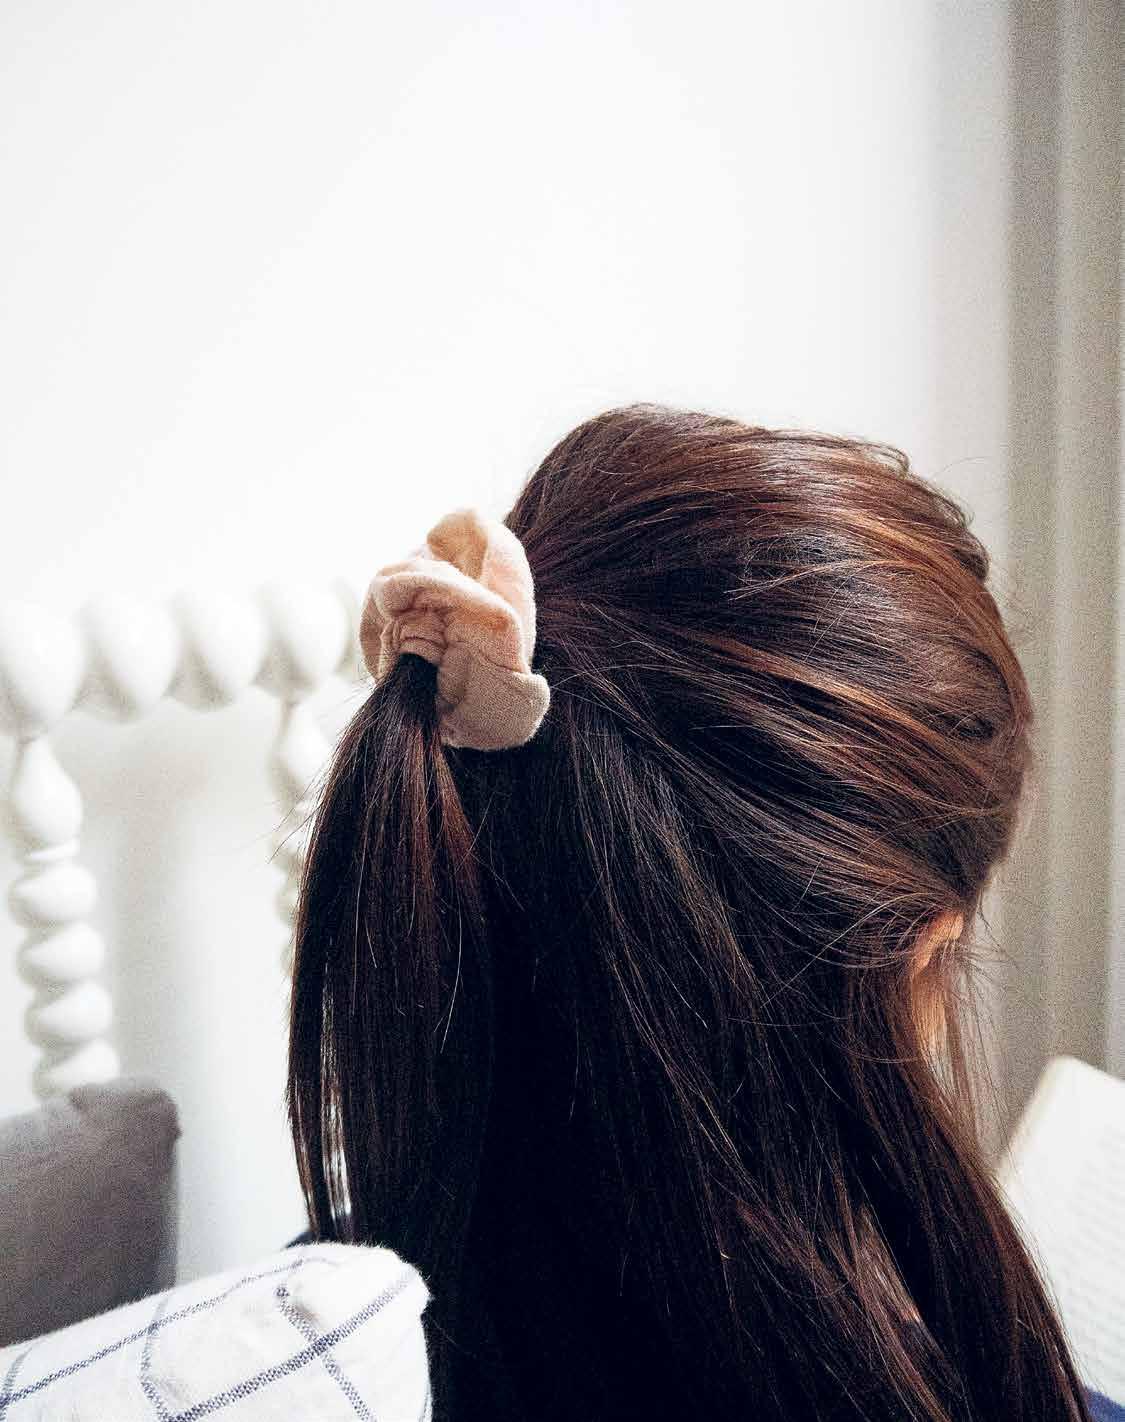
origami folder with closure
It’s useful to have a few pretty packaging tricks up your sleeve for gifts that might be otherwise lacking in physical form; gifts of experience, gifts of self, gifts of donations, even gifts of subscriptions and gifts of cash are all things that can be lovely to give but that can be somewhat challenging to present with fanfare. This simple origami folder fits the bill. It’s the sort of gift envelope that stationery enthusiasts might covet from specialty shops, and it can be easily made at home with kid art or any medium-weight paper you have at hand (a recycled brown paper bag works to lovely effect). Like handmade envelopes from recycled paper or origami masu boxes, these little folders are nearly endlessly customizable.
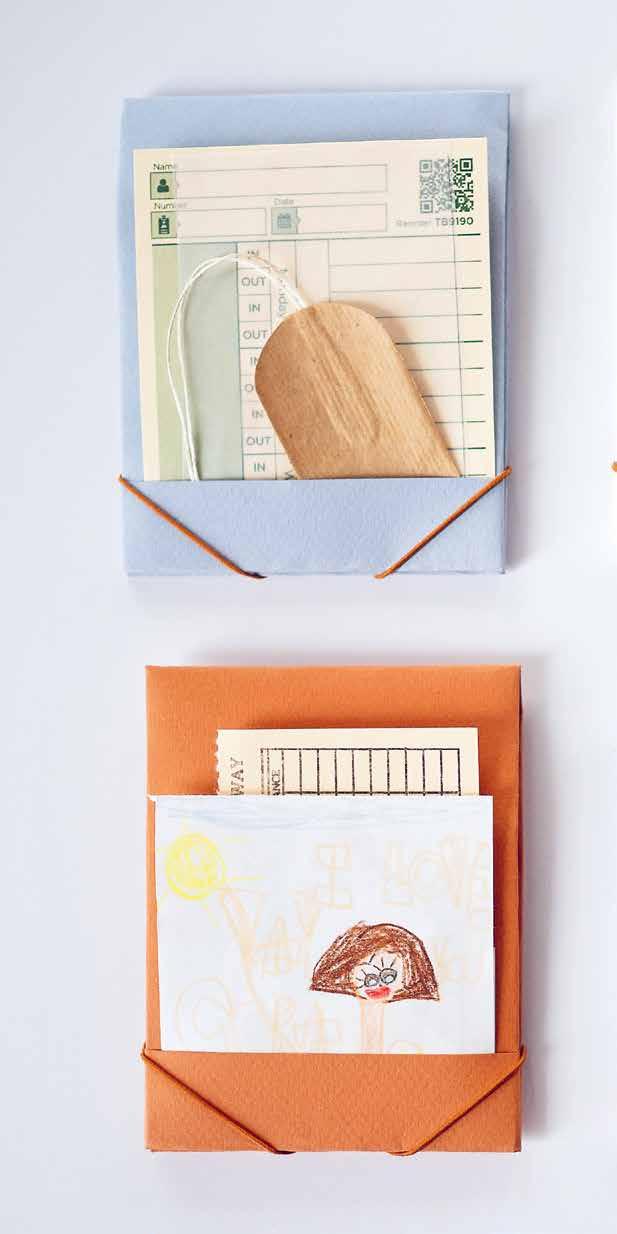
GIVE 306 PROJECT
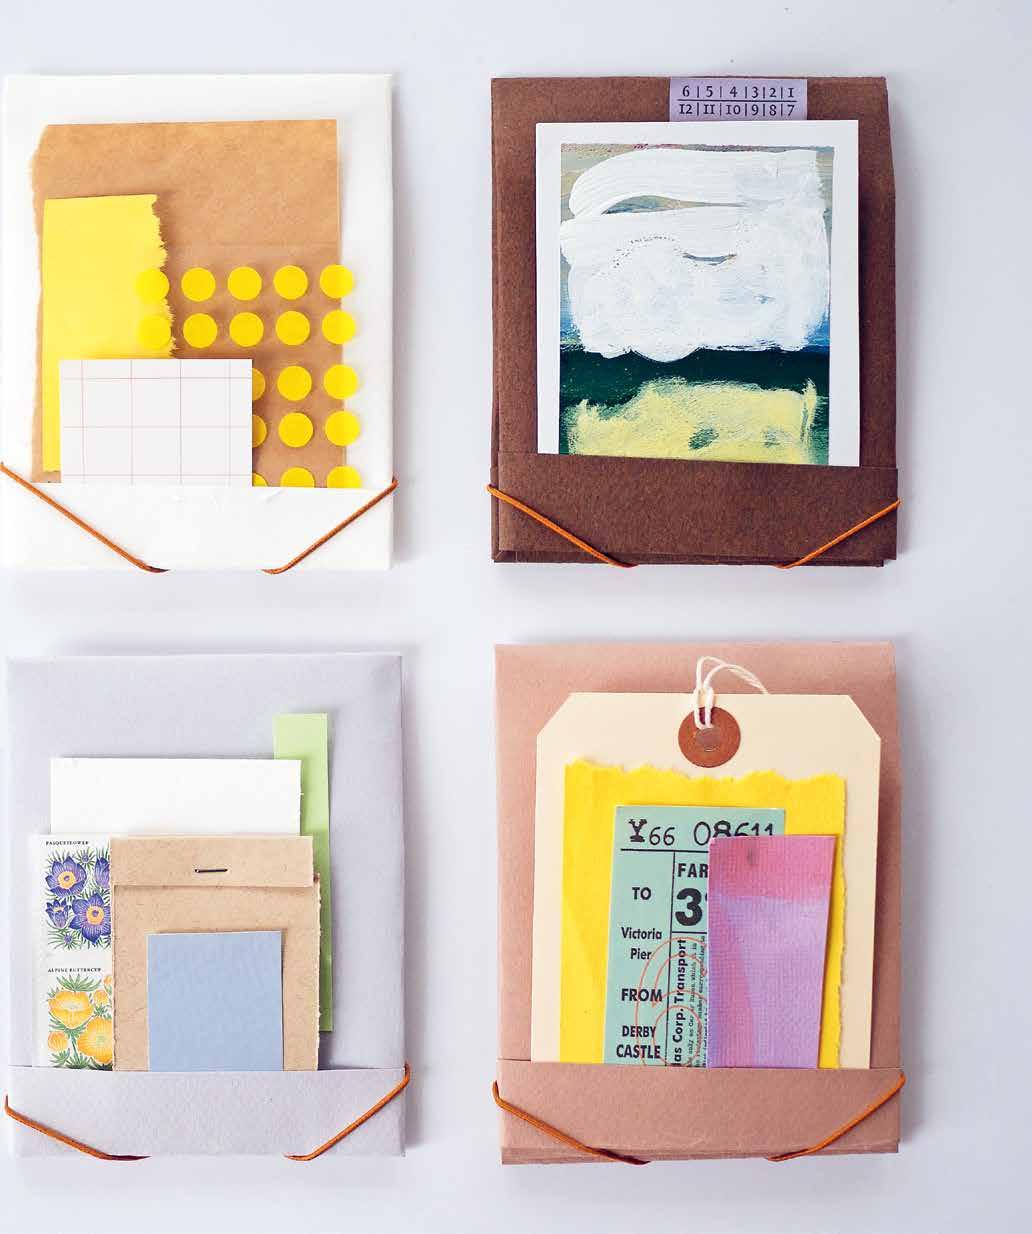
GIVE 307
SUPPLIES AND TOOLS
+ Sheet of medium-weight paper, 9 by 12 inches / 23 by 30.5 cm*
+ Hole punch or awl
+ 5–7 inches / 13–18 cm of round cord elastic
+ Scissors
* The paper can be a variety of sizes and weights. Folding is much easier with lightweight paper, but medium-weight paper provides the structure and support you will need for the elastic closure. See our paper supply suggestions on page 21.

TIP:
It might be helpful to use the back of a spoon or the blunt side of a butter knife to help crease your paper neatly, especially if using thicker paper.

to fold the paper
1. Fold the paper in half, matching short edge to short edge. Be sure to match up your edges, then crease the center fold.
2. Starting on one open edge of the paper, make a small fold (1–2 inches / 2.5–5 cm) toward the center fold.
3. Flip the paper over and, using the first fold as a guide, fold the other edge down in the same way. This second small flap should match the size of the first.
4. Open the center fold and turn the paper so that the folded edges are facing the table and the center crease is vertical in front of you.
5. Keeping the folded ends tucked under, bring the bottom edge closest to you up toward the top paper, stopping 2–3 inches / 5–7.6 cm from the top, and make a crease.
6. Fold the back flap of paper over the front flap and make a crease.
7. Tuck the edges of the top flap under the folds running along each side of the bottom flap. (You will need to lift the bottom flaps slightly to make the paper lie flat.)
8. Fold the upper flap of each overlapping corner inward on the diagonal, tucking each corner under itself.
9. Re-crease the vertical center fold to close.
to create the elastic closure
1. Hold the folder open with the long inside pocket at the bottom. With a hole punch or awl, make two small holes, one above the other, in the center of the righthand end of the folder. The holes should be about ½ inch / 1.3 cm apart.
2. Just to the left of the folded section where you have made the first two holes, make two more holes on the back of the folder about ¼ inch / 6 mm from the top and bottom edges.
3. Tie a secure knot at one end of your elastic, knotting two or three times so it can’t slip through the hole. Push the unknotted end of the elastic through the lowest hole from front to back so that the knot catches on the inside of the folder. Thread the unknotted end of the elastic through the lower side hole from back to front and then back through the top side hole from front to back. Push the end of the elastic through the uppermost hole from back to front and secure with a knot on the interior side of the folder. Knot two or three times to secure and trim any extra elastic.
4. Close the folder and secure it by pulling the elastic over each corner.
GIVE 308
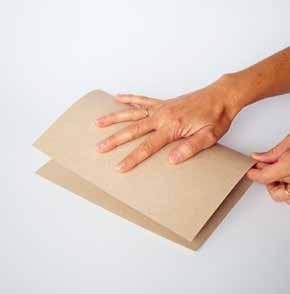


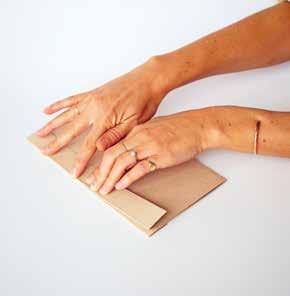
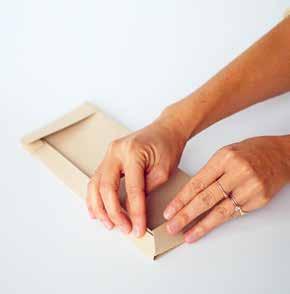

GIVE 309
travel watercolor kit
SUPPLIES AND TOOLS
+ Origami folder with closure (see page 306)
+ 4–6 pieces of watercolor paper to fit inside the folder pocket (smaller than your folder)
+ Watercolor tubes, various colors
+ Squeeze brush pen
+ Small scrap of absorbent fabric to use to wipe your brush pen (optional)
1. Place a tiny dot of paint from each tube onto a small sheet of watercolor paper, creating a line of dots with equal space in between each one.
2. Let the paint dry and harden (this takes one to three hours).
3. Tuck the remaining paper, your dried paint palette, and fabric scrap, if desired, into the interior pockets.
TO USE: Open the folder. Tuck the palette into the top exterior pocket and your empty watercolor sheet into the exterior pocket below. Rewet the dried paint on the palette, using the empty section of the palette to mix colors and paint! Once finished, tuck the dry palette and painting back into the interior pockets for safekeeping. The palette can be rewet and used multiple times.

GIVE 310 PROJECT

PROJECT
cloth gift wrap
Wrapping a gift in a beautiful cloth that becomes part of the gift itself is a custom with roots in many cultures. In Japan, there’s the tradition of furoshiki, in Korea, there’s bojagi, and while these cloths may be used to wrap up all kinds of belongings in different contexts, they make for an especially lovely way to wrap and offer a gift.
In some traditions, like jogak-bo, or Korean patchwork bojagi, the cloths themselves are intricate and finely wrought—but even a simpler square of unhemmed cloth can make a lovely alternative to wrapping paper and tape.
There are countless ways to wrap gifts in the furoshiki and bojagi style, but this is the fold we turn to most often.
SUPPLIES AND TOOLS
+ A square of fabric large enough to hold small gifts or Upcycled Hankie/Kerchief (page 222)
+ Small gifts for wrapping
1. Lay your fabric square out flat and place your gifts in the center of the cloth at an angle to each fabric corner. If wrapping more than one gift, stack them neatly in a pile.
2. Take one corner of the fabric and fold it over the gifts, tucking any extra fabric underneath the gifts.
3. Bring the opposite fabric corner up and over to cover the first fold. If there is a lot of extra fabric, you can fold the corner backward over the top of the gift.
4. Bring the remaining two fabric corners up to and over the center of the gift and knot the ends together.
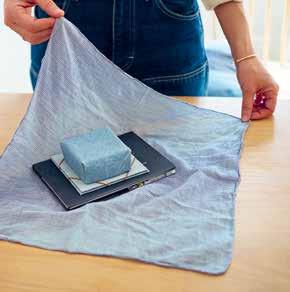
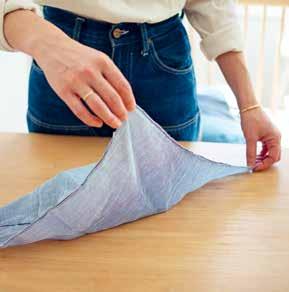


GIVE 312

GIVE 313
giving
suggestions for kids’ birthday gifts, party favors & holiday gifts
+ Construction-paper masu box with 3-D cardboard notch puzzle pieces 143, 245
+ Travel watercolor kit with squeeze brush pen 310
+ Lollipop Lips and Mustache 253
+ Kumihimo braiding disk with embroidery floss 266
+ Matchbook notebook and pencil 288


+ Masu box with beads and cord 143, 66
+ Pom-pom hair ties on cardstock 300
+ Mini starched fabric bunting in a see-through envelope 298, 297
+ Block stamps in a masu box 262, 143
birthday gifts for adults, teacher gifts, host gifts
+ Petal press with photos and mementos 284
+ Clay vessel with incense holder and incense 58, 62
+ DIY kid art turned stationery in a magazine box or a seethrough envelope 146, 296
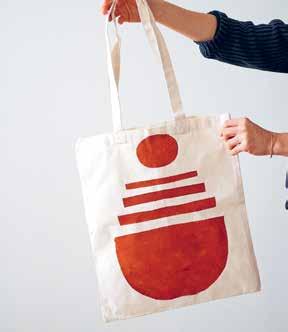

+ Anything wrapped in a handstitched, repurposed handkerchief 222, 312
+ Knit or woven potholder with a baked good, jar of jam, or other specialty food 164, 165, 180, 183
+ String bag and a bottle of wine or bounty of seasonal citrus 70
+ Canvas craft kit with sewing notions or matchbook notebooks and a mini pen 112, 288
+ Knit bath mitt with a fancy bar of soap 166
+ DIY kumihimo lanyard with rubber band ties for holding reading glasses, sunglasses, or lobster clip for keys 266
+ Freezer Paper Printed Totes 260


GIVE 314
acknowledgements
To our editor, Jenny Wapner at Hardie Grant, for believing in this scrappy project and giving us the opportunity to put it into the world in a way that is wholly our own. To Carolyn Insley for keeping us on track and nudging us over the finish line. To Anne Cherry, for not only making the copy edits on this book, but for trying her hand at its projects and understanding its ethos. It was a joy to be seen for more than our misplaced commas. To Amanda Jane Jones for lending her vision and keen eye to this project. Thank you for taking endless direction, for offering kind advice and encouragement, for paying such careful attention.
To Tatter Blue Textile Library for being a source of knowledge and inspiration, and especially to Jordana Munk Martin for carving out such a special spot in this city. To Anna Wallack for her encouragement and generosity and yarn for making the most beautiful scarf. To Polly Dixon, thank you for knitting with bamboo skewers. To Katie Henry, thank you for introducing us to Lizzie Crocker, who not only supplied the perfect light-filled bathroom for this book, but hardly batted an eye when we put a hole in its wall. To Kayvalyn Tersch for lending us the very sweetest pup, Pants! To Nelson Martinez for letting us play with Mars. To Julie Stephenson of So Elly, for the most beautiful bundle of fabric.
Big love to Lauren Sharpe, Liz Libré, Sachiko Ostle, Aaron Nachmann, Eamonn Wright, Avery Cole, and Sacha Wynne for crafting with us. Seeing these projects in your hands made us feel like this was possible.
To the artists who lent their voices, their expertise, and their way of seeing the world to this book: Cynthia Alberto, Sok Song, Vivian Shao Chen, Alexa Rene Rivera, Sarah Nsikak, Zak Foster, Deanne Fitzpatrick, and Youngmin Lee. You’re an inspiration to all of us.
To the streets of New York City for providing the colorful, dirty, chaotic, and inspiring backdrop to these projects, our friendship, and this book.
To our families, for being crafting guinea pigs, test dummies, tireless champions, and recipients of our handmade offerings. We love you.
And finally, to people everywhere endeavoring to make things, even, and especially, very small things. This book is for you.

ACKNOWLEDGMENTS 315
A
Accordion Memento Book, 284, 287
Activity Spinner, 248
Advent Calendar, 124 alligator clips, 26
All-Purpose Carrier, 49 annealed wire, 26
Apron Tool Roll, 115 awl, 26
B backstitch, 105 bags
Simple String Bag, 70, 72, 75
Tote Bag, 124
Upcycled Fabric Punched Bag, 212 Band, Paper, 151 banks
Papier-mâché Bank, 246
Papier-mâché Fruit Bank, 126 baskets
Floral Wire Basket, 76
Floral Wire Macramé Basket, 86
Bathmat, Knit, 176
Bath Mitt, Knit, 166 Beads, Clay, 66
Bedside Caddy, 116 Belt, 55 binding off, 159 bind wire. See floral wire, paperwrapped Binoculars, 252 blocking, 194 blocks, wooden about, 30
Block Stamps, 262–63 books
Accordion Memento Book, 284, 287
Matchbook Notebook, 288 Bowls, Rope, 90, 95 boxes
Box Divider, 143
Canvas Tissue Box with Pockets, 135–37
Magazine Box, 146, 149
Masu Box, 143
Paper Boxes, 140 bracelets
Bracelet Loom, 247
Bracelet Organizer, 252 kumihimo-braided, 268 brads, 26 braiding
four-string, 52 kumihimo, 266
Bulky Yarn Winter Hat, 193 bulldog clips, 26
Bunting, Starched Fabric, 298
C caddies
Bedside Caddy, 116
Canvas Wall Caddy, 120–21 Car Caddy, 122
Calendar, Advent, 124 canvas about, 18
Advent Calendar, 124
Apron Tool Roll, 115
Bedside Caddy, 116
Canvas Tissue Box with Pockets, 135–37
Canvas Wall Caddy, 120–21
Car Caddy, 122
Drop Cloth Satchels, 106
Envelope Pillow Covers, 214
Fold-over Pouches, 108
Kit Case, 112
Pencil Case, 116
Starched Fabric Cube, 139 Tote Bag, 124
Travel Tissue Pouch, 218
Upcycled Coasters, 189
Wipes Cover, 218
Woven Checkerboard, 258
Car Caddy, 122
cardboard about, 22
Accordion Memento Book, 284, 287
Activity Spinner, 248
Binoculars, 252
Box Divider, 143
Bracelet Loom, 247
Bracelet Organizer, 252
Cardboard and Brad Puppet, 249
Cardboard Cup Sleeve Mask and Cuff, 253
Cardboard Loom, 182, 254
Cardboard Magnets, 244
Emotional Check-in, 250
Envelope and Gift Tag Templates, 295
Geometric Shape Stencils, 248
Lollipop Lips and Mustache, 253
Nail-painting Practice, 249
Sewing Boards, 245
Shoe Tie Practice, 250
Tear-off Scrap Paper Pad, 292
3-D Cardboard Notch Puzzle, 245
Time-Telling Practice, 244 types of, 22
Weather Board, 251
Carrier, All-Purpose, 49 cases
Kit Case, 112
Pencil Case, 116 casting on, 156 cats
Cat Scratch Board, 276
Cat Toy, 276 checkers
Clay Checker Pieces, 258
Woven Checkerboard, 258
chipboard, 22. See also cardboard chopsticks, 26 clay
Clay Beads, 66
Clay Checker Pieces, 258
Clay Incense Burner, 62
Pincushion with Magnetic Bottom, 65 vessels, 58, 61
Clip Storage, 55
Clothes Hanger, 45 clothespins about, 26
Clothespin Knitting Loom, 68
Cloth Gift Wrap, 312 Coasters, Upcycled, 189 cord. See elastic cord; string, twine, and cord corks about, 30
Cork Knitting Needle Stoppers, 162
INDEX 316
index
cotton weave about, 18
Envelope Pillow Covers, 214
Freezer Paper Printing, 260
Masu Box, 143
Scrap Fabric Hair Bows, 302
Scrunchie, 304
Starched Fabric Bunting, 298
Starched Fabric Cube, 139
Torn Sheet Woven Potholder, 183
Upcycled Hankie/Kerchief, 222 cow hitch, 84
Cozy, Hot Water Bottle, 192 craft foam, 26 craft knives, 26
Cube, Starched Fabric, 139
Cuff, Cardboard Cup Sleeve, 253
Curtain, 228
Curtain Tieback, 42
D darning needles, 26 dogs
Kumihimo Corded Dog Leash, 270, 272–73
Kumihimo Rope Dog Toy, 277 dowels, 26
Drop Cloth Satchels, 106
Dust Mitt, 191 dye bath, tea leaves, 220
E elastic cord about, 24
Accordion Memento Book, 284, 287
Origami Folder with Closure, 306, 308
Scrunchie, 304 embroidery hoops, 26
Emotional Check-in, 250
Envelope Pillow Covers, 214 envelopes
Envelope and Gift Tag Templates, 295
Kid Art Envelopes, 296
Mini Envelope, 297
Extra Large Lampshade, 234
Eyeglass Cord, 268
F fabric
Cloth Gift Wrap, 312
Envelope Pillow Covers, 214 Extra Large Lampshade, 234
Hanging Lavender Sachet, 219 joining strips of, 175
Knit Bathmat, 176
Lampshade, 230, 232
Pinboard, 98
Scrap Fabric Hair Bows, 302
Scrunchie, 304
Starched Fabric Bunting, 298
Starched Fabric Cube, 139 starching, 130, 132 stripping cotton, 174 tubes, reversing, 302 types of, 18–19
Upcycled Coasters, 189
Upcycled Hankie/Kerchief, 222
upcycling, into yarn, 168, 170, 172
See also individual fabrics fabric chalk, 26 felt, 18 finger cording about, 36
All-Purpose Carrier, 49
Clothes Hanger, 45
Curtain Tieback, 42
Flower Crown, 50 Headband, 50 Herb Hanger, 50
Jump Rope, 264
Kitchen Hanger, 45
Paper Roll Hanger, 46 techniques for, 39–40
Tote Bag, 124
Wreath, 50
floral wire, paper-wrapped about, 24
Floral Wire Basket, 76
Floral Wire Macramé Basket, 86
Flower Frog, 80
Flower Crown, 50
Flower Frog, 80
Fly Swatter, Paper Bag Woven, 184
Folder, Origami, with Closure, 306, 308
Fold-over Pouches, 108
freezer paper
about, 21
Freezer Paper Printing, 260
Frog, Flower, 80
Fruit Bank, Papier-mâché, 126
G
Geometric Shape Stencils, 248 gifts
Cloth Gift Wrap, 312
Envelope and Gift Tag Templates, 295 suggestions for, 314 glue, 26, 129
H
Hair Bows, Scrap Fabric, 302 hangers
Clothes Hanger, 45
Herb Hanger, 50
Kitchen Hanger, 45
Paper Roll Hanger, 46
Hanging Lavender Sachet, 219
Hankie/Kerchief, Upcycled, 222 Hat, Bulky Yarn Winter, 193 Headband, 50 hem, rolled, 222
hemp. See linen and hemp weave
Herb Hanger, 50 hole punches, 29
Hot Water Bottle Cozy, 192 I
Incense Burner, Clay, 62 inspiration, 14–15
J
jersey about, 18
Upcycled Fabric Punched Bag, 212
Upcycled Jersey Punched Pillow, 217
Woven Potholder, 180
See also T-shirt yarn
jogak-bo, 226
Jump Rope, 264
K
Kerchief, Upcycled, 222 key rings, 29
Kid Art Envelopes, 296
Kit Case, 112
Kitchen Hanger, 45
INDEX 317
Kitchen Scrubber, Knit, 166 knitting equipment
Clothespin Knitting Loom, 68
Cork Knitting Needle Stoppers, 162
Knitting Needles, 160 knitting projects
Bulky Yarn Winter Hat, 193
Floral Wire Basket, 76
Flower Frog, 80
Knit Bathmat, 176
Knit Bath Mitt, 166
Knit Cotton String Potholder, 164–65
Knit Kitchen Scrubber, 166
Knit Rope Potholder, 165
Scout Scarf, 194
Simple String Bag, 70, 72, 75 knitting techniques binding off, 159
blocking, 194 casting on, 156 knit stitch, 158 knit 2 together, 194
slipping a stitch, 194 weaving in, 159 knots
cow hitch, 84
Knotted Jute Trivet, 186–87 square, 85 whipping, 274
kumihimo braiding about, 266
Bracelet, 268
Eyeglass Cord, 268
Kumihimo Corded Dog Leash, 270, 272–73
Kumihimo Rope Dog Toy, 277 L
Lampshade, 230, 232
Extra Large Lampshade, 234
Lanyard, 57
Lavender Sachet, Hanging, 219
Leash, Kumihimo Corded Dog, 270, 272–73
leggings, repurposing kids’, 182 linen and hemp weave about, 19
Envelope Pillow Covers, 214
Fold-over Pouches, 108
Freezer Paper Printing, 260
Hanging Lavender Sachet, 219
Kit Case, 112 Knit Bathmat, 176
Upcycled Hankie/Kerchief, 222 Lips, Lollipop, 253 lobster clasps, 29 Lollipop Lips and Mustache, 253 looms
Bracelet Loom, 247
Cardboard Loom, 182, 254
Clothespin Knitting Loom, 68 M
macramé about, 82
Floral Wire Macramé Basket, 86
Magazine Box, 146, 149
Magnets, Cardboard, 244 Mask and Cuff, Cardboard Cup Sleeve, 253
Masu Box, 143
Matchbook Notebook, 288 materials and supplies, 8, 11, 18–19, 21–22, 24–25. See also individual materials measurements, 12, 14
Memento Book, Accordion, 284, 287
Mini Envelope, 297 mitts
Dust Mitt, 191 Knit Bath Mitt, 166 monk’s cloth about, 19, 202
Reversible Butcher’s Twine and Wool Punched Rug, 208, 210
Upcycled Fabric Punched Bag, 212
Upcycled Jersey Punched Pillow, 217 multitools, 29 Mustache, Lollipop, 253
N
Nail-painting Practice, 249 Night-light, 236 Notebook, Matchbook, 288
P
Pacifier Clip, 57 paintbrushes, 29 paper
about, 21
Accordion Memento Book, 284, 287
boxes, 140
Freezer Paper Printing, 260
Kid Art Envelopes, 296
Magazine Box, 146, 149
Masu Box, 143
Matchbook Notebook, 288
Mini Envelope, 297
Origami Folder with Closure, 306, 308
Paper Bag Woven Fly Swatter, 184
Paper Band, 151
Paper Roll Hanger, 46
Tear-off Scrap Paper Pad, 292
Travel Watercolor Kit, 310 types of, 21
See also papier-mâché paperboard, 22. See also cardboard paper gum tape, 29 papier-mâché
Papier-mâché Bank, 246
Papier-mâché Fruit Bank, 126 parchment paper about, 21
Accordion Memento Book, 284, 287 paste, 26, 129 patchwork bojagi, 226 Pencil Case, 116 pillows
Envelope Pillow Covers, 214
Upcycled Jersey Punched Pillow, 217
Pinboard, 98 Pincushion with Magnetic Bottom, 65 pocket multitools, 29 Pom-poms, 300 potholders
Knit Cotton String Potholder, 164–65
Knit Rope Potholder, 165
Origami Folder with Closure, 306, 308
Torn Sheet Woven Potholder, 183
Woven Potholder, 180
INDEX 318
O
pouches
Fold-over Pouches, 108
Travel Tissue Pouch, 218
Upcycled Woven Pouch on a Cardboard Loom, 254, 256–57
printing
Block Stamps, 262–63
Freezer Paper Printing, 260 punching about, 200
Reversible Butcher’s Twine and Wool Punched Rug, 208, 210
techniques for, 202, 204–206 three rules to, 202
tools and supplies for, 29, 202
Upcycled Fabric Punched Bag, 212
Upcycled Jersey Punched Pillow, 217
Puppet, Cardboard and Brad, 249
Puzzle, 3-D Cardboard Notch, 245
R
Reversible Butcher’s Twine and Wool Punched Rug, 208, 210 rolled hem, 222
rope about, 24
All-Purpose Carrier, 49
Clothes Hanger, 45
Curtain Tieback, 42
Flower Crown, 50
Headband, 50
Herb Hanger, 50
Jump Rope, 264
Kitchen Hanger, 45
Knit Rope Potholder, 165
Kumihimo Corded Dog Leash, 270, 272–73
Kumihimo Rope Dog Toy, 277
Paper Roll Hanger, 46
Rope Bowls, 90, 95
Wreath, 50
rubber bands about, 29
Rubber Band Tie, 297 rugs
hooking, 200
Reversible Butcher’s Twine and Wool Punched Rug, 208, 210
rug yarn, 25. See also punching rulers, 29 running stitch, 105
S
Sachet, Hanging Lavender, 219 sandpaper, 29
Satchels, Drop Cloth, 106 scissors, 29
Scout Scarf, 194
Scrap Fabric Hair Bows, 302
Scratch Board, Cat, 276 Scrubber, Knit Kitchen, 166
Scrunchie, 304 seam allowance, 105 sewing about, 104
Advent Calendar, 124
Apron Tool Roll, 115
Canvas Tissue Box with Pockets, 135–37
Canvas Wall Caddy, 120–21
Car Caddy, 122
Drop Cloth Satchels, 106
Envelope Pillow Covers, 214
Fold-over Pouches, 108
Hanging Lavender Sachet, 219 Kit Case, 112 needles and sewing pins, 30
Pencil Case, 116
Rope Bowls, 90, 95
Scrap Fabric Hair Bows, 302 Scrunchie, 304
Sewing Boards, 245
Starched Fabric Bunting, 298 techniques for, 105, 106
Tote Bag, 124
Upcycled Coasters, 189
Wipes Cover, 218
Woven Checkerboard, 258
See also stitches
Shoe Tie Practice, 250
Simple String Bag, 70, 72, 75
slipping a stitch, 194
Spinner, Activity, 248 square knot, 85
squeeze brush pens, 30
ssamsol seams, 226, 228
stamp pads, 30
Stamps, Block, 262–63 staple guns, 30 staplers, 30
starched fabric about, 130, 132
Starched Fabric Bunting, 298
Starched Fabric Cube, 139 Stencils, Geometric Shape, 248 stitches back-, 105 knit, 158 running, 105 slipping, 194 whip-, 105
zigzag, 106 stretcher bars, 30 string, twine, and cord about, 24
Belt, 55
Cat Scratch Board, 276
Cat Toy, 276
Clip Storage, 55
Four-String Braid, 52
Knit Bath Mitt, 166
Knit Cotton String Potholder, 164–65
Knit Kitchen Scrubber, 166
Knotted Jute Trivet, 186–87
kumihimo braiding, 266
Kumihimo Corded Dog Leash, 270, 272–73
Lanyard, 57
Pacifier Clip, 57
Reversible Butcher’s Twine and Wool Punched Rug, 208, 210
Simple String Bag, 70, 72, 75
Tassels, 301
Upcycled Woven Pouch on a Cardboard Loom, 254, 256–57
T tape, 30 Tassels, 301
Tea Leaves Dye Bath, 220
Tear-off Scrap Paper Pad, 292 tempera paint, 30 thread, 25. See also kumihimo braiding; sewing
3-D Cardboard Notch Puzzle, 245
Time-Telling Practice, 244 tissues
Canvas Tissue Box with Pockets, 135–37
Travel Tissue Pouch, 218
INDEX 319
Tool Roll, Apron, 115 tools, 26, 29–30
Torn Sheet Woven Potholder, 183
Tote Bag, 124
Travel Tissue Pouch, 218
Travel Watercolor Kit, 310
Trivet, Knotted Jute, 186–87
T-shirt yarn making, 172
Upcycled Fabric Punched Bag, 212
Upcycled Jersey Punched Pillow, 217
Upcycled Woven Pouch on a Cardboard Loom, 254, 256–57
Woven Potholder, 180
twill tape about, 24
Kit Case, 112
Pencil Case, 116 twine. See string, twine, and cord twining, 279
U
Upcycled Coasters, 189
Upcycled Fabric Punched Bag, 212
Upcycled Hankie/Kerchief, 222
Upcycled Jersey Punched Pillow, 217
Upcycled Woven Pouch on a Cardboard Loom, 254, 256–57
V
value, finding, 11–12
W
Wall Caddy, Canvas, 120–21 water balloons, 30
watercolor
Travel Watercolor Kit, 310 tubes, 30
wax paper about, 21
Accordion Memento Book, 284, 287
Mini Envelope, 297
Weather Board, 251
weaving
about, 178
Cardboard Loom, 182
Paper Bag Woven Fly Swatter, 184 tips, 180
Torn Sheet Woven Potholder, 183
Upcycled Woven Pouch on a Cardboard Loom, 254, 256–57
Woven Checkerboard, 258
Woven Potholder, 180 weaving in, 159 whipping knot, 274 whipstitch, 105 Wipes Cover, 218 wool
about, 18
Dust Mitt, 191
felting/shrinking, 192
Hot Water Bottle Cozy, 192
Reversible Butcher’s Twine and Wool Punched Rug, 208, 210
Wreath, 50 Y yarn
about, 25
Bulky Yarn Winter Hat, 193
Kumihimo Braiding, 266 Pom-poms, 300
Scout Scarf, 194
upcycling fabrics into, 168, 170, 172
See also rug yarn; T-shirt yarn Z
zigzag stitch, 106
INDEX 320
“This book is bursting with creativity and resourcefulness! By transforming ordinary materials like torn T-shirts, shipping boxes, and rope we can make a bevy of beautiful objects. Erin and Rose celebrate the opportunity to make everyday life more sustainable, resourceful, and delightful too.”
—KATRINA RODABAUGH, AUTHOR OF MENDING MATTERS AND MAKE THRIFT MEND
“This is a book for me. Rose and Erin inspire me to slow down and connect with my creativity daily. As I move away from buying new materials, I’m always looking for ways to put to use what I have on hand. MAKING THINGS shows us a way of living—seeing possibility all around.”
—LENA CORWIN, DESIGNER AND AUTHOR OF MADE BY HAND
Rose Pearlman is an artist, teacher, and textile designer. With a background in fine arts and a love of well-designed, functional objects, her creations blur the lines between art and craft and push the boundaries of both with non-traditional techniques and materials. Rose’s hooked rugs and craft tutorials have been featured in magazines, galleries, and numerous online design sites. Her first book, Modern Rug Hooking, was published in 2019. She lives in Brooklyn, NY with her family.
Erin Boyle is a writer and creator of the popular lifestyle blog Reading My Tea Leaves and subscription newsletter, Tea Notes. Her writing covers the intersection of sustainability, consumerism, and family. Her first book, Simple Matters (2016), was a nod to the growing consensus that living simply and purposefully is more sustainable, not only for the environment, but for our own happiness and well-being too. She lives in Brooklyn, NY with her family.