Café Project
Description of the design plan
This store is located on the corner of the ground floor in a thirty to forty-year-old apartment, with good lighting next to the sidewalk.
It will be renovated and transformed into a dark industrial style with indoor seating after rent. Although the owner expects an industrial style, he also wants the overall interior space to be warm and comfortable.
In addition, he also looks forward to another expectation, which is to have different forms of seating in the seating area to make the store visually richer, even if the store space is not large enough.
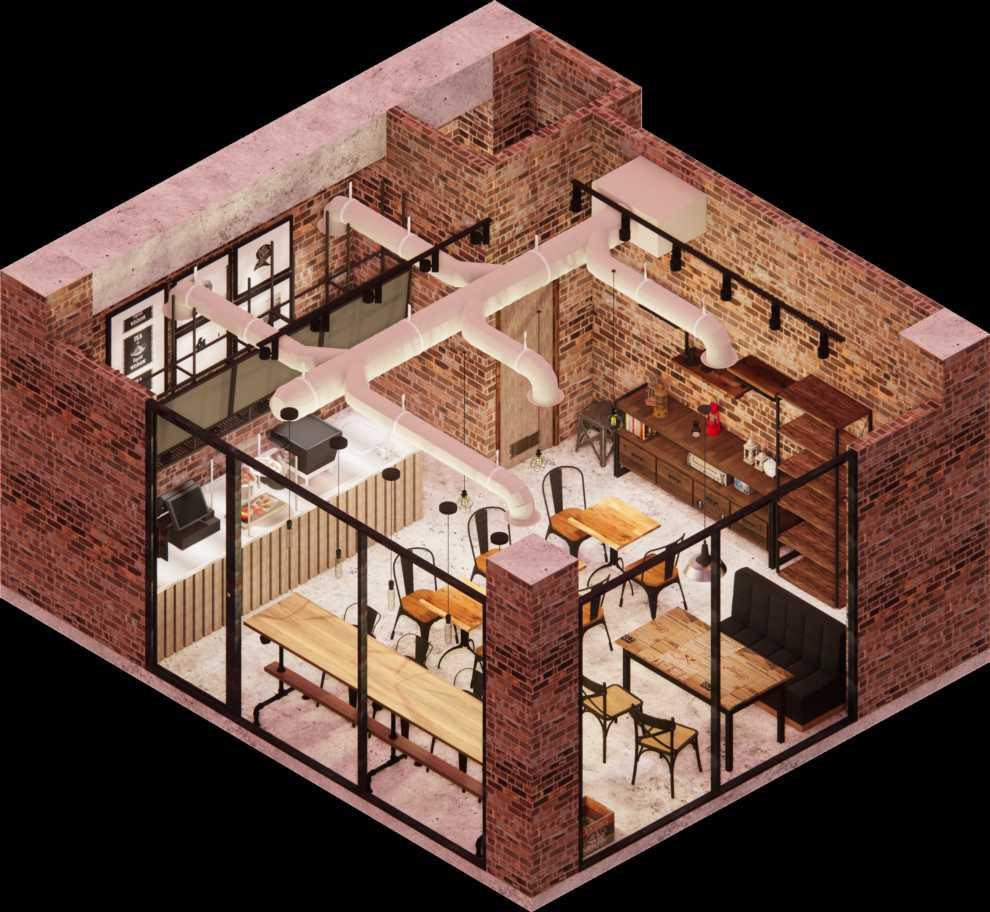
This space was used as a storeroom.
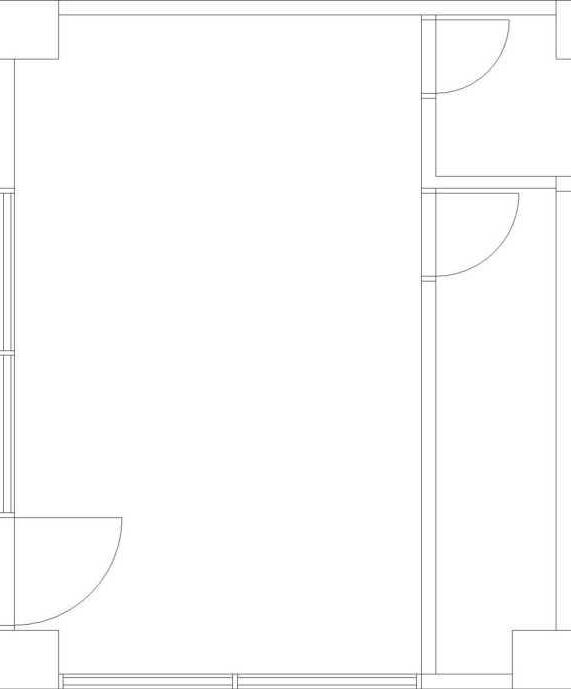
The layout of the original area includes a main space, a lavatory, and a storeroom.
The layout of the original area is divided into three parts, including a main space, a lavatory, and a storeroom.
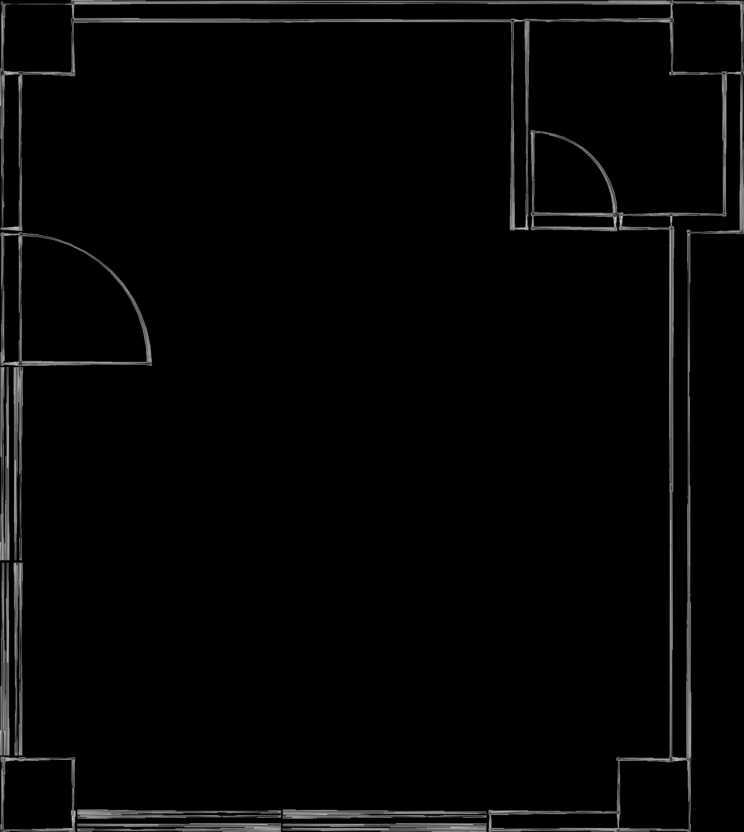
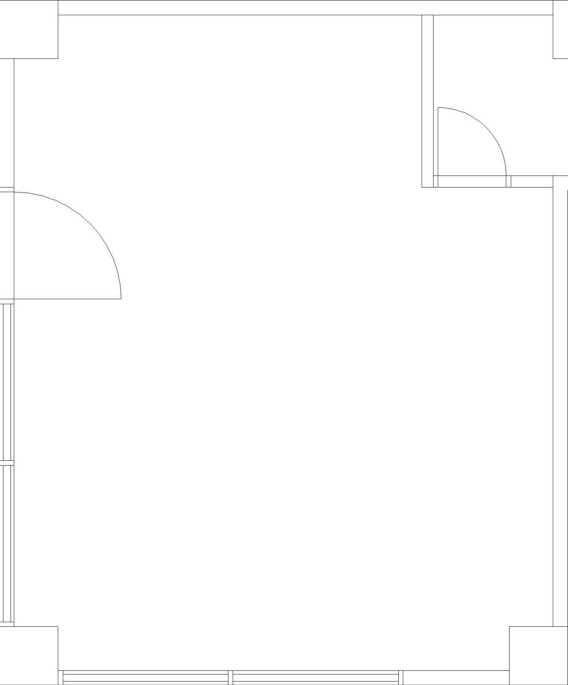
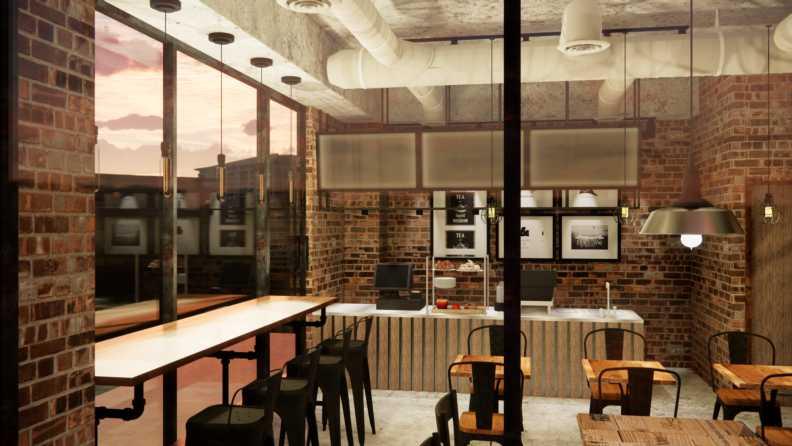
Compared to a regular coffee shop, the seating area isn’t commodious enough for customers. Therefore, I intend to knock down the partition of the storeroom and move the front door to the other side of the pillar to make the shop look more spacious. As a result, it could provide more seats and space for customers.


sunshine diffused light
The store has large floor-to-ceiling windows on the west and south side, letting the light come in.
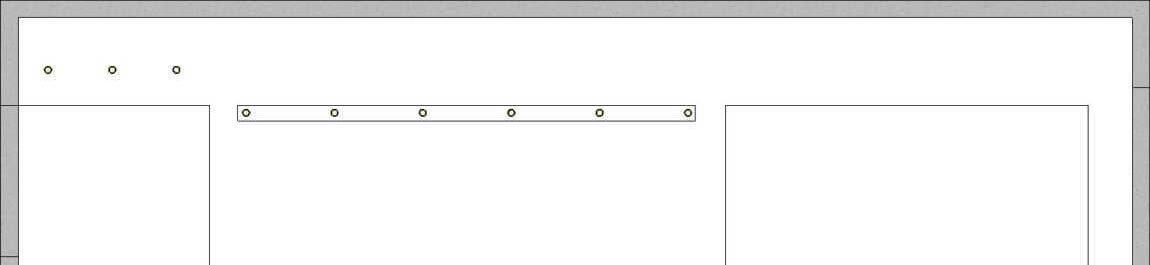
*The scale of the Dimension diagram is one to eighty. The unit is millimeter.
1:80/mm 1:80/mm 1:80/mm
ORIGIONAL PLAN MODIFIED PLAN 1:80/mm Light source directions
afternoon
4189 1650 4970 6290 1200 1770 7040 1681 1231
800 600 600 1351 3550 3320 Dimension diagram


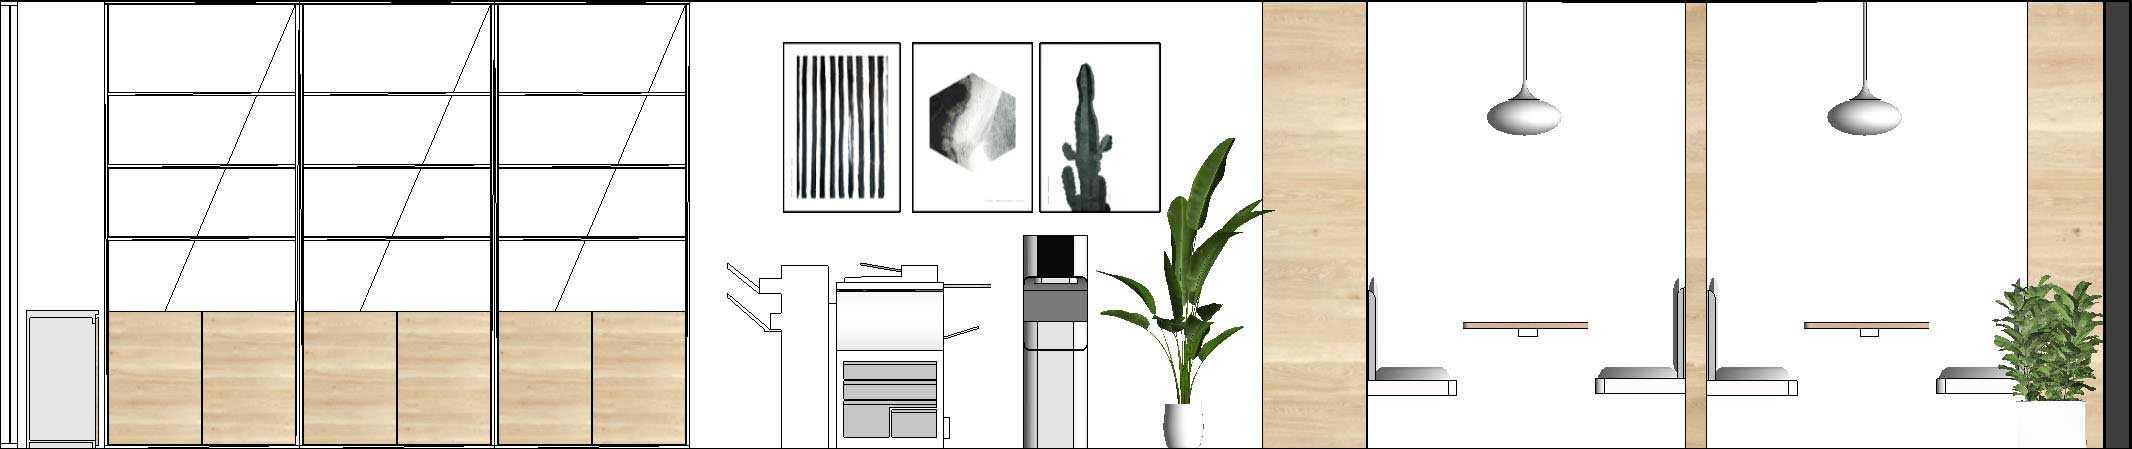
Rough and coarse cement ground
Wall Lamp
Spot Light
Track Lighting (Spot Light)
Pendant Light (Long strip tungsten lamp)
Rough and coarse cement
The
Pendant Light (Frame decorative tungsten lamp)
Pendant Light
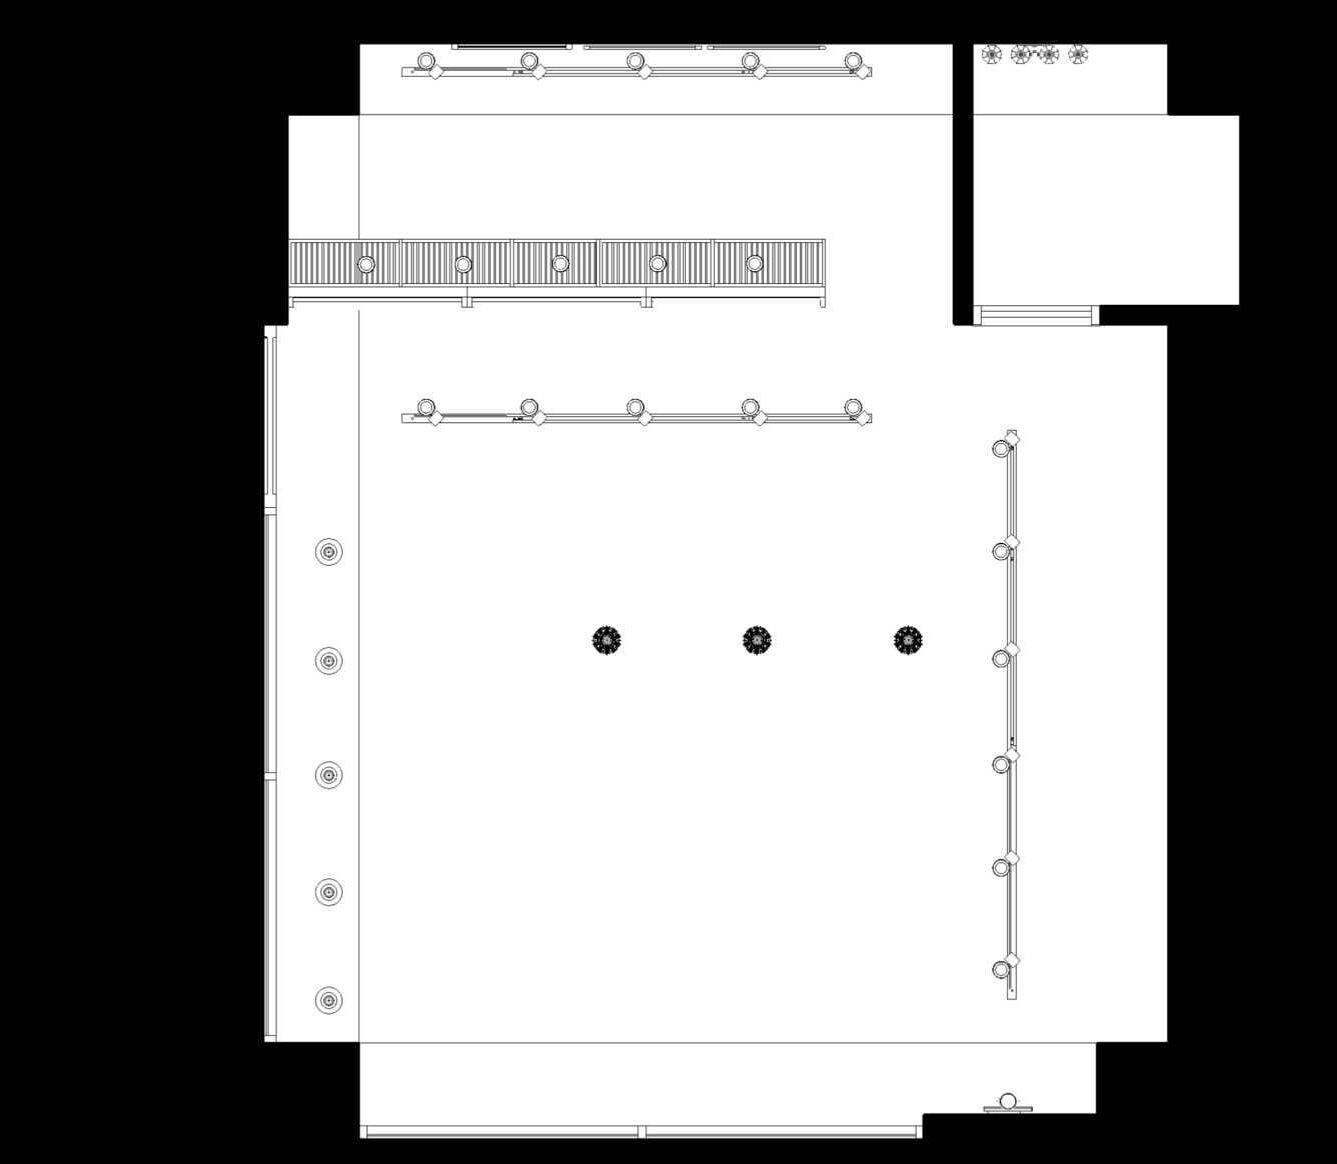
1:50/mm 1:50/mm CEILING PLAN
1:50/mm FLOOR FINISH PLAN (FURNITURE PLAN)
945 685 330 795 650 725 530 605 475 270 650 385 645 1545 265 660 2475 CH:3500 CH:3500 CH:3000 A B A B For Guest For Staff
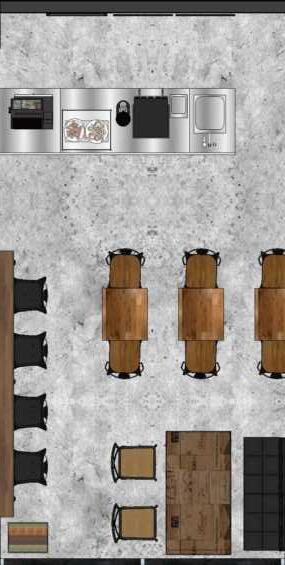
counter and bar area. 1
decorative wall and shelves. 3
The
The
seating area.
a bar, tables for two and four.)
Retaining the original lavatory location. 2 FLOOR PLAN 1 3 4 2
(Including
4
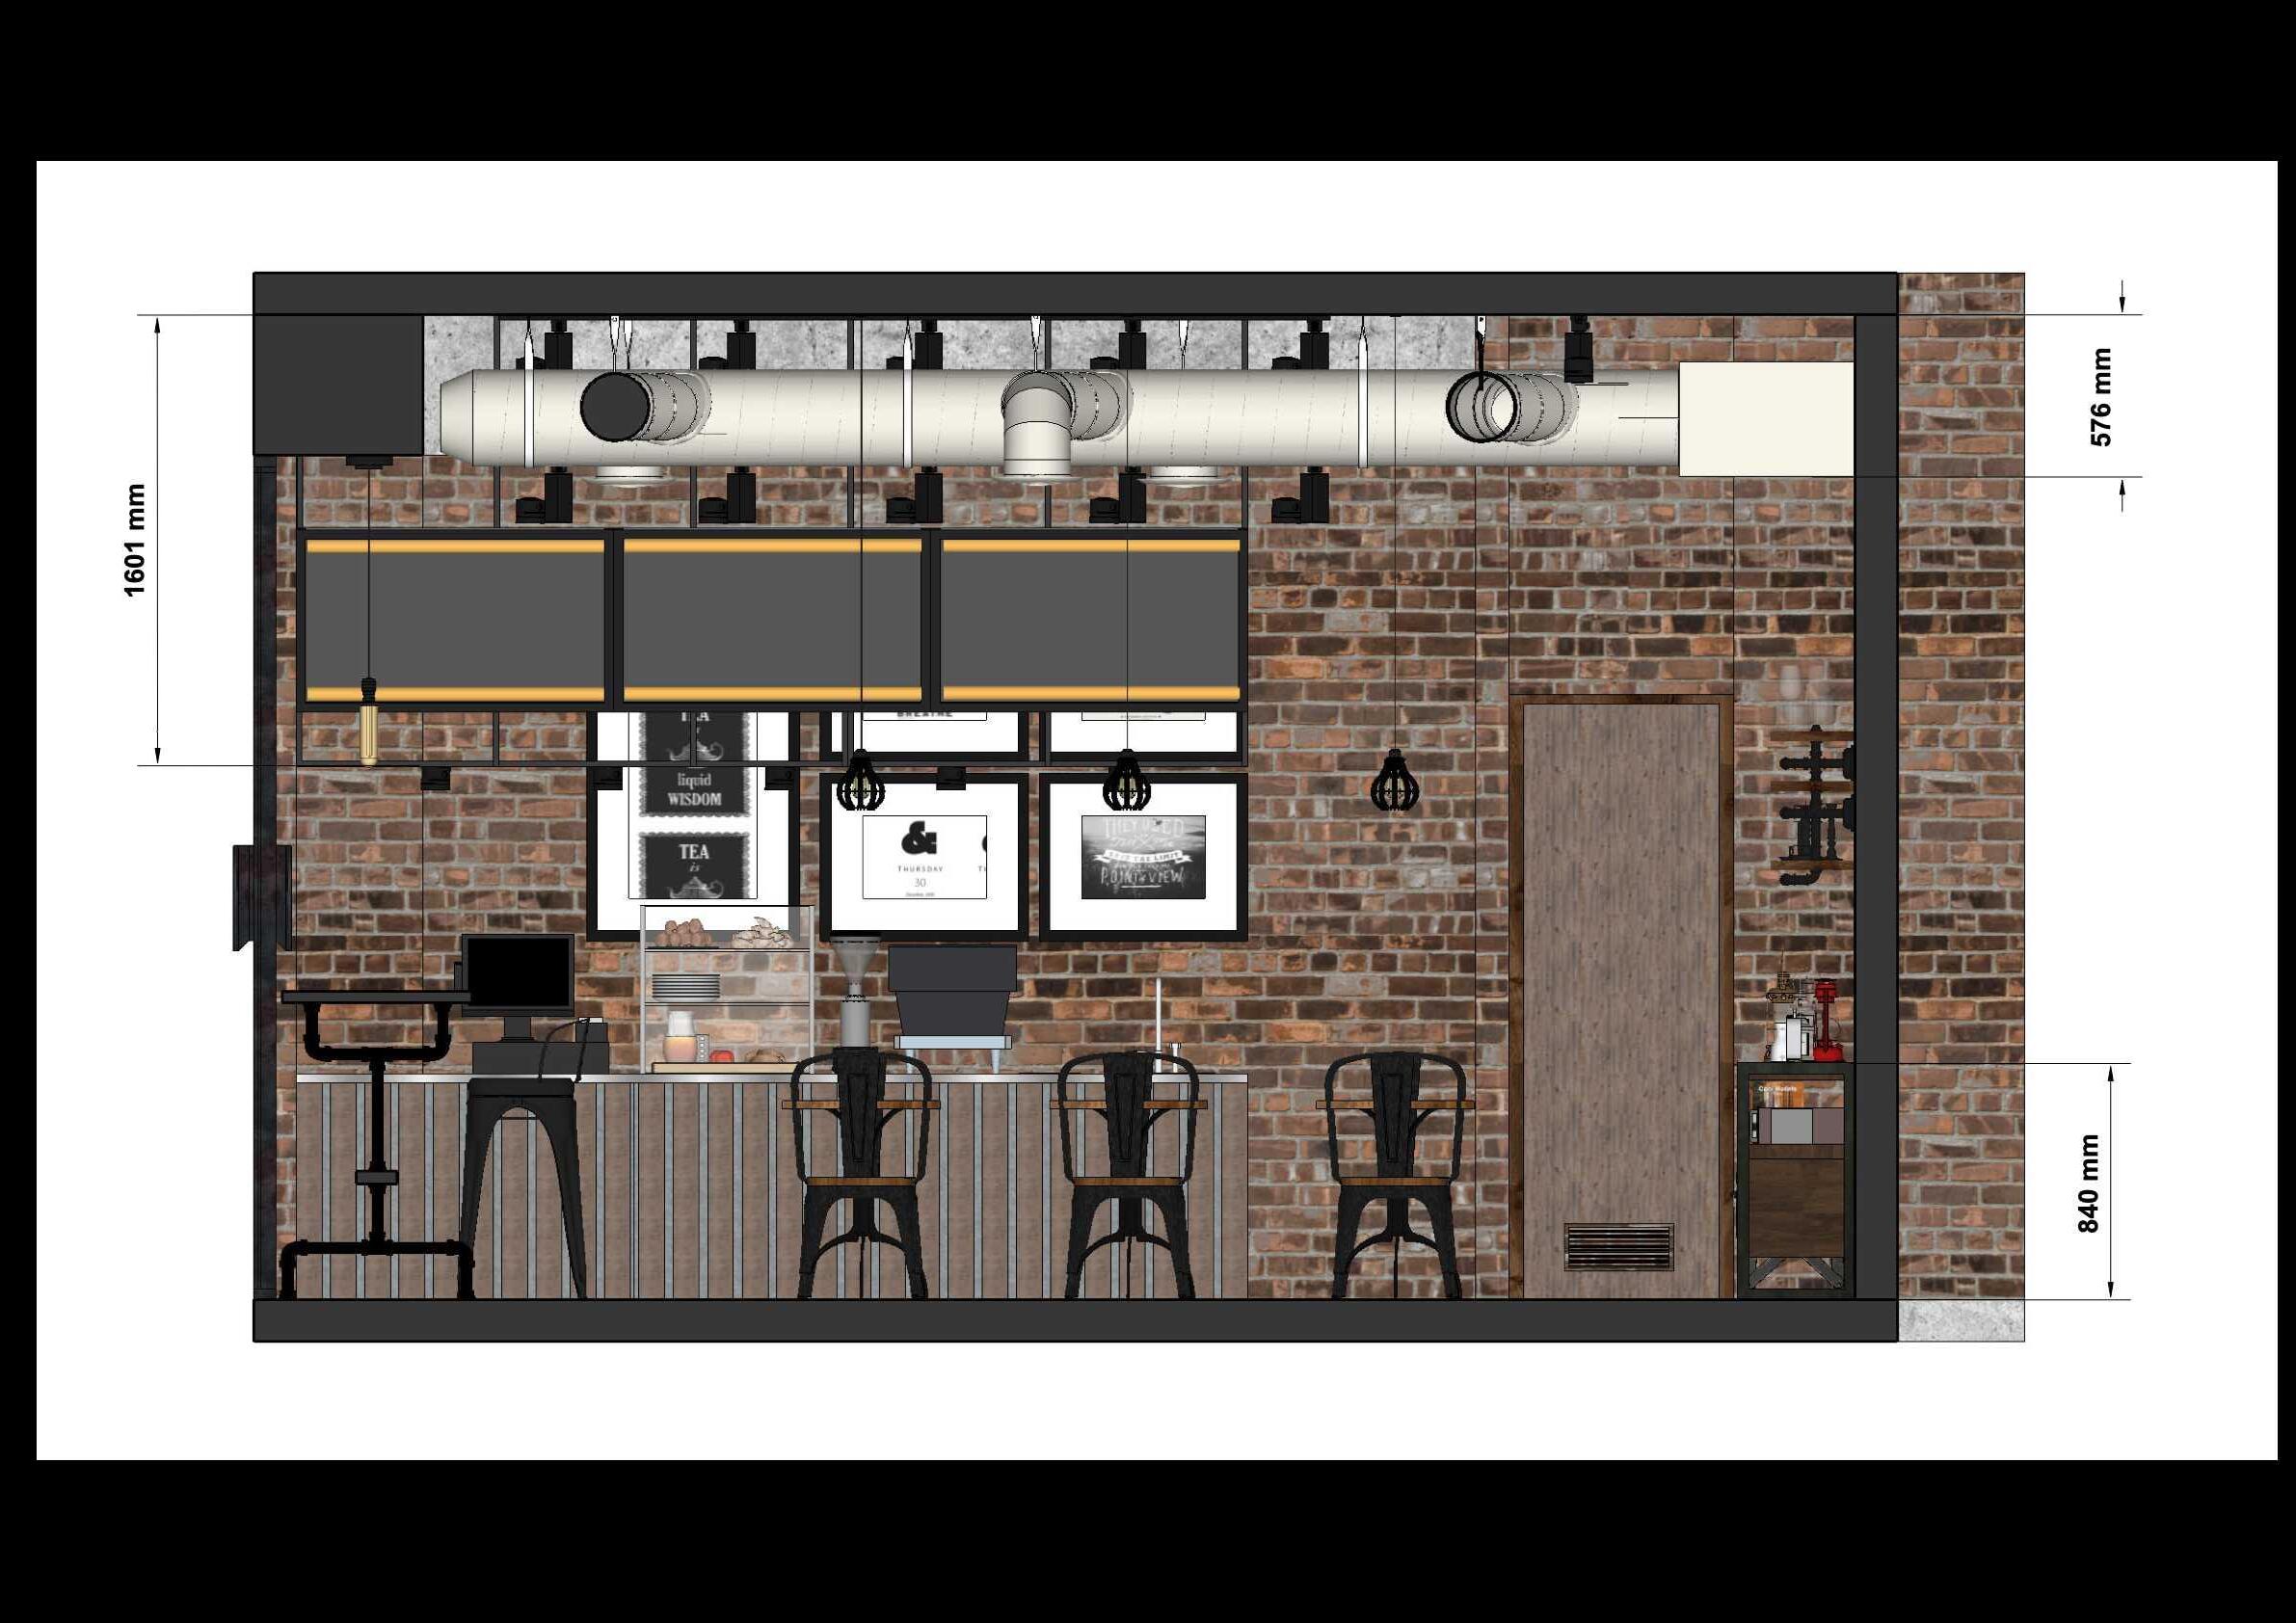
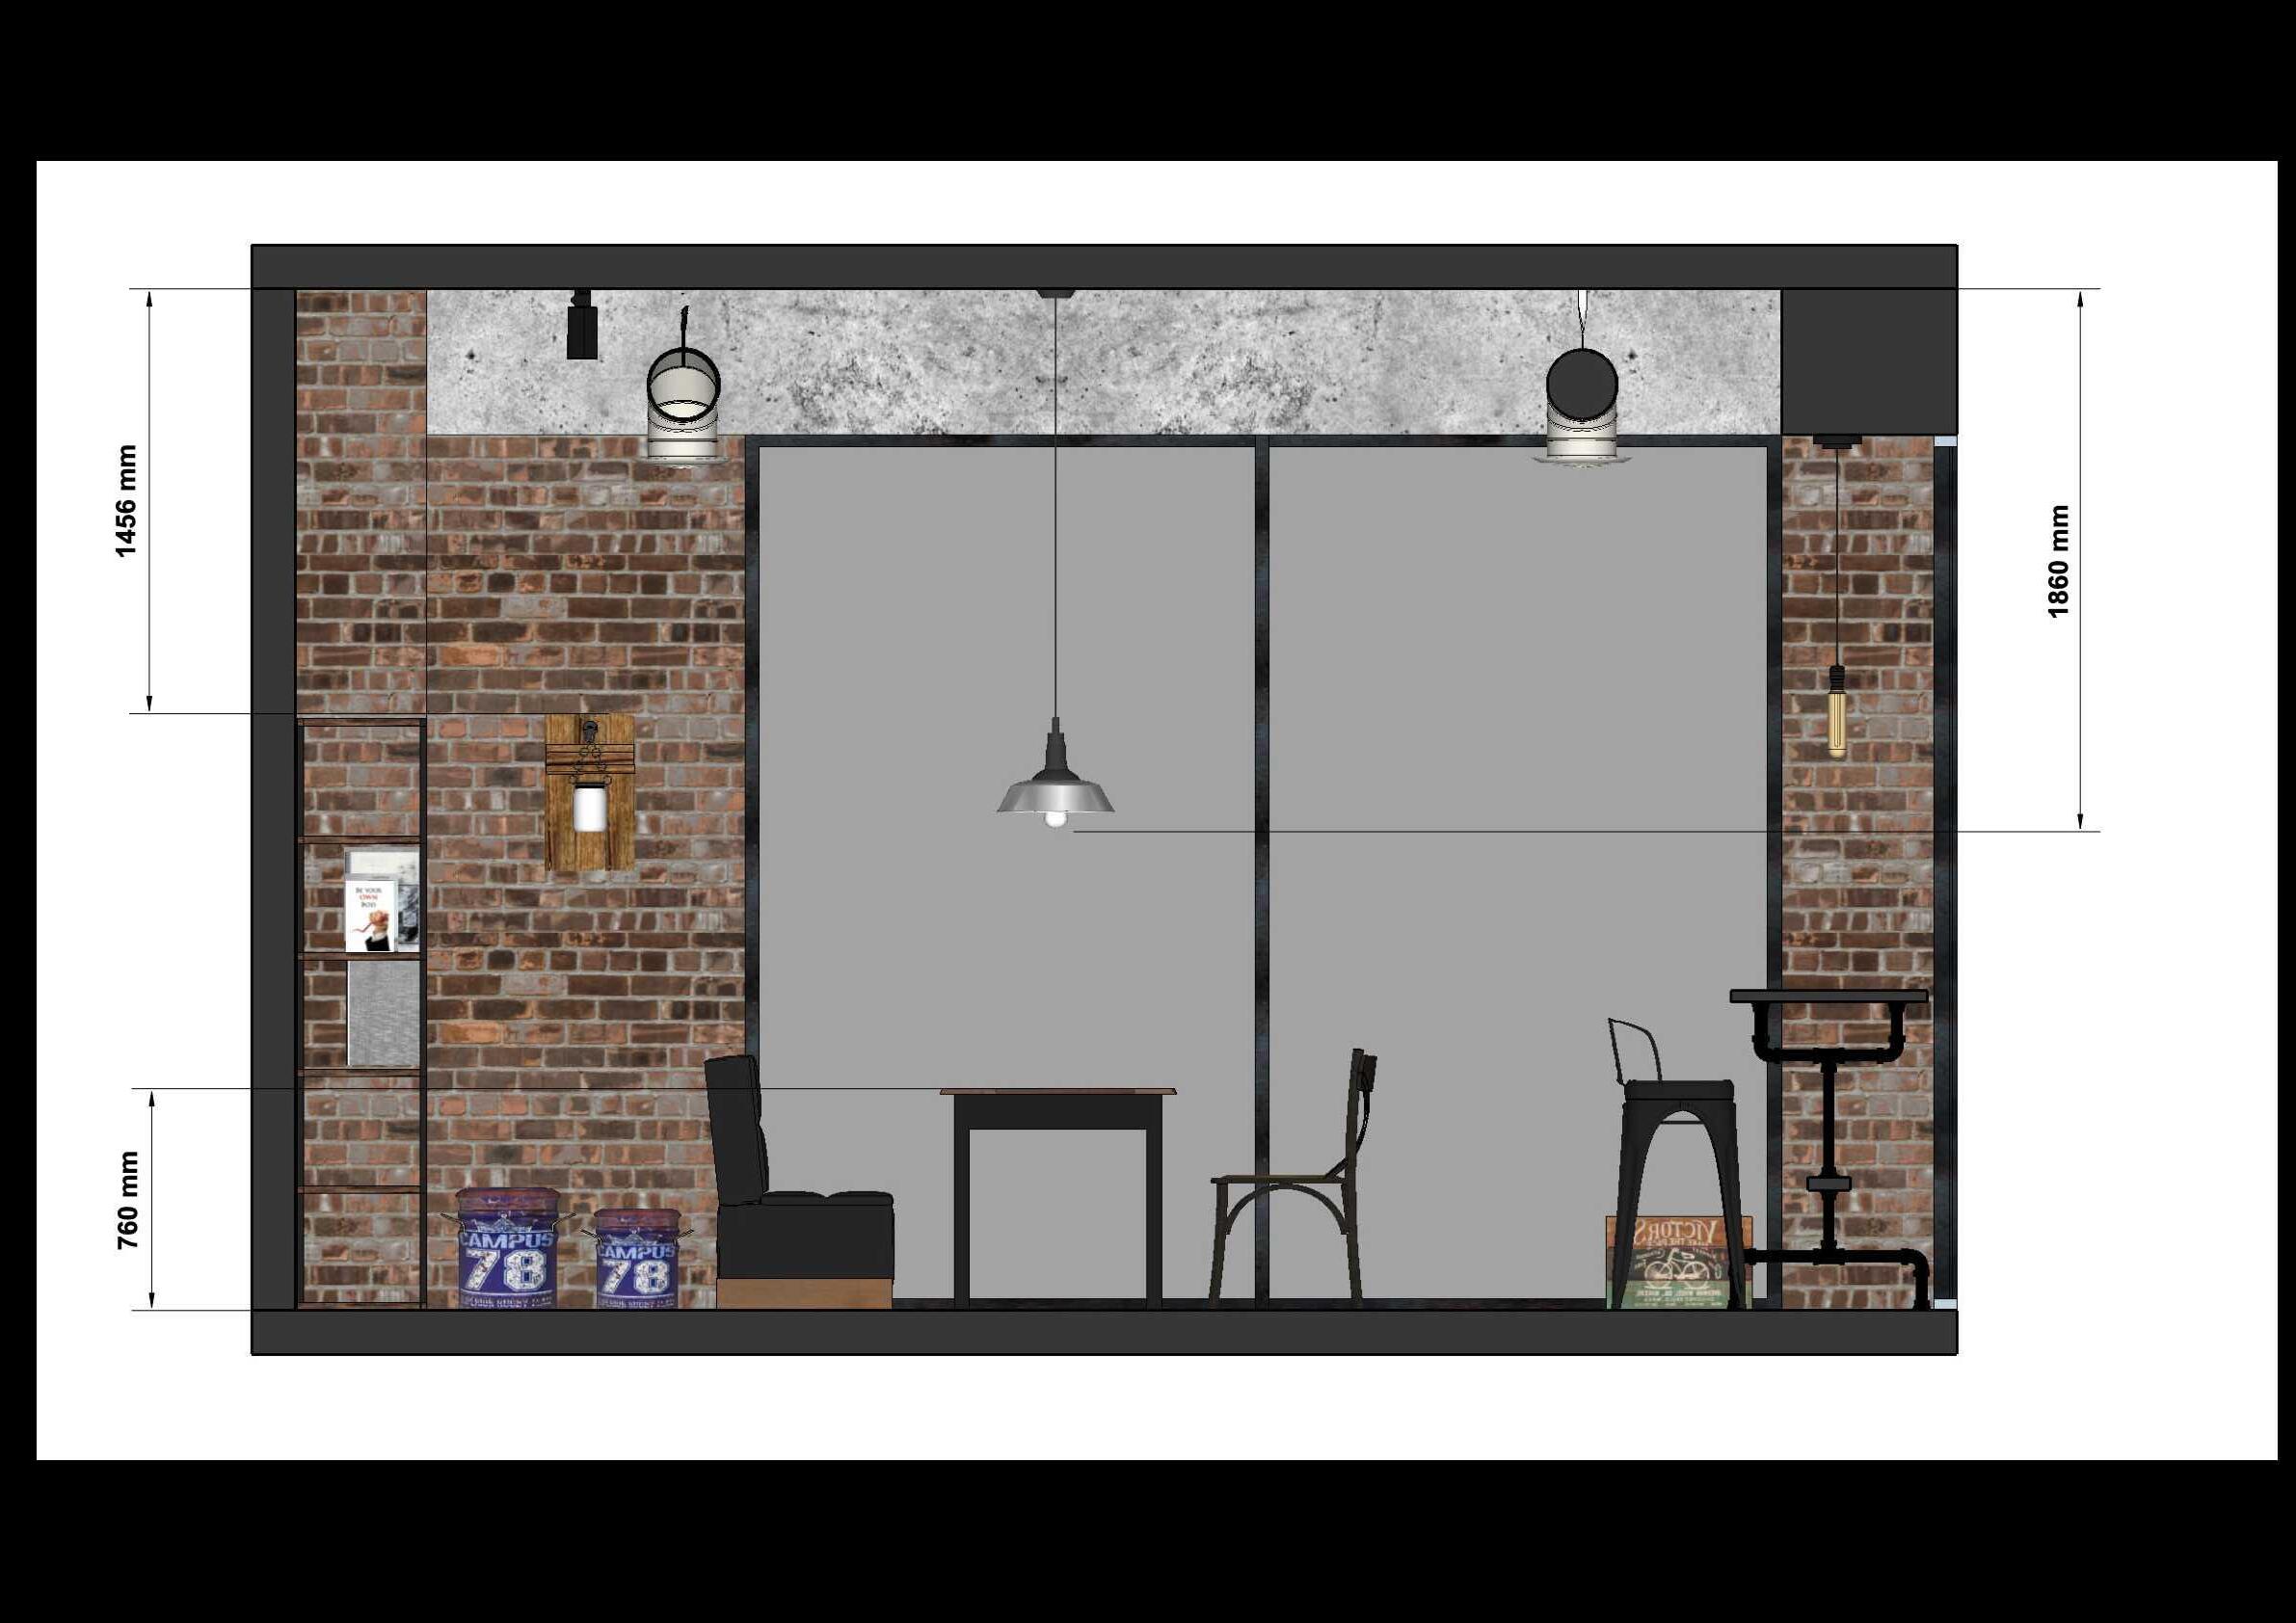
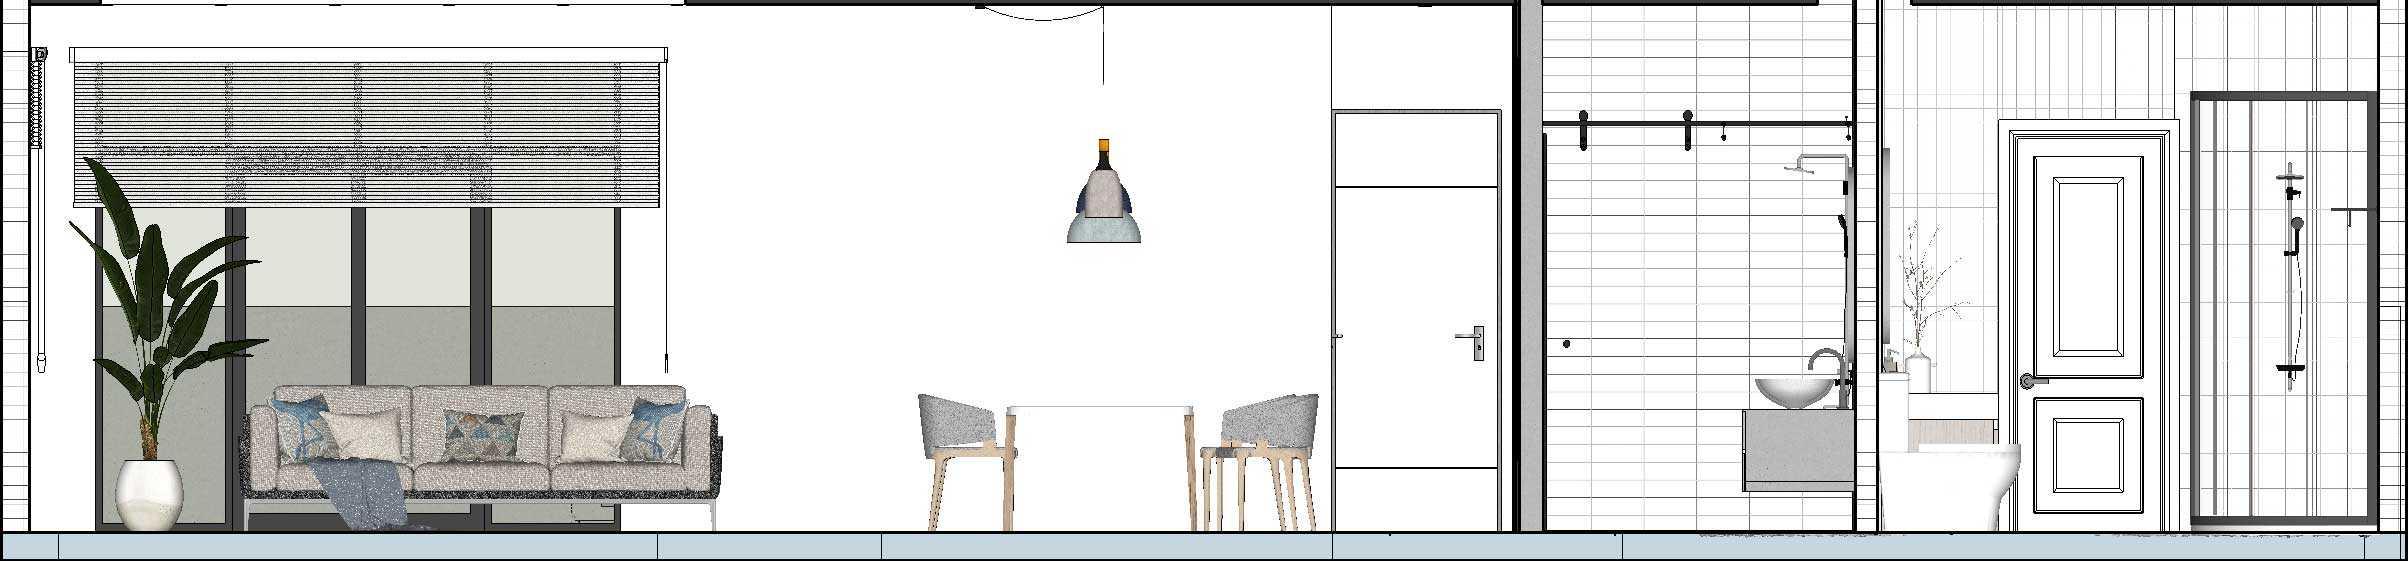
INTERIOR ELEVATION
1:30/mm
West Side
Maintain the west side wall then swap the original entrance with the floor-to-ceiling window. The height of the bar facing the floor-to-ceiling window is 1100mm. Install tungsten filament chandeliers above the bar. The bottom of the chandelier to the beam above it is 1116mm. Set four tables and five chandeliers in this area. To avoid the shadow caused by the customers during the meal, I arrange the tables and the chandeliers in stagger. Because the space for the bar and the counter is quite small, I hang the shelves above the counter to make more space for the employees. Let them work comfortably and safely.
INTERIOR ELEVATION
1:30/mm
North Side
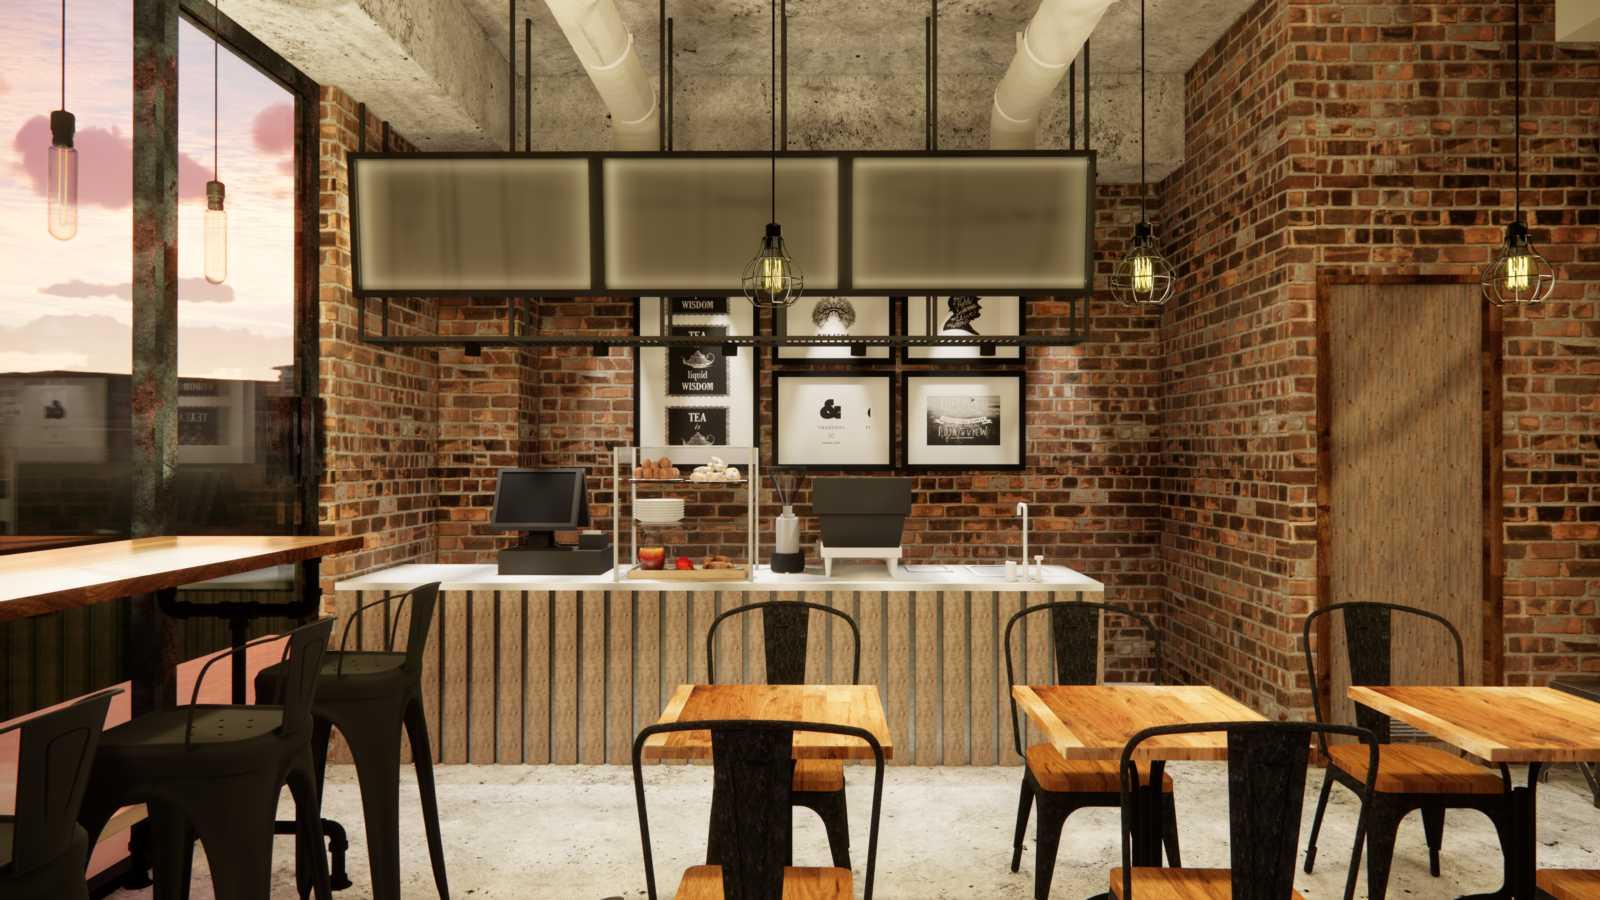
Both the north side wall and the paration around the lavatory would be built of red bricks with exposed surfaces. The bottom of the shelves hanging above the counter to the ceiling is 1600mm. The shelves and the counter would be equal width. The painting hanging on the behind wall and the walkway for the counter would be equal width and aligned.
1600 mm1600 585 840 1100 1116 800
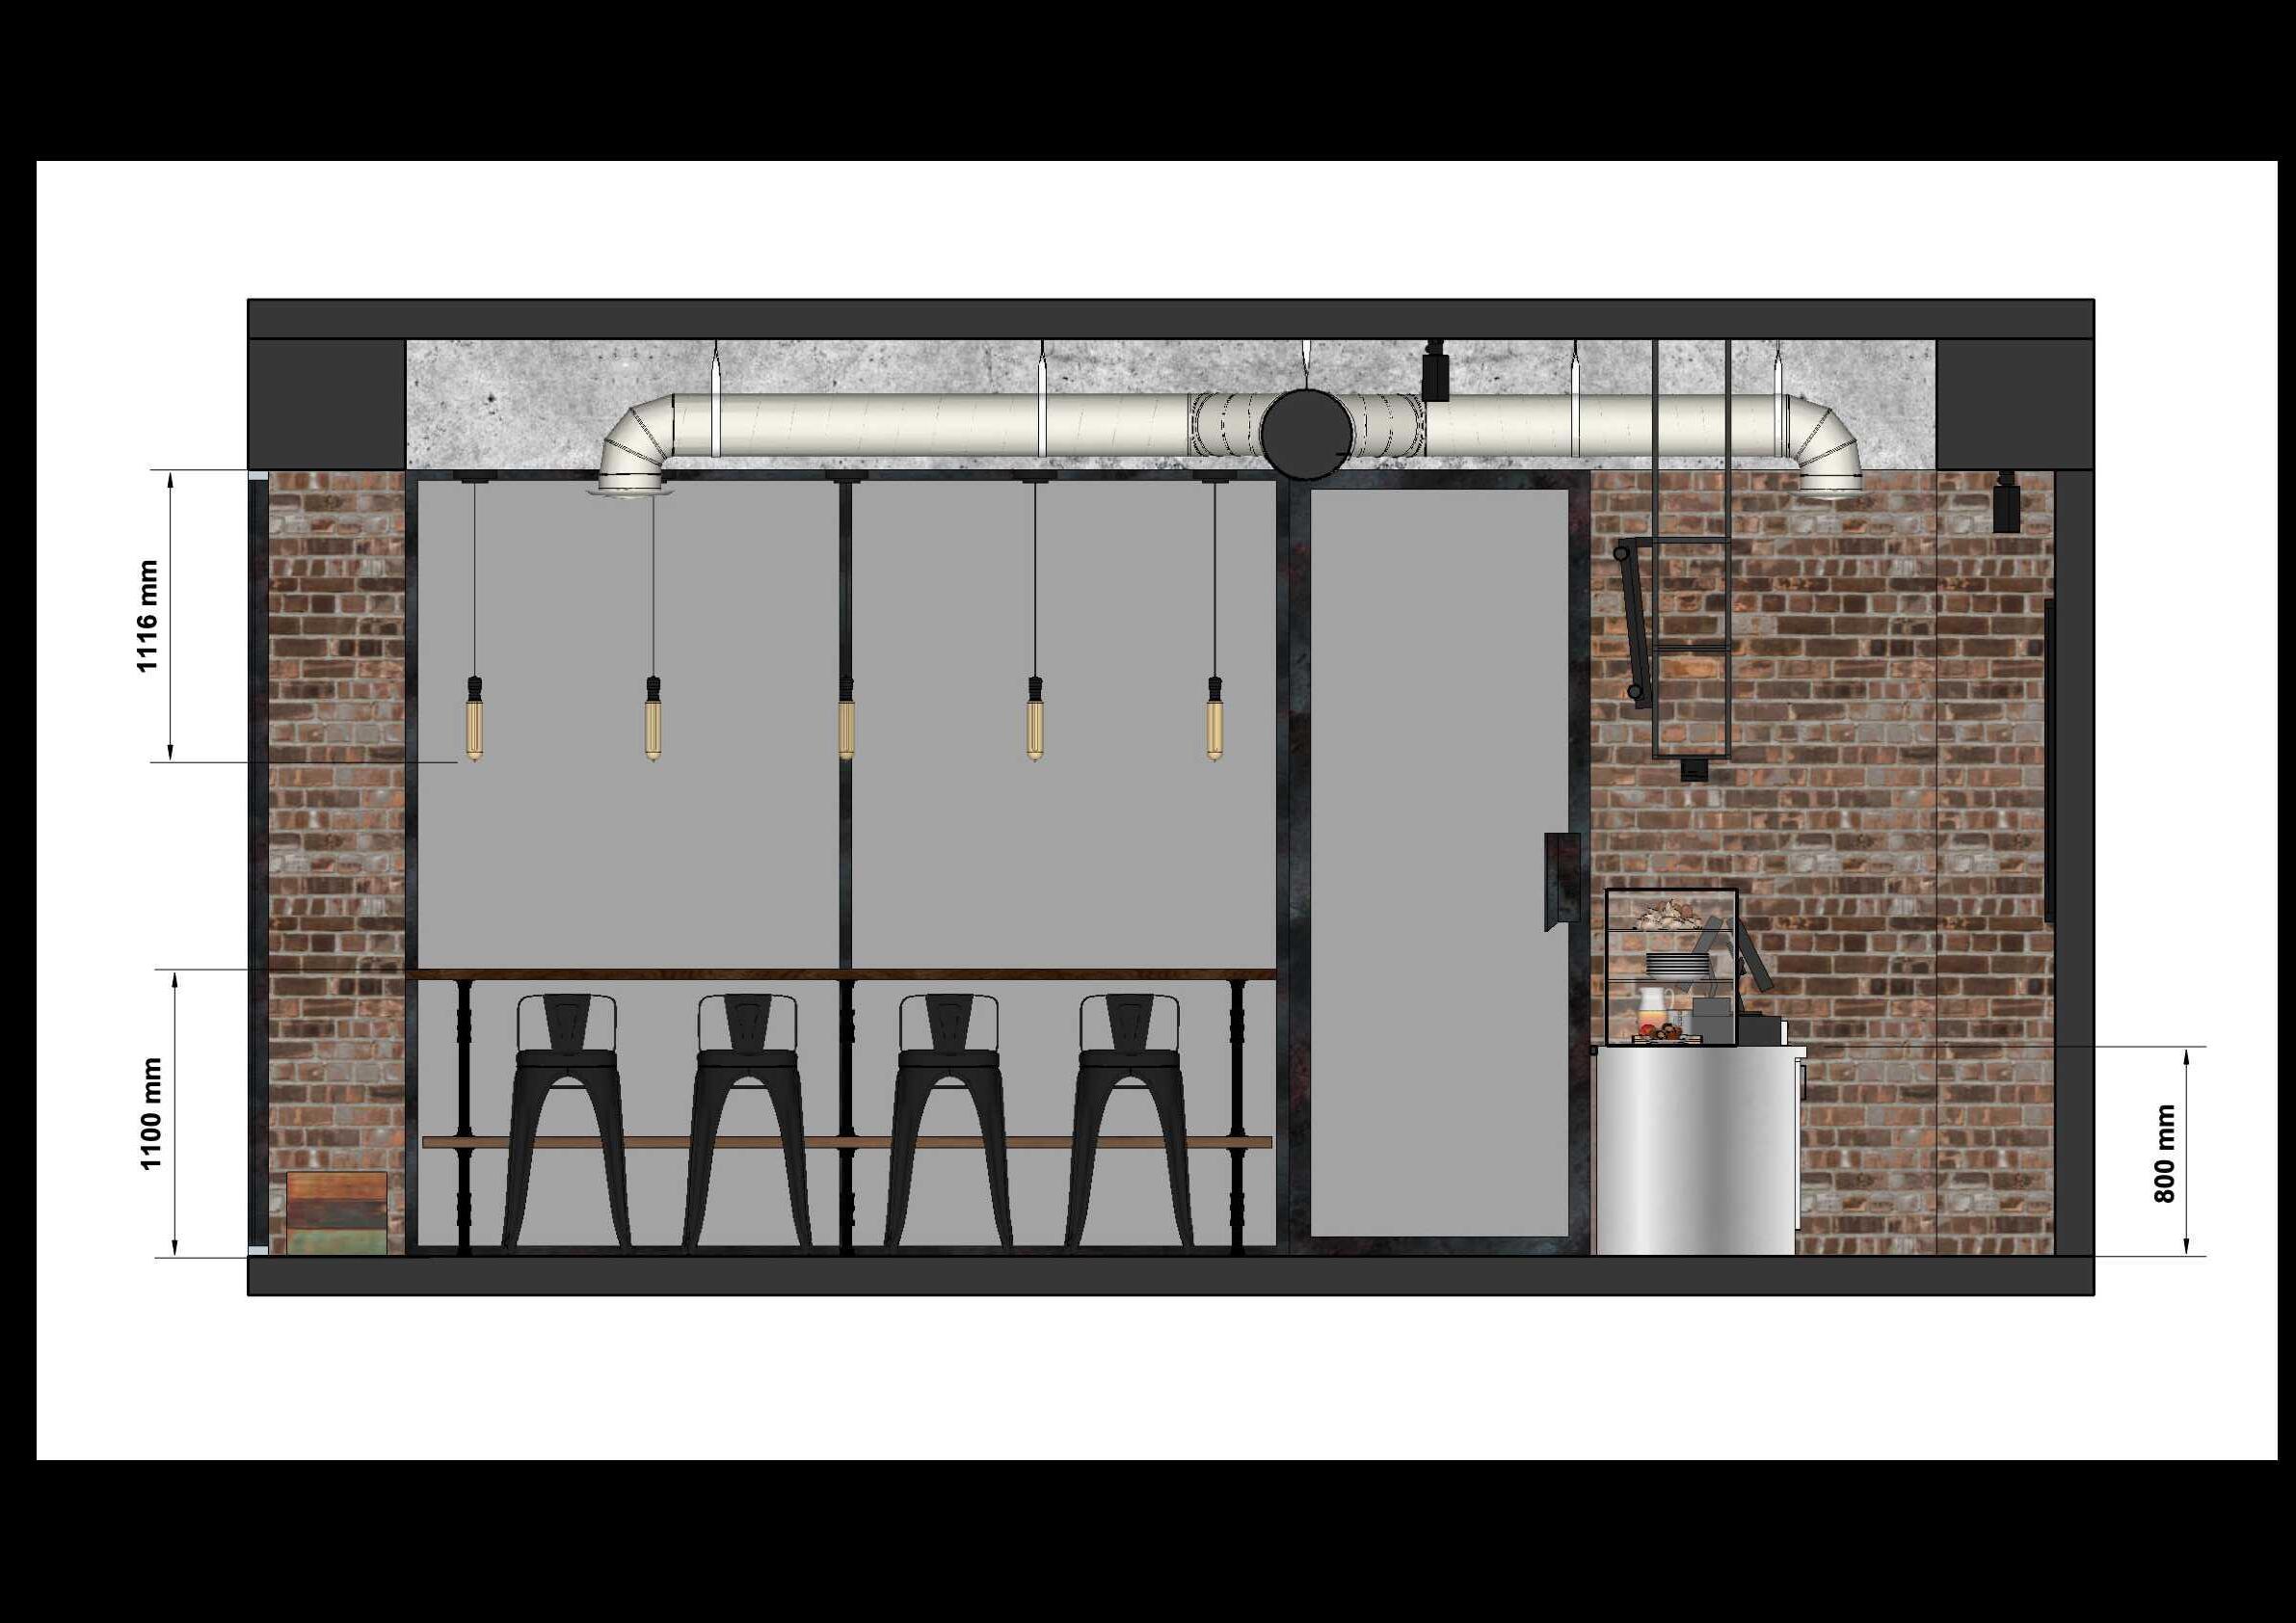
INTERIOR ELEVATION
1:30/mm
East Side
The total height of the interior area is 3500mm. The length of the beam is 500mm from the ceiling. The east side wall as the extended space would be built of red bricks with exposed surfaces. In order to look visually neat, the top of the storage shelves and the shelf panels, as well as the wall lamp on the right need to be aligned.

INTERIOR ELEVATION
1:30/mm
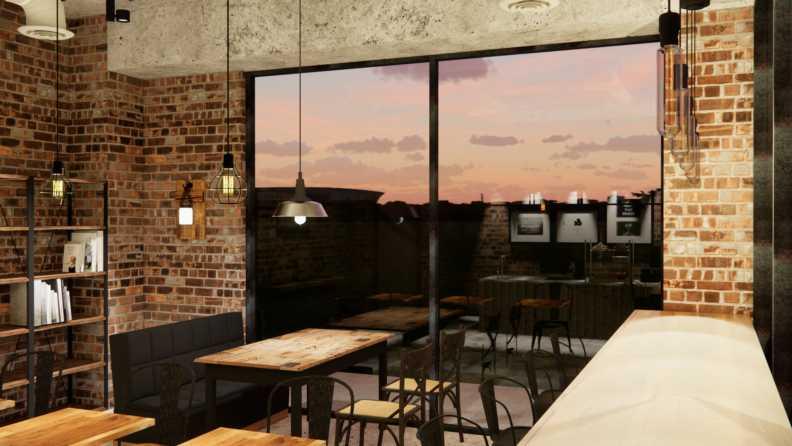
South Side
Maintain the wall and the floor-to-ceiling window on the south side. The height of the only table for four is 760mm. The bottom of the chandelier to the ceiling is 1860mm.
The upper edge of the chandelier is arranged in the same position as the upper edge of the wall lamp on the left side, as well as the top of the storage shelves; therefore, it will be visually neat.
1860 1456 760
2150 3000 500
3800

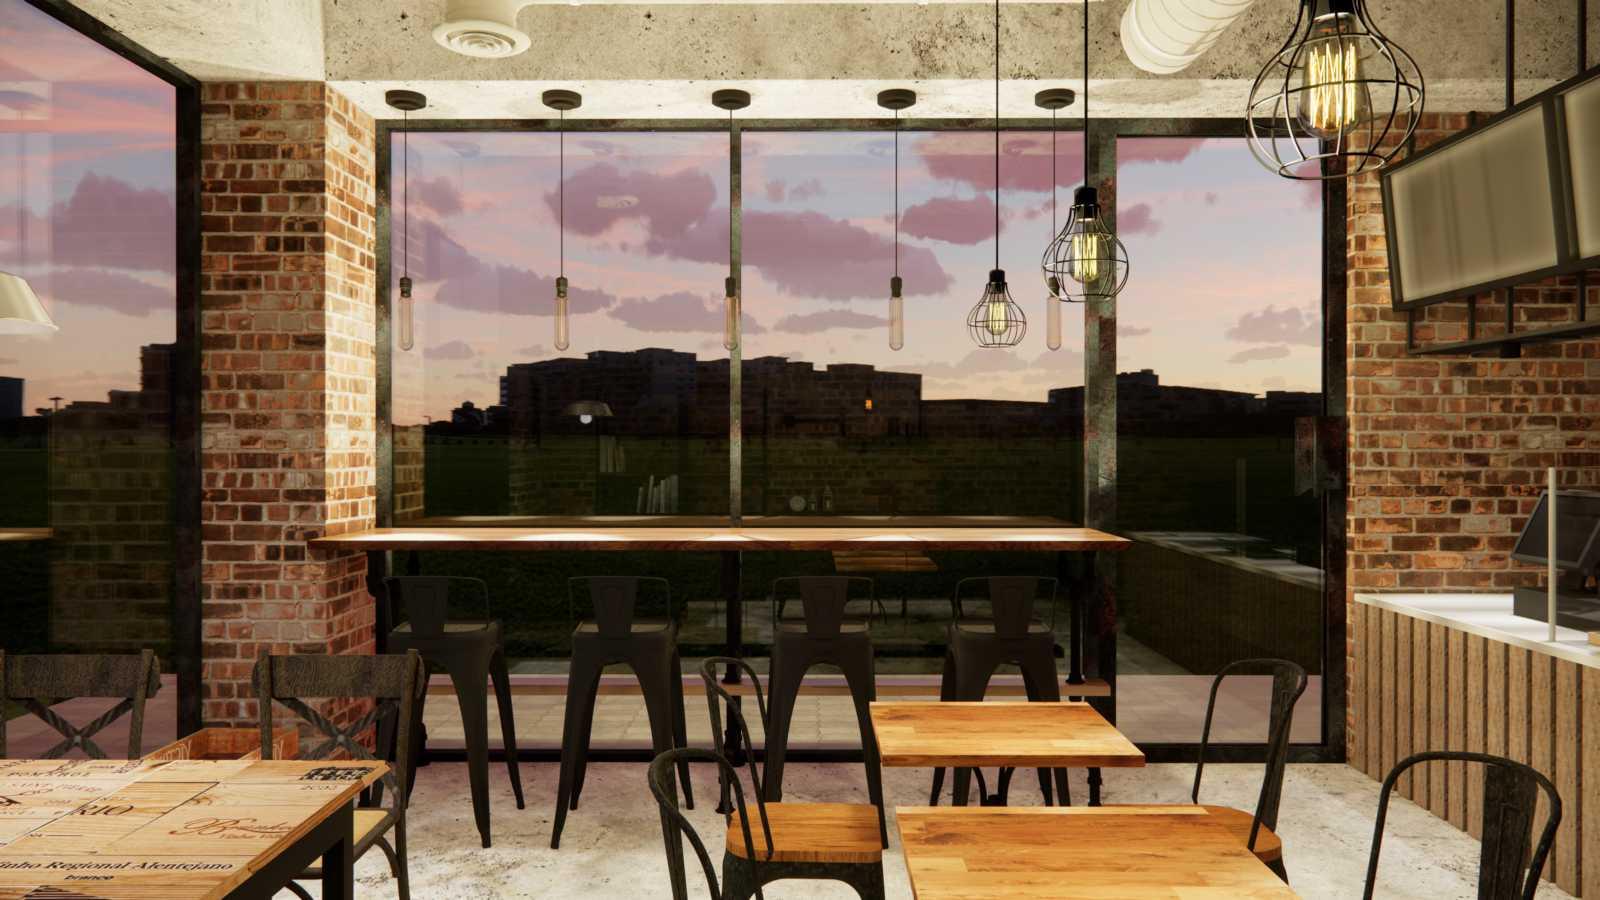
3D RENDERING DISPLAY
West Side
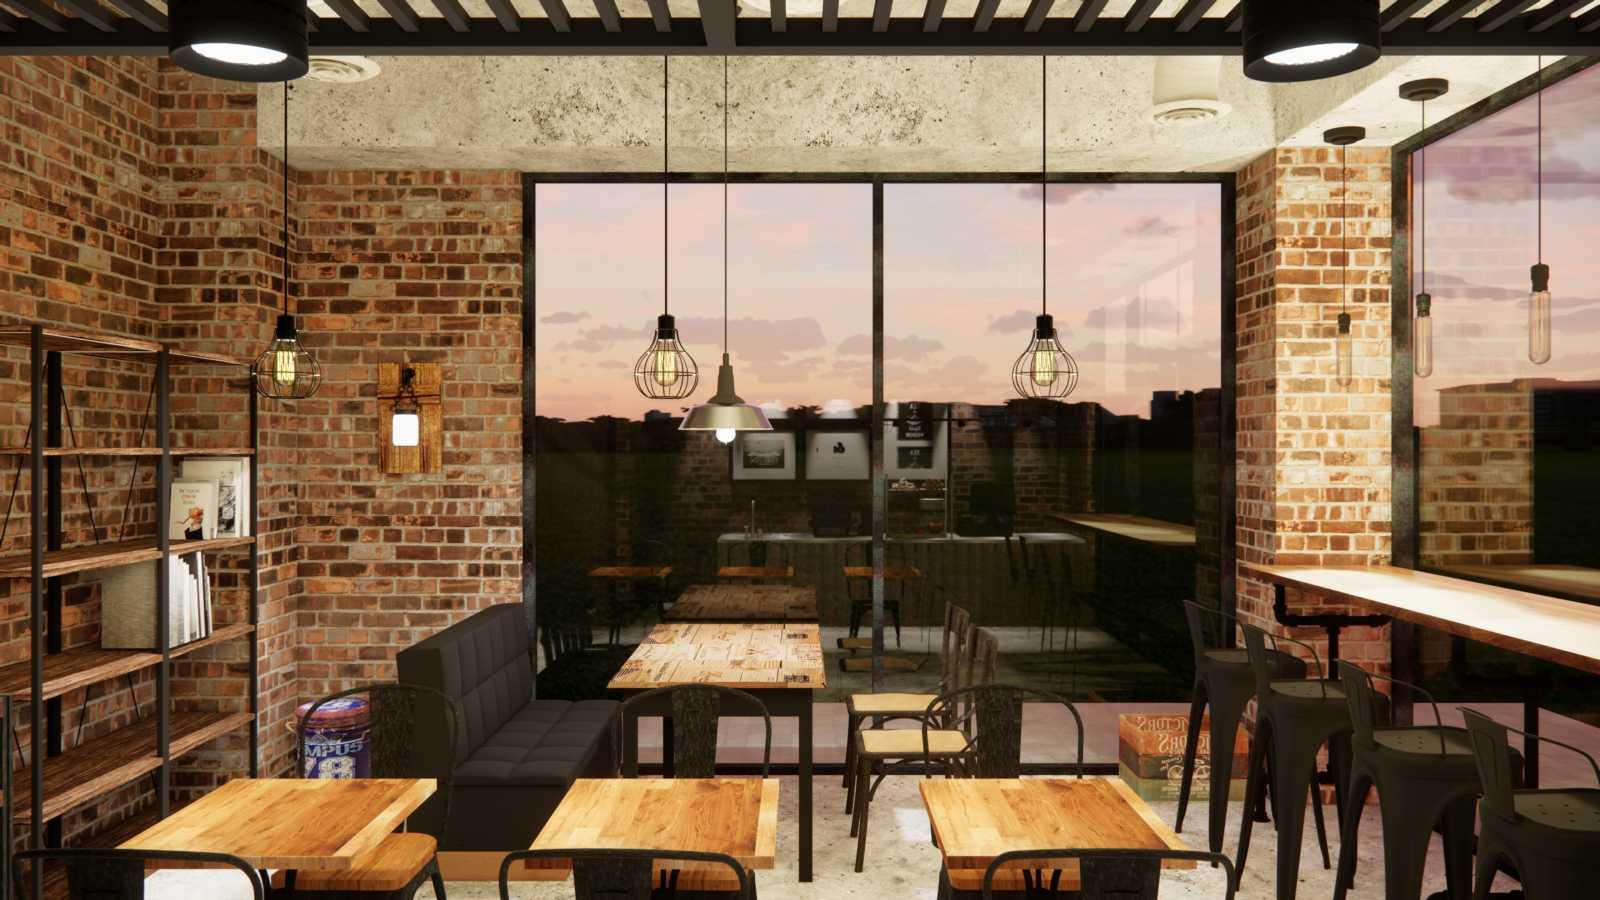
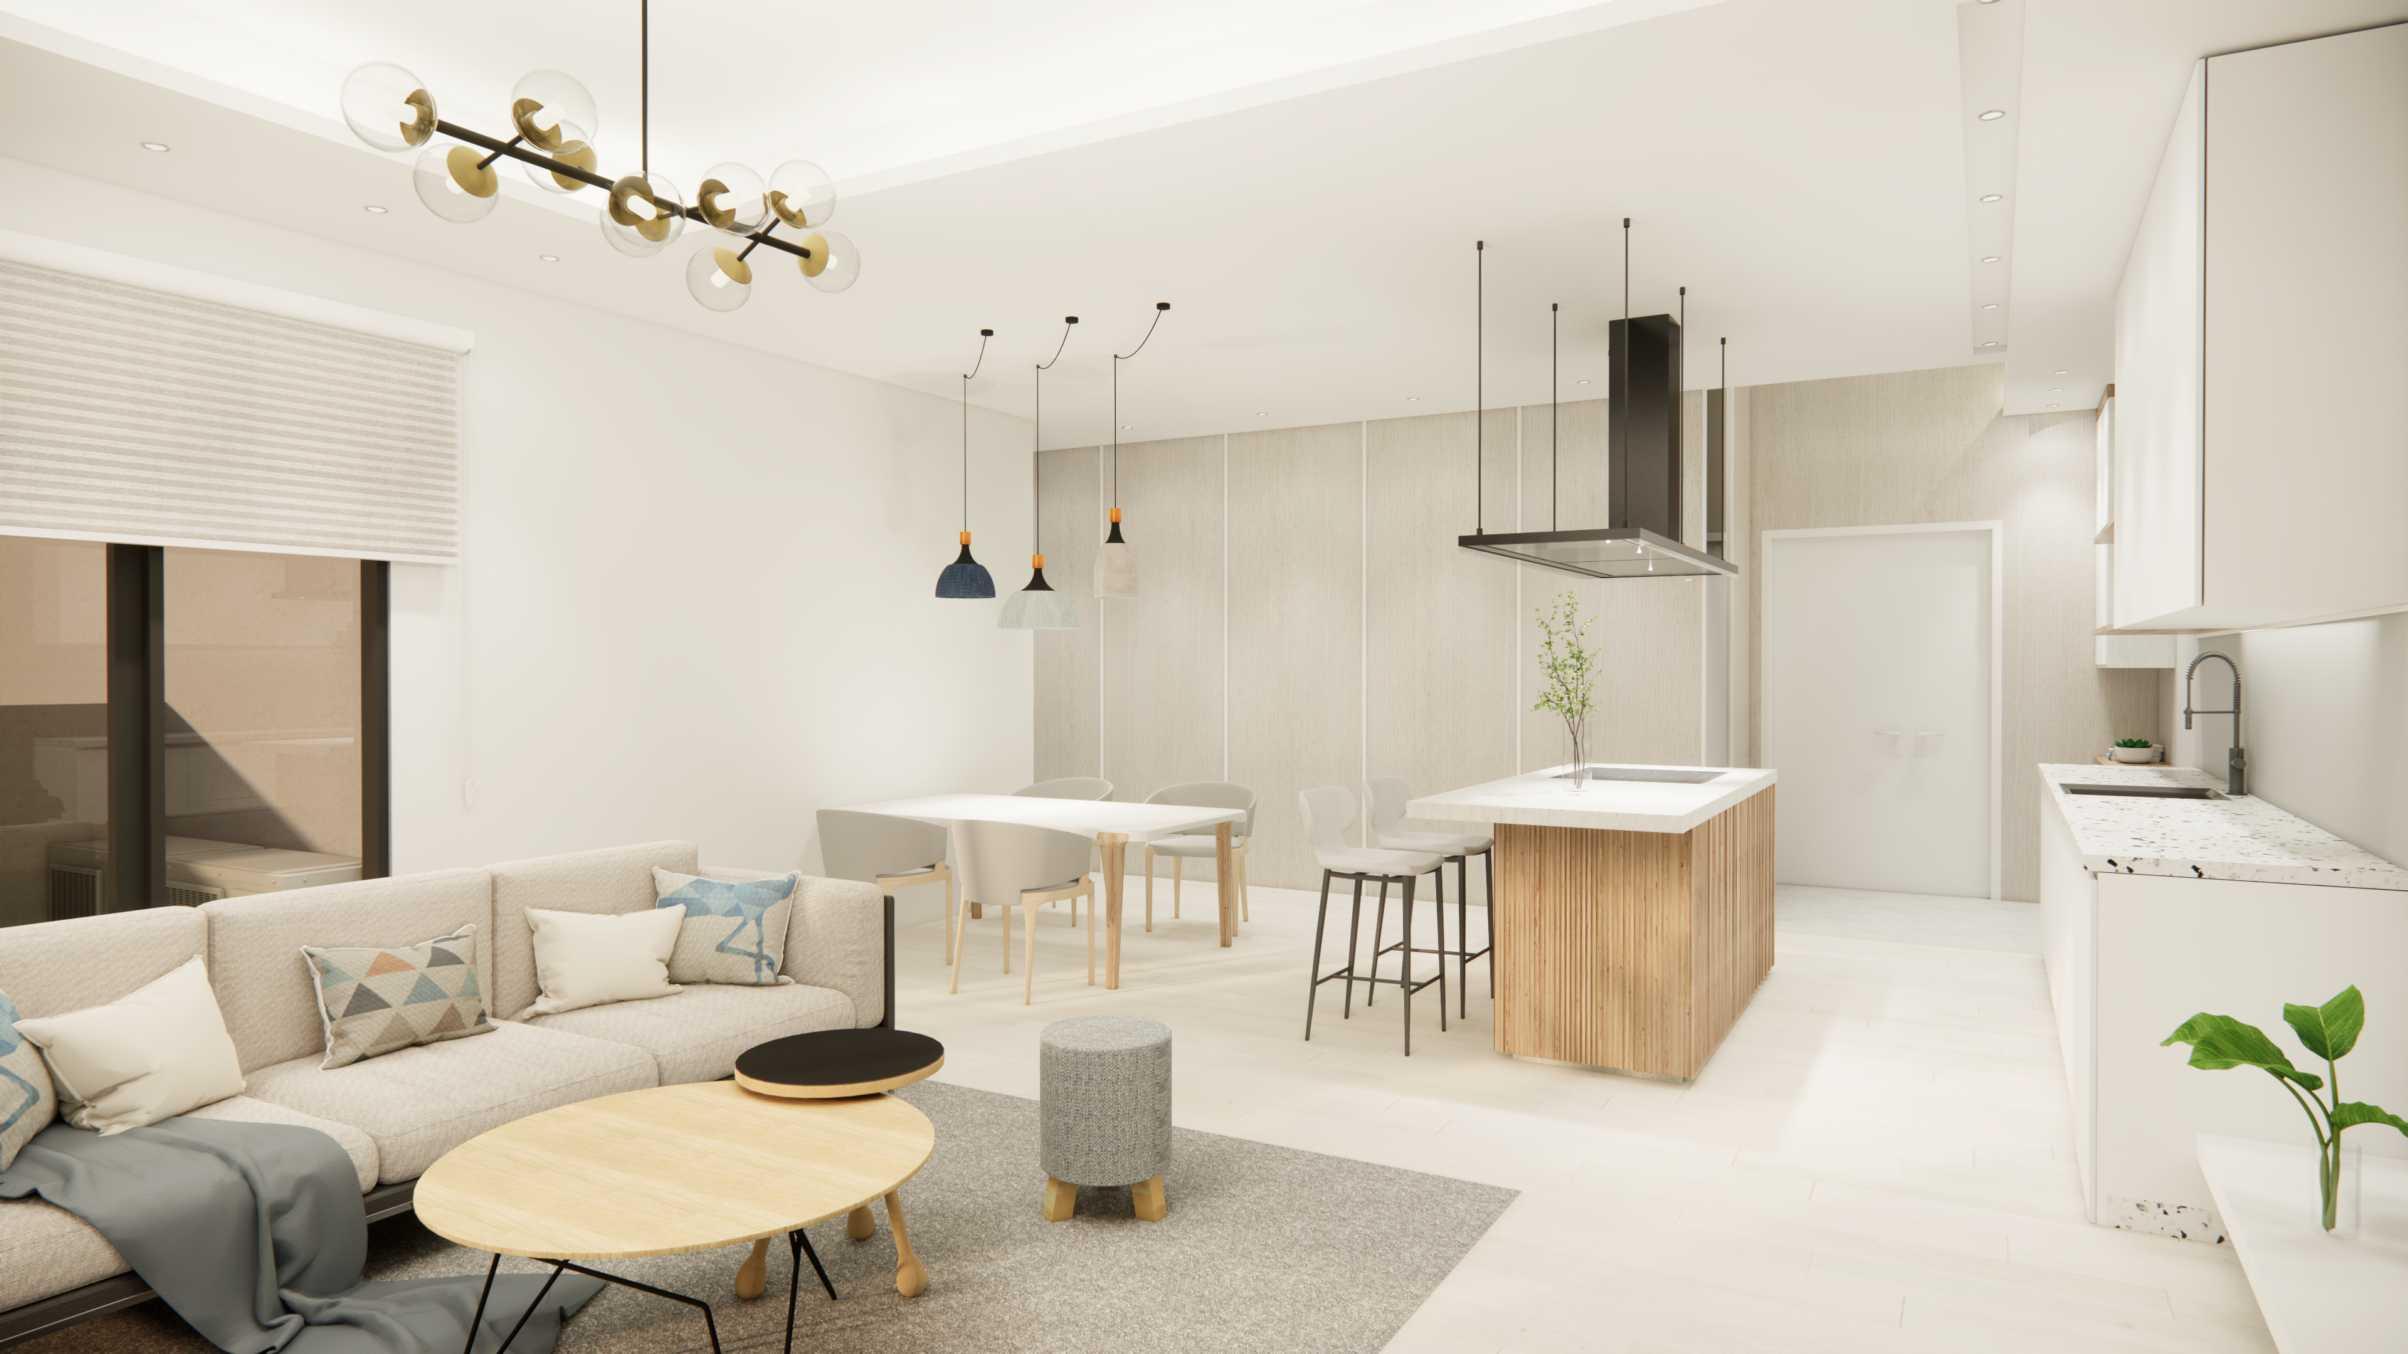
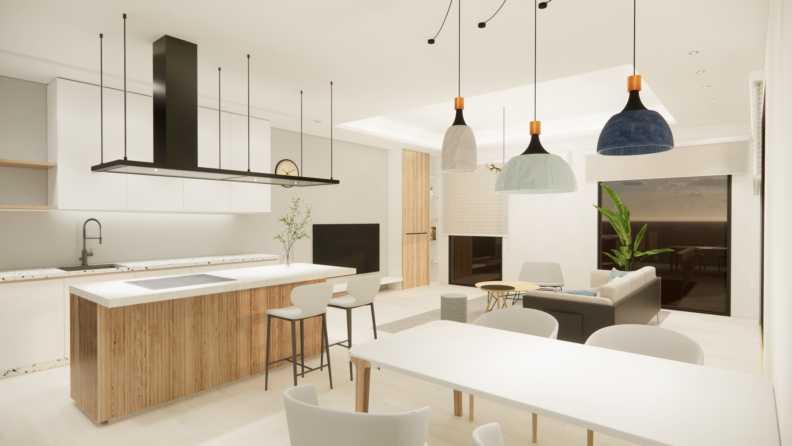
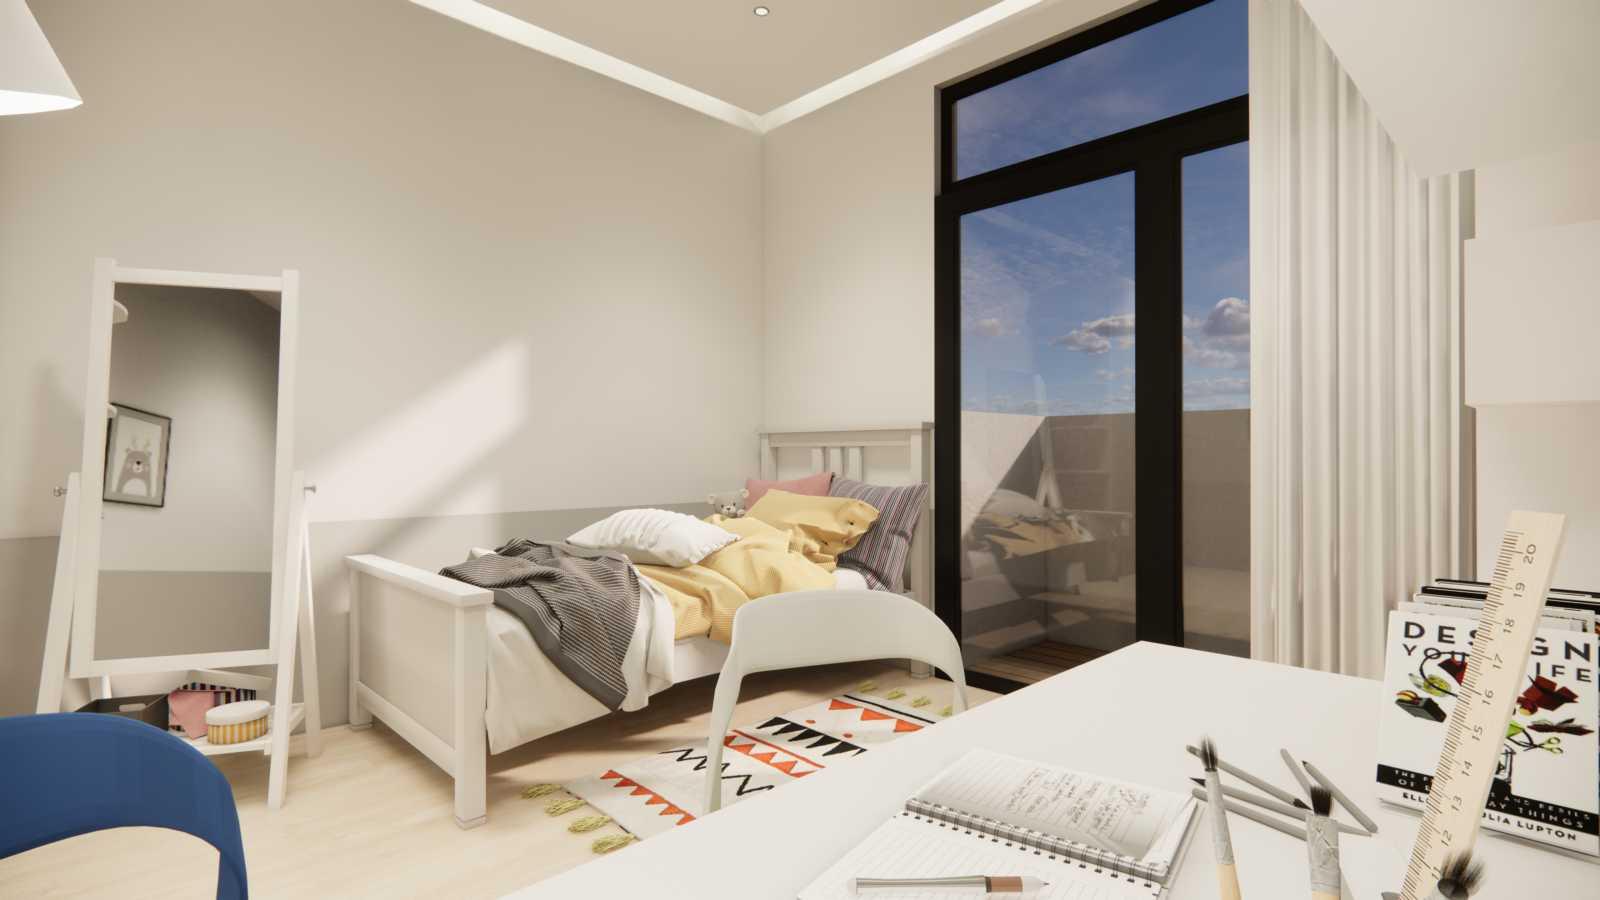
By moving the original entrance to the new location, the two floor-to-ceiling windows will enclose a rectangular space for seating area, which not only increases the natural light, but also shortens the distance between the customers and the scenery outside.
The menu is arranged in this way, not only for the reasons mentioned in “INTERIOR ELEVATION - WEST SIDE”, but also to be closer to the front door and the two floor-to-ceiling windows. This makes it easier to attract passers-by to flip through the menu, at the same time it helps them better understand what this shop sells.
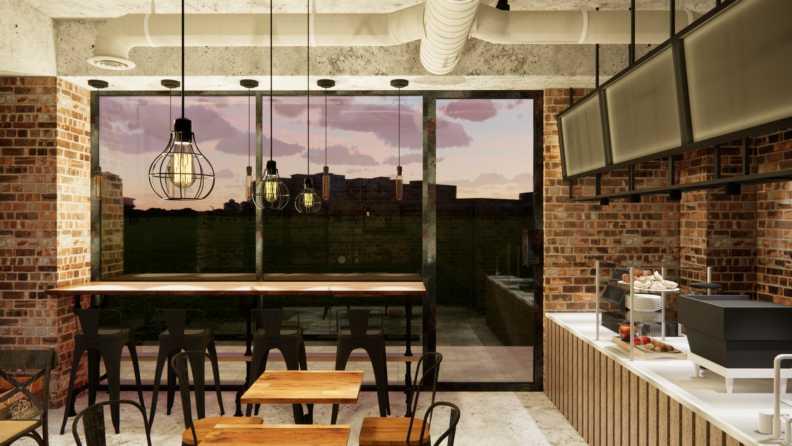
3D RENDERING DISPLAY
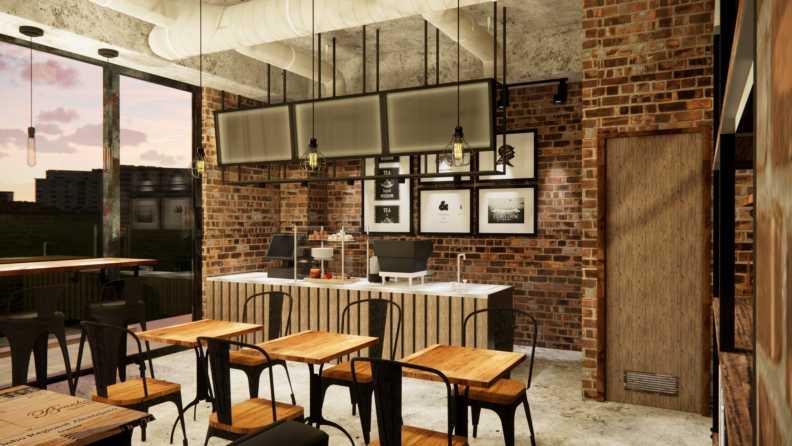
North Side
In the middle of the seating area, three groups of double seats are placed. In order to accommodate the arrival of multiple guests, rectangular tables will be used to facilitate the combination.
There are two more reasons why seats are placed in this way. First, since the seats are closer to the counter and adjacent to the main aisle, I arrange that the guests should sit the opposite way to the aisle. Then, there is a table closest to the lavatory, which is also adjacent to the aisle where employees enter and exit. Consequently, it’s better to sit the opposite way to them to avoid being disturbed by meals.

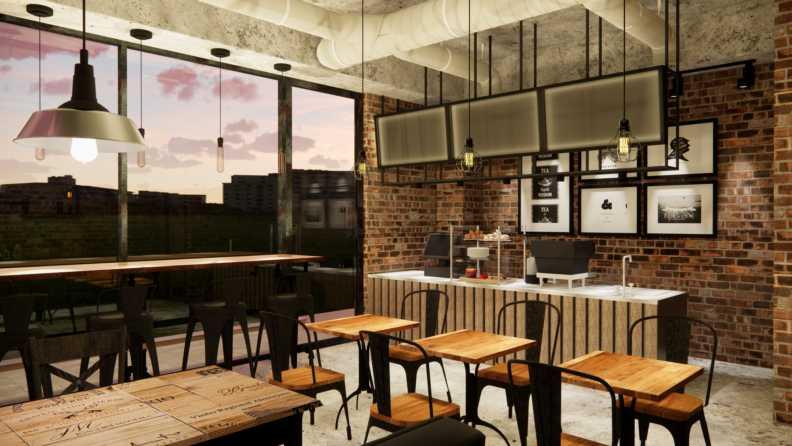
3D RENDERING DISPLAY
North Side
The only one table for four is arranged by the floor-to-ceiling window on the south side, and chandeliers are selected to hang above. The light from the chandelier shines downward and the side of it has a slight exposure bulb, so there is still a little bit of light from the side. In order to increase the brightness and decoration, one of the walls will be decorated with industrial-style wall lamps.
3D RENDERING DISPLAY
East Side
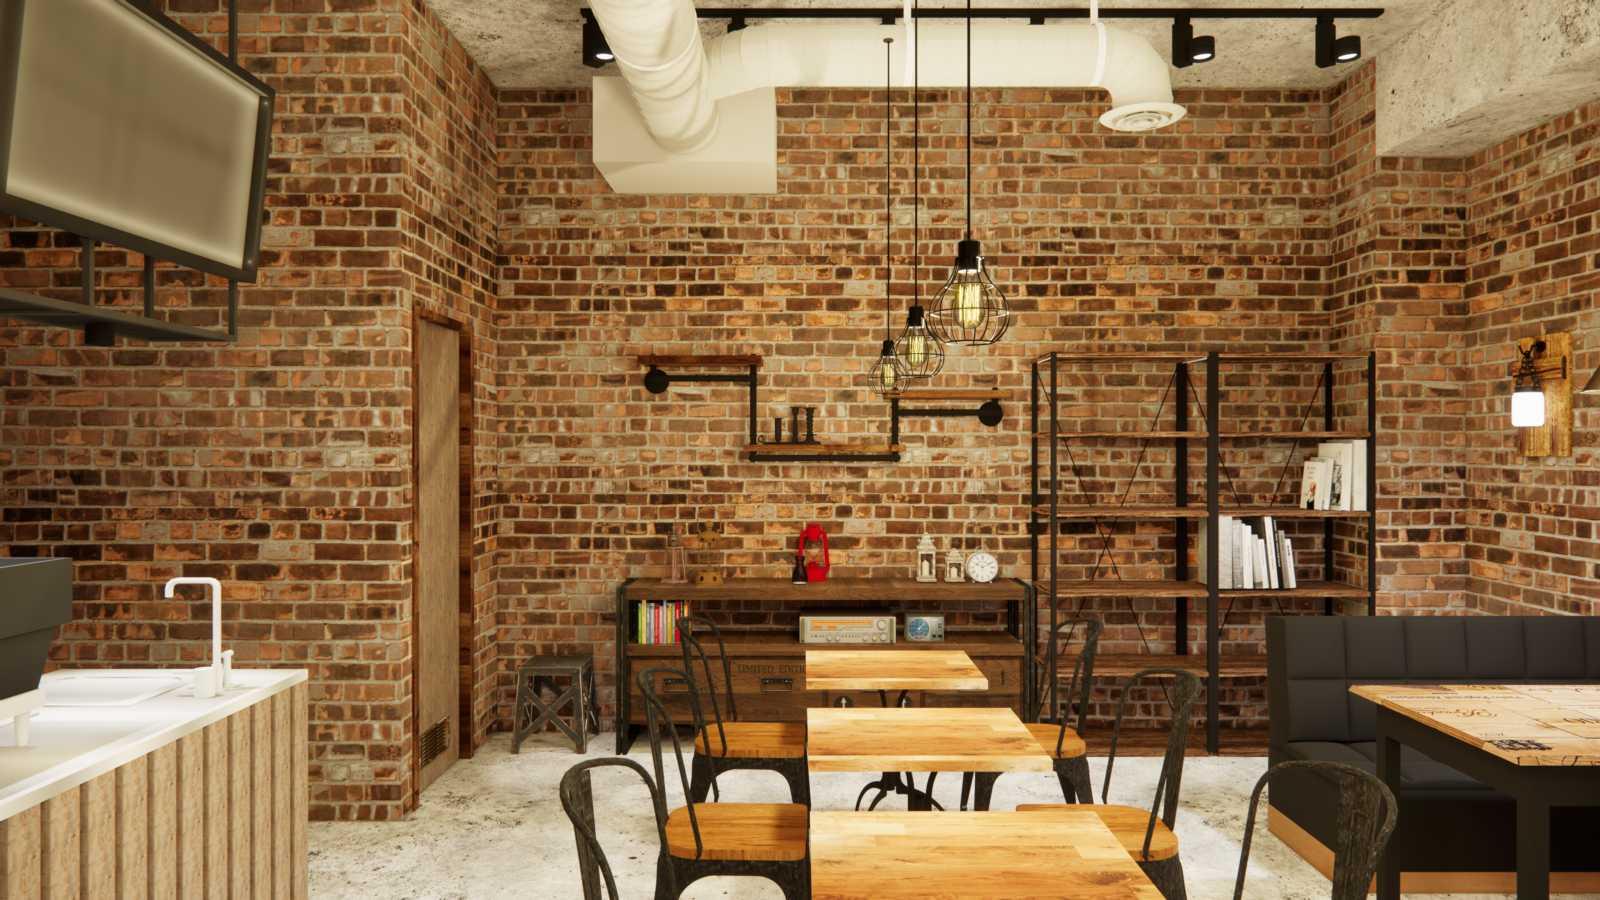
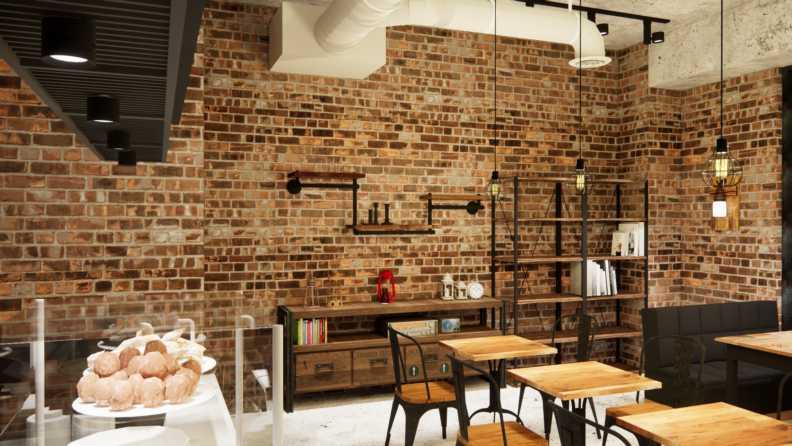
Originally, this area was a storage room. After the demolition, the overall space will become more spacious and comfortable.
In addition, upright shelves and decorative cabinets will be placed, and shelves of the same style will be installed on the wall.

2
Flat Project
Description of the design plan
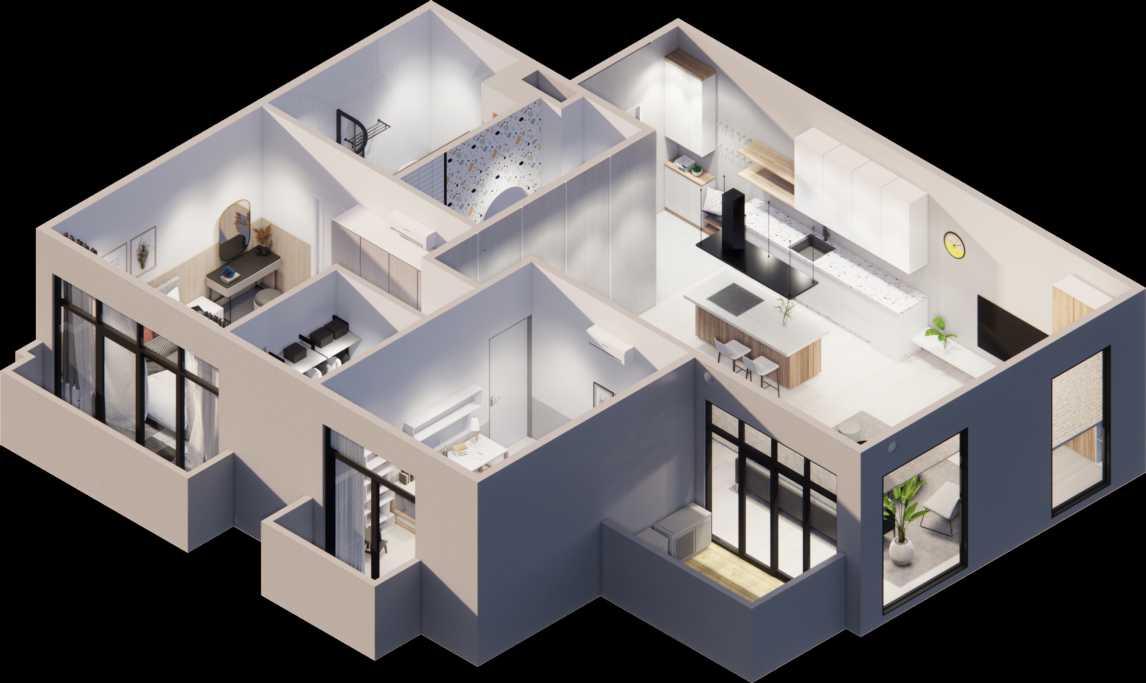
The flat of this plan located in the Taipei city center belongs to these parents. They have a daughter in first grade. They want their home to be in a light tone and brighter Modern style or combine with Scandi style. The wife has more clothes to store, so she wants more wardrobes in the master bedroom, or a walk-in closet. Due to the current young age of the daughter, as she gets older, the furniture will need to be replaced all the time. Therefore, I try not to install furniture fixed to the wall and ceiling so that it could be better moved and replaced in the future.
The flat is located at the intersection of two six-lane roads and there is a MRT and bus stop within 100 meters. Because of its proximity to the commercial area, the flow of cars and motorcycles is high even if there is sufficient public transportation. Therefore, they want good air quality in their flat. I will install energy recovery ventilation(EVR) in the main space.
The owner wants to solve the Feng Shui problem that Orientals care about, so I will make some changes to the layout.
ORIGIONAL PLAN
MODIFIED PLAN
Light source directions before midday sunshine
The area in the red square is the opposite two-bedroom entrance. If the two doors are within 3 meters, it will form the so-called "ma men" in feng shui, also known as "tou kou sha".
This would cause people in two rooms to communicate discordantly and be prone to arguments. Besides, the children's room is opposite to the parents' room, so the child would talk back to their parents. The solution is to move the orange square dividing wall to the right, so that the door of the room on the left can be reoriented.
After the replanning, the door on the right room maintains the original opening direction, and the door on the left room will be changed to open to the south.
Since the room on the right has an en-suite bathroom, it would be used as a master bedroom, so the partition wall will be moved to the right. In this way, it could have more space to set a wall-in closet, allowing the wife to have more storage space.
diffused light
diffused light
Floor-to-ceiling windows are on both the east and south sides of the flat, so natural light will shine into the interior from both directions.
There are two floor-to-ceiling windows that can’t be opened on the east side of the living room, and on the south side there is one that allows us to go out to the balcony.
Both rooms have balconies with floor-to-ceiling windows facing south.
1:80/mm 1:80/mm 1:80/mm

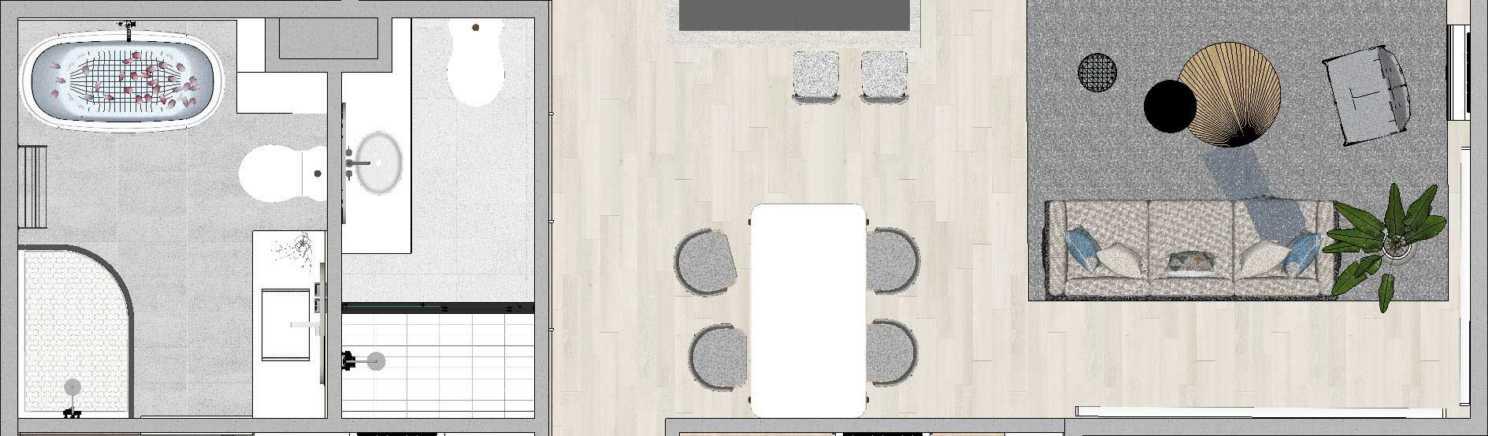

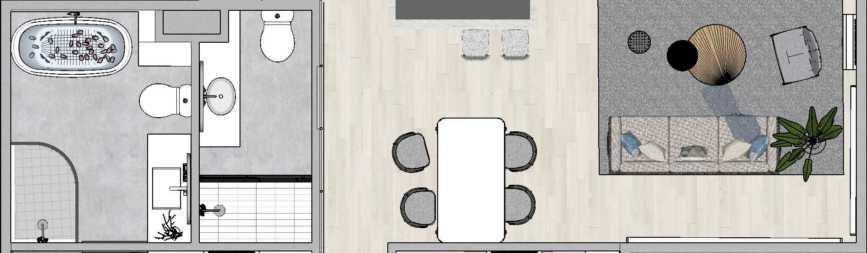


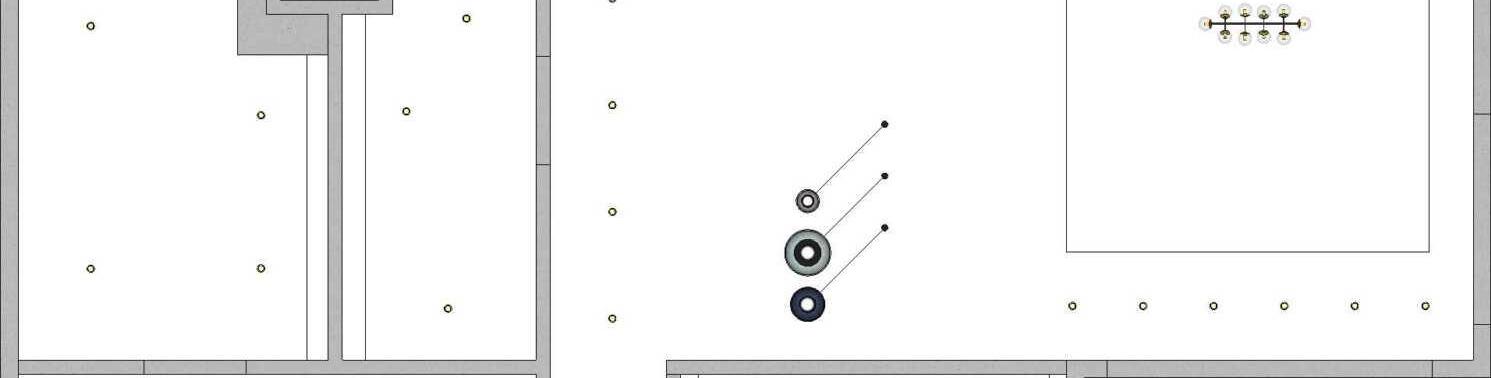
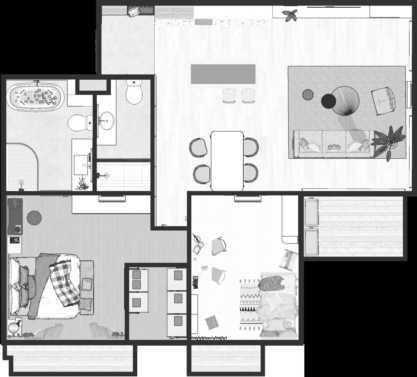
diagram & Floor PLAN Porch 1 Dining Room 3 Living Room 5 Living Room Balcony 6 Daughter Room 7 Daughter Room Balcony 8 Public Lavatory 4 Kitchen 2 1:50/mm Master Room 9 Master Lavatory 10 Master Bedroom Balcony 11 1:50/mm FLOOR FINISH PLAN (FURNITURE PLAN) 1 3 5 6 7 8 9 10 11 4 2 8 4
3 6
5 7 11 2 9
Dimension
Mono Terrazzo Glazing Tiles Weathered Timber
Reconstituted Stone Stack Ash Staggered Matte Hexagonal
White Oiled Timber Staggered Oak Stack Granite Stack
12759 7793 1930 1000 1216 470 3435 431 1636 1118 9278 4445 5553 3306 5515 2788 1800 1200 1945 3500 1130 2965 1171 924 1750 2565 1 3 5 6 7 9 10 11 8 4 2
*The scale of the Dimension diagram is one to fifty. The unit is millimeter.
1:50/mm

Pendant Light
Recessed Light Spot Light
4-in-1 Bathroom Ventilation Heater
1:50/mm Ventilation Heater & ERV PLAN
2650W 4-in-1 Bathroom Ventilation Heater (Ventilation, Warming, Cool Air, Dry) 1
1800W 4-in-1 Bathroom Ventilation Heater (Ventilation, Warming, Cool Air, Dry) 2
Energy Recovery Ventilation System (ERV) 3 1 2 3
Return Air
Supply Air
Exhaust Air
Outdoor Air
ERV has not only the function of temperature exchange, but also the function of humidity exchange. Since most of the climate in Taiwan is in a state of humidity of more than 70%, it is more suitable for us to use.
Installing the EVR on the ceiling of the living room can make the two bedrooms quieter. When planning ERV, I try not to show a short distance of 90 degrees, in order to reduce the process of air transportation in the pipeline without pressure loss, thereby increasing the exchange efficiency. When purchasing ERV, it is recommended that homeowners choose models equipped with HEPA filters to increase the function of filtering PM2.5 and make indoor air quality better.
CEILING PLAN
A C
F White
B D E G K H I J A B C J K I E F G H 605 750 1495 455 405 750 1551 1455 480 500 1050 1050 950 980 2050 520 455 905 255 550 450 600 550 500 445 1100 755 620 1300 500 550 1450 780 620 1300 2347 600 950 900 1125 450 450 480 450 450 750 CH:3175 CH:3175 CH:3100 CH:3200 CH:3175 CH:3200 CH:3200 CH:2750 CH:2750 CH:2750 CH:2750 CH:2750 1955 D
Light Tube Indirect Lighting Ceiling
White Flat Ceiling
ceiling with indirect light on the side

INTERIOR ELEVATION
North Side
The total height of the indoor space is 3200mm; the ceiling is lowered by 450mm. Indirect lighting is planned for the entrance and living room area.
At the entrance, there is a shoe cabinet and sky-high locker, while on the side is a shoe bench and a wooden hall stand that can temporarily hang dirty clothes or bags when you go home.
The color of the main wall is light gray cloaked diatomaceous earth. It not only helps the space to adjust the humidity, but also separates the white kitchenware from the wall. At the same time, the background color of the TV wall will not have such a strong reflection effect as white, which can make people watching TV will not have an additional burden.

There are four compartments under the shoe chair, and at least eight pairs of shoes can be placed. This area can be considered as a temporary placement area or a disinfection area. At the top of each compartment is a 10-watt germicidal lamp installed. Due to the close distance, the switch is set to a button with a countdown of 15 minutes.
INTERIOR ELEVATION
East Side
Since there is not much space for the walk-in closet in the master bedroom, we use the open hangers and the addition of shelves at the top can prevent dust on the one hand, and on the other hand, it can be used as a space for storing.
The lower crossbar of the double-layer hanger can be moved and disassembled, which is convenient for the homeowner to have more space to store things.
Although the main lamp in the living room is a chandelier, the center of the lamp is planned to be 2250mm from the ground. Therefore, the hostess can do yoga in the living room even if the arms stretch up high.
1:40/mm
1:40/mm
1505 300 100 450 345 1080 2280 2250
3200

South Side
The three floor-to-ceiling windows in the living room are arranged as honeycomb shades, allowing more controllable light into the space.
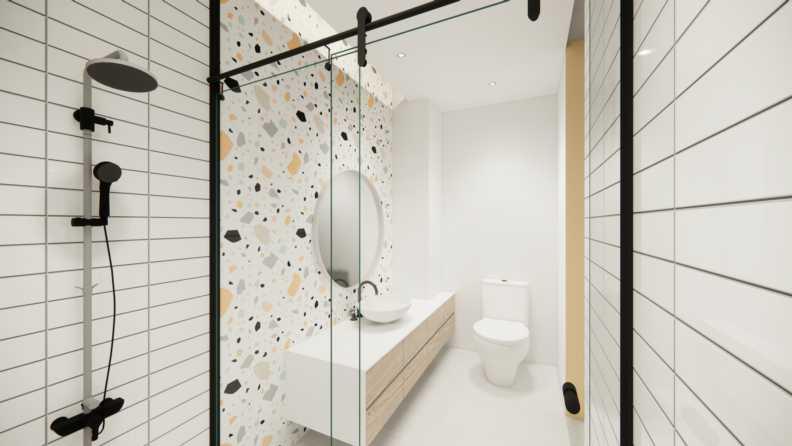
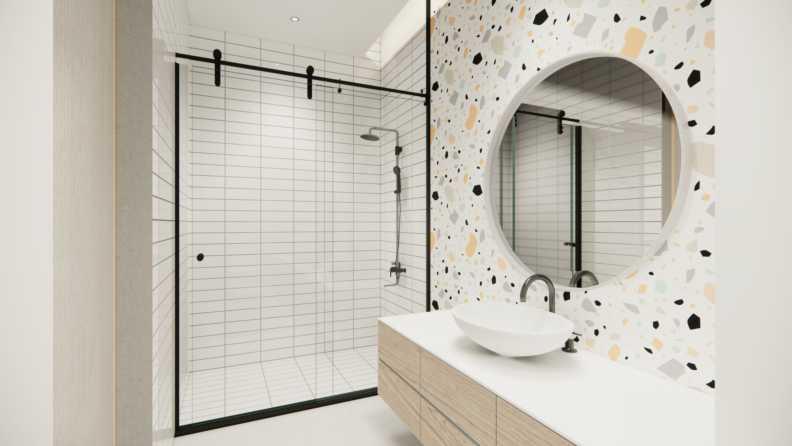
The shower space of the public bathroom is planned as horizontal and large white tiles. As for the bathroom in the master bathroom, except for the wall of the sink and the rest are straight white mosaic tiles.

West Side
The wall plan of the master bedroom is 1200mm high maple plank from the ground, providing a warmer tone, except for the wall of the walk-in closet.
The mirror of the public bath is aligned with the sink to the left of the chest of drawers, and the middle of the door of the toilet.
If you look inside, you will see a completely symmetrical design.
750 200 1700 1200 815 1950
1:40/mm INTERIOR ELEVATION
1:40/mm INTERIOR ELEVATION

3D RENDERING DISPLAY
Living Room & Dining Room
On the left side of the entrance is a locker and a shoe bench, and on the right is a full-length mirror from floor to ceiling. So, the family can tidy up their appearance before going out.
In order to make the kitchen look more spacious, it will be set as an open kitchen. In addition, I also recommend that homeowners embed the refrigerator in the cupboard to make the overall space a little cleaner and more comfortable. We decided to place the refrigerator on the far right of the wall side cabinet; therefore, the kitchen would not have an obtrusive general upright refrigerator.
A kitchen island is designed between the kitchen and dining area, and an IH stove is installed on it. Not only the family have better interaction, but there is also more storage space on the wall side of the kitchen.
The kitchen countertop chooses a terrazzo tile artificial stone with a white background and some gray-black stone. Kitchen island uses fine-grained artificial stone countertops. Both are part of the area where food is cooked, and unlike tables, they are easy to change. As a result, it is less likely to see stains remaining on the surface after prolonged use.
In terms of layout, the public bathroom is adjacent to the dining room and kitchen. In order to reduce the presence of the bathroom, the door of it is planned as a hidden sliding door without a handle.


3D RENDERING DISPLAY
Public Lavatory
Mainly, the public bath is used by their daughter.
The main wall at the entrance is planned as a terrazzo tile with the base colors white, orange, black, light green and gray stone grains selected to give the space a more lively atmosphere.
The washbasin cabinets in the public bathroom, like all cabinets with doors in all rooms, are wood grain panel door sheets with white veneer frames.
In addition to the ceiling and sliding doors, the other four walls of the shower room are covered with white tiles. The floor in the dry area is planned to use Reconstituted Stone Stack tiles.
3D RENDERING DISPLAY
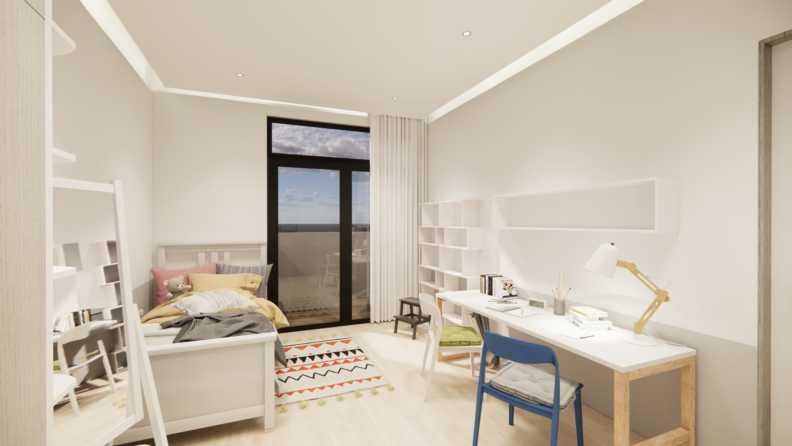
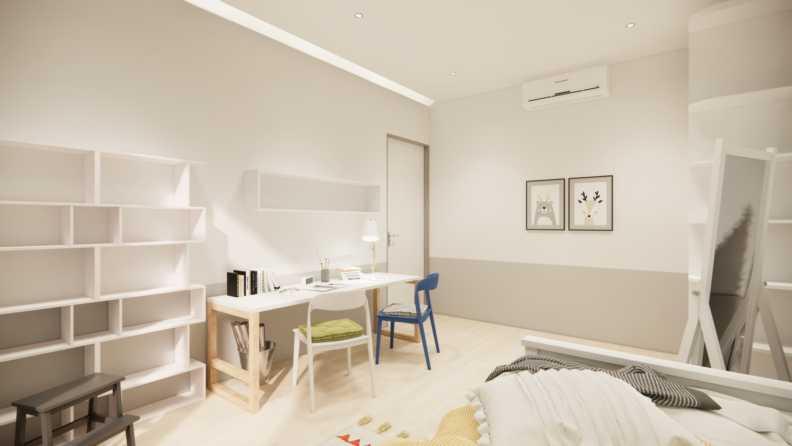
Daughter Room
In the beginning, the homeowner wants the daughter's room to be mainly movable furniture so he doesn’t want any system furniture.
Since children's things have more colors, the furniture will be matched with light wood grain and grayscale, and the desk will be selected in a wider one for the companion of parents.
In addition, the floor is planned to be the highest saturation wood grain color in the whole house. Using white electric curtains to avoid children tearing the drawstring, while minimizing the wire, which is relatively safe for children.
3D RENDERING DISPLAY
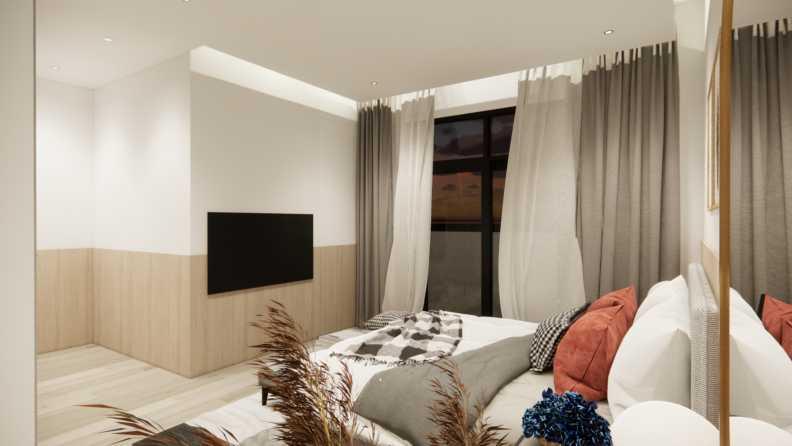
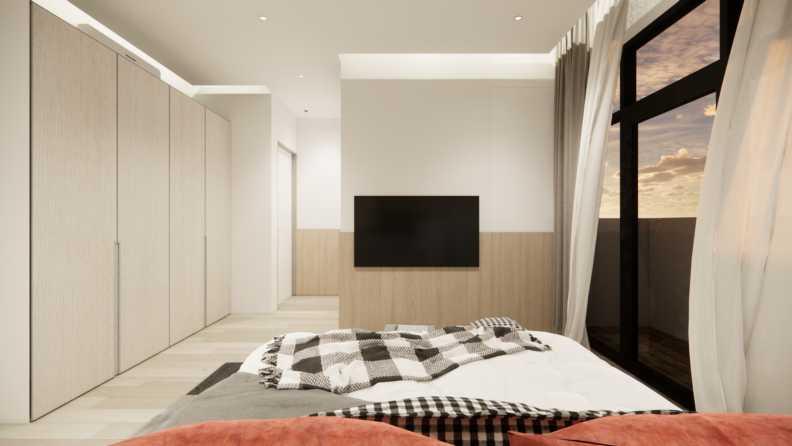
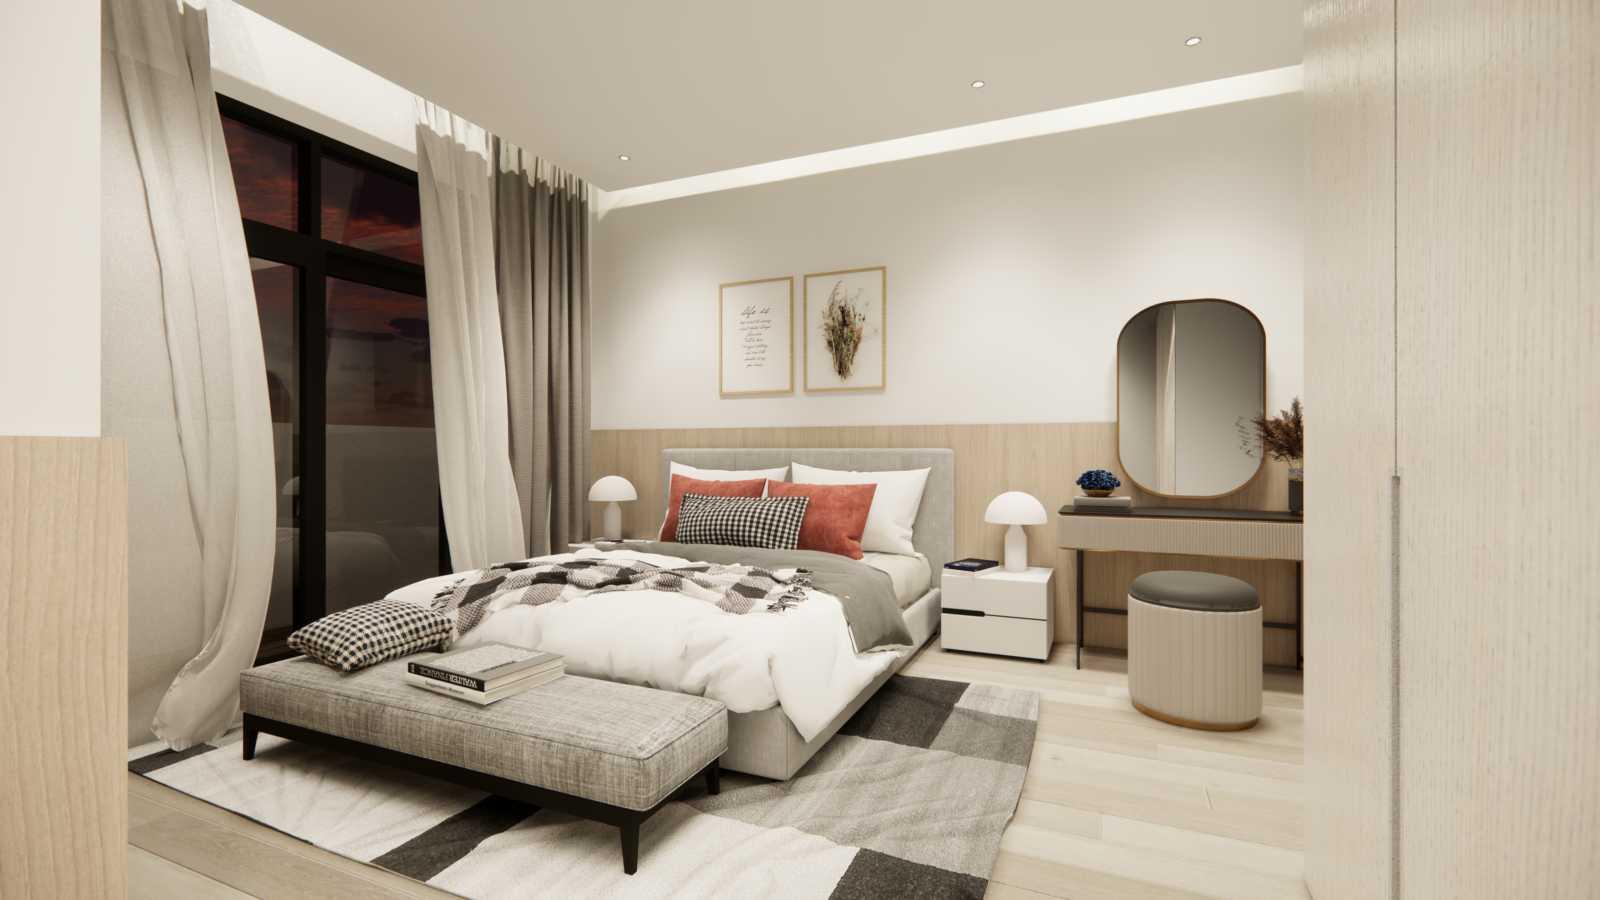
Master Room
The wood grain color of the master bedroom floor is the darkest in the whole house, and the maple wood board on the wall creates a calmer atmosphere.
The master bedroom and daughter's room are lit with a color temperature of about 3500K, so you will feel warmer when you enter the room.
Homeowners want to have a TV in the master bedroom room, so when planning the door of the walk-in closet, also include a space to hang the TV. Therefore, the TV can be in the front of the bed in the middle.
3D RENDERING DISPLAY
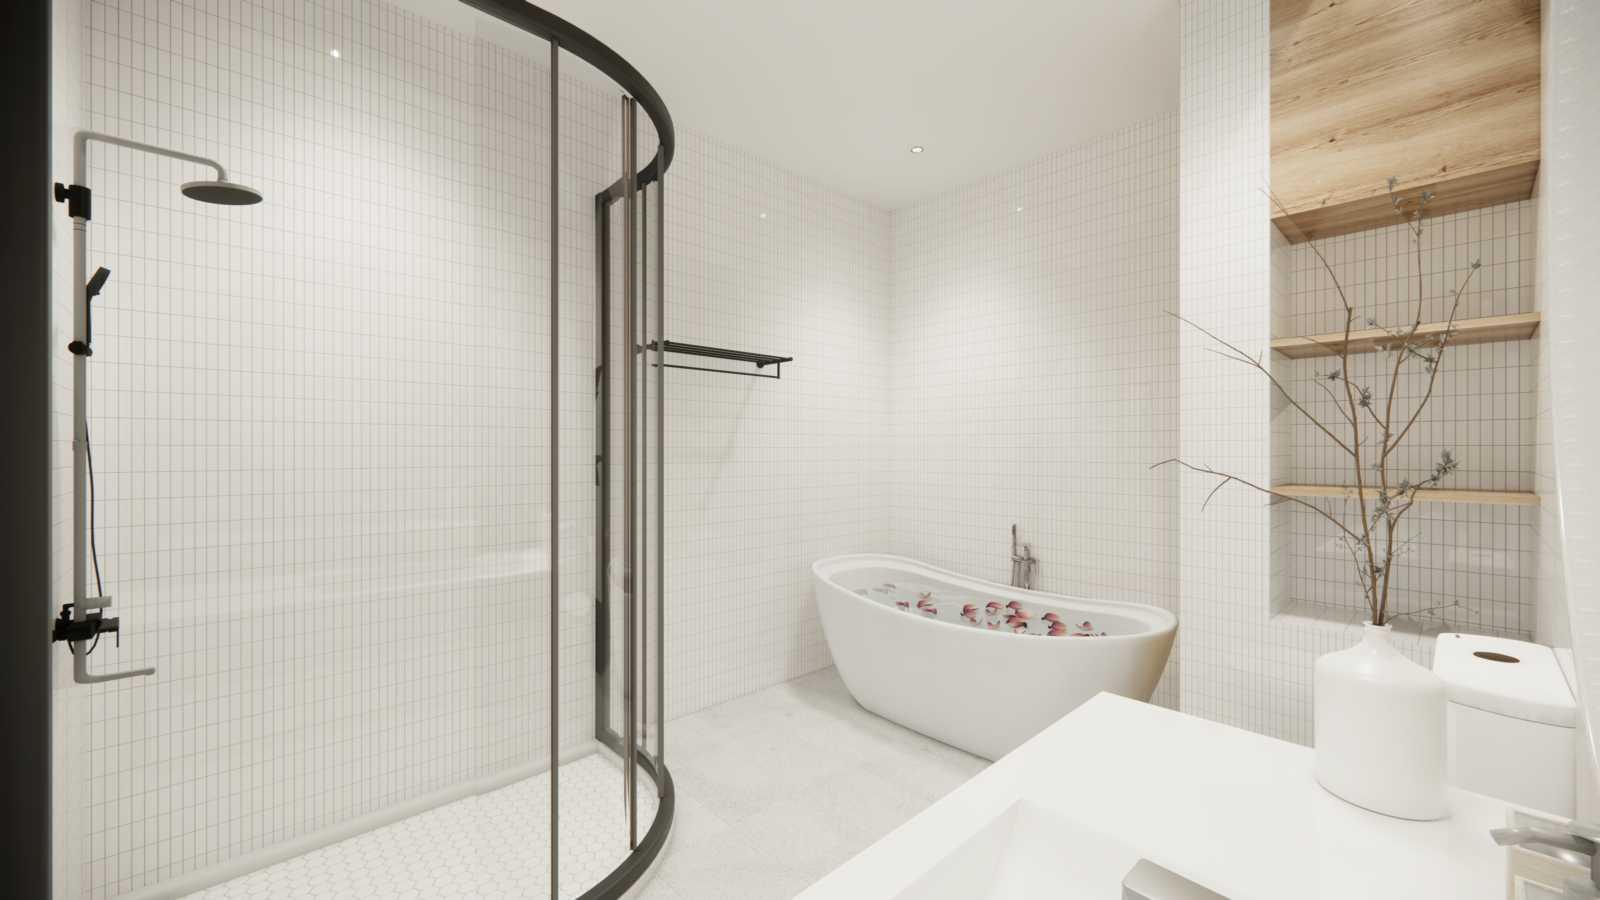
Master Lavatory
Since the en-suite bathroom in the master bedroom is relatively large, it is also possible to install a bathtub.
In order to make the bathroom not feel too stiff, the shower room will choose a curved design, and the bathtub will not be a built-in square bathtub.
The wall of the washbasin and the cabinet below choose a wood grain pattern to add a little warmth to the overall space. The shelves and cabinet door pieces on that side of the pipe room also use wood grain pattern.
The material of the floor is planning Granite Stack floor tiles.


Startup Company Office Project
This is the office of a start-up technology company located in a building in the business district.
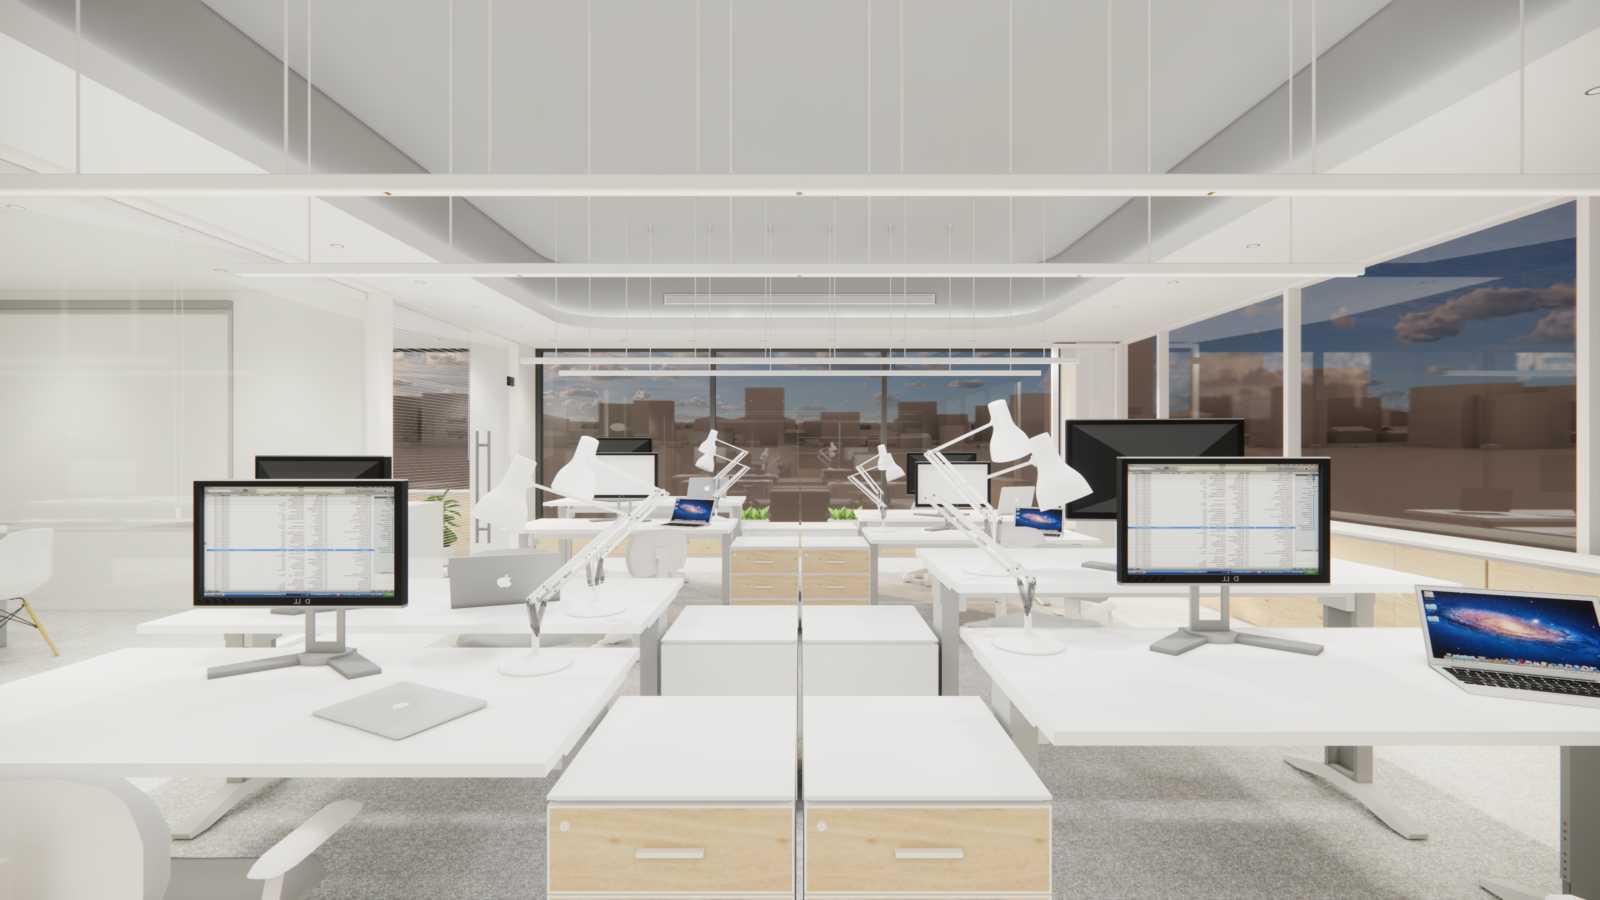
At present, the company has a total of seven employees. The staff seating area would be an open space and be planned to seat up to eight.
In addition, the boss needs a separate space, as well as a meeting room that could accommodate all employees. Also, they need a lot of storage space for documents and larger items like billboards or promotional materials for events. Besides, a photocopier and a water dispenser will need to be placed.
If there is space left, small rest areas could be planned for employees to eat, rest, or for clients to use when the meeting room is occupied.

before midday sunshine
diffused light & hallway public area light
The east side of this office is full of floor-to-ceiling windows, and the main natural light will enter the space from the east side.
According to the number of people used in each area and the scope of use, divide the number of spaces that the owner wants the office to have.
Area (open)
Manager’s Office
Staff Office Area
Meeting Room 2 Floor PLAN 3
Resting
1
3
(open) 4
1 3 4 2 12300 10345 6700 3800 9145 450 450 600 150 150 150 600 100 Dimension diagram 1:80/mm 1:80/mm 1:80/mm Light source directions
Description of the design plan
The scale of the Dimension diagram is one to eighty. The unit is millimeter.


A B C C Indirect Lighting Ceiling (Gray) A B D White Flat Ceiling Recessed Light Spot Light Pendant Light Light Tube CEILING PLAN 1:50/mm FLOOR FINISH PLAN (FURNITURE PLAN) 1 3 5 4 2 1:50/mm Loop Pile Carpet (Dark) 1 4 2 Loop Pile Carpet (Light) 3 5 CH:3175 CH:2675 CH:2675 CH:2675 450 827 355 800 1310 450 605 350 1700 1700 1700 1700 1300 1300 1300 380 990 990 1120 855 380 1980 935 855 660 1820 1822 875 955 D
The bottom of the luminaires above the employee seating area is planned to be 1250 mm from the ceiling.
The luminaries are more than 2000 mm above the ground. Therefore, the employees won’t feel pressure when the height-adjustable desk rises to the highest level while standing and working.

INTERIOR ELEVATION
East Side
The top of the glass door doorknob of the office is 1525 mm from the ground, while the bottom end is 300 mm from the ground.
The height of the personal movable lockers in the employee office area is planned to be 625 mm.
In order to add some warmth to the part facing the space, the lockers are all planned as white veneer, and the drawers and door pieces are planned as wood grain veneer.
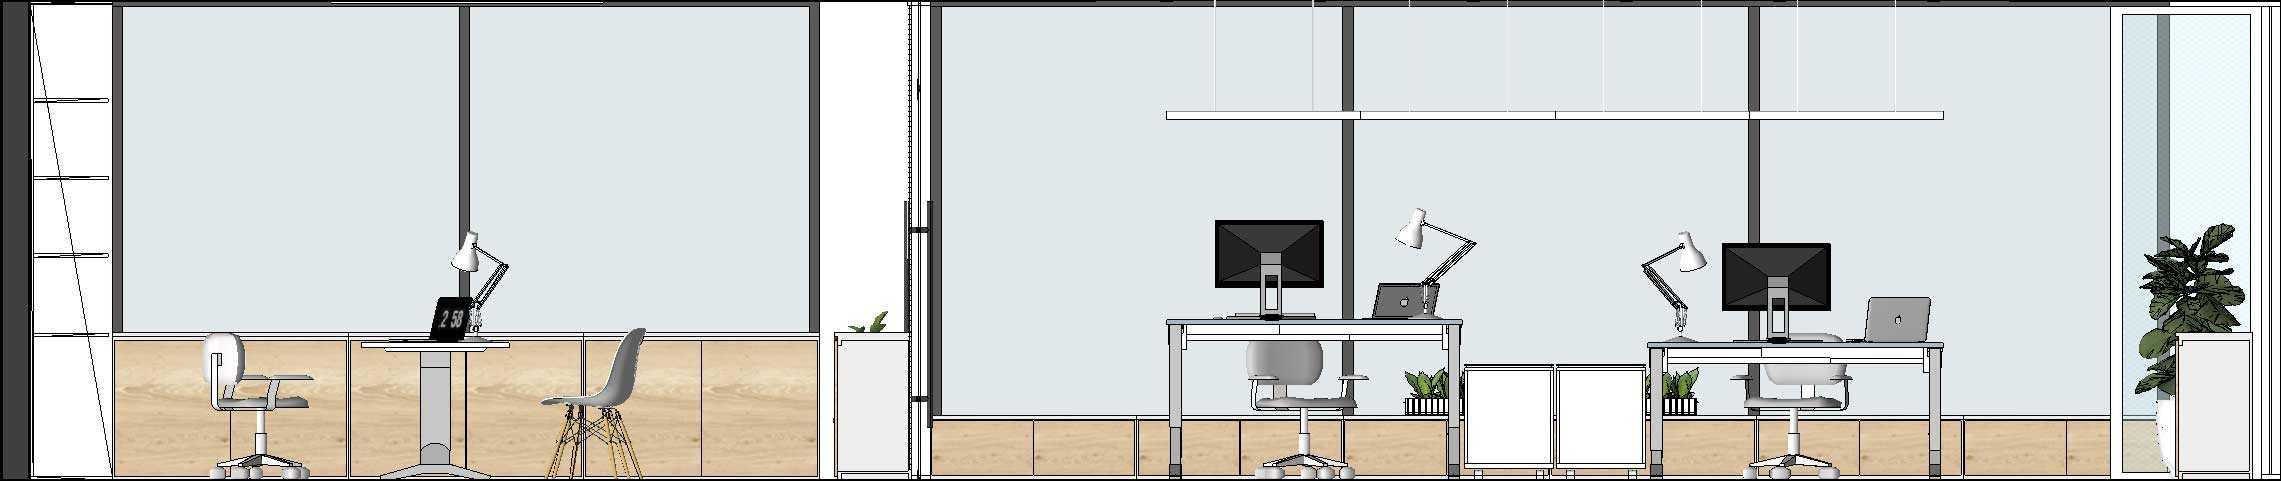

INTERIOR ELEVATION
South Side
The total height of the interior space in this case is 3300 mm, and the height of the beam is 700 mm.
The groove of the ceiling's indirect light source in the office area has a depth of 100 mm.
In order to allow more natural light into the space, the floor-to-ceiling window cabinet on the outdoor side is planned as a low drawer with a height of 350mm.
The height of the low cabinet on the same side of the entrance is planned to be 800mm. Since there is no sunlight on this side, it is set to a higher cabinet, which can store more items and add some privacy.
350 700 3300 800 100 1250 625 300 1225
1:40/mm
1:40/mm
The bottom end of the chandelier in the lounge area is 770mm from the ceiling. The bottom end of the chandelier is 1085mm from the tabletop.

West Side
1:40/mm
The upper edge of the air outlet of the air conditioner in the open office area is planned to be 300mm from the ceiling.
The top of the seat is 452mm from the ground and the bottom is 305mm. The seat surface is made of beige linen fabric.
The top floor of the ceiling cabinet is planned to be 510mm high, which is convenient for storing larger than a class of books or large items.
INTERIOR ELEVATION
1:40/mm
North Side
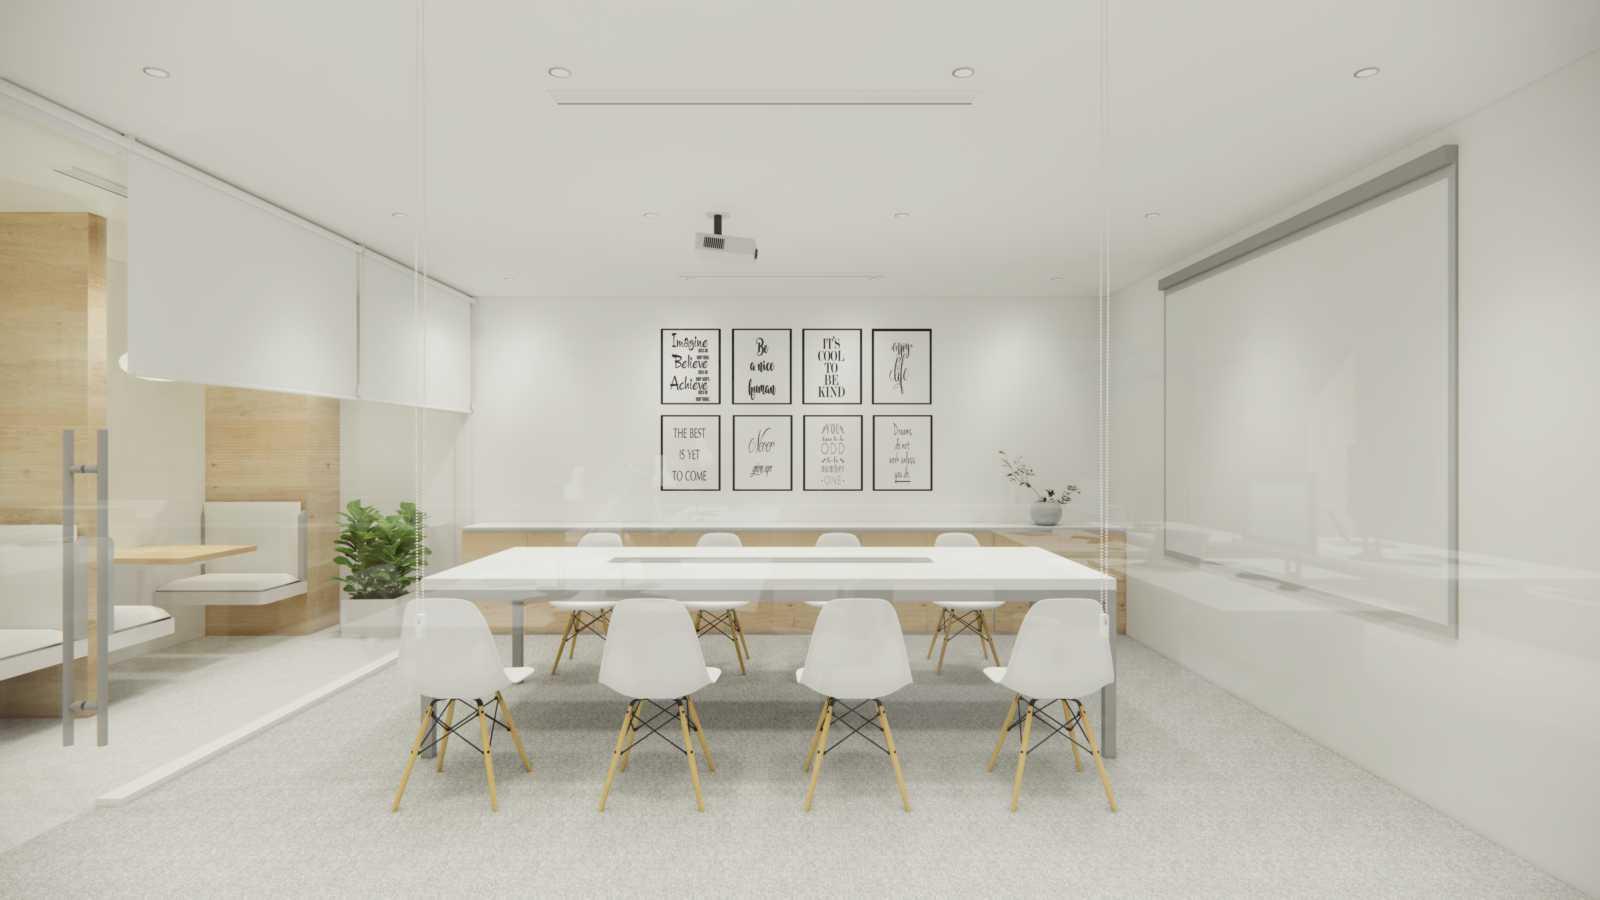
The long table in the conference room is planned to be 800mm high as the cabinet.
Since most internal meetings require employees to use their own laptops for projection, setting it slightly higher than a shift of desks so that they don't have to bow their heads too much.
The air conditioning vents in the manager's office, conference room, and lounge area are all arranged above the aisle to avoid direct blowing to the person sitting in the seat and reduce discomfort.
800 305 305
1085 452 300 510
770
INTERIOR ELEVATION

3D RENDERING DISPLAY
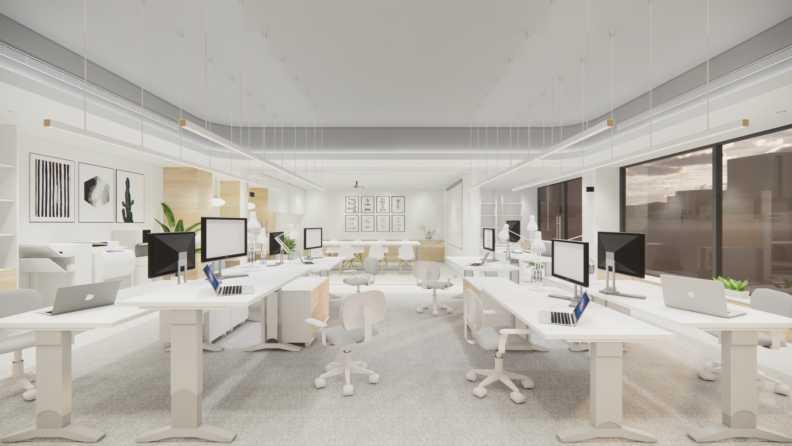
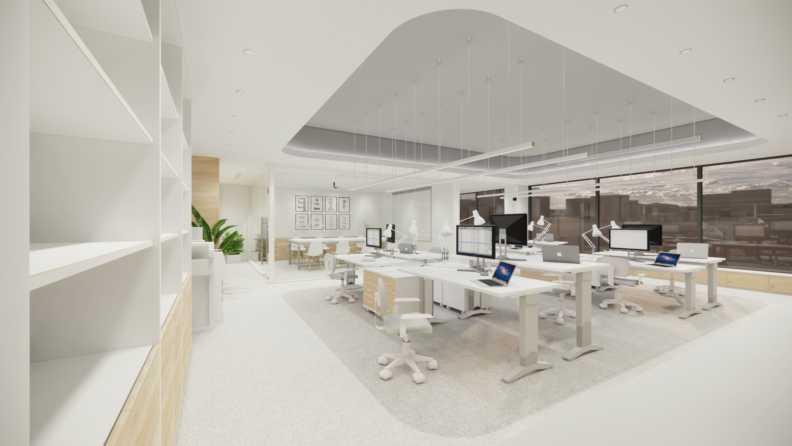
Staff Office Area
The main plan of the open office area is to surround the walkway, so that people are less likely to disturb other colleagues when moving.
In order to allow each other more space to move around and not be easily affected, place individual movable lockers between the two seats connected to the left and right.
In addition to setting air conditioning outlets on both sides, it is also necessary to provide employees with a little more space. Therefore, the ceiling of the seating area won’t be lowered.
The area that is not lowered is planned with indirect light sources and painted with gray paint, which echoes the dark gray carpet on the floor to give the seating area a more differentiated feeling.
3D RENDERING DISPLAY
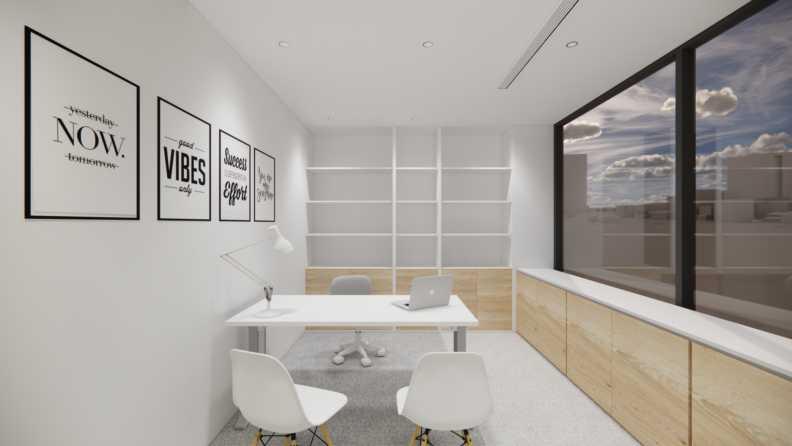
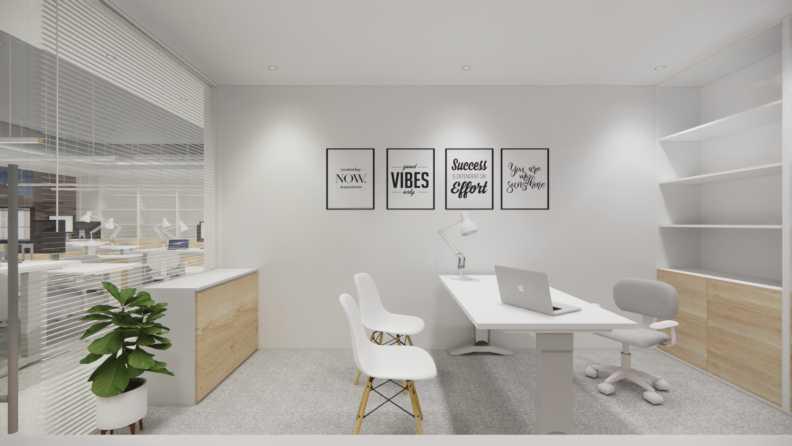
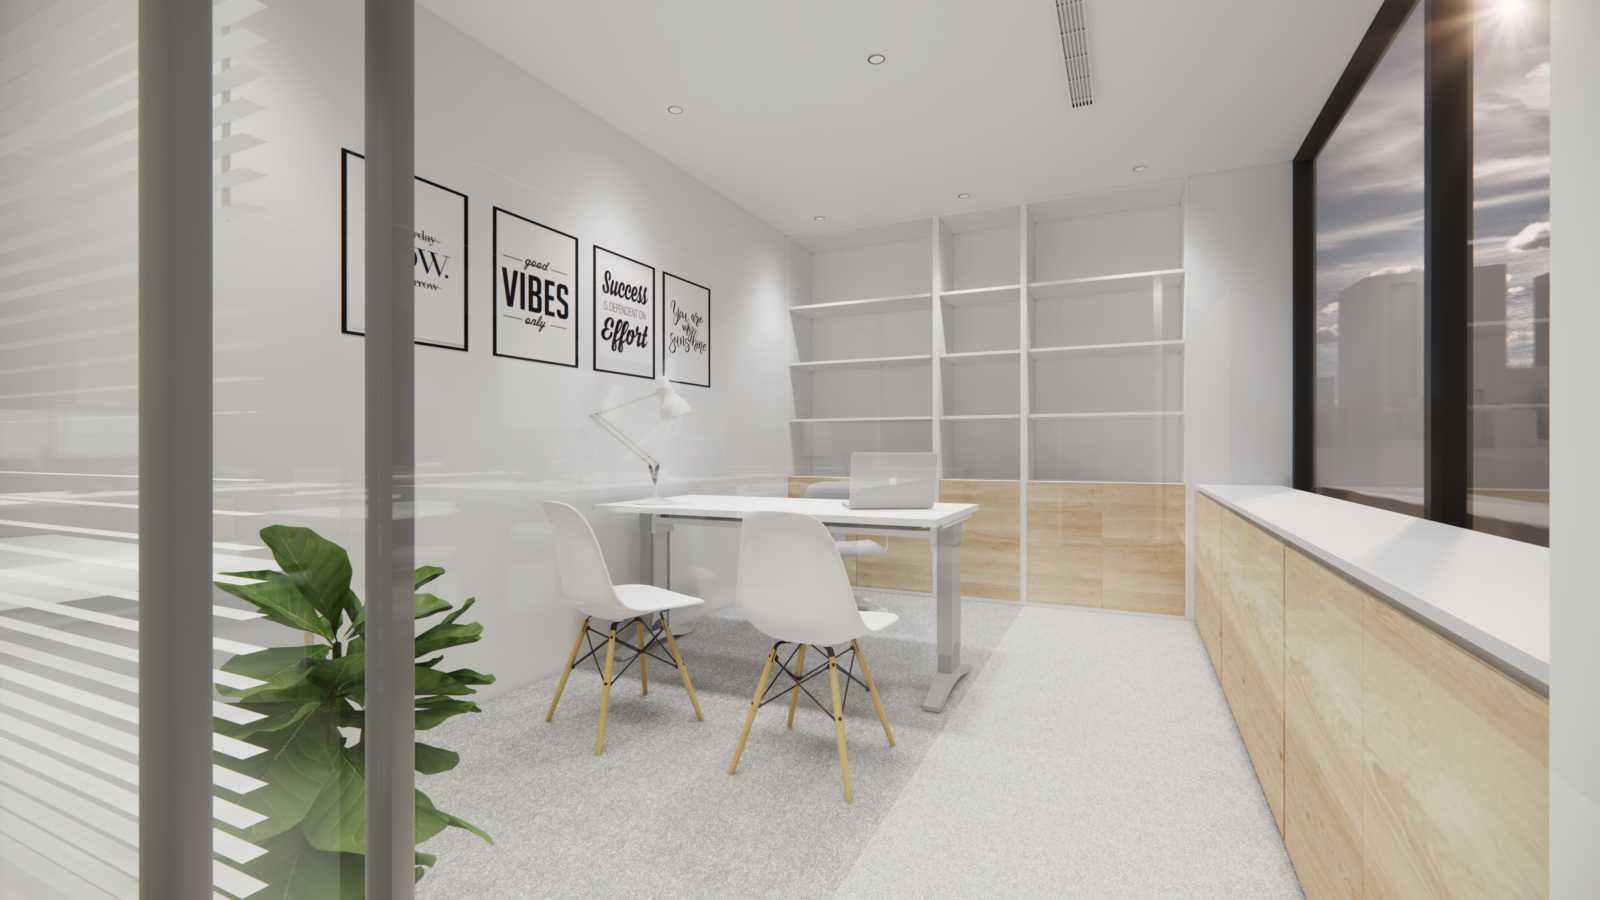
Manager’s Office
There are more storage cabinets in the manager's office.
Unlike the 350mm drawers in the open space outside, the cabinets on the other side of the floor-to-ceiling windows are 800mm. In this way, there will be more storage space, and the office on the second floor will have more privacy.
In addition to the boss's seat, the other two are in the same style as the conference room for uniformity when moving to another space as needed.
The seating area carpet in the office is as dark gray as the seating area in the open space. The aisle is lightly colored and connects with the open space.


3D RENDERING DISPLAY
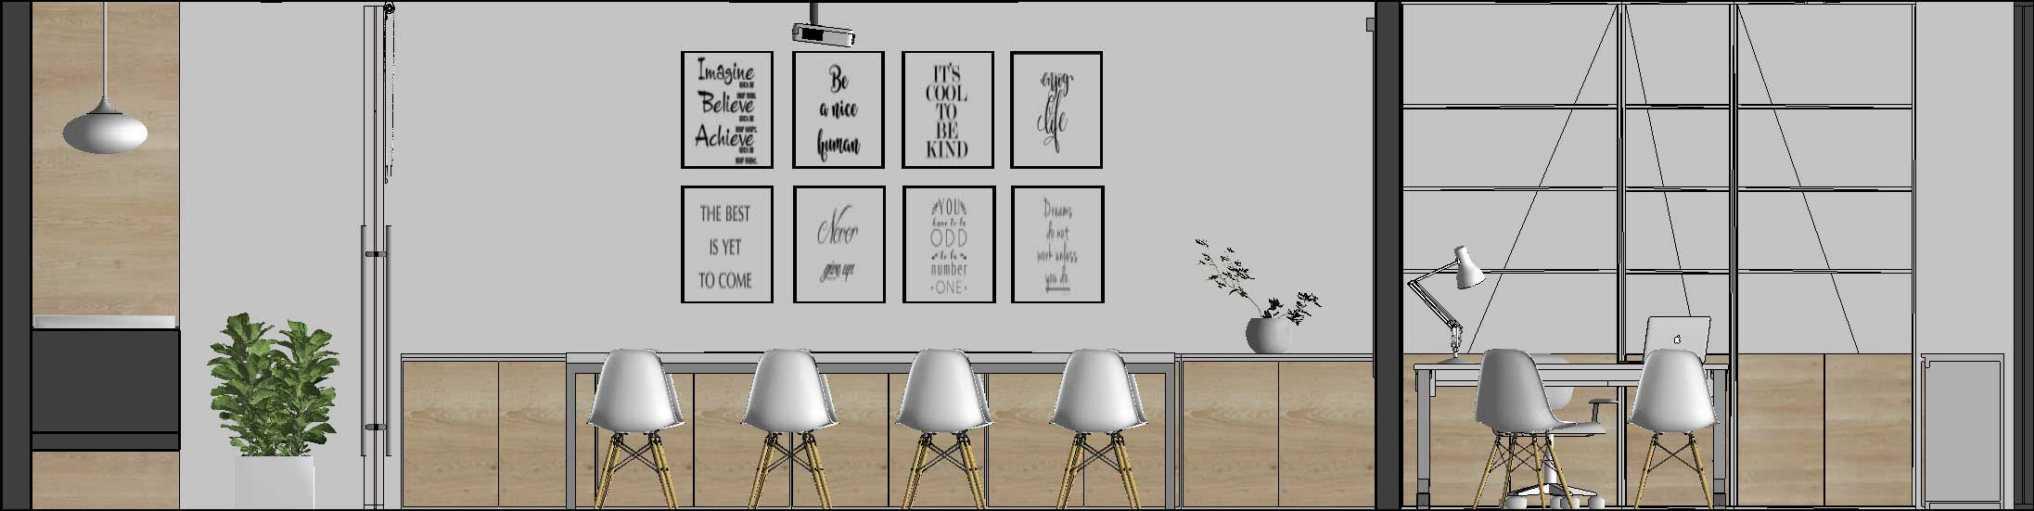
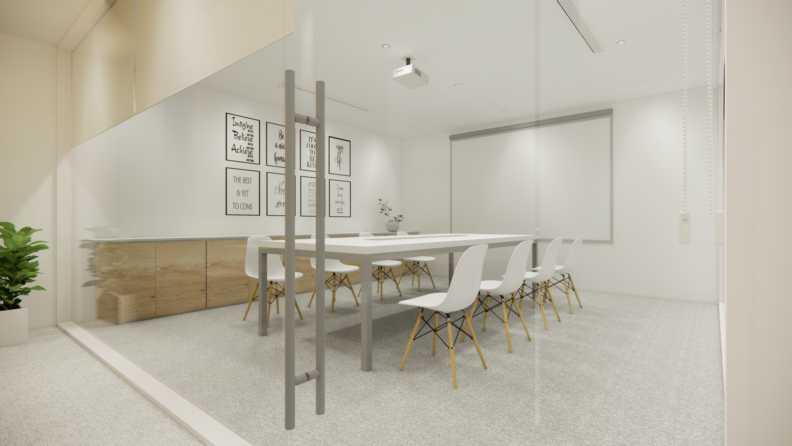
Meeting Room
In order to make the overall space better, the cubicle of the conference room is planned to use glass. Not only can we use the whiteboard pen to write directly on it, but it is also convenient for meeting discussions. Opaque roller blinds are installed on the inner part. If there is a more intimate meeting, it can be put down.
On the innermost side, there is a row of 800mm cabinets for storing related items or documents.
The color of the carpet is also the same dark gray as the office seating area.
3D RENDERING DISPLAY
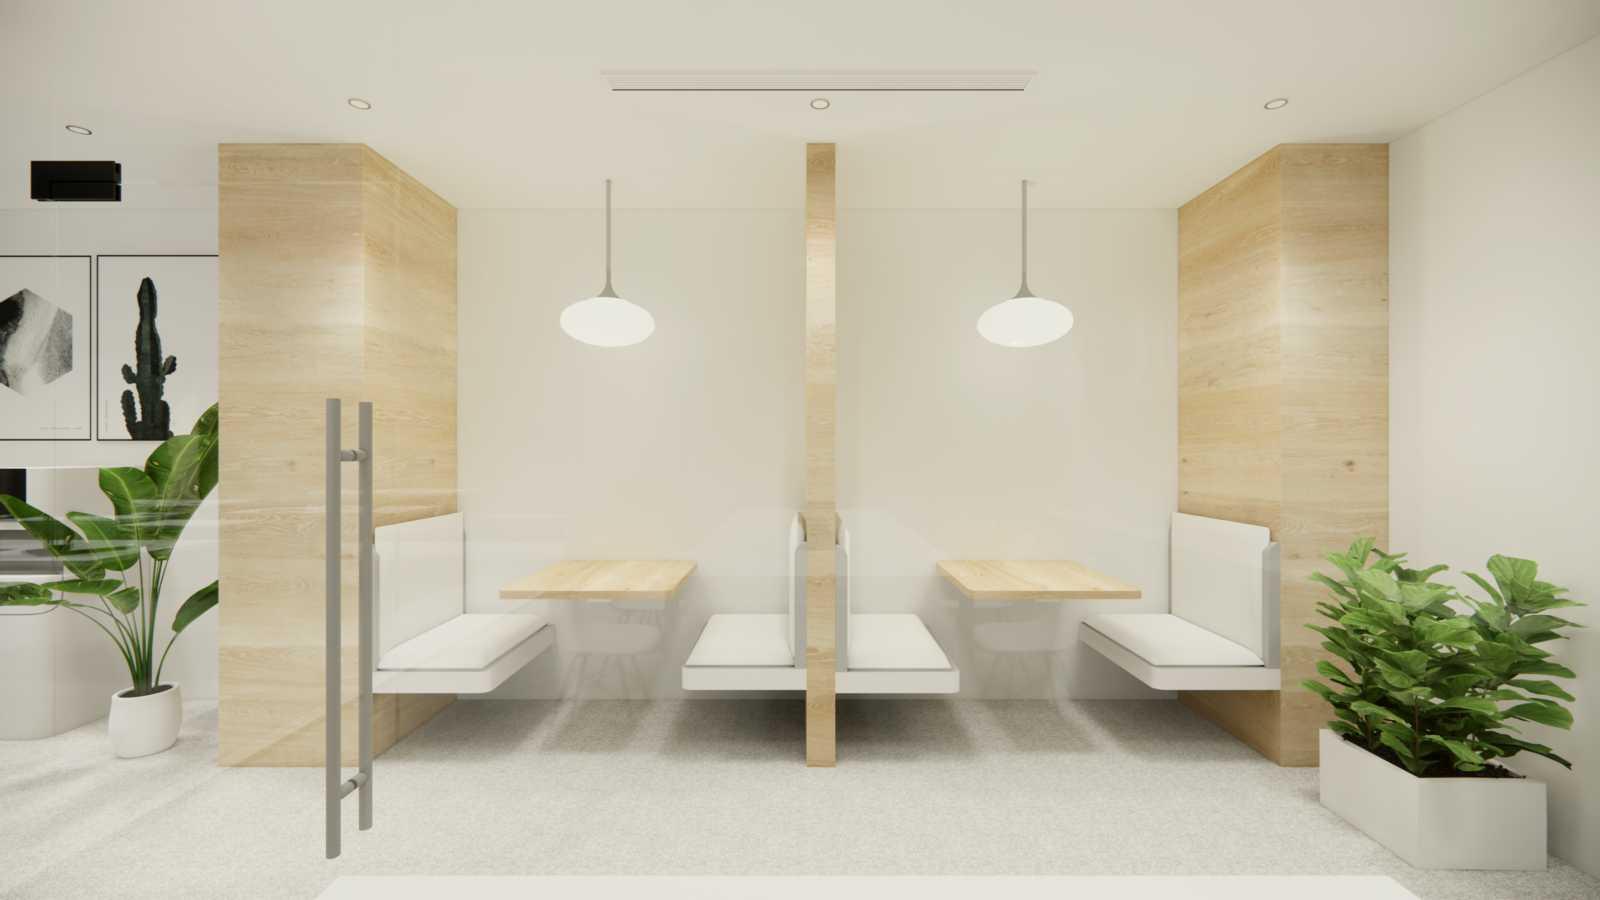
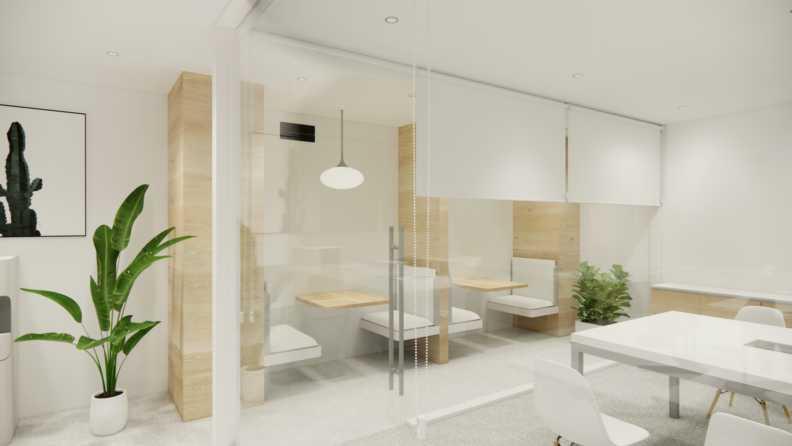
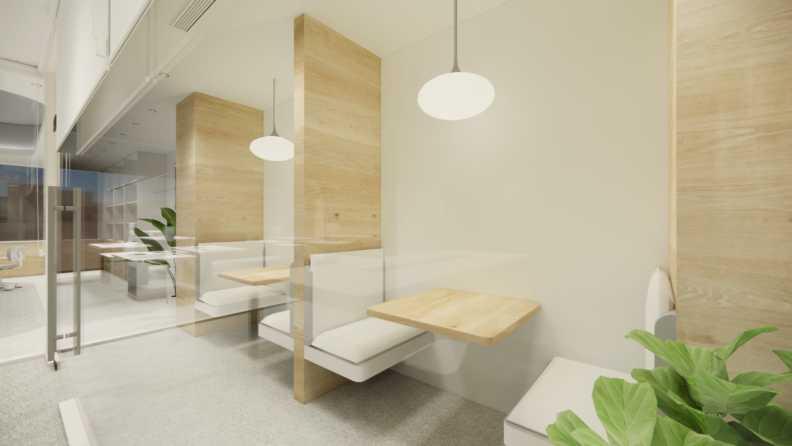
Resting Area
The pillar layout of the rest area is the same wood grain veneer as the tabletop, making the overall space warmer.
The chandelier is a non-directional fog lampshade, and the color temperature is a warm 3500k bulb, which makes the light in the rest area space more comfortable and softer.
The fabric of the seat is made of linen with an obvious weave pattern, strong breathability, and strong wear resistance.
The front and back sides of the rest area are planned to be planted in order to make the area more relaxed.