GT GT
TECH TIPS SKODA OCTAVIA 2.0 TDI TIMING BELT KIT INSTALLATION
The 2.0-litre TDI diesel engine used in the Octavia, features a timing belt driven water pump. As replacing the belt also requires the auxiliary drive system to be removed, Dayco recommend that all the systems’ components primary drive and auxiliary drive - be replaced at the same time.
This step-by-step technical guide will help technicians through the process, to avoid complications and ensure a first-rate job. As with all primary drive system jobs, the work should be undertaken when the engine is cold, so ideally the vehicle will not have been run for at least four hours. Remove the plastic cover to reveal the engine, followed by the mudguard moulding under the right hand wheel arch, which will allow access to the auxiliary drive system, then remove the tensioner and auxiliary belt. Remove the tie rod beneath the engine and then the crankshaft, or TVD, pulley in order to remove the lower and central timing belt covers. Then from the top of the engine move the differential pressure sensor of the FAP with its bracket and the electric fuel pump
with its bracket, followed by the fuel filter and cooling circuit tank, to be able to then remove the top timing belt cover. Remove the lower bolt of the engine mounting bracket flange, correctly support the engine and then remove the upper right engine mounting bracket, followed by the bracket flange. Rotate the crankshaft clockwise to match the timing reference marks on the pulley and lock the pulley in place using Dayco tool T10050 (figure 1). Insert Dayco tool 3359 into the camshaft pulley and a second into the fuel injection pump pulley and loosen both pulleys. After loosening the bolt of the tensioner, rotate the tensioner and remove the upper idler in order to remove the timing belt and then, remove the tensioner. Remove and replace the belt tensioner stud with the new one supplied with the Dayco timing belt kit KTBWP5630, along with the lower and
central idlers with nut and bolt respectively.
and install the new water pump from the Dayco timing belt kit.
Remove the water pump from the casting and after flushing the system and ensuring the mating surfaces are clean, soap the O-ring
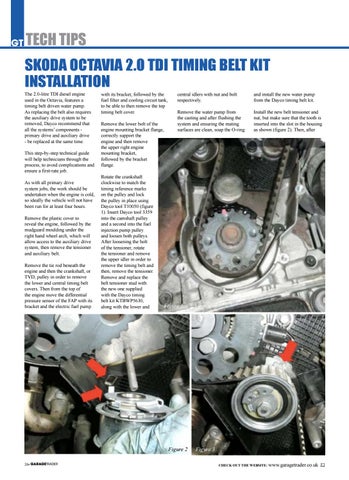
Install the new belt tensioner and nut, but make sure that the tooth is inserted into the slot in the housing as shown (figure 2). Then, after
Figure 1
Figure 2 26- garageTRADER
Figure 3 check out the website: www.garagetrader.co.uk