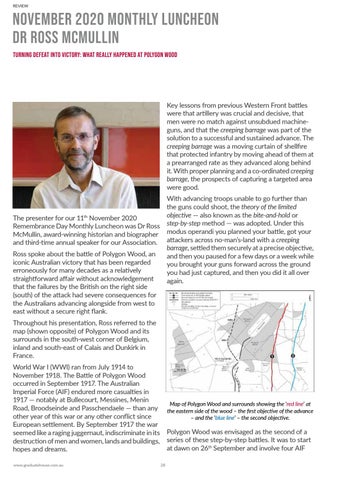
REVIEW
November 2020 Monthly Luncheon Dr Ross McMullin Turning defeat into victory: What really happened at Polygon Wood
Key lessons from previous Western Front battles were that artillery was crucial and decisive, that men were no match against unsubdued machineguns, and that the creeping barrage was part of the solution to a successful and sustained advance. The creeping barrage was a moving curtain of shellfire that protected infantry by moving ahead of them at a prearranged rate as they advanced along behind it. With proper planning and a co-ordinated creeping barrage, the prospects of capturing a targeted area were good. With advancing troops unable to go further than the guns could shoot, the theory of the limited objective — also known as the bite-and-hold or step-by-step method — was adopted. Under this modus operandi you planned your battle, got your attackers across no-man’s-land with a creeping barrage, settled them securely at a precise objective, and then you paused for a few days or a week while you brought your guns forward across the ground you had just captured, and then you did it all over again.
The presenter for our 11th November 2020 Remembrance Day Monthly Luncheon was Dr Ross McMullin, award-winning historian and biographer and third-time annual speaker for our Association. Ross spoke about the battle of Polygon Wood, an iconic Australian victory that has been regarded erroneously for many decades as a relatively straightforward affair without acknowledgement that the failures by the British on the right side (south) of the attack had severe consequences for the Australians advancing alongside from west to east without a secure right flank. Throughout his presentation, Ross referred to the map (shown opposite) of Polygon Wood and its surrounds in the south-west corner of Belgium, inland and south-east of Calais and Dunkirk in France. World War I (WWI) ran from July 1914 to November 1918. The Battle of Polygon Wood occurred in September 1917. The Australian Imperial Force (AIF) endured more casualties in 1917 — notably at Bullecourt, Messines, Menin Road, Broodseinde and Passchendaele — than any other year of this war or any other conflict since European settlement. By September 1917 the war seemed like a raging juggernaut, indiscriminate in its destruction of men and women, lands and buildings, hopes and dreams. www.graduatehouse.com.au
Map of Polygon Wood and surrounds showing the ‘red line’ at the eastern side of the wood – the first objective of the advance – and the ‘blue line’ – the second objective.
Polygon Wood was envisaged as the second of a series of these step-by-step battles. It was to start at dawn on 26th September and involve four AIF 28