10 minute read
November Monthly Luncheon Dr Ross McMullin

REVIEW November 2020 Monthly Luncheon Dr Ross McMullin
Turning defeat into victory: What really happened at Polygon Wood
Advertisement
The presenter for our 11th November 2020 Remembrance Day Monthly Luncheon was Dr Ross McMullin, award-winning historian and biographer and third-time annual speaker for our Association. Ross spoke about the battle of Polygon Wood, an iconic Australian victory that has been regarded erroneously for many decades as a relatively straightforward affair without acknowledgement that the failures by the British on the right side (south) of the attack had severe consequences for the Australians advancing alongside from west to east without a secure right flank. Throughout his presentation, Ross referred to the map (shown opposite) of Polygon Wood and its surrounds in the south-west corner of Belgium, inland and south-east of Calais and Dunkirk in France. World War I (WWI) ran from July 1914 to November 1918. The Battle of Polygon Wood occurred in September 1917. The Australian Imperial Force (AIF) endured more casualties in 1917 — notably at Bullecourt, Messines, Menin Road, Broodseinde and Passchendaele — than any other year of this war or any other conflict since European settlement. By September 1917 the war seemed like a raging juggernaut, indiscriminate in its destruction of men and women, lands and buildings, hopes and dreams. Key lessons from previous Western Front battles were that artillery was crucial and decisive, that men were no match against unsubdued machineguns, and that the creeping barrage was part of the solution to a successful and sustained advance. The creeping barrage was a moving curtain of shellfire that protected infantry by moving ahead of them at a prearranged rate as they advanced along behind it. With proper planning and a co-ordinated creeping barrage, the prospects of capturing a targeted area were good. With advancing troops unable to go further than the guns could shoot, the theory of the limited objective — also known as the bite-and-hold or step-by-step method — was adopted. Under this modus operandi you planned your battle, got your attackers across no-man’s-land with a creeping barrage, settled them securely at a precise objective, and then you paused for a few days or a week while you brought your guns forward across the ground you had just captured, and then you did it all over again.
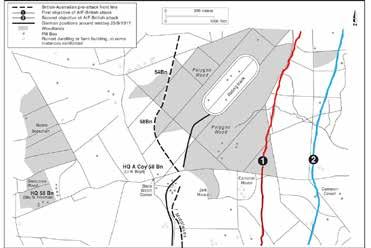
Map of Polygon Wood and surrounds showing the ‘red line’ at the eastern side of the wood – the first objective of the advance – and the ‘blue line’ – the second objective.
Polygon Wood was envisaged as the second of a series of these step-by-step battles. It was to start at dawn on 26th September and involve four AIF
brigades attacking alongside British formations. The 15th AIF Brigade on the right was led by Pompey Elliott, Australia’s most famous fighting general. Within his brigade’s sector he arranged for the 60th Battalion to undertake the first phase to the red line, while the 57th and 59th Battalions continued the advance to the second objective, the blue line. His brigade’s other battalion, the 58th, was to occupy the front line before the battle and remain there as a garrison and brigade reserve. However, the Germans sensed what was coming and decided to prevent it by getting in first. At 5:15am on 25th September they launched a ferocious preemptive bombardment against the 58th Battalion holding the front line. Casualties rapidly resulted, but they hung on tenaciously. They observed German infantry advancing behind the bombardment and could also see the complete disarray and withdrawal of the British unit on their immediate right. With reinforcements needed desperately, Pompey Elliott sent forward part of the 60th, but this battalion also sustained casualties from the shellfire. The Germans knew the exact location of strongpoints and headquarters because they had previously occupied them. Though the British brigade alongside claimed they had regained their front line, Pompey knew from his 58th officers on the spot that this was not the case. When a promised 2:00pm counterattack by the British did not eventuate, Pompey sent in the 57th Battalion to bolster the precarious front-line situation. Ross then mentioned his visit in 1982 to Charles Noad. At Polygon Wood, Noad went into action for the first time as an officer. He was nervous, and reminisced to Ross about the reassurance from his experienced captain, Herb Dickinson, who advised with philosophical fatalism, “Go for your life” and “if your name’s on it you’ll get it and you can’t do much about it”. The 57th had to proceed through Glencorse Wood, where lethal enemy shells were crashing down. One of them had Dickinson’s name on it. With other officers also killed, Noad found himself in charge of Dickinson’s shaken company. The arrival of the 57th Battalion at the front helped to consolidate the parlous situation there. Pompey’s exposed brigade had held on despite tremendous shellfire, but the Germans had achieved a deep penetration on his right, inflicted sizeable casualties in three of his four battalions, destroyed much of the accumulated ammunition, and played havoc with other AIF preparations. Understandably, he strongly recommended that the scheduled attack should be postponed. But his superiors told him the operation had to proceed nevertheless. The night of 25th-26th September was long, strenuous and stressful for Elliott’s brigade. His men adapted quickly and cohesively to different roles. Including men from borrowed battalions (29th and 31st) who were entirely unfamiliar with the area, all were guided into position for the attack just before zero hour. Pompey was understandably gratified by this outstanding display of brigade cohesion. To illustrate this cohesion, Ross pointed to a particular discussion during this night of preparation. It involved Charles Mason, commander of the 59th Battalion (the only 15th Brigade unit that had not yet been in battle) being instructed on the need change the 59th’s mission from a blue line advance to a red line advance. Pompey says, “So you know what to do?” Mason says, “Yes.” Pompey says, “Well then, go and do it”, and out he goes and does it! Just before ‘zero’ a runner advised Pompey that the British had not managed to retain their front line. It was thus inevitable that his men, advancing in compliance with his superiors’ orders, would be acutely vulnerable to flanking fire from the undislodged Germans on their right. Indeed, five of the six officers in the 59th Battalion’s leading companies were soon hit. Nevertheless the 59th reached the red line within an hour. But there was no sign of the British on the right, and commanders of the 29th and 31st Battalions were refusing to carry out the second advance to the blue line because of this exposed right flank. Elliott issued peremptory orders directing them to get forward, even threatening to replace them with Mason. A British unit, the 2nd Royal Welch Fusiliers, was sent up through the 15th Brigade’s sector to deal with the problem on the right. The battle raged. Day became night. Lethal enemy resistance from artillery and machine-guns continued. The personal toll on Pompey was immense. His brother George, a popular doctor and talented footballer who had captained his VFL team and represented Victoria, had been mortally wounded by a shell. Pompey wrote: “They brought the news to me when I was tied to my office directing the fight, and I could not go to him though they said he was dying. I hope never to have such an experience again.” During
the battle he also received a letter advising him of major legal and financial troubles in his Melbourne law firm! A Pompey ‘classic’ nevertheless ensued. He visited the forward trenches to undertake a comprehensive survey. “With mud and slush up to our knees, Pomp took short cuts and missed nothing. The boys who looked abjectly miserable when we arrived at the various pillboxes and shell holes managed to raise a grin when the old man spoke to them.” Pompey wrote afterwards: “I never saw such a scene of confusion, men of all regiments mixed up all over the place.” For example, Charles Noad had ended up in charge of men from the 57th, 59th, 60th and 31st Battalions, as well as some from the Royal Welch Fusiliers unit. Pompey’s appraisal, astute tactical insight, apt reorganisation and judicious pressure revived the attacking impetus. Units under his command proceeded to attain the blue line and also ensured that the British objectives alongside were achieved (by capturing some positions themselves and enabling British troops to reach the others). This brilliant victory amid circumstances of the gravest adversity was an outstanding performance by Pompey Elliott and the men of his brigade. Elliott’s headquarters was inundated with fervent congratulations. “General Plumer says my boys saved the whole British army,” Pompey reported proudly. Pompey’s characteristic front-line intervention was no surprise to his own men, but British soldiers were amazed. One wrote that it was the only time in the whole war that he saw a brigadier in the front line. Another marvelled at the unique spectacle of a senior commander in the shelled zone with the acumen and authority to resolve difficulties on the spot. He added that “the Australian brigadier Elliott, called Pompey by his men” had told British officers that he knew there were hardly any Germans in front of them because he had “been to look” himself. Exhausted after Polygon Wood, Elliott took a month to recover in England. He told his wife Kate that “When I came over I had no colour at all and rings under my eyes and not a kick in me … my eyes [were] back in my head somewhere.” Ross read out a remarkable letter Pompey wrote to his five-year-old son at this time that exemplified his humanity. Charles Bean, the Australian official correspondent and historian, described the detailed battle report from Pompey Elliott as “easily the most valuable document” of all the records pertaining to Polygon Wood. Annoyed by the repeated and incorrect claim by the 98th British Brigade headquarters that its men had regained their lost front line, Elliott described this in his report as a “delusion” (twice), “quite unfounded” and “emphatically not the case”. The fallacy had been circulated to other formations during the battle and even published in the official dispatches of the Commander-in-Chief, Sir Douglas Haig. Pompey’s detailed and illuminating report was suppressed by his (British) corps commander, General Birdwood. Pompey was stunned by this heavy-handed suppression. “It does not pay to tell the truth, as I know to my cost,” he observed ruefully. Though all copies of the report were to be destroyed, one survived and was conveyed to the Australian War Records Section in London. Director of the War Records, J. L. Treloar, who later became the inaugural director of the Australian War Memorial, later admitted that it “was smuggled to me and held by me with some trepidation” and that he had decided to retain it on a top-secret basis apart from other records. The suppression of Pompey’s Polygon Wood report remained rigorous for decades. In 1982, when Ross asked to see the surviving copy at the Australian War Memorial, he was told that it was locked in a safe and accessible to no-one. Ross admitted that he resorted to Pompey-like bluntness to gain access! Though Pompey Elliott’s dynamic leadership was particularly evident at Villers-Bretonneux in April 1918, in the climax of the war, Charles Bean concluded that Pompey had been even more meritorious at Polygon Wood, where his brigade “snatched complete success from an almost desperate situation on the right”. Ross completed his talk by saying he agreed with Bean. * * * To learn more about Ross McMullin’s historical and biographical publications visit http://www. rossmcmullin.com.au. If you would like a signed copy of a book, send Ross an email through his website by clicking on the heading CONTACT. Postage is free for Members of our Association in Australia, and reduced by 20% for Members outside Australia.