
Installing Network Cabling in New Zealand Homes v1.1 (September 2022) INSTALLING NETWORK CABLING IN NEW ZEALAND HOMES 1. PURPOSE OF THIS GUIDE .......................................................................................... 2 2. PLAN YOUR CABLE RUNS .......................................................................................... 3 3. CHOOSING YOUR CABLE AND EQUIPMENT ............................................................... 8 4. WORK OUT YOUR CABLE ROUTES AND RUN YOUR CABLES.......................................11 5. TERMINATING YOUR CABLES...................................................................................15 6. HOOKING IT ALL UP.................................................................................................17
1.1. This guide is intended as a starting point for anyone looking to install network cabling in their own home, or to upgrade their existing cabling It covers installation of twisted pair cable for computer networks (also called “ethernet cables” or “data cables”) and not fibre, coaxial or other cables that may be found in homes.
Installing Network Cabling in New Zealand Homes v1.1 (September 2022) INSTALLING NETWORK CABLING IN NEW ZEALAND HOMES
1.3. The best time to think about cabling is when you’re building a new house, or carrying out renovations that involve removing wall linings. Having wall linings off during construction will make it much easier to install cables out of sight inside the walls.
1.4. The guide isn’t intended as a substitute for the technical material available to professional installers, such as New Zealand Telecommunications Forum Premises Wiring Cable Installers Guidelines for Telecommunication Services (the Premises Wiring Guidelines).
1. PURPOSE OF THIS GUIDE
1.2. The network cabling covered by this guide is the modern replacement for the “daisy chained” telephone wiring previously installed in homes. It is a more flexible system, which can be used for both computer networking and telephones (as well as a number of other uses). In the home, its main use will be providing Internet access to computers and other devices, and it will form the “backbone” for WiFi access points. At least a basic level of network cabling should be included in every new house built in New Zealand.
Figure 1 Star wiring arrangement with the central point in the garage Choose a central point
2.1. Your first step should be to plan the position in your house where each cable will run to, and how many cables you are going to install. It’s useful to have a floor plan where you can mark each location.
2. PLAN YOUR CABLE RUNS
2.5. If you are only planning to run a few cables (6 or less), then you could use one of the wall plates around your house as your central point. This would normally be near the
Installing Network Cabling in New Zealand Homes v1.1 (September 2022)
2.2. Each cable should be run as a single length, with no breaks or joints. They will each start at a central point, and run out to the points around the house where they will connect to devices (an arrangement called “star wiring”). The cables will usually be terminated with a RJ45 socket (a “network jack”) at each end, but may in some cases be terminated with an RJ45 plug.
2.4. In new houses, the central point will often be a network cabinet in the wall of an internal garage. If you’re working with an existing house, then “unfinished” areas are ideal (for example an unfinished basement). Having an area without wall linings, where you have easy access to the subfloor or ceiling space, will make running cables to other parts of the house much easier.
2.3. The central point where all the cables begin can be anywhere in the house, provided it doesn’t get too hot, dusty or damp. Ideally, it will be somewhere out of the way, to hide any networking equipment and cabling located there. If you can, it’s also useful to locate it near the centre of the house, which will keep the overall length of cabling down. There should also be at least one power point available.

2.11. Having two network jacks on a wall plate will also allow you to place your router at that wall plate, and run the WAN (i.e. Internet connection) off one jack, and feed the LAN (i.e. local network) back to the central point via the other. This is useful if you are using a wireless router supplied by your Internet Service Provider (ISP), and allows it to be placed where it will give better WiFi coverage of the house (see Figure 5).
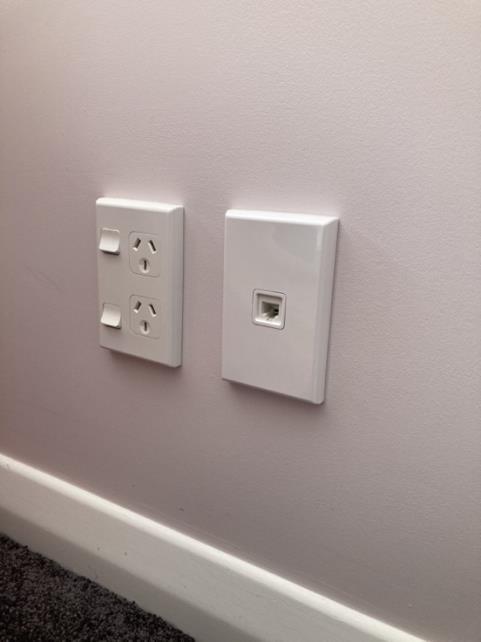
Figure 2 Single network jack on a wall plate next to a power point
Installing Network Cabling in New Zealand Homes v1.1 (September 2022) main TV, but could also be under a desk in an office for example. If you use this approach, keep in mind that at the very least, you will need a place to put your router or an ethernet switch at that location.
2.6. Where a there are a larger number of cable runs, they should ideally be terminated to a patch panel mounted in the central point. A patch panel is effectively a large wall plate, usually holding between 8 and 24 separate network jacks. Patch panels come in different sizes, with options available for wall mounting, or mounting in a 19 inch rack or in wall network cabinet. For large installs, you can use two or more patch panels
2.9. Other cable runs may instead terminate with an RJ45 plug, such as runs for ceiling mounted wireless access points or security cameras. These types of devices generally do not need a separate power point, and instead use power over ethernet (PoE). There may also be runs to a home alarm system, or smart home devices.
2.7. If you are installing a network cabinet or rack, check with your electrician whether it needs to be separately earthed. That will most likely be the case where a power point is installed inside a metal cabinet. Plan where to run the cables 2.8. Cable runs will usually terminate at wall plates around the house, placed next to a power point (most devices connected to the network will also need separate power)
2.10. When running cables to an wall plate, the Premises Wiring Guidelines suggest a minimum of two cables, for two separate network jacks. Having two network jacks will give more flexibility than a single jack For example, you could connect two devices (for example a computer and a telephone).
2.12. You may also want to install more than two jacks at some locations, for example behind your main TV. This will allow you to connect more network devices at that location without having to put a separate ethernet switch there
2.20. If you’re planning to have ceiling mounted access points, the cable can be run through a small hole in the ceiling and terminated with an RJ45 plug, rather than a network jack. This style of wireless access point will generally be powered through the ethernet cable (power over ethernet) and so a power point isn’t needed for the access point
2.19. Access points come in a number of different configurations. Ceiling mounted access points will generally give the best coverage, because there are less obstructions at ceiling height. Wireless access points can also be connected to wall plates around the house, and some can be wall mounted.
2.14. Unless the modem or other device you use to connect to the Internet is located at your central point, then you will need to run one or more network cables to it. This device might be an optical network terminal (ONT) for a fibre connection, a cable modem, DSL modem, or equipment for a fixed wireless connection.
2.17. WiFi is generally now the main way devices in the home connect to the Internet. Wiring each wireless access point to your network with a network cable (rather than using a wireless mesh for example) will give you the most consistent and stable WiFi throughout your home. These are likely to be your most important cable runs.
Installing Network Cabling in New Zealand Homes v1.1 (September 2022)
2.18. A single storey house with a floor area of around 100 square metres can often be covered by a single well positioned wireless access point, but coverage will depend on the shape of the house and the materials used to construct it. With houses that are larger or several storeys, it’s worth allowing for two or more access points. WiFi might be from by the wireless router provided by your ISP, separate wireless access points, or a combination of both.
2.16. If you connect to the Internet using ADSL or VDSL, then ideally bring the line for the DSL connection into the central point and locate the modem there. If that’s not feasible, then run a network cable out to the location of the modem. Wireless access points
2.13. For most people, it will be enough to have a basic setup that provides a wired Internet connection to the main TV and to locations for one or two wireless access points around the house (depending on the size). Although this section suggests a number of potential places network cable can be run, it is possible to go overboard and install more network jacks than needed. ONT or modem
2.15. Particularly you have a fibre connection, you should run three ethernet cables between your Internet connection device and your central point. That will give you the flexibility to have both Internet and phone services delivered out to the rest of your network, as well as future services or multiple Internet connections.
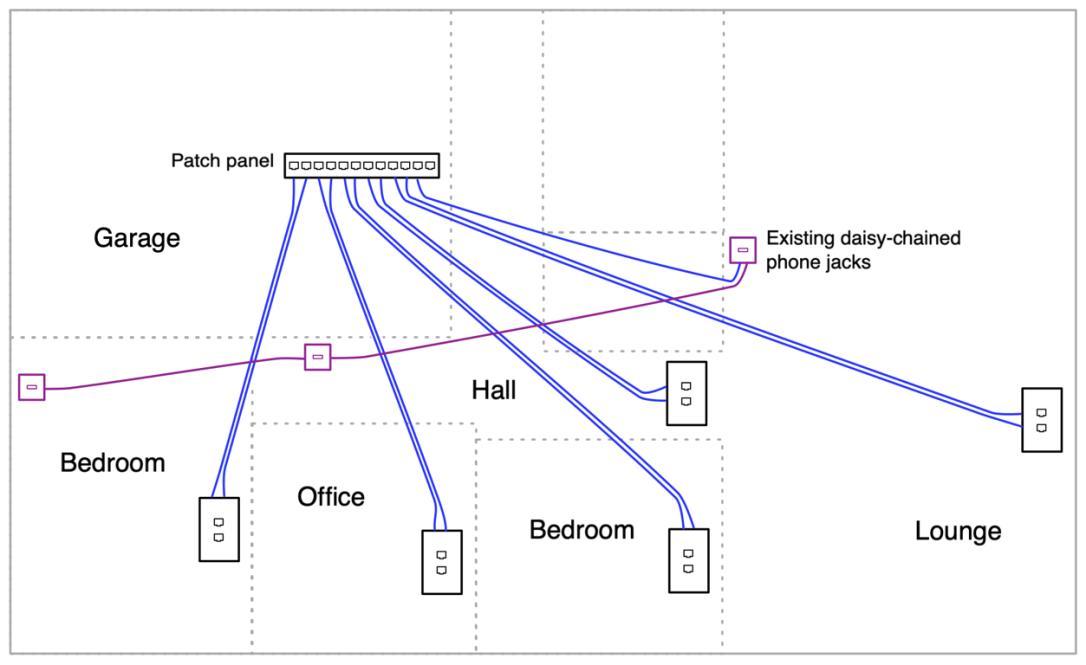
Installing Network Cabling in New Zealand Homes v1.1 (September 2022) Televisions 2.21. TV locations are usually next on the list of priorities, to allow for media streaming without relying on WiFi bandwidth. The main TV in the lounge will be the most important, but you could also consider wall plates for other potential TV locations, such as in bedrooms. 2.22. For a wall mounted TV, you can place the wall plate directly behind the TV next to its power point. Alternatively, the wall plate could go behind a TV cabinet, with the network cable running up through a cable channel fed to the TV (alongside HDMI and other cables). Desks 2.23. It could also be useful to have a wall plate in your home office for a computer desk, or in bedrooms or other locations you might have a desk. Security cameras 2.24. If you plan to install security cameras, then you should run a cable to each of their locations, to be terminated with RJ45 plugs. For example, you might run cables to the underside of the eaves. Network connected security cameras may operate through power over ethernet, without the need for a separate power point House alarm 2.25. Modern security alarms may need their own network cable run, to allow them to send alerts via the Internet, or to enable remote monitoring and arming. Older alarms may have an input and output for an analogue telephone connection (which can be connected using a single network cable), allowing them to “grab” the phone line if needed. Cupboard 2.26. It could be worth running a connection to a cupboard or set of shelves, if you don’t already have space at your central point where you could store devices such as a printer, a NAS (network attached storage) device, or a smart home controller (for example a lighting controller). Telephones 2.27. If you plan on having a landline, you should install an wall plate in any location you would like to have a telephone. 2.28. If you’re working on an existing house which already has telephone jacks, one option is to leave them in place and integrate them with your new network cabling. This requires a cable run from the central point to one of the existing telephone jacks, which will be used to connect the old wiring to the new (see Figure 3 below) 2.29. The network cable can be run to any one of the telephone jacks, and the outside telephone line should be disconnected from them
2.30. In some cases, existing phone cabling may have been installed in a star configuration using cable suitable for networking (i.e. Cat 5 cabling or above) Where that’s the case, the cabling can be left in place and repurposed for computer equipment by re terminating them with a patch panel and network jacks Other devices
2.31. There may be other devices in your home not listed here, that connect over ethernet. Ideally, every device in your house that has a network port will be able to connect to your network cabling
Installing Network Cabling in New Zealand Homes v1.1 (September 2022)
Figure 3 Connecting existing telephone jacks
3.7. All three cable standards can carry 10Gb speed, but to different lengths: Cat 6A to 100 metres, Cat 6 to 55 metres, and Cat 5e to around 45 metres (although the Cat 5e specification does not officially support 10Gb speeds).
3.5. In general, most home networking equipment at the moment will run at a speed of 1 Gigabit per second (i.e. 1Gb ethernet), and 2.5Gb ethernet is starting to appear in some high end consumer devices. All three of these cable standards are rated to carry 1Gb and 2.5Gb speeds up to a distance of 100 metres (which is much longer that you’re likely to need for any run in an average home).
3.9. Although 10Gb Ethernet should work on Cat 5e at cable lengths of 45 metres or less, that speed is not supported by the specification. Cat 6 is also a similar price, and is only slightly more difficult to work with. Because of that, for most home installs it makes sense to use Cat 6.
3.8. Because cable runs in a home will almost always be less than 55 metres, there isn’t a strong case for installing Cat 6A. It is also more difficult to work with, more expensive, and has a much larger diameter (meaning less cables can be run through a hole in timber framing, for example)
3. CHOOSING YOUR CABLE AND EQUIPMENT
3.1. Your next step will be to buy all the cable and other equipment you’ll need for the installation. Cable standards
3.2. The three most suitable cable standards for home networks are Category 5e (Cat 5e), Category 6 (Cat 6), and Category 6A (Cat 6A) cable. Cat 6 will be the most straightforward choice for most homes.
3.4. Conversely, Cat 5e is the easiest of the three cables to work with, Cat 6 is slightly more difficult (typically being a thicker cable overall, with larger wires, more twists, and a plastic wire separator running through it), and Cat 6A is more difficult again.
3.6. While not currently needed for most users, the faster standards of 5Gb, and 10Gb Ethernet are also already available, and should become more affordable in the short to medium term. Speeds higher than that are currently reserved for direct attached copper and fibre connections (used in businesses and datacentres).
3.10. Cat 7 and Cat 8 cables are also available, but are even more expensive and difficult to work with, and offer no real advantage to home users at this point.
Installing Network Cabling in New Zealand Homes v1.1 (September 2022)
3.3. All three of these cables share the same basic configuration of 4 twisted pairs of wires. However, Cat 6 cable contains enhancements to improve the performance of the cable beyond Cat 5e, and Cat 6A improves on this further still.
3.18. To connect the cables to the patch panel, you will need a cable stripper, punch down tool, and a pair of wire cutters. The punch down tool is likely to be for “110” IDC connectors, although some patch panels instead use “krone” IDC connectors.
3.17. Another option is a small patch panel that screws directly to the wall, which works well where the central point is a cupboard or another small space.
Installing Network Cabling in New Zealand Homes v1.1 (September 2022)
3.16. A small rack is a good solution for a home install. In this case, you could consider an “unloaded” patch panel which takes individual keystone jacks in the same way as wall plates, which can make it easier to add new cable runs further down the track.
3.12. Shielded cable isn’t typically needed for home installs; instead use unshielded twisted pair (UTP).
3.20. If you are installing any cable runs that will end with a plug, instead of a jack (for example a ceiling mounted wireless access point or security camera), then you will need to buy RJ45 plugs that are suitable for solid core cable. The plug ends are installed using an RJ45 crimping tool.
Wall plates
Tester 3.21. It’s useful to be able to test cables once you’ve installed them. A basic continuity tester that can check that the wires at each end of the cable are connected in the correct order can be found quite cheaply. Slightly more expensive testers will be able
3.13. If any of your runs need to go outdoors (for example around the outside of the house), outdoor rated cable is available (including gel filled cable that can be buried). Patch panel
3.14. The patch panel in your central point should match the cable standard you plan to install (e.g. Cat 6). It needs to be large enough for the number of cables you plan to run (or may want to run in the future). For larger installs, you may need more than one patch panel. 3.15. If you are installing an in wall network cabinet, then you should get a patch panel that is designed to slot into the cabinet. Equally, if you are installing a 19 inch rack, there are patch panels made to fit.
3.19. For any wall plates you plan to install, you should buy compatible keystone jacks. The keystones should also be rated for the type of cable you are using (e.g. Cat 6). You’ll also need a flush box or plasterboard c clip to hold the wall plate to the wall. Plugs
3.11. Cables used for in wall runs should be solid core stranded cable is intended for flexible patch cables, and can’t be reliably terminated to the insulation displacement contact (IDC) connectors commonly used in patch panels and network jacks.
Installing Network Cabling in New Zealand Homes v1.1 (September 2022) to test for shorts, opens, miswires, reversals and split pairs. Be aware that some of the less expensive testers can only test cables over a more limited distance.
3.22. Other more expensive testers are available that can certify cables, but these are not usually cost effective to buy for a basic home install. Borrow one if it’s an option
4.8. If cables are being installed with the wall linings still in place, it’s usually easier to run cables through the bottom plate and into the subfloor, either by drilling down through the opening in the wall made for the wall plate, or up from underneath.
Installing Network Cabling in New Zealand Homes v1.1 (September 2022)
4.5. Unless you are removing the wall linings, it will be difficult to drill through the nogs without cutting a hole in the lining. Because of that, it will often be easiest to run cables during construction or when renovations are being carried out.
4.6. If some or all of your walls are built using a different method of construction, then you will need to allow for that in your installation. For example with a solid concrete block wall, you would likely need to run the cable on the face of the wall with conduit or capping.
4.3. Walls in New Zealand homes are usually made using a series of vertical lengths of 100 x 50mm timber (called “studs”) with plasterboard linings. Studs run from floor to ceiling in the wall, and are connected together by continuous horizontal lengths of timber at the top and bottom (the “top plate” and “bottom plate”).
4.1. When running your own cables, you may be exposed to hazards, including electrical cables, protruding nails and confined spaces. Ensure you’re familiar with the dangers present and how to work safely around them, as with any DIY. Health and safety advice is outside the scope of this guide.
4.4. Houses built from about 1930 will also usually have two rows of horizontal timber fitted between the studs, called dwangs or noggins (nogs) Nogs often fill the full depth of the wall, in which case they need to be drilled through to allow cable runs up the wall.
4.2. Working out your cable routes Before you run a cable, you’ll need to work out the route it will take from the central point to its destination. This will usually involve running the cable up through the top of a wall or down through the bottom, across the ceiling or subfloor space, then back up or down through the wall. While ideally cables will be run through the inside of walls out of sight, it is also possible to run them on the outside of the wall, where they would usually be enclosed in conduit or capping. Stud walls
4. WORK OUT YOUR CABLE ROUTES AND RUN YOUR CABLES Safety
4.7. Wall plates for network jacks will usually be attached on the opposite side of a stud from a power point. The cables from the wall plate will then run either down through a hole in the bottom plate into a basement or subfloor space (if the house is on raised piles), or up through the nogs and top plate into the ceiling space (if the house is on a concrete slab) Both approaches can be used in some houses
4.9. In either case, you need to be precise with measurements and careful to drill in the right location, to avoid making holes in flooring, accidently drilling through a joist or other structural timber, or hitting electrical cables or other services.
4.10. There are size restriction on the holes that can be made the top or bottom plate of a wall, which can be seen on the BRANZ website [buildmagazine.org.nz]. This also applies if you have to drill through (or notch) studs or joists.
4.16. Leave more cable than you think you need at each end, to avoid running short when you come to terminate the cables (or if you need to re terminate them in the future). It’s useful to label the cables as you go, which will make it easier to make a record of which port on the patch panel connects to each network jack
4.17. If a finished house doesn’t have a ceiling or floor space, then it is likely to be difficult to run cables without removing sections of wall lining, or running cables externally. In those cases, you may want to wait until renovations to the house are taking place, before running network cabling.
4.11. If you’re running the cable through the top plate, try and keep the holes in the nogs in line with the hole in the top plate, so that it’s easier to pull through the cable in the future to replace it. Ideally, leave the cable unsecured and don’t staple or otherwise fix it to the timber framing inside the wall.
Installing Network Cabling in New Zealand Homes v1.1 (September 2022)
4.15. Cables can be secured in the subfloor or ceiling space using Velcro straps or zip ties. Be careful not to over tighten these, as this could damage the cable. When running your cables, avoid tight bends, keep clear of snags and avoid twisting or putting kinks in your cables, which can damage them.
4.12. For the best future proofing, fix a length of conduit in the wall to run the cable through, which will make swapping out the cable much more straightforward It may also be useful to install one or more lengths of conduit that run the full height of the house, to pass cables from the subfloor to the ceiling space where both are accessible.
4.13. If possible, avoid horizontal runs through a wall, which will make replacing the cable more difficult, and may mean the cable does not meet requirements for separation from electrical cables (see below). Subfloor and roof space 4.14. Where the house has a basement or is built on piles (rather than a concrete stab) and has an accessible subfloor space, cables run down through the bottom plate of the walls can be run through that space back to the central point. Some houses will also have accessible attics or ceiling spaces, which can be used in the same way for cable runs up through the top plate.
Installing Network Cabling in New Zealand Homes v1.1 (September 2022) Outdoors
4.18. If the only option is to run a cable outside for some of its length, be sure to use cable that is rated for use outdoors (or gel filled cable if it will be buried). Before considering drilling a hole through the cladding, make sure you’re familiar with how to keep it weathertight. Separation from power cables 4.19. Wherever the cables are run, they should be kept separate to power cables. The best way to do this inside the wall is to locate wall plates for network jacks on the other side of a stud from a power point. The stud then acts as a separation between power and network cables inside the wall. See the Electrical Workers Registration Board website [ewrb.govt.nz] for details of these requirements. Reusing existing cables 4.20. As above, in some cases (particularly with houses built in the early 2000s), the phone cabling may have been installed in a star configuration. If the existing cabling is Cat 5 cable or above, then the telephone termination at each end can be replaced with a RJ45 termination, and the cable used for networking.
4.22. If the telephone cabling is not at all suitable for networking, then in some cases it can be used to pull through a new cable (by taping the new cable at one end and pulling at the other). However, often telephone cables will be stapled inside the wall, making this impractical. Flush boxes 4.23. If you are installing cabling while the wall linings are off, screw a flush box to the stud at each wall plate location, and tape the end of your cable into that box (leaving some slack to work with in the wall). When the wall linings are installed, a hole will be cut out at each flush box location. 4.24. If the wall linings are on, then you will need to cut a hole to pull the cable through (using a plasterboard saw or oscillating saw). If you can line up your hole right next to a stud, then it is possible to place a flush box through the hole and screw it into the stud. Otherwise, a plasterboard c clip may be used (or alternatively a flush box that grips to the plasterboard).
4.25. Don’t coil the network cables tightly in the flush box, as this can damage them. Instead, bring them into the flush box then loop any excess back into the wall space, ready for termination.
4.21. Even if the phone cable has only two pairs of wires (e.g. Cat 3 cable), it may still be able to be used for networking, by terminating those wires in the positions of the green and orange wire pairs. However even if it works, speeds will be limited to the 100Mb per second ethernet standard.
4.26. Be aware that if any of your cable runs terminate on a fire rated wall or a bracing wall, there may be additional requirements in relation to cable penetrations or wall plates. Holes in the plasterboard linings of bracing walls will usually be permissible, provided they are not too large or close together. Holes in fire rated walls will likely require additional measures to maintain the fire rating. Check the requirements with a professional, or relocate the wall plate to another wall. Bringing the cable into your central point 4.27. If you are terminating to a wall plate at your central point (i.e. you have 6 or fewer cable runs), then install a flush box as above, and bring all the cables from around the house to that point. 4.28. If you are using an in wall cabinet, then you can bring the cables up or down the wall directly into the cabinet (through one of its punch out holes) 4.29. If you are using a 19 inch rack or wall mounted patch panel, then you could also bring the cables to one or more flush boxes, and bring them into the room through a brush plate. Be sure to leave enough extra length on the cables to comfortably reach the patch panel.
Installing Network Cabling in New Zealand Homes v1.1 (September 2022) Fire rated walls and bracing walls
5.7. To make your own telephone hub, cut a length of the blue twisted pair of wires from an ethernet cable, then run that cable as a continuous length punched down to the blue pair of IDC connectors for each port of the hub. Only untwist the cable at the points it is punched down.
5.2. At the other end of the cable, it will be connected to a keystone jack (or in some cases terminated with an RJ45 plug, as below). Keystone jacks will be terminated using IDC connectors, similar to a patch panel. Orient the jack with the clip facing down (to avoid dust settling on the pins) T568A and T568B wiring layouts
5.5. Cable runs that end in RJ45 plugs are terminated by stripping back the jacket, untwisting and straightening the wires, cutting them to an appropriate length and pushing them into plug end. Squeezing the plug with a crimping tool will then connect the wires to the contacts in the plug. Follow the same T568A or T568B wiring layout you have been using for your patch panel. Phone patch 5.6. The easiest approach to connect multiple landline phones is to use an RJ45 splitter. Alternatively, you can buy a dedicated telephone hub, which are available to slot into network cabinets, or connect together some of the jacks in your patch panel to make your own hub.
RJ45 plug termination
5.1. Each length of cable should terminated on a separate port on your patch panel The cable jacket should be stripped back, and the eight individual coloured wires inside the cable punched down into the slot of the corresponding colour, using your IDC punchdown tool. Remember to strip back the jacket and untwist the wires as little as possible, as this can otherwise degrade the quality of the signal the cable can carry. Keystone jacks
Installing Network Cabling in New Zealand Homes v1.1 (September 2022)
5.3. Often patch panels and keystone jacks will be marked with two wiring options T568A and T568B. Either option will work, but the Premises Wiring Guidelines specify the use of T568A in New Zealand. Only single option should be used in any given home, to avoid inadvertently wiring a network cable with different standards at each end (which results in a crossover cable). Even if that occurs, most modern network equipment will be able to automatically detect the issue and continue to work fine. Connecting existing phone sockets 5.4. If you ran a cable to an existing phone socket, this will only need the blue pair of wires punched down (or two of the pairs, if you are connecting two phone lines). At the other end, those two wires are punched into the phone socket.
5. TERMINATING YOUR CABLES
Connecting your patch panel
5.8. If you plan to install a DSL splitter for an ADSL or VDSL connection, this can be placed in the external termination point (ETP), in your network cabinet, or (if needed) somewhere between the two. The DSL and telephone lines coming off the splitter can be terminated to separate ports on your patch panel. Testing your cable runs 5.9. Once each end of the cable is terminated, you can plug in your cable tester to both ends, to make sure it is wired correctly. Check the tester for signs of any mistakes It’s also worth plugging a device in at each end, to make sure it can establish a link at gigabit (or greater) link speed.
Installing Network Cabling in New Zealand Homes (September 2022)
v1.1
DSL splitter
Installing Network Cabling in New Zealand Homes v1.1 (September 2022)
6.2. Devices will connect to a network jack on a wall plate with a short network cable with RJ45 plugs at both ends (a “patch cable”). For situations where you’ve terminated the cable with an RJ45 plug (such as for a ceiling mounted WiFi access point or security cameras) the device can connect directly to it.
6.4. If you have any devices that require power over ethernet, they should be connected to either a PoE capable ethernet switch, or a PoE injector. Be careful to plug in a PoE injector the correct way around, as it can otherwise damage devices that are not designed to accept the additional power.
Figure 4 Wireless router at central point, connected to a smart TV and PC
6. HOOKING IT ALL UP
6.3. In the central point, a patch cable should be connected between the port that corresponds to each device, and an ethernet switch. That may be the switch built into the wireless router provided by your Internet service provider (see Figure 4), or a separate ethernet switch (see Figure 5), which is itself connected to your ISP router (to provide Internet access to all devices on the network).
6.1. Once all of your cables are terminated at both ends (and your renovations are finished) you can screw in your wall plates, and hook up all of your devices.

Figure 5 Separate ethernet switch in central point with wireless router moved for better WiFi coverage
6.6. When hooking up a telephone to a network jack around the house, you may need to purchase an RJ11 to RJ45 cable, or make one using your crimper. If you plug an RJ11 plug into a RJ45 jack, it should work, but it may damage the jack and is not recommended.
6.5. Where an analogue telephone is being hooked up, it doesn’t get connected to the ethernet switch. Instead, connect your phone port (on your ISP router, ONT or separate analogue telephone adapter (ATA) device) to the port on the patch panel where your phone is connected To hook up more than one phone, connect a RJ45 splitter or telephone hub to the phone port, then patch the ports in the hub into the ports on your patch panel which connect to the phones (see Figure 6 below).
Installing Network Cabling in New Zealand Homes v1.1 (September 2022)
Figure 6 Two telephones connected to ATA on router, using two port RJ45 splitter

