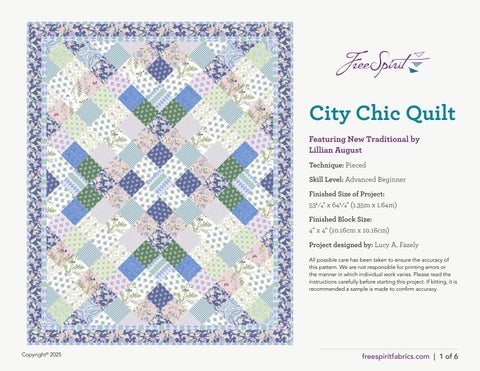
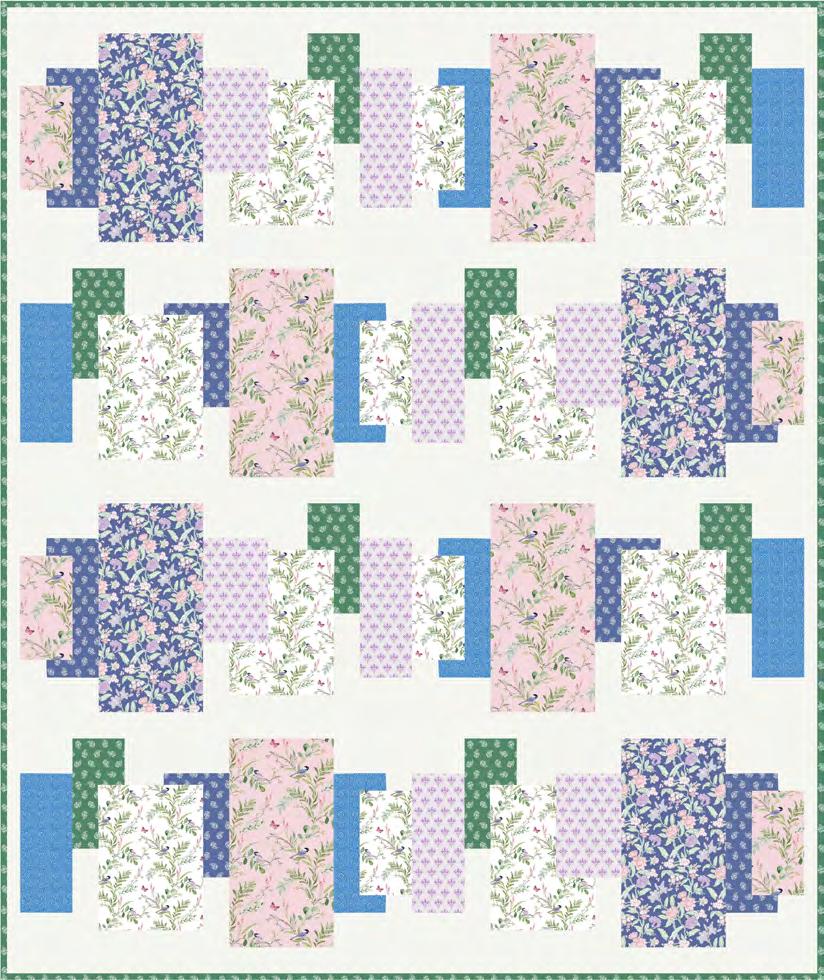
City Chic Quilt
Featuring New Traditional by Lillian August
Technique: Pieced
Skill Level: Advanced Beginner
Finished Size of Project:
531⁄4 4" x 641⁄2" (1.35m x 1.64m)
Finished Block Size: 4" x 4" (10.16cm x 10.16cm)
Project designed by: Lucy A. Fazely
All possible care has been taken to ensure the accuracy of this pattern. We are not responsible for printing errors or the manner in which individual work varies. Please read the instructions carefully before starting this project. If kitting, it is recommended a sample is made to confirm accuracy
City Chic Quilt
FABRIC REQUIREMENTS
(Tech edited by: Julie Kentner)
Design Color Item ID
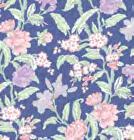
A Francine Periwinkle
B Willow Sage
C Arabella Cobalt
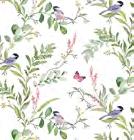
D SM Celeste White
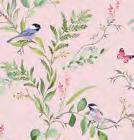
E Celeste Rose
F Camille Sage
G Nadine Cobalt
H Constance Juniper
I Violetta Lavender
J Genieve Cobalt
K Brooke Cobalt
L Brooke Lavender
M Brittany Juniper
N Brittany Periwinkle
O Kendra Sage
P Sofia Rose
*includes binding
Backing (Purchased Separately)
44" (1.12m) wide
SM Celeste White
PWLA004.WHITE 4 yards (3.66m) OR 108" (2.74m) wide 17⁄8 yards (1.71m) Swatches
PWLA001.PERIWINKLE 1 yard (0.91m)
PWLA002.SAGE 1⁄4 yard (0.23m)
PWLA003.COBALT 1⁄4 yard (0.23m)
PWLA004.WHITE 3⁄8 yard (0.34m)
PWLA005.ROSE 1⁄4 yard (0.23m)
PWLA006.SAGE 3⁄8 yard (0.34m)
PWLA007.COBALT 1⁄2 yard (0.46m)
PWLA008.JUNIPER* 11⁄8 yards (1.03m)
PWLA009.LAVENDER 1⁄4 yard (0.23m)
PWLA010.COBALT 1⁄4 yard (0.23m)
PWLA011.COBALT 3⁄8 yard (0.34m)
PWLA011.LAVENDER 3⁄8 yard (0.34m)
PWLA012.JUNIPER 1⁄4 yard (0.23m)
PWLA012.PERIWINKLE 1⁄4 yard (0.23m)
PWLA013.SAGE 1⁄4 yard (0.23m)
PWLA014.ROSE 3⁄8 yard (0.34m)


ADDITIONAL REQUIREMENTS
• 100% cotton thread in colors to match
• 61" x 73" (1.55m x 1.85m) quilt batting
City Chic Quilt
CUTTING
WOF = Width of Fabric
Label cut pieces with fabric letter for easier assembly
Fabric A, cut:
(2) 41⁄2" x WOF; sub-cut
(18) 41⁄2" squares
(3) 31⁄2" x WOF; sewn together end to end and sub-cut into
(2) 31 1⁄2" x 59" and
(2) 31⁄2" x 533⁄4" (borders)
Fabric B, cut:
(1) 41⁄2" x WOF; sub-cut
(4)41⁄2" squares
Fabric C, cut:
(1)41⁄2" x WOF; sub-cut
(8)41⁄2" squares
Fabric D, cut:
(2)41⁄2" x WOF; sub-cut
(16)41⁄2" squares
Fabric E, cut:
(1)41⁄2" x WOF; sub-cut
(8)41⁄2" squares
Fabric F, cut:
(2)41⁄2" x WOF; sub-cut
(16)41⁄2" squares
Fabric G, cut:
(3)41⁄2" x WOF; sub-cut
(24)41⁄2" squares
Fabric H, cut:
(1)41⁄2" x WOF; sub-cut
(5)41⁄2" squares
(7)21⁄2" x WOF (binding)
(6) 11⁄2" x WOF; sewn together end to end and sub-cut into (2) 11⁄2" x 57" and (2) 11⁄2" x 473⁄4" (borders)
Fabric L, cut:
(2) 41⁄2" x WOF; sub-cut
(12)41⁄2" squares
Fabric M, cut:
(1)41⁄2" x WOF; sub-cut
(8)41⁄2" squares
Fabric N, cut:
Fabric I, cut:
(1)41⁄2" x WOF; sub-cut
(8)41⁄2" squares
Fabric J, cut:
(1)41⁄2" x WOF; sub-cut
(8)41⁄2" squares
Fabric K, cut:
(2)41⁄2" x WOF; sub-cut
(16)41⁄2" squares
(1)41⁄2" x WOF; sub-cut
(8)41⁄2" squares
Fabric O, cut:
(1)41⁄2" x WOF; sub-cut
(8)41⁄2" squares
Fabric P, cut:
(2)41⁄2" x WOF; sub-cut
(12)41⁄2" squares
City Chic Quilt
SEWING INSTRUCTIONS
Notes:
• Use a 1⁄4" seam allowance throughout.
• Sew all pieces with right sides together (RST) and raw edges even using neutral or coordinating thread.
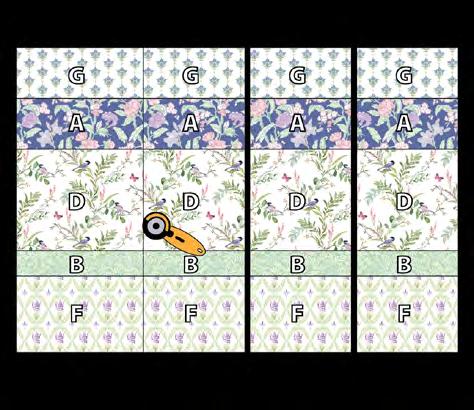
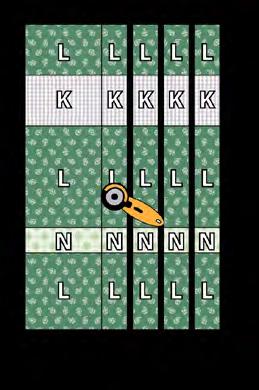
Block Assembly:
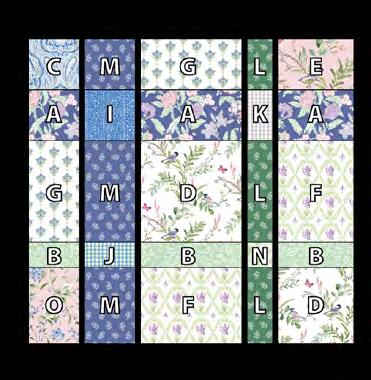
1
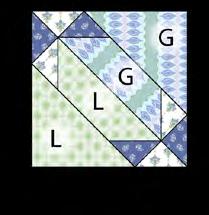
Arrange all 41⁄2" squares into (19) diagonal rows as shown. Note orientation of stripes. Stitch squares into diagonal rows. Sew rows together, pressing odd rows in one direction and even rows in the opposite direction. (Fig. 1)
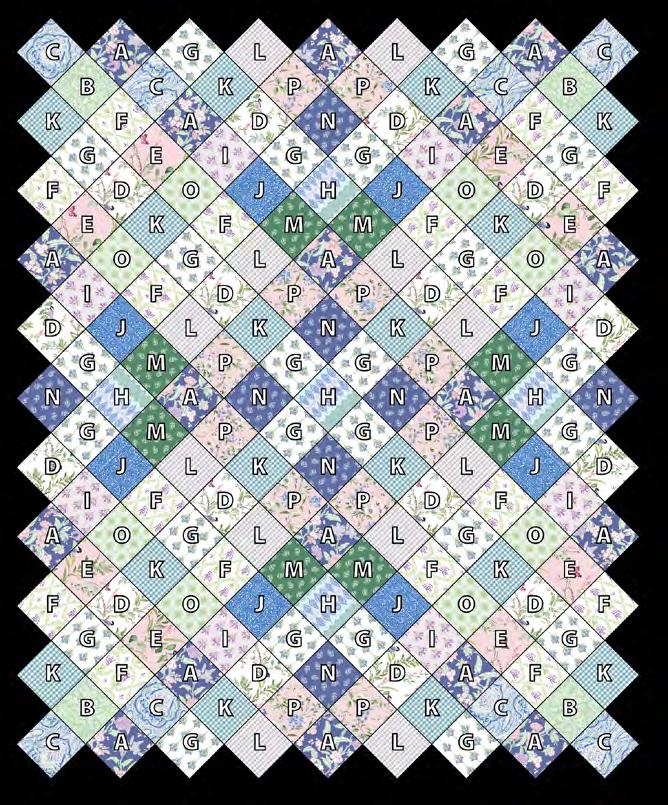
Fig. 1
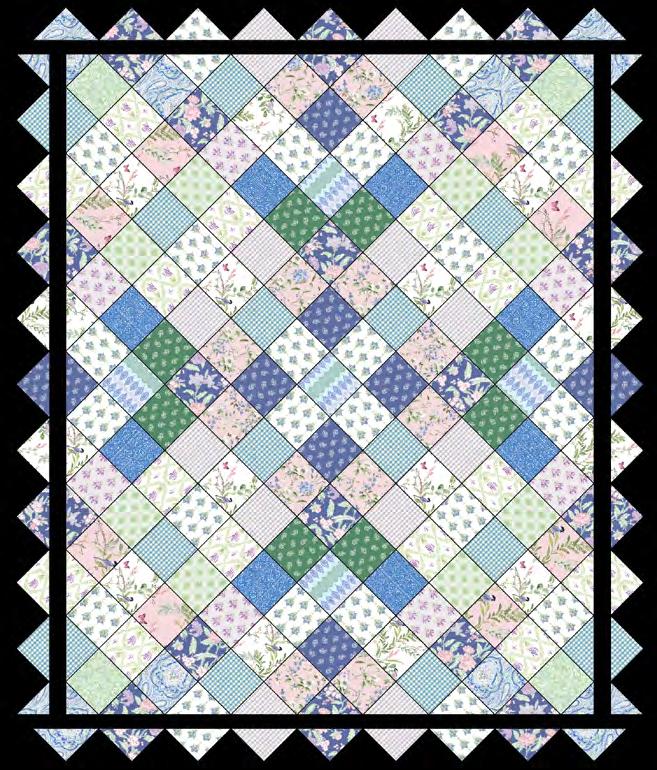
2 Trim quilt center to approximately 453⁄4" x 57". Baste edges of quilt center to keep bias cut edges from stretching. (Fig. 2) Fig. 2
City Chic Quilt
QUILT TOP ASSEMBLY
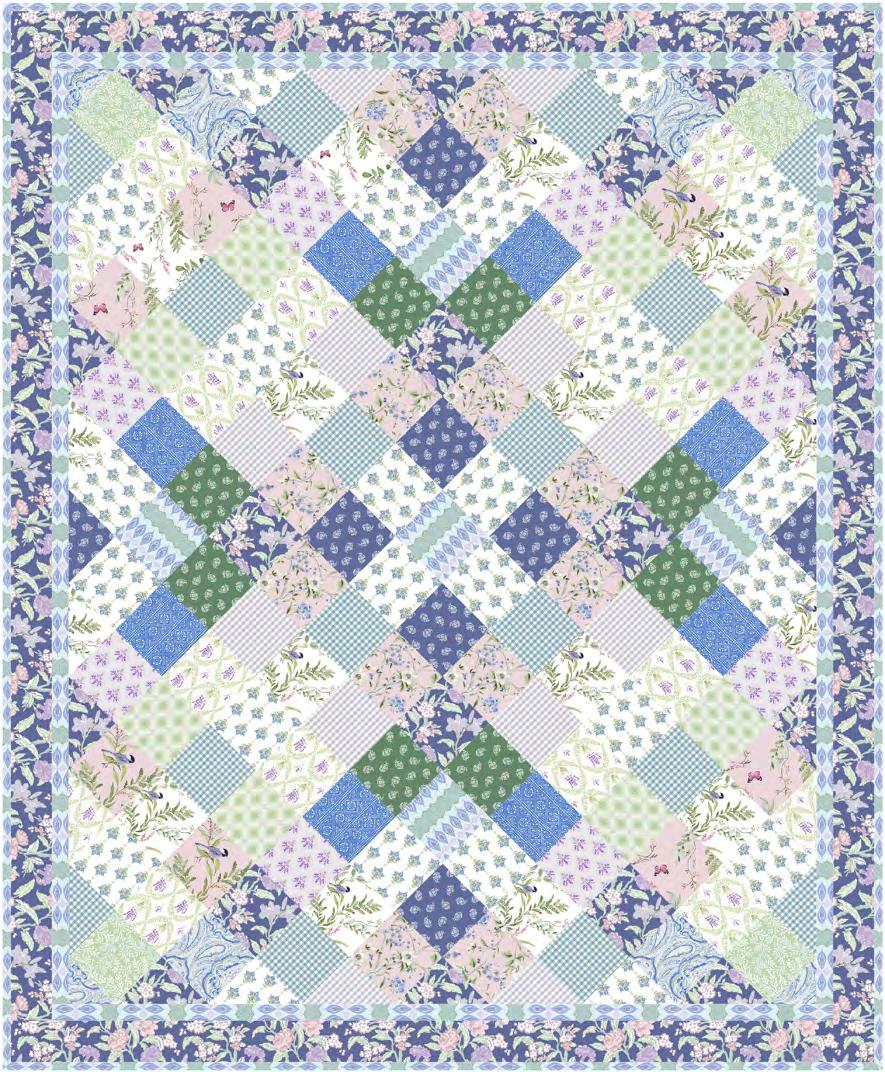
3 Add borders, noting Quilt Layout (Page 6). Sew 11⁄2" x 57" Fabric H borders to the left and right sides of quilt. Add 11⁄2" x 473⁄4" Fabric H borders to the top and bottom of quilt. Press towards borders.
4 Sew the 31⁄2" x 59" Fabric A borders to the left and right sides of quilt. Add 31⁄2" x 533⁄4" Fabric A borders to the top and bottom of quilt. Press towards borders.
FINISHING
5 Sew together (7) 21⁄2" x WOF Fabric H binding strips endto-end using diagonal seams. Press seams open. Press the binding strip in half, wrong sides together, and set aside until quilt is ready for binding.
6 Once the top is complete it is ready for quilting! Quilts can be sent out for longarm quilting or you can quilt it yourself. If you are sending the quilt out, it is important to discuss backing and batting requirements with the quilter to ensure they have everything needed to properly finish the quilt.
7 If quilting yourself and using 44" fabric for backing, choose your favorite method for piecing (taking time to remove selvedges), then layer, baste and quilt. Once finished, trim excess batting and backing and bind according to your favorite method.
8
9
To complete binding by hand, it must first be machine sewn to the quilt top. Leaving an 8" tail of binding, sew binding to top of quilt through all layers, matching raw edges. Miter corners. Stop approximately 12" from where you started. Lay both loose ends of binding flat along quilt edge. Where the two loose ends meet, fold each side back on themselves and press to form a crease. Using this crease as your stitching line, sew the two open ends of the binding together right sides together. Trim seam to 1⁄4" and press seam open. The binding will naturally fold, wrong sides together, and lay along the quit edge. Finish sewing binding to quilt. Turn and press the binding to the back of the quilt and hand stitch in place.
If machine binding, complete the steps above only attach the binding to the BACK of the quilt, turn and press to the front of the quilt and machine stitch in place.
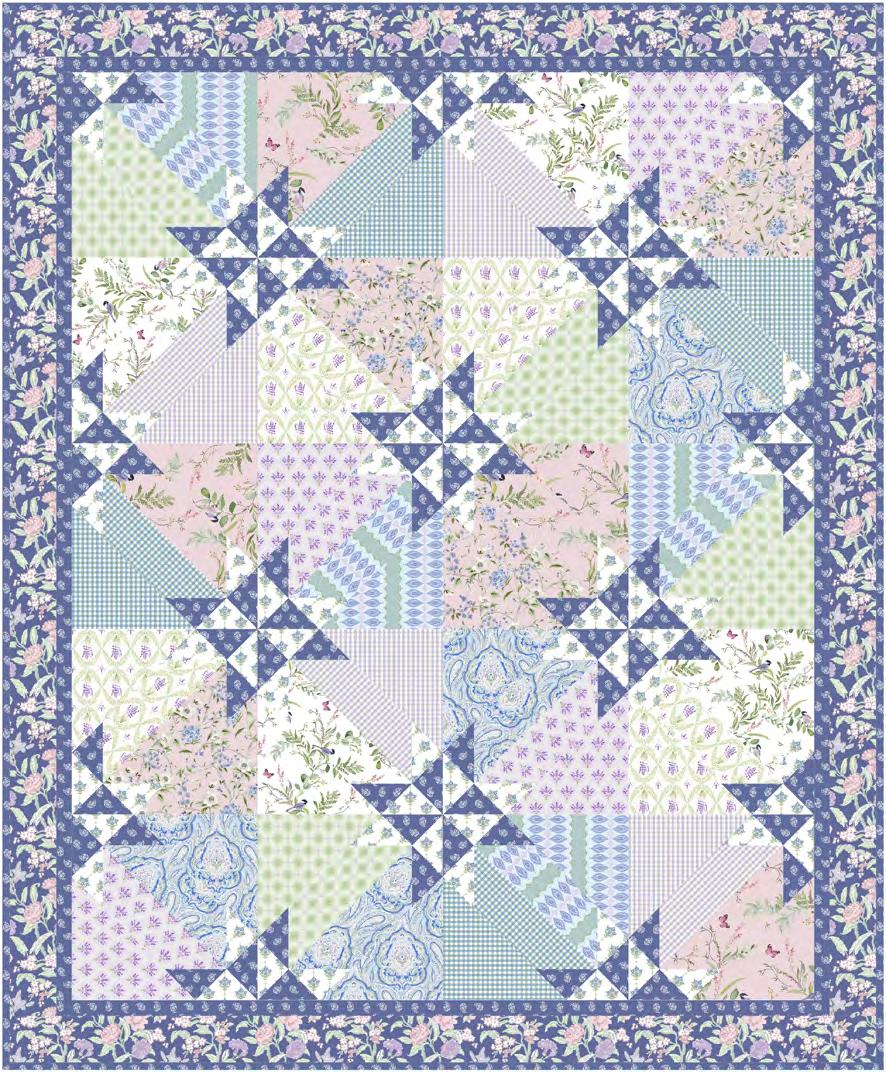
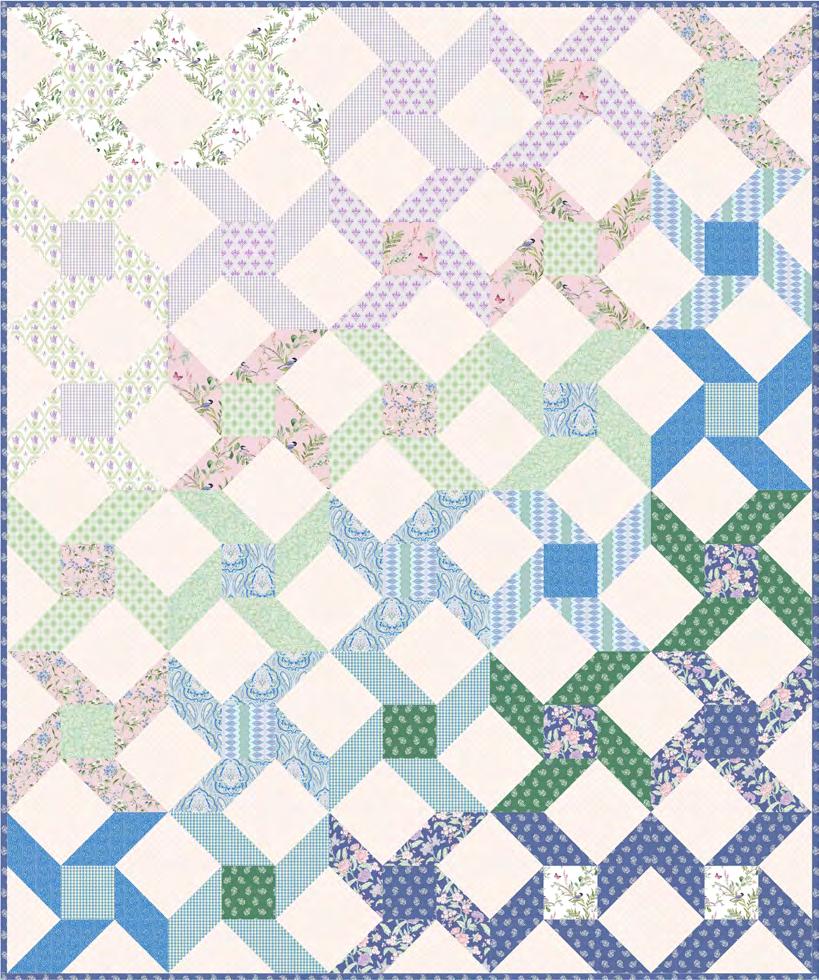
City Chic Quilt
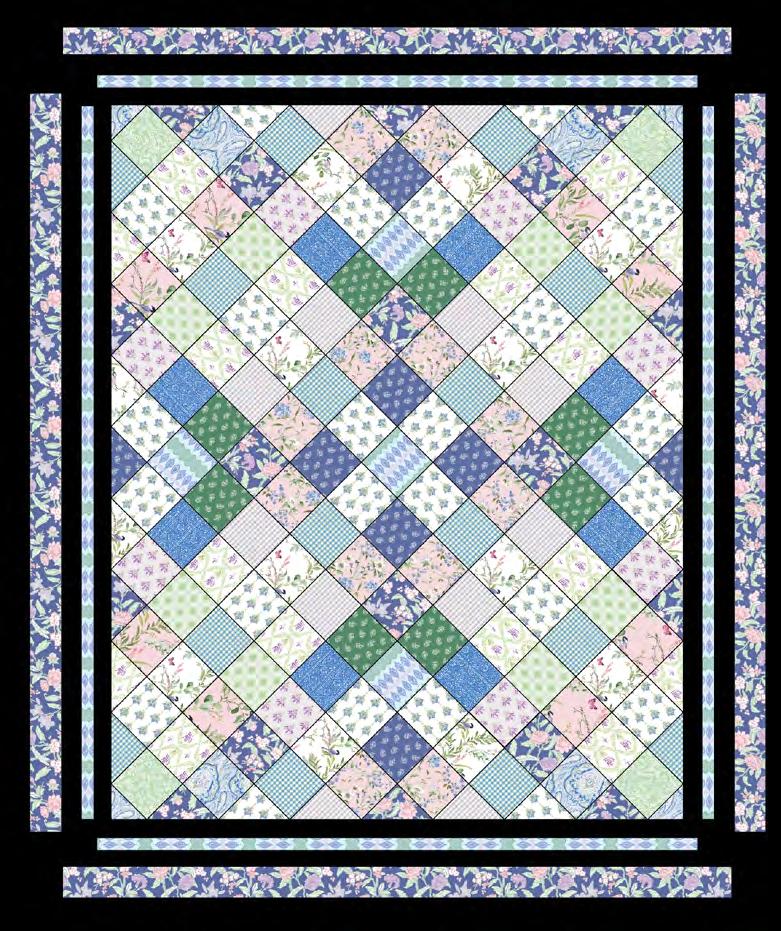
Quilt Layout
Shabby Plaid Quilt
Featuring New Traditional by Lillian August
Technique: Strip Pieced
Skill Level: Advanced Beginner
Finished Size of Project: 72" x 96" (1.83m x 2.44m)
Finished Block Size: 24" x 24" (60.96cm x 60.96cm)
Project designed by: Lucy A. Fazely
All possible care has been taken to ensure the accuracy of this pattern. We are not responsible for printing errors or the manner in which individual work varies. Please read the instructions carefully before starting this project. If kitting, it is recommended a sample is made to confirm accuracy
Shabby Plaid Quilt
FABRIC
REQUIREMENTS (Tech edited by: Julie Kentner)
Design Color Item ID
A Francine Periwinkle
B Willow Sage
C Arabella Cobalt
D SM Celeste White
E Celeste Rose
F Camille Sage
G Nadine Cobalt
H Violetta* Lavender
I Genieve Cobalt
J Brooke Cobalt
K Brooke Lavender
L Brittany Juniper
M Brittany Periwinkle
N Kendra Sage
O Sofia Rose
* includes binding
Backing (Purchased Separately)
44" (1.12m) wide
Constance Juniper
Yardage
PWLA001.PERIWINKLE 11⁄4 yards (1.14m)
PWLA002.SAGE 3⁄4 yard (0.69m)
PWLA003.COBALT 3⁄8 yard (0.34m)
PWLA004.WHITE 11⁄3 yards (1.22m)
PWLA005.ROSE 1⁄2 yard (0.46m)
PWLA006.SAGE 11⁄4 yards (1.14m)
PWLA007.COBALT 11⁄8 yards (1.03m)
PWLA009.LAVENDER* 3⁄4 yard (0.69m)
PWLA010.COBALT 3⁄8 yard (0.34m)
PWLA011.COBALT 1⁄3 yard (0.30m)
PWLA011.LAVENDER 1⁄3 yard (0.30m)
PWLA012.JUNIPER 3⁄4 yard (0.69m)
PWLA012.PERIWINKLE 11⁄4 yards (1.14m)
PWLA013.SAGE 1⁄8 yard (0.11m)
PWLA014.ROSE 1⁄2 yard (0.46m)
Swatches


ADDITIONAL REQUIREMENTS
PWLA008.JUNIPER 6 yards (5.49m)
OR 108" (2.74m) wide 21⁄3 yards (2.13m)
• 100% cotton thread in colors to match
• 80" x 104" (2.03m x 2.64m) Quilt Batting
Shabby Plaid Quilt
CUTTING
Label pieces as they are cut for easier identification when sewing.
WOF = Width of Fabric
Fabric A, cut:
(1) 81⁄2" x WOF
(1) 61⁄2" x WOF
(5) 41⁄2" x WOF; from (1) sub-cut
(1) 41⁄2" x 21"
Fabric B, cut:
(1) 81⁄2" x WOF; sub-cut
(1) 81⁄2" x 21"
(1) 61⁄2" x 21"
(1) 41⁄2" x WOF; sub-cut
(1) 41⁄2" x 21"
(1) 21⁄2" x 21"
(3) 21⁄2" x WOF
Fabric C, cut:
(2) 41⁄2" x WOF
Fabric D, cut:
(3) 81⁄2" x WOF; from (1) sub-cut
(2) 81⁄2" x 21"
(2) 61⁄2" x WOF
Fabric E, cut:
(1) 61⁄2" x WOF
(1) 41⁄2" x WOF
Fabric F, cut:
(2) 81⁄2" x WOF
(3) 61⁄2" x WOF; from (1) sub-cut
(2) 61⁄2" x 21"
Fabric G, cut:
(2) 81⁄2" x WOF
(3) 41⁄2" x WOF; from (1) sub-cut
(2) 41⁄2" x 21"
Fabric H, cut:
(9) 21⁄2" x WOF (binding)
Fabric I, cut:
(2) 41⁄2" x WOF
Fabric J, cut:
(1) 41⁄2" x WOF; sub-cut
(1) 41⁄2" x 21"
(1) 21⁄2" x WOF
Fabric K, cut:
(1) 41⁄2" x WOF; sub-cut
(1) 41⁄2" x 21"
(1) 21⁄2" x WOF
Fabric L, cut:
(1) 81⁄2" x WOF; sub-cut
(1) 81⁄2" x 21"
(1) 61⁄2" x 21"
(1) 41⁄2" x WOF; sub-cut
(1) 41⁄2" x 21"
(1) 21⁄2" x 21"
(3) 21⁄2" x WOF
Fabric M, cut:
(1) 81⁄2" x WOF
(1) 61⁄2" x WOF
(5) 41⁄2" x WOF; from (1) sub-cut
(1) 41⁄2" x 21"
Fabric N, cut:
(1) 21⁄2" x WOF; sub-cut
(2) 21⁄2" x 21"
Fabric O, cut:
(1) 61⁄2" x WOF
(1) 41⁄2" x WOF
Shabby Plaid Quilt
SEWING
Notes:
• Use a 1⁄4" seam allowance throughout.
• Sew all pieces with right sides together (RST) and raw edges even using neutral or coordinating thread.
• Label units as they are completed to help with block assembly.
Block Assembly:
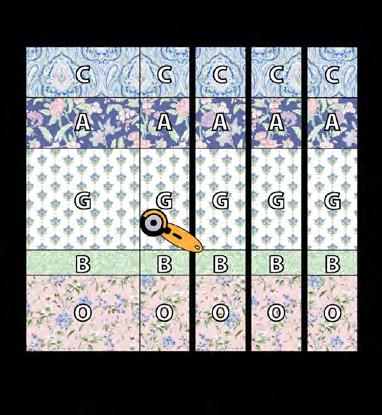
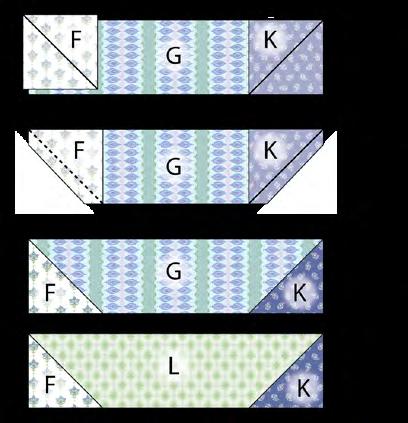
1 Sew (1) Fabric C 41⁄2" x WOF strip, (1) Fabric A 41⁄2" x WOF strip, (1) Fabric G 81⁄2" x WOF strip, (1) Fabric B 21⁄2" x WOF strip, (1) Fabric O 61⁄2" x WOF strip together lengthwise. From this strip set cut (6) 41⁄2" wide Unit 1a (41⁄2" x 241⁄2" unfinished). (Fig. 1)
Fig. 1
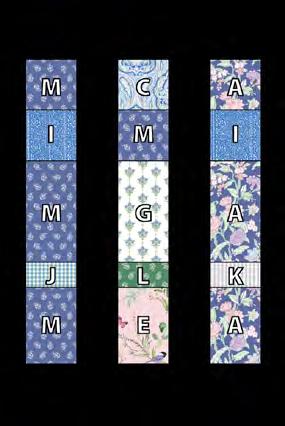
2 In the same manner and using the additional fabric combinations shown in (Fig. 2), make (1) WOF strip set for each and cut into 41⁄2" wide segments to make (6) each Units 1b, 1c, and 1d.
Fig. 2
3 Sew (1) Fabric G 41⁄2" x WOF strip, (1) Fabric A 41⁄2" x WOF strip, (1) Fabric D 81⁄2" x WOF strip, (1) Fabric B 21⁄2" x WOF strip, (1) Fabric F 61⁄2" x WOF strip together lengthwise. Make a half-strip with 21" wide fabrics in the same order. From these, cut (6) 81⁄2" wide Unit 2a (81⁄2" x 241⁄2" unfinished). (Fig. 3)
Fig. 3
Shabby Plaid Quilt
4 In the same manner and using the fabric combination shown in (Fig. 4), make (1) WOF strip set and (1) 21" strip set. Cut into 81⁄2" wide segments to make (6) Unit 2b.
5 Sew (1) Fabric L 41⁄2" x 21" strip, (1) Fabric K 41⁄2" x 21" strip, (1) Fabric L 81⁄2" x 21" strip, (1) Fabric N 21⁄2" x WOF strip, (1) Fabric L 61⁄2" x 21" strip together lengthwise. From this cut (6) 21⁄2" wide Unit 3a (21⁄2" x 241⁄2" unfinished). (Fig. 5)
Fig. 4
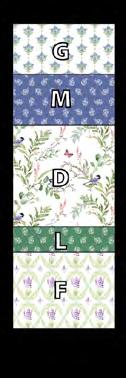
Fig. 5
6 In the same manner and using the fabric combination shown in (Fig. 6), make (1) 21" strip set. Cut into 21⁄2" segments to make (6) Unit 3b.
7 Sew (1) Fabric E 41⁄2" x WOF strip, (1) Fabric A 41⁄2" x WOF strip, (1) Fabric F 81⁄2" x WOF strip, (1) Fabric B 21⁄2" x WOF strip, (1) Fabric D 61⁄2" x WOF strip together lengthwise. From this cut (6) 61⁄2" wide Unit 4a (41⁄2" x 241⁄2" unfinished).
(Fig. 7)
6

Shabby Plaid Quilt
8 In the same manner and using the fabric combination shown in (Fig. 8), make (1) WOF strip set. Cut into 41⁄2" wide segments to make (6) Unit 4b.
8
7
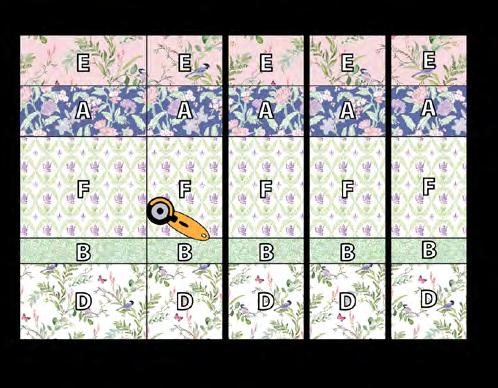

Fig.
Fig.
Fig.
9
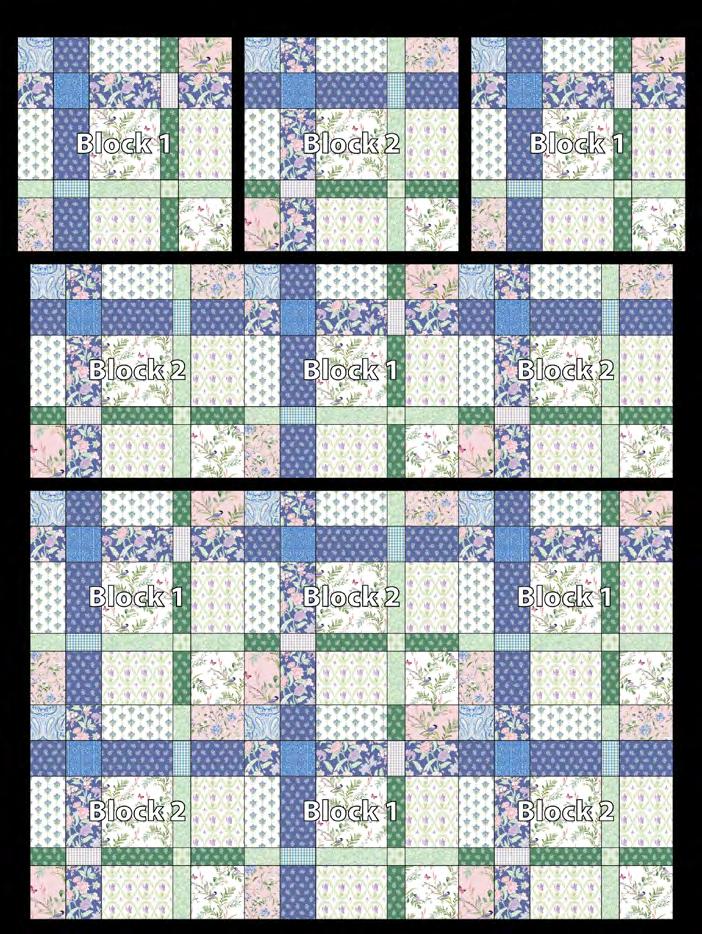
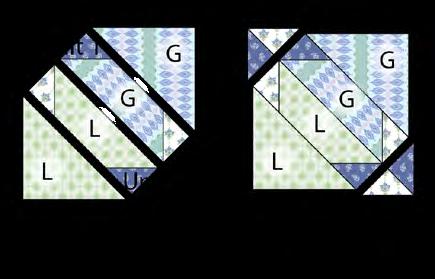
Arrange (1) each Unit 1a, 1b, 2a, 3a, and 4a as shown. Stitch units together. Repeat to make a total of (6) Block 1 (241⁄2" square unfinished). (Fig. 9)
9
Shabby Plaid Quilt
10 Arrange (1) each Units 1c, 1d, 2b, 3b, and 4b as shown. Stitch units together. Repeat to make a total of (6) Block 2 (241⁄2" square unfinished). (Fig. 10)
10
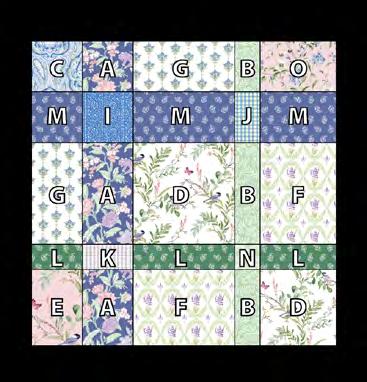
Fig.
Fig.
Shabby Plaid Quilt
QUILT TOP ASSEMBLY
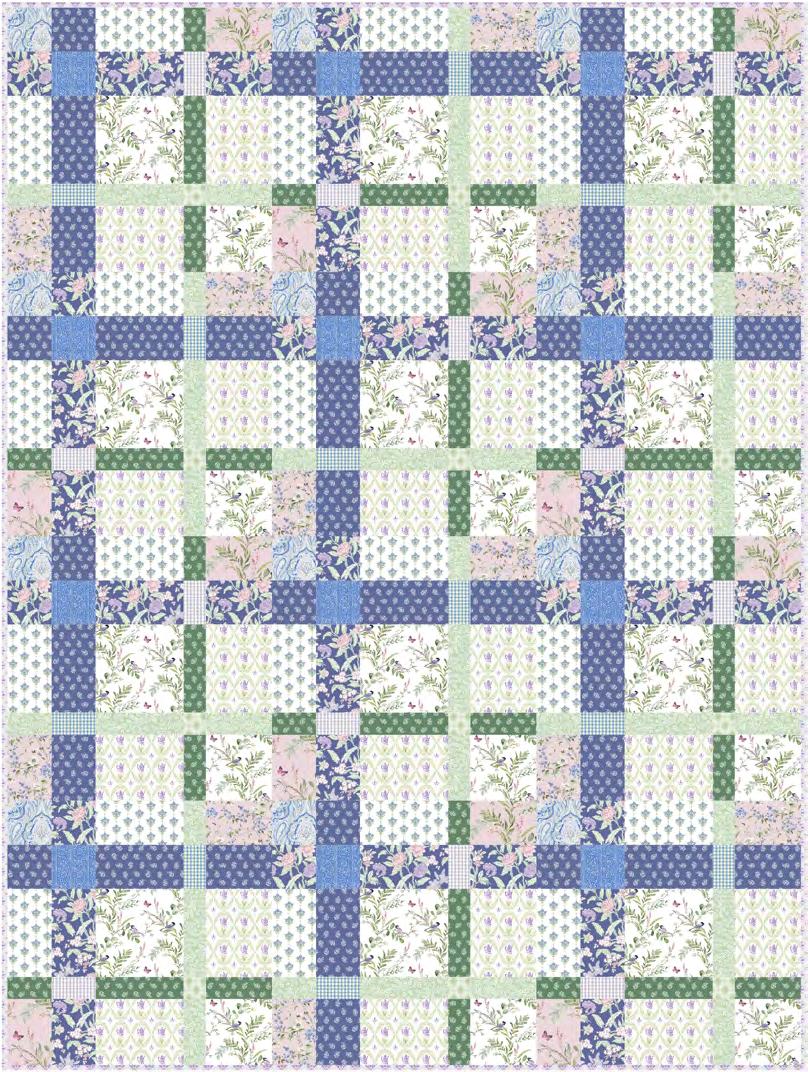
11 Noting Quilt Layout (page 9) arrange blocks in (4) horizontal rows, alternating Block 1 and Block 2. Sew blocks into rows, backstitching at top of top row and bottom of bottom row. Sew rows together. Backstitch at both ends of seams.
FINISHING
12 Sew together (9) 21⁄2" Fabric H binding strips end-to-end using diagonal seams. Press seams open. Press the binding strip in half, wrong sides together, and set aside until quilt is ready for binding.
13 Once the top is complete it is ready for quilting! Quilts can be sent out for longarm quilting or you can quilt it yourself. If you are sending the quilt out, it is important to discuss backing and batting requirements with the quilter to ensure they have everything needed to properly finish the quilt.
14 If quilting yourself and using 44" fabric for backing, choose your favorite method for piecing (taking time to remove selvedges), then layer, baste and quilt. Once finished, trim excess batting and backing and bind according to your favorite method.
15 To complete binding by hand, it must first be machine sewn to the quilt top. Leaving an 8" tail of binding, sew binding to top of quilt through all layers, matching raw edges. Miter corners. Stop approximately 12" from where you started. Lay both loose ends of binding flat along quilt edge. Where the two loose ends meet, fold each side back on themselves and press to form a crease. Using this crease as your stitching line, sew the two open ends of the binding together right sides together. Trim seam to 1⁄4" and press seam open. The binding will naturally fold, wrong sides together, and lay along the quit edge. Finish sewing binding to quilt. Turn and press the binding to the back of the quilt and hand stitch in place.
16 If machine binding, complete the steps above only attach the binding to the BACK of the quilt, turn and press to the front of the quilt and machine stitch in place.
Shabby Plaid Quilt
Quilt Layout
Summer Stars Quilt
Featuring New Traditional by Lillian August
Technique: Pieced
Skill Level: Advanced Beginner
Finished Size of Project: 56" x 68" (1.42m x 1.73m)
Finished Block Size: 12" x 12" (30.48cm x 30.48cm)
Project designed by: Lucy A. Fazely
All possible care has been taken to ensure the accuracy of this pattern. We are not responsible for printing errors or the manner in which individual work varies. Please read the instructions carefully before starting this project. If kitting, it is recommended a sample is made to confirm accuracy.
FABRIC REQUIREMENTS (Tech edited by: Julie Kentner)
Design Color Item ID
A Francine Periwinkle
B Arabella Cobalt
C SM Celeste White
D Celeste Rose
E Camille Sage
F Nadine Cobalt
G Constance Juniper
H Violetta Lavender
I Brooke Cobalt
J Brooke Lavender
K Brittany* Periwinkle
L Kendra Sage
M Sofia Rose
* includes binding
Backing (Purchased Separately)
44" (1.12m) wide
Willow Sage
Summer Stars Quilt
PWLA002.SAGE 33⁄4 yards (3.43m) OR 108" (2.74m) wide 2 yards (1.83m) Swatches
PWLA001.PERIWINKLE 7⁄8 yard (0.80m)
PWLA003.COBALT 1⁄2 yard (0.46m)
PWLA004.WHITE 1⁄2 yard (0.46m)
PWLA005.ROSE 1⁄2 yard (0.46m)
PWLA006.SAGE 1⁄2 yard (0.46m)
PWLA007.COBALT 7⁄8 yard (0.80m)
PWLA008.JUNIPER 1⁄2 yard (0.46m)
PWLA009.LAVENDER 1⁄2 yard (0.46m)
PWLA011.COBALT 1⁄2 yard (0.46m)
PWLA011.LAVENDER 1⁄2 yard (0.46m)
PWLA012.PERIWINKLE* 13⁄4 yards (1.60m)
PWLA013.SAGE 1⁄2 yard (0.46m)
PWLA014.ROSE 1⁄2 yard (0.46m)


ADDITIONAL REQUIREMENTS
• 100% cotton thread in colors to match
• 64" x 76" (1.63m x 1.93m) Quilt Batting
Summer Stars Quilt
CUTTING
WOF = Width of Fabric
Fabric A, cut:
(7)31⁄2" x WOF; sew together end to end and sub-cut
(2)31⁄2" x 621⁄2"
(2)31⁄2" x 561⁄2"
Fabrics B, C, D, E, G, H, I, J, L, and M cut:
(1)87⁄8" x WOF; sub-cut
(2)87⁄8" squares
(1)33⁄8" x 117⁄8"
(1)33⁄8" x WOF; sub-cut
(3)33⁄8" x 117⁄8"
Fabric F, cut:
(2)51⁄4" x WOF; sub-cut
(10)51⁄4" squares
(4)33⁄8" x WOF; sub-cut
(40)33⁄8" squares
Fabric K, cut:
(2) 51⁄4" x WOF; sub-cut (10) 51⁄4" squares (4) 33⁄8" x WOF; sub-cut (40) 33⁄8" squares
(7) 2
2" x WOF (binding) (6)
" x WOF; sew together end to end and sub-cut (2)
SEWING
Notes:
• Use a 1⁄4" seam allowance throughout.
• Sew all pieces with right sides together (RST) and raw edges even using neutral or coordinating thread.
Block Assembly:
1 Cut all 87⁄8" Fabric B-E, G-J, L, and M squares in half diagonally once. (Fig. 1)
1
2 Cut all 51⁄4" Fabric F and Fabric K squares in half diagonally twice. (Fig. 2)
Fig. 2

3 Mark a diagonal line across the wrong side of all 33⁄8" Fabric F and Fabric K squares. (Fig. 3)
Fig. 3
Summer Stars Quilt
4 Arrange (1) marked 33⁄8" Fabric F and (1) marked 33⁄8" Fabric K square RST on (1) 33⁄8" x 117⁄8" Fabric G piece as shown. Stitch on marked lines. Trim seam allowances to 1⁄4" and press triangles out to make Unit 1 (33⁄8" x 117⁄8" unfinished). Repeat with (1) each marked 33⁄8" Fabric F and Fabric K square and (1) 33⁄8" x 117⁄8" Fabric L piece to make Unit 2. (Fig. 4)
Fig. 4
5 Stitch (1) 51⁄4" Fabric F and (1) 51⁄4" Fabric K triangle together as shown. Make a total of (40) Unit 3 (47⁄8" x 67⁄8" unfinished). (Fig. 5)
Fig. 5

6
Arrange (1) each 87⁄8" Fabric G and Fabric L triangles and Units 1 and 2 as shown. Stitch together. Add (2) Unit 3 as shown to complete the block (121⁄2" square unfinished). (Figs. 6 and 7)
6
Summer Stars Quilt
7
7 Refer to the Quilt Layout (page 7) for fabric combinations and placement of the 87⁄8" triangles and 33
" pieces in each block. Repeat Steps 4 and 6 to make the remaining (19) blocks.
QUILT TOP ASSEMBLY
8 Noting Quilt Layout (page 7) for block placement and orientation, arrange blocks into (5) horizontal rows of (4)blocks each. Sew the blocks into rows. Sew rows together.
9 Inner border. Sew 11⁄2" x 601⁄2" Fabric K borders to the left and right sides of quilt. Add 11⁄2" x 501⁄2" Fabric K borders to the top and bottom of quilt.
10 Outer border. Sew 31⁄2" x 621⁄2" Fabric A borders to the left and right sides of quilt. Add 31⁄2" x 561⁄2" Fabric A borders to top and bottom of quilt.
Fig.
Fig.
Summer Stars Quilt
FINISHING
11 Sew together (7) 21⁄2" Fabric K binding strips end-to-end using diagonal seams. Press seams open. Press the binding strip in half, wrong sides together, and set aside until quilt is ready for binding.
12 Once the top is complete it is ready for quilting! Quilts can be sent out for longarm quilting or you can quilt it yourself. If you are sending the quilt out, it is important to discuss backing and batting requirements with the quilter to ensure they have everything needed to properly finish the quilt.
13 If quilting yourself and using 44" fabric for backing, choose your favorite method for piecing (taking time to remove selvedges), then layer, baste and quilt. Once finished, trim excess batting and backing and bind according to your favorite method.
14 To complete binding by hand, it must first be machine sewn to the quilt top. Leaving an 8" tail of binding, sew binding to top of quilt through all layers, matching raw edges. Miter corners. Stop approximately 12" from where you started. Lay both loose ends of binding flat along quilt edge. Where the two loose ends meet, fold each side back on themselves and press to form a crease. Using this crease as your stitching line, sew the two open ends of the binding together right sides together. Trim seam to 1⁄4" and press seam open. The binding will naturally fold, wrong sides together, and lay along the quit edge. Finish sewing binding to quilt. Turn and press the binding to the back of the quilt and hand stitch in place.
15 If machine binding, complete the steps above only attach the binding to the BACK of the quilt, turn and press to the front of the quilt and machine stitch in place.
Summer Stars Quilt
Quilt Layout

Finished Size: 60" x 72" (1.52m x 1.82m)
Project designed by Marcea Owen - Common Street Commons
Purchase pattern at cottonstreetcommons.com
Technique: Pieced | Skill Level: Advanced Beginner
Fabric Requirements
DESIGN
COLOR
(A) Francine Periwinkle
(B) Willow Sage
(C) Arabella Cobalt
(D) SM Celeste White
(E) Celeste Rose
(F) Camille Sage
(G) Constance Juniper
(H) Violetta Lavender
(I) Genieve Cobalt
(J) Brooke Cobalt
(K) Brooke Lavender
(L) Brittany Juniper
(M) Brittany Periwinkle
(N) Kendra Sage
(O) Sofia Rose
(P) Peachy Mellow
*includes binding
Backing (Purchased Separately)
44" (1.12m) wide
Sofia Rose


Liverpool Lane Quilt
ITEM ID
PWLA001.PERIWINKLE
PWLA002.SAGE
PWLA003.COBALT
PWLA004.WHITE
PWLA005.ROSE
PWLA006.SAGE
PWLA008.JUNIPER
PWLA009.LAVENDER
PWLA010.COBALT
PWLA011.COBALT
PWLA011.LAVENDER
PWLA012.JUNIPER
PWLA012.PERIWINKLE*
PWLA013.SAGE
PWLA014.ROSE
PWSK034.MELLOW
YARDAGE
FQ (45.72cm x 53.34cm)
FQ (45.72cm x 53.34cm)
FQ (45.72cm x 53.34cm)
FQ (45.72cm x 53.34cm)
FQ (45.72cm x 53.34cm)
FQ (45.72cm x 53.34cm)
FQ (45.72cm x 53.34cm)
FQ (45.72cm x 53.34cm)
FQ (45.72cm x 53.34cm)
FQ (45.72cm x 53.34cm)
FQ (45.72cm x 53.34cm)
FQ (45.72cm x 53.34cm)
3⁄4 yard (0.69m)
FQ (45.72cm x 53.34cm)
FQ (45.72cm x 53.34cm)
21⁄2 8 yards (1 94m)
PWLA014.ROSE


41⁄2 yards (4.11m)


Backing
44"
If kitting, refer to the final pattern for yardage amounts, it is recommended that a sample is made to confirm accuracy.
(A) (B) (C) (D) (E)
Featuring New Traditional by Lillian August
Finished Size: 62" x 74" (1.57m x 1.87m)
Project designed by Marcea Owen - Common Street Commons
Purchase pattern at cottonstreetcommons.com
Technique: Pieced | Skill Level: Advanced Beginner
Trafalgar Square Quilt
Trafalgar Square Quilt
Fabric Requirements
DESIGN
(A) Francine Periwinkle
(B) SM Celeste White
(C) Celeste Rose
(D) Violetta Lavender
(E) Genieve Cobalt
(F) Brittany Juniper
(G) Brittany Periwinkle
(H) Ice Chips Wind
* includes binding
Backing (Purchased Separately)
44" (1.12m) wide
Francine
Periwinkle
PWLA001.PERIWINKLE 1⁄2 yard (0.46m)
PWLA004.WHITE 3⁄4 yard (0.69m)
PWLA005.ROSE 2⁄3 yard (0.61m)
PWLA009.LAVENDER 1⁄3 yard (0.30m)
PWLA010.COBALT 1⁄3 yard (0.30m)
PWLA012.JUNIPER* 3⁄4 yard (0.69m)
PWLA012.PERIWINKLE FQ (45.72cm x 53.34cm)
PWSK012.WIND 2 yards (1.83m)
PWLA001.PERIWINKLE 41⁄2 yards (4.11m)


If kitting, refer to the final pattern for yardage amounts, it is recommended that a sample is made to confirm accuracy.
(H) Backing 44"