LABORATORY SERVICES
General Guidelines
Specimen requirement section of this manual generally includes the requested volume, container type, preservative, and any special handling notes. Specimens collected from Forrest General nursing units should meet special handling notes (i.e. keep on ice) and be transported to the laboratory immediately following collection.
Health & Safety Precautions
Specimens must be handled in a safe manner and according to applicable legal requirements or guidance. Information on safe specimen handling can be found at FH On-line > Policies > Infection Prevention and Control > Exposure Control Plan for Bloodborne Pathogens. Information may also be obtained from the U.S. Occupational Safety and Health Administration (OSHA) and the Centers for Disease Control and Prevention (CDC). In handling human specimens, the goal is to protect health care workers and ancillary staff from exposure to blood and to other potentially infectious body fluids. Please ensure that there is no leakage from or visible contamination outside the specimen container and that there are no needles or other sharps in the package that could cause injury or pathogenic exposure to anyone handling or opening the package. The laboratory reserves the right to refuse to accept any specimens, or containers that pose a safety hazard to our employees.
FGH Clinical Laboratory Hours of Operation
Clinicallaboratoryservicesareoffered24hoursaday,7daysaweek.
Support Services staff is responsible for outpatient phlebotomy, specimen receiving and processing, and shipping samples to reference laboratories.
TechnicalStaffisresponsiblefortestingandresultingtestsrequested. Pleasenote, limited staffing and services are available during weekends and Federal holidays.
Outpatient Collection
Outpatients may report to the Outpatient scheduling area for routine specimen collection between the hours of 0500 to 1700 hours Monday through Friday. After hours, weekends and Federal holidays, outpatients may report to the business office and/or Emergency Department. No STAT or ASAP specimens will be collected here. STAT or ASAP specimens will be collected and transported to the laboratory by the requesting clinic.
Inpatient Specimen Processing
Specimen processing is staffed 24 hours a day, 7 days a week. This service supports the processing of inpatient/outpatient samples that have been collected by the ward/clinic personnel and delivered to the laboratory.
FGH Clinical Laboratory Specimen Collection Manual Date of Last Review: 05/10/2022 6 | Page
Reference Laboratories
The laboratory contracts and ships specimens to a variety of commercial laboratoryservicesforspecializedtestsnotperformedin-house.Turn-around times for results may vary, but will generally range from 7 to 10 days. Normal hours of operation are typically 24 hours a day, 7 days a week.
Laboratory test requirements are continually changing. FGH Clinical Laboratory offers an on-line lab test/procedure directory by either accessing the procedure catalog via EPIC or by calling the clinical laboratory.
Point of Care
Point-of-Care Testing (POCT) is utilized at Forrest General Hospital, The Orthopedic Institute, FGH Homecare, and Pine-Grove to enhance patient care by providing limited laboratory testing capability at the patient bedside. DNV GM Healthcare, Clinical Laboratory Improvement Act (CLIA) and College of American Pathologist (CAP) inspect and accredit the POCT program. Strict Federal, CLIA and CAP accreditation standards must be met for a unit to maintain POCT privileges. Staff responsible for POCT must be familiar with Standard Operating Procedures (SOP) for the specific POCT performed in their area.
Reporting of Laboratory Results
ALL laboratory results are recorded in the patient electronic medical record (EMR) in EPIC.
Quality Assurance
As part of the organization’s on-going efforts to reduce medical errors and to confirm the reporting of accurate, high quality test results, FGH Clinical Laboratory have established guidelines for the ordering and collection of laboratory tests that are consistent with state and federal regulations.
Laboratory specimens submitted that do not meet these guidelines will be rejected. See specimen rejection criteria. The appropriate personnel will be notified at the time of specimen rejection and the rejection will be documented inEPIC. The patient will not be billed for the rejected test.
Although the quality of laboratory test results is dependent on many variables, it all begins with proper specimen collection. Many tests require that the patient be prepared in a specific way to ensure useful results. Some may require the patient be fasting, or be timed in relation to a medication that was given.
Site selection and good technique are important as well. Samples collected from a venous access port must have a sufficient waste sample collected first.
FGH Clinical Laboratory Specimen Collection Manual Date of Last Review: 05/10/2022 7 | Page
CRITICAL VALUES
Critical Values
Critical values are those results so far below or so far above the reference range which have a life threatening potential. Once a critical value is noted by the technologist (MLS/MLT), the technologist will report the value as indicated: Inpatient ALL laboratory results are recorded in the patient electronic medical record (EMR) in EPIC
A. Inpatient: the technologist will report the value to the nurse in charge of the patient;
B. Outpatient: the value will be reported to the primary care provider ordering the test; or to an appropriate physician on call for the patient primary care provider.
Documentation of notification will be recorded in the patient's electronic medical record. Because patient safety is of utmost importance, and per CAP and DNV regulations, the critical value MUST be ‘read back’ by the receiver and documented in the patients EMR as ‘results read back and confirmed’.
A. Receiver is defined as either the Nurse in charge of the patient, the PCC, the Primary Care provider ordering the test; or the physician on call for the patient primary care provider.
B. First AND Last name, title is optional, (i.e., Jan Woods, RN) of the receiver taking the critical value must be documented in the patients EMR. A MLS/MLT may not document Jan W. as the person receiving the critical value, as this does not meet DNV nor CAP requirements for receiver of a critical value.
C. .read (results read back and confirmed) MUST be documented with each critical value obtained on the patient. For example, if a patient has a critical K+ on BMP and a critical Troponin on Cardiac Risk, EACH critical value (K+ and Troponin) must be documented according to the documentation of notification of critical values
Chemistry, Critical Value Listing – Quantitative Results
Amikacin
Ammonia
Amylase
Bicarbonate
Bilirubin, Neonatal
Trough: greater than 8 ug.mL
Peak: greater than 35 ug/mL
< 1 year old: Greater than 100 uMol/L
>1 year old: Greater than 200 uMol/L
Greater than 300 U/L
Less than 12 mMol/L
0 up to 1 day old: Greater than 6.8 mg/dl
1 days up to 2 days: Greater than 7.8
2 days up to 3 days: Greater than 13.0
3 days up to 4 days: Greater than 16.0
4 days up to 5 days: Greater than 17.4
5 days up to 10 days: Greater than 17.6
FGH Clinical Laboratory Specimen Collection Manual Date of Last Review: 05/10/2022 8 | Page
Blood
Calcium
Caffeine
Greater than 40 ug/dL
CO2 (ER patients only) <12 meq/L
Digoxin
Dilantin (phenytoin)
Gentamicin
Glucose – Adult
Glucose – Newborn
Lactate
Lithium
Magnesium
Osmolality
Phenobarbital
Phosphorous
Potassium
Protein, Serum
Protein, Cerebrospinal fluid
Salicylate
Sodium
Theophylline
Tobramycin
Troponin T
Uric Acid
Vancomycin, Trough
Valproic Acid
Greater than 2.5 mg/dL
Greater than 40 ug/mL
Trough: Greater than 2.0 ug/dL
Peak: Greater than 10 ug/dL
Less than 40 mg/dl
Greater than 500 mg/dl
Less than 30 mg/dL
Greater than 300 mg/dL
Greater than 2.0 mg/dL
Greater than 2.0 mEq/L
Less than 1.2 mEq/L
Greater than 3.0 mEq/L
Less than 270 mOsm/kg
Greater than 60 mg/dL
Less than 1.0mg/dL
Less than 2.5 mEq/L
Greater than 6.0 mEq/L
Greater than 11.0 g/dL
Less than 10 mg/dL
Greater than 75 mg/dL
Greater than 30 mg/dL
Less than 125 mEq/L
Greater than 160 mEq/L
Greater than 25 ug/mL
Trough: Greater than 2.0 ug/mL
Peak: Greater than 10 ug/mL
Greater than 0.10
Greater than 15 mg/dL
Trough: Greater than 25 ug/mL
Peak: Greater than 40 ug/mL
Greater than 120 ug/mL
Hematology / Coagulation, Critical Value Listing – Quantitative Results
aPTT
D-Dimer
Fibrinogen
Hematocrit
Greater than 500 mg/dL
Less than 22%
FGH Clinical Laboratory Specimen Collection Manual Date of Last Review: 05/10/2022 9 | Page 10 days up to 30 days: Greater than 15
Total Greater than 15 mg/dL
Bilirubin
Gases
pH < 7.30 >7.50 pCO2 <35 >50 PO2 <50 >100
(arterial)
< 7.0
mg/dL >14.0 mg/dL
See partial thromboplastin time
Greater than 230ug/mL DDU
Less than 50 mg/dL
Microbiology, Critical Value Listing
Preliminary results on positive Sterile Body Cultures (Blood, Spinal fluid, etc.)
Positive Respiratory Syncytial Virus
Positive Cryptococcal Antigen
Enteric Pathogens encountered in Stool Cultures (Salmonella, Shigella, Campylobacter, E.coli 0157)
Positive results on AFB Stain (preliminary)
Positive results on Bacterial Meningitis Screen
Positive Gram Stains on Sterile Body Cultures
Positive Group A throat screen
Positive Rotavirus
Positive TB Quantiferon
Positive Influenza Screen
Preliminary identification of agents of bioterrorism
Positive urine cultures on inpatients 9 weeks or younger
Group A Streptococcus isolated from any source
Cryptococcus neoformans isolated from any source
Blood Bank, Critical Value Listing
Confirmed immediate hemolytic transfusion reaction
FGH Clinical Laboratory Specimen Collection Manual Date of Last Review: 05/10/2022 10 | Page Hemoglobin Less than 7.0 g/dL HIT (Heparin Induced Thrombocytopenia) Positive Partial Thromboplastin Time (PTT) Greater than 79 seconds
Greater than 200 seconds
Platelet count Less than 50.0 bil/L Greater than 1,000.0 bil/L Prothrombin Time (PT) INR Greater than 4.4 White Blood Count Less than 2.5 bil/L Greater than 30.0 bil/L
(no heparin)
(Heparin therapy)
Positive Antibody Screen when blood is requested from Surgery or Emergency Services
Cold agglutinin reacting at 30°C when the patient is scheduled for vascular surgery and hypothermia will be used
Warm autoantibody in the serum. Notify pathologist so pathologist/physician consultation can occur.
Incompatible crossmatch following release and transfusion of blood EMR (Emergency Release)
Hemolysis noted in repeatedly drawn samples and not thought to be due to traumatic venipuncture.
Positive direct coombs on newborns
ORDERING LABORATORY TESTS
Patient Identification
All specimen collection procedures must begin with correct patient identification. Positive patient identification is made by comparing the patient’s armband ATTACHED TO THE PATIENT to EACH requisition / label The patient’s name and medical record (or visit) number should match exactly. Any discrepancy MUST be resolved prior to specimen collection.
For patients with hearing or speech impairments, or patients who speak a different language, identity may be verified with physical forms of identification (driver’s licenses, etc.), translators, companions accompanying the patient, or other members of the health care team who are personally familiar with the patient (nurses, providers, etc.). If the patient does not have a translator or family member available, please call the house/nursing supervisor at (601)606-7651 to ask for assistance on finding an interpreter.
A. DO NOT
1) Try to identify the patient by calling the patient by name. You may be misunderstood or they may be hard of hearing.
2) Assume
3) Collect if there is a discrepancy.
B. If no armband exists
1) In emergency situations place a transfusion bracelet on the patient. The transfusion number will serve as a temporary medical record number. Record the transfusion number on all requisitions and specimens. The patient’s name should be recorded as John Doe #1, John Doe #2 etc., until the identity of the patient is known.
Transfusion Bracelet Policy
FGH Clinical Laboratory Specimen Collection Manual Date of Last Review: 05/10/2022 11 | Page
The purpose of the transfusion bracelet is to assure accurate identification of patients, blood specimens, and blood transfusion products thus minimizing identification errors.
A. All patients with requests for transfusion service will have a green identification bracelet placed on their wrist at the time the pre-transfusion sample is collected. The armband will remain on the patient until discharged.
B. At the time of collection, the transfusion number from the green armband must be recorded on the blood specimen along with other required information such as full name, medical record number, date and time of collection, and initials of the collector. Labeling must be done at the bedside, in the presence of the patient.
C. Samples received in the laboratory without the appropriate identifying information will be discarded and a new sample required.
D. New samples will be required if the identification number on the sample and the transfusion armband do not match EXACTLY.
E. Re-labeling of pre-transfusion specimens will NOT be allowed.
F. Nursing personnel will verify the numbers on the green transfusion bracelet, the patient's hospital bracelet, and on the blood product. This is done to ensure a correct match of blood products to the recipient prior to beginning a transfusion.
G. Any discrepancy between identification numbers (hospital number and/or transfusion number) and the numbers recorded on the blood component tag must be resolved BEFORE administering any blood component. Contact the laboratory for instructions.
H. Transfusion bracelets are available for issue in the Clinical Laboratory.
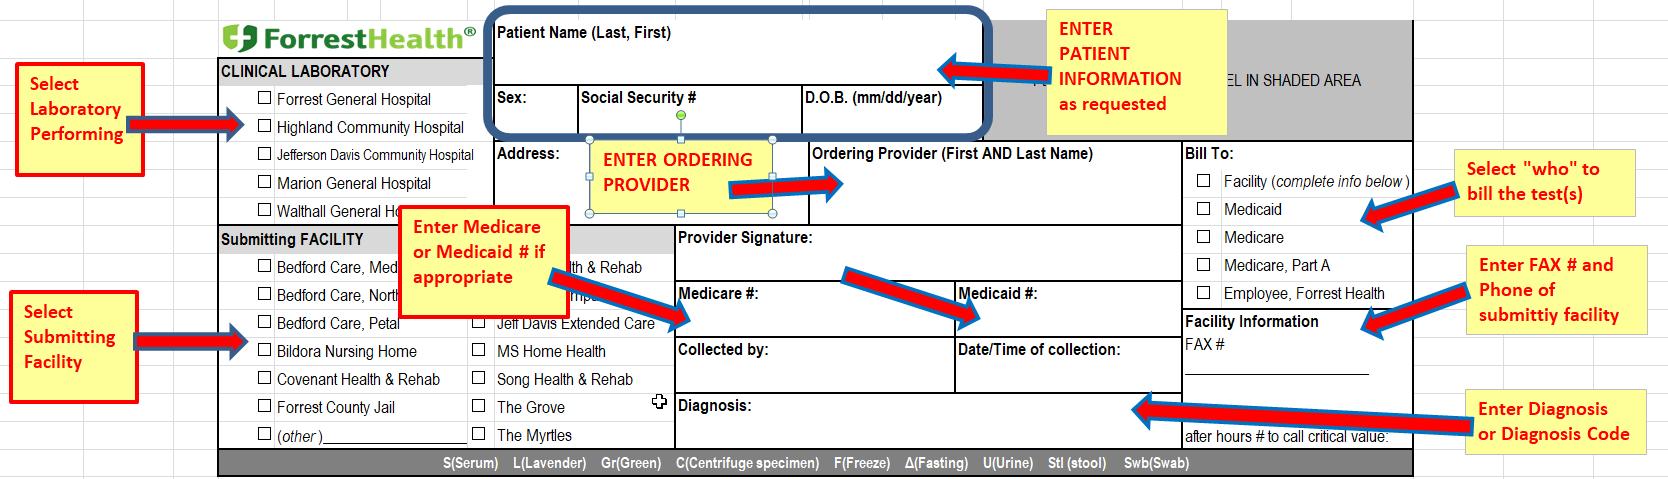
Test Requisitions
Specimens received must be accompanied by a written request from the provider or preferably Clinical Laboratory test request form requisition. Requisitions must contain the following information
Patient’s first AND last name
Date of Birth (DOB)
Social Security Number (SS#)
First AND last name of the ordering physician
Appropriate diagnosis code
Other information needed
Submitting facility
Specimen type (site/source), if not blood
Identity of the collector
Date and time of collection
Test requested
FGH Clinical Laboratory Specimen Collection Manual Date of Last Review: 05/10/2022 12 | Page
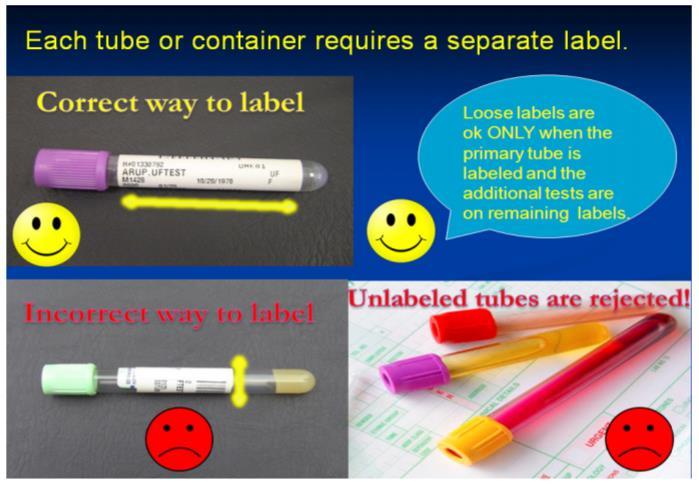
Specimen Labeling
Each primary specimen container (innermost container that actually holds the specimen) must be labeled at the time of specimen collection in the presence of patient at time of collection. EPIC generated labels are recommended. If preprinted labels are not available, handwritten patient information, using indelible ink (i.e., ink pen) is acceptable if legible.
Positive patient identification must be made prior to collection, and specimens labeled and verified against the patient armband prior to leaving the patient bedside.
A. ALL In-patient specimens submitted to the laboratory for testing MUST be labeled with pre-printed computer generated labels at the point of collection.
If the EPIC label must be placed over an existing label, care must be taken not to obscure the two forms of patient identification, name and date of birth or name and MRN number.
FGH Clinical Laboratory Specimen Collection Manual Date of Last Review: 05/10/2022 13 | Page
Example Test Requisition
B. If a pre-printed computer generated label is not available, and for outpatient specimens submitted to the laboratory for testing, use an indelible marker (i.e., ink pen). Specimens must be labeled at the point of collection. Specimen labeling should be done by the individual collecting the sample, and include the following information:
The patient's FIRST and LAST name
MRN#, CSN# or SS#
DOB
Date and time of collection.
Initials of person performing the phlebotomy.
Transfusion ID (green armband) number if appropriate
C. Specimens submitted as “extra” to be held for any additional testing must be labeled with the extra order, which will state what color tube has been drawn to be held extra. Blood will be scanned into a location in EPIC, so the specimens can be easily found. Under no circumstance will ‘extra blood” be used for blood bank. Specimens not meeting the labeling criteria will be quarantined for 24 hours and then discarded.
D. Specimens received incorrectly labeled may be re-labeled if recollection of the specimen poses trauma to the patient. i.e. spinal fluids, tissues, cytology. A disclaimer must be put on the report or in the audit trail (accessioning comment) stating the labeling change. Blood and urine specimens may not be relabeled without the permission of the lab manager, supervisor or charge tech.
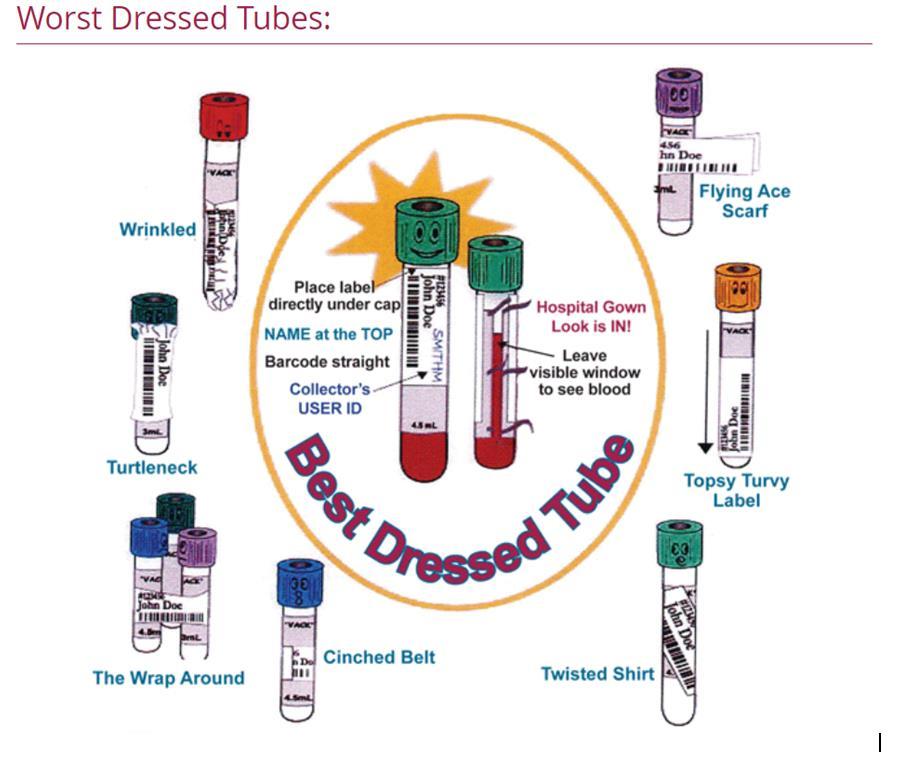
E. Specimen tubes must be labelled according to the “Best Dressed” diagram below.
FGH Clinical Laboratory Specimen Collection Manual Date of Last Review: 05/10/2022 14 | Page
FGH Clinical Laboratory Specimen Collection Manual Date of Last Review: 05/10/2022 15 | Page
Test Additions after Specimen Submission
EPIC Patients – Lab tests may be added to existing specimens by placing an add on order in the EPIC computer system. Add-on tests most times can be performed, provided they meet the following conditions:
Sufficient volume is available
Original specimen type is acceptable for additional testing requested
Specimen stability guidelines have not been exceeded
Specimen is NOT a Reference Lab Tests
If for any reason the lab test cannot be performed, the laboratory staff will notify the patient’s nurse, unit clerk, or the outpatient office to request a redraw
Verbal Orders
Verbal orders are not authorized to be taken by any MLS/MLT or Support Services team member. In rare instances, blood may be tested without the presence of an order; HOWEVER, results cannot be documented, either verbally or electronically, until a lab requisition order is received or an EPIC order has been placed.
Downtime Procedure
During a downtime event, the clinical laboratory will perform test(s) on specimens and telephonically report all critical values to the responsible provider and will document notification and result read back. Laboratorypersonnel will fax a copy or send results via the pneumatic tube station of all patient results with accompanying reference ranges to the specificnursing unit. The laboratory will enter the orders and results into CHCS once it is again operational.
All orders are received via manual requisition. All requisitions must contain the following information:
Patient’s name
Medical record or visit number
Ordering physician
Patient Location
Date and time of collection
Collector (preferably the employee ID)
A list of test(s) to be performed
FGH Clinical Laboratory Specimen Collection Manual Date of Last Review: 05/10/2022 16 | Page
All of the above information is necessary to ensure the correct tests are performed, for timely distribution of the test result reports and for downtime recovery. Downtime forms are issued by the laboratory – along with blank specimen labels.
During a downtime event, specimen must be labelled with the following information:
Patient’s name
MRN or CSN (visit #)
Date and time of collection
ID of the collector (preferably the employee ID)
Green armband number (for transfusion specimens only)
TESTING PRIORITY
An urgency status is defined as the priority given to each laboratory test that will indicate how quickly Laboratory personnel must perform that test.
In a hospital setting, test orders are often assigned a priority to help organize and rank by urgency or need the specimen collection process. This code is used to prioritize specimen collection and testing workflow in order to provide timely results to the medical team. These are some of the most common priorities in use:
Priority Definition
AM Designates blood collection in the morning, generally as part of morning rounds in the hospital setting.
ASAP Indicates collection as soon as possible in the workflow, but does not designate a specific time.
Pre-op Denotes collection for a patient prior to a surgery but does not designate a specific time.
Routine Designates collection during a regularly scheduled collection time frame. Routine priorities can be collected throughout the day as time allows. Each facility will set the routine collection times that best suit the daily workflow.
Stat Requires specimen collection immediately, taking priority over other designations.
Timed
Designates blood collection for a specific time. Many facilities will have a procedure that clearly defines the window of time the specimen can be collected (e.g., ten minutes before or after the time requested). Time of actual draw must be recorded. Institutional policies and procedures for this type of collection should be observed.
FGH Clinical Laboratory Specimen Collection Manual Date of Last Review: 05/10/2022 17 | Page
Managing multiple priorities on the same patient
The goal of managing multiple priorities on the same patient is to minimize the number of venipunctures performed on that patient. Combining collections with an understanding of the priority codes will allow a reduction in the number of venipunctures a patient receives without compromising their treatment and care.
Immediate or stat collections always have the highest priority; other priority collections can be combined with stats, such as routine collections.
Timed specimens must be collected at the specified time. Other priorities can be combined with timed specimens, but the phlebotomist should never change the collection on a timed specimen without prior communication and permission from the nurse, physician, or caregiver in charge of the patient.
The urgencies for the Laboratory tests are as follows:
Routine
Most routine tests performed in-hours are tested as soon as the specimen is received. Turn-around time for a routine test request is typically three (3) hours or less, excluding specimens that are “batch tested” to reduce costs and improve efficiency (i.e. Quantiferon TB testing, RPR, etc.). Turnaround times for batch testing may range from twenty-four (24) hours to four (4) days depending on the assay being performed.
ASAP (As Soon As Possible)
This category is to be utilized for lab requests that are not emergencies, but require results to be received as quickly as possible. The turn-around time for an ASAP procedure performed in house is typically less than two (2) hours. Results will be certified in CHCS and be available to the clinician within two hours of specimen receipt. All critical values will be called directly to the provider with read back verification. Multiple ASAP requests will be performed in the order received.
ED / STAT
The “STAT” as applied to Laboratory test requests means a request for information that has immediate implications for patient care. The key elements of the definition are:
Patient’s condition requires immediate action
FGH Clinical Laboratory Specimen Collection Manual Date of Last Review: 05/10/2022 18 | Page
Results of the test are required before a decision about the type of action to be taken can be made
The category should be confined to life threatening situations. STAT requests are for true emergencies that involveloss oflife, limb or eyesight. The turn-around time for a STAT procedure is one hour or less from specimen receipt. Results will be certified in EPIC and available to the requesting clinician. All critical values will be called directly to the provider with read back verification. When multiple STAT requests are received testing is performed in the order specimens are received (unless a call for immediate priority is received from the unit nurse or clinician).
CLINICAL LABORATORY TURN AROUND TIMES
Turn - around times have been established by FGH Clinical Laboratory. Unless otherwise noted, turn-around times are determined according to the status of the test ordered. Below is a list of turn-around times
Routine Labs…………………………… 240 minutes
As soon as possible (ASAP)……………. 120 minutes
STAT ……………………………........... 120 minutes
ED ……………………………………… 120 minutes
Basic Metabolic Profile……… < 30 minutes
Cardia Risk Profile…………… < 30 minutes
Complete Blood Count (CBC)… < 30 minutes
Preg w/reflex to bHCG………… < 60 minutes
proBNP ………………………... < 30 minutes
PT / PTT ……………………… < 25 minutes
Type & Screen ……………….. < 45 minutes
Urinalysis …………………….. < 13 minutes
Microbiology Molecular Tests
Affirm Vaginosis ……………… 60 minutes
FGH Clinical Laboratory Specimen Collection Manual Date of Last Review: 05/10/2022 19 | Page
CT-NG, by DNA ……………… 108 minutes
C. difficile, by DNA…………… 58 minutes
Nasal MRSA, by DNA …………80 minutes
Biofire Film Array, M/E Panel ….120 minutes
Biofire Film Array, BCID Panel …110 minutes
COVID, by DNA……………… 55 minutes
Flu A/B, by DNA 55 minutes
Flu / RSV, by DNA 55 minutes
Group A Strep, by DNA 37 minutes
RSV, by DNA………………… 55 minutes
Microbiology Rapid Tests.
COVID 19, BD……………….. 20 minutes
FLU, A/B, BD ….…………….. 20 minutes
Rotavirus …………………….. 30 minutes
S. pneumonia Urinary Antigen .. 30 minutes
Legionella Urinary Antigen …. 30 minutes
Cryptococcal antigen ………….. 60 minutes
Gastocult …………………….. 30 minutes
Occult Blood ……………........ 30 minutes
CRITERIA FOR REJECTION OF SPECIMENS
Any specimen not meeting the defined acceptance criteria will be rejected as per policy. If a test is rejected, the originating location/collector will be notified of the need to re-collect or re-order.
Reasons for potential specimen rejection may include the following:
FGH Clinical Laboratory Specimen Collection Manual Date of Last Review: 05/10/2022 20 | Page
Specimen not labelled
Specimen mislabeled
Specimen with no name
Specimen with no green armband
Specimen with multiple specimen numbers
Specimen with multiple names on specimen
Specimen with MRN incomplete or cutoff label
Specimen in which green armband does not match sample and/or patient
Sample drawn from wrong patient
Specimen with possible contamination from IV fluid or anticoagulant
Sputum specimens > 10 epithelial cells/lpf
Specimen submitted for urine culture > 3 organisms
Specimens broken and/or spilled in transit
Specimens which contain exterior contamination of the container
Specimen which are hemolyzed
Specimens submitted in the improper container (i.e., heparinized potassium submitted in a marble top tube)
Specimen requirements not met (i.e., patient not fasting; lactic acid not submitted on ice)
Specimens which are clotted
Specimen collected at the wrong time
Specimen too old for processing
Sputum specimens in which WBC < Epithelial cells
Notification for Unacceptable Samples
The following protocol will be utilized for notification when samples are considered unacceptable:
Patient samples that are deemed irretrievable (i.e. spinal fluid), every effort will be made to determine the appropriate identifying information in order to process and test the sample. In this instance a Laboratory Unacceptable Specimen Authorization Form MUST be completed and signed by the individual accepting responsibility for the specimen identification.
Irretrievable specimens (e.g. tissue, CSF, etc.) will be processed, if possible, and the appropriate clinic notified of specimen condition and the lack oforders.
Samples with improper forms, contaminated containers or incomplete information will not be accepted.Nursingunitorclinic personnel will benotified to resubmit thesespecimens properly.
For specimens which fall into ANY of the rejection criteria listed above, the laboratory will notify the nursing unit or clinic. If the
FGH Clinical Laboratory Specimen Collection Manual Date of Last Review: 05/10/2022 21 | Page
patient is an inpatient, it is the nursing unit’s responsibility to recollect. If the patient had blood collected as an outpatient, the laboratory will contact the patient for recollection.
Sub-optimal microbiology cultures that are irreplaceable will be held for 48 hours before discarding. The clinician will be contacted as soon as possible after receipt. If the clinician requests, these specimens will be cultured andprocessed.
SPECIMEN TYPES
Tests ordered by the patient's physician will typically need serum, plasma, or whole blood. Collection of these blood samples is performed using specific additive or non-additive tubes. Verifying test requirements and determining which additive tubes are needed before specimen collection is an important part of patient preparation.
Centrifugation of a blood specimen for laboratory testing will separate whole blood into a cellular portion, found on the bottom of the collection tube, and a liquid portion found on top of the cells.
Serum
Serum is the fluid that is expressed from a clotted whole blood specimen after centrifugation.
Tubes that provide serum include the red top tube, gold top tube, and the serumseparator tube (SST). Serum tubes may or may not have a clot activator in them to help the clotting process. Additionally, serum tubes may have a gel-like material at the bottom of the tube, as in the case of the serum separator tube (SST). If this gel is present, upon centrifugation it will migrate in the tube to provide a separation barrier between the cellular components of the blood and the liquid serum portion.
Plasma
Plasma is the fluid expressed from a whole blood specimen that has NOT been allowed to clot after collection and subsequently centrifuged.
If plasma is the specimen of choice for a test, the specimen must be collected in a tube with an appropriate additive to prevent clotting or coagulation of the blood. This additive is known as an anticoagulant, and different types of anticoagulants are used depending on the laboratory test ordered. Common anticoagulant type additive tubes include the lavender and pink top tubes, green top tubes, blue top
FGH Clinical Laboratory Specimen Collection Manual Date of Last Review: 05/10/2022 22 | Page
tubes, and gray top tubes. Centrifugation of a tube of blood with an anticoagulant will yield liquid plasma that can be removed.
Whole Blood
Often, an anticoagulated whole blood specimen (e.g., lavender top) is required for test purposes, as seen with common hematology tests like the complete blood count (CBC). With anticoagulated whole blood specimens, complete mixing of these samples is critical to accurate testing results.
BLOOD COLLECTION ADDITIVES
Blood collection tube additives function to:
1. Prevent blood from clotting or
2. Promote blood clotting or
3. Preserve cellular components and chemical constituents
The color-coded caps found on blood collection tubes are a quick way to visually select the appropriate additive tube for the test ordered. The presence of a specific additive within the tube and/or the specific purpose for that tube type is indicated not only by cap color, but also noted on the tube itself. (Note: Color coding is generally universal for most manufacturers.)
There are few additive-free types of tubes; typically, blood will clot in a non-additive glass red top tube. However, these are used less frequently now. The use of plastic collection tubes requires clot activators, added to the tubes by the manufacturer, to promote blood clotting necessary to yield a serum specimen. Remember, an additive can significantly alter test results if the collection tube is not filled to its maximum volume or if not handled properly, which could ultimately lead to improper patient treatment.
Proper handling of blood collection tubes includes the end-over-end gentle inversion of tubes after their draw. This inversion should be for a minimum of five to eight times and done in a gentle motion without shaking the tubes. This inversion is performed during the venipuncture process. As a tube is removed from the needle holder, the phlebotomist can gently invert the tube end-over-end while reaching to place it safely on a flat surface.
The following table indicates the most common additives used in blood collection for patient testing and their uses:
FGH Clinical Laboratory Specimen Collection Manual Date of Last Review: 05/10/2022 23 | Page
Color Tube (Plastic or Additive Function of Common
Glass)


1. Sterile blood culture tubes (yellow)
2. Coagulation tube (light blue)
Anticoagulant: Sodium polyanethol sulfonate (SPS)
Anticoagulant: Sodium citrate


3. Serum tube with or without clot activator, with or without gel (red, gold, or red/black "tigertop")
4. Heparin tube with or without gel plasma separator (green)


5. EDTA tube with or without gel separator (lavender/purple or pink)
6. Glycolytic inhibitor tube (gray)
Additive: Clot activator (NOT an anticoagulant)
Anticoagulant/Additive Laboratory Tests
Prevents coagulation by binding calcium and slows phagocytosis of bacteria by leukocytes Blood cultures
Prevents blood from clotting by binding calcium; preserves coagulation factors; provides specific 9:1 blood to anticoagulant ratio
Plastic tube promotes blood clotting with addition of glass or silica particles; gel separates serum from cells
Anticoagulant: Sodium or lithium heparin
Prevents clotting by inhibiting thrombin activation
Coagulation tests
Anticoagulant: Potassium EDTA
Prevents clotting by binding calcium; preserves cells and prevents platelet aggregation
Anticoagulant: Sodium fluoride with sodium or potassium oxalate
Fluoride inhibits glycolysis and oxalate prevents clotting by precipitating calcium
Chemistry, serology, and immunology tests
Stat and some routine chemistry tests, esp. potassium
Hematology (lavender) and blood bank (pink) tests
Glucose (especially for delayed testing), blood alcohol
FGH Clinical Laboratory Specimen Collection Manual Date of Last Review: 05/10/2022 24 | Page
SPECIMEN TRANSPORT TO FGH CLINICAL LABORATORY
All diagnostic specimens should be submitted in properly labeled closed containers that are inside a sealed biohazard bag. Care should be given to transport all specimens in a manner to prevent contamination of workers, other patients and the environment.
NOTE: Information contained within this topic is a general overview. More information pertaining to inpatient specimen collection may be found in EPIC under procedure catalog.
In the search bar, enter the name of the test (for example, lactate {lactic acid}.
Select the test with the star beside the name.
o Specimen requirements, to include collection requirements (PLACE SPECIMEN ON ICE), container type and turnaround time will display.
Outpatient areas not connected with EPIC may call FGH Clinical Laboratory to speak with a MLS, MLT or Support Services Team Member for specimen requirements and container type.
Pneumatic tube system
The hospital pneumatic transport system may be used to transport most specimens within the facility. Follow current guidelines for system. Ensure that all specimens are transported in a sealed biohazard bag. If any specimen spills during pneumatic transport, refer to current facility policy and procedure for cleanup and notification of appropriate departments.
Courier Specimens
Specimens transported by couriers should be tripled packaged. The original container must be leak-tight and inserted into a secondary bag with preferably absorbing material to absorb accidental spills. The outer
FGH Clinical Laboratory Specimen Collection Manual Date of Last Review: 05/10/2022 25 | Page
levels, and lactic acid tests
packaging (cooler) must be designated and labeled as biohazard and secured during transport to prevent movement. All operators of motor vehicles that transport specimens are trained as to the proper transportation rules for the type of hazardous materials they transport.
Safety Note: Needles should be removed from all specimen collection devices before transporting. Specimens received with intact needles will be rejected.
Serum Separator Tubes
Samples should be sent to the laboratory as soon as possible after collection.
If there is a delay between sample collection and submission to the laboratory, samples should be refrigerated.
a) Allow whole blood samples in plain (red top) or gel (gold top) tubes to sit at room temperature for 30 minutes prior to refrigeration to allow the clotting process to occur.
If samples will be delayed by more than 12 hours
a) If possible, centrifuge the plain (red top) and gel (gold top) tubes after allowing them to sit at room temperature for 30 minutes. Remove the serum, and place in a plain tube. Clearly label this tube with the patient name and date of birth.
Lavender Tube (EDTA)
Samples should be sent to the laboratory as soon as possible after collection.
CBC
a) Test MUST be performed within 24 hours of collection
b) Stable for twenty-four (24) hours at Room Temperature.
c) Stable for forty-eight (48 hours) refrigerated (i) If transport to the Clinical Lab is greater than 8 hours, refrigerate specimen and deliver within 24 hours of collection
Retic
a) Test MUST be performed within 24 hours of collection
b) Stable for twenty-four (24) hours at Room Temperature.
c) Stable for seventy-eight (78 hours) refrigerated
FGH Clinical Laboratory Specimen Collection Manual Date of Last Review: 05/10/2022 26 | Page
ESR
(i) If transport to the Clinical Lab is greater than 8 hours, refrigerate specimen and deliver within 24 hours of collection
a) Test MUST be performed within 4 hours of collection
Hgb A1C
a) Test is stable for 7 days, if refrigerated
BNP
a) Test MUST be performed within 24 hours of collection
b) Stable for eight hours (8) at Room Temperature.
(i) If transport to the Clinical Lab is greater than 8 hours, refrigerate specimen and deliver within 24 hours of collection
Light Blue Top Tube (Sodium Citrate)
Samples should be sent to the laboratory as soon as possible after collection.
PT/INR
a) Test must be performed within 24 hours of collection
(i) Stable for one (1) hour at Room Temperature uncentrifuged.
(a) If transport to the lab is greater than one (1) hour, centrifuge specimen
APTT
a) Test must be performed within four (4) hours of collection
(i) Stable for one (1) hour at Room Temperature uncentrifuged.
(a) If transport to the lab is greater than one (1) hour, centrifuge specimen
D-Dimer
a) Test must be performed within four (4) hours of collection
(i) Stable for one (1) hour at Room Temperature uncentrifuged.
(a) If transport to the lab is greater than one (1) hour, centrifuge specimen testing MUST be performed within four (4) hours of centrifugation
CSF Samples
FGH Clinical Laboratory Specimen Collection Manual Date of Last Review: 05/10/2022 27 | Page
Samples should be sent to the laboratory as soon as possible after collection.
The stability of the CSF sample varies depending on the procedures ordered. Hematologic analysis of CSF samples should be performed within one hour of fluid aspiration.
o Both red blood cells (RBCs) and white blood cells (WBCs) have limited stability in CSF because CSF is hypotonic and cells can rapidly lyse.
o Timing is especially critical for WBCs since both the number and type of cells present are clinically important in diagnosing cases of meningitis as well as detecting CNS leukemic involvement.
CSF samples for hematologic testing should be maintained at room temperature prior to testing.
Refrigeration is also not recommended for culture specimens since fastidious organisms such as Haemophilus influenzae and Neisseria meningitidis may not survive at refrigerated temperatures.
Urine samples
Samples should be sent to the laboratory as soon as possible after collection.
For random urine collections, the preferred specimen is the first urine voided in the morning. This is the most accurate single sample because of the high concentration of various urine constituents.
For 24-hour urine container, unless otherwise specified, preservatives are not added to the urine container during collection, however refrigeration is required. The patient should begin collection in the morning after discarding the first morning void. Note the time, and collect all urine until the same time the next morning, completing the collection by emptying the bladder and adding this to the sample. Note date and time of final collection
Urine analysis should be performed as soon as possible after collection as changes in composition may occur over time (e.g. changes in pH, proliferation of bacteria, dissolution/precipitation of crystals etc.).
Refrigerate the sample if it is not being analyzed immediately.
Allow the sample to return to room temperature before performing analysis.
FGH Clinical Laboratory Specimen Collection Manual Date of Last Review: 05/10/2022 28 | Page
Swabs in Amies transport media for culture and sensitivity testing should be stored and transported at room temperature (not refrigerated).
Urine samples (see general rules for urine samples above).
Fecal samples should be refrigerated if transport to the laboratory will be delayed.
Glass slide samples (cytology and blood films)
Specimens on glass slides (cytology and blood films) should be stored at room temperature. Refrigeration may result in condensation on the slide which can damage cells.
Formalin should never be added to non-histopathology specimens.
Glass slide samples must not be stored with formalin containers. When submitting glass slide samples and formalin-fixed samples to the laboratory, these specimens must be submitted in separate slide containers. Formalin and formalin fumes fix the cell membranes, reducing the ability of cytological stains to penetrate. This may result in a non-diagnostic sample.
SPECIMEN COLLECTION: Whole Blood, Serum or Plasma
Blood Specimen Overview
Blood is the most frequent body fluid used for analytical testing. The relative ease of obtaining venous blood makes this a primary specimen source for clinical laboratory analysis. The most common samples of laboratory testing are whole blood, serum, or plasma.
Whole blood specimens are usually collected in Lavender and dark green tubes with an anticoagulant and are not centrifuged or frozen. The whole blood lavender tube is the more common specimen of choice that is used for hematology tests such as complete blood counts.
Serum is the clear yellowish fluid that is obtained when the blood is allowed to clot and the specimen is separated into its solid and liquid components.
FGH Clinical Laboratory Specimen Collection Manual Date of Last Review: 05/10/2022 29 | Page
Microbiological samples
Serum obtained from specimens collected in the Red tubes is the specimen of choice for many chemistry and virology tests.
Plasma is the clear yellowish fluid that is obtained when blood is collected in an anticoagulant tube and the specimen is separated into its solid and liquid components. Plasma contains fibrinogen and other clotting factors that are absent from serum. Plasma obtained from specimens collected in Light Green, Lavender, and Light Blue tubes is the specimen of choice for many chemistry and coagulation tests. The preferred collection method is venipuncture using a closed vacuum tube collection method or syringe method.
Specimen Collection DO’s & DON’T’s
Patient results are only as good as the specimen collected. The integrity of the sample must be preserved and requirements for collection and handling must be followed. It is critical that adequate volumes are collected on each patient and the patient preparation is adhered to follow test requirements such as fasting
1. Following proper phlebotomy techniques will assist in preventing inaccurate test results
2. All tubes collected must be collected in the correct Order of Draw and inverted gently to ensure proper mixing of additive or anticoagulant
a. Incorrect Order of Draw will introduce contamination with anticoagulants and often produce inaccurate results. An example would be increased Potassium if the Lavender tube is drawn prior to collection of Red top or Serum Separator tube.
3. All collection tubes must be filled with the required volume (no short samples). Fill lines are indicated by the black and white notches on the side of the label
FGH Clinical Laboratory Specimen Collection Manual Date of Last Review: 05/10/2022 30 | Page

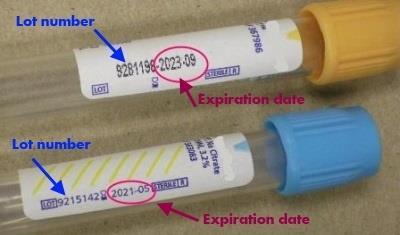
4. Do not use expired tubes. Expiration dates can be found on each paper label on the tube
Order of Draw (evacuated method)
The order of draw is a special sequence in blood tube collection intended to minimize additive carryover and cross contamination problems with a multiple-tube draw. Color-coded additive tubes must be collected in a specific order to prevent possible interference in testing that could result in a wrong diagnosis and treatment of patients.
The Clinical and Laboratory Standards Institute (CLSI) recommends the following order be observed for evacuated tube blood collection
1. Blood culture tube YELLOW
2. Sodium citrate tube LIGHT BLUE
3. Serum tube with or without clot activator or gel RED/GOLD / RED & GRAY (Marble)
FGH Clinical Laboratory Specimen Collection Manual Date of Last Review: 05/10/2022 31 | Page
This order of draw will address most blood collection specimens. Other less commonly used additives should be included in the order of draw based on the health care facility's policy with consideration of a specific additive's potential to alter test results through carryover.
Specimens collected using evacuated tubes with a tube holder, such as the Vacutainer system, will be filled in the followingorder:
- Blood Cultures – SPS
- Plain Red Top (Glass or Plastic)
- Light Blue (Sodium Citrate )
- Marbled red/SST/red & yellow
- Green (Sodium or LithiumHeparin)
- Lavender (EDTA)
- Gray (SodiumFluoride)
Order of Transfer (syringe method)
8.
10.
12. Serum tube with or without clot activator or gel RED/GOLD / RED & GRAY (Marble)
13. Other additive tubes
Specimens collected in a syringe will be transferred into blood tubes in the following order:
- Blood Cultures
- Light blue (Sodium Citrate)
- Green (Sodium or LithiumHeparin)
- Lavender (EDTA)
- Gray (SodiumFluoride)
- Marbled red/SST/red & yellow
- Plain Red Top
Maintaining Specimen Integrity
FGH Clinical Laboratory Specimen Collection Manual Date of Last Review: 05/10/2022 32 | Page 4. Heparin tube GREEN /GREEN
EDTA tube LAVENDER /PINK
Sodium fluoride /potassium oxalate GRAY
5.
6.
7. Blood culture tube YELLOW
Sodium
Heparin
citrate tube LIGHT BLUE 9.
tube GREEN /GREEN
EDTA
tube LAVENDER /PINK
11. Sodium fluoride /potassium oxalate GRAY
Maintaining specimen integrity is very important to the provision of a quality specimen for patient testing and ultimately, patient diagnosis and treatment.
Carryover or cross-contamination is the transfer of additive from one tube to the next. Carryover occurs when the needle used to fill one tube transfers blood and additive to the next tube. Even minute amounts of additive carryover can affect certain patient analytes considerably. Using a multi-sample collection system like the evacuated tube system (ETS) makes this scenario, no matter how slight the carryover of additive, possible. Observing the order of draw will help eliminate this problem by keeping certain additives from being carried over to the tests that cause adverse reactions and have the potential to significantly alter test results.
Examples:
EDTA is a popular additive for hematology studies that contains potassium (K+) in its formulation. It is found in the lavender top tube and the pink top tube.
In the order of draw, certain chemistry tests (e.g., potassium or K+ level) may be drawn in a green or gold top tube before the lavender top tube. This avoids the potential for K+ from the EDTA additive tube to be transferred to the chemistry tube and falsely elevating the patient's potassium result. False elevation of a patient's potassium could result in unwarranted treatment or a lack of necessary treatment, potentially leading to misdiagnosis and serious problems.
Another common carryover problem occurs when a light blue top tube containing the anticoagulant sodium citrate is drawn after a serum tube (red, gold or tiger top) that contains clot activators. These clot activators could potentially contaminate the light blue sodium citrate tube and prevent complete anticoagulation of the blood specimen. This could result in erroneous coagulation test results (e.g., prothrombin time PT or activated partial thromboplastin time APTT) that may impact a patient's treatment.
There are many other analytes that can be altered because of seemingly minor mistakes in the order of draw that can seriously impact a patient's health care.
Blood Volume
As part of a CAP accreditation standard, efforts have been made to minimize the volume of blood collected from patients. The EPIC system is set up to combine all possible tests under one accession number. For example, a request for CBC, Sickle Cell Screen, and an ESR will be combined under one accession number so only one specimen is collected to perform these tests.
Certain reference laboratories require one specimen per test (e.g., HIV specimens). In these cases it is impossible to minimize the amount of blood collected.
FGH Clinical Laboratory Specimen Collection Manual Date of Last Review: 05/10/2022 33 | Page
If there are concerns about blood loss to a patient during specimen collection, contact the laboratory for guidance at (601)288-4273.
Blood Collection Supplies
Collectors of specimens are responsible to assure that collection supplies such as blood collection tubes and collection devices (e.g. heel lancets, culture swabs and transport media) are stored according to manufacturer’s requirements and used before the manufacturer expiration date. For newborn screening collection cards, if expiration date is not printed on the individual cards, another mechanism, such as serial number, may be used for tracking. Basic supply list includes:
1. Blood collection sterile disposable, single-use devices
Needles gauge 21-23 for general patient use
Needles gauge 23-25 for pediatric patient use
Safety-Lok® blood collection (butterfly) sets
Capillary Puncture devices (i.e., Tenderfoot®)
2. Disposable vacutainer needle adapters or syringe and blood transfer device
3. Evacuated tubes appropriate for test ordered. (Vacutainers, microtainers)
4. Disposable single-use tourniquet (latex-free)
5. Venipuncture site cleansing solution
Sterile alcohol preps is acceptable for most venipuncture procedures and capillary punctures.
Betadyne cleanser should be used when collecting ethanol (alcohol) test specimens.
Chloraprep® swap stick (2% chlorhexidine gluconate in 70% isopropyl alcohol) is required when collecting blood cultures
6.
9.
FGH Clinical Laboratory Specimen Collection Manual Date of Last Review: 05/10/2022 34 | Page
Disposable
Cotton Balls
Dressing (paper tape, coverlet, copan wraps)
gloves 7.
8.
Waste and sharps containers
Patient Orders
The receipt of a test requisition is the first step in the blood collection process. Typically, a physician or qualified heath care professional will request (order) laboratory testing on a patient in the form of a requisition that is handwritten or electronically generated. Requisitions should include information (at a minimum) such as:
1. Patient first name, middle initial, last name
2. Patient unique hospital identification number, such as a medical record number (MRN)
3. Patient date of birth
4. Ordering physician's name
5. Patient location
6. Test(s) to be performed
7. Test status or priority
8. Special requirements or precautions
9. Billing information if patient is an outpatient
A thorough review of the requisition by the phlebotomist is required prior to specimen collection and allows personnel to clarify and confirm orders. This will ensure:
Completeness of required information
Verification of tests to be collected, including date and time
Prevention of duplicates or errors in test orders
Acknowledgment of priority level (e.g., stat, routine, timed)
Awareness of any special circumstances (e.g., patient fasting restrictions, posture requirements, medication dosage)
An accession number is used as a unique identifier for an order by medical information systems, such as a laboratory information system (LIS). The accession number connects a patient uniquely with their specimen and the paperwork and processes involved with the individual's test order. This allows efficient and accurate management from the beginning of the process, starting with receipt of order by the phlebotomist through the reporting of test results.
Blood Collection Method: Percutaneous Venipuncture Procedure
1. Identify self to patient.
2. Properly identify the patient using two unique identifiers
a. Medical Record Number on the gummed EPIC label to the Medical Record Number of the armband attached to the patient
FGH Clinical Laboratory Specimen Collection Manual Date of Last Review: 05/10/2022 35 | Page 10. Patient identification labels
b. Date of Birth
3. Verify test(s) ordered and if there were any special preparation requirements (fasting, diet, timed collections, etc.) If yes, verify with patient or care giver that the special preparation requirements have been met.
4. Assemble the necessary collection supplies and vacutainer tubes.
5. Position patient. Most patients should be seated or laying in a position so the arm is extended and the wrist is lower than the elbow. This should allow comfortable access to the antecubital fossa.
6. Wash hands thoroughly and apply clean gloves. NOTE: All patient blood specimens are to be treated with “Standard Precautions” as it is frequently impossible to know which specimens might be infectious. Gloves are to be worn when performing a venipuncture.
7. Apply tourniquet to extremity 2 inches proximal to desired site.
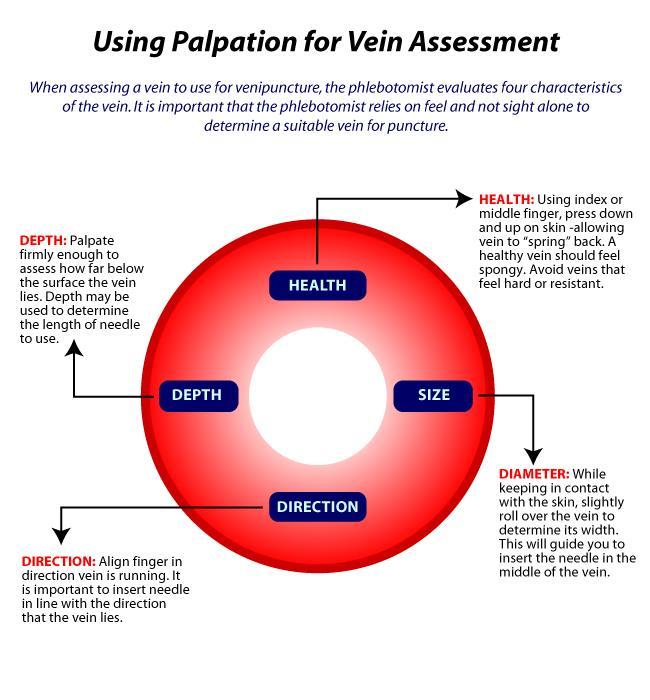
8. Select venipuncture site (usually arm veins, Cephalic, Median and Basilic Refer to figure). A vein with good circulation will be palpable and should spring back when palpated. Larger veins are generally palpable and not visible. Surface veins may be visible but not palpable. Choose a vein with a large diameter as not to collapse it.
FGH Clinical Laboratory Specimen Collection Manual Date of Last Review: 05/10/2022 36 | Page
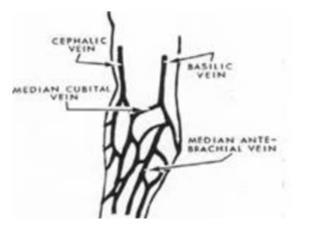
9. The Cubital Vein is usually the vein of choice. It is the largest and fullest vein and is best anchored by the surrounding musculature of the arm.
10. The Cephalic Vein is the next largest vein and usually the second best choice.
11. The Basilic Vein is the smaller vein and is not anchored well by the surrounding musculature. If this vein is used, the phlebotomist must ensure that they anchor the vein well by holding the skin taut just below the needle insertion point. This vein is close to the brachial artery so there is more risk of hitting an artery. Exercise caution.
a. Avoid extremities with an A-V shunt or status/post mastectomy.
b. Avoid areas with extensive scarring.
c. Avoid sites with hematomas.
d. Avoid using any site above an IV line.
12. Prep overlying skin with alcohol using a circular motion starting from the center and moving outward. Chloraprep® may be used if patient is allergic to alcohol. If the venipuncture site is touched, the site must be cleansed again.
13. Insert blood collection tube into holder and onto needle up to the recessed guideline on the Vacutainer® adapter. (or prepare syringe)
14. Unsheath needle and position the needle with the bevel up and the shaft parallel to the path of the vein.
15. Hold the patient’s arm using your thumb to draw the skin taught to anchor the vein. Verbally state to patient that the venipuncture is starting and insert the needle at a 15-30˚ angle and ¼ to ½ inches below the intended entry into the vein.
16. While securely grasping the vacutainer holder with one hand, use the other hand to push the tube onto the needle inside the vacutainer. The stopper of the tube must be adequately punctured. If venipuncture is successful, blood will start to fill the tube.
FGH Clinical Laboratory Specimen Collection Manual Date of Last Review: 05/10/2022 37 | Page
17. Remove the vacutainer tubes as they fill. The shut-off valve recovers the point, stopping blood flow until the next tube is inserted.
18. Tubes containing additives should be mixed immediately upon draw by inverting 5-10 times. Avoid vigorous mixing because it may cause hemolysis and erroneous patient results.
19. To obtain additional specimens, insert the next tube into the holder and repeat steps 7-9. When all tubes are filled, remove last tube from the holder.
20. After all tubes are collected, fold a gauze pad or place a cotton ball over the needle and remove the needle in one quick motion and activate the safety device. Discard into a sharps container.
21. Apply pressure to site with gauze pad. Check patient’s arm to ensure bleeding has stopped. Apply gauze pad secured lightly with tape to the puncture site. Instruct patient to leave bandage in place for at least 15 minutes.
22. Label all blood tubes in patient’s presence. Record time of draw and collectors Initials or identification code on each label. Place labeled specimens in biohazard bag.
23. Discard gloves and wash hands.
24. Transport specimens to the laboratory for testing
Blood Collection Method: Venipuncture Procedure with Needle and Syringe
A syringe and needle set may be used in the venipuncture process instead of the vacutainer holder system outlined in venipuncture procedure.
1. Perform venipuncture. Pull back on plunger or syringe slowly until sufficient volume of sample is achieved.
2. Remove needle from patient arm and immediately activate the safety feature according to manufacturer instructions and discard into a sharps container.
3. Attach syringe to a blood transfer device, female luer adapter.
4. Insert vacutainer tubes into the transfer device. Fill to desired level. Remove vacutainer tube and add next. Continue until all required vacutainer tubes are filled.
Blood Collection Complications
1. Phlebotomist should only attempt a Venipuncture two times. If still unsuccessful, call another phlebotomist to perform procedure.
FGH Clinical Laboratory Specimen Collection Manual Date of Last Review: 05/10/2022 38 | Page
2. Patient complications may occur during or immediately after procedure. Refer to this list on the more common complications and the appropriate response action(s) and care recommended to address or minimize the complication.
Bruises (Ecchymosis) – Most commonly caused by a leakage of a small amount of blood around the puncture site. Prevent by keeping patient arm straight and applying pressure to venipuncture site for 35 minutes to allow a platelet plug to form.
Fainting (Syncope) – The patient becomes frightened and the body goes through physical stages of increased heart rate, dilated blood vessels and blood pools in the tissues followed by slow heart rate. The slower heart rate deprives the brain of blood resulting in fainting. If this occurs, withdraw the needle, lower the patient’s head, and apply a wet towel to patient’s forehead and neck.
Hematoma – Caused by a leakage of a large amount of fluid around the puncture site which can cause the area to swell. This may be caused by the needle going through the vein, the bevel of the needle only partially in the vein, or failure to apply adequate pressure at end of procedure. If a hematoma occurs, withdraw the needle and apply direct pressure on puncture site.
Seizures/Convulsions – Caused by the patient’s condition or a reaction to pain or fright caused by the needle. Remove the needle and protect the patient. Keep the patient from hitting his head or hurting himself. Activate facility specific medical emergency plan if needed.
Vomiting/Choking – The biggest danger is that the patient may aspirate some vomit. If the patient is sitting, have him lean forward and use an emesis basin or trash can. If the patient is lying down, turn his head to the side and provide an emesis basin.
Infection at Venipuncture Site – This is rare but can be caused by not using aseptic technique when performing a venipuncture. Instruct the patient to keep a bandage on for at least 15 minutes post puncture.
Pain – There is always a little pain associated with a venipuncture. Inform the patient that there will be some discomfort and communicate to them when the venipuncture will occur to avoid startled reactions. Allowing the alcohol to dry before puncture will minimize pain.
Reflux of Anticoagulant – If the last tube is not released from the multi-sample needle sleeve before removing the needle from the arm,
FGH Clinical Laboratory Specimen Collection Manual Date of Last Review: 05/10/2022 39 | Page
it is possible for blood from the collection tube to back flow (reflux) into the patient’s vein. Some patients have been known to have reactions to additives in tubes, especially EDTA. If this happens, make sure to keep the patient’s arm in a downward position. If patient is lying down, raise his head or extend his arm over the edge of the bed.
Nerve Damage – Excessive or blind probing for a vein can lead to permanent damage of a main nerve. If unable to find vein, begin procedure from the beginning with a new needle. Ask for assistance if still unable to find a vein.
Inadvertent Arterial Puncture – If an artery is punctured, the blood will be bright red in color as compared to the dark red color of venous blood. If this occurs, apply direct pressure to the puncture site for a minimum of 5 minutes.
Petechiae – Blood which escapes into the epithelium will cause small, non-raised red spots on a patient’s skin. This usually indicates a coagulation problem that may be due to defective platelets or defective capillary walls. Petechiae are common in leukemia or patients undergoing chemotherapy. The phlebotomist should be alert to the possibility of prolonged bleeding in the patient.
Edema – Caused by an abnormal accumulation of fluid in the intercellular spaces of the body resulting in swelling. Edema is most commonly caused by IV infiltrations. Do not use the edematous arm to prevent specimen contamination from tissue or IV fluid.
Obesity – Veins may be deep and hard to palpate. Consider the hand or forearm as an alternative venipuncture site. Ask the patient where the best site to obtain blood is located (many times the patient knows from previous experiences).
Intravenous Therapy – Venipunctures should never be performed above an IV site. Perform procedure on other arm. If both arms are unavailable, consult with the nurse in charge of patient for assistance. One alternative is to have the nurse turn the IV fluid off for 2 to 3 minutes prior to performing a venipuncture OR to perform the venipuncture below the IV site. In extreme circumstances, perform capillary puncture collection or obtain permission for a venipuncture on ankle or foot.
Veins Damaged by Burns, Scars or Occluded – These veins are very sensitive and tend to have limited blood flow or may collapse and should not be used.
FGH Clinical Laboratory Specimen Collection Manual Date of Last Review: 05/10/2022 40 | Page
Post Mastectomy – Surgeons state that it is permissible to draw from the arm on the mastectomy side after 6 months to 1 year without danger of lymphostasis (a build-up of lymphatic fluid in the lymph glands). If the patient insists that the physician has told them not to have blood drawn on that side, honor the patient’s request.
Allergies to Antiseptics and/or Adhesives – Some patients may be allergic to alcohol, iodine, band aids or tape. Use an approved antimicrobial soap to cleanse skin. Paper tape or Coban® wrap may be used to bandage the site.
Collapsed Veins – Using a vacuum tube on a small delicate vein or pulling back on the plunger of a syringe too quickly may cause a vein to collapse. Consider use of a smaller vacuum tube, a smaller syringe or a butterfly or consider use of a partial draw tube to enable a successful venipuncture.
Thrombosis – Blood clots at the site of the puncture can reside in blood vessels and can partially block a vein or artery. An embolus results when a thrombus fragment breaks off and moves through the body. Patients may request to have blood drawn from a certain arm if they are prone to develop clots in a certain area.
Excessive bleeding: Normally a patient will stop bleeding from the collection site within a few minutes. Some patients, particularly those on aspirin or anticoagulant therapy, may take longer to stop bleeding. Pressure must be maintained on the site until bleeding stops. Never apply a pressure bandage instead of maintaining pressure and DO NOT leave or dismiss the patient until bleeding has stopped. If bleeding continues after 5 minutes, notify the nursing “house” supervisor.
Blood Collection Method: Line Collections
Specimens collected in this fashion are collected by non-laboratory personnel such as nursing staff, anesthesiologists, physicians and Respiratory therapists.
NOTE: Collection of blood for coagulation testing through intravenous lines that have been previously flushed with heparin should be avoided, if possible. If the blood must be drawn through an indwelling catheter, possible heparin contamination and specimen dilution should be considered. When obtaining specimens from indwelling lines that may contain heparin, the line should be flushed with 5 mL of saline and the first 5 mL of blood or 6-times the line volume (dead space volume of the catheter) be drawn off and discarded before the coagulation tube is filled. For those samples collected
FGH Clinical Laboratory Specimen Collection Manual Date of Last Review: 05/10/2022 41 | Page
from a normal saline lock (capped off venous port) twice the dead space volume of the catheter and extension set should be discarded.
Blood Collection Method: Capillary Punctures
Capillary puncture may be used for obtaining specimens in infants where venipuncture is difficult. Specimens from infants under the age of 12 months are usually collected by heelstick.
Capillary specimens may by collected in microtainers which are color coded similar to the vacutainer tubes and sent to the laboratory for testing.
Recommended order of collection for microtainer specimens:
Lavender EDTA microtainers
Other Additive microtainers (green – heparin)
Serum microtainers (yellow)
NOTE: Capillary punctures are not suitable for blood culture testing and most coagulation tests.
Capillary Puncture – Heel Stick
1. Position the infant with the head slightly elevated.
2. Warm the heel from which blood is to be obtained. A commercial heel warmer may be used.
3. Cleanse the heel with alcohol prep, then dry with a sterile 2x2 as alcohol can influence test results.
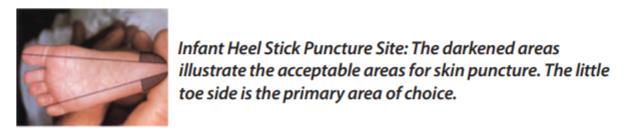
4. Using a sterile lancet, puncture the most medial or lateral portion of the plantar surface of the heel, medial to a line drawn posteriorly from the mid great toe to the heel.
5. Puncture no deeper than 2.4mm (approximately 0.1 inches).
6. Punctures to the posterior curvature of the heel cab cause damage to the bones.
7. Previous puncture sites should be avoided. Avoid bruising the infant’s heel when obtaining blood.
8. Wipe away the first drop of blood with a sterile 2x2 gauze.
9. Allow another large drop of blood to form. Lightly touch the microtainer capillary collection device (or filter paper) to the LARGE drop of blood. Collect drops of blood into the collection device by gently massaging the finger. Avoid excessive pressure that may squeeze tissue fluid into the drop of blood. Fill the microtainer tube(s) as needed.
FGH Clinical Laboratory Specimen Collection Manual Date of Last Review: 05/10/2022 42 | Page
10. Cap, rotate and invert the microtainer to mix the blood collected.
11. When finished, clean the site and apply pressure with clean gauze to stop the bleeding. Apply an adhesive bandage.
12. Label all specimens per accepted guidelines.
13. Place labeled specimens in zip lock bag and deliver to the laboratory as soon as possible.
SPECIMEN LABELING
All specimens should be labeled at the time of blood collection. Labeling tubes before collection is NEVER allowed. It is possible for misidentification of specimens to occur if prelabeled tubes are not used, but remain on the tray or in the draw area. Additionally, pre-printed labels should not be left in a patient's room. All unused labels should be discarded immediately to prevent accidental use later.
Labeling is a standardized step performed by the phlebotomist BEFORE they leave the room after collecting blood from the patient. This part of the venipuncture should be performed in the presence of the patient (inpatient or outpatient). Most institutions now require phlebotomists to re-verify patient information verbally during the labeling process and request that patients acknowledge their name and information on the labeled tubes. If it is determined that a specimen has not been labeled at the time of collection, the best practice is to recollect the specimen following proper positive patient identification protocol.
Tubes can be labeled with a computer-generated label or information can be handwritten on the labels. Labels should always be placed on the body of the container and not on the lid. Care should be taken to prevent patient information, as listed on the labels, from the view of unauthorized personnel.
Accord to CLSI standards, information on the specimen label should always include:
Patient first and last name
Unique patient identifier such as hospital medical records number or date of birth
Date and time of collection
Identification of the associate collecting the specimen
FGH Clinical Laboratory Specimen Collection Manual Date of Last Review: 05/10/2022 43 | Page
REDUCING PRE-ANALYTICAL ERRORS
Pre-analytic errors are errors that occur prior to the testing process. Pre-analytical errors can occur before, during, or after specimen collection. These errors may be unknown to the laboratory analyst and can delay or prevent the delivery of quality patient care. To reduce errors, the phlebotomist should always:
Positively identify the patient prior to venipuncture
Observe special directions, needs, and timing of collection (e.g., fasting, timed specimens)
Select the correct blood collection tube needed for the requested testing
Avoid prolonged tourniquet use (one minute or less)
Observe the correct order of draw
Ensure proper filling of blood tubes, particularly those containing an additive
Mix specimen tubes appropriately five to eight times end-over-end after collection
Correctly label specimens in the presence of patient
Deliver in a timely manner to the laboratory for testing
Always adhere to the policies, procedures, and protocols required by your facility for proper blood collection
Never transfer blood from one collection tube to another
It is never acceptable to uncap blood collection tubes and pour blood between tubes, even with tubes containing the same additive. Pouring blood from one tube to another of the same type may alter the proper blood-to-additive ratio that is required for accurate test results.
Pouring blood between tubes with different additives will cause invalid results as well. For example, pouring blood collected in a tube containing the anticoagulant potassium EDTA into a tube that will be used for a potassium test will falsely elevate the patient's potassium test value, resulting in possible erroneous treatment and risk to the patient's health.
Avoiding errors when collecting specimens for coagulation testing
The light blue top tube (containing 3.2% sodium citrate) used for coagulation testing must be filled to the line indicated by the manufacturer on the tube (see image on the right) for proper testing to occur. Under-filling the tube changes the ratio of blood-to-anticoagulant. This can affect the accuracy of a prothrombin time (PT), an activated partial thromboplastin time (aPTT), and other coagulation tests that are performed using this specimen.
If a winged blood collection device (butterfly) is used to collect a light blue top tube for coagulation studies, a waste tube should be drawn first if the coagulation tube is the first tube to be collected for patient testing. The Clinical and Laboratory Standards Institute (CLSI) states that the waste tube should be a non-additive tube or another light blue top tube. This waste tube is
FGH Clinical Laboratory Specimen Collection Manual Date of Last Review: 05/10/2022 44 | Page
drawn first to remove the air in the tubing of the winged collection device. Once blood flows through the tubing, the waste tube can be removed and discarded as this waste tube does not need to be completely filled. If the air is not displaced from the tubing into a waste tube, it will be drawn into the tube used for testing and cause a short-fill of the tube. Less volume of blood in the tube alters the required blood-to-anticoagulant ratio needed for accurate coagulation studies.
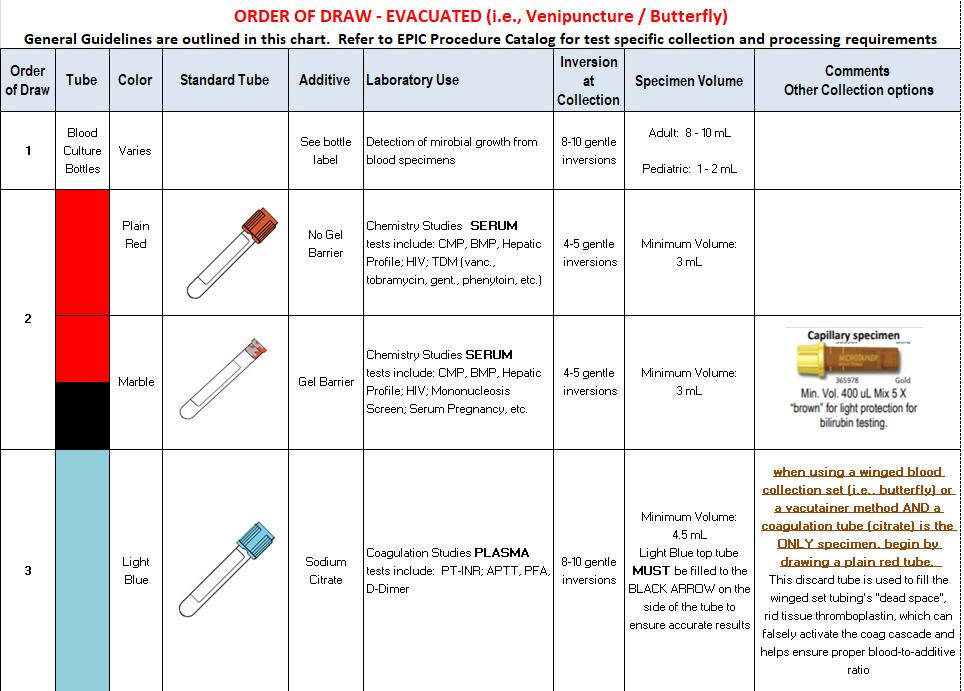
SPECIMEN COLLECTION GUIDE – EVACUATED METHOD
FGH Clinical Laboratory Specimen Collection Manual Date of Last Review: 05/10/2022 45 | Page
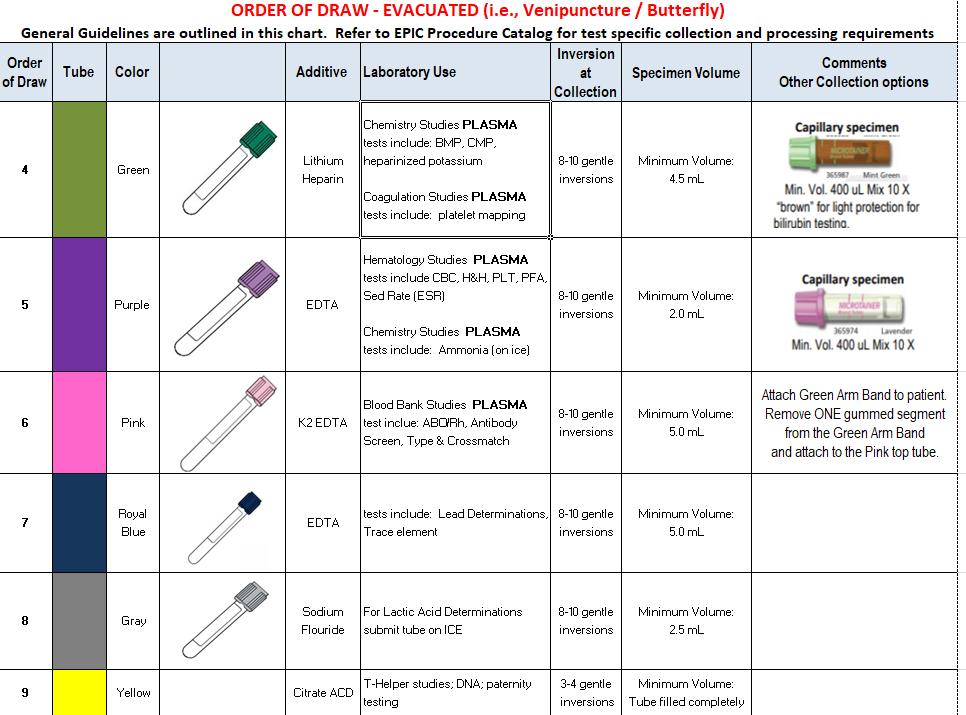
FGH Clinical Laboratory Specimen Collection Manual Date of Last Review: 05/10/2022 46 | Page SPECIMEN COLLECTION GUIDE – EVACUATED, continued
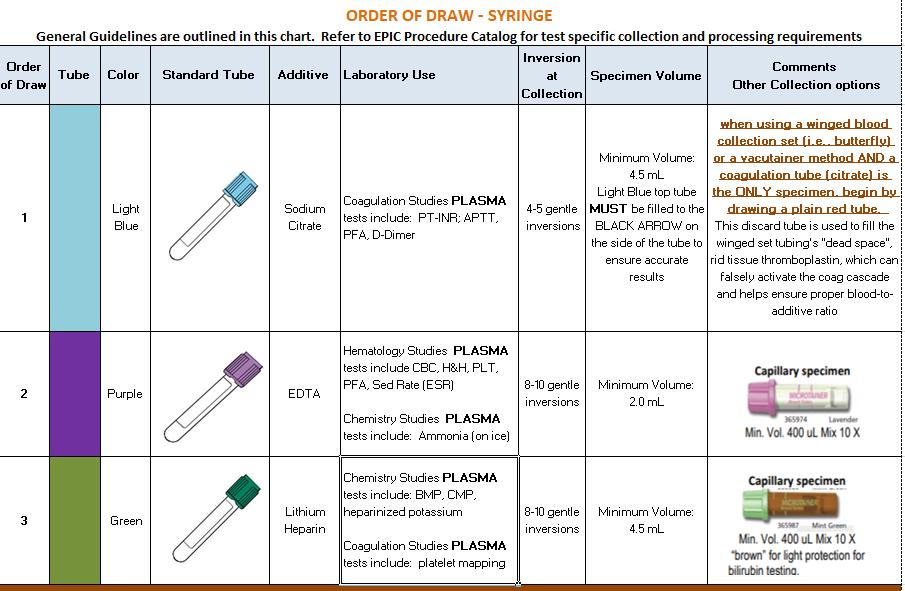
FGH Clinical Laboratory Specimen Collection Manual Date of Last Review: 05/10/2022 47 | Page SPECIMEN COLLECTION GUIDE – SYRINGE METHOD
FGH Clinical Laboratory Specimen Collection Manual Date of Last Review: 05/10/2022 48 | Page
BLOOD CULTURE COLLECTIONS
Blood Culture Overview: The detection of microorganisms in a patient’s blood has diagnostic and prognostic importance when bacteria multiply at a rate that exceeds the capacity of the reticuloendothelial system to remove them, bacteremia results. Bacteria enter the blood from extravascular sites via lymphatic vessels. Blood cultures are essential in the diagnosis and treatment of the etiologic agent of sepsis. Bacterial sepsis constitutes one of the most serious infectious diseases and therefore, the expeditious detection and identification of blood-borne bacterial pathogens is one of the most important functions of the diagnostic microbiology laboratory. Guidelines to achieve this end are described in this procedure.
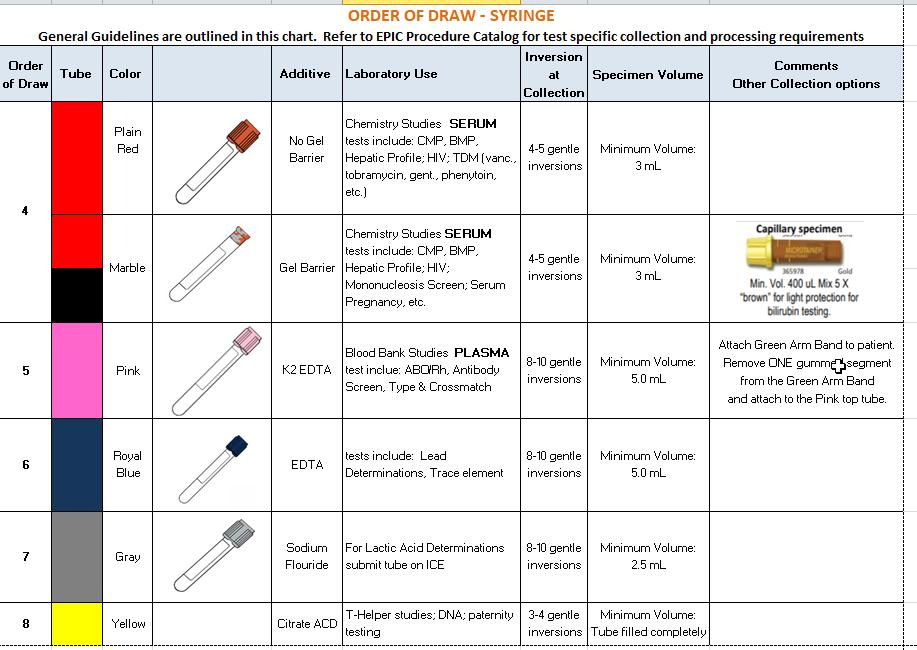
FGH Clinical Laboratory Specimen Collection Manual Date of Last Review: 05/10/2022 49 | Page SPECIMEN COLLECTION GUIDE – SYRINGE, continued
1. Blood cultures can be obtained by using the venipuncture method. Select venipuncture site.
2. Optimal skin preparation includes cleansing with ChloraPrep®. The venipuncture site should not be palpated after disinfection unless a sterile glove is used. If you must relocate the vein, apply ChloraPrep® to fingertip and let dry before touching the puncture site.
3. Remove the cap from culture bottles and clean with ChloraPrep®.
4. Perform venipuncture using a sterile syringe and needle. Pull back on plunger or syringe slowly until sufficient volume of sample is achieved. To achieve best results, collect 20 mL of blood for an adult (Minimum 6 mL) and 6 mL of blood for a pediatric (minimum 4 mL). (Sterile butterfly sets may also be used with a blood transfer device. Fill the Blood culture bottles directly.)
5. Remove needle from patient arm and immediately activate the safety feature according to manufacturer instructions and discard into a sharps container.
6. Attach syringe to a sterile blood transfer device, female luer adapter.
7. Add 8-10 mL of blood into purple lytic bottle first. (Minimum 3 mL)
8. Add 8-10 mL of blood into gray aerobic culture bottle. (Minimum 3 mL)
Use a pediatric bottle if necessary to replace the gray aerobic bottle. Pediatric bottles are acceptable with 1-3 mL of blood per bottle. (Pediatric bottles can be used for adults that are hard sticks.)
9. Label each blood culture bottle per policy
Label should include complete patient name, medical record number, and date time of collection, location of venipuncture (i.e., L arm, R hand, etc.) and initials of person collecting the specimen.
Labels should not cover bottom of the bottle.
Labels should not cover or touch the bar code on the bottle’s label.
Labels should run the length of the bottle (from top to bottom).
10. Transport blood cultures to Microbiology within an hour of collection time. Blood culture bottles should not be refrigerated.
FGH Clinical Laboratory Specimen Collection Manual Date of Last Review: 05/10/2022 50 | Page
RANDOM URINE COLLECTION
Urine is one of the easiest specimens to collect for laboratory testing. Urinalysis, urine chemistry tests, drug screens, culture and sensitivities are some of the few tests that may be ordered. Refer to the test catalog for test specific specimen requirements. Random Urine collection procedures:
Urine Collection: Clean Catch Method
For complete instructions on proper method of urine collection, see URINE COLLECTION METHOD in this manual.
Patient is provided with sterile collection cup and two towelettes.
Upon entering bathroom, patient should wash hands with soap and water
Remove lid from cup; taking care NOT to touch the inside of the lid or cup: place lid flat side down on the counter.
Wash the area with one of the towlettes. DO NOT USE SOAP.
WOMEN: Wash the area around the vagina. Wash genital area from front to back. Separate the genital folds (also known as lips or labia) with your hand. Gently wipe inside the folds with a second towelette.
MEN: Wash the area around the penis. Retract the foreskin, if present, and clean the head of the penis thoroughly with a packaged towelette.
FGH Clinical Laboratory Specimen Collection Manual Date of Last Review: 05/10/2022 51 | Page
Starting urinating into the toilet. After the first part of the urine has gone in the toilet: place the cup under the stream. Catch 50 mL of urine. Remove cup. Finish urinating in the toilet.
Put the lid securely on the cup and wash hands.
Give sample to provider.
Urine Collection: Infants
Thoroughly wash the area around the urethra using towelettes. –
o FEMALE: Clean from the front to the back on a female infant.
o MALE: Clean from the tip of the penis down on a male infant.
A Special Urine Collection bag will be provided. It is a plastic bag with a sticky strip on one end. It is made to fit over the infant’s genital area. Open this bag and place it on the infant.
o FEMALES, place the bag over the labia.
o MALES, place the entire penis in the bag and attach the adhesive to the skin.
Put a diaper securely over the bag. For active infants, this procedure may take a couple of attempts – lively infants can displace the bag.
Check your baby often and remove the bag after the infant has urinated into it.
Drain the urine into a sterile container and give it to the health care provider. Do not touch the inside of the cup or lid.
Timed Urine Collection
Timed urine collections may be for a two (2) or twenty-four (24) hour time period. The normal volume of urine collected over a 24-hour period ranges from 800-2000 mL. The laboratory supplies the containers to be used for the collections with the appropriate preservative added. The requesting location should come to the laboratory to pick up the 24-hour collection jug and the test(s) requested so that the 24-hour urine container can be prepared, if applicable
Collection Container – Obtain gallon jug from clinical lab.
FGH Clinical Laboratory Specimen Collection Manual Date of Last Review: 05/10/2022 52 | Page
Directions for a Time collection of urine
1. Unless the physician states otherwise, instruct the patient to maintain the usual fluid intake, but to avoid alcoholic beverages.
2. During the collection period, the specimen should be placed in a refrigerator or in a secondary container filled with ice to prevent growth of microorganisms and possible decomposition of urine constituents.
3. Have the patient empty his / her bladder in the morning into the toilet (not to be included in the 24 hour collection)
4. Collect the next voiding and add it as soon as possible to the 24 hour urine container.
5. Add all subsequent voiding to the container.
6. The last specimen collected should be the first specimen voided the following morning.
7. Ensure the lid is properly tightened to prevent leakage.
8. Specimen labeling guidelines apply.
Urine Preservatives: Some 24 hour urine tests require a preservative to help stabilize the substance that is to be measured. The preservative should be added to the sample collection container before the collection begins.
Common Urine Preservatives include:
Refrigeration: Keep urine container in refrigerator or on wet ice throughout the collection time period.
Boric Acid: 4 grams of dry powder or in tablet form added to container before collection begins.
6 N HCL (Hydrochloric Acid): 30 mL added to container before collection begins.
SAFETY NOTE: Some preservatives are caustic and the sample containers should be labeled as such. Collect specimen into another clean container and carefully pour sample into the 24-hour collection container.
Patient Collection Instructions: 24-hour (Timed) Urine
1. When you arise in the morning, empty your bladder into the toilet.
2. Write this date and time on the collection container label along with your full name and date of birth.
3. Collect urine, day and night, for the next 24 hours. Add all urine collected into the 24 hour container. Urine may be collected in a separate CLEAN container and carefully poured into the 24-hour collection jug
4. The next morning (24 hours later) collect the last urine specimen. Write the Finish time and date of this last collection on the container label.
FGH Clinical Laboratory Specimen Collection Manual Date of Last Review: 05/10/2022 53 | Page
5. Deliver the 24-hour specimen jug and test order to FGH Outpatient Registration.
Timed Urine Collection Notes:
Keep the urine container in the refrigerator during the collection.
Collect ALL urine during the 24 hour period, or specimen will have to be recollected. (Volume of urine is measured for testing).
Some 24-hour urine tests also require a blood specimen. (i.e., creatinine clearance and urea clearance). Please check with lab assistant when you drop off you urine collection to see if a blood specimen is required.
Follow same guidelines for a 2- or 12-hour collection. The label and order should match the time period for what is collected.
If an aliquot of urine is lost during the collection period, note this variance on the collection label. If the volume lost is less than 10% of the final volume, the test may be continued. If the volume lost is greater than 10%, the entire specimen may have to be started over.
If the total volume of the 24-hour collection is less than 200 mL, the laboratory will request a recollection unless instructed by the patient’s physician to proceed with testing.
BODY FLUID SPECIMENS
Diagnostic testing may be performed on various fluids that are present in the body. Body fluids are usually collected by the physician. Each body fluid submitted for testing should indicate the source of the fluid on the order and the specimen label. Body fluid specimens and tests may include:
Refer to the EPIC Procedure Catalog specific test specimen collection requirements.
General collection guidelines to follow include:
Lavender tubes for cell counts/differentials
Clear, no additive tubes for chemistry tests
Sterile containers for Microbiology Cultures
Sterile Containers/Clear No Additive tubes for Virology, Cytology
FGH Clinical Laboratory Specimen Collection Manual Date of Last Review: 05/10/2022 54 | Page
SAFETY NOTES:
1. CSF SPECIMENS: If Creutzfeldt-Jacob disease or any other prior disease is suspected, contact the laboratory before sending the specimen.
2. Please remove needles from specimen collection syringes. The laboratory will reject any specimen containers received if the needle is still intact.
BLOOD BANK
General Information
The Clinical Laboratory Blood Bank is accredited by the American Association of Blood Banks (AABB) and the College of American Pathologists (CAP) and is registered as a licensed facility with the Food and Drug Administration (FDA). The Blood Bank follows the policies and standards of these agencies.
Transfusion Bracelet Policy
The purpose of the transfusion bracelet is to assure accurate identification of patients, blood specimens, and blood transfusion products thus minimizing identification errors.
A. All patients with requests for transfusion service will have a green identification bracelet placed on their wrist at the time the pre-transfusion sample is collected. The armband will remain on the patient until discharged.
B. At the time of collection, the transfusion number from the green armband must be recorded on the blood specimen along with other required information such as full name, medical record number, date and time of collection, and initials of the collector. Labeling must be done at the bedside, in the presence of the patient.
FGH Clinical Laboratory Specimen Collection Manual Date of Last Review: 05/10/2022 55 | Page
C. Samples received in the laboratory without the appropriate identifying information will be discarded and a new sample required.
D. New samples will be required if the identification number on the sample and the transfusion armband do not match EXACTLY.
E. Re-labeling of pre-transfusion specimens will NOT be allowed.
F. Nursing personnel will verify the numbers on the green transfusion bracelet, the patient's hospital bracelet, and on the blood product. This is done to ensure a correct match of blood products to the recipient prior to beginning a transfusion.
G. Any discrepancy between identification numbers (hospital number and/or transfusion number) and the numbers recorded on the blood component tag must be resolved BEFORE administering any blood component. Contact the laboratory for instructions.
H. Transfusion bracelets are available for issue in the Clinical Laboratory.
FGH Clinical Laboratory Specimen Collection Manual Date of Last Review: 05/10/2022 56 | Page
Specimen Type – ABO/Rh, Type & Screen, Type & Crossmatch Tube Type: Pink (K3 EDTA) tube, filled appropriately with patient blood. Specimen Labeling requirements: Specimens submitted for ABO/Rh, T&S or T&C Will be labeled using the EPIC generated label AND green armband. Green arm bands are available through the Clinical Laboratory and Supply Chain.
Tube type: Purple (K2 EDTA) tube, filled appropriately with patient blood
Type and Screen versus Type and Crossmatch
a) Type and Screen (T&S) is a procedure where the Blood Bank determines the ABO/Rh of a patient and performs a screening test to determine the presence of any “irregular” or unexpectedred cell antibodies. No blood products are set up for transfusion unless antibodies are found during the screen. In this case, the Type and Screen is automatically converted to a crossmatch. The unexpected antibody will be identified and units will be screened to find antigen negative blood. Antigen negative blood will then be crossmatched. If no antigen negative units are found in our inventory, antigen negative units will be ordered from other hospitals. Type and Screen samples are good for 72 hours.
b) Type and Crossmatch (T&C) starts with the same testing as in a Type and Screen (ABO/Rh and antibody screen) but then has more specific testing performed. Blood products of compatible ABO and Rh are tested against the patient’s plasma to determine compatibility. Test results are valid for 72 hours after time of specimen collection. After 72 hours, a new specimen must be collected and submitted for testing (exceptions can be made for the length of time a sample is viable for some pre-operativepatients).
Requests for Type and Screen or Type and Crossmatch
Routine requests for scheduled surgical patients should be received in the laboratory within 72 hours of the scheduled surgery. Green armbands will be placed on the patient and specimens will be promptly brought to the laboratory fortesting.
ASAP Requests: Standard crossmatch procedures are utilized; however, priority isgiven over routine requests. The blood will be available within two hours, but is sometimes available within 60 minutes if the patient
FGH Clinical Laboratory Specimen Collection Manual Date of Last Review: 05/10/2022 57 | Page Specimen Type – Rh Immune Globulin (RhoGam), Direct Antiglobulin Test (DAT), Indirect Antiglobulin Test (IAT)
has no irregularantibodies.
STAT Requests: The appropriate screen or full crossmatch procedure will be started immediately upon receipt of the specimen. Blood will be available within one hour providing the patient has no irregularantibodies.
Emergency Release: The requesting physician or designee will sign an emergency release form to obtain release of uncrossmatched blood. A full crossmatch procedure will be started immediately upon receipt of the pretransfusion blood sample. NOTE: A sample of blood MUST be obtained from the patient BEFORE any transfusions arestarted.
Massive Transfusion Protocol: If a patient is hemorrhaging and is anticipated to use large quantities of blood products, a physician has the option of initiating a Massive Transfusion Protocol. Once the lab has been notified that a Massive Transfusion Protocol has been initiated, the lab will automatically take steps to prepare blood products as rapidly as possible. Specifically, 4 units of packed red cells will be crossmatched (or Emergency Released if warranted), 4 units of Fresh Frozen Plasma will be thawed, and two units ofApheresis platelets will be ordered from a local hospital.
Procedure for Issuing Blood
Only an adequately trained individual should be sent to pick up blood products that are ready for issue. A printout from EPIC of the physician’s order to transfuse the patient should be presented when picking up blood.
Only one unit of blood will be issued at a time for any given patient. Exceptions to this policy will be dealt with on a case-by-case basis (e.g. Emergency release or multiple units issued in a cooler for the OperatingRoom).
Crossmatched blood will be reserved in the Blood Bank for only 72 hours after the time of specimen collection.
Notify the Blood Bank 30 to 45 minutes prior to anticipated need to infuse fresh frozen plasma (FFP) or cryoprecipitate (cryo). This time is required to completely thaw FFP and/or cryo units according to established guidelines. Note: After thawing, FFP is only good for 24 hours and cryo 4 hours; these products must be discarded if not used within thesetimeframes.
FGH Clinical Laboratory Specimen Collection Manual Date of Last Review: 05/10/2022 58 | Page
Anyunused units of blood must bereturned to thelaboratorywithin 30 minutes of issue (except for units issued in coolers to the OR). Units returned after this time period must bedestroyed.
Return of Unused Blood Products that were issued in a cooler to OR
Blood that has been returned to the Blood Bank from the OR in Blood Bank’s Igloo coolers shall not be made available for reissue unless the following conditions have been met:
(1) The HemoTemp label on the unit indicates that the unit has been maintained at 1° to 6°C.
(2) The unit of blood has not been penetrated or entered in anyway.
(3) The integral pilot segments are still attached to theunit
RhoGam (RhIG) Administration
RhoGam is used to prevent the sensitization of Rho (D) negative individuals (particularly women of childbearing age) to the Rho (D) antigen. In order to be a candidate for passive immunization to these factors, the patient must meet thefollowing criteria:
(1) The patient must be Rho (D) negative.
(2) The patient must lack circulating active immunization anti-Rho(D).
(3) The infant (if postpartum exposure) must be Rho (D) positive.
To be most effective RhoGam should be administered within the first 72 hours following delivery, miscarriage, or placental challenges
Misc. RhIG (miscarriage, ectopic pregnancy, abortion, bleeding episodes, placental challenges, etc.). When the health care provider places the order in EPIC for RhIG, an appropriate comment should beincluded that explains thepatient’s situation such as “Bleeding at 8 weeks” or “Threatened abortion at 14 weeks”. It is important that Blood Bank staff be made aware of the patient’s gestational age so that additional testing, if indicated, can be performed. Misc. RhIG may be ordered as ROUT or ASAP in CHCS. If a situation warrants a STAT (1 hour or less) workup, the provider should place the order as ASAP in CHCS but notify Blood Bank staff telephonically that the order is really STAT and explain thesituation.
Antepartum RhIG (usually ordered at 28 weeks gestation). When the health care provider places the order in CHCS for RhIG, a comment of “28 week OB” should be included. RhIG ordersareordered as ROUTin CHCS. Ifthepatient has acomputer
FGH Clinical Laboratory Specimen Collection Manual Date of Last Review: 05/10/2022 59 | Page
historyat EVANS ofbeing Rh negative, Blood Bank personnel will begin setting up the RhIG as soon as notification is received that the patient is waiting; in this case, the RhIG is usually available in about 15 minutes. In any case, a specimen MUST be drawn from the patient before administering the RhIG even if testing is not performed immediately on that specimen. If the patient does not haveahistoryof havingbeentestedpreviouslyatEVANS,RhIGwillnotbeissueduntiltesting has been completed on a newly drawn specimen; in this case, the RhIG is usually available in about 45 minutes.
PostpartumRhIG.Theorderisplacedin CHCSasROUT. TheBlood Bank normally processes these requests in less than 4 hours.
Transfusion Reaction
If a transfusion reaction is encountered or suspected, the following steps must be performed:
(1) Discontinue the transfusionimmediately.
(2) Keep the patient’s IV line open with saline or otherfluids.
(3) Notify the attending physician.
(4) Follow the nursing protocol for transfusion reactions.
(5) Collect appropriate samples immediately. EDTA-purple top tube and a urinespecimen.
(6) Return remaining blood and attached transfusion set to the Blood Bank fortesting.
CHEMISTRY
Fasting blood specimens
Patients will have nothing to eat or drink (except water) for 10 to 12 hours prior to reporting to the laboratory for specimen collection.
Therapeutic Drug Monitoring
Knowing when to collect the sample for serum drug level monitoring is critical. Refer to the chart in Appendix E for information on when to collect specimens. Any questions should be directed to the requesting physician or a pharmacist.
Chemistry Profiles
Thelaboratoryprefersthathealth careprovidersusethevariouspanelsoffered to aid or confirm diagnosis. If additional tests are required, they must be orderedseparately.
FGH Clinical Laboratory Specimen Collection Manual Date of Last Review: 05/10/2022 60 | Page
HEMATOLOGY & COAGULATION
Specimen Collection Instructions
Collection of blood through intravenous lines that have been previously flushed with heparin should be avoided, if possible. If the blood must be drawn through an indwelling catheter, possible heparin contamination and specimen dilution should be considered. When obtaining specimens from indwelling lines that may contain heparin, the line should be flushed with 5.0 ml saline and the first 5 ml of blood or 6-times the line volume (dead space volume of the catheter) be drawn off and discarded. For those samples collected from a normal saline lock (capped off venous port), twice the dead space volume of the catheter and extension set should be discarded.
Anticoagulants
EDTA
The anticoagulant of choice for hematology studies is EDTA. The lavender/purple topped vacuum blood tube contains this anticoagulant. The tube must be at least 50% filled with blood. Anything less than this volume will affect the accuracy of testing and will be rejected (due to inappropriate anticoagulant to blood ratio). Providers who utilize the raised bottom microtainer tubes are reminded that these tubes have a tendency to clot very quickly if the tube is not thoroughly mixed immediately upon collection.
Sodium Citrate
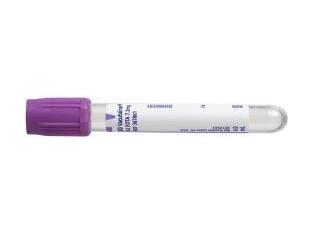
The blue topped vacuum blood tube contains sodium citrate and is to be used for coagulation studies. This includes ship-out tests for factor studies. This type of tube must have at least 90% of the expected fill and not more than 100%. Any other volumes will invalidate test results due to inappropriate anticoagulant to bloodratio.

FGH Clinical Laboratory Specimen Collection Manual Date of Last Review: 05/10/2022 61 | Page
Routine Urinalysis
Routine urinalysis should be performed on a fresh specimen. Specimens that are more than one hour old will usually show signs of deterioration and will be unreliable for testing. Specimens collected from inpatient units will be delivered immediately to the laboratory. Samples can be refrigerated and should be delivered within three hours. Routine urinalysis will consist of the following tests and examinations:
Microscopic examination (if indicated; or by positive test of Blood, Protein, Leukocyte esterase or Nitrite)
MICROBIOLOGY
Specimen Collection Guidelines
Each specimen should be considered potentially infectious; handle using Standard Precautions.
Each specimen requires collection in a STERILE and tightly capped/sealed container to avoid leakage and possible rejection of specimen due to contaminated exterior of container.
BLOOD CULTURES for bacteria consist of one (1) Silver labeled AEROBIC bottle and one (1) Purple labeled LYTIC (ANAEROBIC) bottle, with recommended blood volume of 8-10mL each. PEDIATRIC draws (1-3 mls) can be inoculated into a Pink-labeled PEDS PLUS (aerobic) bottle.
Tissue samples for bacterial culturing MUST NOT be placed into formalin fixative. Send the samples in a dry sterile container or with 1-5 mL of sterile saline solution in a sterile container to the Microbiology Laboratory directly.
Specimen with needles attached will be rejected per UF Health Shands Hospital Infection Control Policy. Recapping of needles is contrary to UF Health Shands Hospital Infection Control policy and will also be rejected
All microbiology specimens will be collected by nursing staff or by the
FGH Clinical Laboratory Specimen Collection Manual Date of Last Review: 05/10/2022 62 | Page
Color Blood Protein Appearance Bilirubin Nitrite Specific gravity Ketone Leukocyte esterase
Glucose
Urobilinogen
requesting clinician. Submit all specimens to the laboratory immediately after collection to prevent the overgrowth by contaminating organisms. Please collect one swab for eachtest.
Specimens MUST be labelled appropriately as described in the specimen labelling portion of this manual.
Specimen source (i.e., left knee, right foot, etc.) must be documented in the specimen source field when documenting collection in EPIC.
Specimens MUST be submitted in appropriate sterile containers. The laboratory will provide outpatients with stool collection kits. All other swabs, culturettes and any items required for inpatients or outpatients must be obtained from eithertheclinicallaboratoryorSupplyChain.
Culture Incubation Time
Throat cultures will be held 48 hours unless a positive result is obtained before that time
Sputum and stool cultures will be held for 48 hours unless a positive result is obtained before that time.
Wound and cervical cultures will be held for 48 hours unless a positive result is obtained before that time.
Blood cultures will be held for five (5) days and monitored continuously for growth.
Cultures of body fluids, such as CSF and tissues, will be held for (3) days
Anaerobic cultures will be held for seven (7) days, with the exception of anaerobic cultures obtained from joints, which are held for fourteen (14) days
Urine cultures will be held for 48 hours.
Antibiotic Sensitivity Studies
The Clinical Laboratory utilizes a selective reporting method for antibiotics. The report sent to the provider is appropriate for the site the specimen was collected from and for the results of the gram stain. If MICs of other antibiotics are required, contact the Microbiology department or enter information in the comments of the EPIC order. If the desired sensitivity testing is not available in-house, the organism will be sent to a commercial reference laboratory for study.
Sensitivity studies are performed routinely on all positive cultures and are normally available within forty-eight (48) to seventy-two (72) hours.
FGH Clinical Laboratory Specimen Collection Manual Date of Last Review: 05/10/2022 63 | Page
Parasitology Specimens
Fecal specimens for Parasitology must be sent to the Clinical Lab in a sterile container (such as a Urine Collection Cup). The Clinical Laboratory will determine if the specimen submitted meets the required minimum volume; and if so, will separate the specimen into the kit provided by LabCorp (if the specimendoesnotmeettheminimumvolume,thetechnologistortechnicalassistantwill recollect the sample and document accordingly in EPIC). This kit consists of two vials; one pink topped containing formalin and the other gray topped containingPVA.
Mycology Specimens (Fungus)
Specimens forvaginal wet prep examination will becollectedbythe requesting clinician and submitted to the laboratory placed in approximately 1 ml of saline in a plain red top tube.
Skin or hair scrapings for KOH exams should be submitted in a sterile container. The source of the specimen must be noted in EPIC or on the requisition form. Wet preps and KOH preps will be reported out the day they are received.
Mycologycultures are performedintheclinicallaboratory. Swabs ofexudate will be submitted in aculturette. Otherspecimens, such as tissue,skin scrapings, and urine will be submitted in appropriate sterile containers.
Culture times for fungus vary with the organism. Fungal cultures are held four (4) weeks before the final report is sent, although most yeast culture results are available in five (5) to seven (7) days.
Acid Fast Cultures (AFB), Mycobacteria, and Tuberculosis
Direct culture stains are performed in house with typically same day result if received before 2p. Cultures for AFB are not performed in house. All requests for AFB culture are sent to the Mississippi State Department of Health. Concentrated culture stains are typically resulted within five (5) to seven (7) days. Cultures are held for eight(8) weeks before thefinal report is sent.
Virology Specimens
All specimens for virus isolation will be collected by the nursing unit or clinic personnel and delivered to the lab immediately. Ensure that the proper type of transport media is utilized. These supplies are obtained from the clinical laboratory. Specimens will be sent to a reference laboratory. All specimens submitted for virus studies must include the specimen source.
FGH Clinical Laboratory Specimen Collection Manual Date of Last Review: 05/10/2022 64 | Page
Blood Cultures
Blood cultures must be collected prior to starting antibiotic therapy. If the nursing unit is collecting the specimens, ensurepropercollection technique is utilized to minimize the risk of contamination. If unsure of how to properly collect blood cultures, contact the Microbiology section. Blood cultures will be held and examined for five (5) days.
CSF and Sterile Body Fluid Cultures
Spinal fluid specimens must be collected under sterile conditions and transported to the laboratory immediately. CSF will be cultured and incubated at 37 C for seventy-two (72) hours. Gram stains will be made on all specimens. India ink preps are done upon request.
Ear and Eye Cultures
Material from the ear and eye should be collected by the clinician in a sterile swab collection system and delivered to the lab without delay. These cultures will be incubated at 37 C for seventy-two (72) hours. Most positive cultures will be reported in 48 hours.
Mastoid / Sinus Cultures
Material from the mastoid and sinus regions should be submitted in a sterile swab collection system. These cultures will be incubated at 37 C for at least seventy-two (72) hours.
Sputum Cultures
Sputum for bacterial culture should be submitted in a dry, sterile containerand sent immediately to the lab. A gram stain will be performed to determine the suitability of a specimen for culture. Cultures will be incubated at 37 C for at least forty-eight (48) hours.
Stool and Rectal Cultures
Stool specimens should be submitted on a culturette or in a sterile container. Stool and rectal cultures will be incubated at 37 C for at least forty-eight (48) hours.
Throat Cultures
Specimens are to be submitted on a culturette. Cultures will be incubated at 37 C for forty-eight (48) hours. A positive report maystate, “Beta Hemolytic
FGH Clinical Laboratory Specimen Collection Manual Date of Last Review: 05/10/2022 65 | Page
Streptococci, Group A, Isolated.” A negative report will state “Normal / Absent / Reduced Normal Throat Flora.”
Urethral / Vaginal Cultures
Specimens must be submitted on sterile swabs. Cultures will be incubated at 37 C for at least seventy-two (72) hours.
Urine Cultures
Specimens will be submitted in sterile containers. If a specimen cannot be delivered within 30 minutes to the laboratory place the cup in a refrigerator that is not used for staff/patient food or that holds medications for not more than 24 hours. All cultures will be incubated at 37 C for at least forty-eight (48) hours and sensitivity will be performed as necessary.
Wound and Tissue Cultures
Wound cultures will be submitted on a culturette or in an appropriate sterile container. When collecting, avoid contamination by normal skin flora. Tissues will be submitted in small pieces in a sterile container, and if appropriate, with sufficient sterile normal saline to cover the tissue. Send immediately to the lab. A gram stain is performed on all tissue and wound specimens. Wound and tissue cultures are incubated at 37 C for 48 – 72 hours. Note: State specific site of culture in EPIC or onrequisition.
Anaerobic Cultures
Specimens will be collected in anaerobic transportation tubes and sent immediately to the lab with the collection time noted on the tube. A gram stain will be performed on all anaerobic cultures. Note that the following specimens are NOT acceptable for anaerobic culture: gastric washings, sputum, throat, nasal, urine, feces, ileostomy or colostomy swabs, superficial skin or environmental cultures and vaginal/cervical swabs. Cultures are incubated anaerobically at 37 C for five (5) days, with the exception of cultures obtained from a “joint” (such as knee joint, etc.), which will be help anaerobically for fourteen (14) days. Sensitivities for anaerobic organisms are not performed at FGH Clinical Laboratory. If susceptibility testing is needed, contact the Microbiology section. These are sent to commercial referencelaboratories.
Stains
Acid Fast Stain: Direct AFB smears are performed in house if received by 2p daily. The Mississippi State Department of Health will perform a concentrated smear with the culture request.
FGH Clinical Laboratory Specimen Collection Manual Date of Last Review: 05/10/2022 66 | Page
Gram Stain: Specimens will be submitted in sterile containers. Smears should be prepared without preservative. Gram stains on vaginal, urine and stool specimens are discouraged due to heavy amount of normal flora present.
PCR / NAAT Testing
Chlamydia / Gonorrhea (CT-NG)
The methodology used detects the presence of DNA from Chlamydia trachomatis and Neisseria gonorrhoeae in cervical, urethral, or urine specimens. This methodology is not validated for specimens from any other anatomicalsource.
Collection device for Endocervical AND Vaginal specimens
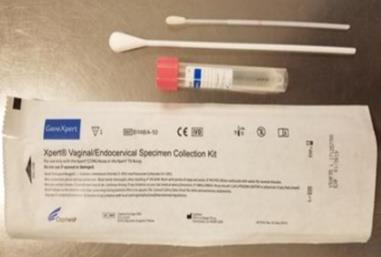
Endocervical Swab:
1) Open the swab collection kit.
2) Use the large cleaning swab to remove excess mucus from endocervix and surrounding mucosa and discard.
3) Open the package that contains the pink-capped Xpert Swab Transport Reagent tube and the individually wrapped collection swab. Set the tube aside before proceeding.
4) Remove the swab, taking care not to touch the tip or lay it down. If the soft tip is touched, the swab is laid down, or the swab is dropped, use a new Xpert Vaginal/Endocervical Specimen Collection Kit.
5) Insert collection swab into endocervical canal, and rotate swab gently for 30 seconds. Avoid touching vaginal wall when removing swab.
6) Immediately place collection swab into Xpert Swab Transport Reagent Tube (pink cap) provided in collection kit. Snap off swab at score line so swab fits into closed tube.
7) Cap tube securely and invert the tube 3-4 times to elute material
FGH Clinical Laboratory Specimen Collection Manual Date of Last Review: 05/10/2022 67 | Page
from the swab. Avoid foaming.
8) Label the transport tube with the patient label including date of collection, specimen type and collector’s initials.
9) Transport and store swab container at 2 to 30 degrees C (refrigerate is preferred temperature) within 3 days of collection.
10) Do not spill the contents of the tube. If the contents of the tube are spilled, use a new collection kit.
11) Warning: lf the contents of the tube are spilled on your skin, wash the affected area with soap and water. lf the contents of the tube are splashed in your eyes, immediately flush your eyes with water.
Vaginal Swab
1) Open the Xpert Vaginal/Endocervical Specimen collection kit.
2) Discard the large cleaning swab.
3) Open the package that contains the pink-capped Xpert Swab Transport Reagent tube and the individually wrapped collection swab. Set the tube aside before proceeding.
4) Remove the swab, taking care not to touch the tip or lay it down. If the soft tip is touched, the swab is laid down, or the swab is dropped, use a new Xpert Vaginal/Endocervical Specimen Collection Kit.
5) Insert collection swab about 5 cm past introitus and rotate gently for 30 seconds.
6) Immediately place collection swab into Xpert Swab Transport Reagent Tube (pink cap) provided in collection kit. Snap off swab at score line so swab fits into closed tube.
7) Cap tube securely and invert the tube 3-4 times to elute material from the swab. Avoid foaming.
8) Label the transport tube with the patient label including date of collection, specimen type and collector’s initial
9) 9. Transport and store swab container at 2 to 30 degrees C (refrigerate is preferred temperature) within 3 days of collection.
10) Do not spill the contents of the tube. If the contents of the tube are spilled, use a new collection kit.
11) Warning: lf the contents of the tube are spilled on your skin, wash the affected area with soap and water. lf the contents of the tube are
FGH Clinical Laboratory Specimen Collection Manual Date of Last Review: 05/10/2022 68 | Page
splashed in your eyes, immediately flush your eyes with water.
Neisseria gonorrhea culture
Culture for Neisseria gonorrhea is the gold standard for diagnosis. Vaginal and penile specimens are to be submitted on a culturette. For other specimen sources (i.e., eye, rectal, pharyngeal), contact the Microbiology Department directly.
DO NOT REFRIGERATE specimens prior to submitting to the laboratory, as this will cause death of the Neisseria organism. Cultures will be incubated at37 C for seventy-two(72) hours. A gram stain will be performed on all specimens submitted for testing.
NOTE:
FEMALES: due to normal flora in the vaginal tract, a presumptive identification of N. gonorrhea CANNOT be made for females. In this instance, culture (other than molecular procedures) is the only definitive method in which diagnosis may be made.
MALES: a presumptive identification of N. gonorrhea may be made IF the organism is seen within a White Blood Cell (WBC)
Xpert Xpress Strep A (Group A Strep, Qualitative procedure)
The methodology used accurately diagnose pharyngitis caused by Group A Streptococcus (GAS) to reduce overuse of antibiotics for the treatment of pharyngitis
Sample type: Throat swab specimens.
Sample Collection: Sample collection should be performed in accordance with institutional guidelines for collection of throat swab specimens. Samples should be collected by vigorously swabbing the tonsils and the posterior pharynx. Swab sample(s) should be collected with COPAN eSwab (shown below).
FGH Clinical Laboratory Specimen Collection Manual Date of Last Review: 05/10/2022 69 | Page
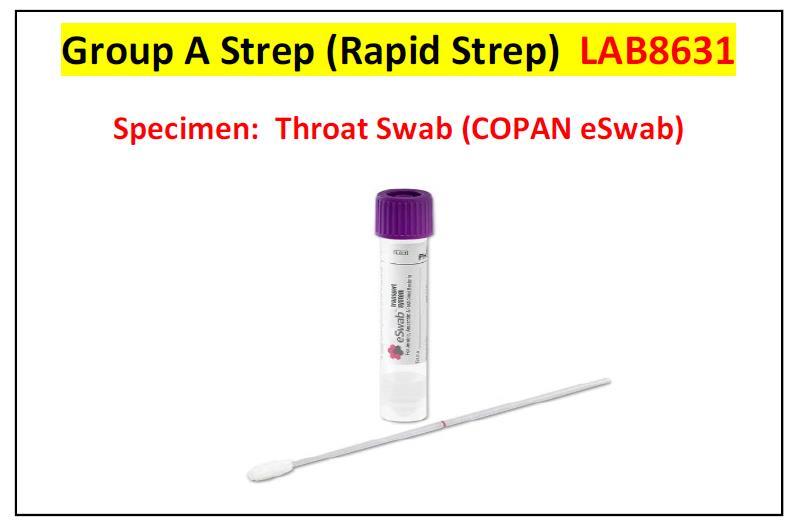
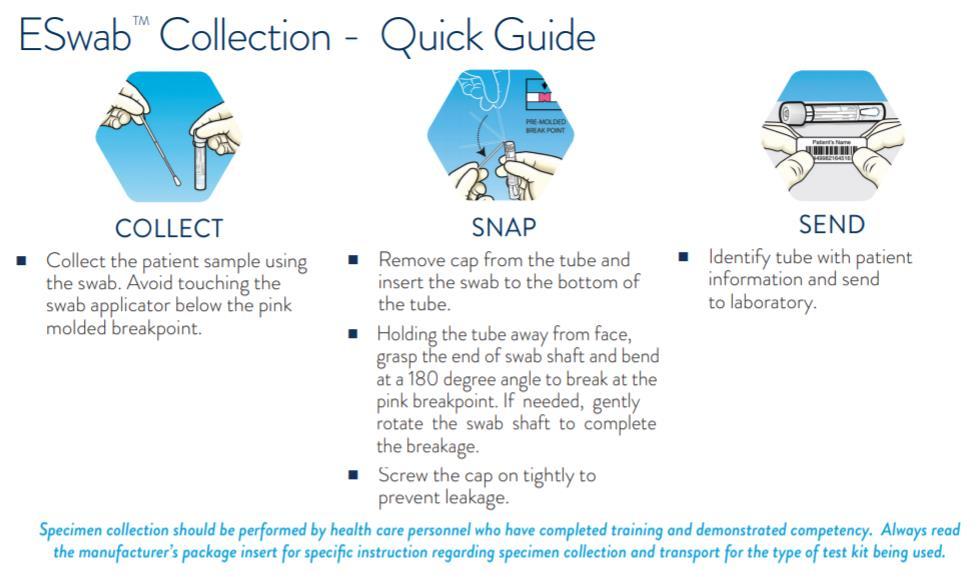
Xpert Xpress Flu/RSV (Flu A, Flu B and RSV, Qualitative procedure)
The Cepheid Xpert® Xpress Flu Assay, performed on the GeneXpert® Instrument System, is an automated, multiplex real-time RT-PCR assay intended for the in vitro, qualitative detection of influenza A and influenza B viral RNA. The Xpress Flu Assay uses nasopharyngeal swab specimens placed into UTM (Universal Transport Media) that were collected from patients with signs and symptoms of respiratory infection in conjunction with clinical and epidemiological risk factors. The Xpress Flu Assay is intended as an aid in the diagnosis of influenza. Performance characteristics for influenza A were established during the 2015 2016 influenza season. When other novel influenza A viruses are emerging, performance characteristics may vary.
FGH Clinical Laboratory Specimen Collection Manual Date of Last Review: 05/10/2022 70 | Page
SPECIMEN COLLECTION AND PREPARATION
Sample type: Nasopharyngeal swab specimens.
Sample Collection: Collect specimens according to the instructions below. Use GeneXpert Nasal Swab Collection Kit for viruses (shown below).
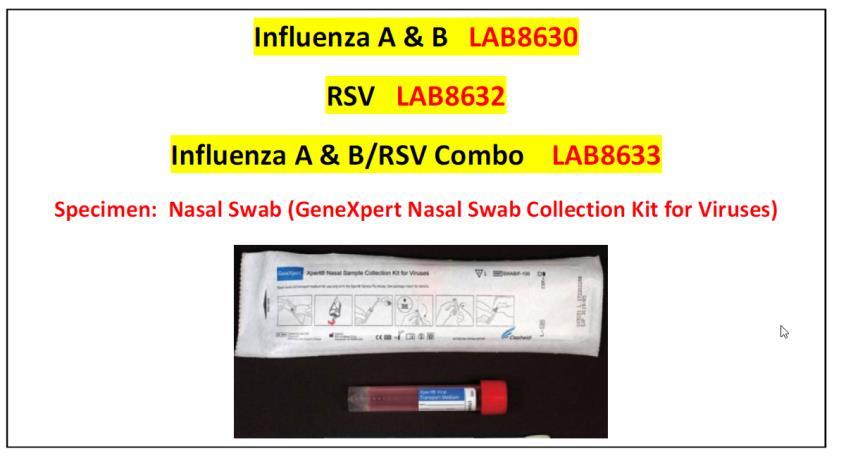
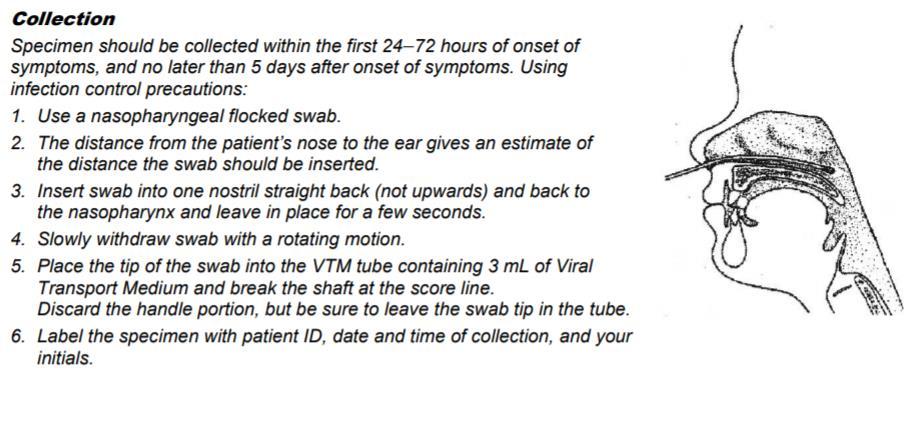
Mycoplasma pneumonia (DNA Amplification; qualitative procedure)
Mycoplasma pneumoniae is a common cause of human upper and lower respiratory infections, including pharyngitis, acute bronchitis and pneumonia. Mycoplasma became recognized as a human pathogen in the 1960s, with Mycoplasma pneumoniae the best known and most studied. M. pneumoniae contains a triple-layered cell
FGH Clinical Laboratory Specimen Collection Manual Date of Last Review: 05/10/2022 71 | Page
membrane rather than a structured cell wall, which prevents identification by traditional gram stain methods and visualization by light microscopy.
M. pneumoniae has been associated with up to 40% of community-acquired pneumonia cases. Infection occurs in both children and adults without geographical, gender or climate-related restrictions. M. pneumoniae is most often associated with atypical pneumonia, presenting with symptoms that include headache, malaise, myalgia, fever, and sore throat accompanied by dry, paroxysmal cough. While the clinical course of mycoplasma pneumonia is generally mild and self-limiting, it has been associated with a mortality rate of approximately 1.4%. An estimated 2 million cases of M. pneumoniae infection occur annually with approximately 100,000 pneumonia-related hospitalizations in the United States each year. It is estimated as many as 18% of children requiring hospitalization with community-acquired pneumonia are caused by M. pneumoniae.
Transmission of M. pneumoniae is generally from person to person by aerosol with a reported incubation period of one to four weeks. As patients with active infection carry Mycoplasma in the nose, throat, trachea, and sputum, the spread of the disease is facilitated by its accompanying cough. This mode of transmission lends itself to outbreaks in close personal contact settings such as schools, military barracks, businesses, summer camps, colleges or institutions. Similarly, the disease is commonly spread among family members within a household.
Diagnosis of acute M. pneumoniae infection is difficult. Basic diagnostic strategies in clinical practice include culture and serology. M. pneumoniae culture is often impractical for patient management as the organism may take as many as six weeks to culture. Serology products are widely available and offer practical diagnostic solutions, however, may be limited in their ability to detect acute infection. Serological assays are often directed at specific IgM and IgG antibodies. IgM antibodies are generally not detectable within the first seven days of symptom onset and may persist for months after active infection. Studies indicate that less than 50% of patients with acute infection demonstrate a positive IgG response.
SPECIMEN COLLECTION AND PREPARATION
Sample type: Throat swab specimens.
Sample Collection: Sample collection should be performed in accordance with institutional guidelines for collection of throat swab specimens. Samples should be collected by vigorously swabbing the tonsils and the posterior pharynx. Swab sample(s) should be collected with COPAN dual swab.
FGH Clinical Laboratory Specimen Collection Manual Date of Last Review: 05/10/2022 72 | Page
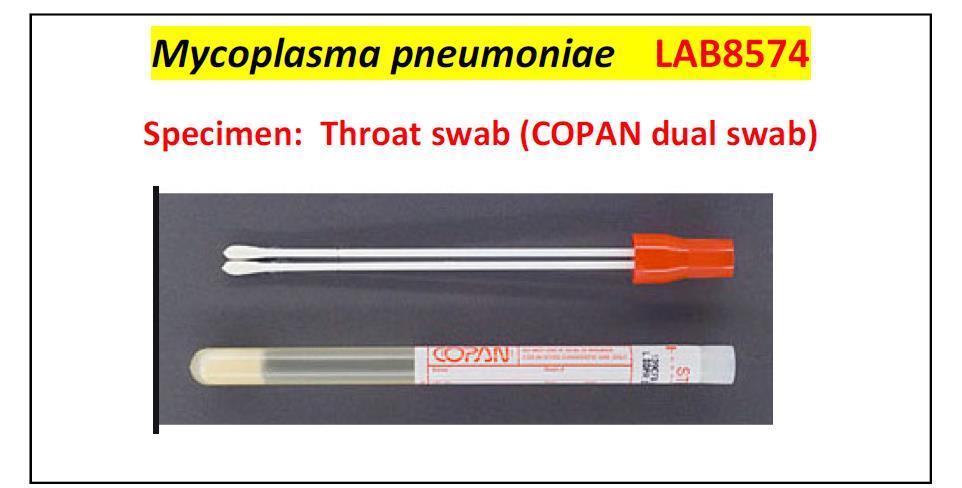
MICROBIOLOGY CULTURES
BBL Culture Swab Plus Collection and Transport Swabs
The BBL CultureSwab Plus Collection and Transport System features Amies agar gel media with oxygen-scavenging agents, for sampling of both aerobic and anaerobic organisms.
Sample type: Throat swab specimens (for CULTURE ONLY)
Wound specimens (for CULTURE ONLY)
Anaerobic specimens (for CULTURE ONLY)
Sample Collection: Sample collection should be performed in accordance with institutional guidelines for collection of throat swab specimens
Culture Type Collection Instructions
Anaerobic Culture

All material from sites not harboring indigenous microorganisms are suitable for anaerobic culturing. If using swab, collect with CultureSwab Plus (blue cap culturette)
FGH Clinical Laboratory Specimen Collection Manual Date of Last Review: 05/10/2022 73 | Page
Bronchoalveolar lavage
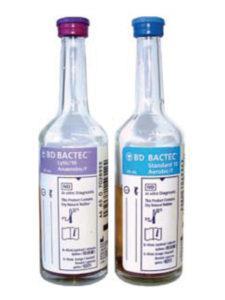
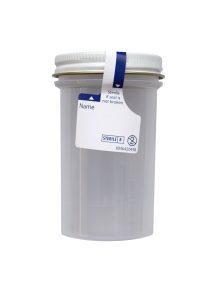
Gonorrhea, culture (female)
Refer to the blood culture collection procedure
Wedge bronchoscope into subsegmental bronchus; insert four 50 mL boluses of sterile saline into the suction port with immediate return suction after the insertion of each sample. Submit – mL in a sterile container.
Xpert CT/NG Urine Specimen Collection (Male and Female)
Patient should not have urinated for at least one hour. Insert a small wire-shafted Dacron swab 2-4 cm into the endourethra. Gently rotate the swab. Wait 1-2 seconds. Withdraw the swab.
Culture:
Collect specimen using the CultureSwab Plus (blue cap culturette)
Collect 2 mL or more if possible (1 mL from infants or children). Place in a sterile container.
FGH Clinical Laboratory Specimen Collection Manual Date of Last Review: 05/10/2022 74 | Page
Culture Type Collection Instructions Blood Culture
Culture Type
Fluids: Cerebrospinal
Fluids: joint, pericardial, peritoneal, and pleural
Fungal or Mycobacterial Culture, Blood
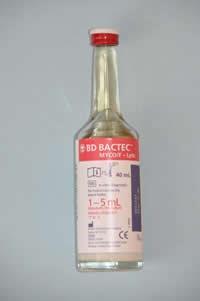
Rectal Swab, Rotavirus

Collection Instructions
Collect 2 mL or more if possible (1 mL from infants or children). Place in a sterile container.
Transport peritoneal fluid, synovial fluid, pleural fluid, sputum, bronchial washings, skin scrapings etc. in sterile container
Refer to the blood culture collection procedure
Collect specimen using the CultureSwab Plus (blue cap culturette)
Rectal Swab, culture for GC
Collect in sterile container.
FGH Clinical Laboratory Specimen Collection Manual Date of Last Review: 05/10/2022 75 | Page
Culture Type
Stool
Throat, culture
Collection Instructions
Collect expectorate in response to a deep cough and place in sterile container.
First morning specimens are recommended
Use a Dacron swab, rub the tonsil area and the back of the pharynx.
Collect on a sterile swab. Transport in a sterile container (Red top vacutainer tube)
Swabs with wooden applicator sticks will not be accepted.
Urine Clean Voided Urine Males:
Retract the foreskin of the penis, and using a aseptic wipe, cleanse the glans and the area surrounding the foreskin.
With the foreskin still retracted, pass a small amount of urine into the toilet.
Collect midstream urine into a sterile container.
Females
Spread the labia. Using an aseptic wipe, cleanse the area on each side of the meatus using a single front-to-back motion.
Using a second wipe, cleanse directly across the meatus
While the labia is still held apart, pass a small amount of urine into the toilet.
Collect the specimen in a sterile container.
FGH Clinical Laboratory Specimen Collection Manual Date of Last Review: 05/10/2022 76 | Page
ANATOMIC PATHOLOGY, CYTOLOGY
Specimen Collection
CAUTION: UTILIZE ALL BLOOD AND BODY FLUID PRECAUTIONS RECOMMENDED BY THE CDC IN HANDLING ANY TISSUE SPECIMEN OR MATERIAL
CONTAMINATED BY THESE SPECIMENS
Collect and have ready ALL slides, fixatives, and materials necessary for submission of these specimens BEFORE the specimen is collected. RAPID FIXATION IS CRITICAL with these specimens. MORE THAN A SECOND OR TWO OF DRYING TIME may ruin the specimen and make it UNDIAGNOSABLE. ALL slides and specimen containers must be properly labeled with the patient’s name and the source of the specimen and must be accompanied by a complete requisition which includes:
1. Patient Name
2. Patient Identification Number
3. Patient location (Room number or other location)
4. Physician requesting the examination
5. Clinical history or clinical diagnosis relevant to the specimen being submitted
Collection and Preservation of Cytology Specimens
1. Body Cavity Fluids
(Applies to pleural, peritoneal, pericardial, cul de sac washing etc.). Fresh body fluid should be collected in sterile containers. DO NOT ADD ALCOHOL OR FORMALIN.
Send the specimen to the laboratory immediately or refrigerate if a delay in transport to the laboratory is necessary.
2. Breast Nipple Discharge
Express the discharge from the nipple and apply a clean glass slide directly to the nipple. Drop the slide IMMEDIATELY into 95% ethyl alcohol or express the discharge from the nipple and catch the fluid in a sterile tube with saline.
3. Breast Fluid
Freshly aspirated breast fluid should be sent immediately to the laboratory in a clean container. Do not add fixative.
4. Broncho alveolar lavage
Lavage fluid should be sent immediately to the laboratory in clean containers.
FGH Clinical Laboratory Specimen Collection Manual Date of Last Review: 05/10/2022 77 | Page
5. Brushings
(Applies to bronchial brushings, gastric brushings, colonic brushings, esophageal brushing, tracheal brushings, and ureteral brushings). The brush should be sent to the laboratory in normal saline.
6. Cerebrospinal Fluid
Collect fresh fluid in a sterile container and send IMMEDIATELY to the laboratory.
7. Cyst fluid
Applies to brain cyst fluid, breast cyst fluid, hydrocele fluid, ovarian cyst fluid, pancreatic cyst fluid, and renal cyst fluid. Send freshly aspirated fluid immediately to the laboratory or refrigerate until the specimen can be submitted (must be delivered within 24 hours).
8. Fine needle aspirations
Aspirate a small quantity of material into the HUB of a syringe using as large a caliber syringe as practical (18 gauge for superficial aspirations and at least 21 gauge for deeper aspirations). Use an in and out motion while aspirating passing the tip of the needle through the mass. When material appears in the HUB of the needle…withdraw the needle BACK onto the syringe and gently express the material from the HUB of the needle into a sterile tube with saline. The syringe can be filled with 1 –2 cc of sterile saline or vial of cytolyt solution and the remaining material flushed into a clean container for immediate delivery to the laboratory.
9. PAP Smear
The Cytology Department performs Pap Smears using the Thin Prep technique, here are the following guidelines to obtain an optimal specimen for Thin Prep Pap Smear/
a. The patient should be instructed not to use a vaginal douche or any type of lubricant for 24 hours before having a Pap smear.
b. Cytological specimen should be obtained after a non-lubricated speculum (moistened only with warm water) is inserted and before the pelvic examination.
c. The cervix and the area of the vaginal adjacent to the cervix must be fully visible when the smear is obtained.
d. Both endocervix and ectocervix should be sampled separately
e. The ectocervix is sampled by rotating a plastic spatula and applying pressure along its entire surface.
i. The spatula is rinsed in the PreservCyt Solution vial by swirling the spatula vigorously in the vial 10 times. After swirling 10 times discard the spatula. If using an endocervical brush, insert the brush into the cervix until only the bottom most fibers are exposed. Slowly rotate ¼ to ½ turn in one direction. DO NOT OVER ROTATE. Rinse the endocervical brush in the PreservCyt Solution by rotating the brush in the solution 10
FGH Clinical Laboratory Specimen Collection Manual Date of Last Review: 05/10/2022 78 | Page
times while pushing against the PreservCyt vial wall, swirl the brush vigorously to further release material. Discard the brush. Tighten the cap on the PreservCyt Solution so that the torque line on the cap passes the torque line in the vial. Record the patient’s name on the vial. Place the vial and completed requisition form in the specimen bag for transport to the laboratory
ii. If using a broom-like collection device, insert the central bristles of the bottom into the endocervical canal deep enough to allow the shorter bristles to fully contact the ectocervix. Push gently and rotate the broom in a clockwise direction 5 times. Rinse the broom in the PreservCyt Solution vial by pushing the broom vigorously to further release material. Discard the broom collection device. Tighten the cap on the PreservCyt solution so that the torque line on the cap passes the torque line on the vial. Record the patient’s name on the vial. Place the vial and completed requisition form in the specimen bag for transport to the laboratory.
f. Thin-Prep supplies are available upon request.
10. Smears
Smears made by the physician from any body site should be fixed immediately in 95% alcohol
11. Sputum
Three EARLY MORNING DEEP COUGH specimens are preferred and may be sent to the laboratory immediately. DO NOT add ethanol or other fixatives. Send to the laboratory UNFIXED.
12. Urine
DO NOT SEND A FIRST MORNING SPECIMEN. Collect a random clean or catheterized specimen. Specimen may be refrigerated overnight. Send to the laboratory as soon as possible.
13. Washings
Applies to bronchial washings, colonic washings, esophageal washings, gastric washings, and bladder washings. The washing is collected by the physician into disposable tubes or containers. Send the specimen to the laboratory immediately.
Log Book
It is recommended that the nursing unit / clinic keep a log of all specimens submitted to the laboratory which includes:
1. Patient Name
2. Specimen Type
FGH Clinical Laboratory Specimen Collection Manual Date of Last Review: 05/10/2022 79 | Page
Supplies
3. Date and time of submission to the laboratory
4. A space for the initials of the individual talking the specimen to the laboratory
5. A logbook will aid greatly in tracking specimens which may be misplaced or delayed.
1. Slides and alcohol solutions are available in the laboratory (ext. 4273 –main lab) (ext. 1059 cytology Dept)
2. Requisitions are printed on the unit after order entry in EPIC.
3. Biohazard outer wrap bags are available in the laboratory.
Criteria for rejection of Cytology Specimens
1. Improper labeling on specimens or requisition form
2. Prolonged period (over 24 hours) at room temperature without fixation
3. Unlabeled slides or specimens
4. Improper or inadequate fixation
5. Incomplete requisition
6. Any specimen that is not properly labeled or properly fixed according to procedure will be rejected.
7. The operating room personnel or nursing personnel and submitting physician will be notified and a QC form will be written up.
Interpretation
Non-gynecological smears are screened by a qualified cytotechnologist and/or pathologist. All non-gynecological smears are reviewed by a pathologist.
Collection and Handling of Tissues
CAUTION: UTILIZE ALL BLOOD AND BODY FLUID PRECAUTIONS RECOMMENDED BY THE CDC IN HANDLING ANY TISSUE SPECIMEN OR MATERIAL CONTAMINATED BY THESE SPECIMENS.
Prior to any tissue specimen being harvested by a physician, GET a SUITABLE SPECIMEN CONTAINER for that particular specimen containing an appropriate QUANTITY of fixative. Containers may be obtained in Surgery or Labor and Delivery.
FGH Clinical Laboratory Specimen Collection Manual Date of Last Review: 05/10/2022 80 | Page
Fixatives
1. Unless the physician specified otherwise, 10% NEUTRAL BUFFEREND FORMATION is satisfactory. This is obtained in the tissue holding room next to surgery. Call 288-1050 if you have difficulty.
2. EM, ZF, IF fixatives are available in the Cat Scan Department for use in the preservation of RENAL BIOPSIES. ( FIXATIVE BOTTLE STORED IN CT)
3. POC (fetal tissue) for Microarray testing – no fixative , store in refrigerator
(SEND OUT FOR PATHOLOGY)
4. Pathology Specimens for Frozen Section no fixative, notify pathology on-call.
Containers
1. RULE OF THUMB: FOR EACH VOLUME OF TISSUE…ADD TEN VOLUMES OF FIXATIVE SOLUTION.
Therefore, in general select a container that is at least 10 times larger than the specimen to be submitted. For very large specimens where this rules is impractical, such as colon or breast resections, select as large a container as possible and be surface that the tissue is totally IMMERSED in formalin. Opening bowel resections will greatly aid in fixation and enhance the quality for the subsequent examinations by the Pathologist.
2. Renal Biopsies
Must be placed in EM, ZF, IF fixatives. Place small 1 mm or less thickness aliquots container glomeruli in each container. Specimens are sent to Renal Path Diagnostics for special studies.
3. Legs and other Amputated Parts
Are to be placed inside TWO biohazard vinyl red bags with no formalin added. Place the specimens in the ‘amputated parts’ refrigerator located in the tissue holding room. The request slip should be left on the counter to make the pathology staff aware a specimen is ready for pickup.
4. Fetuses
Are carried to the morgue (Public safety should be notified). Complete a Morgue Utilization Form and submit with the fetus. Fetuses may be held for pickup or sent for disposal. Fetuses are held for a maximum of 21 days and will be disposed of after that time.
FGH Clinical Laboratory Specimen Collection Manual Date of Last Review: 05/10/2022 81 | Page
5. Biohazard plastic pouches
Are available in the Supply Chain (288-1915) for use on specimens which must be transported from outside the building or within the building it situations where ALL individual handling the specimen cannot wear gloves or protective eyewear in handling the specimens.
Container Labels
Place a label on each container with at least the following information present:
1. Patient Name
2. Patient ID Number
3. Specimen source
4. FOR MULTIPLE SPECIMENS….Designate each specimen with a separate consecutive letter of the alphabet (A,B,C, etc.)
Requisitions
A COMPLETE REQUISITION IS REQUIRED for ALL ANATOMIC PATHOLOGY PROCEDURES. Incomplete requisitions may be result in specimen rejection. Please provide a COMPLETE Requisition with all specimens submitted which includes the following information:
1. Patient Name
2. Patient ID Number
3. Patient Age
4. Patient Sex
5. Location (room number or other location)
6. CLINICAL INFORMATION….this is VERY important!! Enter the clinical diagnosis or other reason that the examination of the tissue is being requested. GOOD clinical information results in BETTER diagnoses by the laboratory!
7. Date of Collection
8. Specimen Source
9. FOR MULTIPLE SPECIMENS…Designated each specimen with a separate consecutive letter of the alphabet (A,B,C, etc.)
Delivery to the Laboratory
1. FGH Surgery
Take specimens to the Tissue Holding Room and leave them for Anatomic Path personnel to pick up.
FGH Clinical Laboratory Specimen Collection Manual Date of Last Review: 05/10/2022 82 | Page
2. Labor & Delivery
Take specimens to the Tissue Holding Room. Add 10% formalin to the unfixed specimen. Leave specimen for Anatomic Path personnel to pickup.
3. Endoscopy
Log specimens and transport them immediately to the laboratory. The pathology staff will make pickups twice a day.
4. Radiology
Take specimens to the Laboratory office immediately after logging them in your area.
5. Other FGH Locations
Take specimens to the Laboratory Office after logging them in your area. You may use the tube system ONLY if you follow tube system procedures for delivery of tissue to the laboratory using UNIVERSAL BLOOD AND BODY FLUID PRECAUTIONS.
6. Physician Offices
After logging the specimen in your logbook, place the specimen with the requisition inside the BIOHAZARD plastic pouch in whatever designated area in your office that you desire for pickup. A courier will pick your specimens up each day and deliver them to the Laboratory for you.
Muscle Biopsy
DO NOT PUT IN ANY FIXATIVE SOLUTION
Call pathology to notify them of muscle biopsy at 288-1050. Place the specimens in a sterile container and deliver immediately to the Clinical Laboratory. Laboratory staff are to place the specimen in the refrigerator immediately upon receipt and notify Anatomic pathology that a specimen is ready for pickup. Muscle Biopsies are sent to a reference lab.
Frozen Sections
Pathologists are on call and available for FROZEN SECTIONS or INTRAOPEREATIVE consultation at ALL times. If the pathologist assistance is needed for ANY reason, consult your PATHOLOGY CALL ROSTER. Pathologist’s pager and home phone numbers are listed on that roster. Monday through Friday during the day, a pathologist is generally present in the Clinical Laboratory or at the Anatomic Pathology Laboratory. When paging a pathologist to surgery enter the phone number of the OPERATING ROOM WHERE THE PATINET IS LOCATED. By entering that number the Pathologist can respond more efficiently to your needs. IMPORTANT: PLEASE HAVE
FGH Clinical Laboratory Specimen Collection Manual Date of Last Review: 05/10/2022 83 | Page
A COMPLETE REQUISITION TOGETHER WITH THE SPEIMEN IN AN EMPTY CONTAINER WHEN THE SPECIMEN IS READY FOR INTRAOPERATIVE EXAMINATION. THIS INCLUDES CLINICAL DIAGNOSIS OR HISTORY INFORMATION ON THE REQUISITION. DO NOT PUT THE SPECIMEN IN FIXATIVE.
The Pathologist will put fixative in the container after he is finished with the examination.
To provide detailed instructions for proper collection and submission of surgical pathology specimens, all specimen containers must be properly labeled with patient name, source of specimen, physician, room number, clinical history, and date specimen was obtained.
Frozen sections, collection and transport
Principle
To provide immediate delivery to the laboratory of specimen obtained, thus allowing the surgeon to receive a report from the pathologist while the patient is in surgery.
A frozen section specimen will be labeled and carried to the frozen section room by operating room personnel immediately after being obtained to ensure prompt handling.
Equipment and Materials
1. Specimen container – NO solution added
2. Label
3. Lab Requisition
Procedure – Stepwise
1. Frozen section specimen is handed from the sterile field by the scrub nurse to the circulator
2. Specimen container is properly labeled with patient identification
3. Specimen is transported immediately to the frozen section room with requisition slip by operating room personnel
4. Duplicate label is logged in specimen book in tissue holding room / surgery.
Requisition Completion
FGH Clinical Laboratory Specimen Collection Manual Date of Last Review: 05/10/2022 84 | Page
1. Requisitions are completed in the hospital information system by verifying the patient identification including name and hospital visit number.
2. Enter specimen type.
3. Enter date and time of collection.
4. Enter pertinent clinical diagnosis or other information.
5. Transport immediately to laboratory using universal precautions for blood and body fluids.
Criteria for Rejection
1. Improper labeling on specimens or requisition form
2. Improper or inadequate fixation
3. Incomplete requisition
4. Any specimen that is not properly labeled or properly fixed according to procedure will be rejected. The operating room personnel or submitting physician will be notified Documentation will be written up in Case Flag in Patient Chart.
COLLECTION AND SHIPPING INSTRUCTIONS FOR MECONIUM DRUG SCREENS
1. Order the meconium drug panel in EPIC. The 9 panel drug screen should be ordered unless otherwise specified by the physician (do not document collection in the HIS until the collection is completed)
2. Place the infant’s name and identification number (Medical Record Number preferred) on the Requisition and Chain of Custody Form.
3. Label the meconium container with the specimen label generated from EPIC
4. Place one of the provided non-absorbent polyethylene diaper liners strategically in the diaper so that as the meconium is passed it collects on the liner.
5. When the meconium has been passed, transfer the meconium from the liner to the collection container using one of the wooden spatulas provided.
6. Repeat the process, pooling the successive meconium passages until the stool becomes transitional. Each segment of meconium represents a different time period in utero. A minimum of three (3) grams of meconium is necessary for maximum sensitivity.
7. Following each meconium collection, the collector must sign and complete the date/time in the appropriate space on the Requisition and Chain of Custody Form.
FGH Clinical Laboratory Specimen Collection Manual Date of Last Review: 05/10/2022 85 | Page
8. When a baby’s meconium collection is complete, remove one of the barcode stickers from the bottom of the Requisition and Chain of Custody Form and place it over the cap of the meconium container.
9. Complete all of the relevant information on the Requisition and Chain of Custody Form, including the MecStat test panel desired, and place the top copy (white copy) of the completed form in the large (rear) pouch in the plastic specimen bag provided.
10. Document collection of the specimen in EPIC.
11. Place the specimen container in the small (front) pouch of the plastic specimen bag.
12. Remove the release liner from the flap of the plastic specimen bag and fold the adhesive flap to cover the blue cross hatch area of the specimen bag.
13. Place the closed specimen bag in the MedStat cardboard box and close the box. Place the ‘Box Seal” over the indicated area on the box and initial the ‘Box Seal”
14. Take the pink copy of the Requisition and Chain of Custody Form and rubber band it to the cardboard box. (The pink copy serves as the laboratory copy and identifies to us the sample that is sealed inside the cardboard box. This is required so the sample can be shipped with a dispatch log) United States Drug testing laboratory will also not answer any questions we may have about test results unless we have the chain of custody number that is printed on the form.
15. Retain the yellow – collector copy for your records.
COLLECTION OF UMBILICAL CORD FOR DRUG SCREENS
1. Cut a 6 inch segment of the umbilical cord. This will be the collected specimen.
2. Pinch the specimen between the finger and thumb, then run your fingers down the specimen 3-4 times to drain excess blood. Discard any excess blood.
3. Rinse the exterior/outside of the specimen with normal saline or an equivalent rinsing solution. Important: Prevent the umbilical cord and specimen from coming in contact with ethanol-based liquids or vapors previous to and during the collection process. This includes ethanol-based hand sanitizer and alcohol prep pads.
4. Pat the specimen dry and place it in the specimen container.
FGH Clinical Laboratory Specimen Collection Manual Date of Last Review: 05/10/2022 86 | Page
5. Place the newborn’s ID number on the specimen container (the newborn’s name is optional). The ID number may be the medical record number, hospital laboratory accession number, or any other unique identifying number of the collection facility’s choosing. The hospital patient ID label/sticker may be utilized to satisfy this step.
6. Fill out the Custody and Control Form. Please verify that the pre-printed company information is correct in the Client section of the form: Place the newborn’s ID number on the Custody and Control Form in the Patient/Donor section (the newborn’s name is optional). A hospital patient ID label/sticker may be utilized to satisfy this step. Mark the specimen type box for Umbilical Cord. Mark the test(s) requested to be performed in the Test(s) Requested section.
7. Check ALL that apply.
8. The specimen container must be sealed with a tamper-evident seal. Match/verify the newborn’s information on the Custody and Control Form with the newborn’s information on the specimen container. Peel off one of the bar-coded, tamper-evident specimen seals located at the bottom of the Custody and Control Form. Place the bar-coded, tamperevident seal over the cap. Failure to place a tamper-evident seal over the cap will result in a “Rejected Specimen.”
9. Initial and date the tamper-evident specimen seal(s)
10. Print, sign, and date in the Collector/Processor Certification Form.
11. Place the original, white copy (Copy 1 LAB Copy) of the Custody and Control Form in the large pouch of the plastic specimen bag provided.
12. Place the sealed specimen container in the small pouch of the specimen bag and seal the specimen bag
13. Place the sealed specimen bag in the transport box provided.
14. Specimens should be kept refrigerated in a secure area until they are ready to be shipped.
COLLECTION AND SHIPPING INSTRUCTIONS FOR PETH –WITH COC FORM
1. Order the test in the Electronic Record: Phosphatidylethanol (PEth)
FGH Clinical Laboratory Specimen Collection Manual Date of Last Review: 05/10/2022 87 | Page
2. Collect an EDTA (purple top tube) using proper phlebotomy technique.
3. Label the specimen in accordance with labeling protocol (the same as you do for other laboratory specimens)
4. Complete the ‘Chain of Custody” form - complete all sections (clarification below for some sections)
a. Use the patient’s medical record number as the Donor ID (Section C of the COC form)
b. Complete Section E of the COC form by marking ‘other” and then write in that box “EDTA blood)
c. Section G: Drug Tests to be Performed – mark PEth
d. Specimen Bottles Released to - mark FedEx
5. The patient must complete Step 5 on the form.
6. Place a specimen seal over the cap and down each side of the purple top tube.
7. Have the patient sign and date the seal.
8. Place the sample in the Styrofoam specimen container.
9. Place the top copy (white copy) of the completed COC form and the Styrofoam specimen container inside the shipping box. Place a tamper evident seal on each end of the shipping box and initial it.
10. Document collection in EPIC
11. Rubber band the second copy of the completed COC form to the sealed box and transport to FGH Laboratory for dispatch and processing. (This copy serves as the laboratory copy and identifies to us the sample that is sealed inside the cardboard box. This is required so the sample can be shipped with a dispatch log) United States Drug testing laboratory will also not answer any questions we may have about test results unless we have the chain of custody number that is printed on the form.
12. Retain remaining copies of the COC form for your records.
FGH Clinical Laboratory Specimen Collection Manual Date of Last Review: 05/10/2022 88 | Page
FGH Clinical Laboratory Specimen Collection Manual Date of Last Review: 05/10/2022 89 | Page
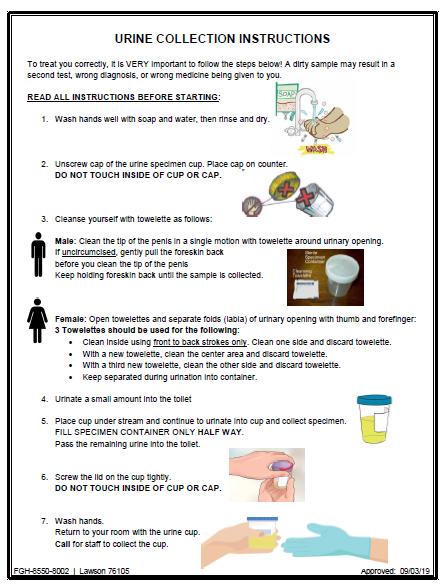
FGH Clinical Laboratory Specimen Collection Manual Date of Last Review: 05/10/2022 90 | Page
URINE COLLECTION INSTRUCTIONS
