
Personal Online Banking User Guide
Welcome
Welcome to Personal Online Banking presented by First National Bank Alaska. This guide includes log in information, an overview of the service’s features, and account management information.
Personal Online Banking includes the ability to:
• View account balances and transfer funds between your accounts.
• Enroll in eStatements to view your bank statements electronically.
• Set up and manage security Alerts to receive account-based security and transaction notifications.
• Enroll in and use BillPay services.
• Enroll in Zelle® to make person-to-person payments.
Set Up and Getting Started
First Time Log In
You’ll need a phone and:
• Your checking, savings or loan account number.
• Your temporary password. The temporary password can be obtained by visiting any First National branch or by calling 907-777-4362 or 800-856-4362.
• A six-digit, easily remembered numerical code of your own choosing.
1. Call 907-777-4700 or 800-856-4362.
2. When the recorded message starts, press ‘ 1 ’.
3. At the next prompt, press ‘ 1 ’ again for All Account Information
4. Enter your seven-or eight-digit account number and press the ‘#’ key.
5. At the next prompt, select the appropriate account type.
6. When asked to enter a password, enter the temporary password the bank provided to you.
7. You will be told the password has expired and will be prompted to enter a new password. Enter a six-digit numerical code of your choice and press the ‘#’ key. This code will also be your new BankNow! by Phone password. You can change it at any time by phone.
8. When the phone system tells you it has accepted your new password, hang up and start the online banking first time log in steps.
Logging On
1. Go to www.FNBAlaska.com 1
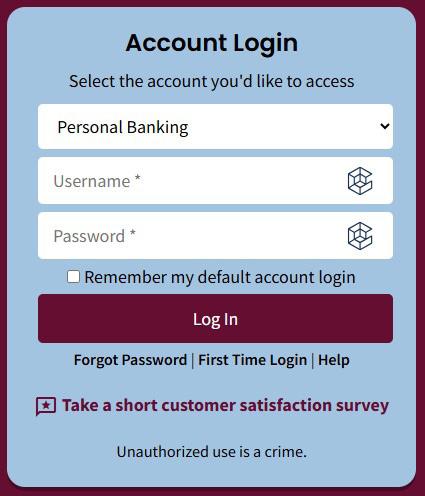
2. On the home page under the account login window, click the First Time Login . 2
3. Complete the Enrollment fields and then click the Enroll button. This information will verify your access, so make sure you use the six-digit numerical password you established over the phone
4. Accept the terms and conditions by clicking “I agree.” You may download a copy of the terms and conditions.
5. In the Establish credentials screen, create a new Username and Password.
a. New User name –Your User name is case-sensitive and must contain at least six characters.
b. New Password - Your password must be between 9-17 characters long and contain at least one uppercase letter, one lowercase letter, one number and one special character. The password is case-sensitive.
c. Confirm New Password – confirm the new password you entered by entering it again in this field.
d. Click Continue.
6. In the set-up security challenge screen
a. You will be prompted to register a home, mobile or work phone number to receive a one-time passcode via SMS text message or automated phone call through our enhanced multifactor authentication (MFA) system.
I. The next time you access online banking after registering your phone number(s) you be sent a onetime passcode via your selected contact method. Enter this one-time passcode to verify your phone number.
II. You will only be prompted to verify your identity by entering a one-time passcode when logging in from a new device or if the system detects suspicious activity.
NOTE | 1. When setting up First Time Login for loans, users must choose Loans as the type of account — not Mortgage Loan or Consumer Loan 2. For security purposes, First National suggests customers avoid using their account number or SSN for their user name.
See page 19 for more information and setup instructions for Enhanced MFA.
7. If you wish to receive electronic statements instead of paper statements, complete the Electronic Statement Enrollment screen. Otherwise, click the Decline or A sk Me Later button.
a. Mark the radio button to the right of each account for which you want to receive an eStatement.
b. Read the Electronic Document Agreement carefully. You may wish to print the disclosure for your records before continuing.
c. Click the check box to agree to the terms and conditions.
d. Click the Enroll button to complete the enrollment. You are now logged in to online banking and your online banking Home Page will be reflected.
NOTE | Customers listed as a joint on an account will be required to send a secure email to enroll in the eStatements Service. The email should list your account number and email address where you’d like to receive notifications.
Ending Your Session
The best and most secure way to end your online banking session is to click on Log Out located on the right hand corner of the screen. You’ll be returned to the FNBAlaska.com home page.
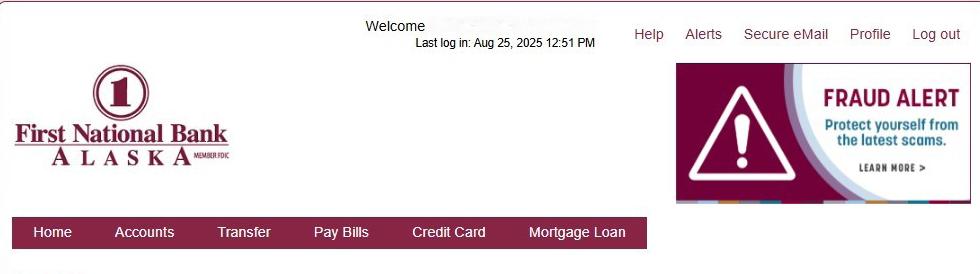
Home Page
After you log in for the first time, and every time you log in thereafter, your online banking Home Page is the first screen you’ll see.
NOTE | Do not use the Back button on your browser while logged in to online banking. Use of the Back button will cause a security error and automatically close your online banking session.
Your Home Page is arranged into categories; making all of your account information available at a glance. It also acts as your launching pad to give you access to all of your online banking features. The Home Page provides access to the information or features below.
• Alerts
• List of Accounts (including Escrow if applicable) and Current Balances
• Bill Pay (if you subscribe) and Zelle
• Transfer
• Recent Transactions
• Contact us via secure eMail
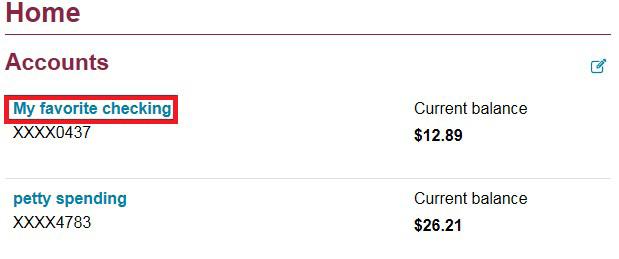
Accounts List
All accounts associated with your username and password will be categorized under Accounts . Accounts displays the last four digits of each account number, the account name and current balances.
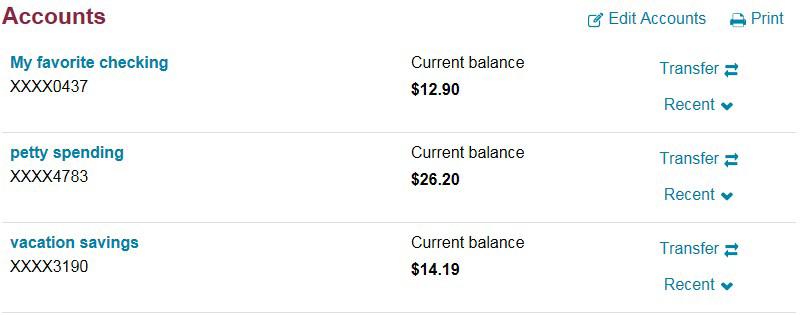
A list of accounts under other groups appears below the Account list.
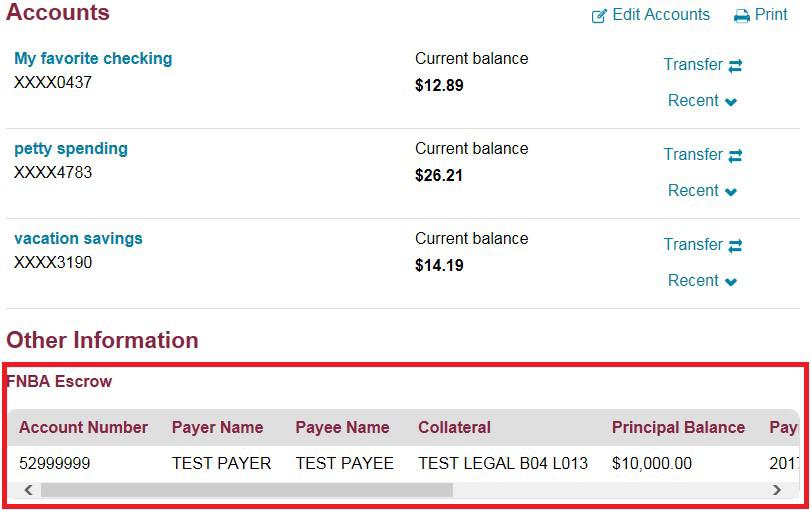
NOTE | Only escrow accounts where your tax identification number is on file as the payor or payee will be reflected. Users are not able to make payments or transfers to Escrow Accounts through online and mobile banking.
To view details of a specific account, click on the account name. To return to your Home Page, simply click Home from the main toolbar.
Recent Transactions
The most recent transactions from the selected account, including all ATM transactions and most debit card purchases made that day, appear by clicking the Recent caret.

Bill Payment
If you subscribe to the Bill Payment service, a Bill Pay window will be reflected on your Home Page to quickly initiate a bill payment by selecting the Biller, Pay Date and Amount . Access to the Bill Pay function is also available from the Pay Bills option on the main toolbar.
Transfer
Funds can be transferred from available accounts by clicking the Transfer button to the right of account names. Once you select the Transfer From account, Transfer To account and the Transfer Amount, click the Preview Transfer button to review the transfer and the Complete Transfer button to finalize the transfer.

You also have access to set a recurring transfer by clicking the Repeat checkbox and completing the additional fields.
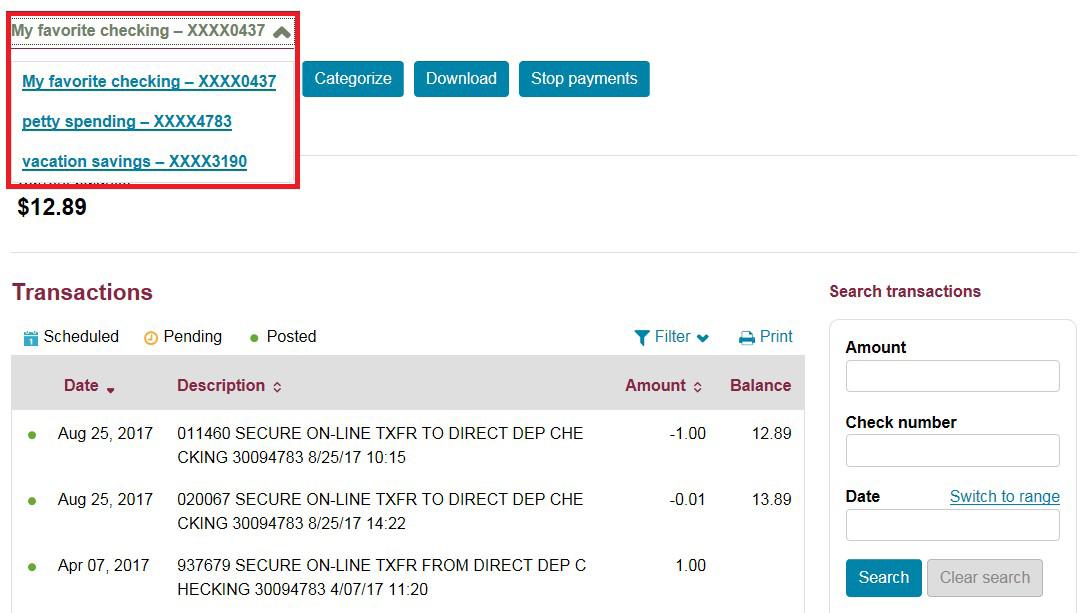
Accounts
The accounts page is where you can access all the online banking features for a specific account. You can access the Account Summary page by clicking on the Accounts button on the main toolbar or clicking a specific account name on the homepage.
In addition to displaying the function toolbar, the Summary Page reflects summary account information and displays transactions activity. You can change the displayed account information by selecting accounts from the account name drop-down.
On checking accounts, the Account Summary page will include recent deposits, checks and the current balance. Loan accounts will show, among other things, recent payments, interest accrued and current balance.
NOTE | The menu below the account name dropdown (Details, Transfer, Documents, etc.) will help you monitor and manage activity in your account.
Details
Use the Details option to see your account activity.
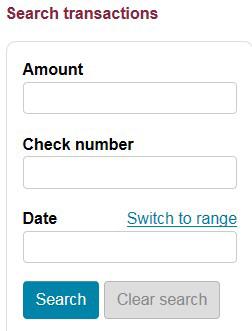
Use the Search transactions tool to find specific transactions. Searches are only applied to the selected account.
The details screen displays all recent transactions for the selected account. You can sort information by clicking on any column heading. Click the More Transactions button at the bottom of the Transactions section to expand the number of displayed transactions.
Transfer
Transfers can also be made from the Account Summary page by clicking the Transfer button in the function toolbar.
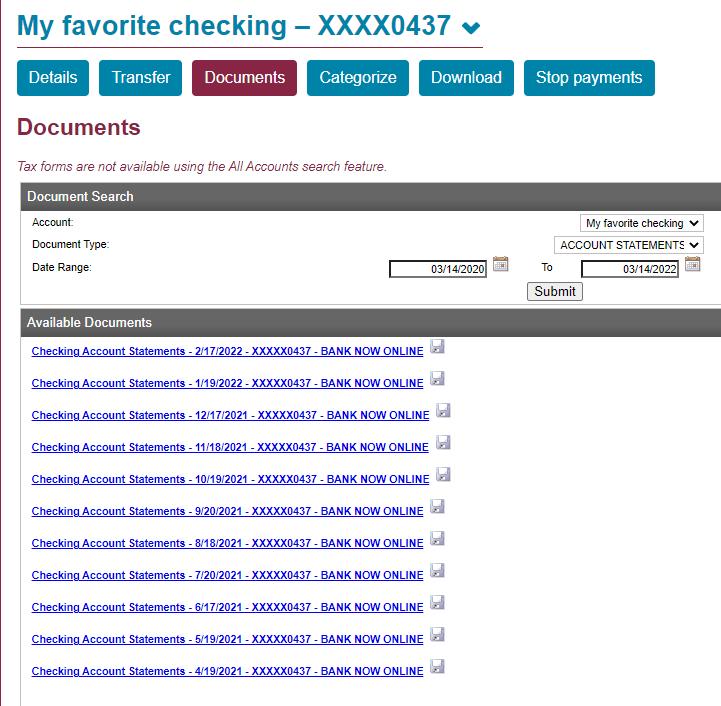
Documents
Once you enroll to receive e-Documents for your accounts, you can view, print and/or download those documents with Personal Online Banking.
From the Account Summary screen, click on Document . Select the Document Type, complete the Date Range fields and click the Submit button to retrieve a list of available documents for the specified account(s).

From the Available Documents screen, click on the document you want to view. Account statements are available for two years. Other e-Documents are available for thirty days. The documents are in .pdf format and can be viewed using Adobe Acrobat Reader.
Tax forms are also available on the Available Documents screen. Available tax forms include 1098, 1099-INT, 1099-SA and 5498-SA. Displayed tax forms are based on the Social Security Number tied to the Online Banking Account. The same forms will appear under each individual account associated with the SSN; if you have multiple interest-earning accounts the aggregate information from each individual account will be on the same tax form.
As 1098 tax forms are not aggregated by SSN/TIN, multiple 1098s may appear when performing a search under a loan.
NOTE | Tax forms will not display if a search is performed with the All Accounts option selected in the Account field.
Categorize
Categorize will display a pop-up window reflecting posted transactions for up to two years. The All Transactions listing is primarily used to code transactions for expense and income reporting (budgeting tool) as well as to tag specific transactions for export to other personal finance software.
By default, 25 transactions are displayed per page; this can be changed using the Transactions per page drop-down.
If you use personal finance software such as Quicken™ or Microsoft Money™, tag the specific transactions you want exported by clicking in the box to the far left of the transaction (or click on the Select All link under the Export column). To begin the export process, click the Export Selected button at the bottom of the page.
Download
For more options, click Download on the function toolbar. On the Download screen select the statement or date range and the format in which the download will be viewed or used to import to your personal financial software or other program.
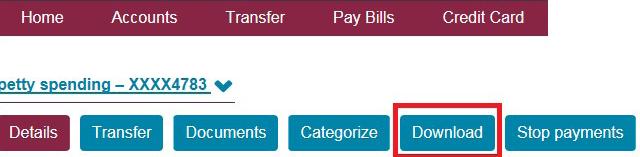
Click the Download transactions button and your download will begin.
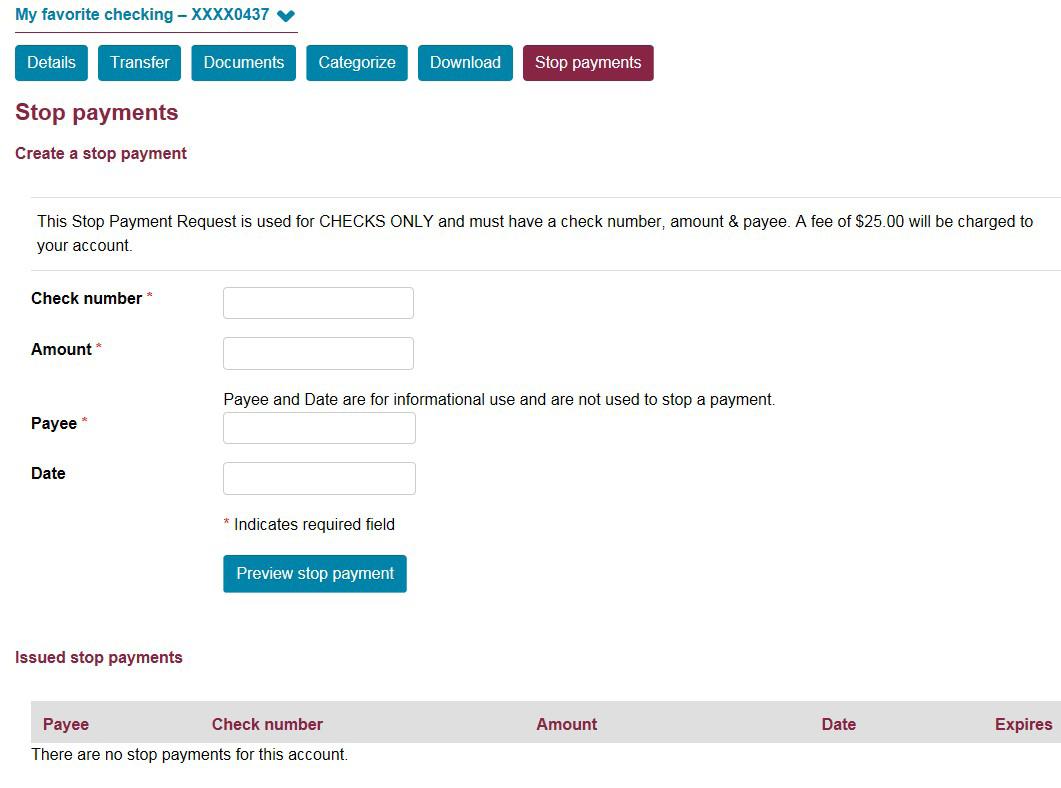
Stop Payments
You can place a stop payment on checks written on your account, one check at a time, by using the Stop Payments option on the Accounts Summary screen and completing the Stop Payment screen. Issued stop payments are listed at the bottom of the screen.
NOTE | Make sure you look to see that the check hasn’t already paid against your account before placing a stop payment. Use the Search transactions tool to search for the check. (Fees may apply, so be sure the check has not already been processed before placing a stop payment.)
Check and Deposit Images
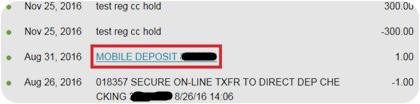
You can view both sides of checks that have cleared your account (including in-person withdrawals) and paper deposits made to your account. When you see a check or deposit listed in any of the transaction activity screens, note if the check or deposit number is highlighted and linked. If so, just click on the link to view the item.
You can enlarge the image and/or rotate the image for better viewing. Item images appear in a pop-up window; if you cannot see images, your browser’s pop-up blocker may be activated. Override the pop-up blocker using the Ctrl+Shift keys.
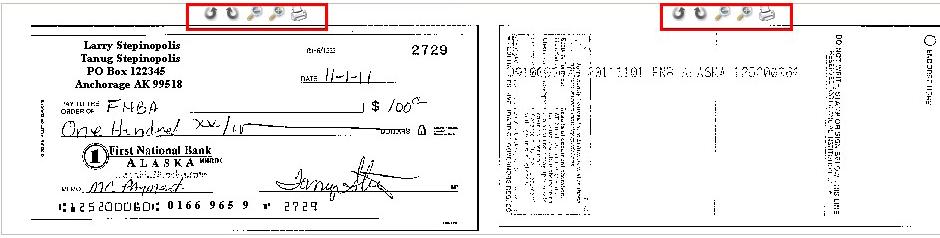
NOTE | Don’t use the Back button to close the pop-up window. Make sure you click the X icon that appears in the right corner of the pop-up window to close the window. If the Back button is used, you will close your online session.
Transfer
From the Account Summary page or the main toolbar, use the Transfer option to make a transfer between your accounts, set up a recurring transfer, or view a list of scheduled transfers.
LOAN PAYMENTS – You can make loan payments online through the Transfer menu. Simply transfer funds from your checking or savings account to your loan account.
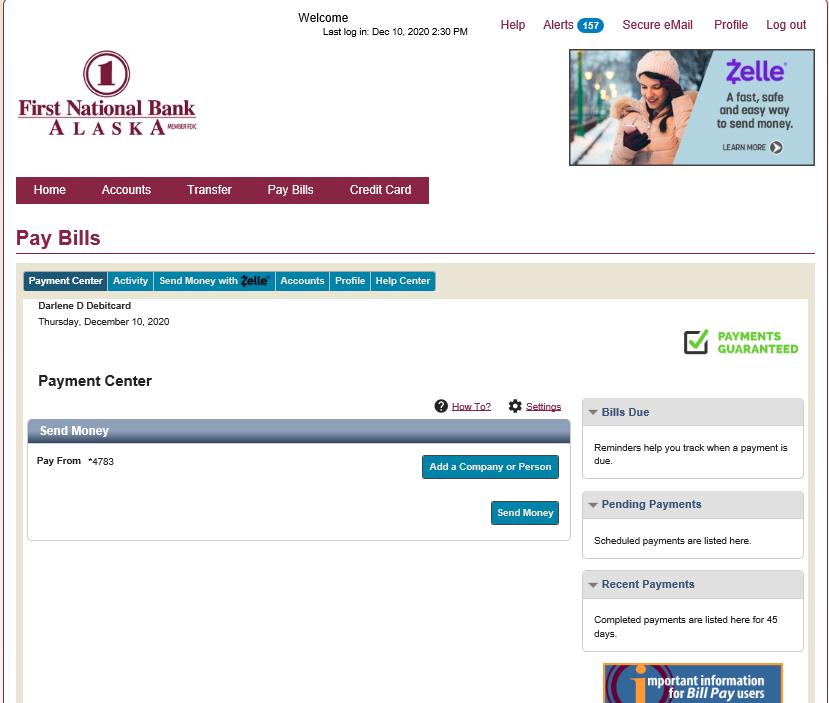
Pay Bills
If you enroll in the Bill Payment service you can conveniently pay your bills online. Through the Bill Payment service you can also use the Zelle feature to send money to other people or request money from other people. Whether sending money or requesting money, you just need an email or text number for the other party.
From the Home Page, click on the Pay Bills option to access the bill payment service. The Payment Center Information screen will appear. Information on using specific features of the bill payment service is available through any of the Help links located on the Bill Payment screens. Additional help on using Zelle is available after clicking on the Zelle button.
Pay Bills Enrollment
To enroll in Bill Pay, log in to Personal Online Banking. From the List of Accounts complete the following:
1. From the Home Page, click the Pay Bills button on the toolbar.
NOTE | Only a checking account may be used as the account to be debited for payment of bills. Use of a savings account is not permitted.
2. Click I Accept on the Terms of Service. Click Continue.
3. When the Terms and Conditions of the Bill Payment Service disclosure appears, read through the document. If you agree with the terms and conditions, click the I Accept button at the end of the document. If not, click the Close link to return to the Balances window.
4. When the Privacy Policy disclosure appears, read through the document. If you agree with the terms and conditions, click the Enroll button at the end of the document. If not, click the Decline link to return to the Balances window.
5. Once you accept the terms and the privacy policy, the Welcome screen appears; click the Get Started button. The ‘quick start’ screen appears.)
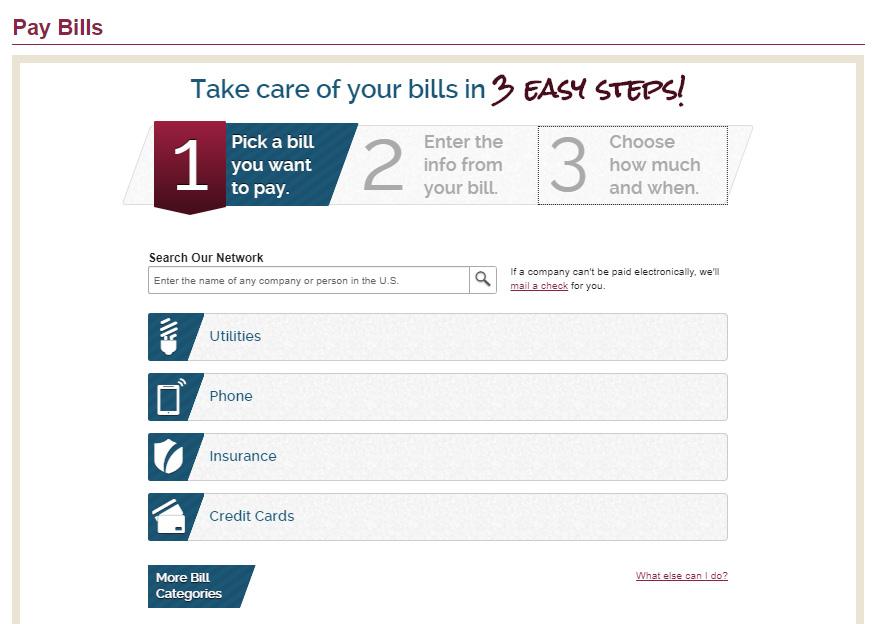
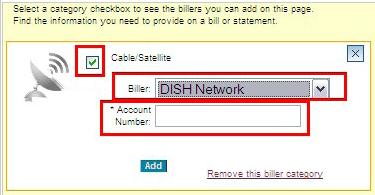
6. In the quick start screen, click on a category box to activate the category for bills you want to add. Click the drop-down box icon to select a biller and then add the specific account number (biller) information. If you’re not ready to set up a biller, click the Go To The Payment Center link at the bottom of the screen.
7. From the Payment Center screen, select what feature you wish to use. Refer to the online Help link found on the bill payment screens for specific instructions for setting up payees, payments, etc. You can also view online video demonstrations on how to use the Bill Payment service features from the bank’s website www.fnbalaska.com

Bill Pay Support
Bill Pay support is available in several ways. First, the upper right corner of each bill pay screen contains the Help link to obtain information on how to use the bill pay features. The bill pay Customer Service Support telephone number is displayed at the bottom of each bill pay screen and can be used between the hours of 3:00 a.m. and 9:00 p.m. Alaska Standard Time. And, of course, feel free to call First National’s Contact Center at 907-777-4362 or 800-856-4362, Monday through Friday 8 a.m. to 5 p.m. and Saturday 9 a.m. to 4 p.m.
Zelle
Zelle is a fast, safe and easy way to send money directly between almost any bank accounts in the U.S., typically within minutes. With just an email address or U.S. mobile phone number, you can send money to people you trust regardless of where they bank.
Zelle is accessed through Personal Online Banking or the FNBApp. To use Zelle, you must first enroll in First National’s Bill Pay service at no cost. First National does not charge a fee to use Zelle, but message and data rates may apply when using the mobile FNBApp.
When sending money with Zelle to a recipient already enrolled, the money goes directly into the recipient’s bank account and is available for use typically within minutes. Be sure to use the correct email or U.S. mobile phone number for your recipient and that it is someone you know and trust.
For more information on how to use Zelle, please read our FAQs
NOTE | In order to use Zelle, the sender and recipient bank accounts must be based in the U.S.
Credit Card
If you have a personal First National Bank Alaska Mastercard® credit card, you can access the Mastercard e-Customer Service site from your online banking Home Page by using the Credit Card option.
The MasterCard e-Customer Service site can also be accessed from the Online Banking Account Login page.
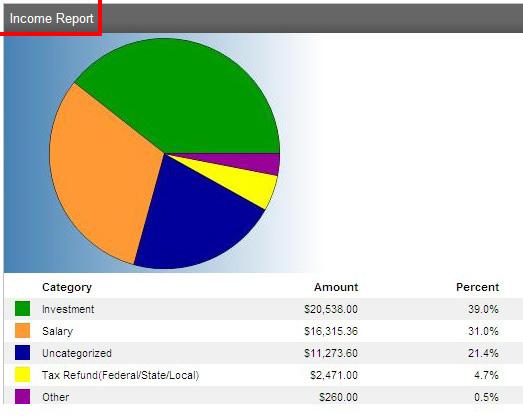
Expense and Income Reporting (Budgeting Tool)
You can easily view where you’re spending your money by using the budgeting tool available as part of your online banking service. The Expense Report and Income Report will give you a colorful pie chart of your expenses and income along with a breakdown of the dollars associated with the expenditures/income.
Using the Expense Report is simple. You start by assigning a category to each posted transaction on the All Transactions activity page (expense-dining out, expense-groceries, income-salary, income-interest, etc.). Once transactions are assigned a category, view the Spending Report and Income Report to see how you’ve managed your money. Each time you log in, check for new transaction postings and code them so you get the most from this useful budgeting tool.
Assigning Categories
1. From the Accounts screen, click Categorize. When the screen of transactions appears, scroll to the Transactions section.
2. For each transaction where the Category column reflects ‘Uncategorized’, click the Change icon to the left of the transaction to open the Category drop-down selection box.
3. From the drop-down selection box, click on the category you want assigned to the transaction, whether it is an expense (debit) or income (credit). Click the Save icon that appears to the right of the selected category. Complete this step for each transaction.
NOTE | It is important that you click the Save icon to the right of the selected category to save your selection. If you have not clicked the Save icon for each of your selected transaction categories, they will not be saved when you close the pop-up window.
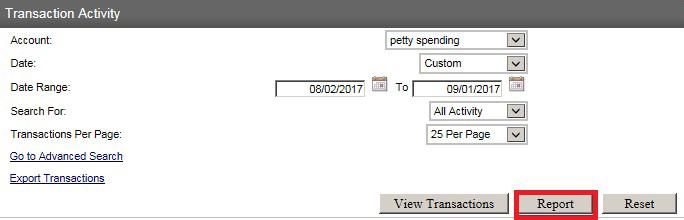
4. Once you’ve coded your transactions, complete the following:
• Scroll up to the Transaction Activity area. From the Search For field, select the period that you’d like the Spending Report and Income Report to cover.
• In the Transactions Per Page, make sure to select the option that will list the transactions to be reflected.
• Click Report. The Expense Report and Income Report will appear. To return to the Activity Details to add or change a transaction category, click the View Transactions button under the Transaction Activity panel.
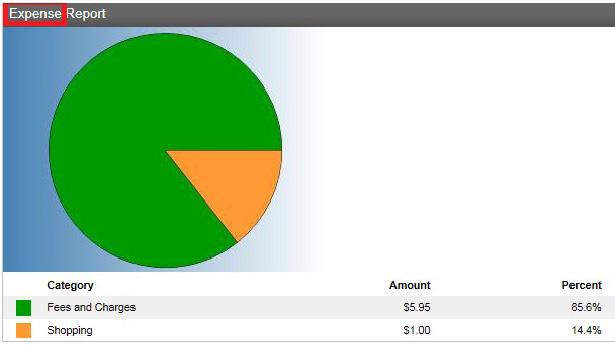
Expense Report
Income Report
Features Alerts
Alerts is a notification system that sends account-based security and transaction notifications. Alerts are critical for the timely detection of fraud attempts. Alerts may be real time as transactions/events occur, or triggered during account update processing by the bank each night. Do Not Disturb timeframes can be set to establish a blackout period during which alerts will not be sent. Alerts will still generate and be delivered after the defined Do Not Disturb period.
Once enrolled, click Alerts in the upper right hand corner to establish and manage the alerts for your account(s).
From the Alerts landing page you can review any currently set alerts on the Overview tab, set new alerts in the Alert Options tab, change your alert contact information in Contact Options, and view Sent Alerts.
Setting Up Alerts
1. From the Alerts landing page, click the Manage Alerts button. Click the expand button for the category of alert you want to set up.
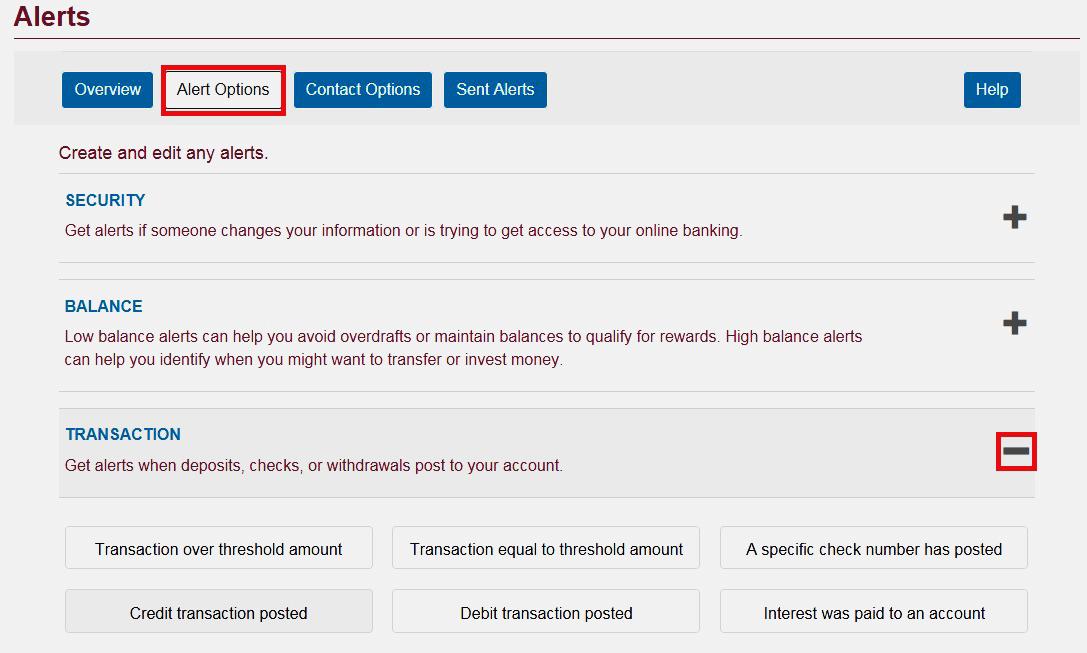
2. Click the alert you want to set. Enter the relevant information into the fields, if any, select how you would like to receive the alert, and click Save. The Secure inbox option will allow you to view alerts when you log into Personal Online Banking.
3. Click the Contact Options tab. Here you can set Do Not Disturb time frames by clicking the Set Up button below each listed contact method.
Enhanced Multifactor Authentication
Enhanced Multifactor Authentication (MFA) for Personal Online Banking confirms your credentials and the device you are using each time you log in. If the system detects a new device or suspects fraud, it will prompt you to verify your identity by entering a one-time passcode sent via SMS text message or an automated phone call.
How to enroll
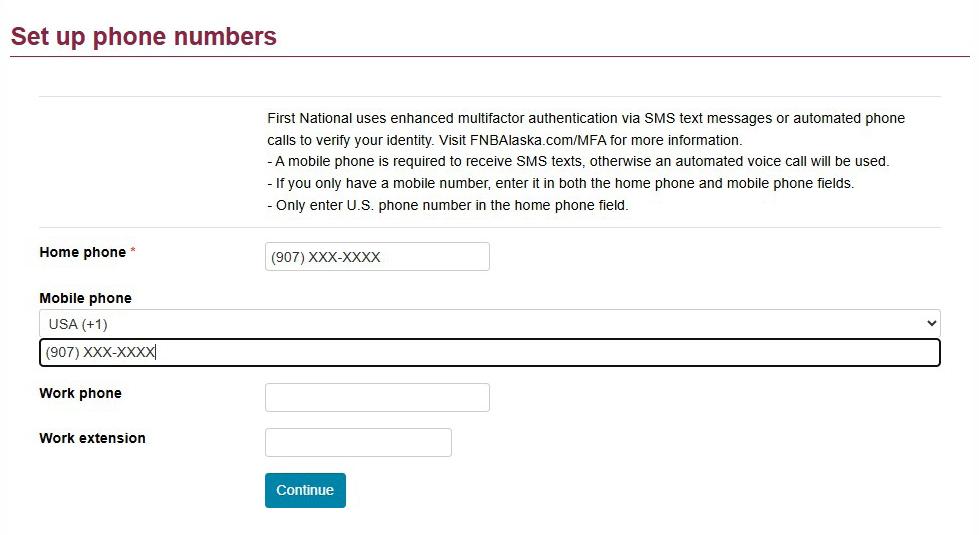
1. The first time you log into online banking, you will be prompted to enroll your phone numbers in Enhanced MFA.
2. Enter the phone number(s) you want to use to receive your one-time passcodes via SMS text message or voice call. Click Continue
NOTE
• To receive your one-time passcodes via SMS text message, a mobile phone number is required.
• If you enter a mobile phone number you will receive the following SMS text message from 36397: “FNBA Verification codes activated Msg&Data rates may apply.”
• The Home phone field is required. If you do not want to add a home phone number, add your mobile or work phone number to the Home phone field as well as the applicable Mobile phone or Work phone field.
• Only enter U.S. phone numbers in the Home and Work phone fields.
3. After you enter your phone number(s), click Continue to access your online banking account normally. To immediately finish setup, log off, then immediately log back in to online banking.
4. The next time you access online banking, you be prompted to select an option to receive a one-time passcode. Select Send text message or Call phone and you will receive a one-time code via your selected option.
• SMS text messages will come from 36397.
• Automated phone calls to domestic numbers will come from 1-678-498-2706
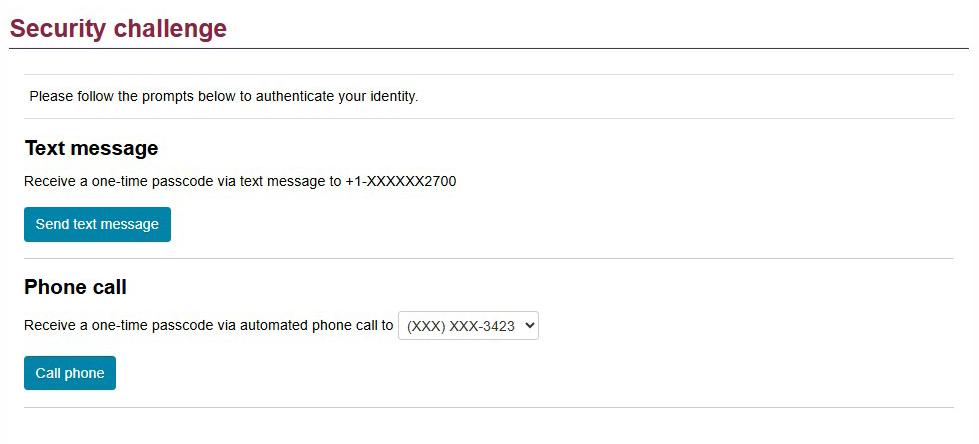
5. Enter the one-time passcode you received in the Passcode field and click Continue to verify your phone number and access online banking.
6. Enrollment is complete - You can now access online and mobile banking as usual. You will be prompted to enter a one-time passcode again if you log in from a new device, or if the enhanced MFA system detects suspicious activity.
How to modify your Enhanced MFA phone number
You must use online banking to update your Enhanced MFA phone numbers. This functionality is not available on the FNBApp.
1. Click on the Profile link.
2. To edit the mobile phone number where you will receive your one-time passcode, click Edit next to Security Challenge. If you wish to edit the home or work phone number where you receive your one-time passcode via automated phone, skip to step six
3. Update your mobile phone number as needed and click Save
Note - To receive your one-time passcodes via SMS text message, a mobile phone number is required.
4. After clicking save, you will see a confirmation message and receive a confirmation text: “FNBA Verification codes activated Msg&Data rates may apply.”
5. You’ve successfully updated your mobile phone number – The next time you access online or mobile banking, the system will promp you to enter a one-time passcode via SMS text message or automated voice call using the updated phone number.
6. To edit the home or work phone number you use for Enhanced MFA, click Edit next to Phone.
7. Update the Home phone or Work phone fields as needed and click Save
NOTE • The Home phone field is required. If you do not want to add a home phone number, add your work phone number to the Home phone field as well as the Work phone field.
• Only enter U.S. phone number in the Home and Work phone fields.
8. You’ve successfully updated your home or work phone number(s) – The next time you access online or mobile banking, you will be prompted to enter a one-time passcode via automated voice call using your updated home or work phone number(s).
Secure eMail
Click Secure eMail in the upper right hand corner to communicate with our Contact Center via secure email service.
From the Secure eMail landing page, you can view any emails you have sent or received, or compose a new email. When composing a new email, FNBA’s customer service email address’s automatically inserted into the To field. Once you have finished typing your email click the Send button. Emails are reviewed periodically by the bank during business days (Monday through Friday, excluding bank holidays).
The email feature is not used to request account transactions (transfers, stop payments, wire transfers, etc.). If you have a time-critical issue (unauthorized transactions, lost or stolen debit card, etc.) contact First National’s Contact Center directly at 907-777-4362 or 800-856-4362.
Our Support hours are:
Monday through Friday 8 a.m. to 5 p.m., Saturday 9 a.m. to 4 p.m.
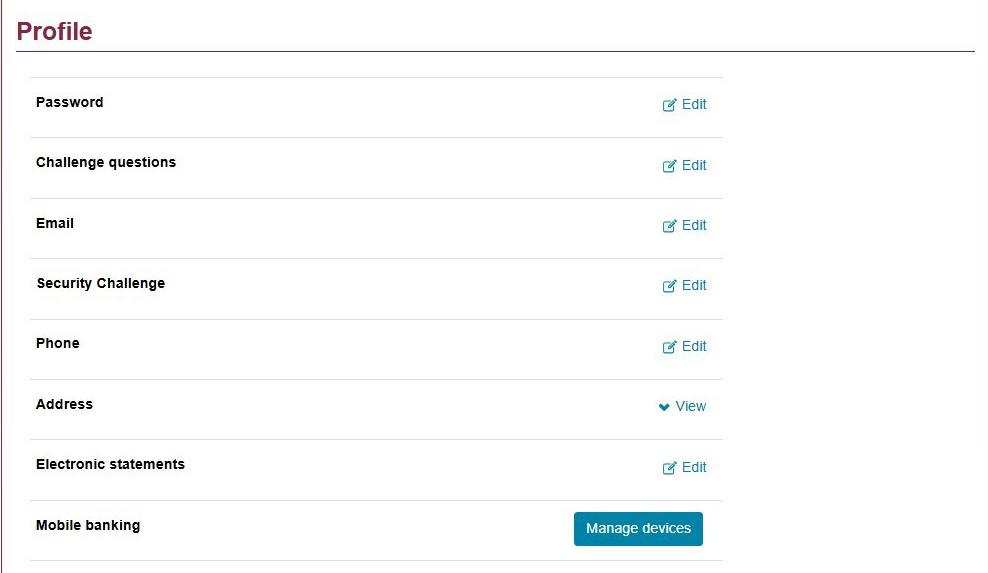
Profile Options
Click Profile in the upper right hand corner to change your password, challenge questions, online banking email address and phone number. You can also manage your electronic statements, and enroll in mobile banking or manage your mobile devices. Click the Edit button next to the information you’d like to change. Complete the fields accordingly and click the Save button when finished.
Make sure you keep your online banking email address current. If an email notification on the availability of an e-Document is returned to the bank, the e-Document service will be changed back to paper delivery.
Electronic Statements
This option allows you to enroll for e-Statements and e-Notices. Click the Edit button to open the Electronic Statements screen; accounts may display under the Accounts heading and/or the Secondary Accounts heading. By default, e-Statement notifications will be sent to the first named account holder’s email address. Click the radio button next to each account for which you want to receive e-Statements and e-notices. Read the terms and conditions and click the “I have read and accept the electronic statements terms and conditions” check box. Click the Save button to save your changes.
Secondary accounts have the first named account holder’s email listed next to the account. To have statement notifications sent to an email address other than the one listed, use the secure email feature by clicking on Secure eMail in the upper right hand corner of the Online Banking screen. Specify your request and include the relevant account number(s) and the email address to which you want statement notifications to be sent.
NOTE | If an account is not listed under either the Account or Secondary Account heading, use the secure email feature. Specify the account number(s) you wish to enroll for e-Statements and e-Notices, and provide the email address to which statement notices are to be sent.
If no owner on your account has used online banking for at least 365 days, the bank reserves the right to revert the account to a paper statement and assess the bank’s then-current fee for mailed statements.
E-Statements and e-Notices cannot be enrolled for separately. You can view three types of notices online. All three types of e-Notices remain available online for 30 days:
• REPURCHASE AGREEMENT CONFIRMATION - This is a notice relating to the daily sweep from a checking account to invest funds in an overnight Repurchase Agreement. Selecting e-Notices will discontinue the paper mailing of this type of notice.
• INCOMING WIRE TRANSFER NOTICE - This is a notice of an incoming wire transfer. Selecting e-Notices will discontinue the paper mailing of this type of notice.
• RETURN DEPOSIT ITEM NOTICE - This is a notice that a deposited item is being returned. Selecting e-Notices does not stop the notice with referenced deposited item from being mailed - you will continue to receive the printed notice with the item being returned, via mail.
Mobile Banking Profile
This option allows you to enroll in mobile banking to access online banking from your mobile device (smartphone or cell phone). If not previously enrolled in mobile banking, the Enroll Now button is reflected. If already enrolled, the Manage Devices button is reflected.