
How to upload multiple files to Salesforce from Desktop?
Salesforce is a cloud-based software that helps organizations manage their customer relationship and potential sales. However, it comes with its limitations that can result in frustration for users. One such limitation is the challenge of uploading multiple files to Salesforce account. Let’s dig deeper into the challenges of this process.
Compatibility: One of the challenges in uploading multiple files from a desktop to a Salesforce account is ensuring compatibility between the file formats supported by Salesforce and those on the desktop.
File Size and Limits: Salesforce imposes limits on the maximum file size and the total storage capacity available. Uploading large files or multiple files that exceed these limits can pose a challenge.
Permissions and Security: Depending on the Salesforce account configuration, users may encounter challenges related to permissions and security when uploading multiple files. Access restrictions and user-level permissions need to be considered to ensure that only authorized individuals can upload files and maintain data security.
Bulk Upload Performance: Uploading a large number of files simultaneously can impact system performance. It may be necessary to optimize the upload process, use bulk upload methods or tools, and consider system resources to maintain efficiency and avoid disruptions.
User Experience: Lastly, the user experience should be taken into account when dealing with multiple file uploads. Providing clear instructions, progress indicators, and feedback on the upload status can enhance user satisfaction and minimize potential challenges.
To deal with these issues, FileZIPO A Native Salesforce app help you in a better way. Here are Few Simple Steps to upload/transfer files from Desktop to Salesforce with FileZIPO:
As Files or Attachments of Desktop can be linked to particular record in Salesforce, so we need to add the FileZIPO component on the Detail page of the record as the first step and then transfer files from Desktop to Salesforce.
Note: You can skip step 1–6 if the FileZIPO component is already added on your record detail page.
Scenario: I need to transfer or upload some files from my Desktop to my Account record.
Step 1. Go to App Launcher like below image.
Step 2. Search any Standard or Custom object and click on the searched object.


(Account object in this example)
Step 3. Go to object record page by clicking on any record

 Step 4. Go To Gear Icon on the top right corner and click on “Edit Page”.
Step 5. Once “Edit Page” is clicked, it will open the App Builder page.
Step 4. Go To Gear Icon on the top right corner and click on “Edit Page”.
Step 5. Once “Edit Page” is clicked, it will open the App Builder page.
Above image has some features (each number has its description as below):
1. Click on Tab section.
2. Click on “Add Tab” button.
3. Choose Tab label as “Custom” and enter name in “Custom label” as “File ZIPO”
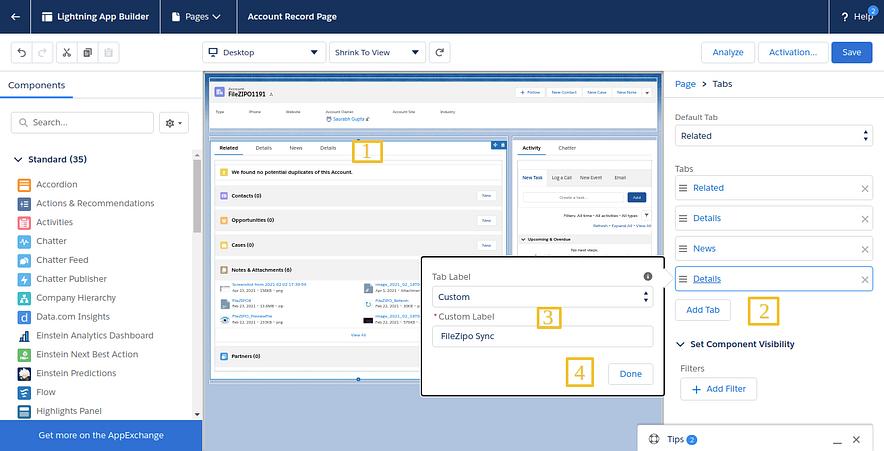
4. Click on “Done” Button to add tab.
Step 6. After adding tab, select the below component & drag the component to the newly added tab like below image.
Name of Component: FileZIPO_ManageExternalFiles
Click on Save and then Activate Button to add tab on detail page.


Step 7. Click on “Click Here to Add Files” button
Step 8. Once “Click Here to Add Files” button is clicked, it will display the popup as shown in below image
Above image has some features (each number has its description as below):
1. Choose option as Upload from Desktop .
2. Select file from Desktop
Step 9. You are done to upload files. Go to record’s related tab and check the uploaded files like below image.


Have you started using FileZIPO yet? Get this revolutionary application and make your Salesforce file storage effortless and pocket-friendly. Click here to install the latest version of FileZIPO application in your Salesforce instance & explore its complete benefits for you.