

It is important to set up an account before signing in. When you first set up an account, you might not see any subscription information. Subscription information appears after the subscription is activated using the unique link provided in the purchase confirmation email.


5. After you create your password, you’re redirected to a page to finish completing your registration.
6. Follow the on-screen instructions to complete signing up.
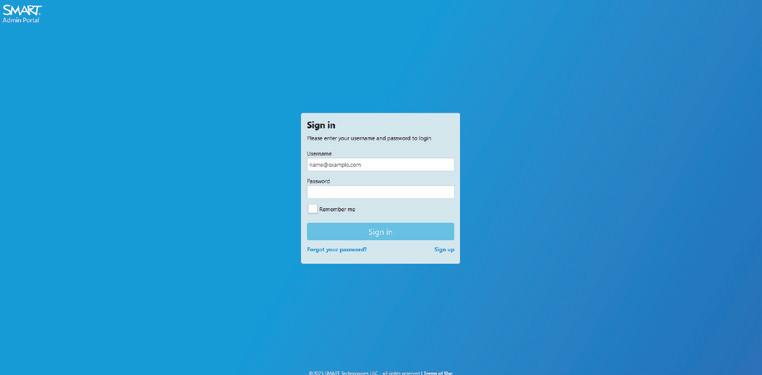
1. Go to adminportal.smarttech.com and click Sign In.
2. Enter your user name and password (using the login box as in Figure 1).
3. Click Sign In.
4. Following the on-screen instructions to finish signing in.
Note: When you first sign in, you might not see any subscription information. Subscription information only appears in the following scenarios:

- After the subscription is activated using the unique link provided in the purchase confirmation email., The person who activates the subscription is considered the admin for the subscription.
- An existing admin invites you to be an admin for a subscription. If you do not know who an existing admin is or you do not have access to purchase confirmation email, contact SMART Support.
Click the profile icon next to your name in the top-right corner and select Sign Out
3 - The SMART Admin Portal Sign out.


1. Go to adminportal.smarttech.com and click Sign In.
2. Click Forgot your password? (as in Figure 1).
3. Enter your username in the Username box and click Continue.
4. SMART sends you an email with details for resetting your password.
Note: If you do not receive an email, check your junk folder. If you still can’t find the reset password email, contact SMART support.
5. In the email, locate and click the link to reset your password.
6. In your browser, click Reset Password.
7. Enter your new password in the New password box and Confirm new password box, and click Change password.


Figure 4 - The SMART Admin Subscription Confirmation email, showing the location of the unique URL.


Click on this link to use our unique URL to start activating your subscription.
After you’ve signed in, you’ll see a screen that lists all the software subscriptions available for you to claim.
Add an organization
* Name of organization
Select an organization
Assign these subscription to:
3) Click and either select an existing organization to assign the software subscription to (Figure 5); OR
If the organisation you want isn’t listed, complete the Add an organization from that appears. When you’re done, click Add organization (Figure 6)
* Industry
* Country
* Street Address
* City / Locality
* State / Province
* Postal Code Phone (optional)
Add Organization

4) Click Continue
The SMART Admin Portal shows a confirmation message and begins generating subscription details for the software. This can take up to 15 minutes. If the software subscription details do not appear in the ‘Manage’ tab of the SMART Admin Portal after 15 minutes, contact SMART support.
To claim the bonus subscription manually
1) Go to adminportal.smarttech.com
2) If you’ve previously used the SMART Admin Portal, click Sign In and log into the account.
3) Click the Software tab and them click Claim included software
4) Enter the number of displays purchased and the serial number of one of the display.
Tip - To find the display’s serial number, SMART boards have a sticker on the left hand side of the screen, giving the serial number and a QR code. You can also go into the board’s settings to view the serial number.
5) Click Continue
6) Optional > Enter the name and location of the vendor from which you purchased the display(s) and click Next.
7) Select an existing organisation to assign the software subscription to (Figure 7). OR
If the organization you want isn’t listed, click and add the details for the organization (Figure 8). When you’re done, click Add organization. The following screen allows you to review the details you’ve entered. If you need to correct anything, use the next to an item to edit as required.
Figure 7 - Manually adding subscriptions to an organization
11 - Your current user list

You’re presented with five ways to add teachers to a subscription in the SMART Admin Portal. Each option is explained over the page (Figure 12).
12 - Selecting how you wish to add users
Add users
How would you like to add users?
Sync with a supported management tool.
On entering this section, simply add your staff email addresses into the portal.
Once entered, simply communicate with your newly added staff that their email address has been added to the SMART Portal, so they can complete the creation and setup of their account. If you need to manually remove a teacher(s), simply select the required teachers, and remove users through the Admin Portal.
Before importing a CSV, please ensure that your CSV file complies with the following:
- Includes a single column of email addresses, with each address on its own line.
- Doesn’t include titles or headers
- Doesn’t include spaces, commas or quotation marks.
After selecting the Import CSV file, locate and open the CSV file, and if there are no errors, all email addresses will be assigned a seat.
Once entered, simply communicate with your newly added staff that their email address has been added to the SMART Portal, so they can complete the creation and setup of their account.

Syncing the SMART Admin Portal with Google enables you to quickly import and provision a list of teachers from Google to a subscription. The list of teachers is managed through Google Classroom or in a Google Group. The SMART Admin Portal syncs with Google daily to check for updates, automatically provisioning or removing teachers from the subscription based on the synced data from Google.
Important - When you sync with Google, any teachers you previously added manually are removed. You’ll no longer be able to add or remove teachers in the SMART Admin Portal because the list of provisioned teachers is now managed in the Google platform you sync with, not in the portal.
After selecting ‘Google’ from the list, you’ll be presented with the below box (Figure 13):
Figure 4 - Selecting how to set up sync-ing through Google
Import and Sync with Google
Tell us with Google Group your provisions will be synced with
Your Domain (i.e. yourDomain.com)
Or, enter a Google’s email address
Google Classroom’s default teacher group groupName@yourDomain.com
NOTE: Your current provisions will remain in effect until the sync is completed and all your new provisions get imported successfully.
Learn More: Google sync setup and management
Cancel Authorize via Google
Enter a domain address to sync with its Google Classroom default teacher group, or enter a Google Group’s email address to sync with. Then click ‘Authorize via Google’
This will open up a further Google window, allowing you to sign in to your Google Group admin account. The first sync starts after you’ve successfully signed in to your Google account.
Syncing the SMART Admin Portal with Microsoft enables you to quickly import and provision a list of teachers from Microsoft to a subscription. The list of teachers is managed in a Microsoft Group or through a Microsoft School Data Sync. The SMART Admin Portal syncs with Microsoft daily to check for updates, automatically provisioning or removing teachers from the subscription based on the synced data from Microsoft.
Before you sync with Microsoft and auto-provision users, you’ll first need your Microsoft Group’s object ID or your Microsoft School Data Sync’s Teacher domain address.
Important - When you sync with Microsoft, any teachers you added to a subscription manually are removed. You’ll no longer be able to add or remove teachers in the SMART Admin Portal because the list of provisioned teachers is now managed in the Microsoft platform you sync with, not in the portal.
To find a Microsoft Group’s Object ID
1) Browse to portal.azure.com and sign in as a global administrator using your Microsoft Azure account.
2) Select Azure Active Directory from the main page or from the expandable menu on the left.
3) Select Groups from the menu on the left. A page opens that lists all your groups.
4) Copy the code in the Object ID field for the group you’d like to sync with the SMART Admin Portal.
To set up the sync, you’ll enter this ID in the SMART Admin Portal.
To find the Teacher domain address for an organisation
1) Browse to sds.microsoft.com and sign in as a global administrator using your Microsoft Azure account.
2) Open Sync Dashboard and select the organisation whose list of teachers you would like to sync with the SMART Admin Portal
3) Copy the address in the Domain for teachers field. To set the sync, you’ll enter this address in the SMART Admin Portal.
4) Copy the code in the Object ID field for the group you’d like to sync with the SMART Admin Portal.
To set up the sync, you’ll enter this ID in the SMART Admin Portal.


