

Fabric collection by Jennifer Ellory Pillow designed by Stacey Day
Finished size approximately: 20" x 20"
Pillow 1 Yardage: Pillow 2 Yardage:
Fabric A DTHA 5402 PA 1 panel
Fabric B DTHA 5403 N ........................... 1/8 yard
Fabric C DTHA 5404 E 1/4 yard
Fabric D DTHA 5406 G 1/2 yard
Fabric E DTHA 5407 B............................ 1/4 yard
Fabric F DTHA 5408 E 1/4 yard
Fabric G DTHA 5409 DB 1/4 yard
Additional supplies: muslin ........................... 3/4 yard
Pillow 1 Cutting Instructions:
Fabric A DTHA 5402 PA 1 panel
Fabric B DTHA 5404 N ........................... 1/4 yard
Fabric C DTHA 5405 N 1/8 yard
Fabric D DTHA 5406 B 1/2 yard
Fabric E DTHA 5407 G ........................... 1/4 yard
Fabric F DTHA 5408 N 1/4 yard
Fabric G DTHA 5409 E 1/4 yard
Additional supplies: muslin ........................... 3/4 yard
Pillow 2 Cutting Instructions:
Please read all instructions carefully before beginning. Strips are cut across the width of fabric WOF (perpendicular to selvedges) unless otherwise stated. All seams are sewn with 1/4" seam unless otherwise stated. Label all pieces.
Fabric A:
• Cut (1) 6 1/2" x 6 1/2" squares, fussy cut around the Seasons Greetings wreath *set the rest of the panel aside for the remaining projects
Fabric B:
• Cut (1) 3 7/8" x WOF strip; cut (4) 3 7/8" x 3 7/8" squares sub cut on one diagonal into (8) triangles, and (4) 3 1/2" x 3 1/2" squares
Fabric C:
• Cut (1) 7 1/4" X 7 1/4" square, sub cut on both diagonals into (4) triangles
Fabric D:
• Cut (1) 12 1/2" x WOF; cut (2) 12 1/2" x 20 1/2" rectangles
• Cut (2) 1 1/2" WOF; cut (2) 1 1/2" x 18 1/2" rectangles, (2) 1 1/2" x 20 1/2" rectangles
Fabric E:
• Cut (2) 7 1/4" X 7 1/4" square, sub cut on both diagonals into (8) triangles
Fabric F:
• Cut (1) 7 1/4" x WOF strip; cut (1) 7 1/4" x 7 1/4" square, sub cut on both diagonals into (4) triangles, (4) 3 7/8" x 3 7/8" squares sub cut on one diagonal into (8) triangles, (4) 3 1/2" x 3 1/2" squares
Fabric G:
• Cut (3) 2 1/4" x WOF
Fabric A:
• Cut (1) 6 1/2" x 6 1/2" squares, fussy cut around the art deco Merry Christmas motif*set the rest of the panel aside for the remaining projects
Fabric B:
• Cut (1) 7 1/4" X 7 1/4" square, sub cut on both diagonals into (4) triangles
Fabric C:
• Cut (1) 3 7/8" x WOF strip; cut (4) 3 7/8" x 3 7/8" squares sub cut on one diagonal into (8) triangles, and (4) 3 1/2" x 3 1/2" squares
Fabric D:
• Cut (1) 12 1/2" x WOF; cut (2) 12 1/2" x 20 1/2" rectangles
• Cut (2) 1 1/2" WOF; cut (2) 1 1/2" x 18 1/2" rectangles, (2) 1 1/2" x 20 1/2" rectangles
Fabric E:
• Cut (2) 7 1/4" X 7 1/4" square, sub cut on both diagonals into (8) triangles
Fabric F:
• Cut (3) 2 1/4" x WOF
Fabric G:
• Cut (1) 7 1/4" x WOF strip; cut (1) 7 1/4" x 7 1/4" square, sub cut on both diagonals into (4) triangles, (4) 3 7/8" x 3 7/8" squares sub cut on one diagonal into (8) triangles, (4) 3 1/2" x 3 1/2" squares
Piecing Instructions: Both Pillows
The arrows in figures represent the fabric seam pressing direction. Pay attention to the fabric and unit orientations while assembling the various components.
1. Sew (2) 3 7/8" triangles together to make an HST. Trim and square to 3 1/2" x 3 1/2". Make (8).
Diagram 1


2. Sew (2) HST and (2) 3 1/2" squares together to make an A Unit. Make (4).
Diagram 2


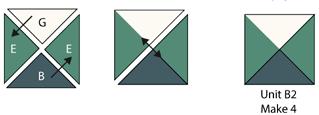
3. Sew (4) 7 1/4" triangles together to make a B Unit. Make (4).
Diagram 3


4. Sew (4) A Units, (4) B Units, and (1) Fabric A 6 1/2" square together to make the pillow center 18 1/2" x 18 1/2". Sew the 1 1/2" x 18 1/2" rectangles to the side, and the 1 1/2" x 20 1/2" rectangle to the top and bottom.
Diagram 4


5. Take the 12 1/2"x 20 1/2" rectangles and turn one 20 1/2" raw edge of each rectangle to the wrong side by 1/4", then turn under again by 1/4". Topstitch the folded edge. PILLOW 1


Finishing:
1. Cut a batting approx 22" x 22". Layer the pillow top, muslin, and batting; baste. Quilt as desired. Trim the pillow to 20 1/2" x 20 1/2".
2. Place the quilted pillow top right side down and place the Fabric D rectangles right side up on the back, matching raw edges and overlapping the finished long edges . Pin in place and baste them together using a 1/4" seam allowance around the outside of the pillow.
3. Fold the binding in half wrong sides together, press. Sew the binding to the pillow top.


