2.0 Example!
The Flutter team launched Navigator 2.0 to manage complicated routing because Navigator 1.0 was only capable of adding and deleting pages from stacks, which made it difficult to handle deep linking or URI parsing for the Flutter Web development company. But can Navigator 2.0 really solve this problem?
What and why is Flutter Navigator 2.0?
In contrast to Navigator 1.0, an imperative API, flutter's Navigator 2.0 operates mostly in an imperative manner but has a declarative API.
Navigation 1.0's Drawbacks
Until any application had basic routing with a limited number of screens and didn't need to be utilized on the web, navigator 1.0 gave us a stack to which we could PUSH or POP pages.
The issue arose when we had to create complicated apps, implement "deep linking," go straight to a product page from alerts, handle OS events, and parse URIs for the handling of the Flutter web back button.
Flutter Navigator 2.0: Why Use It?
Then Navigator 2.0 was released, which is declarative, giving you greater control over the Navigation stack. With Navigator 2.0, we can manipulate the stack according to the state of our app and respond to back button events sent by OS.
By supplying a list of pages and doing URI parsing using routeInformationParser and provider, we can use this to not only PUSH and POP from the top but from any place we wanted to.
Tutorial Purpose
In this tutorial, we'll create a straightforward example application with just two screens:
● A list of anime characters will appear on Screen 1 for Characters.
● Screen 2: Character Information Through a callback method, it is linked to screen 1 and displays information about the chosen character from that screen.
● Goal: To show how Navigator 2.0 works by delivering our stack of pages to MaterialApp via Navigator instead of just using simple POP and PUSH to change screens based on our application state (selectedChar!= null).
Flutter Navigator 2.0 Example
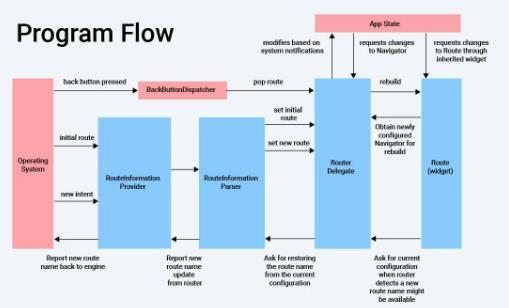
To implement the app screen as a byproduct of the app state and to enable the parsing of routes from URLs for the flutter web, Navigator 2.0 introduces additional classes. A new declarative API architecture is offered by Navigator 2.0, i.e.,
● Pages: For the current Navigator. Pages are used to set the Navigator history stack that is immutable. The pages that must be added to the navigation history stack are listed there.
● Router: This brand new widget encapsulates the navigator and modifies its current list of pages in accordance with the app state. Additionally, it has the ability to listen to operating system events and adjust the navigation accordingly.
The developer basically creates a Flutter application development and learns how to add pages and routers using Flutter Navigator 2.0 as an example.
following list of four classes
The
includes: ● RouterInformationParser ● RouterDelegate ● RouterInformationProvider ● BackButtonDispatcher
The classes we'll be working with are the ones.
The list of anime characters is displayed on the Anime Characters panel
a. Screen for Characters Details: When a specific character is chosen, a new screen that shows the anime to which that character belongs is added to the stack.
b. Anime Char Model is only a model class for anime characters, complete with a function Object() { [native code] }, name, and anime.

c. App class: This straightforward class controls all navigation and app state monitoring for Material widgets.
Let's now configure our pages inside the app state. Create a variable to track application status after that, and then show the screen in accordance with the state.
// ignore_for_file:
import 'package:
prefer_const_constructors
import 'package:navigator_2/Models/anime_char_model.dart';
import 'package:navigator_2/Screens/anime_characters.dart';
import 'package:navigator_2/customRoute.dart';
class MyApp extends StatefulWidget {
:
key);
dead_code,
flutter/material.dart';
const MyApp({Key? key})
super(key:
@override
_MyAppState extends State
unknown = false;
animeChars =
=
'Naruto'),
'Naruto'),
'Jujutsu Kaisen'),
'One Piece)
onCharTapped(AnimeCharModel
MaterialApp(
'Anime Characters,
context)
'7 deadly sins');
ValueKey('anime_chars'),
AnimeChars(
_selectedChar)
(route, result)
false;
State createState() => _MyAppState(); } class
{ //AnimeCharModel? _selectedChar
AnimeCharModel('Escanor',
AnimeCharModel? _selectedChar; //bool
List
[ AnimeCharModel('Hashirama',
AnimeCharModel('Madara',
AnimeCharModel('Gojo',
AnimeCharModel('Zoro',
]; void
selectedChar) { setState(() { _selectedChar = selectedChar; //print(selectedChar.anime); }); } @override Widget build(BuildContext
{ return
title:
home: Navigator( // ignore: prefer_const_literals_to_create_immutables pages: [ MaterialPage( key:
child:
animeChar: animeChars, onTapped: onCharTapped, ), ), if (_selectedChar != null) CustomRoute(character:
], onPopPage:
{ if (!route.didPop(result)) { return
} setState( () { _selectedChar = null; }, ); return true; }, ), ); } }
As you can see, we have configured our pages so that MaterialPage is passed as a child for each page during custom routing. We made a custom route.dart for the Character details screen as an example to demonstrate that we can also customize pages to suit our needs.
● Page: Each page will be individually identified using the key.
● onPopPage: This function is used to make sure that nothing unexpected happens when POP is being done. A POP operation returns true if it is successful and false otherwise.
● A list of anime characters is supplied to the Anime_characters_screen via the List> animeChars variable.
● To show the character_details screen, the program uses _selectedChar to keep track of its current state.
So, the topic here was how to integrate Navigator 2.0 into our Flutter application.
Flutter Navigator 2.0 Example on Github
We've spoken about Navigator 2.0's fundamental implementation up to this point. All the classes' connection makes up the remaining code. You are welcome to play around with the source code by cloning the full application.
You can also check out the Google Dev Fest celebrating the release of Navigator 2.0.
Chun heng Dev Tai's Fest GDG Saudi Arabia.
What’s more in Navigator 2.0?
We have just recently begun to handle routes declaratively that are depending on app states and are not something we direct the app to perform up till this point. What is now basically left is the flutter web portion, which parses the URL to go directly to certain pages and vice versa.
We will have given you the architecture that the Flutter development services team used to describe Navigator 2.0 so you can complete the remaining task. You can read it and comprehend what is occurring so that our upcoming blog and video will assist you to learn more. Even if you don't read everything all the way through, we will still cover it in detail.
Conclusion
So these were our take on providing Flutter Navigator 2.0 best examples to you. To sum up, in the above mentioned we have induced critical aspects of how to implement basic routing with Navigator 2.0 in your business application. The tutorial will help you understand kick start with implementing navigation in mobile application development.
If you are interested in having a detailed grasp of the above given Flutter tutorials, get in touch with the top website development company to help you a clone and explore more about Flutter app development seamlessly.